


Genuine Dewalt replacement part, this item is sold individually.
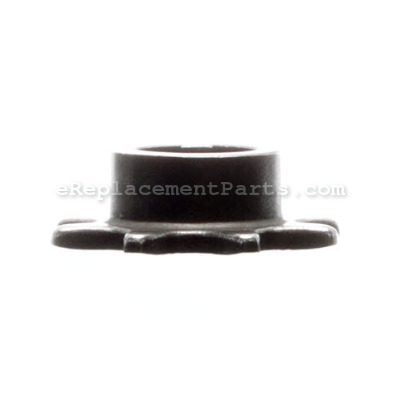
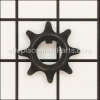
This Sprocket is used on the Dewalt Planers listed below to drive the feed rollers
There are four of these Sprockets used in each Planer.
The Sprocket has eight teeth, 5/8 bore, with a 3/16 key inside the bore.
Sprocket 285928-00
OEM part for: DeWALT
Part Number: 285928-00
$6.33
In Stock
Jump To:
Product Description ?
- Classification: Part
- Weight: 0.01 lbs.
- Shipping: Ships Worldwide
Frequently Purchased Together ?


Compatibility
This part will fit the following 5 machines
DeWALT
DW733 Type 1 12 1/2 inch Planer View Diagrams & Manuals
DW733 Type 2 12 1/2 inch Planer View Diagrams & Manuals
DW734 Type 1 12-1/2 inch Planer View Diagrams & Manuals
DW733-B2 (Type 2) Planer View Diagrams & Manuals
DW733-B2C (Type 2) Planer Thicknesser Power Tool View Diagrams & Manuals
This item works with the following types of products:
- Planer Parts
Repair Videos ?
Watch the Repair Video for
Sprocket

Articles:
|
Step-by-step instructions for removing and installing the inner sprocket on your DeWALT planer....
February 05, 2018
|

Customer Part Reviews ?
Average Rating (out of 5):
Click to filter by ratings:
5 stars
19
4 stars
2
3 stars
0
2 stars
0
1 stars
0
< PREV
- 1
- 2
- 3
Easy Repair - works good
Planer works great
Guest -
September 2, 2023
Verified Purchase
Gear for planner
Easy lookup,Quick order process and received replacement part in just a few days.
Guest -
June 29, 2023
Verified Purchase
Perfect fit 30 min for complete install
Perfect fit works as should
jim -
June 26, 2023
Verified Purchase
Parts right when you said there to be.
Installed the parts easy and put everything back together and working again. Thank You for for your service.Dave C.
Guest -
May 18, 2023
Verified Purchase
Perfect fit and performance
Got here on time and worked out great! My planer is working again! Thanks
Guest -
March 6, 2023
Verified Purchase
pianer parts
The parts i received from eReplacementparts worked like they were suppose to and came in a reasonable time.
Guest -
February 12, 2023
Verified Purchase
Easyi repair
Quick, cheap and easy fix. Only negative comment shipping cost more than the part.
Gary -
April 6, 2022
Verified Purchase
Fit perfect!!
This part arrived quickly and was as described.
Guest -
June 24, 2021
Verified Purchase
parts fit perfect
change sprocket bushen fit perfect
Guest -
January 6, 2021
Verified Purchase
Very easy to install, by your instructions. I was totally amazed on the shipping. I live in north Ms. and not counting our COVID problem we’re having. I will order again and I have the conference in your company and super fast shipping. Thanks again
My planer works like new. I ordered 1 sprocket and it was very easy to install.
Guest -
September 30, 2020
Verified Purchase
t
t
t -
t days ago
Verified Purchase
eReplacementParts Team
t
Questions & Answers ?
Our customer Service team is at the ready daily to answer your part and product questions.

Ask our Team
We have a dedicated staff with decades of collective experience in helping customers just like you purchase parts to repair their products.
Does this fit my product?Questions & Answers for Sprocket
No questions have been asked yet
Customer Repair Instructions ?
All our customer repair instructions are solicited directly from other customers just like you who have purchased and replaced this exact part.
2 Sprockets broke for the rollers
carrie - December 15, 2015
👍 8 of 9 people found this instruction helpful
Tool Type
Planer
Difficulty
Easy
Time
30-60 minutes
Tools Used
Screwdriver, Circlip pliers
Parts Used
Take side panel off left side. Unscrew top on that side. Remove sprocket cover. Remove circlips on sprockets the remove chains and sprockets. Installation is reverse of these directions.
Did you find this story helpful?
Thanks for voting and helping fellow customers!
Broken Drive Sproket
Carl - September 25, 2016
👍 2 of 2 people found this instruction helpful
Tool Type
Planer
Difficulty
Medium
Time
15-30 minutes
Tools Used
Screwdriver, Wrench Set, Lock Washer Spreader
Parts Used
1. Removed the upper cover
2. Removed the chain drive cover
3. Removed lock washers
4. Removed Drive Sprockets and Drive Chains
5. Replaced Broken Sprocket, Other Drive Sprokets and Drive Chains
6. Replaced Covers
The difficult part was getting the chain with the drive sprokets back onto the drive shafts
2. Removed the chain drive cover
3. Removed lock washers
4. Removed Drive Sprockets and Drive Chains
5. Replaced Broken Sprocket, Other Drive Sprokets and Drive Chains
6. Replaced Covers
The difficult part was getting the chain with the drive sprokets back onto the drive shafts
Did you find this story helpful?
Thanks for voting and helping fellow customers!
Broke sproket on planer
Lorren - April 1, 2016
👍 2 of 2 people found this instruction helpful
Tool Type
Planer
Difficulty
Easy
Time
30-60 minutes
Tools Used
Screwdriver, Pliers, retainer clip pliers
Raise planer head all the way up so you can access phillips screws on bottom cover. Very easy remove side cover and bottom plastic cover with short phillips screw driver. Find why feed rolls do not work. It will be a drive sprocket or chain that is broke. Do not take chain apart when replacing sprocket. Remove outside sprocket to replace inside sprocket. Place new sprocket in chain and walk it back or forward to line up the key in the key way. Slide on outside sprocket with chain on it place retainer clip on shaft to hold sprockets. put side panel on and replace bottom cover and you are ready to go.
Did you find this story helpful?
Thanks for voting and helping fellow customers!
Planer didn't want to feed wood to the cutter head
Jack - December 31, 2016
👍 1 of 1 people found this instruction helpful
Tool Type
Planer
Difficulty
Easy
Time
1-2 hours
Tools Used
Screwdriver, Snap ring pliers
Removed side panels , chain guard then the snap rings holding sprockets on . Removed sprockets and chains then replaced three of the bushings . The fourth bushing could not be removed because a Philips head screw refused to budge . The other three was an easy change and they really needed it . Roller shafts were rattling around in the bushing . Put on new chains and sprockets when putting things back together . One of the chains might have been reused but the other was stiff .
Overall with the exception of trying to break that screw loose without breaking it off the repair went well . Just waiting for a day when the wind isn't howling to use it .
Overall with the exception of trying to break that screw loose without breaking it off the repair went well . Just waiting for a day when the wind isn't howling to use it .
Did you find this story helpful?
Thanks for voting and helping fellow customers!
Broken sprocket on feed rollers
Scott - August 11, 2016
👍 1 of 1 people found this instruction helpful
Tool Type
Planer
Difficulty
Medium
Time
30-60 minutes
Tools Used
Screwdriver, Socket set, Wrench Set, Adjustable Wrench
Parts Used
Took apart planner and replaced parts. Put it back together.
Did you find this story helpful?
Thanks for voting and helping fellow customers!
Roller was skipping
Charles - September 17, 2018
Tool Type
Planer
Difficulty
Medium
Time
More than 2 hours
Tools Used
Screwdriver, Pliers, Socket set, Wrench Set
Removal covers pulled out support rods removed motor cutter roller assembly replaced roller bushing chains and sprockets . Reassemblied back to working order.
Went well with all the necessary parts on hand THANKS
Went well with all the necessary parts on hand THANKS
Did you find this story helpful?
Thanks for voting and helping fellow customers!
3 broken sprockets that run the rollers that pull the wood through the planer
David - July 14, 2018
Tool Type
Planer
Difficulty
Easy
Time
15-30 minutes
Tools Used
Pliers, Wrench Set, Snap ring pliers / allen wrenches
Parts Used
Unplugged planer from power source.
Removed 4 main cover screws and took off cover. Removed c-clips on sprockets and removed old sprockets and chains, replaced sprockets with new ones. Re-installed c-clips on sprockets and tested installation for proper operation, then put cover back on. Job completed and working well.
Pay attention to the orientation of the sprockets before disassembly. I didn't and had to think a bit during re-assembly.
When doing this repair make sure your planer is unplugged (Safety First)
Did you find this story helpful?
Thanks for voting and helping fellow customers!
Broken sprocket.
Sam - April 23, 2018
Tool Type
Planer
Difficulty
Easy
Time
Less than 15 minutes
Tools Used
Pliers
Parts Used
Took apart, removed the old sprocket and secured the new one. Reassembled.
Did you find this story helpful?
Thanks for voting and helping fellow customers!
The feed rollers in my Dewalt Planer quit working.
Joel - April 16, 2018
Tool Type
Planer
Difficulty
Easy
Time
15-30 minutes
Tools Used
Screwdriver, Clip spreader
Parts Used
1. Cranked the cutter assembly as far up as it would go.
2. Removed the left side cover (2 Phillips screws).
3. Removed the dust shield (2 more Phillips screws from the bottom, you can't see them).
From here the drive sprocket (top one) was obviously broken. It was in two pieces hung up in the lower chain.
Now is a good time to clean the sawdust out of the machine and lightly oil the height adjusting bolt and columns.
4. Note the position of the sprockets. Three are the same part number, one is different. Orientation matters so take a picture if you have to.
5. Remove three clips that hold the sprockets on the various shafts.
6. Remove the outer chain with its two sprockets.
7. Remove the inner chain with the remaining sprocket
8. Slide the inner chain back on the shafts with the new sprocket and the surviving older sprocket. If the chain has much slack you want to replace it too or you will be back to do it later.
9. Reinstall the outer chain and all three clips, Reinstall the dust cover and the side cover.
Make a test run with a short scrap. It should work like new.
Did you find this story helpful?
Thanks for voting and helping fellow customers!
Replaced drive belt and springs also replaced drive sprocket
DON - March 24, 2018
Tool Type
Planer
Difficulty
Medium
Time
30-60 minutes
Tools Used
Screwdriver, Gear puller and allen wrench and snapring pliers
Parts Used
Remove cover, remove shields and screws, pull sprocket from shaft. Replace drive belt, this was the hardest part. There is no adjustment so the belt has to be forced on drive pulleys
Did you find this story helpful?
Thanks for voting and helping fellow customers!
Load More Install Stories
OEM stands for Original Equipment Manufacturer and means the part you’re buying is sourced directly from the manufacturer who made your product. At eReplacementParts, we sell only genuine OEM parts, guaranteeing the part you’re purchasing is of better design and of higher quality than aftermarket parts.
Our product descriptions are a combination of data sourced directly from the manufacturers who made your product as well as content researched and curated by our content & customer service teams. This content is edited and reviewed internally before being made public to customers.
Our customer service team are at the ready daily to answer your part and product questions. We have a dedicated staff with decades of collective experience in helping customers just like you purchase parts to repair their products.
All our part reviews are solicited directly from other customers who have purchased this exact part. While we moderate these reviews for profanity, offensive language or personally identifiable information, these reviews are posted exactly as submitted and no alterations are made by our team.
All our customer repair instructions are solicited directly from other customers just like you who have purchased and replaced this exact part. While we moderate these reviews for profanity, offensive language or personally identifiable information, these reviews are posted exactly as submitted and no alterations are made by our team.
Based on data from past customer purchasing behaviors, these parts are most commonly purchased together along with the part you are viewing. These parts may be necessary or helpful to replace to complete your current repair.
All our installation videos are created and produced in collaboration with our in-house repair technician, Mark Sodja, who has helped millions of eReplacementParts customers over the last 13 years repair their products. Mark has years of experience in selling and repairing both commercial and residential products with a specialty in gas-powered equipment.
This data is collected from customers who submitted a repair instruction after replacing this exact part. Customers can rate how easy the repair was to complete and how long it took. We aggregate this data to provide a repair rating that allows customers to quickly determine the difficulty and time needed to perform their own repair.