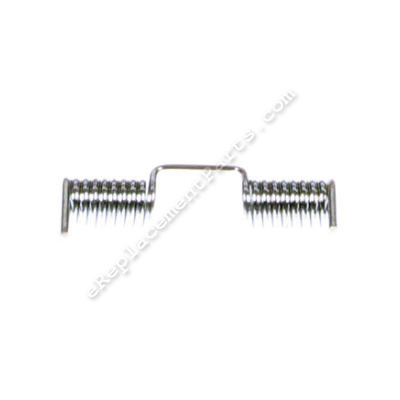
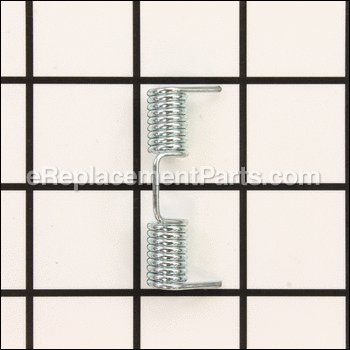


This is a genuine manufacturer sourced replacement part designed for use with Porter Cable sanders. This spring is an important part of the clamping mechanism which helps to secure the sand paper to the sander pad. It is made out of metal and it is sold individually.
You may need pliers to complete this repair.
Spring 843450
OEM part for: Porter Cable
Part Number: 843450
$5.72
Usually ships in 7 - 12 business days
7 - 12 business days
Jump To:
Product Description ?
- Classification: Part
- Weight: 0.01 lbs.
- Shipping: Ships Worldwide
Frequently Purchased Together ?


Compatibility
This part will fit the following 2 machines
Porter Cable
330 Type 1 Finishing Sander View Diagrams & Manuals
330 Type 2 Finishing Sander View Diagrams & Manuals
This item works with the following types of products:
- Sander Parts
Customer Part Reviews ?
Average Rating (out of 5):
Click to filter by ratings:
5 stars
6
4 stars
1
3 stars
1
2 stars
0
1 stars
0
< PREV
- 1
part fit as expected
easy to order, more difficult to install, but works great.
Guest -
January 11, 2023
Verified Purchase
Old Porter Cable palm sander
My 30 plus year old palm sander finally broke a part. The retainer spring holding the sand paper snapped. I ordered 2 (someday they will not be available) and they arrived quickly. Fast, friendly and efficient service.
Guest -
December 17, 2022
Verified Purchase
As advertised
The part arrived as expected, on time. Worked as expected.
Guest -
July 1, 2021
Verified Purchase
Perfect
Just like the original part.
Worked great.
Guest -
May 20, 2020
Verified Purchase
Perfect fit and as stated difficult to install, but with a vice and some though it worked out.
Received the part faster than expected, good service as well.
Guest -
May 14, 2020
Verified Purchase
right part, fast shipping
My Porter Cable 1/4 sheet sander was worthless without this spring but now it's back to 100%. Thank you
Guest -
June 8, 2019
Verified Purchase
Springs for sander
Parts arrived promptly, was correct part
Guest -
June 1, 2022
Verified Purchase
The good and the
Made 2 orders simultaneous, one for repair parts for an orbital sander and one for parts for a Presto pressure cooker. The sander parts showed up in a few days, its been weeks and still waiting for the pressure cooker parts to ship.
Guest -
May 9, 2020
Verified Purchase
t
t
t -
t days ago
Verified Purchase
eReplacementParts Team
t
Questions & Answers ?
Our customer Service team is at the ready daily to answer your part and product questions.

Ask our Team
We have a dedicated staff with decades of collective experience in helping customers just like you purchase parts to repair their products.
Does this fit my product?Questions & Answers for Spring
No questions have been asked yet
Customer Repair Instructions ?
All our customer repair instructions are solicited directly from other customers just like you who have purchased and replaced this exact part.
1) Seized or rough running bearings, 2) Broken sand paper clamping retainer springs
Geoff - February 24, 2017
👍 3 of 4 people found this instruction helpful
Tool Type
Sander
Difficulty
Medium
Time
15-30 minutes
Tools Used
Screwdriver, Pliers, Made my own to hold springs in tension position and a block
Parts Used
Removed sander backing plate held by four screws. Removed tape over bearing. Inserted screwdriver in hole to keep sander shaft from rotating while I used an allen wrench to remove offset base plate screw and special washer. Bearing retaining circlip can be removed with special pliers that have two pins that can be pulled together or spread apart made for retaining clips such as these. I modified a pair of end nippers to do the same job. Bearing is in the base plate that was held in by the special screw and washer that secured it to the rotating shaft and can be knocked out or pushed out with a press or a hammer and something that spans the width of the bearing. New bearing gets pressed in with same tools and retaining clip reinserted with special pliers. A specially shaped block of wood was used to seat the bearing at the bottom of its hole in the base plate. Clear shipping tape was replaced over screw and washer. To replace the broken sand paper clamping spring, I drove the steel rod out of the clamping device which is held onto the base plate by a hole in a raised part of the base plate in the center of it on the edge. Once the rod is removed the clamp falls off and the pieces of broken spring can be removed. Install the new spring the same way the other side's spring is mounted with the rod in place but slightly off center to one side. The base plate should be held in a vice while all this is going on. I made two metal rods with a 1/16" hole in the end of each so I could insert the springs' straight ends into each rod, then the rod is bent down toward the opposite side of the base plate and held down while the hole of one side of the clamping lever is slid over the rod that extends slightly out to one side. The hole in the clamping lever on the opposite side will have to be forced into position by tapping the rod inward thru the entire mechanism while you do whatever is necessary to get the hole at the other end of the clamp to line up with the rod that is being tapped across to meet it. This is the most difficult step and may require someone to help push the clamping piece inward toward the rod, as the spring is trying to force the rod to bend away from it. Without the vice and the two brass rods with holes in the end, this is almost an impossible task. Now that I've done it about a dozen times, it takes no more than about 15 minutes. My terms base plate and backing plate are for the cast aluminum base that secures the backing plate for the sand paper and has the spring rod and clamps attached to it. The four screws remove the sand paper backing plate and also go through the base plate but the base plate is still held on by the special washer and screw attached to the rotating shaft. The cast aluminum base holds the bearing and the sand paper clamps and springs, so it has to be removed to fix either problem. Good luck. Geoff S.
Did you find this story helpful?
Thanks for voting and helping fellow customers!
1 of the hold down clamps that holds the 4 x 4 sandpaper to the pad was missing.
John - January 9, 2021
Tool Type
Sander
Difficulty
Hard
Time
1-2 hours
Tools Used
, 2 1/8\\
Parts Used
Removed the pad from the sander. lined up the spring, clamp, and retaining rod. Put the roll pins on the ends of the spring with the hold-down clamp half in place. Bent the spring into position then clamp the piece of wood over them, and carefully secured them. Tapped the rod into place, removed the clamp. I suggest safety glasses and leather gloves for this project as the spring has quite a bit of Torx to it. FYI 1 of the roll pins shot of the spring and have yet to find it. Be careful when installing these items.
Did you find this story helpful?
Thanks for voting and helping fellow customers!
broken spring clamp for sandpaper on Porter Cable finish sander.
William - January 4, 2019
Tool Type
Sander
Difficulty
Hard
Time
1-2 hours
Tools Used
Screwdriver, Pliers, clamps
Parts Used
Removing broken spring was easy. Replacing broken spring was difficult due to alignment problems with new spring tension during reassembly. Used clamps to realign rod with holes then completed. It was learn as you go using whatever tool I had to solve the problem. In the end, determination and success! Sander back to normal.
Did you find this story helpful?
Thanks for voting and helping fellow customers!
Spring broke on sander
James - May 16, 2018
Tool Type
Sander
Difficulty
Hard
Time
30-60 minutes
Tools Used
Pliers, Bench vise, hammer
Parts Used
Had to use vise to hold spring and cross rod in position so rod could be put back in place.
Did you find this story helpful?
Thanks for voting and helping fellow customers!
Spring broken
Armand - September 10, 2017
Tool Type
Sander
Difficulty
Medium
Time
Less than 15 minutes
Tools Used
Screwdriver, Adjustable Wrench
Parts Used
Installed the spring and a new rod
Did you find this story helpful?
Thanks for voting and helping fellow customers!
Retainer spring for mechanism to secure sandpaper broke while in use.
Stephen - November 2, 2017
👍 0 of 1 people found this instruction helpful
Tool Type
Sander
Difficulty
Medium
Time
30-60 minutes
Tools Used
Screwdriver, Pliers, Clamps
Parts Used
1. Removed the sanding pad.
2. Removed the metal base.
3. Installed the retaining spring on the rod that secures the sandpaper retaining clamp.
4. Used three clamps to hold the retaining clamp and rod in position.
5. Tapped rod through retaining clamp.
6. Reassembled metal base and sanding pad.
7. Tested sander under workshop conditions.
Did you find this story helpful?
Thanks for voting and helping fellow customers!
OEM stands for Original Equipment Manufacturer and means the part you’re buying is sourced directly from the manufacturer who made your product. At eReplacementParts, we sell only genuine OEM parts, guaranteeing the part you’re purchasing is of better design and of higher quality than aftermarket parts.
Our product descriptions are a combination of data sourced directly from the manufacturers who made your product as well as content researched and curated by our content & customer service teams. This content is edited and reviewed internally before being made public to customers.
Our customer service team are at the ready daily to answer your part and product questions. We have a dedicated staff with decades of collective experience in helping customers just like you purchase parts to repair their products.
All our part reviews are solicited directly from other customers who have purchased this exact part. While we moderate these reviews for profanity, offensive language or personally identifiable information, these reviews are posted exactly as submitted and no alterations are made by our team.
All our customer repair instructions are solicited directly from other customers just like you who have purchased and replaced this exact part. While we moderate these reviews for profanity, offensive language or personally identifiable information, these reviews are posted exactly as submitted and no alterations are made by our team.
Based on data from past customer purchasing behaviors, these parts are most commonly purchased together along with the part you are viewing. These parts may be necessary or helpful to replace to complete your current repair.
All our installation videos are created and produced in collaboration with our in-house repair technician, Mark Sodja, who has helped millions of eReplacementParts customers over the last 13 years repair their products. Mark has years of experience in selling and repairing both commercial and residential products with a specialty in gas-powered equipment.
This data is collected from customers who submitted a repair instruction after replacing this exact part. Customers can rate how easy the repair was to complete and how long it took. We aggregate this data to provide a repair rating that allows customers to quickly determine the difficulty and time needed to perform their own repair.