
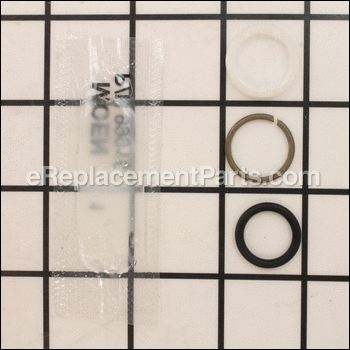
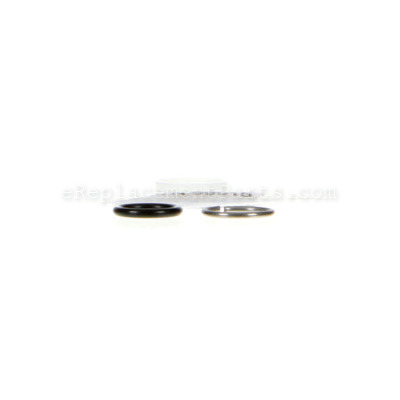


This is available as a kit that contains three rings. These genuine items are supplied by the original equipment manufacturer for use with Moen faucets. They attach to the spout assembly. During the installation process, a set of pliers might be needed to help replace these parts. They will need to be replaced if they break.
Spout Retaining Kit 101879
OEM part for: Moen
Part Number: 101879
$9.70
In Stock
Jump To:
Frequently Purchased Together ?

Compatibility
This part will fit the following 21 machines
Moen
4975 Laundry / Utitility Faucet View Diagrams & Manuals
74998 Laundry / Utitility Faucet View Diagrams & Manuals
4903 (After 1-07) Bar Faucet View Diagrams & Manuals
4903BC (After 1-07) Bar Faucet View Diagrams & Manuals
4910 (Before 3-10) Bar Faucet View Diagrams & Manuals
5996 Bar Faucet View Diagrams & Manuals
5996SL Bar Faucet View Diagrams & Manuals
7900 (6-10 to 5-11) Kitchen Sink Faucet View Diagrams & Manuals
7902 Kitchen Sink Faucet View Diagrams & Manuals
7902SL Kitchen Sink Faucet View Diagrams & Manuals
7905 Kitchen Sink Faucet View Diagrams & Manuals
87484 Kitchen Sink Faucet View Diagrams & Manuals
CA87000 Kitchen Sink Faucet View Diagrams & Manuals
CA87003SRS Kitchen Sink Faucet View Diagrams & Manuals
CA87004 Kitchen Sink Faucet View Diagrams & Manuals
CA87007SRS Kitchen Sink Faucet View Diagrams & Manuals
CA87055SRS Kitchen Sink Faucet View Diagrams & Manuals
CA87552 Kitchen Sink Faucet View Diagrams & Manuals
CA87685 Kitchen Sink Faucet View Diagrams & Manuals
CA84668 Bathroom Faucet View Diagrams & Manuals
CA84668BN Bathroom Faucet View Diagrams & Manuals
Show More Compatible Models
This item works with the following types of products:
- Faucet Parts
Customer Part Reviews ?
Average Rating (out of 5):
Click to filter by ratings:
5 stars
3
4 stars
0
3 stars
1
2 stars
0
1 stars
0
< PREV
- 1
Worked perfect
Arrived soon and fit and stopped the leak
Guest -
February 1, 2021
Verified Purchase
Thanks again.
I attempted to get the parts locally. Wasn't gonna happen. Found exactly what I needed on your website and placed the order. Job Done!
Guest -
July 21, 2020
Verified Purchase
Painless repair
Parts were what I expected and fit well
Guest -
May 26, 2020
Verified Purchase
Everything work right no problem
To long of waiting
Guest -
February 9, 2021
Verified Purchase
t
t
t -
t days ago
Verified Purchase
eReplacementParts Team
t
Questions & Answers ?
Our customer Service team is at the ready daily to answer your part and product questions.

Ask our Team
We have a dedicated staff with decades of collective experience in helping customers just like you purchase parts to repair their products.
Does this fit my product?Questions & Answers for Spout Retaining Kit
No questions have been asked yet
Customer Repair Instructions ?
All our customer repair instructions are solicited directly from other customers just like you who have purchased and replaced this exact part.
Water leaking from the base of the spout.
David - December 3, 2015
👍 9 of 13 people found this instruction helpful
Tool Type
Faucet
Difficulty
Easy
Time
Less than 15 minutes
Tools Used
Pliers
Parts Used
Place a cloth around the base of the spout to prevent scratches then use pliers to unscrew and remove the base nut. Pull up on the spout to remove it from the facet. Replace the oring and retaining clip. Reassemble in reverse order. Job done. No more leak.
Did you find this story helpful?
Thanks for voting and helping fellow customers!
Water would seep out at base of spigot when the water was turned on.
Gary - December 5, 2018
👍 2 of 2 people found this instruction helpful
Tool Type
Faucet
Difficulty
Easy
Time
Less than 15 minutes
Tools Used
Screwdriver, Adjustable Wrench
Parts Used
Removed the old rubber ring and the split nylon ring, then inserted the new ones. Applied the silicon grease that was supplied and reassembled the spigot.
Did you find this story helpful?
Thanks for voting and helping fellow customers!
Leaking from base of spout
Douglas - April 9, 2023
Tool Type
Faucet
Difficulty
Medium
Time
15-30 minutes
Tools Used
Screwdriver, Pliers, Wrench Set, Adjustable Wrench
Parts Used
I was able to get the spout retaining kit installed. But I wasn't able to get the old diverter out! The old diverter plastic was so degraded it wouldn't come loose. I eventually replaced the whole faucet. Up to that point the replacement part were perfect and easy to install.
Did you find this story helpful?
Thanks for voting and helping fellow customers!
Spout leaking at base.
Drew - July 23, 2020
Tool Type
Faucet
Difficulty
Easy
Time
Less than 15 minutes
Tools Used
Screwdriver, Adjustable Wrench
Parts Used
Removed spout. Replaced O-ring and Bushing. The repair was easy. The trick was finding the right parts. Thanks to you that wasn't an issue.
Did you find this story helpful?
Thanks for voting and helping fellow customers!
Leaking water
Allistine - March 10, 2019
Tool Type
Faucet
Difficulty
Medium
Time
30-60 minutes
Tools Used
Pliers
Parts Used
Changed parts
Did you find this story helpful?
Thanks for voting and helping fellow customers!
Faucet leaked
Chris - April 25, 2018
Tool Type
Faucet
Difficulty
Easy
Time
Less than 15 minutes
Tools Used
Pliers
Parts Used
Unscrewed retaining sleeve, removed old o-ring and tapered ring, cleaned and lubed bottom of faucet, replaced o-ring and tapered ring, and reassembled. Works great!
Did you find this story helpful?
Thanks for voting and helping fellow customers!
OEM stands for Original Equipment Manufacturer and means the part you’re buying is sourced directly from the manufacturer who made your product. At eReplacementParts, we sell only genuine OEM parts, guaranteeing the part you’re purchasing is of better design and of higher quality than aftermarket parts.
Our product descriptions are a combination of data sourced directly from the manufacturers who made your product as well as content researched and curated by our content & customer service teams. This content is edited and reviewed internally before being made public to customers.
Our customer service team are at the ready daily to answer your part and product questions. We have a dedicated staff with decades of collective experience in helping customers just like you purchase parts to repair their products.
All our part reviews are solicited directly from other customers who have purchased this exact part. While we moderate these reviews for profanity, offensive language or personally identifiable information, these reviews are posted exactly as submitted and no alterations are made by our team.
All our customer repair instructions are solicited directly from other customers just like you who have purchased and replaced this exact part. While we moderate these reviews for profanity, offensive language or personally identifiable information, these reviews are posted exactly as submitted and no alterations are made by our team.
Based on data from past customer purchasing behaviors, these parts are most commonly purchased together along with the part you are viewing. These parts may be necessary or helpful to replace to complete your current repair.
All our installation videos are created and produced in collaboration with our in-house repair technician, Mark Sodja, who has helped millions of eReplacementParts customers over the last 13 years repair their products. Mark has years of experience in selling and repairing both commercial and residential products with a specialty in gas-powered equipment.
This data is collected from customers who submitted a repair instruction after replacing this exact part. Customers can rate how easy the repair was to complete and how long it took. We aggregate this data to provide a repair rating that allows customers to quickly determine the difficulty and time needed to perform their own repair.