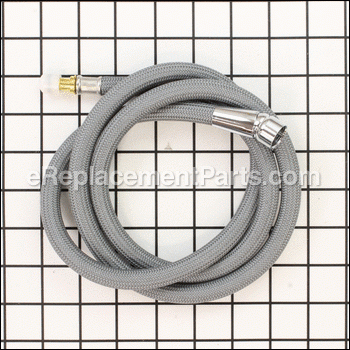

Spout Kit 159560
OEM part for: Moen
Part Number: 159560
$48.96
In Stock
Compatibility
This part will fit the following 1 machine
Moen
87017SRS Banbury Single Control Kitchen Pull Out Faucet View Diagrams & Manuals
This item works with the following types of products:
- Faucet Parts
Customer Part Reviews ?
Average Rating (out of 5):
Click to filter by ratings:
5 stars
2
4 stars
0
3 stars
0
2 stars
0
1 stars
0
< PREV
- 1
Quick and easy
Got the part very quickly. Installed it in fifteen minutes. Works like a charm!
Guest -
April 11, 2020
Verified Purchase
easy repair
The part arrived on time,and it was very easy to repair.I think it took all of 5 minutes.If I need parts again,I will be sure to order from e replacements.
Guest -
November 6, 2019
Verified Purchase
t
t
t -
t days ago
Verified Purchase
eReplacementParts Team
t
Questions & Answers ?
Our customer Service team is at the ready daily to answer your part and product questions.

Ask our Team
We have a dedicated staff with decades of collective experience in helping customers just like you purchase parts to repair their products.
Does this fit my product?Questions & Answers for Spout Kit
No questions have been asked yet
Customer Repair Instructions ?
All our customer repair instructions are solicited directly from other customers just like you who have purchased and replaced this exact part.
The hose for the pull out sprayer started to leak from an area that couldn't be adjusted or repaired
Marcus - October 20, 2016
👍 19 of 20 people found this instruction helpful
Tool Type
Faucet
Difficulty
Easy
Time
Less than 15 minutes
Tools Used
Pliers
Parts Used
1. Removed the spray head with a pair of pliers. Next I grabbed a hand towel and ducked down into the cabinet. I used my finger/thumb to press the quick release and used the towel to catch all the water that drained out of the hose. There was less than half a cup of water that came out. Next, remove the lead weight that assists with retracting the hose. No tools necessary, it had a simple clip. Then I pulled the hose up through the fixture. Next I opened the replacement hose from the kit I got through ereplacementparts.com. The hose was the exact length and had the same connections on each end as the original. One BIG difference though, the hose was a different diameter than the original, so the weight that came with the faucet wouldn't grab. I wrapped a small section of the hose with duct tape to bring it back out to the right diameter and the weight attached to the taped section without further problems. Everything else went back together easily. the press-on fitting under the cabinet worked flawlessly and the spray nozzle screwed right back down. No leaks!
Did you find this story helpful?
Thanks for voting and helping fellow customers!
Original hose developed a pin hole leak near the crimp connection.
Tim - August 24, 2017
👍 4 of 4 people found this instruction helpful
Tool Type
Faucet
Difficulty
Easy
Time
Less than 15 minutes
Tools Used
Adjustable Wrench
Parts Used
I removed the old hose from the faucet and released the quick connect under the sink. Slid the hose weight off the hose. Inserted the new hose and connected it to the sprayer head with an adjustable wrench. Put the hose weight back on and pushed the other end into the quick connect, all in less than 5 minutes. This has to be a record fast repair. On a scale of 5 wrenches, I give this a 1! Easy
Did you find this story helpful?
Thanks for voting and helping fellow customers!
Spray hose was leaking at flex joint.
Spencer - April 28, 2017
👍 3 of 3 people found this instruction helpful
Tool Type
Faucet
Difficulty
Easy
Time
Less than 15 minutes
Tools Used
Pliers, Teflon tape
Parts Used
1. Removed all the products from under the kitchen sink (this took longer than the repair!)
2. Turned off the water lines to the faucet.
3. Unhooked the hose end from the supply lines (no tools required).
4. Pulled the hose out along with the spray head.
5. Unthreaded the spray head with the players.
6. Attached the new hose making sure to go through the counter weight.
7. Put the new hose up through the faucet hole and reattach the spray head using Teflon tape on the threads.
8. Turn on the water, check for leaks, good to go!
Did you find this story helpful?
Thanks for voting and helping fellow customers!
The hose on our pull out Moen kitchen faucet was leaking below the spout connection.
Eric - September 15, 2018
👍 1 of 1 people found this instruction helpful
Tool Type
Faucet
Difficulty
Easy
Time
Less than 15 minutes
Tools Used
Adjustable Wrench
Parts Used
Shut water valves off below sink.
Used adjustable wrench to remove faucet spout.
Moen's easy clip on/off (press in) connector was simple to remove leaky hose.
New hose attached in 15 seconds.
Turn on water valves & purge new hose.
Reattached faucet spout & tightened with wrench. Done!
I'm 67 yrs old. It took me longer to get down/up under sink than to remove & attach the new hose!
Great system from Moen.
Did you find this story helpful?
Thanks for voting and helping fellow customers!
Hose that was connected to the faucet was leaking near the connection.
Herbert - April 10, 2018
👍 1 of 1 people found this instruction helpful
Tool Type
Faucet
Difficulty
Easy
Time
Less than 15 minutes
Tools Used
, No tools were needed for this
Parts Used
Shut off hot and cold water supplies.
Reached underneath and disconnected the old hose from the quick connect.
Installed new hose to the faucet and snapped it in the quick connect.
Turned the hot and cold water back on.
Worked like a charm.
Reached underneath and disconnected the old hose from the quick connect.
Installed new hose to the faucet and snapped it in the quick connect.
Turned the hot and cold water back on.
Worked like a charm.
Did you find this story helpful?
Thanks for voting and helping fellow customers!
Original spray hose was leaking
Eric - February 12, 2020
Tool Type
Faucet
Difficulty
Easy
Time
15-30 minutes
Tools Used
Pliers, Adjustable Wrench, None
Parts Used
Since I had the original install instructions, it was easy.
1. I removed the hose from the faucet snap connection.
2. I pulled the hose and spray head out of the assembly.
3. I removed the old hose from the spray head and attached the new hose to the spray head.
4. I ran the new house down through the faucet assembly through the weight and snapped the hose in place.
Done! Checked the water flow and no leaks.
Did you find this story helpful?
Thanks for voting and helping fellow customers!
Hose leaking
Mark - January 21, 2020
Tool Type
Faucet
Difficulty
Easy
Time
Less than 15 minutes
Tools Used
Adjustable Wrench, None
Parts Used
Removed old hose and replaced it
Did you find this story helpful?
Thanks for voting and helping fellow customers!
flexible hose between the connection under sink and pull out faucet was leaking
Ralph - November 16, 2019
Tool Type
Faucet
Difficulty
Medium
Time
30-60 minutes
Tools Used
Wrench Set, alen wrench
Parts Used
needed to crawl to disengage the quick disconnect insert.
pulled the assembly out from the top.
ran into a minor problem when the old unit got jammed and I had to disassemble the faucet assembly. Otherwise it would have been a relatively easy task to remove the old unit and install the new one. It should only require about 30 minutes without the delay I encountered.
Did you find this story helpful?
Thanks for voting and helping fellow customers!
Spout hose leaked.
David - March 25, 2019
Tool Type
Faucet
Difficulty
Easy
Time
15-30 minutes
Tools Used
Pliers, No other tools were needed
Parts Used
Removed spout.
Pushed lock button to remove hose.
Pushed hose back into faucet.
Reattached spout.
Pushed lock button to remove hose.
Pushed hose back into faucet.
Reattached spout.
Did you find this story helpful?
Thanks for voting and helping fellow customers!
hose sprung a leak
Waldon - December 2, 2018
Tool Type
Faucet
Difficulty
Easy
Time
15-30 minutes
Tools Used
Screwdriver, Pliers
Parts Used
unsnapped old hose and pulled it out and fed new hose down and snapped it in and un screwed nozzle from old hose and screwed it on new hose, "all done"
Did you find this story helpful?
Thanks for voting and helping fellow customers!
Load More Install Stories
OEM stands for Original Equipment Manufacturer and means the part you’re buying is sourced directly from the manufacturer who made your product. At eReplacementParts, we sell only genuine OEM parts, guaranteeing the part you’re purchasing is of better design and of higher quality than aftermarket parts.
Our product descriptions are a combination of data sourced directly from the manufacturers who made your product as well as content researched and curated by our content & customer service teams. This content is edited and reviewed internally before being made public to customers.
Our customer service team are at the ready daily to answer your part and product questions. We have a dedicated staff with decades of collective experience in helping customers just like you purchase parts to repair their products.
All our part reviews are solicited directly from other customers who have purchased this exact part. While we moderate these reviews for profanity, offensive language or personally identifiable information, these reviews are posted exactly as submitted and no alterations are made by our team.
All our customer repair instructions are solicited directly from other customers just like you who have purchased and replaced this exact part. While we moderate these reviews for profanity, offensive language or personally identifiable information, these reviews are posted exactly as submitted and no alterations are made by our team.
Based on data from past customer purchasing behaviors, these parts are most commonly purchased together along with the part you are viewing. These parts may be necessary or helpful to replace to complete your current repair.
All our installation videos are created and produced in collaboration with our in-house repair technician, Mark Sodja, who has helped millions of eReplacementParts customers over the last 13 years repair their products. Mark has years of experience in selling and repairing both commercial and residential products with a specialty in gas-powered equipment.
This data is collected from customers who submitted a repair instruction after replacing this exact part. Customers can rate how easy the repair was to complete and how long it took. We aggregate this data to provide a repair rating that allows customers to quickly determine the difficulty and time needed to perform their own repair.