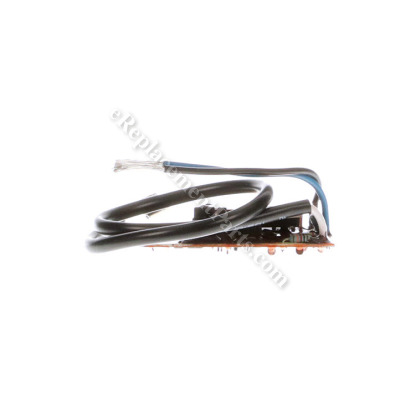


This is a genuine manufacturer sourced replacement part designed for use with Bosch table saws. This board controls the speed of the saw. It has a circuit breaker to protect the motor from overheating and damaging it. It is sold individually.
Speed Control 2610997306
OEM part for: Bosch
Part Number: 2610997306
$55.58
In Stock
Jump To:
Frequently Purchased Together ?


Compatibility
This part will fit the following 12 machines
Bosch
4000 (0601476139) Table Saw View Diagrams & Manuals
4100 (0601B13010) Table Saw View Diagrams & Manuals
4100DG-09 (0601B13010) 10" Worksite Table Saw View Diagrams & Manuals
4100DG-09 (3601L13010) 10" Worksite Table Saw View Diagrams & Manuals
4100-09 (0601B13010) 10" Worksite Table Saw View Diagrams & Manuals
4100-09 (3601L13010) 10" Worksite Table Saw View Diagrams & Manuals
4000 (0601476260) Saw Table View Diagrams & Manuals
4100 (3601L13010) Table Saw View Diagrams & Manuals
4100 (3601L13011) Table Saw View Diagrams & Manuals
4100 (3601L13012) Table Saw View Diagrams & Manuals
4100XC (3601L13014) Table Saw 4100xc View Diagrams & Manuals
4100XC (3601L13015) Table Saw, 10-Inch, Bare Tool Tw Ul62841 View Diagrams & Manuals
Show More Compatible Models
This item works with the following types of products:
- Saw Parts
- Table Saw Parts
Customer Part Reviews ?
Average Rating (out of 5):
Click to filter by ratings:
5 stars
5
4 stars
0
3 stars
0
2 stars
0
1 stars
0
< PREV
- 1
Good parts. Always correct
Arrived timely. No problems
Guest -
March 9, 2022
Verified Purchase
Easy install
Easy install just watch the YouTube video https://youtu.be/47XX36dJ1_E
Guest -
October 19, 2021
Verified Purchase
Best place to get the parts you need.
No reason to go anyplace else to get your parts. Best pricing, best quality, best service. ereplacementparts.com is My place to go.
Stanley -
July 29, 2020
Verified Purchase
Easy repair
The parts came as order and on time
Guest -
May 19, 2020
Verified Purchase
Bosch speed control
OEM part works great
Guest -
August 19, 2019
Verified Purchase
t
t
t -
t days ago
Verified Purchase
eReplacementParts Team
t
Questions & Answers ?
Our customer Service team is at the ready daily to answer your part and product questions.

Ask our Team
We have a dedicated staff with decades of collective experience in helping customers just like you purchase parts to repair their products.
Does this fit my product?Questions & Answers for Speed Control
No questions have been asked yet
Customer Repair Instructions ?
All our customer repair instructions are solicited directly from other customers just like you who have purchased and replaced this exact part.
Bosch 4100 table saw was running backwards slowly
steven - March 29, 2016
👍 18 of 24 people found this instruction helpful
Tool Type
Table Saw
Difficulty
Medium
Time
More than 2 hours
Tools Used
Screwdriver, Pliers, Socket set, Nutdriver, to crimpable wire nuts (clear plastic type)
Parts Used
Replaced speed control and saw was still running backwards.
So next replaced field coil and saw now works properly.
I have model with gravity stand and to make repair I left saw in folded position which allows view of underside of table saw. 1. have new field coil present before starting repair to make referencing easier. 2. set saw to 45 deg. 3. remove lever and rod from stand as it blocks view of motor.4. use short flat screwdriver and remove brush caps and brushes. 5. remove three phillips screws and top part of motor housing make note of wiring and how wires are tucked in (take picture) the wires coming out of the remaining motor housing are the only ones you have to deal with.6. use pliers to undo crimp wire nuts holding black and white wire pairs .7. Next remove long black wire that goes to brush housing on right side. It is conjoined with red wire coming from field coil still in side housing. 8. Un plug both red wires. 9. Remove 4 phillips screws from motor housing at base and slide off housing from armature . The bearing will stay with armature , field coil is in housing. 10. Remove two long machine screws that hold field coil to housing, then use long flat blade screwdriver and gently tap field coil out of housing ( carefully go from side to side against solid part of field coil. You can suspend housing across 2 blocks of wood so coil has room to come out. 11. Now replace new field coil matching orientation of old one ( because of tight fit use a little dish soap on sides of field coil and make sure to align with threaded inserts in head of housing. Make sure to pull wires from field coil up through housing before completely seating field coil. 12. Replace 2 machine screws and reattach wires.( I reused wire crimps but it would be best to use new ones)
13. Reattach top housing and then attach complete motor housing to armature. replace table saw stand lever and rod assembly. Done
Did you find this story helpful?
Thanks for voting and helping fellow customers!
Speed was up & down, then when running the motor sparked
Thomas - December 27, 2017
👍 3 of 4 people found this instruction helpful
Tool Type
Table Saw
Difficulty
Medium
Time
1-2 hours
Tools Used
Screwdriver, Pliers, Soldering iron
Parts Used
1) Replaced speed control - motor still sparked & ran poorly
2) Ordered field, armature, brushes & bearing
3) Disassembled motor, armature is pressed in, so either use puller or remove gear cover opposite the motor shaft & gently tap it out.
4) Inserted new armature, gently tapping it into pressed bearing (wood in between shaft & hammer)
5) Replaced field, soldered all wire connections & taped as the crimp nuts take too much space in the confines of the motor cover
6) Replaced with new brushes - old ones probably still OK.
7) Runs like a champ.
Did you find this story helpful?
Thanks for voting and helping fellow customers!
Motor would not run
Yusuf - January 6, 2022
Tool Type
Table Saw
Difficulty
Medium
Time
30-60 minutes
Tools Used
Screwdriver, Socket set
Parts Used
Replaced speed control board.
Did you find this story helpful?
Thanks for voting and helping fellow customers!
Table saw would not turn on.
Richard - March 16, 2021
Tool Type
Table Saw
Difficulty
Easy
Time
30-60 minutes
Tools Used
Screwdriver, Wire snips, wire strippers and wire crimper.
Parts Used
Place table saw on its side. Take a minute and use compressed air to blow all dust from around the motor. Position saw/ blade in position to allow the easiest access to the rear of motor. Remove three screws in motor cover plate. This allows access to speed control. Speed control has three wire. Two wires are crimped on and the other already has an electrical connector attached. Take a picture of the wires before removal to assist in rewiring. After pulling old speed controller out and replacing with new, reattach wires with two new wire connectors (not provided). When reattaching the motor cover plate, make sure all wires are positioned to allow the cover to be reinstalled without pinching and/or damaging the wires. Tighten the three screws holding the cover plate. Check work to make sure everything is tight. Check and make sure table saw starts and operates normally. Good luck!
Did you find this story helpful?
Thanks for voting and helping fellow customers!
motor was running to fast at no load and had no power at slight load and tripped The circuit breaker
Edward - June 22, 2020
Tool Type
Table Saw
Difficulty
Easy
Time
15-30 minutes
Tools Used
Screwdriver, wire stripper/crimper
Parts Used
Remove the small cover on the end of the motor where the wires go in clip the wires replace the speed control reconnect the wires and replace the cover
Did you find this story helpful?
Thanks for voting and helping fellow customers!
Rodolfo - August 25, 2018
Tool Type
Table Saw
Difficulty
Easy
Time
15-30 minutes
Tools Used
Screwdriver, Wire nuts
Parts Used
Opened the motor .. slipped the controller board out ...removed the wires..installed new!
Did you find this story helpful?
Thanks for voting and helping fellow customers!
Won't turn on.
Glenn - April 17, 2018
Tool Type
Table Saw
Difficulty
Medium
Time
15-30 minutes
Tools Used
Screwdriver, Pliers
Unplugged the saw. Tilted the motor to 45 degrees. Removed 3 screws to remove the cover off the motor. Cut one of the wires going to speed controller, removed one wire nut and unplugged third wire from the motor. Replaced the speed controller. reconnected the wires. replaced the motor cover.
Did you find this story helpful?
Thanks for voting and helping fellow customers!
Faulty speed control.
Charles - August 7, 2017
👍 2 of 4 people found this instruction helpful
Tool Type
Table Saw
Difficulty
Easy
Time
15-30 minutes
Tools Used
Screwdriver, Pliers, Socket set
Parts Used
1. Took apart.
2. Removed the old part.
3. Connected the new one.
4. Reassembled and tested.
2. Removed the old part.
3. Connected the new one.
4. Reassembled and tested.
Did you find this story helpful?
Thanks for voting and helping fellow customers!
Replaced speed controller
William - July 9, 2018
👍 0 of 1 people found this instruction helpful
Tool Type
Table Saw
Difficulty
Medium
Time
15-30 minutes
Tools Used
Screwdriver, Pliers
Parts Used
Took off motor housing, marked wires to make sure they were replaced in correct order. Had to remove wire grommet that held the wires in the housing. Replaced controller. Put back together.
Did you find this story helpful?
Thanks for voting and helping fellow customers!
Speed control
David - June 8, 2017
👍 2 of 5 people found this instruction helpful
Tool Type
Table Saw
Difficulty
Easy
Time
15-30 minutes
Tools Used
Screwdriver, Socket set
Parts Used
Very simple just opened up the motor and replaced the speed control closed the motor back up reinstall the housing and flip the switch. Not Very difficult if you have some common sense
Did you find this story helpful?
Thanks for voting and helping fellow customers!
OEM stands for Original Equipment Manufacturer and means the part you’re buying is sourced directly from the manufacturer who made your product. At eReplacementParts, we sell only genuine OEM parts, guaranteeing the part you’re purchasing is of better design and of higher quality than aftermarket parts.
Our product descriptions are a combination of data sourced directly from the manufacturers who made your product as well as content researched and curated by our content & customer service teams. This content is edited and reviewed internally before being made public to customers.
Our customer service team are at the ready daily to answer your part and product questions. We have a dedicated staff with decades of collective experience in helping customers just like you purchase parts to repair their products.
All our part reviews are solicited directly from other customers who have purchased this exact part. While we moderate these reviews for profanity, offensive language or personally identifiable information, these reviews are posted exactly as submitted and no alterations are made by our team.
All our customer repair instructions are solicited directly from other customers just like you who have purchased and replaced this exact part. While we moderate these reviews for profanity, offensive language or personally identifiable information, these reviews are posted exactly as submitted and no alterations are made by our team.
Based on data from past customer purchasing behaviors, these parts are most commonly purchased together along with the part you are viewing. These parts may be necessary or helpful to replace to complete your current repair.
All our installation videos are created and produced in collaboration with our in-house repair technician, Mark Sodja, who has helped millions of eReplacementParts customers over the last 13 years repair their products. Mark has years of experience in selling and repairing both commercial and residential products with a specialty in gas-powered equipment.
This data is collected from customers who submitted a repair instruction after replacing this exact part. Customers can rate how easy the repair was to complete and how long it took. We aggregate this data to provide a repair rating that allows customers to quickly determine the difficulty and time needed to perform their own repair.