eReplacementParts.com
877-346-4815
Breville Parts
Repair Parts Home
  
Appliance Parts
  
Breville Parts
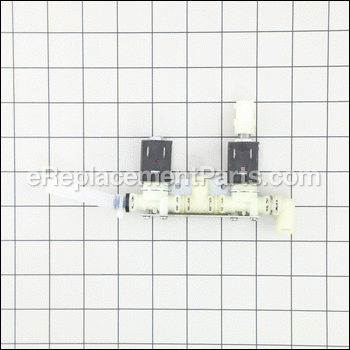
  SP0100757 Valve Solenoid Kit 120v Jlt

Valve Solenoid Kit 120v Jlt SP0100757

OEM part for: Breville

Part Number: SP0100757


Install
Videos!
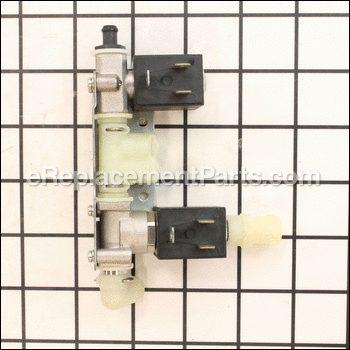
Grid squares measure 1x1 inch
Valve Solenoid Kit 120v Jlt - SP0100757:BrevilleValve Solenoid Kit 120v Jlt - SP0100757:Breville
Usually ships in 7 - 12 business days
Leaves our warehouse within
7 - 12 business days
Medium 30-60 minutes (29 rated repairs)?
OEM: Original Equipment Manufacturer ?
Breville
Does this d-block d-md-none fit my product?

Product Description ?

This solenoid valve kit, also known as the solenoid valve assembly, is sourced from the original manufacturer for use in espresso machines. It is responsible for controlling the flow of water or steam within the machine. It operates on a standard voltage of 120 volts, and includes the safety valve, solenoid coil, and solenoid valve. Does not include set of O-rings, these are sold separately. Over time the solenoid valve assembly can fail due to several reasons including the fluids/debris entering and blocking the valve, overheating or physical damage to the solenoid coil, faulty electrical wiring, or mechanical wear on the moving parts of the assembly. A faulty solenoid valve kit will result in a noisy machine, low water pressure, and difficulties properly brewing coffee. To remove the valve solenoid kit, you will need to disassemble the appliance. Once you have accessed the valve assembly, take a note of how the wire connectors and water lines are attached for the installation process later. It may be helpful to take a picture with your phone. Disconnect the water lines and wire connectors. Remove the fasteners that secure the solenoid valve assembly in place and carefully pull it out of the machine. Mount the new assembly in place and reconnect the wiring and water lines to their appropriate slots. Reassemble the espresso machine to complete the repair.

  • Classification: Part
  • Weight: 1.00 lbs.
  • Shipping: Ships Worldwide

Compatibility

This part will fit the following 2 machines

Breville

BES860XL Barista Express View Diagrams & Manuals
BES870XL The Barista Express View Diagrams & Manuals
Don't see yours? Try searching our site for :

This item works with the following types of products:

  • Espresso Parts

This part replaces obsolete part #: SP0010228, SP0013665, BES860XL/14, BES870XL/02.14, SP0010230, BES870XL02.14, SP0013662, SP0020444

Customer Part Reviews ?

4.6
Average Rating (out of 5):
42 Reviews
Click to filter by ratings:
5 stars
34
4 stars
5
3 stars
0
2 stars
1
1 stars
2
  • Highest Rating
  • Most Recent
< PREV
  • 1
  • 2
  • 3
NEXT >
  • Easy install, good part
    Easy install, good part
    iGlobal - March 7, 2024 Verified Purchase
    Thanks
    Part fit perfectly and machine is working again !
    iGlobal - January 31, 2023 Verified Purchase
    Easy repair, great price, quick shipping!
    worked perfectly. however the picture does not match
    Jeff - January 18, 2023 Verified Purchase
    Great Part A+++
    Direct Fit Easy Install Thanks
    Guest - December 13, 2022 Verified Purchase
    Easy repair!
    Awesome fix since the problem was on my barista express it woul randomly spit out hot water from the coffee brewing part and the hot water option would work. So buying this fixed the hot water and water from randomly spitting out the coffee spicket
    Guest - November 23, 2022 Verified Purchase
    Perfect part for Breville Infuser
    This is the full assembly (two solenoids all the parts minus O rings). Made by JLT now
    Guest - August 18, 2022 Verified Purchase
    Excellent part.
    The part was a OEM replacement. My coffee is ready !!!!!
    Guest - July 14, 2022 Verified Purchase
    Works great but was not the main issue ☕
    The item works great and arrived on time but the issue with the original solenoid valve was a symptom of a larger problem that caused it to fail to begin with. The PCB was setting the two-way solenoid valve to an always-on-state, even when the machine itself was turned off but plugged in. This caused the original solenoid to burn out. I circumvented this by wiring a 120vac rocker switch in-line with the solenoid so I can turn it on and off when needed. It's an extra step but with how rare and expensive these pcbs are, it was a pretty easy fix. Check out "R brown" on YouTube for an under the hood look at the barista Express and it's solenoid sequence when pulling a shot. Specifically the indicator lights he installed in parallel.
    Guest - December 18, 2021 Verified Purchase
    Finally it got fixed
    My coffee machine finally works, thanks to a new solenoid valve assembly.
    Guest - August 16, 2021 Verified Purchase
    Relatively easy repair
    Once I finally got the part it was a pleasant surprise that it completely fixed the issue. My machine instantly went back to sounding brand new. Very satisfied.
    Guest - August 12, 2021 Verified Purchase
    t
    t
    t - t days ago Verified Purchase
    eReplacementParts Team
    t

    Questions & Answers ?

    Our customer Service team is at the ready daily to answer your part and product questions.

    photo of team member
    Ask our Team

    We have a dedicated staff with decades of collective experience in helping customers just like you purchase parts to repair their products.

    Does this fit my product?

    Questions & Answers for Valve Solenoid Kit 120v Jlt


    Not a question, but this part DOES fit the 840xl "Infuser". It DOES NOT come with the 3 small orange o-rings required, you need to reuse old ones or buy new ones. Just installed this and it's an exact replacement that fixed the buzzing and inconsistent shot pressure. Thanks
    Bryan for model number Breville 840xl Infuser asked on 2022-03-14
    Hello Bryan, thank you for writing in. We appreciate your knowledge and experience. We hope to hear from you soon. Have a wonderful day.
    eReplacementParts Team March 14, 2022
    is this a metal or plastic solenoid base assembly?
    Ahim asked on 2024-01-12
    Hello Ahim, thank you for your question. The Valve is plastic. . We sell only OEM products that are available from the manufacturer so this is an exact replacement of what the original part is. We hope this helps.
    eReplacementParts Team January 12, 2024
    This piece is available
    Paul for model number Part Number: SP0100757 asked on 2023-04-10
    Hello Paul, Thank you for your inquiry. Yes, we show it is still available, just on factory back order. We hope this helps.
    eReplacementParts Team April 10, 2023
    Could you contact me on my email? I want to buy a couple of these but the amount switches 1 on 1 to euros. Example. 38 CAD turns to 38 Euro. That seems not right.
    Adel asked on 2023-03-27
    Hello Adel, Thank you for your question. For information on our shipping rates and fees to your desired country, add your parts to the cart and click where it says "Outside the US? Click here for international checkout". When the next screen comes up, enter your name and address. Once you have completed this, the shipping rates and fees will come up for you. We hope this helps!
    eReplacementParts Team March 27, 2023
    Any idea when this might be available?
    Heather for model number Breville 870 asked on 2023-03-15
    Hi Heather, Thank you for your question. The stock status for parts is always listed above the Add to Cart button on our site underneath the part information. If you are not sure what a stock status means, you can click on it and a separate window will appear with the explanation for what that status means. This part is currently in stock. We hope that helps.
    eReplacementParts Team March 15, 2023
    Will this assembly fit a Barista Pro BES787? Thanks
    Pete for model number BES787 asked on 2023-02-18
    Hi Pete, Thank you for your question. We were unable to find a parts list for your Barista Express and for information on the valve solenoid kit, you will need to contact Breville. If they verify that you can use part number SP0100757, or if they provide you with a part number for a valve solenoid kit that you can use, please feel free to contact us and we will verify if we carry it. We look forward to hearing from you!
    eReplacementParts Team February 18, 2023
    I had a blown PCB and when I replaced that, it powered on again. However, only the steam and hot water functions work. If I push a brew button, the water pours out the purge valve. I ended up replacing the solenoid block with this part and it still only diverts water to the steam/hot water or purge valve. Any other ideas? I tried priming the pump as you described above with no luck.
    Carter for model number BES870XL asked on 2023-02-15
    Hi Carter, Thank you for your question. If you push the brew button and water diverts out the purge valve, there may be an issue with the wiring harness. It may have been damaged when the board blew. For information on the wiring, you will need to contact Breville. If you have any questions, please let us know. We look forward to hearing from you!
    eReplacementParts Team February 15, 2023
    My machine is a Solis Grind & Infuse Pro 115. It seems identical to the Breville BES870XL The Barista Express. Can I use this solenoid kit? Grtz Kjell
    Kjell for model number Breville BES870XL The Barista Express asked on 2022-12-21
    Hello Kjell, Thank you for contacting us. We show Solis is the Swiss equivalent of Breville and the 115 is equivalent version of a Breville BES870XL, the only difference is in some of the accessories, so the solenoid kit should fit your model as well. Good luck with your repair.
    eReplacementParts Team December 21, 2022
    Hi,Is it possible to buy only the middle part (the plastic tube) between the 2 solenoid? Mine is broken (I overtightened it when replacing it and it broke) but the solenoid are still working fine. Thanks,
    Christian for model number BES870 asked on 2022-10-23
    Hello Christian, Thank you for your inquiry. We have researched the model number you have provided and show that the plastic tube is only available as part of the solenoid valve kit. We hope this helps and if you need help placing an order for a part, customer service is open 7 days a week. Please feel free to give us a call. We look forward to hearing from you!
    eReplacementParts Team October 23, 2022
    Due to no pressure and water, I have changed the pump but still no water or pressure. Any Thoughts?
    Brian for model number BES870UK/a asked on 2022-03-13
    Hello Brian, Thank you for your inquiry. We heave researched the model number you have provided and if you haven't already done so, we would recommend priming the machine by filling the tank with filtered water, turn on the power button and open the steam wand knob, let it sit for 3 minutes and then press the brew button. Allow it to run for 2 minutes, turn off the brew button, allow the steam want to stay open for 2 minutes and then turn the machine off. If you have already done this, then you can check the valve to see if is clicking when you push the brew button. If there is no click, then the solenoid valve is stuck closed and needs replacing. We hope this helps and if you need help placing an order, customer service is open 7 days a week. Please feel free to give us a call. We look forward to hearing from you!
    eReplacementParts Team March 13, 2022

    Customer Repair Instructions ?

    All our customer repair instructions are solicited directly from other customers just like you who have purchased and replaced this exact part.

    Medium 30-60 minutes (29 rated repairs)?

    Breville 870xl was making loud buzzing noise when trying to pull shots, shots not pouring properly.

    Brian - March 7, 2016
    👍 45 of 49 people found this instruction helpful
    Tool Type

    Espresso

    Difficulty

    Easy

    Time

    15-30 minutes

    Tools Used

    Screwdriver, Pliers

    Make sure the machine is unplugged and follow the ereplacementparts.com youtube video for machine disassembly instructions (remove water reservoir, bean hopper, unscrew back panel, and remove two screws underneath the front panel). With the back panel removed, you should see the solenoid valve assembly in the middle of the machine. Carefully remove set pins and disconnect hoses; be aware not to lose any seals and inspect for possible damage. The main water line is held in place with a zip tie, carefully remove and disconnect. Disconnect electrical cables from solenoid terminals taking note of their location. Unscrew the solenoid assembly from its mount and replace with new assembly. Reattach all lines, hoses, and cables. Before closing the machine back up, power cycle through to make sure there are no leaks. Screw in the back and top panels and you should be good to go.
    Did you find this story helpful?
    Thanks for voting and helping fellow customers!

    Noisy solenoid, poor expressing of coffee.

    Peter - April 3, 2016
    👍 19 of 22 people found this instruction helpful
    Tool Type

    Espresso

    Difficulty

    Medium

    Time

    15-30 minutes

    Tools Used

    Screwdriver, Pliers

    Followed YouTube video of previous model. Easy replacement. Two screws hold in the assembly. Be careful to collect the tiny rubber rings in the fittings and put them back on the new assembly. I unscrewed the fitting on left side of solenoid assembly rather than cutting zip tie on tubing. I then removed the new black fitting on new assembly and carefully screwed in old fitting to assembly. Be careful as you have to turn assembly in place around the other components. If you have access to a small cable tie, you can cut the one securing the tube on the left and replace it, which would have been easier. I didn't have a replacement cable tie, hence the other method worked for me.
    Did you find this story helpful?
    Thanks for voting and helping fellow customers!

    Making a loud buzzing sound, loss of pressure

    Jeff - December 6, 2016
    👍 12 of 13 people found this instruction helpful
    Tool Type

    Espresso

    Difficulty

    Medium

    Time

    15-30 minutes

    Tools Used

    Screwdriver, Pliers, Small zip-tie

    I used the video on the eReplacement parts site for the Breville 860XL as a guide.
    1. Removed the water tank.
    2. Removed the four screws holding the top cover in place.
    3. Removed the caps and screws at the water tank base.
    4. Cut the zip-tie on the left side to the drain.
    5. Removed the clips at the tops of the lines leading to the solenoid.
    6. Removed the screws at the base of the solenoid.
    7. Rotated the solenoid around the supply line to the boiler to remove it.
    8. Reversed the above steps to install the new solenoid.
    Did you find this story helpful?
    Thanks for voting and helping fellow customers!

    Solenoid valve stuttering

    robert - November 10, 2016
    👍 7 of 8 people found this instruction helpful
    Tool Type

    Espresso

    Difficulty

    Medium

    Time

    30-60 minutes

    Tools Used

    Screwdriver, Pliers

    Per the video removed the various panels. Took a pre disassembly photo of the wiring etc. Removed the clips retaining the tubing. Be careful to gently remove the silicone rubber o-rings. Removed the two screws holding the solenoid bracket but had difficulty lifting out the bracket/solenoid assembly. It was not apparent that two underside bent tabs engage the bracket and these were very snug. One needs to lift the assembly straight upward and it required quite a bit of force in my case. Before re-assembly I bent the tabs outward slightly and the re-assembly went easily. Connected the tubes , reinserted the clips , did a smoke test and attached the panels. Made myself a great cup of espresso.
    Did you find this story helpful?
    Thanks for voting and helping fellow customers!

    Banging sound from machine and would not pump enough water to make to make an espresso

    Stuart - May 9, 2016
    👍 4 of 4 people found this instruction helpful
    Tool Type

    Espresso

    Difficulty

    Medium

    Time

    30-60 minutes

    Tools Used

    Screwdriver, Pliers

    Remove back of espresso machine, take photos of unit, remove water tubes and wires, then install the new solenoid valve assembly.
    Did you find this story helpful?
    Thanks for voting and helping fellow customers!

    unusual loud buzzing noise while making an espresso, low water pressure while brewing, water drain pan filled up faster than usual

    Edouard - July 6, 2017
    👍 3 of 4 people found this instruction helpful
    Tool Type

    Espresso

    Difficulty

    Medium

    Time

    15-30 minutes

    Tools Used

    Screwdriver, Pliers

    1 removed the water tank,
    2 run the grinder empty
    3 pop the 3 plastic caps hiding the screws under the water tank support
    4 removed the 2 screws under the top of the machine (one by the tamper the other by the filter/brewing head)
    5 remove the 2 screws on the back of the machine holding the top aluminum tray
    6 removed the grinder assembly
    7 remove the top aluminum tray,
    8 disconnect the ground cable from the tray
    9 remove the back cover (do not disconnect the water hose) and move it out of the way
    10 take a picture of the wires to the solenoids in case you forget which one goes where, and do the same for the hoses.
    11 disconnect all the stiff plastic hoses in the way (those going to the solenoid assembly and in the way of removing it) : pull the metal pin (u shaped) and recover the red o-rings (they have to be slid on the hose before reassembly - be carefull not to twist, roll, or damage them in any way)
    12 disconnect the wires to the assy.
    13 replace the assy.
    14 follow those steps backwards for reassembly
    Did you find this story helpful?
    Thanks for voting and helping fellow customers!

    Buzzing sound and low pressure at the group head

    Andrew - March 29, 2017
    👍 1 of 1 people found this instruction helpful
    Tool Type

    Espresso

    Difficulty

    Medium

    Time

    30-60 minutes

    Tools Used

    Screwdriver, Pliers

    I removed the water tank and removed 5 machine screws in the back. I also removed two screws in the front hidden next to the grinder/group head. Both the top and the back could then be removed. I located the solenoid assembly and disconnected the electrics & steam tubes, then installed the new unit. One of the existing tube connections was made with a zip tie, and I had to search my toolbins for a replacement. Buttoned the machine back up and everything worked perfectly!
    Did you find this story helpful?
    Thanks for voting and helping fellow customers!

    Barista Express making loud noise/low pressure when brewing

    Lisa - March 5, 2017
    👍 1 of 1 people found this instruction helpful
    Tool Type

    Espresso

    Difficulty

    Easy

    Time

    15-30 minutes

    Tools Used

    Screwdriver, Pliers

    I watch your YouTube video on how to remove back of machine. Took a couple photos of tubing and wire connections so I would remember what goes where. Carefully removed 6 wire connections and tubing connections from original solinoid assembly. O-rings and tubing in great condition to reuse (I descale and use clean cycle as recommended by manufacture) after 2+ years of daily use. Very easy to switch out assembly and reconnect wires/tubing.
    Did you find this story helpful?
    Thanks for voting and helping fellow customers!

    Coffee Machine was not working

    Michael - December 18, 2018
    Tool Type

    Espresso

    Difficulty

    Medium

    Time

    15-30 minutes

    Tools Used

    Screwdriver, Pliers

    I removed the back cover. I removed all the wires and the old solenoid. I replaced it with the new solenoid.
    Did you find this story helpful?
    Thanks for voting and helping fellow customers!

    Breville BES870XL No water to brew group

    Matthew - December 17, 2018
    Tool Type

    Espresso

    Difficulty

    Easy

    Time

    15-30 minutes

    Tools Used

    Screwdriver, Pliers, Adjustable Wrench

    Solenoid Valve Assembly Replacement
    0. Unplug machine
    1. Removed water tank, and bean hopper
    2. Removed top and back cover, they don't completely come off due to the electronics
    3. Took pictures of the Solenoid Valve Assembly so I could put the water lines and electrical lines back in the correct order.
    4. Pulled clamps holding water lines from Solenoid Valve Assembly
    5. Pulled electrical lines from Solenoid Valve Assembly
    6. Unscrewed and removed old Solenoid Valve Assembly
    7. Placed new Solenoid Valve Assembly into spot and screwed in place
    8. Replaced electrical and water lines based on my pictures.
    9. Replaced back and top cover
    10. Loaded bean hopper and water reservoir
    11. Plunged it in and pulled a test shot. Worked perfectly.

    Frothing Spout With O Ring
    1. Used adjustable wrench to removed old tip
    2. Used adjustable wrench to replace new tip
    3. Very simple
    Did you find this story helpful?
    Thanks for voting and helping fellow customers!

    OEM stands for Original Equipment Manufacturer and means the part you’re buying is sourced directly from the manufacturer who made your product. At eReplacementParts, we sell only genuine OEM parts, guaranteeing the part you’re purchasing is of better design and of higher quality than aftermarket parts.

    Our product descriptions are a combination of data sourced directly from the manufacturers who made your product as well as content researched and curated by our content & customer service teams. This content is edited and reviewed internally before being made public to customers.

    Our customer service team are at the ready daily to answer your part and product questions. We have a dedicated staff with decades of collective experience in helping customers just like you purchase parts to repair their products.

    All our part reviews are solicited directly from other customers who have purchased this exact part. While we moderate these reviews for profanity, offensive language or personally identifiable information, these reviews are posted exactly as submitted and no alterations are made by our team.

    All our customer repair instructions are solicited directly from other customers just like you who have purchased and replaced this exact part. While we moderate these reviews for profanity, offensive language or personally identifiable information, these reviews are posted exactly as submitted and no alterations are made by our team.

    Based on data from past customer purchasing behaviors, these parts are most commonly purchased together along with the part you are viewing. These parts may be necessary or helpful to replace to complete your current repair.

    All our installation videos are created and produced in collaboration with our in-house repair technician, Mark Sodja, who has helped millions of eReplacementParts customers over the last 13 years repair their products. Mark has years of experience in selling and repairing both commercial and residential products with a specialty in gas-powered equipment.

    This data is collected from customers who submitted a repair instruction after replacing this exact part. Customers can rate how easy the repair was to complete and how long it took. We aggregate this data to provide a repair rating that allows customers to quickly determine the difficulty and time needed to perform their own repair.

    eReplacementParts.com
    7174 South 400 West
    Suite 5
    Midvale, UT 84047
    visa mastercard discover american express PayPal