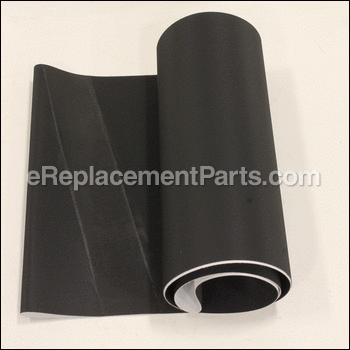

This is a genuine Vision Fitness replacement part. The running belt is commonly found on non-folding treadmills. This part is placed on the rollers as a running surface. You may require a screwdriver when replacing this item. This part is sold individually.
Running Belt 1000210087
OEM part for: Vision Fitness
Part Number: 1000210087
$281.98
In Stock
Product Description ?
- Total Length 114" x Width 19.5"
- Classification: Part
- Weight: 4.67 lbs.
- Shipping: Ships Worldwide
Compatibility
This part will fit the following 40 machines
Vision Fitness
T9200 (TM186-Simple-TC171)(2006) Treadmill - Non-Folding View Diagrams & Manuals
T9200 (TM186-Deluxe-TC17305-4-Window)(2006) Treadmill - Non-Folding View Diagrams & Manuals
T9200 (TM186-Deluxe-TC173B-6-Window)(2006) Treadmill - Non-Folding View Diagrams & Manuals
T9200 (TM186-Premier-TC175B)(2006) Treadmill - Non-Folding View Diagrams & Manuals
T9200 (TM240-Simple-TC171W)(2007) Treadmill - Non-Folding View Diagrams & Manuals
T9200 (TM240-Deluxe-TC173W)(2007) Treadmill - Non-Folding View Diagrams & Manuals
T9200 (TM240-Premier-TC175W)(2007) Treadmill - Non-Folding View Diagrams & Manuals
T9200 (TM349-Simple-TM355)(2009) Treadmill - Non-Folding View Diagrams & Manuals
T9200 (TM349-Deluxe-TM356)(2009) Treadmill - Non-Folding View Diagrams & Manuals
T9200 (TM349-Premier-TM357)(2009) Treadmill - Non-Folding View Diagrams & Manuals
T9200 (TM49)(2002-2003) Treadmill - Non-Folding View Diagrams & Manuals
T9200 (TM49C)(2004) Treadmill - Non-Folding View Diagrams & Manuals
T9300 (TM55)(2002-2003) Treadmill - Non-Folding View Diagrams & Manuals
T9300 (TM55C)(2004) Treadmill - Non-Folding View Diagrams & Manuals
T9400HRT (TM56)(2002-2003) Treadmill - Non-Folding View Diagrams & Manuals
T9500HRT (TM54)(2002-2003) Treadmill - Non-Folding View Diagrams & Manuals
TM453 (2012) Vision Fitness Treadmill - Non-Folding View Diagrams & Manuals
T10 (TM453)(TM456)(2012) View Diagrams & Manuals
T9200 (TM186)(TC171)(Simple)(Platform)(2006) View Diagrams & Manuals
T9200 (TM186)(TC17305-4 Window)(Deluxe)(Platform)(2006) View Diagrams & Manuals
T9200 (TM186)(TC173B-6 Window)(Deluxe)(Platform)(2006) View Diagrams & Manuals
T9200 (TM186)(TC175B)(Premier)(Platform)(2006) View Diagrams & Manuals
T9200 (TM240)(TC171W)(Simple)(Platform)(2007) View Diagrams & Manuals
T9200 (TM240)(TC173W)(Deluxe)(Platform)(2007) View Diagrams & Manuals
T9200 (TM240)(TC175W)(Premier)(Platform)(2007) View Diagrams & Manuals
T9200 (TM349)(TM355)(Simple)(2009) View Diagrams & Manuals
T9200 (TM349)(TM356)(Deluxe)(2009) View Diagrams & Manuals
T9200 (TM349)(TM357)(Premier)(2009) View Diagrams & Manuals
T9200 (TM49)(TM49D)(2002-2003) View Diagrams & Manuals
T9300 (TM55)(2002) View Diagrams & Manuals
T9400HRT (TM56)(2002) View Diagrams & Manuals
T9500HRT (TM54)(2002) View Diagrams & Manuals
T9500 (TM181)(TC171)(Simple)(Platform)(2006) View Diagrams & Manuals
T9500 (TM181)(TC17305-4 Window)(Platform)(2006) View Diagrams & Manuals
T9500 (TM181)(TC173B-6 Window)(Deluxe)(Platform)(2006) View Diagrams & Manuals
T9500 (TM181)(TC175B)(Premier)(Platform)(2006) View Diagrams & Manuals
T9500 (TM195)(TC171)(Simple)(Platform) View Diagrams & Manuals
T9500 (TM195)(TC17305-4 Window)(Deluxe)(Platform)(2006) View Diagrams & Manuals
T9500 (TM195)(TC173B-6 Window)(Deluxe)(Platform)(2006) View Diagrams & Manuals
T9500 (TM195)(TC175B)(Premier)(Platform)(2006) View Diagrams & Manuals
Show More Compatible Models
This item works with the following types of products:
- Treadmill Parts
Questions & Answers ?
Our customer Service team is at the ready daily to answer your part and product questions.

Ask our Team
We have a dedicated staff with decades of collective experience in helping customers just like you purchase parts to repair their products.
Does this fit my product?Questions & Answers for Running Belt
Do you need to lubricate this belt or is it already pre-treated?
Lisa
for model number T9200 TM49
asked on 2023-03-16
Hi Lisa,
Thank you for your question. Yes, the belt should be lubricated at least twice a year. The belt should come pre-lubricated. The belt should be lubricated with 100 percent pure silicon treadmill lubricant. If you have any questions, please let us know. We look forward to hearing from you!
eReplacementParts Team March 16, 2023
Customer Repair Instructions ?
All our customer repair instructions are solicited directly from other customers just like you who have purchased and replaced this exact part.
Worn bearings in front and rear rollers creating noisy treadmill, and worn running belt
Elton - September 17, 2020
Tool Type
Treadmill
Difficulty
Easy
Time
1-2 hours
Tools Used
Screwdriver, metric allen wrench set (hex key set)
I found several YouTube videos that provided that were helpful in tackling project.
Did you find this story helpful?
Thanks for voting and helping fellow customers!
needed a new running belt
Joseph - May 12, 2019
Tool Type
Treadmill
Difficulty
Hard
Time
More than 2 hours
Tools Used
Screwdriver, Pliers, Socket set, Adjustable Wrench, 2 wooden blocks--hammer
Parts Used
Un plug the machine- took the cover off-took out the left bolt that hold the front roller on then the right bolt--took the drive belt off--removed the front roller--took out the right and left rear roller bolts and remove the rear roller-- tap off the right and left roller caps --tap off the right and left side railing --tilted treadmill on its side took out all of the bolts holding the running board -- sat the treadmill upright removed the running board from the frame --removed the running belt from the board --clean the board of old wax and re waxed it -- put on the new running belt place the board back into the frame ----i was very happy you sent me the correct belt !!--finger tight all of the nuts to the board put the treadmill on its side and tighten all nuts with a socket wrench --up right the treadmill slid the right and left side railing on-- put the right and left roller caps on -- put in the front roller and bolted the left end to the frame and attach the drive belt to the pulley -- screwed the bolt on the right side of the roller through the braces and align everything up --tilted the treadmill on its side put the rear roller through the belt align the threads of the left side and screwed in the bolt screwed in the bolt on the right side --stand treadmill upright i took white paint and a little brush and put little white dots on the edge of the running belt both sides all the way around -- i put a dot of white paint on the right and left rear bolts --i started the treadmill put it on 1 with the edges white it was easy to see . i adjusted the right and left bolts turning them clockwise right bolt then left bolt. with the white dot on the bolts you have a starting point- just like on a clock you can turn it 5 minutes-10 minutes - 15 minutes --i increase the speed little at a time until it was running 9 miles an hour. i stop the treadmill put on my sneakers started the treadmill and walk on it for 5 or 10 minutes -- i put the cover over the motor screwed everything in.it took me 6 hours
Did you find this story helpful?
Thanks for voting and helping fellow customers!
OEM stands for Original Equipment Manufacturer and means the part you’re buying is sourced directly from the manufacturer who made your product. At eReplacementParts, we sell only genuine OEM parts, guaranteeing the part you’re purchasing is of better design and of higher quality than aftermarket parts.
Our product descriptions are a combination of data sourced directly from the manufacturers who made your product as well as content researched and curated by our content & customer service teams. This content is edited and reviewed internally before being made public to customers.
Our customer service team are at the ready daily to answer your part and product questions. We have a dedicated staff with decades of collective experience in helping customers just like you purchase parts to repair their products.
All our part reviews are solicited directly from other customers who have purchased this exact part. While we moderate these reviews for profanity, offensive language or personally identifiable information, these reviews are posted exactly as submitted and no alterations are made by our team.
All our customer repair instructions are solicited directly from other customers just like you who have purchased and replaced this exact part. While we moderate these reviews for profanity, offensive language or personally identifiable information, these reviews are posted exactly as submitted and no alterations are made by our team.
Based on data from past customer purchasing behaviors, these parts are most commonly purchased together along with the part you are viewing. These parts may be necessary or helpful to replace to complete your current repair.
All our installation videos are created and produced in collaboration with our in-house repair technician, Mark Sodja, who has helped millions of eReplacementParts customers over the last 13 years repair their products. Mark has years of experience in selling and repairing both commercial and residential products with a specialty in gas-powered equipment.
This data is collected from customers who submitted a repair instruction after replacing this exact part. Customers can rate how easy the repair was to complete and how long it took. We aggregate this data to provide a repair rating that allows customers to quickly determine the difficulty and time needed to perform their own repair.