
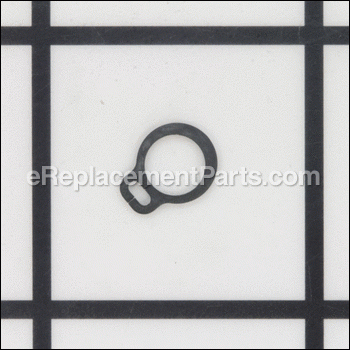
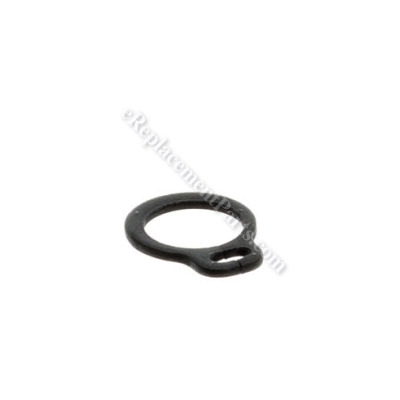

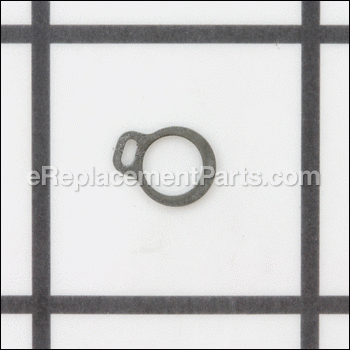

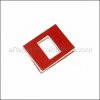
This is a genuine manufacturer-sourced replacement retaining ring, it is specially designed for use with Ryobi power tools. Please make sure to check the appropriate diagrams of your model for the correct location and application of this hardware. Keep in mind this high-quality component is made of durable metal and is sold individually. It is best to use snap ring pliers to secure or remove this part.
Retaining Ring 670704001
OEM part for: Ryobi, Craftsman, Ryobi -TTI
Part Number: 670704001
$4.99
In Stock
Jump To:
Frequently Purchased Together ?


Compatibility
This part will fit the following 40 machines
Ryobi
RJC181 18V Cordless Reciprocating Saw View Diagrams & Manuals
RJC180V 18V Cordless Reciprocating Saw View Diagrams & Manuals
RJC180 18V Cordless Reciprocating Saw View Diagrams & Manuals
P513 18V Cordless Reciprocating Saw View Diagrams & Manuals
P510 18V Cordless Reciprocating Saw View Diagrams & Manuals
RJ165V Variable Speed Reciprocating Saw View Diagrams & Manuals
RJ162VK Variable Speed Reciprocating Saw View Diagrams & Manuals
RJ161VK Variable Speed Reciprocating Saw View Diagrams & Manuals
RJ161V Variable Speed Reciprocating Saw View Diagrams & Manuals
P2600 18 Volt Hedge Trimmer View Diagrams & Manuals
P2600A 18 Volt Hedge Trimmer View Diagrams & Manuals
P2601 18 Volt Hedge Trimmer View Diagrams & Manuals
P514 18V Reciprocating Saw with Anti-Vibe Handle View Diagrams & Manuals
JS481L Orbital Jig Saw View Diagrams & Manuals
RY24602 Hedge Trimmer View Diagrams & Manuals
RY40060 Hedge Trimmer View Diagrams & Manuals
P511 18 Volt Cordless Reciprocating Saw View Diagrams & Manuals
P515 18 Volt Cordless Reciprocating Saw View Diagrams & Manuals
RJ162V Variable Speed Reciprocating Saw View Diagrams & Manuals
JS481LG Orbital Jig Saw View Diagrams & Manuals
P519VN 18 Volt Reciprocating Saw View Diagrams & Manuals
RJ1861V Variable Speed Reciprocating Saw View Diagrams & Manuals
P519 18 Volt Reciprocating Saw View Diagrams & Manuals
P524 18 Volt Jig Saw View Diagrams & Manuals
RJ185V Variable Speed Reciprocating Saw View Diagrams & Manuals
P518 18v Reciprocating Saw View Diagrams & Manuals
RJ186V Variable Speed Reciprocating Saw View Diagrams & Manuals
P2606VNM (107266101) Ryobi 18 Volt Hedge Trimmer View Diagrams & Manuals
RY40603 (107443001) Pole Hedge Trimmer View Diagrams & Manuals
RY40603VNM (107443101) Pole Hedge Trimmer View Diagrams & Manuals
RY40109 (107299013) 20-Inch 40 Volt Lawn Mower View Diagrams & Manuals
P2606 (107266001) Ryobi 18 Volt Hedge Trimmer View Diagrams & Manuals
RY40109 (107299007) 20-Inch 40 Volt Lawn Mower View Diagrams & Manuals
PBLJS01 Pbljs01 18 Volt Brushless Jig Saw 12-7-20 (Rev:02) View Diagrams & Manuals
Craftsman
315114270 Reciprocating Saw View Diagrams & Manuals
315CRS1000 Reciprocating Saw View Diagrams & Manuals
315115790 Reciprocating Saw View Diagrams & Manuals
315114271 Reciprocating Saw View Diagrams & Manuals
315115740 19.2V Reciprocating Saw View Diagrams & Manuals
Ryobi -TTI
RJ185V Variable Speed Reciprocating Saw View Diagrams & Manuals
Show More Compatible Models
This item works with the following types of products:
- Reciprocating Saw Parts
- Saw Parts
- Hedge Trimmer Parts
- Trimmer Parts
- Jig saw Parts
This part replaces obsolete part #: 6770401
Customer Part Reviews ?
Average Rating (out of 5):
Click to filter by ratings:
5 stars
4
4 stars
0
3 stars
0
2 stars
0
1 stars
0
< PREV
- 1
Fit like it should
Bought 2 just in case I lost one like when I originally disassembled the equipment to make another repair.
Stephen -
April 24, 2023
Verified Purchase
easy to fix.
saw is working again
Guest -
September 22, 2021
Verified Purchase
Ryobi reciprocating saw parts
Good shipping time. Parts all correct. Saw works again. Thank you
Guest -
August 4, 2020
Verified Purchase
easy and cheap repair
worked great little slow to arrive but it fixed my saw
Guest -
June 28, 2020
Verified Purchase
t
t
t -
t days ago
Verified Purchase
eReplacementParts Team
t
Questions & Answers ?
Our customer Service team is at the ready daily to answer your part and product questions.

Ask our Team
We have a dedicated staff with decades of collective experience in helping customers just like you purchase parts to repair their products.
Does this fit my product?Questions & Answers for Retaining Ring
No questions have been asked yet
Customer Repair Instructions ?
All our customer repair instructions are solicited directly from other customers just like you who have purchased and replaced this exact part.
bushings that held jig saw blade worn out,which worn out the gear pitman arm,which worn out the gearbox housing
Patrick - December 29, 2019
Tool Type
Jig saw
Difficulty
Medium
Time
More than 2 hours
Tools Used
Screwdriver, Pliers, Nutdriver, files, 4mm tap,jb weld
when the parts arrived,started to assemble the saw to find out had wrong gear bearing, which had to order from somewhere else because one I needed, was discontinued,and one bushing was not the same as the other bushing, so I had to used jb weld to fix, finally got the bearing and bushing reworked, than everything went together, added grease, made a few fiber washers, put the case together, install the battery , ran ok, works like the day I bought it, next time I will buy a new one and throw old worn out one away, also the mount holes in the gearbox was not tapped out to 4mm thread which the tap I had ,
Did you find this story helpful?
Thanks for voting and helping fellow customers!
pin broke in sliding rod assembly
robert - September 11, 2019
Tool Type
Jig saw
Difficulty
Medium
Time
30-60 minutes
Tools Used
Screwdriver, ring expander
took jigsaw apart. swapped out broken part and reassembled. works just like new.
Did you find this story helpful?
Thanks for voting and helping fellow customers!
Retaining clip broke.
Robert - November 29, 2017
Tool Type
Jig saw
Difficulty
Easy
Time
15-30 minutes
Tools Used
Screwdriver
Parts Used
Pulled back the protecting guard and removed six screws. Lifted the cover and installed the new clip. Reinstalled the cover, the screws and rolled the guard back into place.
Did you find this story helpful?
Thanks for voting and helping fellow customers!
Sliding rod broke. Operates saw blade
GARY - September 25, 2017
Tool Type
Jig saw
Difficulty
Medium
Time
1-2 hours
Tools Used
Screwdriver, Pliers
1 Disassembled case to identify parts needed
2 Looked up parts breakdown on ereplacements
3 Wrote down part numbers
4 Placed order
5 Received parts
6 Attempted easy assembly but had to disassemble more to obtain proper
access
7 Slowly carefully installed parts
8 Reassembled case
9 Tested / worked
10 Went outside to use tool
2 Looked up parts breakdown on ereplacements
3 Wrote down part numbers
4 Placed order
5 Received parts
6 Attempted easy assembly but had to disassemble more to obtain proper
access
7 Slowly carefully installed parts
8 Reassembled case
9 Tested / worked
10 Went outside to use tool
Did you find this story helpful?
Thanks for voting and helping fellow customers!
Inner Slide broke loose inside gear case, causing tool to bind up.
Fredrick - August 26, 2016
Tool Type
Saw
Difficulty
Medium
Time
15-30 minutes
Tools Used
Screwdriver, Socket set, Hammer; center punch; bearing grease
1. Figured out that rubber gear case cover was hiding shoe plate retaining screw. Cut a small hole in cover to access screw.
2. Pulled rubber gear case cover off tool.
3. Removed 6 screws from cracked gear case cover. Used rags and q-tips to clean out old grease and dirt.
4. Found that metal ridge that retains slide had broken away, letting slide go where it wasn't supposed to be, causing bind.
5. Removed metal cap that holds down metal slide; used center punch to peen the cap edge to make it hold the slide in place.
6. The retaining ring for the oscillating bearing had broken off. Used a small socket to pop the new one on.
7. Applied fresh wheel bearing grease to exposed gears and sliding parts. Put two small gaskets from old cover in position.
8. Screwed cover down. Cleaned inside of rubber cover; sprayed some WD-40 inside to make it go on easy.
9. Reinstalled shoe plate and set screw.
10. It works like new!
Did you find this story helpful?
Thanks for voting and helping fellow customers!
OEM stands for Original Equipment Manufacturer and means the part you’re buying is sourced directly from the manufacturer who made your product. At eReplacementParts, we sell only genuine OEM parts, guaranteeing the part you’re purchasing is of better design and of higher quality than aftermarket parts.
Our product descriptions are a combination of data sourced directly from the manufacturers who made your product as well as content researched and curated by our content & customer service teams. This content is edited and reviewed internally before being made public to customers.
Our customer service team are at the ready daily to answer your part and product questions. We have a dedicated staff with decades of collective experience in helping customers just like you purchase parts to repair their products.
All our part reviews are solicited directly from other customers who have purchased this exact part. While we moderate these reviews for profanity, offensive language or personally identifiable information, these reviews are posted exactly as submitted and no alterations are made by our team.
All our customer repair instructions are solicited directly from other customers just like you who have purchased and replaced this exact part. While we moderate these reviews for profanity, offensive language or personally identifiable information, these reviews are posted exactly as submitted and no alterations are made by our team.
Based on data from past customer purchasing behaviors, these parts are most commonly purchased together along with the part you are viewing. These parts may be necessary or helpful to replace to complete your current repair.
All our installation videos are created and produced in collaboration with our in-house repair technician, Mark Sodja, who has helped millions of eReplacementParts customers over the last 13 years repair their products. Mark has years of experience in selling and repairing both commercial and residential products with a specialty in gas-powered equipment.
This data is collected from customers who submitted a repair instruction after replacing this exact part. Customers can rate how easy the repair was to complete and how long it took. We aggregate this data to provide a repair rating that allows customers to quickly determine the difficulty and time needed to perform their own repair.