Why Read This Article?
Finish Nailer Repair - Replacing the Driver Guide (Ridgid Part # 79004001022)
Article Breakdown
Finish Nailer Repair - Replacing the Driver Guide (Ridgid Part # 79004001022)
Tools & Materials

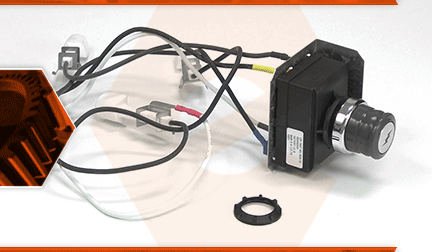
The igniter kit makes lighting your propane grill simple. The kit consists of the igniter module, the wires and electrodes, the push button and battery, and new wire clips. After years of use, the igniter module can wear out; no longer producing enough power to make a spark at the electrodes.
Let's get started.
REMOVING THE IGNITER KIT 1. Remove the lid.
a. Remove the retaining pins from hinge pins at the rear of the lid.
b. Remove the hinge pins from the hinge brackets.
c. Lift the lid away from the cookbox.
2. Remove the grill grates.
a. Remove warming rack. b. Remove the grill grates.
c. Remove the flavorizer bars.
3. Remove the cabinet doors.
a. Insert a screwdriver into the small opening located on the upper-inside corner of the cabinet door.
b. Depress the screwdriver to disengage the locking hinge pin and release the cabinet door.
c. Remove the cabinet door from the grill.
d. Repeat this step to remove the second cabinet door.
4. Remove the control panel bottom.
a. Remove the screws securing the control panel bottom to the upper control panel.
b. Remove the control panel bottom from the grill.
5. Remove the ignitor module.
a. Unscrew the igniter button and remove the battery.
b. Unscrew the retaining ring securing the igniter module to the front of the control panel.
c. Push the igniter module out of the control panel (toward the rear of the grill).
d. Disconnect the ignition wires from the igniter module.
6. Remove the control knobs.
a. Gently pull the (3) control knobs away from the valves.
7. Remove the control panel.
a. Remove the two screws securing the control panel to the front of the grill.
b. Remove the control panel.
8. Remove the heat shield.
a. Pull the igniter wires out of the plastic retaining clips (along the heat shield).
b. Remove the (2) screws securing the heat shield to the manifold bracket (there is one screw on each side of the shield).
c. Remove the heat shield from the unit.
INSTALLING THE NEW ELECTRODES
9. Replace the retaining clips.
a. The igniter kit comes with new plastic retaining clips for the igniter wires. If the plastic retaining clips on your grill are broken or missing, replace them with the new clips.
10. Replace the electrodes.
a. Note that the electrode wires are color-coded. Be sure to replace each electrode on your grill with matching wires from your kit.
b. To disengage the electrode from the burner tube, lift and slide the electrode connector toward the valve (at the front of the grill).
c. Remove the electrode (and wire) from the unit.
d. To install the new electrode, align the bracket on the electrode connector with the bracket on the burner tube; then slide the connector toward the rear of the grill until the locking tabs engage.
e. Repeat this process to replace the remaining two electrodes.
REASSEMBLING THE UNIT
11. Reinstall the heat shield.
a. Install the heat shield onto the grill. (The plastic retaining clips should face the valves.)
b. Secure the heat shield with the two screws.
c. Route and secure the ignition wires in the plastic clips along the front of the heat shield. (The wire on the far-right should bass behind the gas line.)
12. Reinstall the control panel.
a. Install the control panel onto the grill.
b. Secure the control panel with the two screws.
13. Install the new ignition module.
Note: the new ignition module is color-coded to match the ignition wires.
a. Connect the four ignition wires to the (color-coded) terminals on the new ignition module.
b. Install the new ignition module onto the control panel.
c. Secure the ignition module to the control panel with the new retaining ring.
d. Install the new battery into the ignition module.
e. Install the new push-button onto the ignition module.
14. Reinstall the control knobs.
a. Align the notches on the back of the control knobs with the slots on the valve stems.
b. Press the control knobs firmly onto the valves.
15. Reinstall the control panel bottom.
a. Install the control panel bottom. The (small) bent tabs should face the top of the grill; the long tab (on the front of the bottom panel) should interlock with the control panel.
b. Secure the control panel bottom with the (2) screws.
16. Reinstall the cabinet doors.
a. Align the lower-portion of the cabinet door with the hinge-pin on the frame.
b. Depress the top hinge-pin (on the cabinet door) and slide the door into alignment. (When properly aligned, the top hinge-pin will spring-up into the hinge bracket on the frame.
c. Repeat this step to install the second cabinet door.
17. Reinstall the grill grates and rack.
a. Install the flavorizer bars.
b. Install the grill grates.
c. Install the warming rack.
18. Reinstall the lid. a. Install the lid onto the cookbox and align the hinges.
b. Install the hinge pins.
c. Secure the hinge pins with the retaining clips.


