
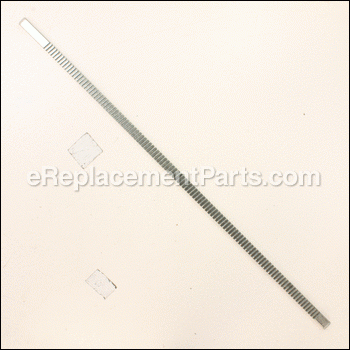
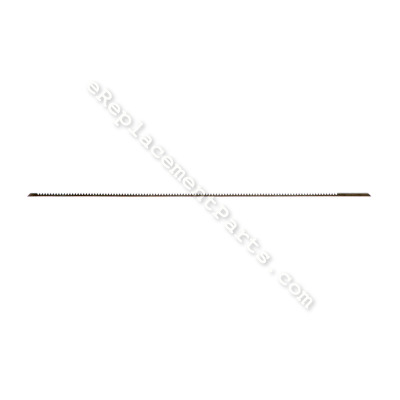


This OEM part is used on Jet and Powermatic Drill Presses to assist in raising and lowering the drill press table. It is controlled by a hand crank on the side of the drill press column clamp. To make sure you do not damage the rack, always loosen the the clamp before moving the table.
Rack PM2800-071
OEM part for: Powermatic, Jet
Part Number: PM2800-071
$69.56
In Stock
Jump To:
Product Description ?
- Length 31 Inches Thickness 5/8 Inch
- Classification: Part
- Weight: 1.40 lbs.
- Shipping: Ships Worldwide
Frequently Purchased Together ?


Compatibility
This part will fit the following 11 machines
Powermatic
PM2800 (1792800) TEFC 1HP 115/230V Drill Press View Diagrams & Manuals
2800 18-inch Variable Speed Drill Press View Diagrams & Manuals
Jet
JDP-17FSE (354171) Drill Press View Diagrams & Manuals
JDP-17MF (354169) 17 in. Drill Press View Diagrams & Manuals
J-2500 (354400) Drill Press View Diagrams & Manuals
J-2530 (354401) Drill Press View Diagrams & Manuals
JDP-15M (354165) Drill Press View Diagrams & Manuals
JDP-15MF (354166) Drill Press View Diagrams & Manuals
JDP-12 (707300) 12" Variable Speed Drill Press View Diagrams & Manuals
354169 Jdp-17mf 16-1/2 Inch 5/8 Inch Capacity Floor View Diagrams & Manuals
354173 Jdp-17dx - 17 Inch View Diagrams & Manuals
Show More Compatible Models
This item works with the following types of products:
- Drill Parts
- Drill Press Parts
This part replaces obsolete part #: 10602205
Repair Videos ?
Watch the Repair Video for
Rack

Articles:
|
Step-by-step instructions for removing and installing the rack on your Jet drill press....
February 28, 2018
|

Customer Part Reviews ?
Average Rating (out of 5):
Click to filter by ratings:
5 stars
8
4 stars
0
3 stars
0
2 stars
0
1 stars
0
< PREV
- 1
Hard to Find
The rack was easy to install on my very old craftsman drill press. My father-in-law gave me the drill press towards the end of his life and it means a great deal to me. Craftsman parts are very hard to find. Thank you for making this replacement part.
Guest -
August 18, 2023
Verified Purchase
Exact part, good quality, and fast shipping
This was the exact part that I needed. The rack for my jet drill press was broken when I bought it and I was having some trouble finding the right part until I found this website. OEM parts are more expensive but it’s worth it when your looking for parts that won’t fail in the future.
Guest -
October 11, 2022
Verified Purchase
Drill press rack
Quick ship part fits packaged to prevent danage
Guest -
October 15, 2021
Verified Purchase
Easy repairs and parts worked as expected
Everything came in good condition and now my drill press works good
Guest -
June 19, 2020
Verified Purchase
Fits perfect
Part fits and works perfect on a JDP-14JF. They don't have it listed for this specific drill model anywhere so I just bought it in hopes it would work and it is an exact fit
Guest -
March 12, 2020
Verified Purchase
Half of the puzzle!
This is the exact right part for half of my repair of a Jet drill press. The second part of the repair has been a bit more problematic, but thanks to Jet technical support, I'm on the right track and ereplacement has that part in stock too!
Marcus -
October 2, 2019
Verified Purchase
Drill press rack
The part showed up quickly and was in great condition. Price was great and so was the quality.
Guest -
September 7, 2019
Verified Purchase
Great part, worked as expected
This was packed well, and worked to replace the bent and broken rack on an earlier model drill press, an Orbit 17" floor standing model, from when Jet first started importing them and before rebranding them as Jet tools.
Joshua -
July 19, 2019
Verified Purchase
t
t
t -
t days ago
Verified Purchase
eReplacementParts Team
t
Questions & Answers ?
Our customer Service team is at the ready daily to answer your part and product questions.

Ask our Team
We have a dedicated staff with decades of collective experience in helping customers just like you purchase parts to repair their products.
Does this fit my product?Questions & Answers for Rack
No questions have been asked yet
Customer Repair Instructions ?
All our customer repair instructions are solicited directly from other customers just like you who have purchased and replaced this exact part.
The rack had broken in two pieces and would not lift the drill press table.
Cary - January 18, 2017
👍 8 of 8 people found this instruction helpful
Tool Type
Drill Press
Difficulty
Medium
Time
15-30 minutes
Tools Used
, allen wrench
Parts Used
I loosened the two allen screws that hold the top assembly on the shaft. Then you should get two people to lift the top assembly off of the shaft. It was very heavy and awkward. I took some time to clean the shaft with a wire brush and then 220 grit sandpaper. Finally using 0000 steel wool to create a smooth surface for the rack and table assembly to move freely. Thus, preventing binding situations that bound the rack in the first place. Then, you bring the table to just above the top of the shaft and work the rack into the threads and slide the table back onto the shaft. Make sure that you sure that the arrow on the rack is pointing up. Place the top assembly back onto the shaft, align it with the base, and tighten the allen screws.
Did you find this story helpful?
Thanks for voting and helping fellow customers!
rack was broke
Mel - January 28, 2019
👍 1 of 1 people found this instruction helpful
Tool Type
Drill Press
Difficulty
Easy
Time
Less than 15 minutes
Tools Used
, allen set
Parts Used
removed power head and removed table with broken rack reversed procedure for install. this rack worked as a replacement for a craftsman O5VQ
Did you find this story helpful?
Thanks for voting and helping fellow customers!
Old rack was broken
Bruce - May 17, 2017
👍 1 of 1 people found this instruction helpful
Tool Type
Drill Press
Difficulty
Easy
Time
30-60 minutes
Tools Used
, Hex wrench
Parts Used
1. Removed motor/pulley head.
2. Removed top rack containment ring
3. Cranked old rack up through pinion gear
4. Cranked new rack down through pinion
5. Reinstalled the top rack containment ring
6. Reinstalled the motor/pulley head
DONE
2. Removed top rack containment ring
3. Cranked old rack up through pinion gear
4. Cranked new rack down through pinion
5. Reinstalled the top rack containment ring
6. Reinstalled the motor/pulley head
DONE
Did you find this story helpful?
Thanks for voting and helping fellow customers!
Rack and Coil spring was broken.
Shawn - April 17, 2024
Tool Type
Drill Press
Difficulty
Easy
Time
30-60 minutes
Tools Used
Wrench Set, Adjustable Wrench, Allen wrench
Replaced Rack- use allen wrench to loosen 2 allen screws that tighten drill press head to the post, remove drill press head (it's heavy get help to lift it) lift head off post, you can then remove rack ring by loosening set screw and slide it off post, then slide drill press table and rack off post together, replace old rack with new, the rack can just be lifted out and replaced with new rack from drill press table gear. Then hold together and slide table and rack back onto post, note up side of rack by arrow pointing up, then I had to replace my rack ring, if yours is okay just slide it back onto post with bevel facing down to hold rack in place on the angled edge of rack on the top, don't slide the ring down to tight against the rack it needs to be able to move freely when swinging the table around the post, tighten ring with set screw. Replaced Coil spring- loosen two nuts that hold coil spring and cover on and remove broken coil spring and cover, install new coil spring and cover, you will have to adjust spring tension by turning cover with spring a notch at a time until desired tightness. Hard to explain, but not really hard to do, I looked at youtube videos and still just had to figure it out as I did it. Good luck.
Did you find this story helpful?
Thanks for voting and helping fellow customers!
My old Orbit floor drill press had a broken rack.
John - June 18, 2023
Tool Type
Drill Press
Difficulty
Medium
Time
30-60 minutes
Tools Used
Power Drill, Wrench Set, allen wrench, vise
Parts Used
1. During refurbishment of my 35+ year old floor drill press, I had to replace the broken rack. I ordered a new rack for a JET drill press which has the same rack.
2. I disassembled the drill press, removed years of dried grease and oil from the shaft.
3. The upper rack holder was cracked. I made a circular clamp of aluminum bar stock and epoxied/bolted the clamp over the rack holder, drilled a hole to allow fastening the stiffened rack holder to the column with the set screw.
4. The repair was successful and all functions to raise, lower, and rotate the table support plate are functioning.
Did you find this story helpful?
Thanks for voting and helping fellow customers!
Table rack was damaged
Padraic - February 15, 2022
Tool Type
Drill Press
Difficulty
Easy
Time
30-60 minutes
Tools Used
, Allen wrench set
Parts Used
1. Loosen the 2 set screws that hold power head to column
2. Remove power head, 3 person job
3. Loosen & removerack clamp
4. Remove rack, table and table clamp/adjuster
5. Clean out pinion in table adjuster. Regressed
6. Clean column with Scotch Brite pad and WD-40
7. Reassemble in order. Ensure rack is seated in upper and lower receivers
2. Remove power head, 3 person job
3. Loosen & removerack clamp
4. Remove rack, table and table clamp/adjuster
5. Clean out pinion in table adjuster. Regressed
6. Clean column with Scotch Brite pad and WD-40
7. Reassemble in order. Ensure rack is seated in upper and lower receivers
Did you find this story helpful?
Thanks for voting and helping fellow customers!
Broken rack
Michael - February 2, 2022
Tool Type
Drill Press
Difficulty
Easy
Time
30-60 minutes
Tools Used
, allen wrenches
Parts Used
This was a direct replacement for the Sears Craftsman 113.213151 drill press rack.
Did you find this story helpful?
Thanks for voting and helping fellow customers!
Drill press platform did not move up and down due to broken rack.
Shawn - June 9, 2020
Tool Type
Drill Press
Difficulty
Easy
Time
15-30 minutes
Tools Used
, Allen wrench
Parts Used
This rack was not listed as a replacement part for my drill press but the dimensions were the same and worked perfectly.
1. I removed the drill motor by loosening the set screws and lifted it off the post.
2 I removed the platform and rack by loosening and lifting off the post.
3 I cleaned the post and lubricated with oil.
4 I installed the platform and rack by sliding it onto the post. And secured the retaining clamp above the rack.
5 I installed the drill motor and secured it with the set screws.
Did you find this story helpful?
Thanks for voting and helping fellow customers!
Table rack gear bent
Keith - December 18, 2019
Tool Type
Drill Press
Difficulty
Easy
Time
Less than 15 minutes
Tools Used
, Allen wrench
Parts Used
Remove drill press head.
Remove rack gear locking collar.
Remove gear and table raise/lower assembly.
Reinstall new gear and table raise/lower assembly.
Reinstall collar.
Reinstall drill head
Remove rack gear locking collar.
Remove gear and table raise/lower assembly.
Reinstall new gear and table raise/lower assembly.
Reinstall collar.
Reinstall drill head
Did you find this story helpful?
Thanks for voting and helping fellow customers!
The original rack broke under excess pressure by a novice operator that didn't realize there was a table lock that needed to be loosened before raising the table. Brute strenth was not the answer an
Robert - October 14, 2019
Tool Type
Drill Press
Difficulty
Easy
Time
Less than 15 minutes
Tools Used
, alan wrench
Parts Used
This rack worked for my Sears 137.229150 15 inch drill press. The rack is slightly shorter than original but that doesn't present a problem as the table still comes all the way up to meet the chuck so it's plenty long enough.
Others have described the installation process, but basically just loosen the set screws and lift off the head, loosen set screws on top collar and remove it. Loosen the table lock handle and slide the table and old rack up and off, then put the new rack against the table gear and slide them down to the bottom as a unit. There is an arrow on the rack to indicate the top vs bottom. Reattach the top collar being sure to keep it level all around so the table will be able to turn easily. Reattach the head and secure the set screws.
Others have described the installation process, but basically just loosen the set screws and lift off the head, loosen set screws on top collar and remove it. Loosen the table lock handle and slide the table and old rack up and off, then put the new rack against the table gear and slide them down to the bottom as a unit. There is an arrow on the rack to indicate the top vs bottom. Reattach the top collar being sure to keep it level all around so the table will be able to turn easily. Reattach the head and secure the set screws.
Did you find this story helpful?
Thanks for voting and helping fellow customers!
Load More Install Stories
OEM stands for Original Equipment Manufacturer and means the part you’re buying is sourced directly from the manufacturer who made your product. At eReplacementParts, we sell only genuine OEM parts, guaranteeing the part you’re purchasing is of better design and of higher quality than aftermarket parts.
Our product descriptions are a combination of data sourced directly from the manufacturers who made your product as well as content researched and curated by our content & customer service teams. This content is edited and reviewed internally before being made public to customers.
Our customer service team are at the ready daily to answer your part and product questions. We have a dedicated staff with decades of collective experience in helping customers just like you purchase parts to repair their products.
All our part reviews are solicited directly from other customers who have purchased this exact part. While we moderate these reviews for profanity, offensive language or personally identifiable information, these reviews are posted exactly as submitted and no alterations are made by our team.
All our customer repair instructions are solicited directly from other customers just like you who have purchased and replaced this exact part. While we moderate these reviews for profanity, offensive language or personally identifiable information, these reviews are posted exactly as submitted and no alterations are made by our team.
Based on data from past customer purchasing behaviors, these parts are most commonly purchased together along with the part you are viewing. These parts may be necessary or helpful to replace to complete your current repair.
All our installation videos are created and produced in collaboration with our in-house repair technician, Mark Sodja, who has helped millions of eReplacementParts customers over the last 13 years repair their products. Mark has years of experience in selling and repairing both commercial and residential products with a specialty in gas-powered equipment.
This data is collected from customers who submitted a repair instruction after replacing this exact part. Customers can rate how easy the repair was to complete and how long it took. We aggregate this data to provide a repair rating that allows customers to quickly determine the difficulty and time needed to perform their own repair.