
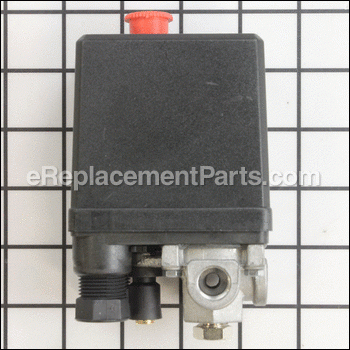
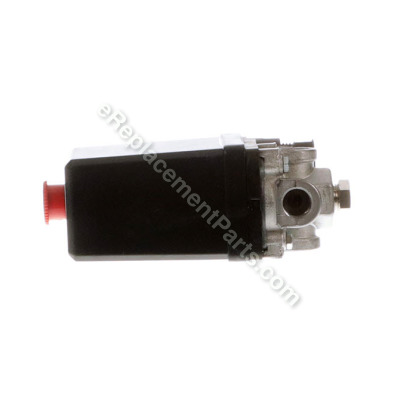


This pressure switch is an authentic manufacturer supplied replacement part. It is specially designed to work with Hitachi air compressors. The purpose of a pressure switch is to control on/off function of a compressor. It features 1/4" quick compression fitting for check valve line. Over time pressure switch might develop air leaks requiring replacement. It is sold individually.
To replace this pressure switch you would need a set of wrenches, nut driver set and a thread-sealing tape.
• Shut off the electricity and drain the air tank
• Remove the tank pressure gauge
• Remove the pressure switch tube
• Remove the pressure regulator assembly
• Disconnect the wires
• Remove the safety valve
• Install the new pressure switch
• Reinstall the safety valve
• Connect the wires
• Reinstall the pressure switch tube
• Screw the pressure gauge onto the new pressure switch and tighten the gauge firmly
• Test the air compressor
Includes part number 881-513
Pressure Switch ( New Style) 882609
OEM part for: Metabo HPT (Hitachi)
Part Number: 882609
Product Description ?
- Classification: Part
- Weight: 0.66 lbs.
- Shipping: Ships Worldwide
Compatibility
This part will fit the following 11 machines
Metabo HPT (Hitachi)
This item works with the following types of products:
- Compressor Parts
This part replaces obsolete part #: 882611
Customer Part Reviews ?
- 1
Questions & Answers ?
Our customer Service team is at the ready daily to answer your part and product questions.

Ask our Team
We have a dedicated staff with decades of collective experience in helping customers just like you purchase parts to repair their products.
Does this fit my product?Questions & Answers for Pressure Switch ( New Style)
Customer Repair Instructions ?
All our customer repair instructions are solicited directly from other customers just like you who have purchased and replaced this exact part.
Compressor would not start.
Tool Type
Compressor
Difficulty
Medium
Time
1-2 hours
Tools Used
Screwdriver, Pliers, Socket set, Wrench Set, Nutdriver
1. Removed the pressure switch and associated parts, including the pressure reducer.
2. Ordered replacement pressure switch and reducer.
3. Carefully cleaned compressor while awaiting delivery of ordered parts.
4. Installed new parts.
5. Test indicated a successful repair.
Note: Take notes or make pics as you disassemble. Remove the pressure reducer, plastic pressure tube, pressure switch cover, and electrical connections to the pressure switch before removing the pressure switch itself. Reverse the noted/pictured disassembly order to compete the repair.
Compressor would not turn on without holding switch in on position.
Tool Type
Compressor
Difficulty
Medium
Time
More than 2 hours
Tools Used
Screwdriver, Pliers, Power Drill, Socket set, Wrench Set, Adjustable Wrench, impact driver
Parts Used
The compressor parts are metric but all the pipe fittings are standard (9/16, 11/16). So you will need both metric and standard wrenches.
To replace the switch:
1. Make sure the compressor is unplugged.
2. Remove the pressure switch cover. Disconnect all wires and label to ensure proper reconnection. An impact driver might be necessary to remove screws without stripping them. Remove or loosen any cord clamps on the pressure switch box. Pull cords out of pressure switch box. Set aside the cord end in a safe place.
3. Disconnect the nylon unloader line at the check valve (end of unloader line NOT connected to pressure switch, 12mm wrench). This will make the next steps easier.
4. Remove the pressure switch from the tank.
5. Remove the regulator, relief valve and gauge from the switch.
6. Disconnect the unloader line from the pressure switch. I thought about cutting the nylon line here but was concerned that it would end up too short. There are a couple different varieties of connection types. If you have a brass unloader valve where the nylon line connects to the pressure switch then you can take the unloader valve off the pressure switch by loosening a set screw in the switch body. To remove the nylon line from the unloader valve, the end of the valve where the line enters must be pressed into the valve, somewhat like a shark bite fitting. A pair of channel locks is helpful here.
This completes the disassembly.
Assembly:
Avoid using tape on these plumbing fittings. Instead use a liquid pipe thread sealant/lubricant. I had to redo several connections because they wouldn't seal with tape.
1. Install the unloader line: The unloader line can be connected to the valve on the pressure switch by pushing the line into the port until it clicks.
2. Install the regulator, relief valve, and pressure gauge on the pressure switch.
4. Install the pressure switch on the tank (no tape or sealant on this step). Connect the loose end of the unloader line to check valve.
5. Pull wires into pressure switch and connect as required. Clamp the cords. The new switch has clamps integral to the switch body so I didn't need the old clamps.
6. Replace the switch cover and you're done!
Compressor would build pressure and stop bud then drop some pressure and stall trying to start again removed old pressure Switch h and also
Tool Type
Compressor
Difficulty
Easy
Time
15-30 minutes
Tools Used
Screwdriver, Wrench Set, Adjustable Wrench
Parts Used
Compressor wouldn't start
Tool Type
Compressor
Difficulty
Easy
Time
15-30 minutes
Tools Used
Screwdriver, Wrench Set, None
Parts Used
Bad pressure switch
Tool Type
Compressor
Difficulty
Medium
Time
15-30 minutes
Tools Used
Screwdriver, Wrench Set
Parts Used
OEM stands for Original Equipment Manufacturer and means the part you’re buying is sourced directly from the manufacturer who made your product. At eReplacementParts, we sell only genuine OEM parts, guaranteeing the part you’re purchasing is of better design and of higher quality than aftermarket parts.
Our product descriptions are a combination of data sourced directly from the manufacturers who made your product as well as content researched and curated by our content & customer service teams. This content is edited and reviewed internally before being made public to customers.
Our customer service team are at the ready daily to answer your part and product questions. We have a dedicated staff with decades of collective experience in helping customers just like you purchase parts to repair their products.
All our part reviews are solicited directly from other customers who have purchased this exact part. While we moderate these reviews for profanity, offensive language or personally identifiable information, these reviews are posted exactly as submitted and no alterations are made by our team.
All our customer repair instructions are solicited directly from other customers just like you who have purchased and replaced this exact part. While we moderate these reviews for profanity, offensive language or personally identifiable information, these reviews are posted exactly as submitted and no alterations are made by our team.
Based on data from past customer purchasing behaviors, these parts are most commonly purchased together along with the part you are viewing. These parts may be necessary or helpful to replace to complete your current repair.
All our installation videos are created and produced in collaboration with our in-house repair technician, Mark Sodja, who has helped millions of eReplacementParts customers over the last 13 years repair their products. Mark has years of experience in selling and repairing both commercial and residential products with a specialty in gas-powered equipment.
This data is collected from customers who submitted a repair instruction after replacing this exact part. Customers can rate how easy the repair was to complete and how long it took. We aggregate this data to provide a repair rating that allows customers to quickly determine the difficulty and time needed to perform their own repair.