
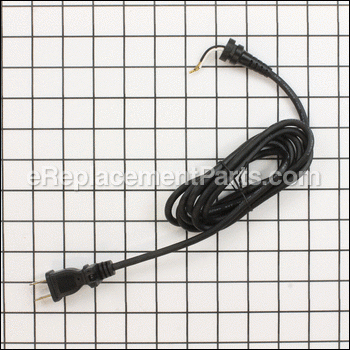
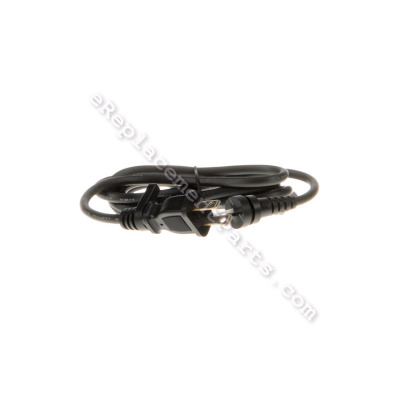


The power supply cord attaches to the electronic speed switch. This part is sold individually and is made of metal and plastic. This is an OEM Dremel item directly sourced from the manufacturer for use in rotary tools. A set of pliers might be necessary during the installation of this part. It will need to be replaced if it breaks or becomes frayed.
Power Supply Cord 2610005557
OEM part for: Dremel, Bosch
Part Number: 2610005557
$8.35
In Stock
Jump To:
Frequently Purchased Together ?
Compatibility
This part will fit the following 3 machines
Dremel
4000 Variable-Speeds Rotary Tool View Diagrams & Manuals
4300 (F013430000) Rotary Tool View Diagrams & Manuals
4000 (F013400001) Bare Tool 120v Usa 4000 View Diagrams & Manuals
This item works with the following types of products:
- Multi-Tool Parts
Customer Part Reviews ?
Average Rating (out of 5):
Click to filter by ratings:
5 stars
3
4 stars
0
3 stars
0
2 stars
0
1 stars
0
< PREV
- 1
exact match
Fit, easy install
Bradley -
March 2, 2023
Verified Purchase
Dremel 4000 Repair
Replacement Parts Fit and Performed as Originals. Fast Shipping. Great Price.
Guest -
November 4, 2021
Verified Purchase
Worked well. Perfect replacement
Part is OEM and fit perfectly. No issues. Would use again.
Guest -
September 12, 2020
Verified Purchase
t
t
t -
t days ago
Verified Purchase
eReplacementParts Team
t
Questions & Answers ?
Our customer Service team is at the ready daily to answer your part and product questions.

Ask our Team
We have a dedicated staff with decades of collective experience in helping customers just like you purchase parts to repair their products.
Does this fit my product?Questions & Answers for Power Supply Cord
No questions have been asked yet
Customer Repair Instructions ?
All our customer repair instructions are solicited directly from other customers just like you who have purchased and replaced this exact part.
The cord was broken
Loren - October 13, 2017
👍 1 of 1 people found this instruction helpful
Tool Type
MultiTool
Difficulty
Easy
Time
Less than 15 minutes
Tools Used
Screwdriver
Parts Used
Take screws out and open tool.
Loosen electrical connections.
Slide old cord out of holder.
Slide new cord in.
Place wires into contacts and tighten.
Close tool up again
Loosen electrical connections.
Slide old cord out of holder.
Slide new cord in.
Place wires into contacts and tighten.
Close tool up again
Did you find this story helpful?
Thanks for voting and helping fellow customers!
cord worn out near the Dremel body
Roger - May 20, 2022
Tool Type
MultiTool
Difficulty
Medium
Time
Less than 15 minutes
Tools Used
Screwdriver, Star tipped screwdriver
Parts Used
1 Removed caps that held in the brushes
2 removed body screws with star tipped screwdriver
3 carefully separated the body into two halves
4 exposed the ends of the power cord on the PC board
5 used screwdriver to loosen screws, remembering which colored wire goes in what slot.
6 Repeated the process in reverse for the assembly
2 removed body screws with star tipped screwdriver
3 carefully separated the body into two halves
4 exposed the ends of the power cord on the PC board
5 used screwdriver to loosen screws, remembering which colored wire goes in what slot.
6 Repeated the process in reverse for the assembly
Did you find this story helpful?
Thanks for voting and helping fellow customers!
nothing
Granville - April 28, 2021
Tool Type
MultiTool
Difficulty
Hard
Time
1-2 hours
Tools Used
Screwdriver
Took the Dremel tool apart.
removed the old power cord.
Put in new cord.
Parts kept falling of the tool.
Had to redo putting the cord in.
Repeated this about 6 times before it was all connected properly
removed the old power cord.
Put in new cord.
Parts kept falling of the tool.
Had to redo putting the cord in.
Repeated this about 6 times before it was all connected properly
Did you find this story helpful?
Thanks for voting and helping fellow customers!
Original cord frayed and unsafe
Jim - September 13, 2020
Tool Type
MultiTool
Difficulty
Medium
Time
Less than 15 minutes
Tools Used
Screwdriver
Parts Used
For Dremel multi-tool:
1) Unscrew the head part by chuck.
2) Remove screws keeping the 2 halves together.
3) Carefully separate the halves being careful not the allow parts to come out.
3) Look carefully at what goes where and how. If unsure take a picture. This is easy for
a more experienced DIY'er, but someone new should take their time.
4) Remove the original cord by loosening the 2 screws holding black and white wires. Do
not mix them up!
5) If circuit boards or other parts come loose carefully put them back. Note the slide
switch and how it engages with the internal lever switch.
6) Tuck cord relief into the dedicated recess.
7) Reassemble both halves. Do NOT force anything. If you need to something is not
properly lines up.
8) Installe screws and head piece. Test and try speed control.
Did you find this story helpful?
Thanks for voting and helping fellow customers!
Needed a new cord
Nicholas - August 16, 2017
Tool Type
MultiTool
Difficulty
Easy
Time
15-30 minutes
Tools Used
Screwdriver, Wrench Set
Parts Used
1. Unscrew two screws, on each on top and bottom of dremel, be careful things under it are spring loaded.
2. Remove useless metal clip.
3. Remove hex screws
4. Slide guitar pick or gift card to release clips. take care not to lose emergency stop button it is spring loaded
5. Detach screws holding power cord. make note of which color goes where.
6. Attach new power cable
7. Clip together lock body. be careful to pit emergency stop button back in place if it fell out.
8. Repeat steps 3-1 in reverse
Did you find this story helpful?
Thanks for voting and helping fellow customers!
Power cord had an open with the moulded strain relief
Brian - February 6, 2017
👍 0 of 1 people found this instruction helpful
Tool Type
MultiTool
Difficulty
Medium
Time
15-30 minutes
Tools Used
Screwdriver, Torx bits for screwdriver plus a flat blade screwdriver
Parts Used
1. Remove the screw on nose ring
2. Remove the wire bail used to hang the tool
3. Remove the screws securing the brushes 2 ea and remove brushes
4. Remove the Torx drive screws securing to tool shell halves and separate the shell halves
5. Be careful to not lose the spring under the shaft lock plunger
6. Loosen and remove the old cord wires
7. Install the new cord wires
8. Align the variable speed dial
9. Install the shaft lock plunger and spring
10. Ensure the off/on slider remained in place
11. Put the shell haves together and install the torx screws, wire bail and nose ring.
Did you find this story helpful?
Thanks for voting and helping fellow customers!
OEM stands for Original Equipment Manufacturer and means the part you’re buying is sourced directly from the manufacturer who made your product. At eReplacementParts, we sell only genuine OEM parts, guaranteeing the part you’re purchasing is of better design and of higher quality than aftermarket parts.
Our product descriptions are a combination of data sourced directly from the manufacturers who made your product as well as content researched and curated by our content & customer service teams. This content is edited and reviewed internally before being made public to customers.
Our customer service team are at the ready daily to answer your part and product questions. We have a dedicated staff with decades of collective experience in helping customers just like you purchase parts to repair their products.
All our part reviews are solicited directly from other customers who have purchased this exact part. While we moderate these reviews for profanity, offensive language or personally identifiable information, these reviews are posted exactly as submitted and no alterations are made by our team.
All our customer repair instructions are solicited directly from other customers just like you who have purchased and replaced this exact part. While we moderate these reviews for profanity, offensive language or personally identifiable information, these reviews are posted exactly as submitted and no alterations are made by our team.
Based on data from past customer purchasing behaviors, these parts are most commonly purchased together along with the part you are viewing. These parts may be necessary or helpful to replace to complete your current repair.
All our installation videos are created and produced in collaboration with our in-house repair technician, Mark Sodja, who has helped millions of eReplacementParts customers over the last 13 years repair their products. Mark has years of experience in selling and repairing both commercial and residential products with a specialty in gas-powered equipment.
This data is collected from customers who submitted a repair instruction after replacing this exact part. Customers can rate how easy the repair was to complete and how long it took. We aggregate this data to provide a repair rating that allows customers to quickly determine the difficulty and time needed to perform their own repair.