
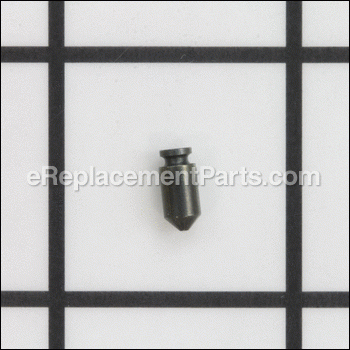
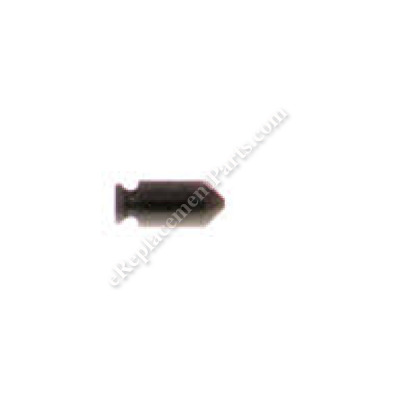


This authentic Makita replacement part is designed for use with impact wrenches. This pin fits in the anvil and it helps to hold sockets in place. This part is made out of metal and it is sold individually. To complete this repair you would need a screwdriver and pliers.
Pin 323675-1
OEM part for: Makita
Part Number: 323675-1
$3.99
In Stock
Jump To:
Frequently Purchased Together ?

Compatibility
This part will fit the following 82 machines
Makita
6905B Impact Wrench View Diagrams & Manuals
6905H Impact Driver View Diagrams & Manuals
6911HD Impact Wrench View Diagrams & Manuals
6910 Impact Wrench View Diagrams & Manuals
6918D Cordless Impact Wrench View Diagrams & Manuals
BTW200 Cordless Impact Wrench View Diagrams & Manuals
6953 Impact Wrench View Diagrams & Manuals
TW0200 Drive Impact Wrench View Diagrams & Manuals
TW0350 Drive Impact Wrench View Diagrams & Manuals
6934FDWDE 14V Cordless Impact Wrench View Diagrams & Manuals
6918FD Cordless Impact Wrench View Diagrams & Manuals
BTW251 18V LXT Lithium-Ion Cordless 1/2" Impact Wrench View Diagrams & Manuals
BTW450 18V LXT Lithium-Ion 1/2" Cordless Impact Wrench View Diagrams & Manuals
BTW151 14.4V Cordless 1/2" Impact Wrench View Diagrams & Manuals
BTW121 12V 1500mA Cordless Impact Wrench View Diagrams & Manuals
6992D 1/2" Impact Wrench View Diagrams & Manuals
BTW450Z 18V LXT Lithium-Ion Cordless 1/2" High Torque Impact Wrench View Diagrams & Manuals
XWT04 18V LXT Lithium-Ion High-Torque Impact Wrench Kit View Diagrams & Manuals
XWT04Z 18V LXT Lithium-Ion Cordless 1/2" High Torque Impact Wrench View Diagrams & Manuals
6911HDWA Drill / Driver View Diagrams & Manuals
6918FDWD Drill / Driver View Diagrams & Manuals
6918FDWDE Drill / Driver View Diagrams & Manuals
6934FD Drill / Driver View Diagrams & Manuals
6992DWDE Drill / Driver View Diagrams & Manuals
BTW120 Drill / Driver View Diagrams & Manuals
BTW121SA Drill / Driver View Diagrams & Manuals
BTW150 Drill / Driver View Diagrams & Manuals
BTW151SA Drill / Driver View Diagrams & Manuals
BTW151Z Drill / Driver View Diagrams & Manuals
BTW200SA (Type 1) Drill / Driver View Diagrams & Manuals
BTW200SH (Type 1) Drill / Driver View Diagrams & Manuals
BTW250 (Type 1) Drill / Driver View Diagrams & Manuals
BTW250 (Type 2) Drill / Driver View Diagrams & Manuals
BTW250 (Type 3) Drill / Driver View Diagrams & Manuals
BTW250 (Type 4) Drill / Driver View Diagrams & Manuals
BTW250Z (Type 1) Drill / Driver View Diagrams & Manuals
BTW250Z (Type 2) Drill / Driver View Diagrams & Manuals
BTW250Z (Type 3) Drill / Driver View Diagrams & Manuals
BTW250Z (Type 4) Drill / Driver View Diagrams & Manuals
BTW251F (Type 1) Drill / Driver View Diagrams & Manuals
BTW251F (Type 2) Drill / Driver View Diagrams & Manuals
BTW251F (Type 3) Drill / Driver View Diagrams & Manuals
BTW251F (Type 4) Drill / Driver View Diagrams & Manuals
BTW251FX1 (Type 1) Drill / Driver View Diagrams & Manuals
BTW251FX1 (Type 2) Drill / Driver View Diagrams & Manuals
BTW251FX1 (Type 3) Drill / Driver View Diagrams & Manuals
BTW251FX1 (Type 4) Drill / Driver View Diagrams & Manuals
BTW251 (Type 1) Drill / Driver View Diagrams & Manuals
BTW251 (Type 2) Drill / Driver View Diagrams & Manuals
BTW251 (Type 3) Drill / Driver View Diagrams & Manuals
BTW251 (Type 4) Drill / Driver View Diagrams & Manuals
BTW251X (Type 1) Drill / Driver View Diagrams & Manuals
BTW251X (Type 2) Drill / Driver View Diagrams & Manuals
BTW251X (Type 3) Drill / Driver View Diagrams & Manuals
BTW251X (Type 4) Drill / Driver View Diagrams & Manuals
BTW251Z (Type 1) Drill / Driver View Diagrams & Manuals
BTW251Z (Type 2) Drill / Driver View Diagrams & Manuals
BTW251Z (Type 3) Drill / Driver View Diagrams & Manuals
BTW251Z (Type 4) Drill / Driver View Diagrams & Manuals
BTW251ZX1 (Type 1) Drill / Driver View Diagrams & Manuals
BTW251ZX1 (Type 2) Drill / Driver View Diagrams & Manuals
BTW251ZX1 (Type 3) Drill / Driver View Diagrams & Manuals
BTW251ZX1 (Type 4) Drill / Driver View Diagrams & Manuals
BTW450F (Type 1) Drill / Driver View Diagrams & Manuals
BTW450F (Type 2) Drill / Driver View Diagrams & Manuals
BTW450FX1 (Type 1) Drill / Driver View Diagrams & Manuals
BTW450FX1 (Type 2) Drill / Driver View Diagrams & Manuals
BTW450 (Type 2) Drill / Driver View Diagrams & Manuals
BTW450X (Type 1) Drill / Driver View Diagrams & Manuals
BTW450X (Type 2) Drill / Driver View Diagrams & Manuals
BTW450Z (Type 1) Drill / Driver View Diagrams & Manuals
BTW450Z (Type 2) Drill / Driver View Diagrams & Manuals
BTW450ZX1 (Type 1) Drill / Driver View Diagrams & Manuals
BTW450ZX1 (Type 2) Drill / Driver View Diagrams & Manuals
XWT02M Drill / Driver View Diagrams & Manuals
XWT02MB Drill / Driver View Diagrams & Manuals
XWT02Z Drill / Driver View Diagrams & Manuals
XWT05 Drill / Driver View Diagrams & Manuals
XWT05Z Drill / Driver View Diagrams & Manuals
XWT11R Drill / Driver View Diagrams & Manuals
XWT11T Drill / Driver View Diagrams & Manuals
XWT11Z Drill / Driver View Diagrams & Manuals
Show More Compatible Models
This item works with the following types of products:
- Impact Wrench Parts
- Impact Driver Parts
This part replaces obsolete part #: 256091-1
Questions & Answers ?
Our customer Service team is at the ready daily to answer your part and product questions.

Ask our Team
We have a dedicated staff with decades of collective experience in helping customers just like you purchase parts to repair their products.
Does this fit my product?Questions & Answers for Pin
No questions have been asked yet
Customer Repair Instructions ?
All our customer repair instructions are solicited directly from other customers just like you who have purchased and replaced this exact part.
XWT04Z - Early models have the pin which makes any 1/2: socket too hard to release
Ben - December 4, 2015
👍 5 of 5 people found this instruction helpful
Tool Type
Impact Driver
Difficulty
Hard
Time
15-30 minutes
Tools Used
Screwdriver, Pliers, Pick, custom \\
Parts Used
I love LXT (and all) Makita tools. XWT04Z is a boss when it comes to removing big bolts, taking off tires, or whenever you need compact brute strength. The only issue with the tool was the retaining pin which keeps the socket on the tool. It was designed as a cylinder, instead of a ball as most other 1/2" socket tools utilize. This was a pain as you had to use another tool (small screwdriver, punch, etc) to depress the pin down in order to change sockets on the tool. When you are working on a vehicle this is a total bummer. I tried to modify the existing pin by grinding it down but that didn't work so well...sockets fell off too easily. I tried to call Makita to see if they would send me a replacement part but got disconnected. My time is valuable so I went on e-replacement parts and found what I needed instantly. When I looked at e-replacement parts for a replacement pin I saw that the part was changed (redesigned!), and wanted to try it out. Not too expensive and they shipped it right out.
It is difficult removing the spring and the small pin as there is minimal clearance to work with. I am sure there is a special service tool from Makita but that is not available. I tried to use pliers, picks, steel rod etc but the access hole from the front is too small. What finally did it was making a special "hook" tool out of a hacksaw blade. Using my bench grinder (i am sure you can use a file too just will take longer), you file down the hacksaw blade to make a small hook. With this special tool, you can now try to pull the retaining spring up towards the front of the tool. When it is almost out, you can snag it with a mechanic's pick and pull it out. The spring may be compromised so I suggest ordering a new one when you perform the service.
Installation is a snap. Insert the pin and push the spring in until it pops in place...way easier than removal. I am sure the current XWT04Z are fixed but if you have an early version, this pin will make your life so much easier. Way worth it.
Did you find this story helpful?
Thanks for voting and helping fellow customers!
Would not hold sockets
Will - November 12, 2015
👍 1 of 1 people found this instruction helpful
Tool Type
Impact Wrench
Difficulty
Medium
Time
Less than 15 minutes
Tools Used
Pliers
Parts Used
Push the pin into the side hole of the anvil, with point facing out. Press the clip in the top hole of the anvil, with the two ends going in first, and make sure the round part of the clip fits in the groove of the pin.
Did you find this story helpful?
Thanks for voting and helping fellow customers!
Pin fell out
jerry - February 8, 2019
Tool Type
Impact Wrench
Difficulty
Easy
Time
Less than 15 minutes
Tools Used
Screwdriver, Pliers
Parts Used
It was easy to replace the pin
Did you find this story helpful?
Thanks for voting and helping fellow customers!
Pin and spring came out that holds socket
KEITH - April 13, 2018
Tool Type
Impact Driver
Difficulty
Medium
Time
Less than 15 minutes
Tools Used
Screwdriver, Flat bar
Parts Used
Slid retainer spring into anvil cavity, push pin in and pulled spring up to retain pin. Took a few tries not as easy as it looks, but not difficult!!! No special instructions.
Did you find this story helpful?
Thanks for voting and helping fellow customers!
Push style detent was a hassle
Amaury - February 6, 2017
Tool Type
Impact Wrench
Difficulty
Medium
Time
Less than 15 minutes
Tools Used
Screwdriver, Pliers
Parts Used
My Makita XWT04Z came with the detent that you needed to have a small screwdriver to remove the sockets and made it more of a struggle to change sockets on the fly, came across eReplacementParts and found they had the replacement detent I needed. Install was a breeze, you just need needle nose pliers and a pick set to remove the inner spring of the anvil and you are done. overall it was very simple and made my impact feel newer.
Did you find this story helpful?
Thanks for voting and helping fellow customers!
OEM stands for Original Equipment Manufacturer and means the part you’re buying is sourced directly from the manufacturer who made your product. At eReplacementParts, we sell only genuine OEM parts, guaranteeing the part you’re purchasing is of better design and of higher quality than aftermarket parts.
Our product descriptions are a combination of data sourced directly from the manufacturers who made your product as well as content researched and curated by our content & customer service teams. This content is edited and reviewed internally before being made public to customers.
Our customer service team are at the ready daily to answer your part and product questions. We have a dedicated staff with decades of collective experience in helping customers just like you purchase parts to repair their products.
All our part reviews are solicited directly from other customers who have purchased this exact part. While we moderate these reviews for profanity, offensive language or personally identifiable information, these reviews are posted exactly as submitted and no alterations are made by our team.
All our customer repair instructions are solicited directly from other customers just like you who have purchased and replaced this exact part. While we moderate these reviews for profanity, offensive language or personally identifiable information, these reviews are posted exactly as submitted and no alterations are made by our team.
Based on data from past customer purchasing behaviors, these parts are most commonly purchased together along with the part you are viewing. These parts may be necessary or helpful to replace to complete your current repair.
All our installation videos are created and produced in collaboration with our in-house repair technician, Mark Sodja, who has helped millions of eReplacementParts customers over the last 13 years repair their products. Mark has years of experience in selling and repairing both commercial and residential products with a specialty in gas-powered equipment.
This data is collected from customers who submitted a repair instruction after replacing this exact part. Customers can rate how easy the repair was to complete and how long it took. We aggregate this data to provide a repair rating that allows customers to quickly determine the difficulty and time needed to perform their own repair.