


Genuine Makita replacement part, this item is sold individually.
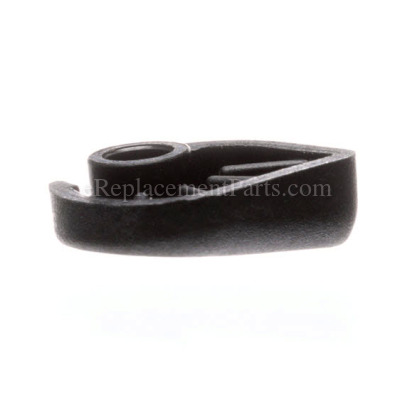
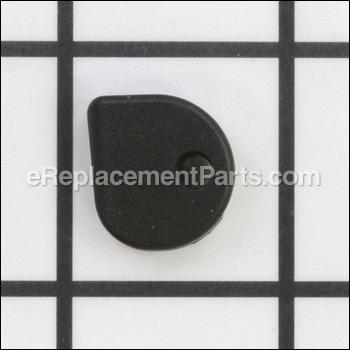
The Pin Cap is part of the spindle lock assembly for the Makita Tool model numbers shown below.
When it is pressed it will stop the spindle from rotating, so that a grinding wheel or blade can be removed or installed.
Pin Cap 417771-6
OEM part for: Makita
Part Number: 417771-6
$4.99
In Stock
Jump To:
Product Description ?
- Classification: Part
- Weight: 0.01 lbs.
- Shipping: Ships Worldwide
Frequently Purchased Together ?


Compatibility
This part will fit the following 70 machines
Makita
9558NB Angle Grinder View Diagrams & Manuals
9558PB Angle Grinder View Diagrams & Manuals
9557NB Angle Grinder View Diagrams & Manuals
9557PB Angle Grinder View Diagrams & Manuals
9554NB Angle Grinder View Diagrams & Manuals
9553NB Angle Grinder View Diagrams & Manuals
BGA452 Angle Grinder View Diagrams & Manuals
GA6010Z 10.5A 6" Cutoff / Angle Grinder View Diagrams & Manuals
GA5020 10.5A 5" SJS Angle Grinder View Diagrams & Manuals
GA5010Z 10.5A 5" Angle Grinder View Diagrams & Manuals
GA4030K 4" Angle Grinder View Diagrams & Manuals
BGA452Z 18V LXT Lithium-Ion Cordless 4-1/2" Cut-Off/Angle Grinder View Diagrams & Manuals
GA4530 4-1/2" Angle Grinder View Diagrams & Manuals
GA4534 Paddle Switch Angle Grinder View Diagrams & Manuals
GA5020Y Super Joint Angle Grinder View Diagrams & Manuals
PC5000C Concrete Planer View Diagrams & Manuals
PC5001C Concrete Planer View Diagrams & Manuals
PJ7000 Plate Joiner View Diagrams & Manuals
GA4030 4" Angle Grinder View Diagrams & Manuals
GA6020 6" Angle Grinder View Diagrams & Manuals
XAG01 18V LXT Lithium-Ion Cordless Grinder Kit View Diagrams & Manuals
XAG01Z 18V LXT Lithium-Ion 4-1/2" Cut-Off/Angle Grinder View Diagrams & Manuals
9553B Grinder View Diagrams & Manuals
9553NBK Grinder View Diagrams & Manuals
9554NBK Grinder View Diagrams & Manuals
9555NB Grinder View Diagrams & Manuals
9555NBK Grinder View Diagrams & Manuals
9557NB2 Grinder View Diagrams & Manuals
9557PBX1 Grinder View Diagrams & Manuals
9558HN Grinder View Diagrams & Manuals
BGA450Z (Type 1) Grinder View Diagrams & Manuals
BGA450Z (Type 2) Grinder View Diagrams & Manuals
BGA452F (Type 1) Grinder View Diagrams & Manuals
BGA452F (Type 2) Grinder View Diagrams & Manuals
BGA452F (Type 3) Grinder View Diagrams & Manuals
BGA452 (Type 2) Grinder View Diagrams & Manuals
BGA452 (Type 3) Grinder View Diagrams & Manuals
BGA452Z (Type 1) Grinder View Diagrams & Manuals
BGA452Z (Type 2) Grinder View Diagrams & Manuals
BGA452Z (Type 3) Grinder View Diagrams & Manuals
GA4530X Grinder View Diagrams & Manuals
GA5010 Grinder View Diagrams & Manuals
GA5030K (Type 1) Grinder View Diagrams & Manuals
GA5030K (Type 2) Grinder View Diagrams & Manuals
GA5030K (Type 3) Grinder View Diagrams & Manuals
GA6010 Grinder View Diagrams & Manuals
GA6010ZX2 Grinder View Diagrams & Manuals
GA6020YX1 Grinder View Diagrams & Manuals
LXJP02 (Type 1) Misc View Diagrams & Manuals
LXJP02 (Type 2) Misc View Diagrams & Manuals
LXJP02Z (Type 1) Misc View Diagrams & Manuals
LXJP02Z (Type 2) Misc View Diagrams & Manuals
MT951 Grinder View Diagrams & Manuals
XAG03M Grinder View Diagrams & Manuals
XAG03MB Grinder View Diagrams & Manuals
XAG03Z Grinder View Diagrams & Manuals
XAG04T Grinder View Diagrams & Manuals
XAG04Z Grinder View Diagrams & Manuals
XAG06M Grinder View Diagrams & Manuals
XAG06MB Grinder View Diagrams & Manuals
XAG06Z Grinder View Diagrams & Manuals
XAG09Z Grinder View Diagrams & Manuals
XAG10M Grinder View Diagrams & Manuals
XAG10Z Grinder View Diagrams & Manuals
XAG11Z Grinder View Diagrams & Manuals
XAG16Z Grinder View Diagrams & Manuals
XAG17ZU Grinder View Diagrams & Manuals
XAG20Z Grinder View Diagrams & Manuals
XAG21ZU Grinder View Diagrams & Manuals
XJP03Z Misc View Diagrams & Manuals
Show More Compatible Models
This item works with the following types of products:
- Grinder Parts
- Planer Parts
- Plate Joiner Parts
Repair Videos ?
Watch the Repair Video for
Pin Cap

Articles:
|
Lock button broken? Learn to quickly remove and install the lock button pin cap on your Makita grinder. Step-by-step ins...
December 01, 2015
|

Customer Part Reviews ?
Average Rating (out of 5):
Click to filter by ratings:
5 stars
4
4 stars
0
3 stars
0
2 stars
0
1 stars
1
< PREV
- 1
Replaced my lost cap, snapped right into place.
Worked just as expected, easy to replace missing cap.
Charles -
July 15, 2021
Verified Purchase
worked like a charm
Could not be more pleased.
Guest -
December 14, 2019
Verified Purchase
Great fit easy installation
Great fit easy installation Fits like new part should!!
Guest -
November 25, 2019
Verified Purchase
easy repair
Exact replacement part, easy install
Doug -
October 15, 2019
Verified Purchase
Bad customer support
Was shipped two of the same part, instead of the two parts I needed. Tiny parts. Called to fix my order and the lady on the phone said it'll be more expensive to ship my part back then it was with, and that it'll cost me $10 to get my tiny O-Ring I needed, and ordered originally but never got. Maybe computer problem? But didn't work w me at all to fix it and just wanted more $$$. Disappointed
Guest -
April 7, 2022
Verified Purchase
eReplacementParts Team
Thank you for your review. I?m sorry to hear that happened, we will be in touch soon to help fix this issue.
t
t
t -
t days ago
Verified Purchase
eReplacementParts Team
t
Questions & Answers ?
Our customer Service team is at the ready daily to answer your part and product questions.

Ask our Team
We have a dedicated staff with decades of collective experience in helping customers just like you purchase parts to repair their products.
Does this fit my product?Questions & Answers for Pin Cap
No questions have been asked yet
Customer Repair Instructions ?
All our customer repair instructions are solicited directly from other customers just like you who have purchased and replaced this exact part.
Spindle lock button broken.
Nir - June 12, 2016
👍 2 of 3 people found this instruction helpful
Tool Type
Grinder
Difficulty
Easy
Time
Less than 15 minutes
Tools Used
Screwdriver, Channel lock pliers.
Parts Used
When I viewed the you tube video on this replacement part. I had the repair done in minutes. Thanks. This is the video I viewed. https://www.youtube.com/watch?v=GRioBAjj5pw
Did you find this story helpful?
Thanks for voting and helping fellow customers!
Grinder lock pin cap & spring disappeared
U&I - May 22, 2022
Tool Type
Grinder
Difficulty
Easy
Time
Less than 15 minutes
Tools Used
, Hands
10 seconds..push the other one on
Did you find this story helpful?
Thanks for voting and helping fellow customers!
Locking pin broke
steven - March 24, 2022
Tool Type
Grinder
Difficulty
Easy
Time
15-30 minutes
Tools Used
Screwdriver, Pliers
Followed video on your website. Very helpful
Did you find this story helpful?
Thanks for voting and helping fellow customers!
Pin cap came off the pin that holds the gear while removing or installing grinding discs. The reason is that the hole Where the pin goes through the housing was warn.
William - April 12, 2020
Tool Type
Grinder
Difficulty
Easy
Time
Less than 15 minutes
Tools Used
Screwdriver, Pliers, Expandable pliers
Removed the guard, then removed the 4 phillips screws from the housing. I Put a little grease on the gears. I Seated the o-ring inside the housing (seat is Inside where the pin goes through the housing) Then I put the pin in the hole (grooved end out) with a small amount of grease on the pin to hold it in place while you replace the housing. Once you screw the housing down, then rotate the shaft to be sure the pin is not in the locked position so that it is protruding from the hole as far as it can. Place the spring over the pin, and place the cap on, aligning the hole over the pin, then take the adjustable pliers and clamp down until the cap pops onto the pin. Reattach the guard.
Did you find this story helpful?
Thanks for voting and helping fellow customers!
The button pressed to lock the wheel broke off, making the grinder unusable, (without button and spring the wheel lock could engage while grinder wheel was spinning, making it dangerous and unusable
Saul - September 6, 2019
Tool Type
Grinder
Difficulty
Easy
Time
Less than 15 minutes
Tools Used
Screwdriver, Hammer
Did you find this story helpful?
Thanks for voting and helping fellow customers!
the pushpin that locked the wheel chuck broke
Richard - April 8, 2019
Tool Type
Grinder
Difficulty
Easy
Time
Less than 15 minutes
Tools Used
Screwdriver, Pliers, vise
took out the old parts and replaced with new
Did you find this story helpful?
Thanks for voting and helping fellow customers!
Cover cap fell off
John - March 5, 2019
Tool Type
Grinder
Difficulty
Easy
Time
Less than 15 minutes
Tools Used
, Brass punch & hammer
Parts Used
Put spring over pin, cap on top of spring, lightly tapped with punch & hammer.
Did you find this story helpful?
Thanks for voting and helping fellow customers!
DRIVEN GEAR TEETH CHIPPED
JOSH - January 7, 2019
Tool Type
Grinder
Difficulty
Easy
Time
Less than 15 minutes
Tools Used
Screwdriver, Wrench Set, SNAP RING PLIERS AND VICE GRIPS
REMOVED 4 SCREWS HOLDING ON THE DRIVEN GEAR HOUSING AND REMOVED FROM TOOL.
CLEANED GREASE FROM GEAR.
REMOVED SNAP RING.
REMOVED DAMAGED DRIVEN GEAR AND INSTALLED NEW DRIVEN GEAR.
REINSTALLED SNAP RING.
REMOVED NOSE HOUSING.
CLEANED GREASE FROM INSIDE HOUSING AND DRIVE GEAR
USED VICE GRIPS TO HOLD GEAR AND 10 MM WRENCH TO REMOVE NUT.
REMOVED OLD DRIVE GEAR AND INSTALLED NEW DRIVE GEAR.
REINSTALLED NUT.
USED SEMI-FLUID GREASE TO LUBE GEARS.
REINSTALLED HOUSINGS.
Did you find this story helpful?
Thanks for voting and helping fellow customers!
OEM stands for Original Equipment Manufacturer and means the part you’re buying is sourced directly from the manufacturer who made your product. At eReplacementParts, we sell only genuine OEM parts, guaranteeing the part you’re purchasing is of better design and of higher quality than aftermarket parts.
Our product descriptions are a combination of data sourced directly from the manufacturers who made your product as well as content researched and curated by our content & customer service teams. This content is edited and reviewed internally before being made public to customers.
Our customer service team are at the ready daily to answer your part and product questions. We have a dedicated staff with decades of collective experience in helping customers just like you purchase parts to repair their products.
All our part reviews are solicited directly from other customers who have purchased this exact part. While we moderate these reviews for profanity, offensive language or personally identifiable information, these reviews are posted exactly as submitted and no alterations are made by our team.
All our customer repair instructions are solicited directly from other customers just like you who have purchased and replaced this exact part. While we moderate these reviews for profanity, offensive language or personally identifiable information, these reviews are posted exactly as submitted and no alterations are made by our team.
Based on data from past customer purchasing behaviors, these parts are most commonly purchased together along with the part you are viewing. These parts may be necessary or helpful to replace to complete your current repair.
All our installation videos are created and produced in collaboration with our in-house repair technician, Mark Sodja, who has helped millions of eReplacementParts customers over the last 13 years repair their products. Mark has years of experience in selling and repairing both commercial and residential products with a specialty in gas-powered equipment.
This data is collected from customers who submitted a repair instruction after replacing this exact part. Customers can rate how easy the repair was to complete and how long it took. We aggregate this data to provide a repair rating that allows customers to quickly determine the difficulty and time needed to perform their own repair.