


Natural Gas
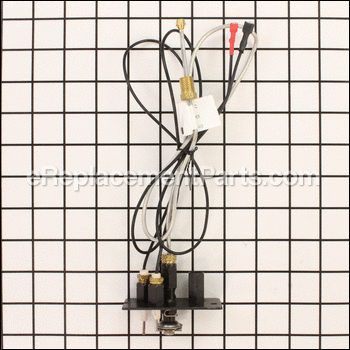
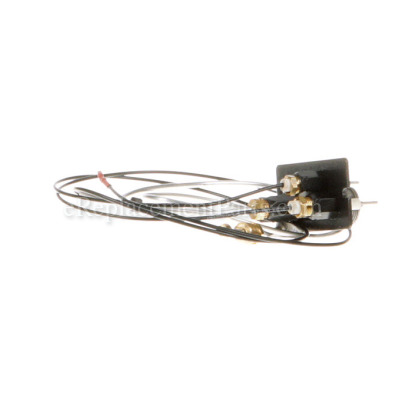
Pilot Assembly, Sit Top Conver 10002387
OEM part for: Majestic
Part Number: 10002387
$121.99
Usually ships in 7 - 12 business days
7 - 12 business days
Compatibility
This part will fit the following 22 machines
Majestic
33BDVR BDVR Series Direct Vent Gas Fireplace View Diagrams & Manuals
36BDVR BDVR Series Direct Vent Gas Fireplace View Diagrams & Manuals
39BDVR BDVR Series Direct Vent Gas Fireplace View Diagrams & Manuals
43BDVR BDVR Series Direct Vent Gas Fireplace View Diagrams & Manuals
33LDVR LDVR Series Direct Vent Gas Fireplace View Diagrams & Manuals
36LDVR LDVR Series Direct Vent Gas Fireplace View Diagrams & Manuals
39LDVR LDVR Series Direct Vent Gas Fireplace View Diagrams & Manuals
43LDVR LDVR Series Direct Vent Gas Fireplace View Diagrams & Manuals
NVBC36 NVB Series B-Vent Gas Fireplace View Diagrams & Manuals
NVBR36 NVB Series B-Vent Gas Fireplace View Diagrams & Manuals
NVBR42 NVB Series B-Vent Gas Fireplace View Diagrams & Manuals
NVBC42 NVB Series B-Vent Gas Fireplace View Diagrams & Manuals
DV580 Direct Vent Gas Fireplace View Diagrams & Manuals
DV360 Direct Vent Gas Fireplace View Diagrams & Manuals
DVRT36 Direct Vent Fireplace View Diagrams & Manuals
DVRT39 Direct Vent Fireplace View Diagrams & Manuals
DVRT43 Direct Vent Fireplace View Diagrams & Manuals
33LDVT Builder Top Vent Direct Vent Fireplace View Diagrams & Manuals
36LDVT Builder Top Vent Direct Vent Fireplace View Diagrams & Manuals
39LDVT Builder Top Vent Direct Vent Fireplace View Diagrams & Manuals
43LDVT Builder Top Vent Direct Vent Fireplace View Diagrams & Manuals
360DVS3 Multisided Top/Rear Vent Convertible Fireplace View Diagrams & Manuals
Show More Compatible Models
This item works with the following types of products:
- Fireplace Parts
Repair Videos ?

Articles:
|
Having trouble getting your grill to light up? A common cause of this issue is a defective ignition switch. We'll sho...
November 08, 2012
|

Customer Part Reviews ?
Average Rating (out of 5):
Click to filter by ratings:
5 stars
1
4 stars
0
3 stars
0
2 stars
0
1 stars
0
< PREV
- 1
Return
Ordered a pilot assembly but it wouldn’t fit. Returned with NO hassle. Great service. Definitely recommend.
Guest -
March 21, 2023
Verified Purchase
t
t
t -
t days ago
Verified Purchase
eReplacementParts Team
t
Questions & Answers ?
Our customer Service team is at the ready daily to answer your part and product questions.

Ask our Team
We have a dedicated staff with decades of collective experience in helping customers just like you purchase parts to repair their products.
Does this fit my product?Questions & Answers for Pilot Assembly, Sit Top Conver
No questions have been asked yet
Customer Repair Instructions ?
All our customer repair instructions are solicited directly from other customers just like you who have purchased and replaced this exact part.
Gas fireplace auto-ignition not working -- Replaced with Majestic pilot assembly SIT 10002387
Robert - April 14, 2018
👍 1 of 1 people found this instruction helpful
Tool Type
Fireplace
Difficulty
Medium
Time
30-60 minutes
Tools Used
Screwdriver, Wrench Set, Liquid dish soap
Parts Used
Please forgive my detailed explanation in advance.
1. Ensured power was off to the unit at the wall switch--probably should have shut of breaker for the living room.
2. The fireplace has 3 sections--a louver unit over the glass, the glass cover and louver section below the glass
3. All of them well need to be removed/accessed for this repair.
4. Open lower louver panel, just pull down on it, locate gas line and turn it off--usually 90 degrees to gas line
5.Removed glass cover to unit--to do this you remove metal louver over glass cover-just lift up on both sides, then unsnap hardware under the lower louver section which secures the glass cover--remove glass cover
6. Remove fireplace logs--take pix prior so u can put it back correctly
7. Remove front metal panel in front of gas burner unit--2 screws hold this in place
8. Pilot assembly is located on upper right side of the unit when looking from the front.
9. Three screws hold it in place, along with high temp silicon caulk. Make sure you notice the bracket arm (closest to the front of the assembly unit) securing the pilot assembly to the bracket goes UNDER, not on top when reinstalling it.
10. Remove screws and pry out old caulk
11. The pilot assembly SIT unit has a gas line connector with threaded hex nut, thermocouple wire and the electrode ignitor wire
12. After freeing the pilot assembly unit, trace the connecting wires/line to each component down under the lower louver section
13. Disconnect the two electrical connections (from wire connectors) and the gas line using a fitted open ended wrench. You might want to tag the wiring with tape to ensure you hook them back up to the right place. The black wire is usually the hot wire and will connect to a black box (ignition control unit) to the left under the gas burner unit. The connection is on the top and you will need a dental mirror to see it or just feel for it and remove the wire.
14. Remove the old SIT pilot assembly. Match this up with the new part to ensure you have the right part.
15. Insert the new assembly and tighten with the three screws removed earlier. NOTE, flange goes under NOT over the screw hole on pilot assembly.
16. Attach the two electrical wires to the their connectors. Just push together for tight fit.
17. Attach the gas line (metal like wiring) to the gas inlet with wrench. Use fingers to do this first to ensure it is threaded correctly and tighten with wrench. Be careful here not to tighten to much. I kept track of how tight it was to remove as my guide when reinstalling this brass hex nut.
18. Using liquid soap and q-tip spread soap over the connection. Turn gas line back on and look for any bubbles indicating escaping gas. Tighten till you do not observe any bubbles after a minute or so.
19. Using high temp silicon caulk (auto parts store has small tubes) fill the hole where the wiring goes through to the lower section part of the fireplace unit. Take 24 hours to cure. Make sure all screws are tight connecting the new pilot assembly.
20. Reinstall all parts removed earlier and place logs. Rehang front glass panel (may need to move it horizontally to get it to hang without binding). Install upper louver unit. Secure glass front with clamps inside lower louver.Close lower louver unit.
Flip the switch on the wall and check to see if the unit ignites. Should be within 5 seconds or so.
Did you find this story helpful?
Thanks for voting and helping fellow customers!
OEM stands for Original Equipment Manufacturer and means the part you’re buying is sourced directly from the manufacturer who made your product. At eReplacementParts, we sell only genuine OEM parts, guaranteeing the part you’re purchasing is of better design and of higher quality than aftermarket parts.
Our product descriptions are a combination of data sourced directly from the manufacturers who made your product as well as content researched and curated by our content & customer service teams. This content is edited and reviewed internally before being made public to customers.
Our customer service team are at the ready daily to answer your part and product questions. We have a dedicated staff with decades of collective experience in helping customers just like you purchase parts to repair their products.
All our part reviews are solicited directly from other customers who have purchased this exact part. While we moderate these reviews for profanity, offensive language or personally identifiable information, these reviews are posted exactly as submitted and no alterations are made by our team.
All our customer repair instructions are solicited directly from other customers just like you who have purchased and replaced this exact part. While we moderate these reviews for profanity, offensive language or personally identifiable information, these reviews are posted exactly as submitted and no alterations are made by our team.
Based on data from past customer purchasing behaviors, these parts are most commonly purchased together along with the part you are viewing. These parts may be necessary or helpful to replace to complete your current repair.
All our installation videos are created and produced in collaboration with our in-house repair technician, Mark Sodja, who has helped millions of eReplacementParts customers over the last 13 years repair their products. Mark has years of experience in selling and repairing both commercial and residential products with a specialty in gas-powered equipment.
This data is collected from customers who submitted a repair instruction after replacing this exact part. Customers can rate how easy the repair was to complete and how long it took. We aggregate this data to provide a repair rating that allows customers to quickly determine the difficulty and time needed to perform their own repair.