
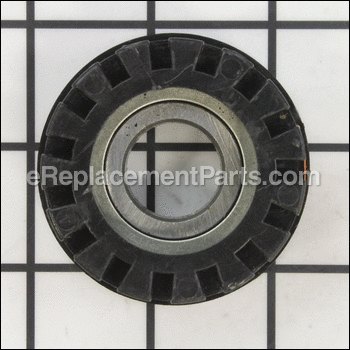
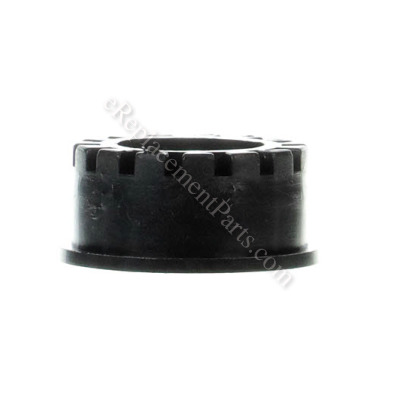


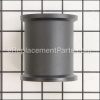
This is an Authentic OEM Sourced replacement part designed for use with Ellipticals. This part is made out of Plastic and Metal. This Bushing is Sold Individually. This part sits on the outer side of the Pedal Arm Sleeve and it allows it to spin smoothly.
To replace this part you would need Pliers and Hex Key/Allen Wrench.
Outside Crank Bushing 244067
OEM part for: NordicTrack, ProForm, Freemotion, HealthRider, Golds Gym
Part Number: 244067
$24.56
In Stock
Jump To:
Product Description ?
- Classification: Part
- Weight: 0.15 lbs.
- Shipping: Ships Worldwide
Frequently Purchased Together ?


Compatibility
This part will fit the following 67 machines
NordicTrack
NTEL77060 Audiostride 800 Elliptical View Diagrams & Manuals
236671 Audiostrider 800 Elliptical View Diagrams & Manuals
NTEL77062 Audiostrider 800 Elliptical View Diagrams & Manuals
NTEL79060 Audiostrider 990 Elliptical View Diagrams & Manuals
NTEL79061 Audiostrider 990 Elliptical View Diagrams & Manuals
NTEL79062 Audiostrider 990 Elliptical View Diagrams & Manuals
NTEL79063 Audiostrider 990 Elliptical View Diagrams & Manuals
NTEL79064 Audiostrider 990 Elliptical View Diagrams & Manuals
NTEL079100 Elliptical E7.1 View Diagrams & Manuals
NTEL079101 Elliptical E7.1 View Diagrams & Manuals
NTEL079102 Elliptical E7.1 View Diagrams & Manuals
NTEL091090 Audiostrider 990 Pro Elliptical View Diagrams & Manuals
NTEL091091 Audiostrider 990 Pro Elliptical View Diagrams & Manuals
NTEL091092 Audiostrider 990 Pro Elliptical View Diagrams & Manuals
NTEL091093 Audiostrider 990 Pro Elliptical View Diagrams & Manuals
NTEL091094 Audiostrider 990 Pro Elliptical View Diagrams & Manuals
NTEL091095 Audiostrider 990 Pro Elliptical View Diagrams & Manuals
NTEL091096 Audiostrider 990 Pro Elliptical View Diagrams & Manuals
NTEL009090 Pathfinder Elliptical View Diagrams & Manuals
NTEL009091 Pathfinder Elliptical View Diagrams & Manuals
NTEL009092 Pathfinder Elliptical View Diagrams & Manuals
NTEL009093 Pathfinder Elliptical View Diagrams & Manuals
NTEL009094 Pathfinder Elliptical View Diagrams & Manuals
298260 E7.1 Elliptical View Diagrams & Manuals
301920 Audiostrider 990 Pro Elliptical View Diagrams & Manuals
301921 Audiostrider 990 Pro Elliptical View Diagrams & Manuals
301922 Audiostrider 990 Pro Elliptical View Diagrams & Manuals
307080 Audiostrider 990 Elliptical View Diagrams & Manuals
307082 Audiostrider 990 Elliptical View Diagrams & Manuals
307250 Audiostrider 800 Elliptical View Diagrams & Manuals
307252 Audiostrider 800 Elliptical View Diagrams & Manuals
NTEVEL812100 E 12.0 Elliptical View Diagrams & Manuals
NTEVEL812101 E 12.0 Elliptical View Diagrams & Manuals
NTEVEL812102 E 12.0 Elliptical View Diagrams & Manuals
NTEVEL879101 E7.0 Elliptical View Diagrams & Manuals
NTEVEL899091 E10 Rear Drive Elliptical View Diagrams & Manuals
NTEVEL899092 E10 Rear Drive Elliptical View Diagrams & Manuals
NTEVEL909100 E11.0 Elliptical View Diagrams & Manuals
NTEVEL990070 Audiostrider 900 Elliptical View Diagrams & Manuals
NTEL098090 Elliptical View Diagrams & Manuals
NTEL77061 AudioStrider 800 View Diagrams & Manuals
23667.0 Audiostride 800 Elliptical View Diagrams & Manuals
23667.2 Audiostrider 800 Elliptical View Diagrams & Manuals
23669.0 Audiostrider 990 Elliptical View Diagrams & Manuals
23669.1 Audiostrider 990 Elliptical View Diagrams & Manuals
23669.2 Audiostrider 990 Elliptical View Diagrams & Manuals
23669.3 Audiostrider 990 Elliptical View Diagrams & Manuals
23669.4 Audiostrider 990 Elliptical View Diagrams & Manuals
ProForm
PFEL649110 410 Ce Elliptical View Diagrams & Manuals
PFEL779080 Spacesaver Dx Elliptical View Diagrams & Manuals
PFEL18012.0 14.0 Re Elliptical View Diagrams & Manuals
PFEL18012.2 14.0 Re Elliptical View Diagrams & Manuals
Freemotion
SFCCEL160102 Elliptical View Diagrams & Manuals
SFEL160090 Rear Drive Elliptical View Diagrams & Manuals
SFEL910090 E4.2 Elliptical View Diagrams & Manuals
SFEL910091 E4.2 Elliptical View Diagrams & Manuals
SMEL160110 510 Elliptical View Diagrams & Manuals
SFEL160091 XTE Rear Drive Elliptical View Diagrams & Manuals
SFEL160093 XTE Rear Drive Elliptical View Diagrams & Manuals
SFEL160095 XTE Rear Drive Elliptical View Diagrams & Manuals
SFEL160100 500 Elliptical View Diagrams & Manuals
SFEL160101 500 Elliptical View Diagrams & Manuals
SFEL160110 510 Elliptical View Diagrams & Manuals
SFCCEL160100 Rear Drive Elliptical View Diagrams & Manuals
SFCCEL160101 Rear Drive Elliptical View Diagrams & Manuals
HealthRider
HREL59808.0 H90e Elliptical View Diagrams & Manuals
Golds Gym
GGEL68108.0 Maxx Stridetrainer 880 Elliptical View Diagrams & Manuals
Show More Compatible Models
This item works with the following types of products:
- Elliptical Parts
Customer Part Reviews ?
Average Rating (out of 5):
Click to filter by ratings:
5 stars
3
4 stars
0
3 stars
0
2 stars
0
1 stars
0
< PREV
- 1
Easy repair.
The Outside Crank Bushing arrived quickly and was easy to install. The elliptical works great again.
Guest -
June 28, 2021
Verified Purchase
Perfect fit OEM.
Perfect fit OEM. Reasonable price and quickly shipped. A+
Guest -
January 29, 2021
Verified Purchase
EReplacement is very easy to use
EReplacement is very easy to use and has the parts I need.
Guest -
August 5, 2020
Verified Purchase
t
t
t -
t days ago
Verified Purchase
eReplacementParts Team
t
Questions & Answers ?
Our customer Service team is at the ready daily to answer your part and product questions.

Ask our Team
We have a dedicated staff with decades of collective experience in helping customers just like you purchase parts to repair their products.
Does this fit my product?Questions & Answers for Outside Crank Bushing
No questions have been asked yet
Customer Repair Instructions ?
All our customer repair instructions are solicited directly from other customers just like you who have purchased and replaced this exact part.
Pedal arm sleeve broke on both arms. Replaced bushing as a precaution.
David - September 20, 2018
👍 1 of 1 people found this instruction helpful
Tool Type
Elliptical
Difficulty
Easy
Time
Less than 15 minutes
Tools Used
, Allen wrench
1. Remove Allen screw and cap that covers bushing and sleeve.
2. Slide bushing and sleeve off shaft.
3. Install bushing and then sleeve.
4. Reattach cap and Allen screw.
2. Slide bushing and sleeve off shaft.
3. Install bushing and then sleeve.
4. Reattach cap and Allen screw.
Did you find this story helpful?
Thanks for voting and helping fellow customers!
Pedal sleeve and axle cover cracked
Jay - June 7, 2017
👍 1 of 1 people found this instruction helpful
Tool Type
Elliptical
Difficulty
Easy
Time
Less than 15 minutes
Tools Used
, Allen wrench
Removed the locking allen screw from post
Slid old sleeve assembly off
Removed good inside bearing and put into new sleeve
Put new outside bearing into sleeve
Slid new assembly back onto post with new cover on outside
Put screw back on and tightened
Slid old sleeve assembly off
Removed good inside bearing and put into new sleeve
Put new outside bearing into sleeve
Slid new assembly back onto post with new cover on outside
Put screw back on and tightened
Did you find this story helpful?
Thanks for voting and helping fellow customers!
Bushing went bad
lorietta - February 18, 2024
Tool Type
Elliptical
Difficulty
Easy
Time
15-30 minutes
Tools Used
, Allen wrench
Parts Used
Removed old bushing and it was simple to slide the new one in.
I took an Allen wrench and put the face plate back on
I took an Allen wrench and put the face plate back on
Did you find this story helpful?
Thanks for voting and helping fellow customers!
Holder of leg arms wore out
tim - February 23, 2021
Tool Type
Elliptical
Difficulty
Easy
Time
Less than 15 minutes
Tools Used
Screwdriver
Took off existing bad parts in order. Laid out the new parts and put them back on in reverse order. Took less than 15 minutes
Did you find this story helpful?
Thanks for voting and helping fellow customers!
Bushing broke
Richard - January 14, 2019
Tool Type
Elliptical
Difficulty
Easy
Time
15-30 minutes
Tools Used
, Allen wrench
Removed old bushing and replaced
Did you find this story helpful?
Thanks for voting and helping fellow customers!
Rear spindle wore out, and it allowed crank to slide off.
Forest - March 16, 2018
Tool Type
Elliptical
Difficulty
Easy
Time
15-30 minutes
Tools Used
, Allen wrench
1. Removed broken parts.
2. Compared parts to supplied diagram on ereplacement parts and ordered replacements.
3. Assembled new parts using unbroken side as a guide.
2. Compared parts to supplied diagram on ereplacement parts and ordered replacements.
3. Assembled new parts using unbroken side as a guide.
Did you find this story helpful?
Thanks for voting and helping fellow customers!
Gears wore out causing damage to the other parts.
Bill - January 24, 2018
Tool Type
Elliptical
Difficulty
Medium
Time
More than 2 hours
Tools Used
Screwdriver, Wrench Set, Allen wrench
Parts Used
- M8 X 15mm Screw - 223089
- Washer - 014030
- M8 X 25mm Button Screw - 186409
- Large Axle Cover - 244070
- Crank Bushing - 244103
- Axle Cover - 244345
- Bushing Assembly - 244209
- Link Arm Spacer - 244344
- Outside Crank Bushing - 244067
- M10 Curved Washer - 224385
- M8 X 30mm Button Screw - 252018
- Pedal Arm Sleeve - 246373
- M6 Split Washer - 014018
I used an Allen wrench used to remove the covers the gears. I removed and replaced the old parts with the new and then put it back together.
Did you find this story helpful?
Thanks for voting and helping fellow customers!
Parts worn
Alex - March 27, 2017
Tool Type
Elliptical
Difficulty
Easy
Time
Less than 15 minutes
Tools Used
, Allen wrench
1. Removed old broken parts with an allen wrench
2. Replaced with new eReplacement parts.
2. Replaced with new eReplacement parts.
Did you find this story helpful?
Thanks for voting and helping fellow customers!
Pedal Arm Sleeve and Large Axle Cover were worn through
James - May 27, 2016
Tool Type
Elliptical
Difficulty
Easy
Time
15-30 minutes
Tools Used
Screwdriver
Took off the old pedal arm sleeve, both crank bushings, the large axle cover, and the M8 washer by unscrewing the M8x30mm button screw with a screwdriver. I inspected all of the parts. The pedal arm sleeve and large axle cover were worn through (plastic shavings everywhere!), and it looked like the outside crank bushing was damaged. So, I replaced these 3 things, and the M8 washer, putting everything back on the crank. I tightened the button screw. Done! Everything seems to work fine. I am a little worried that there still seems to be quite a bit of plastic shavings being created by all of the rubbing/friction. Not sure if this is normal, but if it wears through again, at least I now know how to fix it.
Did you find this story helpful?
Thanks for voting and helping fellow customers!
Large rear axle bushings-sleeves finally wore out
Michelle - May 16, 2016
Tool Type
Elliptical
Difficulty
Easy
Time
15-30 minutes
Tools Used
, allen wrenches a must
Use allen wrenches to remove all. all worn parts slide off of the axle with ease. New parts slide on then tighten down allen screws.
Did you find this story helpful?
Thanks for voting and helping fellow customers!
Load More Install Stories
OEM stands for Original Equipment Manufacturer and means the part you’re buying is sourced directly from the manufacturer who made your product. At eReplacementParts, we sell only genuine OEM parts, guaranteeing the part you’re purchasing is of better design and of higher quality than aftermarket parts.
Our product descriptions are a combination of data sourced directly from the manufacturers who made your product as well as content researched and curated by our content & customer service teams. This content is edited and reviewed internally before being made public to customers.
Our customer service team are at the ready daily to answer your part and product questions. We have a dedicated staff with decades of collective experience in helping customers just like you purchase parts to repair their products.
All our part reviews are solicited directly from other customers who have purchased this exact part. While we moderate these reviews for profanity, offensive language or personally identifiable information, these reviews are posted exactly as submitted and no alterations are made by our team.
All our customer repair instructions are solicited directly from other customers just like you who have purchased and replaced this exact part. While we moderate these reviews for profanity, offensive language or personally identifiable information, these reviews are posted exactly as submitted and no alterations are made by our team.
Based on data from past customer purchasing behaviors, these parts are most commonly purchased together along with the part you are viewing. These parts may be necessary or helpful to replace to complete your current repair.
All our installation videos are created and produced in collaboration with our in-house repair technician, Mark Sodja, who has helped millions of eReplacementParts customers over the last 13 years repair their products. Mark has years of experience in selling and repairing both commercial and residential products with a specialty in gas-powered equipment.
This data is collected from customers who submitted a repair instruction after replacing this exact part. Customers can rate how easy the repair was to complete and how long it took. We aggregate this data to provide a repair rating that allows customers to quickly determine the difficulty and time needed to perform their own repair.