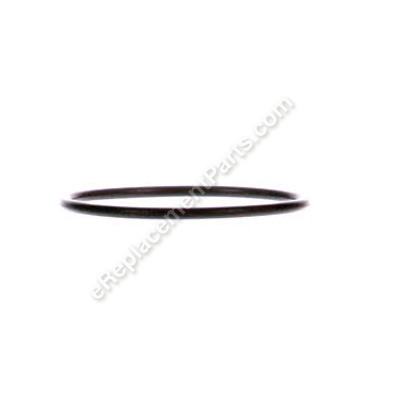


O-rings are designed to contain thousands of pounds of pressure by creating a seal between two or more parts. O-ring measurements are defined by the inside diameter and the thickness.
There are many causes for O-Ring failure, such as pressure, friction, temperature or chemicals. The most common are:
O-ring 35 213460-9
OEM part for: Makita
Part Number: 213460-9
$5.19
Usually ships in 7 - 12 business days
7 - 12 business days
Jump To:
Product Description ?
- Classification: Part
- Weight: 0.01 lbs.
- Shipping: Ships Worldwide
Frequently Purchased Together ?


Compatibility
This part will fit the following 96 machines
Makita
LS1013 Miter Saw View Diagrams & Manuals
LS1212 Miter Saw View Diagrams & Manuals
BLS712 Miter Saw View Diagrams & Manuals
BLS820 Miter Saw View Diagrams & Manuals
LS0711Z Miter Saw View Diagrams & Manuals
LS1011N Compound Miter Saw View Diagrams & Manuals
LS1011 Compound Miter Saw View Diagrams & Manuals
LS1030 Miter Saw View Diagrams & Manuals
HR5001C Rotary Hammer View Diagrams & Manuals
HM1303 Demolition Hammer View Diagrams & Manuals
HM1303B Demolition Hammer View Diagrams & Manuals
HM1500 Demolition Hammer View Diagrams & Manuals
5037NB Circular Saw View Diagrams & Manuals
HM1211B Demolition Hammer View Diagrams & Manuals
HM1500B Demolition Hammer View Diagrams & Manuals
LS800D Cordless Compound Miter Saw View Diagrams & Manuals
5037NBA Circular Saw View Diagrams & Manuals
LS711D Cordless Miter Saw View Diagrams & Manuals
HM1211 Demolition Hammer View Diagrams & Manuals
HR1821 Rotary Hammer View Diagrams & Manuals
LS1214 Dual Slide Compound Miter Saw View Diagrams & Manuals
LS0714 Four Pole Slide Compound Miter Saw View Diagrams & Manuals
LS1013F Miter Saw View Diagrams & Manuals
LS1013FL Compound Miter Saw View Diagrams & Manuals
LS1013L Compound Miter Saw View Diagrams & Manuals
LS1214FL 12" Dual Slide Compound Miter Saw View Diagrams & Manuals
LS1214L 12" Dual Slide Compound Miter Saw with Laser View Diagrams & Manuals
HR5210C 2" SDS-Max AVT Anti-Vibration Technology Rotary Hammer View Diagrams & Manuals
HR4510C 1-3/4" AVT Anti-Vibration Technology Rotary Hammer View Diagrams & Manuals
2401B 10" Miter Saw View Diagrams & Manuals
LS1400 14" Miter Saw View Diagrams & Manuals
LS1016L 10" Dual Slide Miter Saw View Diagrams & Manuals
LS1016LX 10" Dual Slide Compound Miter Saw View Diagrams & Manuals
LS1216L 12" Dual Slide Compound Miter Saw View Diagrams & Manuals
LS1216LX 12" Dual Slide Compound Miter Saw View Diagrams & Manuals
SP6000K1 6-1/2" Plunge Circular Saw with 55" Guide Rail View Diagrams & Manuals
LS1016 Dual Bevel Slide Compound Miter Saw View Diagrams & Manuals
LSXL01Z 18V LXT Lithium-Ion Cordless 7-1/2" Dual Slide Compound Miter Saw View Diagrams & Manuals
LXSL01 18V LXT Lithium-Ion Cordless 7-1/2" Dual Slide Compound Miter Saw Kit View Diagrams & Manuals
LXSL01Z 18V LXT Lithium-Ion Cordless 7-1/2" Dual Slide Compound Miter Saw View Diagrams & Manuals
HM1201 Demolition Hammer View Diagrams & Manuals
LS1016LX5 10" Dual Slide Compound Miter Saw with Laser and Stand View Diagrams & Manuals
LS1216LX4 12" Dual Slide Compound Miter Saw with Laser and Stand View Diagrams & Manuals
2400B Saw View Diagrams & Manuals
4100KB Saw View Diagrams & Manuals
BLS712SFK Saw View Diagrams & Manuals
BLS820SFK Saw View Diagrams & Manuals
CA5000X Saw View Diagrams & Manuals
HR4511C (Type 1) Misc View Diagrams & Manuals
HR4511C (Type 2) Misc View Diagrams & Manuals
HR4511C (Type 3) Misc View Diagrams & Manuals
HR4511C (Type 4) Misc View Diagrams & Manuals
HR5212C Misc View Diagrams & Manuals
LS1013L (Type 1) Saw View Diagrams & Manuals
LS1013L (Type 2) Saw View Diagrams & Manuals
LS1013 (Type 1) Saw View Diagrams & Manuals
LS1013 (Type 2) Saw View Diagrams & Manuals
LS1013 (Type 3) Saw View Diagrams & Manuals
LS1013 (Type 4) Saw View Diagrams & Manuals
LS1016X (Type 1) Saw View Diagrams & Manuals
LS1016X (Type 2) Saw View Diagrams & Manuals
LS1214F Saw View Diagrams & Manuals
LS1214L (Type 1) Saw View Diagrams & Manuals
LS1214L (Type 2) Saw View Diagrams & Manuals
LS1214LX1 (Type 1) Saw View Diagrams & Manuals
LS1214LX1 (Type 2) Saw View Diagrams & Manuals
LS1214 (Type 1) Saw View Diagrams & Manuals
LS1214 (Type 2) Saw View Diagrams & Manuals
LS1216 (Type 1) Saw View Diagrams & Manuals
LS1216 (Type 2) Saw View Diagrams & Manuals
LS1216 (Type 3) Saw View Diagrams & Manuals
LS1216 (Type 4) Saw View Diagrams & Manuals
LS711DWBEK (Type 1) Saw View Diagrams & Manuals
LS711DWBEK (Type 2) Saw View Diagrams & Manuals
LS711DWB (Type 1) Saw View Diagrams & Manuals
LS711DWB (Type 2) Saw View Diagrams & Manuals
LS711DZ (Type 1) Saw View Diagrams & Manuals
LS711DZ (Type 2) Saw View Diagrams & Manuals
LS800DWB Saw View Diagrams & Manuals
LXSL01Z1 (Type 1) Saw View Diagrams & Manuals
LXSL01Z1 (Type 2) Saw View Diagrams & Manuals
LXSL01Z (Type 1) Saw View Diagrams & Manuals
LXSL01Z (Type 2) Saw View Diagrams & Manuals
SP6000 Saw View Diagrams & Manuals
SP6000J Saw View Diagrams & Manuals
SP6000J1 Saw View Diagrams & Manuals
SP6000K Saw View Diagrams & Manuals
SP6000 (Type 1) Saw View Diagrams & Manuals
SP6000X1 (Type 1) Saw View Diagrams & Manuals
SP6000X2 (Type 1) Saw View Diagrams & Manuals
XPS01PTJ Saw View Diagrams & Manuals
XPS01Z Saw View Diagrams & Manuals
XPS02ZU Saw View Diagrams & Manuals
XSL01 Saw View Diagrams & Manuals
XSL01Z Saw View Diagrams & Manuals
XSL02Z Saw View Diagrams & Manuals
Show More Compatible Models
This item works with the following types of products:
- Miter Saw Parts
- Saw Parts
- Rotary Hammer Parts
- Demolition Hammer Parts
- Circular Saw Parts
- Pole Saw Parts
Repair Videos ?
Watch the Repair Video for
O-ring 35

Customer Part Reviews ?
Average Rating (out of 5):
Click to filter by ratings:
5 stars
1
4 stars
0
3 stars
0
2 stars
0
1 stars
0
< PREV
- 1
Easy repair
The part was exactly right, simple to put on and use. Thx!
Guest -
January 25, 2022
Verified Purchase
t
t
t -
t days ago
Verified Purchase
eReplacementParts Team
t
Questions & Answers ?
Our customer Service team is at the ready daily to answer your part and product questions.

Ask our Team
We have a dedicated staff with decades of collective experience in helping customers just like you purchase parts to repair their products.
Does this fit my product?Questions & Answers for O-ring 35
No questions have been asked yet
Customer Repair Instructions ?
All our customer repair instructions are solicited directly from other customers just like you who have purchased and replaced this exact part.
Worn/missing parts
Chris - May 19, 2017
👍 1 of 1 people found this instruction helpful
Tool Type
Chop Saw
Difficulty
Easy
Time
15-30 minutes
Tools Used
Screwdriver
Installed the o-ring on the elbow to keep it on. Removed the fence and the old kerf boards and installed the new ones. Removed the brush caps, then the old brushes and installed the new brushes, then replaced the brush caps.
Did you find this story helpful?
Thanks for voting and helping fellow customers!
Makita LS1011 Compound Miter Saw dust bag needed replacement
Robert - July 7, 2023
Tool Type
Miter Saw
Difficulty
Easy
Time
Less than 15 minutes
Tools Used
, Hands
I purchased the correct replacement parts from eReplacementParts. I've had this Makita saw since the 90s and used it to replace all the base moulding in my house. 20 years later I pulled it out to use it and found the dust bag was torn. Makita had discontinued the original bag with a superseded PN that didn't fit the original plastic elbow. I thought I was going to have to buy a new Makita Compound Miter saw. Then recently I found on the Makita website eReplacementParts had the replacement bag, plastic elbow and o-ring for my 20 year old saw. I've been so happy I found these parts -- so I bought a lifetime supply. Thank you eReplacementParts. You saved me $700!
Did you find this story helpful?
Thanks for voting and helping fellow customers!
Miter Saw
Larry - March 12, 2021
Tool Type
Miter Saw
Difficulty
Easy
Time
Less than 15 minutes
Tools Used
Parts Used
I bought the O Ring and the Elbow in order to put in the Dust Bag on to the machine. It takes me about 15 seconds.
Did you find this story helpful?
Thanks for voting and helping fellow customers!
Broken or missing part in switch assembly
Ivars - April 13, 2018
Tool Type
Miter Saw
Difficulty
Medium
Time
15-30 minutes
Tools Used
Screwdriver, Phillips and flat screwdriver
1. Disassembled handle to access switch assembly
2. Referred to blow up diagram to see all parts and assembly sequence
3. Installed new part ( safety release button) in switch assembly
4. Reassembled saw handle.
Note..several loose parts need to stay in place while testing function of safety button and switch trigger release mechanism in the switch assembly..pieces tend to fall out.. better to lay the saw on its side to keep pieces in place.
Replacing motor brushes was very easy.. only required a flat blade screwdriver
Did you find this story helpful?
Thanks for voting and helping fellow customers!
Missing dust bag
Edward - May 5, 2017
Tool Type
Miter Saw
Difficulty
Easy
Time
Less than 15 minutes
Tools Used
, None
Attached new one.
Did you find this story helpful?
Thanks for voting and helping fellow customers!
Plastic elbow was missing.
Robert - August 3, 2016
Tool Type
Miter Saw
Difficulty
Easy
Time
Less than 15 minutes
Tools Used
, none
Parts Used
Put new elbow in place.
Did you find this story helpful?
Thanks for voting and helping fellow customers!
OEM stands for Original Equipment Manufacturer and means the part you’re buying is sourced directly from the manufacturer who made your product. At eReplacementParts, we sell only genuine OEM parts, guaranteeing the part you’re purchasing is of better design and of higher quality than aftermarket parts.
Our product descriptions are a combination of data sourced directly from the manufacturers who made your product as well as content researched and curated by our content & customer service teams. This content is edited and reviewed internally before being made public to customers.
Our customer service team are at the ready daily to answer your part and product questions. We have a dedicated staff with decades of collective experience in helping customers just like you purchase parts to repair their products.
All our part reviews are solicited directly from other customers who have purchased this exact part. While we moderate these reviews for profanity, offensive language or personally identifiable information, these reviews are posted exactly as submitted and no alterations are made by our team.
All our customer repair instructions are solicited directly from other customers just like you who have purchased and replaced this exact part. While we moderate these reviews for profanity, offensive language or personally identifiable information, these reviews are posted exactly as submitted and no alterations are made by our team.
Based on data from past customer purchasing behaviors, these parts are most commonly purchased together along with the part you are viewing. These parts may be necessary or helpful to replace to complete your current repair.
All our installation videos are created and produced in collaboration with our in-house repair technician, Mark Sodja, who has helped millions of eReplacementParts customers over the last 13 years repair their products. Mark has years of experience in selling and repairing both commercial and residential products with a specialty in gas-powered equipment.
This data is collected from customers who submitted a repair instruction after replacing this exact part. Customers can rate how easy the repair was to complete and how long it took. We aggregate this data to provide a repair rating that allows customers to quickly determine the difficulty and time needed to perform their own repair.