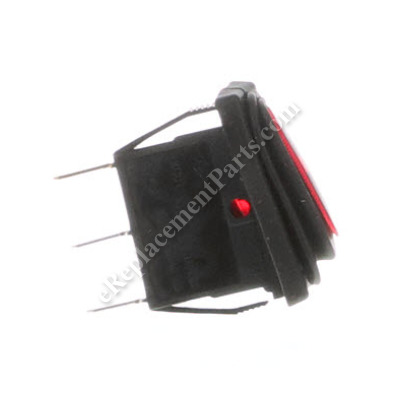
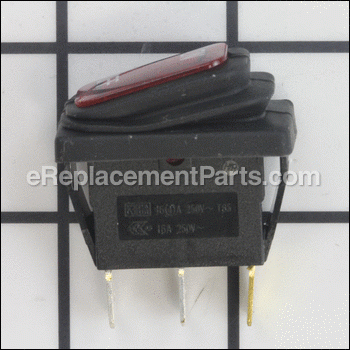
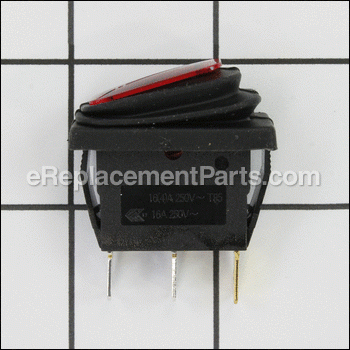
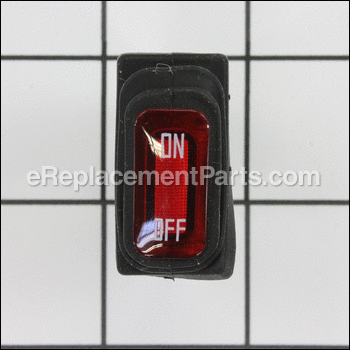


On/off Switch W/light Indicato W13112445101
Part Number: W13112445101
Order within the next 7 hours
and your part ships today!
and your part ships today!
*This part replaces obsolete part #: W151250011101 and W13111290101.
Product Information
Description:
| This replacement switch is specially designed for use with Razor equipment. This is the switch used to turn the unit on and off. This switch has a light indicator built in the button making it easier to see. Please note this plastic switch is sold individually. Replacing this item is easy and does not require any tools • Unplug the wires from the old switch • Pull out the old switch by pushing on side tabs • Secure new switch in place • Connect the wires and test the unit |
Frequently Purchased With


Compatibility
This part is compatible with the following machines:
the 12 compatible machines
Products Compatibility
This item works with the following types of products:
- • Motorcycle
- • Scooter
Questions & Answers for On/off Switch W/light Indicato
No questions have been asked yet
Repair Instructions: Submitted by Customers Like You
3 of 3 people found this instruction helpful
Tool Type:
Scooter
Repair Difficulty:
Easy
Time Spent Repairing:
Less than 15 minutes
Tools Used:
Screwdriver, Socket set
On/off switch was broken
1. Removed base of scooter cover by removing 6 Phillips screws.
2. Disconnected battery harness plug.
3. Removed 2 Phillips screws securing battery's hold down brace.
4. Lifted one of the batteries from the base and rested it out of the way in order to access the wiring for the switch.
5. Disconnected the 3 electrical leads that were connected to existing on/off switch.
6. Pulled the broken switch out of scooter.
7. Snapped in new switch and reconnected electric leads
8. Reconnected battery harness and reassembled the unit.
9. The instructions included with the part were clearly written and very easy to follow.
10. The scooter now runs like new.
Did you find this story helpful?
Thanks for voting and helping fellow customers!
2 of 2 people found this instruction helpful
Tool Type:
Scooter
Repair Difficulty:
Easy
Time Spent Repairing:
Less than 15 minutes
Tools Used:
Screwdriver, Pliers, Wrench Set
Broken On/Off Switch
1. Removed six screws from top plate. (Two on end had nuts to hold with a wrench)
2. Removed bar protecting batteries
3. Pulled batteries out and set to side
4. Used pliers to pull three leads off On/Off switch
5. Cut away glue holding switch in place
6. Pry switch out with screwdriver
7. Reverse process with new switch
2. Removed bar protecting batteries
3. Pulled batteries out and set to side
4. Used pliers to pull three leads off On/Off switch
5. Cut away glue holding switch in place
6. Pry switch out with screwdriver
7. Reverse process with new switch
Did you find this story helpful?
Thanks for voting and helping fellow customers!
1 of 1 people found this instruction helpful
Tool Type:
Scooter
Repair Difficulty:
Medium
Time Spent Repairing:
15-30 minutes
Tools Used:
Screwdriver, Pliers
Scooter on/off switch broke
1. Removed cover on scooter.
2. Removed part after disconnecting battery.
3. Replaced part.
4. Replaced cover and charged scooter.
5. Runs great so far.
2. Removed part after disconnecting battery.
3. Replaced part.
4. Replaced cover and charged scooter.
5. Runs great so far.
Did you find this story helpful?
Thanks for voting and helping fellow customers!
Tool Type:
Scooter
Repair Difficulty:
Easy
Time Spent Repairing:
Less than 15 minutes
Tools Used:
Screwdriver
Switch was worn out and no longer snapped into position.
Removed wires from old switch, making note of where they go in relation to the terminals. Popped out old switch...Popped in new switch. Replaced the wires and done.
Did you find this story helpful?
Thanks for voting and helping fellow customers!
Tool Type:
Scooter
Parts Used:
Repair Difficulty:
Easy
Time Spent Repairing:
15-30 minutes
Tools Used:
Screwdriver
Scooter motor would not run. A clicking noise was heard when throttle was activated.
Repair was not successful..
Replaced module control, power switch and reset switch.
Will test motor next.
Replaced module control, power switch and reset switch.
Will test motor next.
Did you find this story helpful?
Thanks for voting and helping fellow customers!
Tool Type:
Scooter
Repair Difficulty:
Easy
Time Spent Repairing:
Less than 15 minutes
Tools Used:
Screwdriver
The on/off switch was damaged
I replaced the on/off switch. Very easy. Only 3 slip on wire connectors.
Did you find this story helpful?
Thanks for voting and helping fellow customers!
Tool Type:
Scooter
Repair Difficulty:
Easy
Time Spent Repairing:
15-30 minutes
Tools Used:
Screwdriver, Pliers
Switch broken.
Removed and replaced.
Did you find this story helpful?
Thanks for voting and helping fellow customers!
Reviews
2 Reviews
Average Rating (out of 5):
Click to filter by ratings:
5 stars
1
4 stars
1
3 stars
0
2 stars
0
1 stars
0
< PREV
- 1
Switch
Fit and worked perfectly
Guest -
May 12, 2020
Verified Purchase
made a easy repair
took a little than expected but fit perfect
Guest -
November 21, 2019
Verified Purchase
Verified Purchase
eReplacementParts Team
< PREV
- 1
Product Information