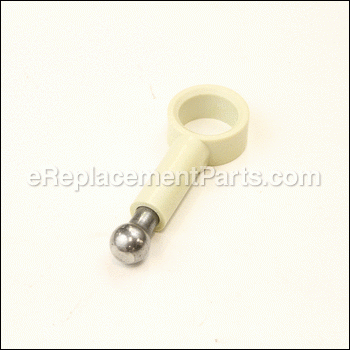

Oil Pump Assembly 29914
OEM part for: Tecumseh, Husqvarna, Toro, Lawn Boy, MTD
Part Number: 29914
$8.23
Usually ships in 7 - 12 business days
7 - 12 business days
Compatibility
This part will fit the following 10522 machines
Husqvarna
Tec (1997-04) Engine View Diagrams & Manuals
Toro
10500 (1000001-1999999)(1981) Lawn Mower View Diagrams & Manuals
10510 (1000001-1999999)(1981) Lawn Mower View Diagrams & Manuals
16077 (0000001-0999999)(1980) Lawn Mower View Diagrams & Manuals
16077 (1000001-1999999)(1981) Lawn Mower View Diagrams & Manuals
16077 (2000001-2999999)(1982) Lawn Mower View Diagrams & Manuals
16165 (0000001-0999999)(1980) Lawn Mower View Diagrams & Manuals
16165 (1000001-1999999)(1981) Lawn Mower View Diagrams & Manuals
16165 (2000001-2999999)(1982) Lawn Mower View Diagrams & Manuals
16165 (3000001-3999999)(1983) Lawn Mower View Diagrams & Manuals
16165 (4000001-4999999)(1984) Lawn Mower View Diagrams & Manuals
16165C (5000001-5999999)(1985) Lawn Mower View Diagrams & Manuals
16165C (6000001-6999999)(1986) Lawn Mower View Diagrams & Manuals
16212W (0000001-0999999)(1990) Lawn Mower View Diagrams & Manuals
16268 (5000001-5999999)(1975) Lawn Mower View Diagrams & Manuals
16297 (0000001-0999999)(1980) Lawn Mower View Diagrams & Manuals
16297 (1000001-1999999)(1981) Lawn Mower View Diagrams & Manuals
16297 (2000001-2999999)(1982) Lawn Mower View Diagrams & Manuals
16297 (3000001-3999999)(1983) Lawn Mower View Diagrams & Manuals
16297 (4000001-4999999)(1984) Lawn Mower View Diagrams & Manuals
16297C (5000001-5999999)(1985) Lawn Mower View Diagrams & Manuals
16299 (4000001-4999999)(1984) Lawn Mower View Diagrams & Manuals
16299 (5000001-5999999)(1985) Lawn Mower View Diagrams & Manuals
16299C (6000001-6999999)(1986) Lawn Mower View Diagrams & Manuals
16299C (7000001-7999999)(1987) Lawn Mower View Diagrams & Manuals
16299C (8000001-8999999)(1988) Lawn Mower View Diagrams & Manuals
16340C (5000001-5999999)(1985) Lawn Mower View Diagrams & Manuals
16340C (6000001-6999999)(1986) Lawn Mower View Diagrams & Manuals
16340C (7000001-7999999)(1987) Lawn Mower View Diagrams & Manuals
16380 (9000001-9999999)(1979) Lawn Mower View Diagrams & Manuals
16380 (0000001-0999999)(1980) Lawn Mower View Diagrams & Manuals
16570 (3000001-3999999)(1983) Lawn Mower View Diagrams & Manuals
16575 (4000001-4999999)(1984) Lawn Mower View Diagrams & Manuals
16575 (5000001-5999999)(1985) Lawn Mower View Diagrams & Manuals
16575 (6000001-6999999)(1986) Lawn Mower View Diagrams & Manuals
16575 (7000001-7999999)(1987) Lawn Mower View Diagrams & Manuals
16575 (8000001-8012678)(1988) Lawn Mower View Diagrams & Manuals
16575 (8012679-8999999)(1988) Lawn Mower View Diagrams & Manuals
16575 (9000001-9999999)(1989) Lawn Mower View Diagrams & Manuals
16575 (0000001-0999999)(1990) Lawn Mower View Diagrams & Manuals
16575C (8000001-8999999)(1988) Lawn Mower View Diagrams & Manuals
16575C (9000001-9999999)(1989) Lawn Mower View Diagrams & Manuals
16576 (0000001-0999999)(1990) Lawn Mower View Diagrams & Manuals
16770 (3000001-3999999)(1983) Lawn Mower View Diagrams & Manuals
16770 (4000001-4999999)(1984) Lawn Mower View Diagrams & Manuals
16771 (3000001-3999999)(1983) Lawn Mower View Diagrams & Manuals
16771 (4000001-4999999)(1984) Lawn Mower View Diagrams & Manuals
16775 (4000001-4999999)(1984) Lawn Mower View Diagrams & Manuals
16775 (6000001-6999999)(1986) Lawn Mower View Diagrams & Manuals
16775 (7000001-7999999)(1987) Lawn Mower View Diagrams & Manuals
16775 (8000001-8022965)(1988) Lawn Mower View Diagrams & Manuals
16775 (8022966-8999999)(1988) Lawn Mower View Diagrams & Manuals
16775 (9000001-9999999)(1989) Lawn Mower View Diagrams & Manuals
16775 (0000001-0999999)(1990) Lawn Mower View Diagrams & Manuals
16776 (0000001-0999999)(1990) Lawn Mower View Diagrams & Manuals
16793 (8000001-8999999)(1988) Lawn Mower View Diagrams & Manuals
16793 (9000001-9999999)(1989) Lawn Mower View Diagrams & Manuals
16793 (0000001-0999999)(1990) Lawn Mower View Diagrams & Manuals
17201 (9000001-9999999)(1969) Lawn Mower View Diagrams & Manuals
17501 (9000001-9999999)(1969) Lawn Mower View Diagrams & Manuals
17601 (9000001-9999999)(1969) Lawn Mower View Diagrams & Manuals
18005 (1000001-1999999)(1981) Lawn Mower View Diagrams & Manuals
18005 (2000001-2999999)(1982) Lawn Mower View Diagrams & Manuals
18010 (1000001-1999999)(1981) Lawn Mower View Diagrams & Manuals
18010 (2000001-2999999)(1982) Lawn Mower View Diagrams & Manuals
18015 (8000001-8999999)(1978) Lawn Mower View Diagrams & Manuals
18015 (9000001-9999999)(1979) Lawn Mower View Diagrams & Manuals
18015 (0000001-0999999)(1980) Lawn Mower View Diagrams & Manuals
18017 (8000001-8999999)(1978) Lawn Mower View Diagrams & Manuals
18017 (9000001-9999999)(1979) Lawn Mower View Diagrams & Manuals
18017 (0000001-0999999)(1980) Lawn Mower View Diagrams & Manuals
18060 (8000001-8999999)(1978) Lawn Mower View Diagrams & Manuals
18060 (9000001-9999999)(1979) Lawn Mower View Diagrams & Manuals
18060 (0000001-0999999)(1980) Lawn Mower View Diagrams & Manuals
18070 (1000001-1999999)(1971) Lawn Mower View Diagrams & Manuals
18070 (2000001-2999999)(1972) Lawn Mower View Diagrams & Manuals
18085 (9000001-9999999)(1979) Lawn Mower View Diagrams & Manuals
18085 (0000001-0999999)(1980) Lawn Mower View Diagrams & Manuals
18090 (9000001-9999999)(1979) Lawn Mower View Diagrams & Manuals
18095 (9000001-9999999)(1979) Lawn Mower View Diagrams & Manuals
18171 (1000001-1999999)(1971) Lawn Mower View Diagrams & Manuals
18208 (1000001-1999999)(1971) Lawn Mower View Diagrams & Manuals
18208 (2000001-2999999)(1972) Lawn Mower View Diagrams & Manuals
18212 (8000001-8999999)(1968) Lawn Mower View Diagrams & Manuals
18213 (8000001-8999999)(1968) Lawn Mower View Diagrams & Manuals
18214 (9000001-9999999)(1969) Lawn Mower View Diagrams & Manuals
18215 (0000001-0999999)(1970) Lawn Mower View Diagrams & Manuals
18216 (0000001-0999999)(1970) Lawn Mower View Diagrams & Manuals
18221 (8000001-8999999)(1968) Lawn Mower View Diagrams & Manuals
18257 (1000001-1999999)(1971) Lawn Mower View Diagrams & Manuals
18257 (2000001-2999999)(1972) Lawn Mower View Diagrams & Manuals
18400 (1000001-1999999)(1971) Lawn Mower View Diagrams & Manuals
19173 (3000001-3999999)(1973) Lawn Mower View Diagrams & Manuals
19221 (8000001-8999999)(1968) Lawn Mower View Diagrams & Manuals
19222 (9000001-9999999)(1969) Lawn Mower View Diagrams & Manuals
19224 (0000001-0999999)(1970) Lawn Mower View Diagrams & Manuals
19225 (0000001-0999999)(1970) Lawn Mower View Diagrams & Manuals
19250 (9000001-9999999)(1969) Lawn Mower View Diagrams & Manuals
19251 (9000001-9999999)(1969) Lawn Mower View Diagrams & Manuals
19271 (1000001-1999999)(1971) Lawn Mower View Diagrams & Manuals
19271 (2000001-2999999)(1972) Lawn Mower View Diagrams & Manuals
19273 (3000001-3999999)(1973) Lawn Mower View Diagrams & Manuals
19333 (0000001-0999999)(1970) Lawn Mower View Diagrams & Manuals
19367 (1000001-1999999)(1971) Lawn Mower View Diagrams & Manuals
19373 (3000001-3999999)(1973) Lawn Mower View Diagrams & Manuals
19400 (4000001-4999999)(1974) Lawn Mower View Diagrams & Manuals
19400 (5000001-5999999)(1975) Lawn Mower View Diagrams & Manuals
19400 (6000001-6999999)(1976) Lawn Mower View Diagrams & Manuals
19444 (0000001-0999999)(1970) Lawn Mower View Diagrams & Manuals
19472 (1000001-1999999)(1971) Lawn Mower View Diagrams & Manuals
19477 (7000001-7999999)(1977) Lawn Mower View Diagrams & Manuals
19500 (1000001-1999999)(1971) Lawn Mower View Diagrams & Manuals
20001 (240000001-240999999)(2004) Lawn Mower View Diagrams & Manuals
20003 (250000001-250999999)(2005) Lawn Mower View Diagrams & Manuals
20003 (260000001-260999999)(2006) Lawn Mower View Diagrams & Manuals
20005 (250000001-250999999)(2005) Lawn Mower View Diagrams & Manuals
20005 (260000001-260999999)(2006) Lawn Mower View Diagrams & Manuals
20007 (240000001-240999999)(2004) Lawn Mower View Diagrams & Manuals
20008 (230000001-230999999)(2003) Lawn Mower View Diagrams & Manuals
20008 (240000001-240999999)(2004) Lawn Mower View Diagrams & Manuals
20009 (220000001-220999999)(2002) Lawn Mower View Diagrams & Manuals
20009 (230000001-230999999)(2003) Lawn Mower View Diagrams & Manuals
20009 (240000001-240999999)(2004) Lawn Mower View Diagrams & Manuals
20009 (250000001-250999999)(2005) Lawn Mower View Diagrams & Manuals
20009 (260000001-260999999)(2006) Lawn Mower View Diagrams & Manuals
20009 (270000001-270999999)(2007) Lawn Mower View Diagrams & Manuals
20012 (220000001-220300000)(2002) Lawn Mower View Diagrams & Manuals
20012 (220300001-220999999)(2002) Lawn Mower View Diagrams & Manuals
20012 (230000001-230999999)(2003) Lawn Mower View Diagrams & Manuals
20012 (240000001-240999999)(2004) Lawn Mower View Diagrams & Manuals
20012 (250000001-250999999)(2005) Lawn Mower View Diagrams & Manuals
20012 (260000001-260999999)(2006) Lawn Mower View Diagrams & Manuals
20013 (220000001-220300000)(2002) Lawn Mower View Diagrams & Manuals
20013 (220300001-220999999)(2002) Lawn Mower View Diagrams & Manuals
20013 (230000001-230999999)(2003) Lawn Mower View Diagrams & Manuals
20013 (240000001-240999999)(2004) Lawn Mower View Diagrams & Manuals
20013 (250000001-250999999)(2005) Lawn Mower View Diagrams & Manuals
20013 (260000001-260999999)(2006) Lawn Mower View Diagrams & Manuals
20014 (220000001-220300000)(2002) Lawn Mower View Diagrams & Manuals
20014 (220300001-220999999)(2002) Lawn Mower View Diagrams & Manuals
20014 (230000001-230999999)(2003) Lawn Mower View Diagrams & Manuals
20016 (220000001-220300000)(2002) Lawn Mower View Diagrams & Manuals
20016 (220300001-220999999)(2002) Lawn Mower View Diagrams & Manuals
20016 (230000001-230999999)(2003) Lawn Mower View Diagrams & Manuals
20016 (240000001-240999999)(2004) Lawn Mower View Diagrams & Manuals
20016 (250000001-250999999)(2005) Lawn Mower View Diagrams & Manuals
20016 (260000001-260999999)(2006) Lawn Mower View Diagrams & Manuals
20017 (220000001-220300000)(2002) Lawn Mower View Diagrams & Manuals
20017 (220300001-220999999)(2002) Lawn Mower View Diagrams & Manuals
20017 (230000001-230999999)(2003) Lawn Mower View Diagrams & Manuals
20017 (240000001-240999999)(2004) Lawn Mower View Diagrams & Manuals
20017 (250000001-250999999)(2005) Lawn Mower View Diagrams & Manuals
20017 (260000001-260999999)(2006) Lawn Mower View Diagrams & Manuals
20018 (220000001-220300000)(2002) Lawn Mower View Diagrams & Manuals
20018 (220300001-220999999)(2002) Lawn Mower View Diagrams & Manuals
20018 (230000001-230999999)(2003) Lawn Mower View Diagrams & Manuals
20019 (230000001-230999999)(2003) Lawn Mower View Diagrams & Manuals
20031 (240000001-240999999)(2004) Lawn Mower View Diagrams & Manuals
20051 (240000001-240999999)(2004) Lawn Mower View Diagrams & Manuals
20060 (9900001-9999999)(1999) Lawn Mower View Diagrams & Manuals
20061 (9900001-9999999)(1999) Lawn Mower View Diagrams & Manuals
20069 (270000001-270999999)(2007) Lawn Mower View Diagrams & Manuals
20070 (260000001-260999999)(2006) Lawn Mower View Diagrams & Manuals
20071 (270000001-270999999)(2007) Lawn Mower View Diagrams & Manuals
20071A (270000001-270999999)(2007) Lawn Mower View Diagrams & Manuals
20072 (270000001-270999999)(2007) Lawn Mower View Diagrams & Manuals
20072A (270000001-270999999)(2007) Lawn Mower View Diagrams & Manuals
20073 (270000001-270999999)(2007) Lawn Mower View Diagrams & Manuals
20073A (270000001-270999999)(2007) Lawn Mower View Diagrams & Manuals
20074 (270000001-270999999)(2007) Lawn Mower View Diagrams & Manuals
20074A (270000001-270999999)(2007) Lawn Mower View Diagrams & Manuals
20075 (270000001-270999999)(2007) Lawn Mower View Diagrams & Manuals
20076 (270000001-270999999)(2007) Lawn Mower View Diagrams & Manuals
20076A (270000001-270999999)(2007) Lawn Mower View Diagrams & Manuals
20079 (260000001-260999999)(2006) Lawn Mower View Diagrams & Manuals
20094 (270000001-270999999)(2007) Lawn Mower View Diagrams & Manuals
20096 (270000001-270999999)(2007) Lawn Mower View Diagrams & Manuals
20098 (270000001-270999999)(2007) Lawn Mower View Diagrams & Manuals
20222 (8000001-8999999)(1968) Lawn Mower View Diagrams & Manuals
20223 (9000001-9999999)(1969) Lawn Mower View Diagrams & Manuals
20227 (0000001-0999999)(1970) Lawn Mower View Diagrams & Manuals
20403 (7000001-7999999)(1977) Lawn Mower View Diagrams & Manuals
20407 (7000001-7999999)(1977) Lawn Mower View Diagrams & Manuals
20440 (4000001-4999999)(1974) Lawn Mower View Diagrams & Manuals
20440 (5000001-5999999)(1975) Lawn Mower View Diagrams & Manuals
20451 (6000001-6999999)(1976) Lawn Mower View Diagrams & Manuals
20456 (6000001-6999999)(1976) Lawn Mower View Diagrams & Manuals
20474 (5000001-5999999)(1975) Lawn Mower View Diagrams & Manuals
20506 (6000001-6999999)(1976) Lawn Mower View Diagrams & Manuals
20511 (9000001-9999999)(1989) Lawn Mower View Diagrams & Manuals
20517 (7000001-7999999)(1977) Lawn Mower View Diagrams & Manuals
20531 (9000001-9999999)(1989) Lawn Mower View Diagrams & Manuals
20532 (9000001-9999999)(1989) Lawn Mower View Diagrams & Manuals
20550 (4000001-4999999)(1974) Lawn Mower View Diagrams & Manuals
20550 (5000001-5999999)(1975) Lawn Mower View Diagrams & Manuals
20555 (0000001-0999999)(1970) Lawn Mower View Diagrams & Manuals
20562 (6000001-6999999)(1976) Lawn Mower View Diagrams & Manuals
20562 (7000001-7999999)(1977) Lawn Mower View Diagrams & Manuals
20570 (3000001-3999999)(1983) Lawn Mower View Diagrams & Manuals
20570 (4000001-4999999)(1984) Lawn Mower View Diagrams & Manuals
20570 (5000001-5999999)(1985) Lawn Mower View Diagrams & Manuals
20571 (1000001-1999999)(1971) Lawn Mower View Diagrams & Manuals
20571 (2000001-2999999)(1972) Lawn Mower View Diagrams & Manuals
20574 (3000001-3999999)(1983) Lawn Mower View Diagrams & Manuals
20574 (4000001-4999999)(1984) Lawn Mower View Diagrams & Manuals
20740 (8000001-8999999)(1978) Lawn Mower View Diagrams & Manuals
20752 (8000001-8999999)(1978) Lawn Mower View Diagrams & Manuals
20752 (9000001-9999999)(1979) Lawn Mower View Diagrams & Manuals
20752 (0000001-0999999)(1980) Lawn Mower View Diagrams & Manuals
20758 (0000001-0999999)(1980) Lawn Mower View Diagrams & Manuals
20758 (1000001-1999999)(1981) Lawn Mower View Diagrams & Manuals
20758 (2000001-2999999)(1982) Lawn Mower View Diagrams & Manuals
20758 (3000001-3999999)(1983) Lawn Mower View Diagrams & Manuals
20762 (9000001-9999999)(1979) Lawn Mower View Diagrams & Manuals
20762 (0000001-0999999)(1980) Lawn Mower View Diagrams & Manuals
20762 (1000001-1999999)(1981) Lawn Mower View Diagrams & Manuals
20762 (2000001-2999999)(1982) Lawn Mower View Diagrams & Manuals
20762 (3000001-3999999)(1983) Lawn Mower View Diagrams & Manuals
20762 (4000001-4999999)(1984) Lawn Mower View Diagrams & Manuals
20715 (1000001-1999999)(1981) Lawn Mower View Diagrams & Manuals
20715 (2000001-2999999)(1982) Lawn Mower View Diagrams & Manuals
20715 (3000001-3999999)(1983) Lawn Mower View Diagrams & Manuals
20715 (4000001-4999999)(1984) Lawn Mower View Diagrams & Manuals
20715 (5000001-5999999)(1985) Lawn Mower View Diagrams & Manuals
20715C (5000001-5999999)(1985) Lawn Mower View Diagrams & Manuals
20718 (5000001-5999999)(1985) Lawn Mower View Diagrams & Manuals
20718C (5000001-5999999)(1985) Lawn Mower View Diagrams & Manuals
20718C (6000001-6999999)(1986) Lawn Mower View Diagrams & Manuals
20720 (1000001-1999999)(1981) Lawn Mower View Diagrams & Manuals
20631 (8000001-8999999)(1988) Lawn Mower View Diagrams & Manuals
20631 (9000001-9999999)(1989) Lawn Mower View Diagrams & Manuals
20632 (9000001-9999999)(1989) Lawn Mower View Diagrams & Manuals
20644 (7000001-7999999)(1977) Lawn Mower View Diagrams & Manuals
20653 (200000001-200999999)(2000) Lawn Mower View Diagrams & Manuals
20657 (7000001-7999999)(1977) Lawn Mower View Diagrams & Manuals
20660 (4000001-4999999)(1974) Lawn Mower View Diagrams & Manuals
20660 (5000001-5999999)(1975) Lawn Mower View Diagrams & Manuals
20671 (3000001-3999999)(1983) Lawn Mower View Diagrams & Manuals
20671 (9000001-9999999)(1989) Lawn Mower View Diagrams & Manuals
20672 (3000001-3999999)(1983) Lawn Mower View Diagrams & Manuals
20672 (4000001-4999999)(1984) Lawn Mower View Diagrams & Manuals
20672 (5000001-5999999)(1985) Lawn Mower View Diagrams & Manuals
20673 (6000001-6999999)(1976) Lawn Mower View Diagrams & Manuals
20673 (7000001-7999999)(1977) Lawn Mower View Diagrams & Manuals
20674 (3000001-3999999)(1983) Lawn Mower View Diagrams & Manuals
20675 (4000001-4999999)(1984) Lawn Mower View Diagrams & Manuals
20675 (5000001-5999999)(1985) Lawn Mower View Diagrams & Manuals
20675 (6000001-6999999)(1986) Lawn Mower View Diagrams & Manuals
20676 (4000001-4999999)(1984) Lawn Mower View Diagrams & Manuals
20676 (5000001-5999999)(1985) Lawn Mower View Diagrams & Manuals
20677 (9000001-9999999)(1989) Lawn Mower View Diagrams & Manuals
20677 (0000001-0002101)(1990) Lawn Mower View Diagrams & Manuals
20677 (0002102-0999999)(1990) Lawn Mower View Diagrams & Manuals
20690 (8000001-8999999)(1978) Lawn Mower View Diagrams & Manuals
20692 (7000001-7999999)(1987) Lawn Mower View Diagrams & Manuals
20692 (8000001-8999999)(1988) Lawn Mower View Diagrams & Manuals
20692 (9000001-9999999)(1989) Lawn Mower View Diagrams & Manuals
20692 (0000001-0999999)(1990) Lawn Mower View Diagrams & Manuals
20692C (8000001-8999999)(1988) Lawn Mower View Diagrams & Manuals
20692C (9000001-9999999)(1989) Lawn Mower View Diagrams & Manuals
20695 (7000001-7999999)(1987) Lawn Mower View Diagrams & Manuals
20695 (8000001-8999999)(1988) Lawn Mower View Diagrams & Manuals
20696 (6000001-7999999)(1976) Lawn Mower View Diagrams & Manuals
20700 (8000001-8999999)(1978) Lawn Mower View Diagrams & Manuals
20700 (9000001-9999999)(1979) Lawn Mower View Diagrams & Manuals
20700 (0000001-0999999)(1980) Lawn Mower View Diagrams & Manuals
20700 (1000001-1999999)(1981) Lawn Mower View Diagrams & Manuals
20700 (2000001-2999999)(1982) Lawn Mower View Diagrams & Manuals
20705 (9000001-9999999)(1979) Lawn Mower View Diagrams & Manuals
20705 (0000001-0999999)(1980) Lawn Mower View Diagrams & Manuals
20705 (2000001-2999999)(1982) Lawn Mower View Diagrams & Manuals
20705 (3000001-3999999)(1983) Lawn Mower View Diagrams & Manuals
20705 (4000001-4999999)(1984) Lawn Mower View Diagrams & Manuals
20705 (5000001-5999999)(1985) Lawn Mower View Diagrams & Manuals
20710 (1000001-1999999)(1981) Lawn Mower View Diagrams & Manuals
20715 (9000001-9999999)(1979) Lawn Mower View Diagrams & Manuals
20715 (0000001-0999999)(1980) Lawn Mower View Diagrams & Manuals
20586 (5000001-5999999)(1985) Lawn Mower View Diagrams & Manuals
20586 (6000001-6999999)(1986) Lawn Mower View Diagrams & Manuals
20586 (7000001-7999999)(1987) Lawn Mower View Diagrams & Manuals
20586 (8000001-8999999)(1988) Lawn Mower View Diagrams & Manuals
20586 (9000001-9999999)(1989) Lawn Mower View Diagrams & Manuals
20586 (0000001-0999999)(1990) Lawn Mower View Diagrams & Manuals
20586C (8000001-8999999)(1988) Lawn Mower View Diagrams & Manuals
20586C (9000001-9999999)(1989) Lawn Mower View Diagrams & Manuals
20587 (0000001-0999999)(1990) Lawn Mower View Diagrams & Manuals
20588 (5000001-5999999)(1985) Lawn Mower View Diagrams & Manuals
20588 (6000001-6999999)(1986) Lawn Mower View Diagrams & Manuals
20588 (7000001-7999999)(1987) Lawn Mower View Diagrams & Manuals
20588 (8000001-8999999)(1988) Lawn Mower View Diagrams & Manuals
20588 (0000001-0999999)(1990) Lawn Mower View Diagrams & Manuals
20588C (8000001-8999999)(1988) Lawn Mower View Diagrams & Manuals
20588C (9000001-9999999)(1989) Lawn Mower View Diagrams & Manuals
20600 (1000001-1999999)(1971) Lawn Mower View Diagrams & Manuals
20610 (9000001-9999999)(1979) Lawn Mower View Diagrams & Manuals
20610 (0000001-0999999)(1980) Lawn Mower View Diagrams & Manuals
20610 (1000001-1999999)(1981) Lawn Mower View Diagrams & Manuals
20610 (3000001-3999999)(1983) Lawn Mower View Diagrams & Manuals
20610 (4000001-4999999)(1984) Lawn Mower View Diagrams & Manuals
20610C (5000001-5999999)(1985) Lawn Mower View Diagrams & Manuals
20611 (9000001-9999999)(1989) Lawn Mower View Diagrams & Manuals
20790 (9000001-9999999)(1979) Lawn Mower View Diagrams & Manuals
20790 (0000001-0999999)(1980) Lawn Mower View Diagrams & Manuals
20790 (1000001-1999999)(1981) Lawn Mower View Diagrams & Manuals
20790 (2000001-2999999)(1982) Lawn Mower View Diagrams & Manuals
20810 (9000001-9999999)(1979) Lawn Mower View Diagrams & Manuals
20810 (0000001-0999999)(1980) Lawn Mower View Diagrams & Manuals
20810 (1000001-1999999)(1981) Lawn Mower View Diagrams & Manuals
20810 (2000001-2999999)(1982) Lawn Mower View Diagrams & Manuals
20810 (3000001-3999999)(1983) Lawn Mower View Diagrams & Manuals
20810 (4000001-4999999)(1984) Lawn Mower View Diagrams & Manuals
20810C (5000001-5999999)(1985) Lawn Mower View Diagrams & Manuals
20574 (5000001-5999999)(1985) Lawn Mower View Diagrams & Manuals
20574 (6000001-6999999)(1986) Lawn Mower View Diagrams & Manuals
20574 (7000001-7999999)(1987) Lawn Mower View Diagrams & Manuals
20574 (8000001-8999999)(1988) Lawn Mower View Diagrams & Manuals
20574 (9000001-9999999)(1989) Lawn Mower View Diagrams & Manuals
20575 (8000001-8007500)(1978) Lawn Mower View Diagrams & Manuals
20575 (8007501-8999999)(1978) Lawn Mower View Diagrams & Manuals
20576 (3000001-3999999)(1983) Lawn Mower View Diagrams & Manuals
20577 (4000001-4999999)(1984) Lawn Mower View Diagrams & Manuals
20577 (5000001-5999999)(1985) Lawn Mower View Diagrams & Manuals
20762C (5000001-5999999)(1985) Lawn Mower View Diagrams & Manuals
20762C (6000001-6999999)(1986) Lawn Mower View Diagrams & Manuals
20770 (2000001-2999999)(1982) Lawn Mower View Diagrams & Manuals
20771 (3000001-3999999)(1983) Lawn Mower View Diagrams & Manuals
20772 (9000001-9999999)(1979) Lawn Mower View Diagrams & Manuals
20772 (0000001-0999999)(1980) Lawn Mower View Diagrams & Manuals
20773 (3000001-3999999)(1983) Lawn Mower View Diagrams & Manuals
20775 (9000001-9999999)(1979) Lawn Mower View Diagrams & Manuals
20775 (0000001-0999999)(1980) Lawn Mower View Diagrams & Manuals
20775 (1000001-1999999)(1981) Lawn Mower View Diagrams & Manuals
20775 (2000001-2999999)(1982) Lawn Mower View Diagrams & Manuals
20778 (9000001-9999999)(1979) Lawn Mower View Diagrams & Manuals
20780C (5000001-5999999)(1985) Lawn Mower View Diagrams & Manuals
20780C (7000001-7999999)(1987) Lawn Mower View Diagrams & Manuals
20780C (8000001-8999999)(1988) Lawn Mower View Diagrams & Manuals
20780C (9000001-9999999)(1989) Lawn Mower View Diagrams & Manuals
20782C (5000001-5999999)(1985) Lawn Mower View Diagrams & Manuals
20782C (6000001-6999999)(1986) Lawn Mower View Diagrams & Manuals
20788 (9000001-9999999)(1979) Lawn Mower View Diagrams & Manuals
20788 (0000001-0999999)(1980) Lawn Mower View Diagrams & Manuals
20788 (1000001-1999999)(1981) Lawn Mower View Diagrams & Manuals
26641 (9000001-9999999)(1989) Lawn Mower View Diagrams & Manuals
26642 (9000001-9999999)(1989) Lawn Mower View Diagrams & Manuals
56027 (4000001-4999999)(1974) Lawn Tractor View Diagrams & Manuals
56027 (5000001-5999999)(1975) Lawn Tractor View Diagrams & Manuals
21738 (2000001-2999999) Whirlwind Lawnmower View Diagrams & Manuals
21738 (1000001-1999999) Whirlwind Lawnmower View Diagrams & Manuals
21738 (0000001-0999999) Whirlwind Lawnmower View Diagrams & Manuals
21738 (9000001-9999999) Whirlwind Lawnmower View Diagrams & Manuals
21738 (8000001-8999999) Whirlwind Lawnmower View Diagrams & Manuals
62837 (3000001-3999999) (1973) Shredder View Diagrams & Manuals
62837 (4000001-4999999) (1974) Shredder View Diagrams & Manuals
62853 (3000001-3999999) (1973) Shredder View Diagrams & Manuals
62853 (4000001-4999999) (1974) Shredder View Diagrams & Manuals
56015 (2000001-2999999) (1972) 25-in. Standard Rider View Diagrams & Manuals
56015 (3000001-3999999) (1973) 25-in. Standard Rider View Diagrams & Manuals
56015 (4000001-4999999) (1974) 25-in. Standard Rider View Diagrams & Manuals
56020 (3000001-3999999) (1973) 25-in. Premium Rider View Diagrams & Manuals
56022 (4000001-4999999) (1974) 25-in. Premium Rider View Diagrams & Manuals
56022 (5000001-5999999) (1975) 25-in. Premium Rider View Diagrams & Manuals
56025 (3000001-3999999) (1973) 25-in. Premium Rider Keylectric View Diagrams & Manuals
20531 (8000001-8999999) (1988) Lawn Mower View Diagrams & Manuals
21073 (3000001-3999999) (1973) Guardian Lawnmower View Diagrams & Manuals
21100 (8000001-8999999) (1968) Whirlwind Lawnmower View Diagrams & Manuals
21101 (9000001-9999999) (1969) Whirlwind Lawnmower View Diagrams & Manuals
21103 (9000001-9999999) (1969) Whirlwind Lawnmower View Diagrams & Manuals
21104 (0000001-0999999) (1970) Whirlwind Lawnmower View Diagrams & Manuals
21172 (1000001-1999999) (1971) Guardian Lawnmower View Diagrams & Manuals
21172 (2000001-2999999) (1972) Guardian Lawnmower View Diagrams & Manuals
21173 (3000001-3999999) (1973) Guardian Lawnmower View Diagrams & Manuals
21273 (3000001-3999999) (1973) Guardian Lawnmower View Diagrams & Manuals
21373 (3000001-3999999) (1973) Guardian Lawnmower View Diagrams & Manuals
21473 (3000001-3999999) (1973) Guardian Lawnmower View Diagrams & Manuals
21500 (4000001-4999999) (1974) Guardian Lawnmower View Diagrams & Manuals
21500 (5000001-5999999) (1975) Guardian Lawnmower View Diagrams & Manuals
21500 (6000001-6999999) (1976) Guardian Lawnmower View Diagrams & Manuals
21557 (7000001-7999999) (1977) Guardian Lawnmower View Diagrams & Manuals
21610 (4000001-4999999) (1974) Guardian Lawnmower View Diagrams & Manuals
21610 (5000001-5999999) (1975) Guardian Lawnmower View Diagrams & Manuals
21610 (6000001-6999999) (1976) Guardian Lawnmower View Diagrams & Manuals
21647 (7000001-7999999) (1977) Guardian Lawnmower View Diagrams & Manuals
21658 (8000001-8999999) (1978) Whirlwind Ii Deluxe View Diagrams & Manuals
21666 (0000001-0033908) (1970) Whirlwind Lawnmower View Diagrams & Manuals
21711 (4000001-4999999) (1974) Guardian Lawnmower View Diagrams & Manuals
21711 (5000001-5999999) (1975) Guardian Lawnmower View Diagrams & Manuals
21711 (6000001-6999999) (1976) Guardian Lawnmower View Diagrams & Manuals
21727 (7000001-7999999) (1977) Guardian Lawnmower View Diagrams & Manuals
21900 (3000001-3999999) (1973) Whirlwind Lawnmower View Diagrams & Manuals
Lawn Boy
10200 (7900001-7999999)(1997) Silver Series Lawnmower View Diagrams & Manuals
10202 (7900001-7999999)(1997) Silver Series Lawnmower View Diagrams & Manuals
10202 (6900001-6999999)(1996) Silver Series Lawnmower View Diagrams & Manuals
10202 (5900001-5999999)(1995) Silver Series Lawnmower View Diagrams & Manuals
10202 (4900001-4999999)(1994) Silver Series Lawnmower View Diagrams & Manuals
10202 (3900001-3999999)(1993) Silver Series Lawnmower View Diagrams & Manuals
10210 (5900001-5999999)(1995) Silver Series Lawnmower View Diagrams & Manuals
10210 (4900001-4999999)(1994) Silver Series Lawnmower View Diagrams & Manuals
10210 (3900001-3999999)(1993) Silver Series Lawnmower View Diagrams & Manuals
10212 (7900001-7999999)(1997) Silver Series Lawnmower View Diagrams & Manuals
10212 (6900001-6999999)(1996) Silver Series Lawnmower View Diagrams & Manuals
10236 (7900001-7999999)(1997) Silver Series Lawnmower View Diagrams & Manuals
10248 (8900001-8999999)(1998) Silver Series Lawnmower View Diagrams & Manuals
10249 (8900001-8999999)(1998) Silver Series Lawnmower View Diagrams & Manuals
10260 (200000001-200999999)(2000) Silver Series Lawnmower View Diagrams & Manuals
10260 (9900001-9999999)(1999) Silver Series Lawnmower View Diagrams & Manuals
10262 (9900001-9999999)(1999) Silver Series Lawnmower View Diagrams & Manuals
10270 (220000001-220999999)(2002) Silver Series Lawnmower View Diagrams & Manuals
10270 (210000001-210999999)(2001) Silver Series Lawnmower View Diagrams & Manuals
10270C (220000001-220999999)(2002) Silver Series Lawnmower View Diagrams & Manuals
10270C (210000001-210999999)(2001) Silver Series Lawnmower View Diagrams & Manuals
10272 (240000001-240999999)(2004) Silver Series Lawnmower View Diagrams & Manuals
10272C (240000001-240999999)(2004) Silver Series Lawnmower View Diagrams & Manuals
10272C (230000001-230999999)(2003) Silver Series Lawnmower View Diagrams & Manuals
10273C (240000001-240999999)(2004) Silver Series Lawnmower View Diagrams & Manuals
10302 (7900001-7999999)(1997) Silver Series Lawnmower View Diagrams & Manuals
10302 (6900001-6999999)(1996) Silver Series Lawnmower View Diagrams & Manuals
10302 (5900001-5999999)(1995) Silver Series Lawnmower View Diagrams & Manuals
10302 (4900001-4999999)(1994) Silver Series Lawnmower View Diagrams & Manuals
10302 (3900001-3999999)(1993) Silver Series Lawnmower View Diagrams & Manuals
10305 (7900001-7999999)(1997) Silver Series Lawnmower View Diagrams & Manuals
10305 (6900001-6999999)(1996) Silver Series Lawnmower View Diagrams & Manuals
10305 (5900001-5999999)(1995) Silver Series Lawnmower View Diagrams & Manuals
10307 (7900001-7999999)(1997) Silver Series Lawnmower View Diagrams & Manuals
10309 (7900001-7999999)(1997) Silver Series Lawnmower View Diagrams & Manuals
10310 (6900001-6999999)(1996) Silver Series Lawnmower View Diagrams & Manuals
10310 (5900001-5999999)(1995) Silver Series Lawnmower View Diagrams & Manuals
10310 (4900001-4999999)(1994) Silver Series Lawnmower View Diagrams & Manuals
10310 (3900001-3999999)(1993) Silver Series Lawnmower View Diagrams & Manuals
10311 (4900001-4999999)(1994) Silver Series Lawnmower View Diagrams & Manuals
10313 (8900001-8999999)(1998) Silver Series Lawnmower View Diagrams & Manuals
10313 (7900001-7999999)(1997) Silver Series Lawnmower View Diagrams & Manuals
10313 (6900001-6999999)(1996) Silver Series Lawnmower View Diagrams & Manuals
10313 (5900001-5999999)(1995) Silver Series Lawnmower View Diagrams & Manuals
10321 (8900001-8999999)(1998) Silver Series Lawnmower View Diagrams & Manuals
10321 (7900001-7999999)(1997) Silver Series Lawnmower View Diagrams & Manuals
10327 (8900001-8999999)(1998) Silver Series Lawnmower View Diagrams & Manuals
10328 (8900001-8999999)(1998) Silver Series Lawnmower View Diagrams & Manuals
10330 (200000001-200999999)(2000) Silver Series Lawnmower View Diagrams & Manuals
10330 (9900001-9999999)(1999) Silver Series Lawnmower View Diagrams & Manuals
10330 (8900001-8999999)(1998) Silver Series Lawnmower View Diagrams & Manuals
10334 (200000001-200999999)(2000) Silver Series Lawnmower View Diagrams & Manuals
10335 (200000001-200999999)(2000) Silver Series Lawnmower View Diagrams & Manuals
10335 (9900001-9999999)(1999) Silver Series Lawnmower View Diagrams & Manuals
10356 (240000001-240999999)(2004) Silver Series Lawnmower View Diagrams & Manuals
10356 (230000001-230999999)(2003) Silver Series Lawnmower View Diagrams & Manuals
10357 (240000001-240999999)(2004) Silver Series Lawnmower View Diagrams & Manuals
10357 (230000001-230999999)(2003) Silver Series Lawnmower View Diagrams & Manuals
10358 (230000001-230999999)(2003) Silver Series Lawnmower View Diagrams & Manuals
10359C (240000001-240999999)(2004) Silver Series Lawnmower View Diagrams & Manuals
10359C (230000001-230999999)(2003) Silver Series Lawnmower View Diagrams & Manuals
10360 (220000001-220999999)(2002) Silver Series Lawnmower View Diagrams & Manuals
10360 (210000001-210999999)(2001) Silver Series Lawnmower View Diagrams & Manuals
10360C (220000001-220999999)(2002) Silver Series Lawnmower View Diagrams & Manuals
10360C (210000001-210999999)(2001) Silver Series Lawnmower View Diagrams & Manuals
10361 (220000001-220999999)(2002) Silver Series Lawnmower View Diagrams & Manuals
10361 (210000001-210999999)(2001) Silver Series Lawnmower View Diagrams & Manuals
10362 (220000001-220999999)(2002) Silver Series Lawnmower View Diagrams & Manuals
10362 (210000001-210999999)(2001) Silver Series Lawnmower View Diagrams & Manuals
10363 (210000001-210999999)(2001) Silver Series Lawnmower View Diagrams & Manuals
10367 (240000001-240999999)(2004) Silver Series Lawnmower View Diagrams & Manuals
10528 (200000001-200999999)(2000) Goldpro Series Lawnmower View Diagrams & Manuals
10551 (210000001-210999999)(2001) Goldpro Series Lawnmower View Diagrams & Manuals
10670C (280000001-280999999)(2008) Insight Lawn Mower View Diagrams & Manuals
10670C (270000001-270999999)(2007) Insight Lawn Mower View Diagrams & Manuals
10671 (290000001-290999999)(2009) Insight Lawn Mower View Diagrams & Manuals
10671 (280000001-280999999)(2008) Insight Lawn Mower View Diagrams & Manuals
10671 (270000001-270004299)(2007) Insight Lawn Mower View Diagrams & Manuals
10671 (270004300-270999999)(2007) Insight Lawn Mower View Diagrams & Manuals
10671 (260000001-260999999)(2006) Insight Lawn Mower View Diagrams & Manuals
10671 (250000001-250999999)(2005) Insight Lawn Mower View Diagrams & Manuals
10673 (280000001-280999999)(2008) Insight Gold Lawn Mower View Diagrams & Manuals
10673 (270000001-270999999)(2007) Insight Gold Lawn Mower View Diagrams & Manuals
10673 (260000001-260999999)(2006) Insight Gold Lawn Mower View Diagrams & Manuals
10682 (280000001-280999999)(2008) Insight Lawn Mower View Diagrams & Manuals
10682 (270000001-270999999)(2007) Insight Lawn Mower View Diagrams & Manuals
10682 (260000001-260999999)(2006) Insight Lawn Mower View Diagrams & Manuals
10683 (280000001-280999999)(2008) Insight Lawn Mower View Diagrams & Manuals
10683 (270000001-270999999)(2007) Insight Lawn Mower View Diagrams & Manuals
10683 (260000001-260999999)(2006) Insight Lawn Mower View Diagrams & Manuals
10683 (250000001-250999999)(2005) Insight Lawn Mower View Diagrams & Manuals
10684 (260000001-260999999)(2006) Insight Lawn Mower View Diagrams & Manuals
10684 (250000001-250999999)(2005) Insight Lawn Mower View Diagrams & Manuals
10684C (290000001-290999999)(2009) Insight Lawn Mower View Diagrams & Manuals
10684C (280000001-280999999)(2008) Insight Lawn Mower View Diagrams & Manuals
10684C (270000001-270999999)(2007) Insight Lawn Mower View Diagrams & Manuals
10684C (260000001-260999999)(2006) Insight Lawn Mower View Diagrams & Manuals
10684C (250000001-250999999)(2005) Insight Lawn Mower View Diagrams & Manuals
10685 (280000001-280999999)(2008) Insight Lawn Mower View Diagrams & Manuals
10685 (270000001-270999999)(2007) Insight Lawn Mower View Diagrams & Manuals
10685 (260000001-260999999)(2006) Insight Lawn Mower View Diagrams & Manuals
10685 (250000001-250999999)(2005) Insight Lawn Mower View Diagrams & Manuals
10686 (270000001-270999999)(2007) Insight Lawn Mower View Diagrams & Manuals
10686 (260000001-260999999)(2006) Insight Lawn Mower View Diagrams & Manuals
10686 (250000001-250999999)(2005) Insight Lawn Mower View Diagrams & Manuals
10686C (260000001-260999999)(2006) Insight Lawn Mower View Diagrams & Manuals
10687 (260000001-260999999)(2006) Insight Lawn Mower View Diagrams & Manuals
10780 (270000001-270999999)(2007) Insight Platinum Lawn Mower View Diagrams & Manuals
10785 (270000001-270999999)(2007) Insight Platinum Lawn Mower View Diagrams & Manuals
10995 (270000001-270999999)(2007) Insight Gold Lawn Mower View Diagrams & Manuals
10995 (260000001-260999999)(2006) Insight Gold Lawn Mower View Diagrams & Manuals
10997 (270000001-270999999)(2007) Insight Gold Lawn Mower View Diagrams & Manuals
10997 (260000001-260999999)(2006) Insight Gold Lawn Mower View Diagrams & Manuals
Tecumseh
OV195XA-23003C 4 Cycle Horizontal Engine View Diagrams & Manuals
OV195XA-23509C 4 Cycle Horizontal Engine View Diagrams & Manuals
OV195XA-23510C 4 Cycle Horizontal Engine View Diagrams & Manuals
OV195XA-23511C 4 Cycle Horizontal Engine View Diagrams & Manuals
OV195XA-23513C 4 Cycle Horizontal Engine View Diagrams & Manuals
SBV-5391 4 Cycle Short Block Engine View Diagrams & Manuals
SBV-5646 4 Cycle Short Block Engine View Diagrams & Manuals
SBV-SBV-1 4 Cycle Short Block Engine View Diagrams & Manuals
SBV-SBV-10 4 Cycle Short Block Engine View Diagrams & Manuals
SBV-SBV-101 4 Cycle Short Block Engine View Diagrams & Manuals
SBV-SBV-102 4 Cycle Short Block Engine View Diagrams & Manuals
SBV-SBV-102A 4 Cycle Short Block Engine View Diagrams & Manuals
SBV-SBV-103 4 Cycle Short Block Engine View Diagrams & Manuals
SBV-SBV-103A 4 Cycle Short Block Engine View Diagrams & Manuals
SBV-SBV-103B 4 Cycle Short Block Engine View Diagrams & Manuals
SBV-SBV-104 4 Cycle Short Block Engine View Diagrams & Manuals
SBV-SBV-104A 4 Cycle Short Block Engine View Diagrams & Manuals
SBV-SBV-105 4 Cycle Short Block Engine View Diagrams & Manuals
SBV-SBV-106 4 Cycle Short Block Engine View Diagrams & Manuals
SBV-SBV-107 4 Cycle Short Block Engine View Diagrams & Manuals
SBV-SBV-107A 4 Cycle Short Block Engine View Diagrams & Manuals
SBV-SBV-108 4 Cycle Short Block Engine View Diagrams & Manuals
SBV-SBV-108A 4 Cycle Short Block Engine View Diagrams & Manuals
SBV-SBV-109 4 Cycle Short Block Engine View Diagrams & Manuals
SBV-SBV-11 4 Cycle Short Block Engine View Diagrams & Manuals
SBV-SBV-110 4 Cycle Short Block Engine View Diagrams & Manuals
SBV-SBV-110A 4 Cycle Short Block Engine View Diagrams & Manuals
SBV-SBV-110B 4 Cycle Short Block Engine View Diagrams & Manuals
SBV-SBV-111 4 Cycle Short Block Engine View Diagrams & Manuals
SBV-SBV-111A 4 Cycle Short Block Engine View Diagrams & Manuals
SBV-SBV-111B 4 Cycle Short Block Engine View Diagrams & Manuals
SBV-SBV-112 4 Cycle Short Block Engine View Diagrams & Manuals
SBV-SBV-112A 4 Cycle Short Block Engine View Diagrams & Manuals
SBV-SBV-112B 4 Cycle Short Block Engine View Diagrams & Manuals
SBV-SBV-113 4 Cycle Short Block Engine View Diagrams & Manuals
SBV-SBV-113A 4 Cycle Short Block Engine View Diagrams & Manuals
SBV-SBV-113B 4 Cycle Short Block Engine View Diagrams & Manuals
SBV-SBV-115 4 Cycle Short Block Engine View Diagrams & Manuals
SBV-SBV-115A 4 Cycle Short Block Engine View Diagrams & Manuals
SBV-SBV-116 4 Cycle Short Block Engine View Diagrams & Manuals
SBV-SBV-116A 4 Cycle Short Block Engine View Diagrams & Manuals
SBV-SBV-117 4 Cycle Short Block Engine View Diagrams & Manuals
SBV-SBV-117A 4 Cycle Short Block Engine View Diagrams & Manuals
SBV-SBV-118 4 Cycle Short Block Engine View Diagrams & Manuals
SBV-SBV-118A 4 Cycle Short Block Engine View Diagrams & Manuals
SBV-SBV-119 4 Cycle Short Block Engine View Diagrams & Manuals
SBV-SBV-119A 4 Cycle Short Block Engine View Diagrams & Manuals
SBV-SBV-12 4 Cycle Short Block Engine View Diagrams & Manuals
SBV-SBV-120 4 Cycle Short Block Engine View Diagrams & Manuals
SBV-SBV-120A 4 Cycle Short Block Engine View Diagrams & Manuals
SBV-SBV-121 4 Cycle Short Block Engine View Diagrams & Manuals
SBV-SBV-121A 4 Cycle Short Block Engine View Diagrams & Manuals
SBV-SBV-121B 4 Cycle Short Block Engine View Diagrams & Manuals
SBV-SBV-121C 4 Cycle Short Block Engine View Diagrams & Manuals
SBV-SBV-122 4 Cycle Short Block Engine View Diagrams & Manuals
SBV-SBV-123 4 Cycle Short Block Engine View Diagrams & Manuals
SBV-SBV-124 4 Cycle Short Block Engine View Diagrams & Manuals
SBV-SBV-124A 4 Cycle Short Block Engine View Diagrams & Manuals
SBV-SBV-125 4 Cycle Short Block Engine View Diagrams & Manuals
SBV-SBV-125A 4 Cycle Short Block Engine View Diagrams & Manuals
SBV-SBV-126 4 Cycle Short Block Engine View Diagrams & Manuals
SBV-SBV-126A 4 Cycle Short Block Engine View Diagrams & Manuals
SBV-SBV-126B 4 Cycle Short Block Engine View Diagrams & Manuals
SBV-SBV-126C 4 Cycle Short Block Engine View Diagrams & Manuals
SBV-SBV-127 4 Cycle Short Block Engine View Diagrams & Manuals
SBV-SBV-127A 4 Cycle Short Block Engine View Diagrams & Manuals
SBV-SBV-127B 4 Cycle Short Block Engine View Diagrams & Manuals
SBV-SBV-128 4 Cycle Short Block Engine View Diagrams & Manuals
SBV-SBV-128A 4 Cycle Short Block Engine View Diagrams & Manuals
SBV-SBV-128B 4 Cycle Short Block Engine View Diagrams & Manuals
SBV-SBV-128C 4 Cycle Short Block Engine View Diagrams & Manuals
SBV-SBV-128D 4 Cycle Short Block Engine View Diagrams & Manuals
SBV-SBV-128E 4 Cycle Short Block Engine View Diagrams & Manuals
SBV-SBV-128F 4 Cycle Short Block Engine View Diagrams & Manuals
SBV-SBV-129 4 Cycle Short Block Engine View Diagrams & Manuals
SBV-SBV-129A 4 Cycle Short Block Engine View Diagrams & Manuals
SBV-SBV-12E 4 Cycle Short Block Engine View Diagrams & Manuals
SBV-SBV-13 4 Cycle Short Block Engine View Diagrams & Manuals
SBV-SBV-130 4 Cycle Short Block Engine View Diagrams & Manuals
SBV-SBV-130A 4 Cycle Short Block Engine View Diagrams & Manuals
SBV-SBV-131 4 Cycle Short Block Engine View Diagrams & Manuals
SBV-SBV-131A 4 Cycle Short Block Engine View Diagrams & Manuals
SBV-SBV-132 4 Cycle Short Block Engine View Diagrams & Manuals
SBV-SBV-132A 4 Cycle Short Block Engine View Diagrams & Manuals
SBV-SBV-133 4 Cycle Short Block Engine View Diagrams & Manuals
SBV-SBV-133A 4 Cycle Short Block Engine View Diagrams & Manuals
SBV-SBV-134 4 Cycle Short Block Engine View Diagrams & Manuals
SBV-SBV-134A 4 Cycle Short Block Engine View Diagrams & Manuals
SBV-SBV-135 4 Cycle Short Block Engine View Diagrams & Manuals
SBV-SBV-135A 4 Cycle Short Block Engine View Diagrams & Manuals
SBV-SBV-136 4 Cycle Short Block Engine View Diagrams & Manuals
SBV-SBV-136A 4 Cycle Short Block Engine View Diagrams & Manuals
SBV-SBV-136B 4 Cycle Short Block Engine View Diagrams & Manuals
SBV-SBV-137 4 Cycle Short Block Engine View Diagrams & Manuals
SBV-SBV-137A 4 Cycle Short Block Engine View Diagrams & Manuals
SBV-SBV-137B 4 Cycle Short Block Engine View Diagrams & Manuals
SBV-SBV-137C 4 Cycle Short Block Engine View Diagrams & Manuals
SBV-SBV-138 4 Cycle Short Block Engine View Diagrams & Manuals
SBV-SBV-138A 4 Cycle Short Block Engine View Diagrams & Manuals
SBV-SBV-138B 4 Cycle Short Block Engine View Diagrams & Manuals
SBV-SBV-171 4 Cycle Short Block Engine View Diagrams & Manuals
SBV-SBV-171A 4 Cycle Short Block Engine View Diagrams & Manuals
SBV-SBV-171B 4 Cycle Short Block Engine View Diagrams & Manuals
SBV-SBV-176 4 Cycle Short Block Engine View Diagrams & Manuals
SBV-SBV-176A 4 Cycle Short Block Engine View Diagrams & Manuals
SBV-SBV-176B 4 Cycle Short Block Engine View Diagrams & Manuals
SBV-SBV-176C 4 Cycle Short Block Engine View Diagrams & Manuals
SBV-SBV-177 4 Cycle Short Block Engine View Diagrams & Manuals
SBV-SBV-177A 4 Cycle Short Block Engine View Diagrams & Manuals
SBV-SBV-177B 4 Cycle Short Block Engine View Diagrams & Manuals
SBV-SBV-177C 4 Cycle Short Block Engine View Diagrams & Manuals
SBV-SBV-178 4 Cycle Short Block Engine View Diagrams & Manuals
SBV-SBV-178A 4 Cycle Short Block Engine View Diagrams & Manuals
SBV-SBV-178B 4 Cycle Short Block Engine View Diagrams & Manuals
SBV-SBV-183 4 Cycle Short Block Engine View Diagrams & Manuals
SBV-SBV-183A 4 Cycle Short Block Engine View Diagrams & Manuals
SBV-SBV-183B 4 Cycle Short Block Engine View Diagrams & Manuals
SBV-SBV-183C 4 Cycle Short Block Engine View Diagrams & Manuals
SBV-SBV-184 4 Cycle Short Block Engine View Diagrams & Manuals
SBV-SBV-184A 4 Cycle Short Block Engine View Diagrams & Manuals
SBV-SBV-184B 4 Cycle Short Block Engine View Diagrams & Manuals
SBV-SBV-184C 4 Cycle Short Block Engine View Diagrams & Manuals
SBV-SBV-184D 4 Cycle Short Block Engine View Diagrams & Manuals
SBV-SBV-185 4 Cycle Short Block Engine View Diagrams & Manuals
SBV-SBV-185A 4 Cycle Short Block Engine View Diagrams & Manuals
SBV-SBV-185B 4 Cycle Short Block Engine View Diagrams & Manuals
SBV-SBV-186 4 Cycle Short Block Engine View Diagrams & Manuals
SBV-SBV-186A 4 Cycle Short Block Engine View Diagrams & Manuals
SBV-SBV-186B 4 Cycle Short Block Engine View Diagrams & Manuals
SBV-SBV-190 4 Cycle Short Block Engine View Diagrams & Manuals
SBV-SBV-190A 4 Cycle Short Block Engine View Diagrams & Manuals
SBV-SBV-190B 4 Cycle Short Block Engine View Diagrams & Manuals
SBV-SBV-190C 4 Cycle Short Block Engine View Diagrams & Manuals
SBV-SBV-191 4 Cycle Short Block Engine View Diagrams & Manuals
SBV-SBV-191A 4 Cycle Short Block Engine View Diagrams & Manuals
SBV-SBV-191B 4 Cycle Short Block Engine View Diagrams & Manuals
SBV-SBV-191C 4 Cycle Short Block Engine View Diagrams & Manuals
SBV-SBV-192 4 Cycle Short Block Engine View Diagrams & Manuals
SBV-SBV-192A 4 Cycle Short Block Engine View Diagrams & Manuals
SBV-SBV-193 4 Cycle Short Block Engine View Diagrams & Manuals
SBV-SBV-193A 4 Cycle Short Block Engine View Diagrams & Manuals
SBV-SBV-194 4 Cycle Short Block Engine View Diagrams & Manuals
SBV-SBV-194A 4 Cycle Short Block Engine View Diagrams & Manuals
SBV-SBV-194B 4 Cycle Short Block Engine View Diagrams & Manuals
SBV-SBV-198 4 Cycle Short Block Engine View Diagrams & Manuals
SBV-SBV-198A 4 Cycle Short Block Engine View Diagrams & Manuals
SBV-SBV-198B 4 Cycle Short Block Engine View Diagrams & Manuals
SBV-SBV-198C 4 Cycle Short Block Engine View Diagrams & Manuals
SBV-SBV-198D 4 Cycle Short Block Engine View Diagrams & Manuals
SBV-SBV-198E 4 Cycle Short Block Engine View Diagrams & Manuals
SBV-SBV-1C 4 Cycle Short Block Engine View Diagrams & Manuals
SBV-SBV-1D 4 Cycle Short Block Engine View Diagrams & Manuals
SBV-SBV-1E 4 Cycle Short Block Engine View Diagrams & Manuals
SBV-SBV-2 4 Cycle Short Block Engine View Diagrams & Manuals
SBV-SBV-21 4 Cycle Short Block Engine View Diagrams & Manuals
SBV-SBV-211 4 Cycle Short Block Engine View Diagrams & Manuals
SBV-SBV-211A 4 Cycle Short Block Engine View Diagrams & Manuals
SBV-SBV-211B 4 Cycle Short Block Engine View Diagrams & Manuals
SBV-SBV-211C 4 Cycle Short Block Engine View Diagrams & Manuals
SBV-SBV-212 4 Cycle Short Block Engine View Diagrams & Manuals
SBV-SBV-212A 4 Cycle Short Block Engine View Diagrams & Manuals
SBV-SBV-212B 4 Cycle Short Block Engine View Diagrams & Manuals
SBV-SBV-212C 4 Cycle Short Block Engine View Diagrams & Manuals
SBV-SBV-212D 4 Cycle Short Block Engine View Diagrams & Manuals
SBV-SBV-212E 4 Cycle Short Block Engine View Diagrams & Manuals
SBV-SBV-212F 4 Cycle Short Block Engine View Diagrams & Manuals
SBV-SBV-213 4 Cycle Short Block Engine View Diagrams & Manuals
SBV-SBV-213A 4 Cycle Short Block Engine View Diagrams & Manuals
SBV-SBV-213B 4 Cycle Short Block Engine View Diagrams & Manuals
SBV-SBV-213C 4 Cycle Short Block Engine View Diagrams & Manuals
SBV-SBV-213D 4 Cycle Short Block Engine View Diagrams & Manuals
SBV-SBV-213E 4 Cycle Short Block Engine View Diagrams & Manuals
SBV-SBV-214 4 Cycle Short Block Engine View Diagrams & Manuals
SBV-SBV-214A 4 Cycle Short Block Engine View Diagrams & Manuals
SBV-SBV-214B 4 Cycle Short Block Engine View Diagrams & Manuals
SBV-SBV-214C 4 Cycle Short Block Engine View Diagrams & Manuals
SBV-SBV-214D 4 Cycle Short Block Engine View Diagrams & Manuals
SBV-SBV-214E 4 Cycle Short Block Engine View Diagrams & Manuals
SBV-SBV-214F 4 Cycle Short Block Engine View Diagrams & Manuals
SBV-SBV-23 4 Cycle Short Block Engine View Diagrams & Manuals
SBV-SBV-230 4 Cycle Short Block Engine View Diagrams & Manuals
SBV-SBV-230A 4 Cycle Short Block Engine View Diagrams & Manuals
SBV-SBV-230B 4 Cycle Short Block Engine View Diagrams & Manuals
SBV-SBV-230C 4 Cycle Short Block Engine View Diagrams & Manuals
SBV-SBV-230D 4 Cycle Short Block Engine View Diagrams & Manuals
SBV-SBV-235 4 Cycle Short Block Engine View Diagrams & Manuals
SBV-SBV-235A 4 Cycle Short Block Engine View Diagrams & Manuals
SBV-SBV-239 4 Cycle Short Block Engine View Diagrams & Manuals
SBV-SBV-239A 4 Cycle Short Block Engine View Diagrams & Manuals
SBV-SBV-239B 4 Cycle Short Block Engine View Diagrams & Manuals
SBV-SBV-23C 4 Cycle Short Block Engine View Diagrams & Manuals
SBV-SBV-23D 4 Cycle Short Block Engine View Diagrams & Manuals
SBV-SBV-250 4 Cycle Short Block Engine View Diagrams & Manuals
SBV-SBV-250A 4 Cycle Short Block Engine View Diagrams & Manuals
SBV-SBV-250B 4 Cycle Short Block Engine View Diagrams & Manuals
SBV-SBV-250C 4 Cycle Short Block Engine View Diagrams & Manuals
SBV-SBV-258 4 Cycle Short Block Engine View Diagrams & Manuals
SBV-SBV-258A 4 Cycle Short Block Engine View Diagrams & Manuals
SBV-SBV-258B 4 Cycle Short Block Engine View Diagrams & Manuals
SBV-SBV-26 4 Cycle Short Block Engine View Diagrams & Manuals
SBV-SBV-268 4 Cycle Short Block Engine View Diagrams & Manuals
SBV-SBV-26C 4 Cycle Short Block Engine View Diagrams & Manuals
SBV-SBV-26D 4 Cycle Short Block Engine View Diagrams & Manuals
SBV-SBV-26E 4 Cycle Short Block Engine View Diagrams & Manuals
SBV-SBV-27 4 Cycle Short Block Engine View Diagrams & Manuals
SBV-SBV-272 4 Cycle Short Block Engine View Diagrams & Manuals
SBV-SBV-272A 4 Cycle Short Block Engine View Diagrams & Manuals
SBV-SBV-272B 4 Cycle Short Block Engine View Diagrams & Manuals
SBV-SBV-272C 4 Cycle Short Block Engine View Diagrams & Manuals
SBV-SBV-276 4 Cycle Short Block Engine View Diagrams & Manuals
SBV-SBV-277 4 Cycle Short Block Engine View Diagrams & Manuals
SBV-SBV-279 4 Cycle Short Block Engine View Diagrams & Manuals
SBV-SBV-279A 4 Cycle Short Block Engine View Diagrams & Manuals
SBV-SBV-279B 4 Cycle Short Block Engine View Diagrams & Manuals
SBV-SBV-27C 4 Cycle Short Block Engine View Diagrams & Manuals
SBV-SBV-27D 4 Cycle Short Block Engine View Diagrams & Manuals
SBV-SBV-27E 4 Cycle Short Block Engine View Diagrams & Manuals
SBV-SBV-27F 4 Cycle Short Block Engine View Diagrams & Manuals
SBV-SBV-285 4 Cycle Short Block Engine View Diagrams & Manuals
SBV-SBV-285A 4 Cycle Short Block Engine View Diagrams & Manuals
SBV-SBV-286 4 Cycle Short Block Engine View Diagrams & Manuals
SBV-SBV-286A 4 Cycle Short Block Engine View Diagrams & Manuals
SBV-SBV-287 4 Cycle Short Block Engine View Diagrams & Manuals
SBV-SBV-288 4 Cycle Short Block Engine View Diagrams & Manuals
SBV-SBV-289 4 Cycle Short Block Engine View Diagrams & Manuals
SBV-SBV-290 4 Cycle Short Block Engine View Diagrams & Manuals
SBV-SBV-290A 4 Cycle Short Block Engine View Diagrams & Manuals
SBV-SBV-290B 4 Cycle Short Block Engine View Diagrams & Manuals
SBV-SBV-292 4 Cycle Short Block Engine View Diagrams & Manuals
SBV-SBV-292A 4 Cycle Short Block Engine View Diagrams & Manuals
SBV-SBV-292B 4 Cycle Short Block Engine View Diagrams & Manuals
SBV-SBV-292C 4 Cycle Short Block Engine View Diagrams & Manuals
SBV-SBV-296 4 Cycle Short Block Engine View Diagrams & Manuals
SBV-SBV-296A 4 Cycle Short Block Engine View Diagrams & Manuals
SBV-SBV-296B 4 Cycle Short Block Engine View Diagrams & Manuals
SBV-SBV-296C 4 Cycle Short Block Engine View Diagrams & Manuals
SBV-SBV-2C 4 Cycle Short Block Engine View Diagrams & Manuals
SBV-SBV-2D 4 Cycle Short Block Engine View Diagrams & Manuals
SBV-SBV-3 4 Cycle Short Block Engine View Diagrams & Manuals
SBV-SBV-301 4 Cycle Short Block Engine View Diagrams & Manuals
SBV-SBV-301A 4 Cycle Short Block Engine View Diagrams & Manuals
SBV-SBV-301B 4 Cycle Short Block Engine View Diagrams & Manuals
SBV-SBV-302 4 Cycle Short Block Engine View Diagrams & Manuals
SBV-SBV-304 4 Cycle Short Block Engine View Diagrams & Manuals
SBV-SBV-308 4 Cycle Short Block Engine View Diagrams & Manuals
SBV-SBV-31 4 Cycle Short Block Engine View Diagrams & Manuals
SBV-SBV-314 4 Cycle Short Block Engine View Diagrams & Manuals
SBV-SBV-314A 4 Cycle Short Block Engine View Diagrams & Manuals
SBV-SBV-315 4 Cycle Short Block Engine View Diagrams & Manuals
SBV-SBV-31C 4 Cycle Short Block Engine View Diagrams & Manuals
SBV-SBV-31D 4 Cycle Short Block Engine View Diagrams & Manuals
SBV-SBV-31E 4 Cycle Short Block Engine View Diagrams & Manuals
SBV-SBV-31F 4 Cycle Short Block Engine View Diagrams & Manuals
SBV-SBV-31G 4 Cycle Short Block Engine View Diagrams & Manuals
SBV-SBV-31H 4 Cycle Short Block Engine View Diagrams & Manuals
SBV-SBV-32 4 Cycle Short Block Engine View Diagrams & Manuals
SBV-SBV-321 4 Cycle Short Block Engine View Diagrams & Manuals
SBV-SBV-324 4 Cycle Short Block Engine View Diagrams & Manuals
SBV-SBV-324A 4 Cycle Short Block Engine View Diagrams & Manuals
SBV-SBV-324B 4 Cycle Short Block Engine View Diagrams & Manuals
SBV-SBV-324C 4 Cycle Short Block Engine View Diagrams & Manuals
SBV-SBV-327 4 Cycle Short Block Engine View Diagrams & Manuals
SBV-SBV-327A 4 Cycle Short Block Engine View Diagrams & Manuals
SBV-SBV-329 4 Cycle Short Block Engine View Diagrams & Manuals
SBV-SBV-32C 4 Cycle Short Block Engine View Diagrams & Manuals
SBV-SBV-32D 4 Cycle Short Block Engine View Diagrams & Manuals
SBV-SBV-32F 4 Cycle Short Block Engine View Diagrams & Manuals
SBV-SBV-32G 4 Cycle Short Block Engine View Diagrams & Manuals
SBV-SBV-33 4 Cycle Short Block Engine View Diagrams & Manuals
SBV-SBV-336 4 Cycle Short Block Engine View Diagrams & Manuals
SBV-SBV-33C 4 Cycle Short Block Engine View Diagrams & Manuals
SBV-SBV-341 4 Cycle Short Block Engine View Diagrams & Manuals
SBV-SBV-345 4 Cycle Short Block Engine View Diagrams & Manuals
SBV-SBV-345A 4 Cycle Short Block Engine View Diagrams & Manuals
SBV-SBV-346 4 Cycle Short Block Engine View Diagrams & Manuals
SBV-SBV-347 4 Cycle Short Block Engine View Diagrams & Manuals
SBV-SBV-348 4 Cycle Short Block Engine View Diagrams & Manuals
SBV-SBV-348A 4 Cycle Short Block Engine View Diagrams & Manuals
SBV-SBV-349 4 Cycle Short Block Engine View Diagrams & Manuals
SBV-SBV-35 4 Cycle Short Block Engine View Diagrams & Manuals
SBV-SBV-350 4 Cycle Short Block Engine View Diagrams & Manuals
SBV-SBV-354 4 Cycle Short Block Engine View Diagrams & Manuals
SBV-SBV-354A 4 Cycle Short Block Engine View Diagrams & Manuals
SBV-SBV-358 4 Cycle Short Block Engine View Diagrams & Manuals
SBV-SBV-358A 4 Cycle Short Block Engine View Diagrams & Manuals
SBV-SBV-358B 4 Cycle Short Block Engine View Diagrams & Manuals
SBV-SBV-35C 4 Cycle Short Block Engine View Diagrams & Manuals
SBV-SBV-35D 4 Cycle Short Block Engine View Diagrams & Manuals
SBV-SBV-35E 4 Cycle Short Block Engine View Diagrams & Manuals
SBV-SBV-35F 4 Cycle Short Block Engine View Diagrams & Manuals
SBV-SBV-35G 4 Cycle Short Block Engine View Diagrams & Manuals
SBV-SBV-35H 4 Cycle Short Block Engine View Diagrams & Manuals
SBV-SBV-35J 4 Cycle Short Block Engine View Diagrams & Manuals
SBV-SBV-361 4 Cycle Short Block Engine View Diagrams & Manuals
SBV-SBV-362 4 Cycle Short Block Engine View Diagrams & Manuals
SBV-SBV-362A 4 Cycle Short Block Engine View Diagrams & Manuals
SBV-SBV-363 4 Cycle Short Block Engine View Diagrams & Manuals
SBV-SBV-363A 4 Cycle Short Block Engine View Diagrams & Manuals
SBV-SBV-363B 4 Cycle Short Block Engine View Diagrams & Manuals
SBV-SBV-363C 4 Cycle Short Block Engine View Diagrams & Manuals
SBV-SBV-364 4 Cycle Short Block Engine View Diagrams & Manuals
SBV-SBV-364A 4 Cycle Short Block Engine View Diagrams & Manuals
SBV-SBV-365 4 Cycle Short Block Engine View Diagrams & Manuals
SBV-SBV-365A 4 Cycle Short Block Engine View Diagrams & Manuals
SBV-SBV-368 4 Cycle Short Block Engine View Diagrams & Manuals
SBV-SBV-368A 4 Cycle Short Block Engine View Diagrams & Manuals
SBV-SBV-368B 4 Cycle Short Block Engine View Diagrams & Manuals
SBV-SBV-370 4 Cycle Short Block Engine View Diagrams & Manuals
SBV-SBV-370A 4 Cycle Short Block Engine View Diagrams & Manuals
SBV-SBV-372 4 Cycle Short Block Engine View Diagrams & Manuals
SBV-SBV-372A 4 Cycle Short Block Engine View Diagrams & Manuals
SBV-SBV-375 4 Cycle Short Block Engine View Diagrams & Manuals
SBV-SBV-375A 4 Cycle Short Block Engine View Diagrams & Manuals
SBV-SBV-377 4 Cycle Short Block Engine View Diagrams & Manuals
SBV-SBV-377A 4 Cycle Short Block Engine View Diagrams & Manuals
SBV-SBV-378 4 Cycle Short Block Engine View Diagrams & Manuals
SBV-SBV-378A 4 Cycle Short Block Engine View Diagrams & Manuals
SBV-SBV-38 4 Cycle Short Block Engine View Diagrams & Manuals
SBV-SBV-381 4 Cycle Short Block Engine View Diagrams & Manuals
SBV-SBV-386 4 Cycle Short Block Engine View Diagrams & Manuals
SBV-SBV-386A 4 Cycle Short Block Engine View Diagrams & Manuals
SBV-SBV-386B 4 Cycle Short Block Engine View Diagrams & Manuals
SBV-SBV-387 4 Cycle Short Block Engine View Diagrams & Manuals
SBV-SBV-388 4 Cycle Short Block Engine View Diagrams & Manuals
SBV-SBV-388A 4 Cycle Short Block Engine View Diagrams & Manuals
SBV-SBV-38C 4 Cycle Short Block Engine View Diagrams & Manuals
SBV-SBV-38D 4 Cycle Short Block Engine View Diagrams & Manuals
SBV-SBV-38E 4 Cycle Short Block Engine View Diagrams & Manuals
SBV-SBV-39 4 Cycle Short Block Engine View Diagrams & Manuals
SBV-SBV-393 4 Cycle Short Block Engine View Diagrams & Manuals
SBV-SBV-393A 4 Cycle Short Block Engine View Diagrams & Manuals
SBV-SBV-394 4 Cycle Short Block Engine View Diagrams & Manuals
SBV-SBV-394A 4 Cycle Short Block Engine View Diagrams & Manuals
SBV-SBV-397 4 Cycle Short Block Engine View Diagrams & Manuals
SBV-SBV-397A 4 Cycle Short Block Engine View Diagrams & Manuals
SBV-SBV-397B 4 Cycle Short Block Engine View Diagrams & Manuals
SBV-SBV-398 4 Cycle Short Block Engine View Diagrams & Manuals
SBV-SBV-398A 4 Cycle Short Block Engine View Diagrams & Manuals
SBV-SBV-399 4 Cycle Short Block Engine View Diagrams & Manuals
SBV-SBV-399A 4 Cycle Short Block Engine View Diagrams & Manuals
SBV-SBV-39C 4 Cycle Short Block Engine View Diagrams & Manuals
SBV-SBV-39D 4 Cycle Short Block Engine View Diagrams & Manuals
SBV-SBV-39E 4 Cycle Short Block Engine View Diagrams & Manuals
SBV-SBV-4 4 Cycle Short Block Engine View Diagrams & Manuals
SBV-SBV-401 4 Cycle Short Block Engine View Diagrams & Manuals
SBV-SBV-401A 4 Cycle Short Block Engine View Diagrams & Manuals
SBV-SBV-407 4 Cycle Short Block Engine View Diagrams & Manuals
SBV-SBV-407A 4 Cycle Short Block Engine View Diagrams & Manuals
SBV-SBV-409 4 Cycle Short Block Engine View Diagrams & Manuals
SBV-SBV-409A 4 Cycle Short Block Engine View Diagrams & Manuals
SBV-SBV-409B 4 Cycle Short Block Engine View Diagrams & Manuals
SBV-SBV-410 4 Cycle Short Block Engine View Diagrams & Manuals
SBV-SBV-410A 4 Cycle Short Block Engine View Diagrams & Manuals
SBV-SBV-417 4 Cycle Short Block Engine View Diagrams & Manuals
SBV-SBV-417A 4 Cycle Short Block Engine View Diagrams & Manuals
SBV-SBV-420 4 Cycle Short Block Engine View Diagrams & Manuals
SBV-SBV-422 4 Cycle Short Block Engine View Diagrams & Manuals
SBV-SBV-423 4 Cycle Short Block Engine View Diagrams & Manuals
SBV-SBV-423A 4 Cycle Short Block Engine View Diagrams & Manuals
SBV-SBV-424 4 Cycle Short Block Engine View Diagrams & Manuals
SBV-SBV-425 4 Cycle Short Block Engine View Diagrams & Manuals
SBV-SBV-425A 4 Cycle Short Block Engine View Diagrams & Manuals
SBV-SBV-426 4 Cycle Short Block Engine View Diagrams & Manuals
SBV-SBV-427 4 Cycle Short Block Engine View Diagrams & Manuals
SBV-SBV-427A 4 Cycle Short Block Engine View Diagrams & Manuals
SBV-SBV-428 4 Cycle Short Block Engine View Diagrams & Manuals
SBV-SBV-428A 4 Cycle Short Block Engine View Diagrams & Manuals
SBV-SBV-429 4 Cycle Short Block Engine View Diagrams & Manuals
SBV-SBV-429A 4 Cycle Short Block Engine View Diagrams & Manuals
SBV-SBV-43 4 Cycle Short Block Engine View Diagrams & Manuals
SBV-SBV-430 4 Cycle Short Block Engine View Diagrams & Manuals
SBV-SBV-430A 4 Cycle Short Block Engine View Diagrams & Manuals
SBV-SBV-430B 4 Cycle Short Block Engine View Diagrams & Manuals
SBV-SBV-431 4 Cycle Short Block Engine View Diagrams & Manuals
SBV-SBV-432 4 Cycle Short Block Engine View Diagrams & Manuals
SBV-SBV-432A 4 Cycle Short Block Engine View Diagrams & Manuals
SBV-SBV-433 4 Cycle Short Block Engine View Diagrams & Manuals
SBV-SBV-434 4 Cycle Short Block Engine View Diagrams & Manuals
SBV-SBV-434A 4 Cycle Short Block Engine View Diagrams & Manuals
SBV-SBV-434B 4 Cycle Short Block Engine View Diagrams & Manuals
SBV-SBV-435 4 Cycle Short Block Engine View Diagrams & Manuals
SBV-SBV-436 4 Cycle Short Block Engine View Diagrams & Manuals
SBV-SBV-436A 4 Cycle Short Block Engine View Diagrams & Manuals
SBV-SBV-437 4 Cycle Short Block Engine View Diagrams & Manuals
SBV-SBV-437A 4 Cycle Short Block Engine View Diagrams & Manuals
SBV-SBV-438 4 Cycle Short Block Engine View Diagrams & Manuals
SBV-SBV-438A 4 Cycle Short Block Engine View Diagrams & Manuals
SBV-SBV-438B 4 Cycle Short Block Engine View Diagrams & Manuals
SBV-SBV-439 4 Cycle Short Block Engine View Diagrams & Manuals
SBV-SBV-439A 4 Cycle Short Block Engine View Diagrams & Manuals
SBV-SBV-43C 4 Cycle Short Block Engine View Diagrams & Manuals
SBV-SBV-43D 4 Cycle Short Block Engine View Diagrams & Manuals
SBV-SBV-43E 4 Cycle Short Block Engine View Diagrams & Manuals
SBV-SBV-43F 4 Cycle Short Block Engine View Diagrams & Manuals
SBV-SBV-43G 4 Cycle Short Block Engine View Diagrams & Manuals
SBV-SBV-43H 4 Cycle Short Block Engine View Diagrams & Manuals
SBV-SBV-43J 4 Cycle Short Block Engine View Diagrams & Manuals
SBV-SBV-442 4 Cycle Short Block Engine View Diagrams & Manuals
SBV-SBV-442A 4 Cycle Short Block Engine View Diagrams & Manuals
SBV-SBV-443 4 Cycle Short Block Engine View Diagrams & Manuals
SBV-SBV-443A 4 Cycle Short Block Engine View Diagrams & Manuals
SBV-SBV-444 4 Cycle Short Block Engine View Diagrams & Manuals
SBV-SBV-444A 4 Cycle Short Block Engine View Diagrams & Manuals
SBV-SBV-446 4 Cycle Short Block Engine View Diagrams & Manuals
SBV-SBV-446A 4 Cycle Short Block Engine View Diagrams & Manuals
SBV-SBV-447 4 Cycle Short Block Engine View Diagrams & Manuals
SBV-SBV-448 4 Cycle Short Block Engine View Diagrams & Manuals
SBV-SBV-449 4 Cycle Short Block Engine View Diagrams & Manuals
SBV-SBV-449A 4 Cycle Short Block Engine View Diagrams & Manuals
SBV-SBV-458 4 Cycle Short Block Engine View Diagrams & Manuals
SBV-SBV-460 4 Cycle Short Block Engine View Diagrams & Manuals
SBV-SBV-460A 4 Cycle Short Block Engine View Diagrams & Manuals
SBV-SBV-460B 4 Cycle Short Block Engine View Diagrams & Manuals
SBV-SBV-465 4 Cycle Short Block Engine View Diagrams & Manuals
SBV-SBV-477 4 Cycle Short Block Engine View Diagrams & Manuals
SBV-SBV-477A 4 Cycle Short Block Engine View Diagrams & Manuals
SBV-SBV-478 4 Cycle Short Block Engine View Diagrams & Manuals
SBV-SBV-479 4 Cycle Short Block Engine View Diagrams & Manuals
SBV-SBV-480 4 Cycle Short Block Engine View Diagrams & Manuals
SBV-SBV-481 4 Cycle Short Block Engine View Diagrams & Manuals
SBV-SBV-481A 4 Cycle Short Block Engine View Diagrams & Manuals
SBV-SBV-482 4 Cycle Short Block Engine View Diagrams & Manuals
SBV-SBV-482A 4 Cycle Short Block Engine View Diagrams & Manuals
SBV-SBV-483 4 Cycle Short Block Engine View Diagrams & Manuals
SBV-SBV-483A 4 Cycle Short Block Engine View Diagrams & Manuals
SBV-SBV-484 4 Cycle Short Block Engine View Diagrams & Manuals
SBV-SBV-491 4 Cycle Short Block Engine View Diagrams & Manuals
SBV-SBV-492 4 Cycle Short Block Engine View Diagrams & Manuals
SBV-SBV-493 4 Cycle Short Block Engine View Diagrams & Manuals
SBV-SBV-496 4 Cycle Short Block Engine View Diagrams & Manuals
SBV-SBV-497 4 Cycle Short Block Engine View Diagrams & Manuals
SBV-SBV-498 4 Cycle Short Block Engine View Diagrams & Manuals
SBV-SBV-498A 4 Cycle Short Block Engine View Diagrams & Manuals
SBV-SBV-499 4 Cycle Short Block Engine View Diagrams & Manuals
SBV-SBV-499A 4 Cycle Short Block Engine View Diagrams & Manuals
SBV-SBV-501 4 Cycle Short Block Engine View Diagrams & Manuals
SBV-SBV-501A 4 Cycle Short Block Engine View Diagrams & Manuals
SBV-SBV-503 4 Cycle Short Block Engine View Diagrams & Manuals
SBV-SBV-503A 4 Cycle Short Block Engine View Diagrams & Manuals
SBV-SBV-50437 4 Cycle Short Block Engine View Diagrams & Manuals
SBV-SBV-50448 4 Cycle Short Block Engine View Diagrams & Manuals
SBV-SBV-50466 4 Cycle Short Block Engine View Diagrams & Manuals
SBV-SBV-50478 4 Cycle Short Block Engine View Diagrams & Manuals
SBV-SBV-50484 4 Cycle Short Block Engine View Diagrams & Manuals
SBV-SBV-50489 4 Cycle Short Block Engine View Diagrams & Manuals
SBV-SBV-50496 4 Cycle Short Block Engine View Diagrams & Manuals
SBV-SBV-50497 4 Cycle Short Block Engine View Diagrams & Manuals
SBV-SBV-50501 4 Cycle Short Block Engine View Diagrams & Manuals
SBV-SBV-50503 4 Cycle Short Block Engine View Diagrams & Manuals
SBV-SBV-50506 4 Cycle Short Block Engine View Diagrams & Manuals
SBV-SBV-50507 4 Cycle Short Block Engine View Diagrams & Manuals
SBV-SBV-50510 4 Cycle Short Block Engine View Diagrams & Manuals
SBV-SBV-50512 4 Cycle Short Block Engine View Diagrams & Manuals
SBV-SBV-50513 4 Cycle Short Block Engine View Diagrams & Manuals
SBV-SBV-50521 4 Cycle Short Block Engine View Diagrams & Manuals
SBV-SBV-50522 4 Cycle Short Block Engine View Diagrams & Manuals
SBV-SBV-50523 4 Cycle Short Block Engine View Diagrams & Manuals
SBV-SBV-50533 4 Cycle Short Block Engine View Diagrams & Manuals
SBV-SBV-50538 4 Cycle Short Block Engine View Diagrams & Manuals
SBV-SBV-50543 4 Cycle Short Block Engine View Diagrams & Manuals
SBV-SBV-50544 4 Cycle Short Block Engine View Diagrams & Manuals
SBV-SBV-50547 4 Cycle Short Block Engine View Diagrams & Manuals
SBV-SBV-50548 4 Cycle Short Block Engine View Diagrams & Manuals
SBV-SBV-50549 4 Cycle Short Block Engine View Diagrams & Manuals
SBV-SBV-50550 4 Cycle Short Block Engine View Diagrams & Manuals
SBV-SBV-50551 4 Cycle Short Block Engine View Diagrams & Manuals
SBV-SBV-50552 4 Cycle Short Block Engine View Diagrams & Manuals
SBV-SBV-50553 4 Cycle Short Block Engine View Diagrams & Manuals
SBV-SBV-50554 4 Cycle Short Block Engine View Diagrams & Manuals
SBV-SBV-50555 4 Cycle Short Block Engine View Diagrams & Manuals
SBV-SBV-50556 4 Cycle Short Block Engine View Diagrams & Manuals
SBV-SBV-50558 4 Cycle Short Block Engine View Diagrams & Manuals
SBV-SBV-50559 4 Cycle Short Block Engine View Diagrams & Manuals
SBV-SBV-50560 4 Cycle Short Block Engine View Diagrams & Manuals
SBV-SBV-50561 4 Cycle Short Block Engine View Diagrams & Manuals
SBV-SBV-50562 4 Cycle Short Block Engine View Diagrams & Manuals
SBV-SBV-50563 4 Cycle Short Block Engine View Diagrams & Manuals
SBV-SBV-50565 4 Cycle Short Block Engine View Diagrams & Manuals
SBV-SBV-50566 4 Cycle Short Block Engine View Diagrams & Manuals
SBV-SBV-50571 4 Cycle Short Block Engine View Diagrams & Manuals
SBV-SBV-50574 4 Cycle Short Block Engine View Diagrams & Manuals
SBV-SBV-506 4 Cycle Short Block Engine View Diagrams & Manuals
SBV-SBV-506A 4 Cycle Short Block Engine View Diagrams & Manuals
SBV-SBV-507 4 Cycle Short Block Engine View Diagrams & Manuals
SBV-SBV-507A 4 Cycle Short Block Engine View Diagrams & Manuals
SBV-SBV-517 4 Cycle Short Block Engine View Diagrams & Manuals
SBV-SBV-52 4 Cycle Short Block Engine View Diagrams & Manuals
SBV-SBV-522 4 Cycle Short Block Engine View Diagrams & Manuals
SBV-SBV-523 4 Cycle Short Block Engine View Diagrams & Manuals
SBV-SBV-523A 4 Cycle Short Block Engine View Diagrams & Manuals
SBV-SBV-523B 4 Cycle Short Block Engine View Diagrams & Manuals
SBV-SBV-523C 4 Cycle Short Block Engine View Diagrams & Manuals
SBV-SBV-524 4 Cycle Short Block Engine View Diagrams & Manuals
SBV-SBV-524A 4 Cycle Short Block Engine View Diagrams & Manuals
SBV-SBV-525 4 Cycle Short Block Engine View Diagrams & Manuals
SBV-SBV-52C 4 Cycle Short Block Engine View Diagrams & Manuals
SBV-SBV-52D 4 Cycle Short Block Engine View Diagrams & Manuals
SBV-SBV-531 4 Cycle Short Block Engine View Diagrams & Manuals
SBV-SBV-535 4 Cycle Short Block Engine View Diagrams & Manuals
SBV-SBV-535A 4 Cycle Short Block Engine View Diagrams & Manuals
SBV-SBV-536 4 Cycle Short Block Engine View Diagrams & Manuals
SBV-SBV-536A 4 Cycle Short Block Engine View Diagrams & Manuals
SBV-SBV-537 4 Cycle Short Block Engine View Diagrams & Manuals
SBV-SBV-537A 4 Cycle Short Block Engine View Diagrams & Manuals
SBV-SBV-5437 4 Cycle Short Block Engine View Diagrams & Manuals
SBV-SBV-5446 4 Cycle Short Block Engine View Diagrams & Manuals
SBV-SBV-5448 4 Cycle Short Block Engine View Diagrams & Manuals
SBV-SBV-5450 4 Cycle Short Block Engine View Diagrams & Manuals
SBV-SBV-5451 4 Cycle Short Block Engine View Diagrams & Manuals
SBV-SBV-5456 4 Cycle Short Block Engine View Diagrams & Manuals
SBV-SBV-5464 4 Cycle Short Block Engine View Diagrams & Manuals
SBV-SBV-5466 4 Cycle Short Block Engine View Diagrams & Manuals
SBV-SBV-5478 4 Cycle Short Block Engine View Diagrams & Manuals
SBV-SBV-5484 4 Cycle Short Block Engine View Diagrams & Manuals
SBV-SBV-5486 4 Cycle Short Block Engine View Diagrams & Manuals
SBV-SBV-5489 4 Cycle Short Block Engine View Diagrams & Manuals
SBV-SBV-5494 4 Cycle Short Block Engine View Diagrams & Manuals
SBV-SBV-5496 4 Cycle Short Block Engine View Diagrams & Manuals
SBV-SBV-5497 4 Cycle Short Block Engine View Diagrams & Manuals
SBV-SBV-5501 4 Cycle Short Block Engine View Diagrams & Manuals
SBV-SBV-5503 4 Cycle Short Block Engine View Diagrams & Manuals
SBV-SBV-5506 4 Cycle Short Block Engine View Diagrams & Manuals
SBV-SBV-5507 4 Cycle Short Block Engine View Diagrams & Manuals
SBV-SBV-5510 4 Cycle Short Block Engine View Diagrams & Manuals
SBV-SBV-5512 4 Cycle Short Block Engine View Diagrams & Manuals
SBV-SBV-5513 4 Cycle Short Block Engine View Diagrams & Manuals
SBV-SBV-5521 4 Cycle Short Block Engine View Diagrams & Manuals
SBV-SBV-5522 4 Cycle Short Block Engine View Diagrams & Manuals
SBV-SBV-5523 4 Cycle Short Block Engine View Diagrams & Manuals
SBV-SBV-553 4 Cycle Short Block Engine View Diagrams & Manuals
SBV-SBV-5533 4 Cycle Short Block Engine View Diagrams & Manuals
SBV-SBV-5538 4 Cycle Short Block Engine View Diagrams & Manuals
SBV-SBV-554 4 Cycle Short Block Engine View Diagrams & Manuals
SBV-SBV-5543 4 Cycle Short Block Engine View Diagrams & Manuals
SBV-SBV-5544 4 Cycle Short Block Engine View Diagrams & Manuals
SBV-SBV-5547 4 Cycle Short Block Engine View Diagrams & Manuals
SBV-SBV-5548 4 Cycle Short Block Engine View Diagrams & Manuals
SBV-SBV-5549 4 Cycle Short Block Engine View Diagrams & Manuals
SBV-SBV-555 4 Cycle Short Block Engine View Diagrams & Manuals
SBV-SBV-5550 4 Cycle Short Block Engine View Diagrams & Manuals
SBV-SBV-5551 4 Cycle Short Block Engine View Diagrams & Manuals
SBV-SBV-5552 4 Cycle Short Block Engine View Diagrams & Manuals
SBV-SBV-5553 4 Cycle Short Block Engine View Diagrams & Manuals
SBV-SBV-5554 4 Cycle Short Block Engine View Diagrams & Manuals
SBV-SBV-5555 4 Cycle Short Block Engine View Diagrams & Manuals
SBV-SBV-5556 4 Cycle Short Block Engine View Diagrams & Manuals
SBV-SBV-5558 4 Cycle Short Block Engine View Diagrams & Manuals
SBV-SBV-5559 4 Cycle Short Block Engine View Diagrams & Manuals
SBV-SBV-555A 4 Cycle Short Block Engine View Diagrams & Manuals
SBV-SBV-5560 4 Cycle Short Block Engine View Diagrams & Manuals
SBV-SBV-5561 4 Cycle Short Block Engine View Diagrams & Manuals
SBV-SBV-5562 4 Cycle Short Block Engine View Diagrams & Manuals
SBV-SBV-5563 4 Cycle Short Block Engine View Diagrams & Manuals
SBV-SBV-5565 4 Cycle Short Block Engine View Diagrams & Manuals
SBV-SBV-5566 4 Cycle Short Block Engine View Diagrams & Manuals
SBV-SBV-557 4 Cycle Short Block Engine View Diagrams & Manuals
SBV-SBV-5571 4 Cycle Short Block Engine View Diagrams & Manuals
SBV-SBV-5574 4 Cycle Short Block Engine View Diagrams & Manuals
SBV-SBV-5576 4 Cycle Short Block Engine View Diagrams & Manuals
SBV-SBV-5579 4 Cycle Short Block Engine View Diagrams & Manuals
SBV-SBV-559 4 Cycle Short Block Engine View Diagrams & Manuals
SBV-SBV-55C 4 Cycle Short Block Engine View Diagrams & Manuals
SBV-SBV-560 4 Cycle Short Block Engine View Diagrams & Manuals
SBV-SBV-561 4 Cycle Short Block Engine View Diagrams & Manuals
SBV-SBV-562 4 Cycle Short Block Engine View Diagrams & Manuals
SBV-SBV-5627 4 Cycle Short Block Engine View Diagrams & Manuals
SBV-SBV-5628 4 Cycle Short Block Engine View Diagrams & Manuals
SBV-SBV-5629 4 Cycle Short Block Engine View Diagrams & Manuals
SBV-SBV-563 4 Cycle Short Block Engine View Diagrams & Manuals
SBV-SBV-5632 4 Cycle Short Block Engine View Diagrams & Manuals
SBV-SBV-5633 4 Cycle Short Block Engine View Diagrams & Manuals
SBV-SBV-5634 4 Cycle Short Block Engine View Diagrams & Manuals
SBV-SBV-563A 4 Cycle Short Block Engine View Diagrams & Manuals
SBV-SBV-564 4 Cycle Short Block Engine View Diagrams & Manuals
SBV-SBV-5645 4 Cycle Short Block Engine View Diagrams & Manuals
SBV-SBV-5646 4 Cycle Short Block Engine View Diagrams & Manuals
SBV-SBV-5647 4 Cycle Short Block Engine View Diagrams & Manuals
SBV-SBV-5648 4 Cycle Short Block Engine View Diagrams & Manuals
SBV-SBV-5649 4 Cycle Short Block Engine View Diagrams & Manuals
SBV-SBV-564A 4 Cycle Short Block Engine View Diagrams & Manuals
SBV-SBV-565 4 Cycle Short Block Engine View Diagrams & Manuals
SBV-SBV-5650 4 Cycle Short Block Engine View Diagrams & Manuals
SBV-SBV-5651 4 Cycle Short Block Engine View Diagrams & Manuals
SBV-SBV-5652 4 Cycle Short Block Engine View Diagrams & Manuals
SBV-SBV-5653 4 Cycle Short Block Engine View Diagrams & Manuals
SBV-SBV-5654 4 Cycle Short Block Engine View Diagrams & Manuals
SBV-SBV-5655 4 Cycle Short Block Engine View Diagrams & Manuals
SBV-SBV-5657 4 Cycle Short Block Engine View Diagrams & Manuals
SBV-SBV-5658 4 Cycle Short Block Engine View Diagrams & Manuals
SBV-SBV-5659 4 Cycle Short Block Engine View Diagrams & Manuals
SBV-SBV-566 4 Cycle Short Block Engine View Diagrams & Manuals
SBV-SBV-5660 4 Cycle Short Block Engine View Diagrams & Manuals
SBV-SBV-5661 4 Cycle Short Block Engine View Diagrams & Manuals
SBV-SBV-5662 4 Cycle Short Block Engine View Diagrams & Manuals
SBV-SBV-5663 4 Cycle Short Block Engine View Diagrams & Manuals
SBV-SBV-5664 4 Cycle Short Block Engine View Diagrams & Manuals
SBV-SBV-5665 4 Cycle Short Block Engine View Diagrams & Manuals
SBV-SBV-5666 4 Cycle Short Block Engine View Diagrams & Manuals
SBV-SBV-5667 4 Cycle Short Block Engine View Diagrams & Manuals
SBV-SBV-5669A 4 Cycle Short Block Engine View Diagrams & Manuals
SBV-SBV-5669B 4 Cycle Short Block Engine View Diagrams & Manuals
SBV-SBV-5669C 4 Cycle Short Block Engine View Diagrams & Manuals
SBV-SBV-567 4 Cycle Short Block Engine View Diagrams & Manuals
SBV-SBV-5670 4 Cycle Short Block Engine View Diagrams & Manuals
SBV-SBV-5670A 4 Cycle Short Block Engine View Diagrams & Manuals
SBV-SBV-5670B 4 Cycle Short Block Engine View Diagrams & Manuals
SBV-SBV-5670C 4 Cycle Short Block Engine View Diagrams & Manuals
SBV-SBV-5670D 4 Cycle Short Block Engine View Diagrams & Manuals
SBV-SBV-5671 4 Cycle Short Block Engine View Diagrams & Manuals
SBV-SBV-5671A 4 Cycle Short Block Engine View Diagrams & Manuals
SBV-SBV-5671B 4 Cycle Short Block Engine View Diagrams & Manuals
SBV-SBV-5672 4 Cycle Short Block Engine View Diagrams & Manuals
SBV-SBV-5672A 4 Cycle Short Block Engine View Diagrams & Manuals
SBV-SBV-5672B 4 Cycle Short Block Engine View Diagrams & Manuals
SBV-SBV-5673 4 Cycle Short Block Engine View Diagrams & Manuals
SBV-SBV-5673A 4 Cycle Short Block Engine View Diagrams & Manuals
SBV-SBV-5673B 4 Cycle Short Block Engine View Diagrams & Manuals
SBV-SBV-5673C 4 Cycle Short Block Engine View Diagrams & Manuals
SBV-SBV-5674 4 Cycle Short Block Engine View Diagrams & Manuals
SBV-SBV-5674A 4 Cycle Short Block Engine View Diagrams & Manuals
SBV-SBV-5674B 4 Cycle Short Block Engine View Diagrams & Manuals
SBV-SBV-5674C 4 Cycle Short Block Engine View Diagrams & Manuals
SBV-SBV-5674D 4 Cycle Short Block Engine View Diagrams & Manuals
SBV-SBV-5675 4 Cycle Short Block Engine View Diagrams & Manuals
SBV-SBV-5676 4 Cycle Short Block Engine View Diagrams & Manuals
SBV-SBV-5676A 4 Cycle Short Block Engine View Diagrams & Manuals
SBV-SBV-5677 4 Cycle Short Block Engine View Diagrams & Manuals
SBV-SBV-5677A 4 Cycle Short Block Engine View Diagrams & Manuals
SBV-SBV-5678 4 Cycle Short Block Engine View Diagrams & Manuals
SBV-SBV-5678A 4 Cycle Short Block Engine View Diagrams & Manuals
SBV-SBV-5678B 4 Cycle Short Block Engine View Diagrams & Manuals
SBV-SBV-5679 4 Cycle Short Block Engine View Diagrams & Manuals
SBV-SBV-5679A 4 Cycle Short Block Engine View Diagrams & Manuals
SBV-SBV-5679B 4 Cycle Short Block Engine View Diagrams & Manuals
SBV-SBV-5679C 4 Cycle Short Block Engine View Diagrams & Manuals
SBV-SBV-5680 4 Cycle Short Block Engine View Diagrams & Manuals
SBV-SBV-5680A 4 Cycle Short Block Engine View Diagrams & Manuals
SBV-SBV-5680B 4 Cycle Short Block Engine View Diagrams & Manuals
SBV-SBV-5680C 4 Cycle Short Block Engine View Diagrams & Manuals
SBV-SBV-5681 4 Cycle Short Block Engine View Diagrams & Manuals
SBV-SBV-5682 4 Cycle Short Block Engine View Diagrams & Manuals
SBV-SBV-5682A 4 Cycle Short Block Engine View Diagrams & Manuals
SBV-SBV-5682B 4 Cycle Short Block Engine View Diagrams & Manuals
SBV-SBV-5682C 4 Cycle Short Block Engine View Diagrams & Manuals
SBV-SBV-5683 4 Cycle Short Block Engine View Diagrams & Manuals
SBV-SBV-5683A 4 Cycle Short Block Engine View Diagrams & Manuals
SBV-SBV-5683B 4 Cycle Short Block Engine View Diagrams & Manuals
SBV-SBV-5684 4 Cycle Short Block Engine View Diagrams & Manuals
SBV-SBV-5684A 4 Cycle Short Block Engine View Diagrams & Manuals
SBV-SBV-5685 4 Cycle Short Block Engine View Diagrams & Manuals
SBV-SBV-5685A 4 Cycle Short Block Engine View Diagrams & Manuals
SBV-SBV-5685B 4 Cycle Short Block Engine View Diagrams & Manuals
SBV-SBV-5685C 4 Cycle Short Block Engine View Diagrams & Manuals
SBV-SBV-5686 4 Cycle Short Block Engine View Diagrams & Manuals
SBV-SBV-5686A 4 Cycle Short Block Engine View Diagrams & Manuals
SBV-SBV-5686B 4 Cycle Short Block Engine View Diagrams & Manuals
SBV-SBV-5686C 4 Cycle Short Block Engine View Diagrams & Manuals
SBV-SBV-5687 4 Cycle Short Block Engine View Diagrams & Manuals
SBV-SBV-5687A 4 Cycle Short Block Engine View Diagrams & Manuals
SBV-SBV-5687B 4 Cycle Short Block Engine View Diagrams & Manuals
SBV-SBV-5687C 4 Cycle Short Block Engine View Diagrams & Manuals
SBV-SBV-5687D 4 Cycle Short Block Engine View Diagrams & Manuals
SBV-SBV-5688 4 Cycle Short Block Engine View Diagrams & Manuals
SBV-SBV-5688A 4 Cycle Short Block Engine View Diagrams & Manuals
SBV-SBV-5688B 4 Cycle Short Block Engine View Diagrams & Manuals
SBV-SBV-5689 4 Cycle Short Block Engine View Diagrams & Manuals
SBV-SBV-5689A 4 Cycle Short Block Engine View Diagrams & Manuals
SBV-SBV-5689B 4 Cycle Short Block Engine View Diagrams & Manuals
SBV-SBV-569 4 Cycle Short Block Engine View Diagrams & Manuals
SBV-SBV-5690 4 Cycle Short Block Engine View Diagrams & Manuals
SBV-SBV-5690A 4 Cycle Short Block Engine View Diagrams & Manuals
SBV-SBV-5690B 4 Cycle Short Block Engine View Diagrams & Manuals
SBV-SBV-5691 4 Cycle Short Block Engine View Diagrams & Manuals
SBV-SBV-5691A 4 Cycle Short Block Engine View Diagrams & Manuals
SBV-SBV-5691B 4 Cycle Short Block Engine View Diagrams & Manuals
SBV-SBV-5692 4 Cycle Short Block Engine View Diagrams & Manuals
SBV-SBV-5692A 4 Cycle Short Block Engine View Diagrams & Manuals
SBV-SBV-5692B 4 Cycle Short Block Engine View Diagrams & Manuals
SBV-SBV-5692C 4 Cycle Short Block Engine View Diagrams & Manuals
SBV-SBV-5692D 4 Cycle Short Block Engine View Diagrams & Manuals
SBV-SBV-5693 4 Cycle Short Block Engine View Diagrams & Manuals
SBV-SBV-5693A 4 Cycle Short Block Engine View Diagrams & Manuals
SBV-SBV-5694 4 Cycle Short Block Engine View Diagrams & Manuals
SBV-SBV-5694A 4 Cycle Short Block Engine View Diagrams & Manuals
SBV-SBV-5694B 4 Cycle Short Block Engine View Diagrams & Manuals
SBV-SBV-5695 4 Cycle Short Block Engine View Diagrams & Manuals
SBV-SBV-5695A 4 Cycle Short Block Engine View Diagrams & Manuals
SBV-SBV-5696 4 Cycle Short Block Engine View Diagrams & Manuals
SBV-SBV-5696A 4 Cycle Short Block Engine View Diagrams & Manuals
SBV-SBV-5697 4 Cycle Short Block Engine View Diagrams & Manuals
SBV-SBV-5697A 4 Cycle Short Block Engine View Diagrams & Manuals
SBV-SBV-5697B 4 Cycle Short Block Engine View Diagrams & Manuals
SBV-SBV-5697C 4 Cycle Short Block Engine View Diagrams & Manuals
SBV-SBV-5698 4 Cycle Short Block Engine View Diagrams & Manuals
SBV-SBV-5699 4 Cycle Short Block Engine View Diagrams & Manuals
SBV-SBV-5699A 4 Cycle Short Block Engine View Diagrams & Manuals
SBV-SBV-5699B 4 Cycle Short Block Engine View Diagrams & Manuals
SBV-SBV-5699C 4 Cycle Short Block Engine View Diagrams & Manuals
SBV-SBV-5699D 4 Cycle Short Block Engine View Diagrams & Manuals
SBV-SBV-56C 4 Cycle Short Block Engine View Diagrams & Manuals
SBV-SBV-56D 4 Cycle Short Block Engine View Diagrams & Manuals
SBV-SBV-5700 4 Cycle Short Block Engine View Diagrams & Manuals
SBV-SBV-5700A 4 Cycle Short Block Engine View Diagrams & Manuals
SBV-SBV-5700B 4 Cycle Short Block Engine View Diagrams & Manuals
SBV-SBV-5700C 4 Cycle Short Block Engine View Diagrams & Manuals
SBV-SBV-5701 4 Cycle Short Block Engine View Diagrams & Manuals
SBV-SBV-5701A 4 Cycle Short Block Engine View Diagrams & Manuals
SBV-SBV-5702 4 Cycle Short Block Engine View Diagrams & Manuals
SBV-SBV-5702A 4 Cycle Short Block Engine View Diagrams & Manuals
SBV-SBV-5702B 4 Cycle Short Block Engine View Diagrams & Manuals
SBV-SBV-5702C 4 Cycle Short Block Engine View Diagrams & Manuals
SBV-SBV-5703 4 Cycle Short Block Engine View Diagrams & Manuals
SBV-SBV-5703A 4 Cycle Short Block Engine View Diagrams & Manuals
SBV-SBV-5704 4 Cycle Short Block Engine View Diagrams & Manuals
SBV-SBV-5704A 4 Cycle Short Block Engine View Diagrams & Manuals
SBV-SBV-5705 4 Cycle Short Block Engine View Diagrams & Manuals
SBV-SBV-5705A 4 Cycle Short Block Engine View Diagrams & Manuals
SBV-SBV-5705B 4 Cycle Short Block Engine View Diagrams & Manuals
SBV-SBV-5705C 4 Cycle Short Block Engine View Diagrams & Manuals
SBV-SBV-5706 4 Cycle Short Block Engine View Diagrams & Manuals
SBV-SBV-5706A 4 Cycle Short Block Engine View Diagrams & Manuals
SBV-SBV-5706B 4 Cycle Short Block Engine View Diagrams & Manuals
SBV-SBV-5706C 4 Cycle Short Block Engine View Diagrams & Manuals
SBV-SBV-5707 4 Cycle Short Block Engine View Diagrams & Manuals
SBV-SBV-5707A 4 Cycle Short Block Engine View Diagrams & Manuals
SBV-SBV-5708 4 Cycle Short Block Engine View Diagrams & Manuals
SBV-SBV-5708A 4 Cycle Short Block Engine View Diagrams & Manuals
SBV-SBV-5708B 4 Cycle Short Block Engine View Diagrams & Manuals
SBV-SBV-5708C 4 Cycle Short Block Engine View Diagrams & Manuals
SBV-SBV-5709 4 Cycle Short Block Engine View Diagrams & Manuals
SBV-SBV-5709A 4 Cycle Short Block Engine View Diagrams & Manuals
SBV-SBV-5709B 4 Cycle Short Block Engine View Diagrams & Manuals
SBV-SBV-5709C 4 Cycle Short Block Engine View Diagrams & Manuals
SBV-SBV-5709D 4 Cycle Short Block Engine View Diagrams & Manuals
SBV-SBV-5710 4 Cycle Short Block Engine View Diagrams & Manuals
SBV-SBV-5710A 4 Cycle Short Block Engine View Diagrams & Manuals
SBV-SBV-5710B 4 Cycle Short Block Engine View Diagrams & Manuals
SBV-SBV-5710C 4 Cycle Short Block Engine View Diagrams & Manuals
SBV-SBV-5711 4 Cycle Short Block Engine View Diagrams & Manuals
SBV-SBV-5711A 4 Cycle Short Block Engine View Diagrams & Manuals
SBV-SBV-5711B 4 Cycle Short Block Engine View Diagrams & Manuals
SBV-SBV-5712 4 Cycle Short Block Engine View Diagrams & Manuals
SBV-SBV-5712A 4 Cycle Short Block Engine View Diagrams & Manuals
SBV-SBV-5712B 4 Cycle Short Block Engine View Diagrams & Manuals
SBV-SBV-5713 4 Cycle Short Block Engine View Diagrams & Manuals
SBV-SBV-5713A 4 Cycle Short Block Engine View Diagrams & Manuals
SBV-SBV-5713B 4 Cycle Short Block Engine View Diagrams & Manuals
SBV-SBV-5713C 4 Cycle Short Block Engine View Diagrams & Manuals
SBV-SBV-5714 4 Cycle Short Block Engine View Diagrams & Manuals
SBV-SBV-5714A 4 Cycle Short Block Engine View Diagrams & Manuals
SBV-SBV-5714B 4 Cycle Short Block Engine View Diagrams & Manuals
SBV-SBV-5714C 4 Cycle Short Block Engine View Diagrams & Manuals
SBV-SBV-5715 4 Cycle Short Block Engine View Diagrams & Manuals
SBV-SBV-5715A 4 Cycle Short Block Engine View Diagrams & Manuals
SBV-SBV-5715B 4 Cycle Short Block Engine View Diagrams & Manuals
SBV-SBV-5715C 4 Cycle Short Block Engine View Diagrams & Manuals
SBV-SBV-5716 4 Cycle Short Block Engine View Diagrams & Manuals
SBV-SBV-5716A 4 Cycle Short Block Engine View Diagrams & Manuals
SBV-SBV-5716B 4 Cycle Short Block Engine View Diagrams & Manuals
SBV-SBV-5717 4 Cycle Short Block Engine View Diagrams & Manuals
SBV-SBV-5717A 4 Cycle Short Block Engine View Diagrams & Manuals
SBV-SBV-5718 4 Cycle Short Block Engine View Diagrams & Manuals
SBV-SBV-5718A 4 Cycle Short Block Engine View Diagrams & Manuals
SBV-SBV-5718B 4 Cycle Short Block Engine View Diagrams & Manuals
SBV-SBV-5719 4 Cycle Short Block Engine View Diagrams & Manuals
SBV-SBV-5719A 4 Cycle Short Block Engine View Diagrams & Manuals
SBV-SBV-572 4 Cycle Short Block Engine View Diagrams & Manuals
SBV-SBV-5720 4 Cycle Short Block Engine View Diagrams & Manuals
SBV-SBV-5720A 4 Cycle Short Block Engine View Diagrams & Manuals
SBV-SBV-5720B 4 Cycle Short Block Engine View Diagrams & Manuals
SBV-SBV-5720C 4 Cycle Short Block Engine View Diagrams & Manuals
SBV-SBV-5721 4 Cycle Short Block Engine View Diagrams & Manuals
SBV-SBV-5721A 4 Cycle Short Block Engine View Diagrams & Manuals
SBV-SBV-5721B 4 Cycle Short Block Engine View Diagrams & Manuals
SBV-SBV-5721C 4 Cycle Short Block Engine View Diagrams & Manuals
SBV-SBV-5721D 4 Cycle Short Block Engine View Diagrams & Manuals
SBV-SBV-5722 4 Cycle Short Block Engine View Diagrams & Manuals
SBV-SBV-5722A 4 Cycle Short Block Engine View Diagrams & Manuals
SBV-SBV-5722B 4 Cycle Short Block Engine View Diagrams & Manuals
SBV-SBV-5722C 4 Cycle Short Block Engine View Diagrams & Manuals
SBV-SBV-5722D 4 Cycle Short Block Engine View Diagrams & Manuals
SBV-SBV-5723 4 Cycle Short Block Engine View Diagrams & Manuals
SBV-SBV-5724 4 Cycle Short Block Engine View Diagrams & Manuals
SBV-SBV-5724A 4 Cycle Short Block Engine View Diagrams & Manuals
SBV-SBV-5725 4 Cycle Short Block Engine View Diagrams & Manuals
SBV-SBV-5725A 4 Cycle Short Block Engine View Diagrams & Manuals
SBV-SBV-5725B 4 Cycle Short Block Engine View Diagrams & Manuals
SBV-SBV-5725C 4 Cycle Short Block Engine View Diagrams & Manuals
SBV-SBV-5725D 4 Cycle Short Block Engine View Diagrams & Manuals
SBV-SBV-5726 4 Cycle Short Block Engine View Diagrams & Manuals
SBV-SBV-5726A 4 Cycle Short Block Engine View Diagrams & Manuals
SBV-SBV-5726B 4 Cycle Short Block Engine View Diagrams & Manuals
SBV-SBV-5726C 4 Cycle Short Block Engine View Diagrams & Manuals
SBV-SBV-5726D 4 Cycle Short Block Engine View Diagrams & Manuals
SBV-SBV-5727 4 Cycle Short Block Engine View Diagrams & Manuals
SBV-SBV-5727A 4 Cycle Short Block Engine View Diagrams & Manuals
SBV-SBV-5728 4 Cycle Short Block Engine View Diagrams & Manuals
SBV-SBV-5728A 4 Cycle Short Block Engine View Diagrams & Manuals
SBV-SBV-5728B 4 Cycle Short Block Engine View Diagrams & Manuals
SBV-SBV-5728C 4 Cycle Short Block Engine View Diagrams & Manuals
SBV-SBV-5728D 4 Cycle Short Block Engine View Diagrams & Manuals
SBV-SBV-5729 4 Cycle Short Block Engine View Diagrams & Manuals
SBV-SBV-5729A 4 Cycle Short Block Engine View Diagrams & Manuals
SBV-SBV-5729B 4 Cycle Short Block Engine View Diagrams & Manuals
SBV-SBV-5729C 4 Cycle Short Block Engine View Diagrams & Manuals
SBV-SBV-5729D 4 Cycle Short Block Engine View Diagrams & Manuals
SBV-SBV-573 4 Cycle Short Block Engine View Diagrams & Manuals
SBV-SBV-5730 4 Cycle Short Block Engine View Diagrams & Manuals
SBV-SBV-5730A 4 Cycle Short Block Engine View Diagrams & Manuals
SBV-SBV-5730B 4 Cycle Short Block Engine View Diagrams & Manuals
SBV-SBV-5730C 4 Cycle Short Block Engine View Diagrams & Manuals
SBV-SBV-5730D 4 Cycle Short Block Engine View Diagrams & Manuals
SBV-SBV-5731 4 Cycle Short Block Engine View Diagrams & Manuals
SBV-SBV-5731A 4 Cycle Short Block Engine View Diagrams & Manuals
SBV-SBV-5731B 4 Cycle Short Block Engine View Diagrams & Manuals
SBV-SBV-5731C 4 Cycle Short Block Engine View Diagrams & Manuals
SBV-SBV-5732 4 Cycle Short Block Engine View Diagrams & Manuals
SBV-SBV-5732A 4 Cycle Short Block Engine View Diagrams & Manuals
SBV-SBV-5732B 4 Cycle Short Block Engine View Diagrams & Manuals
SBV-SBV-5732C 4 Cycle Short Block Engine View Diagrams & Manuals
SBV-SBV-5733 4 Cycle Short Block Engine View Diagrams & Manuals
SBV-SBV-5733A 4 Cycle Short Block Engine View Diagrams & Manuals
SBV-SBV-5733B 4 Cycle Short Block Engine View Diagrams & Manuals
SBV-SBV-5733C 4 Cycle Short Block Engine View Diagrams & Manuals
SBV-SBV-5733D 4 Cycle Short Block Engine View Diagrams & Manuals
SBV-SBV-5734 4 Cycle Short Block Engine View Diagrams & Manuals
SBV-SBV-5735 4 Cycle Short Block Engine View Diagrams & Manuals
SBV-SBV-5735A 4 Cycle Short Block Engine View Diagrams & Manuals
SBV-SBV-5736 4 Cycle Short Block Engine View Diagrams & Manuals
SBV-SBV-5737 4 Cycle Short Block Engine View Diagrams & Manuals
SBV-SBV-5737A 4 Cycle Short Block Engine View Diagrams & Manuals
SBV-SBV-5737B 4 Cycle Short Block Engine View Diagrams & Manuals
SBV-SBV-5737C 4 Cycle Short Block Engine View Diagrams & Manuals
SBV-SBV-5737D 4 Cycle Short Block Engine View Diagrams & Manuals
SBV-SBV-5738 4 Cycle Short Block Engine View Diagrams & Manuals
SBV-SBV-5738A 4 Cycle Short Block Engine View Diagrams & Manuals
SBV-SBV-5739 4 Cycle Short Block Engine View Diagrams & Manuals
SBV-SBV-5739A 4 Cycle Short Block Engine View Diagrams & Manuals
SBV-SBV-574 4 Cycle Short Block Engine View Diagrams & Manuals
SBV-SBV-5740 4 Cycle Short Block Engine View Diagrams & Manuals
SBV-SBV-5740A 4 Cycle Short Block Engine View Diagrams & Manuals
SBV-SBV-5741 4 Cycle Short Block Engine View Diagrams & Manuals
SBV-SBV-5742 4 Cycle Short Block Engine View Diagrams & Manuals
SBV-SBV-5742A 4 Cycle Short Block Engine View Diagrams & Manuals
SBV-SBV-5742B 4 Cycle Short Block Engine View Diagrams & Manuals
SBV-SBV-5742C 4 Cycle Short Block Engine View Diagrams & Manuals
SBV-SBV-5742D 4 Cycle Short Block Engine View Diagrams & Manuals
SBV-SBV-5743 4 Cycle Short Block Engine View Diagrams & Manuals
SBV-SBV-5743A 4 Cycle Short Block Engine View Diagrams & Manuals
SBV-SBV-5743B 4 Cycle Short Block Engine View Diagrams & Manuals
SBV-SBV-5743C 4 Cycle Short Block Engine View Diagrams & Manuals
SBV-SBV-5743D 4 Cycle Short Block Engine View Diagrams & Manuals
SBV-SBV-5744 4 Cycle Short Block Engine View Diagrams & Manuals
SBV-SBV-5744A 4 Cycle Short Block Engine View Diagrams & Manuals
SBV-SBV-5744B 4 Cycle Short Block Engine View Diagrams & Manuals
SBV-SBV-5744C 4 Cycle Short Block Engine View Diagrams & Manuals
SBV-SBV-5745 4 Cycle Short Block Engine View Diagrams & Manuals
SBV-SBV-5745A 4 Cycle Short Block Engine View Diagrams & Manuals
SBV-SBV-5745B 4 Cycle Short Block Engine View Diagrams & Manuals
SBV-SBV-5745C 4 Cycle Short Block Engine View Diagrams & Manuals
SBV-SBV-5746 4 Cycle Short Block Engine View Diagrams & Manuals
SBV-SBV-5746A 4 Cycle Short Block Engine View Diagrams & Manuals
SBV-SBV-5746B 4 Cycle Short Block Engine View Diagrams & Manuals
SBV-SBV-5747 4 Cycle Short Block Engine View Diagrams & Manuals
SBV-SBV-5747A 4 Cycle Short Block Engine View Diagrams & Manuals
SBV-SBV-5747B 4 Cycle Short Block Engine View Diagrams & Manuals
SBV-SBV-5747C 4 Cycle Short Block Engine View Diagrams & Manuals
SBV-SBV-5748 4 Cycle Short Block Engine View Diagrams & Manuals
SBV-SBV-5748A 4 Cycle Short Block Engine View Diagrams & Manuals
SBV-SBV-5749 4 Cycle Short Block Engine View Diagrams & Manuals
SBV-SBV-575 4 Cycle Short Block Engine View Diagrams & Manuals
SBV-SBV-5750 4 Cycle Short Block Engine View Diagrams & Manuals
SBV-SBV-5751 4 Cycle Short Block Engine View Diagrams & Manuals
SBV-SBV-5752 4 Cycle Short Block Engine View Diagrams & Manuals
SBV-SBV-5753 4 Cycle Short Block Engine View Diagrams & Manuals
SBV-SBV-5754 4 Cycle Short Block Engine View Diagrams & Manuals
SBV-SBV-5754A 4 Cycle Short Block Engine View Diagrams & Manuals
SBV-SBV-5754B 4 Cycle Short Block Engine View Diagrams & Manuals
SBV-SBV-5754C 4 Cycle Short Block Engine View Diagrams & Manuals
SBV-SBV-5755 4 Cycle Short Block Engine View Diagrams & Manuals
SBV-SBV-5758 4 Cycle Short Block Engine View Diagrams & Manuals
SBV-SBV-5758A 4 Cycle Short Block Engine View Diagrams & Manuals
SBV-SBV-5759 4 Cycle Short Block Engine View Diagrams & Manuals
SBV-SBV-5759A 4 Cycle Short Block Engine View Diagrams & Manuals
SBV-SBV-5759B 4 Cycle Short Block Engine View Diagrams & Manuals
SBV-SBV-575A 4 Cycle Short Block Engine View Diagrams & Manuals
SBV-SBV-576 4 Cycle Short Block Engine View Diagrams & Manuals
SBV-SBV-5760 4 Cycle Short Block Engine View Diagrams & Manuals
SBV-SBV-5760A 4 Cycle Short Block Engine View Diagrams & Manuals
SBV-SBV-5760B 4 Cycle Short Block Engine View Diagrams & Manuals
SBV-SBV-5760C 4 Cycle Short Block Engine View Diagrams & Manuals
SBV-SBV-5760D 4 Cycle Short Block Engine View Diagrams & Manuals
SBV-SBV-5762 4 Cycle Short Block Engine View Diagrams & Manuals
SBV-SBV-5762A 4 Cycle Short Block Engine View Diagrams & Manuals
SBV-SBV-5762B 4 Cycle Short Block Engine View Diagrams & Manuals
SBV-SBV-5762C 4 Cycle Short Block Engine View Diagrams & Manuals
SBV-SBV-5763 4 Cycle Short Block Engine View Diagrams & Manuals
SBV-SBV-5763A 4 Cycle Short Block Engine View Diagrams & Manuals
SBV-SBV-5764 4 Cycle Short Block Engine View Diagrams & Manuals
SBV-SBV-5764A 4 Cycle Short Block Engine View Diagrams & Manuals
SBV-SBV-5764B 4 Cycle Short Block Engine View Diagrams & Manuals
SBV-SBV-5764C 4 Cycle Short Block Engine View Diagrams & Manuals
SBV-SBV-5764D 4 Cycle Short Block Engine View Diagrams & Manuals
SBV-SBV-5765 4 Cycle Short Block Engine View Diagrams & Manuals
SBV-SBV-5765A 4 Cycle Short Block Engine View Diagrams & Manuals
SBV-SBV-5766 4 Cycle Short Block Engine View Diagrams & Manuals
SBV-SBV-5766A 4 Cycle Short Block Engine View Diagrams & Manuals
SBV-SBV-5766B 4 Cycle Short Block Engine View Diagrams & Manuals
SBV-SBV-5766C 4 Cycle Short Block Engine View Diagrams & Manuals
SBV-SBV-5766D 4 Cycle Short Block Engine View Diagrams & Manuals
SBV-SBV-5767 4 Cycle Short Block Engine View Diagrams & Manuals
SBV-SBV-5767A 4 Cycle Short Block Engine View Diagrams & Manuals
SBV-SBV-5767B 4 Cycle Short Block Engine View Diagrams & Manuals
SBV-SBV-5767C 4 Cycle Short Block Engine View Diagrams & Manuals
SBV-SBV-5767D 4 Cycle Short Block Engine View Diagrams & Manuals
SBV-SBV-5769 4 Cycle Short Block Engine View Diagrams & Manuals
SBV-SBV-5769A 4 Cycle Short Block Engine View Diagrams & Manuals
SBV-SBV-5769B 4 Cycle Short Block Engine View Diagrams & Manuals
SBV-SBV-5769C 4 Cycle Short Block Engine View Diagrams & Manuals
SBV-SBV-5769D 4 Cycle Short Block Engine View Diagrams & Manuals
SBV-SBV-5770 4 Cycle Short Block Engine View Diagrams & Manuals
SBV-SBV-5771 4 Cycle Short Block Engine View Diagrams & Manuals
SBV-SBV-5772 4 Cycle Short Block Engine View Diagrams & Manuals
SBV-SBV-5772A 4 Cycle Short Block Engine View Diagrams & Manuals
SBV-SBV-5772B 4 Cycle Short Block Engine View Diagrams & Manuals
SBV-SBV-5773 4 Cycle Short Block Engine View Diagrams & Manuals
SBV-SBV-5774 4 Cycle Short Block Engine View Diagrams & Manuals
SBV-SBV-5774A 4 Cycle Short Block Engine View Diagrams & Manuals
SBV-SBV-5774B 4 Cycle Short Block Engine View Diagrams & Manuals
SBV-SBV-5774C 4 Cycle Short Block Engine View Diagrams & Manuals
SBV-SBV-5774D 4 Cycle Short Block Engine View Diagrams & Manuals
SBV-SBV-5785 4 Cycle Short Block Engine View Diagrams & Manuals
SBV-SBV-5786 4 Cycle Short Block Engine View Diagrams & Manuals
SBV-SBV-5786A 4 Cycle Short Block Engine View Diagrams & Manuals
SBV-SBV-5787 4 Cycle Short Block Engine View Diagrams & Manuals
SBV-SBV-5787A 4 Cycle Short Block Engine View Diagrams & Manuals
SBV-SBV-5788 4 Cycle Short Block Engine View Diagrams & Manuals
SBV-SBV-5789 4 Cycle Short Block Engine View Diagrams & Manuals
SBV-SBV-5790 4 Cycle Short Block Engine View Diagrams & Manuals
SBV-SBV-5790A 4 Cycle Short Block Engine View Diagrams & Manuals
SBV-SBV-5790B 4 Cycle Short Block Engine View Diagrams & Manuals
SBV-SBV-5790C 4 Cycle Short Block Engine View Diagrams & Manuals
SBV-SBV-5791 4 Cycle Short Block Engine View Diagrams & Manuals
SBV-SBV-5791A 4 Cycle Short Block Engine View Diagrams & Manuals
SBV-SBV-5791B 4 Cycle Short Block Engine View Diagrams & Manuals
SBV-SBV-5791C 4 Cycle Short Block Engine View Diagrams & Manuals
SBV-SBV-5793 4 Cycle Short Block Engine View Diagrams & Manuals
SBV-SBV-5794 4 Cycle Short Block Engine View Diagrams & Manuals
SBV-SBV-5794A 4 Cycle Short Block Engine View Diagrams & Manuals
SBV-SBV-5795 4 Cycle Short Block Engine View Diagrams & Manuals
SBV-SBV-5795A 4 Cycle Short Block Engine View Diagrams & Manuals
SBV-SBV-5795B 4 Cycle Short Block Engine View Diagrams & Manuals
SBV-SBV-5795C 4 Cycle Short Block Engine View Diagrams & Manuals
SBV-SBV-5795D 4 Cycle Short Block Engine View Diagrams & Manuals
SBV-SBV-5796 4 Cycle Short Block Engine View Diagrams & Manuals
SBV-SBV-5796A 4 Cycle Short Block Engine View Diagrams & Manuals
SBV-SBV-5796B 4 Cycle Short Block Engine View Diagrams & Manuals
SBV-SBV-5796C 4 Cycle Short Block Engine View Diagrams & Manuals
SBV-SBV-5797 4 Cycle Short Block Engine View Diagrams & Manuals
SBV-SBV-5797A 4 Cycle Short Block Engine View Diagrams & Manuals
SBV-SBV-5797B 4 Cycle Short Block Engine View Diagrams & Manuals
SBV-SBV-5797C 4 Cycle Short Block Engine View Diagrams & Manuals
SBV-SBV-5799 4 Cycle Short Block Engine View Diagrams & Manuals
SBV-SBV-5799A 4 Cycle Short Block Engine View Diagrams & Manuals
SBV-SBV-57C 4 Cycle Short Block Engine View Diagrams & Manuals
SBV-SBV-57D 4 Cycle Short Block Engine View Diagrams & Manuals
SBV-SBV-57E 4 Cycle Short Block Engine View Diagrams & Manuals
SBV-SBV-57F 4 Cycle Short Block Engine View Diagrams & Manuals
SBV-SBV-5800 4 Cycle Short Block Engine View Diagrams & Manuals
SBV-SBV-5800A 4 Cycle Short Block Engine View Diagrams & Manuals
SBV-SBV-5801 4 Cycle Short Block Engine View Diagrams & Manuals
SBV-SBV-5801A 4 Cycle Short Block Engine View Diagrams & Manuals
SBV-SBV-5801B 4 Cycle Short Block Engine View Diagrams & Manuals
SBV-SBV-5801C 4 Cycle Short Block Engine View Diagrams & Manuals
SBV-SBV-5803 4 Cycle Short Block Engine View Diagrams & Manuals
SBV-SBV-5804 4 Cycle Short Block Engine View Diagrams & Manuals
SBV-SBV-5804A 4 Cycle Short Block Engine View Diagrams & Manuals
SBV-SBV-5804B 4 Cycle Short Block Engine View Diagrams & Manuals
SBV-SBV-5805 4 Cycle Short Block Engine View Diagrams & Manuals
SBV-SBV-5805A 4 Cycle Short Block Engine View Diagrams & Manuals
SBV-SBV-5805B 4 Cycle Short Block Engine View Diagrams & Manuals
SBV-SBV-5805C 4 Cycle Short Block Engine View Diagrams & Manuals
SBV-SBV-5806 4 Cycle Short Block Engine View Diagrams & Manuals
SBV-SBV-5806A 4 Cycle Short Block Engine View Diagrams & Manuals
SBV-SBV-5806B 4 Cycle Short Block Engine View Diagrams & Manuals
SBV-SBV-5806C 4 Cycle Short Block Engine View Diagrams & Manuals
SBV-SBV-5807 4 Cycle Short Block Engine View Diagrams & Manuals
SBV-SBV-5807A 4 Cycle Short Block Engine View Diagrams & Manuals
SBV-SBV-5807B 4 Cycle Short Block Engine View Diagrams & Manuals
SBV-SBV-5809 4 Cycle Short Block Engine View Diagrams & Manuals
SBV-SBV-5809A 4 Cycle Short Block Engine View Diagrams & Manuals
SBV-SBV-5809B 4 Cycle Short Block Engine View Diagrams & Manuals
SBV-SBV-5810 4 Cycle Short Block Engine View Diagrams & Manuals
SBV-SBV-5810A 4 Cycle Short Block Engine View Diagrams & Manuals
SBV-SBV-5811 4 Cycle Short Block Engine View Diagrams & Manuals
SBV-SBV-5811A 4 Cycle Short Block Engine View Diagrams & Manuals
SBV-SBV-5812 4 Cycle Short Block Engine View Diagrams & Manuals
SBV-SBV-5812A 4 Cycle Short Block Engine View Diagrams & Manuals
SBV-SBV-5812B 4 Cycle Short Block Engine View Diagrams & Manuals
SBV-SBV-5812C 4 Cycle Short Block Engine View Diagrams & Manuals
SBV-SBV-5812D 4 Cycle Short Block Engine View Diagrams & Manuals
SBV-SBV-5820 4 Cycle Short Block Engine View Diagrams & Manuals
SBV-SBV-5827 4 Cycle Short Block Engine View Diagrams & Manuals
SBV-SBV-5827A 4 Cycle Short Block Engine View Diagrams & Manuals
SBV-SBV-5829 4 Cycle Short Block Engine View Diagrams & Manuals
SBV-SBV-5829A 4 Cycle Short Block Engine View Diagrams & Manuals
SBV-SBV-5829B 4 Cycle Short Block Engine View Diagrams & Manuals
SBV-SBV-583 4 Cycle Short Block Engine View Diagrams & Manuals
SBV-SBV-5831 4 Cycle Short Block Engine View Diagrams & Manuals
SBV-SBV-5831A 4 Cycle Short Block Engine View Diagrams & Manuals
SBV-SBV-5831B 4 Cycle Short Block Engine View Diagrams & Manuals
SBV-SBV-5832 4 Cycle Short Block Engine View Diagrams & Manuals
SBV-SBV-5832A 4 Cycle Short Block Engine View Diagrams & Manuals
SBV-SBV-5832B 4 Cycle Short Block Engine View Diagrams & Manuals
SBV-SBV-5832C 4 Cycle Short Block Engine View Diagrams & Manuals
SBV-SBV-5832D 4 Cycle Short Block Engine View Diagrams & Manuals
SBV-SBV-5833 4 Cycle Short Block Engine View Diagrams & Manuals
SBV-SBV-5833A 4 Cycle Short Block Engine View Diagrams & Manuals
SBV-SBV-5833B 4 Cycle Short Block Engine View Diagrams & Manuals
SBV-SBV-5834 4 Cycle Short Block Engine View Diagrams & Manuals
SBV-SBV-5834A 4 Cycle Short Block Engine View Diagrams & Manuals
SBV-SBV-5834B 4 Cycle Short Block Engine View Diagrams & Manuals
SBV-SBV-5835 4 Cycle Short Block Engine View Diagrams & Manuals
SBV-SBV-5835A 4 Cycle Short Block Engine View Diagrams & Manuals
SBV-SBV-5835B 4 Cycle Short Block Engine View Diagrams & Manuals
SBV-SBV-5836 4 Cycle Short Block Engine View Diagrams & Manuals
SBV-SBV-5836A 4 Cycle Short Block Engine View Diagrams & Manuals
SBV-SBV-5836B 4 Cycle Short Block Engine View Diagrams & Manuals
SBV-SBV-5837 4 Cycle Short Block Engine View Diagrams & Manuals
SBV-SBV-5837A 4 Cycle Short Block Engine View Diagrams & Manuals
SBV-SBV-5837B 4 Cycle Short Block Engine View Diagrams & Manuals
SBV-SBV-5837C 4 Cycle Short Block Engine View Diagrams & Manuals
SBV-SBV-5837D 4 Cycle Short Block Engine View Diagrams & Manuals
SBV-SBV-5839 4 Cycle Short Block Engine View Diagrams & Manuals
SBV-SBV-5839A 4 Cycle Short Block Engine View Diagrams & Manuals
SBV-SBV-5839B 4 Cycle Short Block Engine View Diagrams & Manuals
SBV-SBV-5839C 4 Cycle Short Block Engine View Diagrams & Manuals
SBV-SBV-584 4 Cycle Short Block Engine View Diagrams & Manuals
SBV-SBV-5840 4 Cycle Short Block Engine View Diagrams & Manuals
SBV-SBV-5840A 4 Cycle Short Block Engine View Diagrams & Manuals
SBV-SBV-5840B 4 Cycle Short Block Engine View Diagrams & Manuals
SBV-SBV-5841 4 Cycle Short Block Engine View Diagrams & Manuals
SBV-SBV-5841A 4 Cycle Short Block Engine View Diagrams & Manuals
SBV-SBV-5841B 4 Cycle Short Block Engine View Diagrams & Manuals
SBV-SBV-5841C 4 Cycle Short Block Engine View Diagrams & Manuals
SBV-SBV-5842 4 Cycle Short Block Engine View Diagrams & Manuals
SBV-SBV-5842A 4 Cycle Short Block Engine View Diagrams & Manuals
SBV-SBV-5842B 4 Cycle Short Block Engine View Diagrams & Manuals
SBV-SBV-5843 4 Cycle Short Block Engine View Diagrams & Manuals
SBV-SBV-5843A 4 Cycle Short Block Engine View Diagrams & Manuals
SBV-SBV-5843B 4 Cycle Short Block Engine View Diagrams & Manuals
SBV-SBV-5843C 4 Cycle Short Block Engine View Diagrams & Manuals
SBV-SBV-5844 4 Cycle Short Block Engine View Diagrams & Manuals
SBV-SBV-5844A 4 Cycle Short Block Engine View Diagrams & Manuals
SBV-SBV-5844B 4 Cycle Short Block Engine View Diagrams & Manuals
SBV-SBV-5845 4 Cycle Short Block Engine View Diagrams & Manuals
SBV-SBV-5845A 4 Cycle Short Block Engine View Diagrams & Manuals
SBV-SBV-5845B 4 Cycle Short Block Engine View Diagrams & Manuals
SBV-SBV-5846 4 Cycle Short Block Engine View Diagrams & Manuals
SBV-SBV-5846A 4 Cycle Short Block Engine View Diagrams & Manuals
SBV-SBV-5846B 4 Cycle Short Block Engine View Diagrams & Manuals
SBV-SBV-5847 4 Cycle Short Block Engine View Diagrams & Manuals
SBV-SBV-5847A 4 Cycle Short Block Engine View Diagrams & Manuals
SBV-SBV-5847B 4 Cycle Short Block Engine View Diagrams & Manuals
SBV-SBV-5849 4 Cycle Short Block Engine View Diagrams & Manuals
SBV-SBV-5849A 4 Cycle Short Block Engine View Diagrams & Manuals
SBV-SBV-585 4 Cycle Short Block Engine View Diagrams & Manuals
SBV-SBV-5850 4 Cycle Short Block Engine View Diagrams & Manuals
SBV-SBV-5851 4 Cycle Short Block Engine View Diagrams & Manuals
SBV-SBV-5851A 4 Cycle Short Block Engine View Diagrams & Manuals
SBV-SBV-5851B 4 Cycle Short Block Engine View Diagrams & Manuals
SBV-SBV-5853 4 Cycle Short Block Engine View Diagrams & Manuals
SBV-SBV-5853A 4 Cycle Short Block Engine View Diagrams & Manuals
SBV-SBV-5853B 4 Cycle Short Block Engine View Diagrams & Manuals
SBV-SBV-5854 4 Cycle Short Block Engine View Diagrams & Manuals
SBV-SBV-5855 4 Cycle Short Block Engine View Diagrams & Manuals
SBV-SBV-5855A 4 Cycle Short Block Engine View Diagrams & Manuals
SBV-SBV-5856 4 Cycle Short Block Engine View Diagrams & Manuals
SBV-SBV-5856A 4 Cycle Short Block Engine View Diagrams & Manuals
SBV-SBV-5856B 4 Cycle Short Block Engine View Diagrams & Manuals
SBV-SBV-5857 4 Cycle Short Block Engine View Diagrams & Manuals
SBV-SBV-5857A 4 Cycle Short Block Engine View Diagrams & Manuals
SBV-SBV-5858 4 Cycle Short Block Engine View Diagrams & Manuals
SBV-SBV-5858A 4 Cycle Short Block Engine View Diagrams & Manuals
SBV-SBV-5859 4 Cycle Short Block Engine View Diagrams & Manuals
SBV-SBV-5859A 4 Cycle Short Block Engine View Diagrams & Manuals
SBV-SBV-586 4 Cycle Short Block Engine View Diagrams & Manuals
SBV-SBV-5860 4 Cycle Short Block Engine View Diagrams & Manuals
SBV-SBV-5860A 4 Cycle Short Block Engine View Diagrams & Manuals
SBV-SBV-5861 4 Cycle Short Block Engine View Diagrams & Manuals
SBV-SBV-5861A 4 Cycle Short Block Engine View Diagrams & Manuals
SBV-SBV-5862 4 Cycle Short Block Engine View Diagrams & Manuals
SBV-SBV-5862A 4 Cycle Short Block Engine View Diagrams & Manuals
SBV-SBV-5863 4 Cycle Short Block Engine View Diagrams & Manuals
SBV-SBV-5863A 4 Cycle Short Block Engine View Diagrams & Manuals
SBV-SBV-5864 4 Cycle Short Block Engine View Diagrams & Manuals
SBV-SBV-5864A 4 Cycle Short Block Engine View Diagrams & Manuals
SBV-SBV-5865 4 Cycle Short Block Engine View Diagrams & Manuals
SBV-SBV-5865A 4 Cycle Short Block Engine View Diagrams & Manuals
SBV-SBV-5866 4 Cycle Short Block Engine View Diagrams & Manuals
SBV-SBV-5866A 4 Cycle Short Block Engine View Diagrams & Manuals
SBV-SBV-5868 4 Cycle Short Block Engine View Diagrams & Manuals
SBV-SBV-5868A 4 Cycle Short Block Engine View Diagrams & Manuals
SBV-SBV-5869 4 Cycle Short Block Engine View Diagrams & Manuals
SBV-SBV-586A 4 Cycle Short Block Engine View Diagrams & Manuals
SBV-SBV-587 4 Cycle Short Block Engine View Diagrams & Manuals
SBV-SBV-5870 4 Cycle Short Block Engine View Diagrams & Manuals
SBV-SBV-5871 4 Cycle Short Block Engine View Diagrams & Manuals
SBV-SBV-5872 4 Cycle Short Block Engine View Diagrams & Manuals
SBV-SBV-5875 4 Cycle Short Block Engine View Diagrams & Manuals
SBV-SBV-5876 4 Cycle Short Block Engine View Diagrams & Manuals
SBV-SBV-5879 4 Cycle Short Block Engine View Diagrams & Manuals
SBV-SBV-588 4 Cycle Short Block Engine View Diagrams & Manuals
SBV-SBV-5881 4 Cycle Short Block Engine View Diagrams & Manuals
SBV-SBV-5885 4 Cycle Short Block Engine View Diagrams & Manuals
SBV-SBV-5888 4 Cycle Short Block Engine View Diagrams & Manuals
SBV-SBV-5889 4 Cycle Short Block Engine View Diagrams & Manuals
SBV-SBV-5891 4 Cycle Short Block Engine View Diagrams & Manuals
SBV-SBV-5892 4 Cycle Short Block Engine View Diagrams & Manuals
SBV-SBV-5893 4 Cycle Short Block Engine View Diagrams & Manuals
SBV-SBV-5894 4 Cycle Short Block Engine View Diagrams & Manuals
SBV-SBV-5895 4 Cycle Short Block Engine View Diagrams & Manuals
SBV-SBV-5897 4 Cycle Short Block Engine View Diagrams & Manuals
SBV-SBV-5899 4 Cycle Short Block Engine View Diagrams & Manuals
SBV-SBV-58C 4 Cycle Short Block Engine View Diagrams & Manuals
SBV-SBV-58D 4 Cycle Short Block Engine View Diagrams & Manuals
SBV-SBV-58E 4 Cycle Short Block Engine View Diagrams & Manuals
SBV-SBV-58F 4 Cycle Short Block Engine View Diagrams & Manuals
SBV-SBV-590 4 Cycle Short Block Engine View Diagrams & Manuals
SBV-SBV-5900 4 Cycle Short Block Engine View Diagrams & Manuals
SBV-SBV-5901 4 Cycle Short Block Engine View Diagrams & Manuals
SBV-SBV-5902 4 Cycle Short Block Engine View Diagrams & Manuals
SBV-SBV-5903 4 Cycle Short Block Engine View Diagrams & Manuals
SBV-SBV-5904 4 Cycle Short Block Engine View Diagrams & Manuals
SBV-SBV-592 4 Cycle Short Block Engine View Diagrams & Manuals
SBV-SBV-593 4 Cycle Short Block Engine View Diagrams & Manuals
SBV-SBV-594 4 Cycle Short Block Engine View Diagrams & Manuals
SBV-SBV-597 4 Cycle Short Block Engine View Diagrams & Manuals
SBV-SBV-599 4 Cycle Short Block Engine View Diagrams & Manuals
SBV-SBV-59C 4 Cycle Short Block Engine View Diagrams & Manuals
SBV-SBV-59D 4 Cycle Short Block Engine View Diagrams & Manuals
SBV-SBV-59F 4 Cycle Short Block Engine View Diagrams & Manuals
SBV-SBV-60 4 Cycle Short Block Engine View Diagrams & Manuals
SBV-SBV-60A 4 Cycle Short Block Engine View Diagrams & Manuals
SBV-SBV-60B 4 Cycle Short Block Engine View Diagrams & Manuals
SBV-SBV-60C 4 Cycle Short Block Engine View Diagrams & Manuals
SBV-SBV-60D 4 Cycle Short Block Engine View Diagrams & Manuals
SBV-SBV-61 4 Cycle Short Block Engine View Diagrams & Manuals
SBV-SBV-61A 4 Cycle Short Block Engine View Diagrams & Manuals
SBV-SBV-61B 4 Cycle Short Block Engine View Diagrams & Manuals
SBV-SBV-61C 4 Cycle Short Block Engine View Diagrams & Manuals
SBV-SBV-61D 4 Cycle Short Block Engine View Diagrams & Manuals
SBV-SBV-62 4 Cycle Short Block Engine View Diagrams & Manuals
SBV-SBV-62A 4 Cycle Short Block Engine View Diagrams & Manuals
SBV-SBV-62B 4 Cycle Short Block Engine View Diagrams & Manuals
SBV-SBV-62C 4 Cycle Short Block Engine View Diagrams & Manuals
SBV-SBV-63 4 Cycle Short Block Engine View Diagrams & Manuals
SBV-SBV-63A 4 Cycle Short Block Engine View Diagrams & Manuals
SBV-SBV-63B 4 Cycle Short Block Engine View Diagrams & Manuals
SBV-SBV-63C 4 Cycle Short Block Engine View Diagrams & Manuals
SBV-SBV-63D 4 Cycle Short Block Engine View Diagrams & Manuals
SBV-SBV-63F 4 Cycle Short Block Engine View Diagrams & Manuals
SBV-SBV-63G 4 Cycle Short Block Engine View Diagrams & Manuals
SBV-SBV-63H 4 Cycle Short Block Engine View Diagrams & Manuals
SBV-SBV-66 4 Cycle Short Block Engine View Diagrams & Manuals
SBV-SBV-66A 4 Cycle Short Block Engine View Diagrams & Manuals
SBV-SBV-66B 4 Cycle Short Block Engine View Diagrams & Manuals
SBV-SBV-66C 4 Cycle Short Block Engine View Diagrams & Manuals
SBV-SBV-67 4 Cycle Short Block Engine View Diagrams & Manuals
SBV-SBV-67A 4 Cycle Short Block Engine View Diagrams & Manuals
SBV-SBV-68 4 Cycle Short Block Engine View Diagrams & Manuals
SBV-SBV-68A 4 Cycle Short Block Engine View Diagrams & Manuals
SBV-SBV-68B 4 Cycle Short Block Engine View Diagrams & Manuals
SBV-SBV-68C 4 Cycle Short Block Engine View Diagrams & Manuals
SBV-SBV-68D 4 Cycle Short Block Engine View Diagrams & Manuals
SBV-SBV-69 4 Cycle Short Block Engine View Diagrams & Manuals
SBV-SBV-69A 4 Cycle Short Block Engine View Diagrams & Manuals
SBV-SBV-70 4 Cycle Short Block Engine View Diagrams & Manuals
SBV-SBV-70A 4 Cycle Short Block Engine View Diagrams & Manuals
SBV-SBV-71 4 Cycle Short Block Engine View Diagrams & Manuals
SBV-SBV-71A 4 Cycle Short Block Engine View Diagrams & Manuals
SBV-SBV-72 4 Cycle Short Block Engine View Diagrams & Manuals
SBV-SBV-72A 4 Cycle Short Block Engine View Diagrams & Manuals
SBV-SBV-73 4 Cycle Short Block Engine View Diagrams & Manuals
SBV-SBV-73A 4 Cycle Short Block Engine View Diagrams & Manuals
SBV-SBV-73B 4 Cycle Short Block Engine View Diagrams & Manuals
SBV-SBV-74 4 Cycle Short Block Engine View Diagrams & Manuals
SBV-SBV-74A 4 Cycle Short Block Engine View Diagrams & Manuals
SBV-SBV-75 4 Cycle Short Block Engine View Diagrams & Manuals
SBV-SBV-75A 4 Cycle Short Block Engine View Diagrams & Manuals
SBV-SBV-75B 4 Cycle Short Block Engine View Diagrams & Manuals
SBV-SBV-76 4 Cycle Short Block Engine View Diagrams & Manuals
SBV-SBV-76A 4 Cycle Short Block Engine View Diagrams & Manuals
SBV-SBV-77 4 Cycle Short Block Engine View Diagrams & Manuals
SBV-SBV-77A 4 Cycle Short Block Engine View Diagrams & Manuals
SBV-SBV-77B 4 Cycle Short Block Engine View Diagrams & Manuals
SBV-SBV-78 4 Cycle Short Block Engine View Diagrams & Manuals
SBV-SBV-78A 4 Cycle Short Block Engine View Diagrams & Manuals
SBV-SBV-78B 4 Cycle Short Block Engine View Diagrams & Manuals
SBV-SBV-78C 4 Cycle Short Block Engine View Diagrams & Manuals
SBV-SBV-79 4 Cycle Short Block Engine View Diagrams & Manuals
SBV-SBV-79A 4 Cycle Short Block Engine View Diagrams & Manuals
SBV-SBV-8 4 Cycle Short Block Engine View Diagrams & Manuals
SBV-SBV-80 4 Cycle Short Block Engine View Diagrams & Manuals
SBV-SBV-80A 4 Cycle Short Block Engine View Diagrams & Manuals
SBV-SBV-80B 4 Cycle Short Block Engine View Diagrams & Manuals
SBV-SBV-80C 4 Cycle Short Block Engine View Diagrams & Manuals
SBV-SBV-80D 4 Cycle Short Block Engine View Diagrams & Manuals
SBV-SBV-9141 4 Cycle Short Block Engine View Diagrams & Manuals
LV148XA-334059D 4 Cycle Veritical Engine View Diagrams & Manuals
LV148XA-334060D 4 Cycle Veritical Engine View Diagrams & Manuals
LV156EA-336501A 4 Cycle Veritical Engine View Diagrams & Manuals
LV156XA-331001A 4 Cycle Veritical Engine View Diagrams & Manuals
LV156XA-331002A 4 Cycle Veritical Engine View Diagrams & Manuals
LV156XA-331005A 4 Cycle Veritical Engine View Diagrams & Manuals
LV156XA-331008A 4 Cycle Veritical Engine View Diagrams & Manuals
LV156XA-331009A 4 Cycle Veritical Engine View Diagrams & Manuals
LV156XA-331010A 4 Cycle Veritical Engine View Diagrams & Manuals
LV156XA-331011A 4 Cycle Veritical Engine View Diagrams & Manuals
LV156XA-331012A 4 Cycle Veritical Engine View Diagrams & Manuals
LV156XA-331013A 4 Cycle Veritical Engine View Diagrams & Manuals
LV156XA-331014A 4 Cycle Veritical Engine View Diagrams & Manuals
LV156XA-331015A 4 Cycle Veritical Engine View Diagrams & Manuals
LV156XA-331018A 4 Cycle Veritical Engine View Diagrams & Manuals
LV195XA-361570F 4 Cycle Veritical Engine View Diagrams & Manuals
LV195XA-361577F 4 Cycle Veritical Engine View Diagrams & Manuals
LV195XA-361580F 4 Cycle Veritical Engine View Diagrams & Manuals
LV195XA-361581F 4 Cycle Veritical Engine View Diagrams & Manuals
LV195XA-361587F 4 Cycle Veritical Engine View Diagrams & Manuals
LV195XA-361590F 4 Cycle Veritical Engine View Diagrams & Manuals
LV195XA-361598F 4 Cycle Veritical Engine View Diagrams & Manuals
LV195XA-361607F 4 Cycle Veritical Engine View Diagrams & Manuals
LV195XA-361608F 4 Cycle Veritical Engine View Diagrams & Manuals
LV195XA-361610F 4 Cycle Veritical Engine View Diagrams & Manuals
LV195XA-362014E 4 Cycle Veritical Engine View Diagrams & Manuals
LV195XA-362029E 4 Cycle Veritical Engine View Diagrams & Manuals
LV195XA-362044E 4 Cycle Veritical Engine View Diagrams & Manuals
LV195XA-362045E 4 Cycle Veritical Engine View Diagrams & Manuals
LV195XA-362078E 4 Cycle Veritical Engine View Diagrams & Manuals
LV195XA-362079E 4 Cycle Veritical Engine View Diagrams & Manuals
LV195XA-362084E 4 Cycle Veritical Engine View Diagrams & Manuals
LV195XA-362086E 4 Cycle Veritical Engine View Diagrams & Manuals
LV195XA-362087E 4 Cycle Veritical Engine View Diagrams & Manuals
LV195XA-362088E 4 Cycle Veritical Engine View Diagrams & Manuals
LV195XA-362089E 4 Cycle Veritical Engine View Diagrams & Manuals
LV195XA-362090E 4 Cycle Veritical Engine View Diagrams & Manuals
LV195XA-362091E 4 Cycle Veritical Engine View Diagrams & Manuals
LV195XA-362093E 4 Cycle Veritical Engine View Diagrams & Manuals
ECV100-145000D 4 Cycle Vertical Engine View Diagrams & Manuals
ECV100-145000E 4 Cycle Vertical Engine View Diagrams & Manuals
ECV100-145000F 4 Cycle Vertical Engine View Diagrams & Manuals
ECV100-145001 4 Cycle Vertical Engine View Diagrams & Manuals
ECV100-145002 4 Cycle Vertical Engine View Diagrams & Manuals
ECV100-145003 4 Cycle Vertical Engine View Diagrams & Manuals
ECV100-145004 4 Cycle Vertical Engine View Diagrams & Manuals
ECV100-145004A 4 Cycle Vertical Engine View Diagrams & Manuals
ECV100-145005 4 Cycle Vertical Engine View Diagrams & Manuals
ECV100-145005A 4 Cycle Vertical Engine View Diagrams & Manuals
ECV100-145006 4 Cycle Vertical Engine View Diagrams & Manuals
ECV100-145007 4 Cycle Vertical Engine View Diagrams & Manuals
ECV100-145008 4 Cycle Vertical Engine View Diagrams & Manuals
ECV100-145008A 4 Cycle Vertical Engine View Diagrams & Manuals
ECV100-145009 4 Cycle Vertical Engine View Diagrams & Manuals
ECV100-145009A 4 Cycle Vertical Engine View Diagrams & Manuals
ECV100-145010A 4 Cycle Vertical Engine View Diagrams & Manuals
ECV100-145011A 4 Cycle Vertical Engine View Diagrams & Manuals
ECV100-145012A 4 Cycle Vertical Engine View Diagrams & Manuals
ECV100-145013A 4 Cycle Vertical Engine View Diagrams & Manuals
ECV100-145015A 4 Cycle Vertical Engine View Diagrams & Manuals
ECV100-145016A 4 Cycle Vertical Engine View Diagrams & Manuals
ECV100-145017A 4 Cycle Vertical Engine View Diagrams & Manuals
ECV100-145018A 4 Cycle Vertical Engine View Diagrams & Manuals
ECV100-145019A 4 Cycle Vertical Engine View Diagrams & Manuals
ECV100-145020A 4 Cycle Vertical Engine View Diagrams & Manuals
ECV100-145021A 4 Cycle Vertical Engine View Diagrams & Manuals
ECV100-145022A 4 Cycle Vertical Engine View Diagrams & Manuals
ECV100-145023A 4 Cycle Vertical Engine View Diagrams & Manuals
ECV100-145024A 4 Cycle Vertical Engine View Diagrams & Manuals
ECV100-145025A 4 Cycle Vertical Engine View Diagrams & Manuals
ECV100-145026A 4 Cycle Vertical Engine View Diagrams & Manuals
ECV100-145028A 4 Cycle Vertical Engine View Diagrams & Manuals
ECV100-145029A 4 Cycle Vertical Engine View Diagrams & Manuals
ECV100-145030A 4 Cycle Vertical Engine View Diagrams & Manuals
ECV100-145031A 4 Cycle Vertical Engine View Diagrams & Manuals
ECV100-145032A 4 Cycle Vertical Engine View Diagrams & Manuals
ECV100-145033A 4 Cycle Vertical Engine View Diagrams & Manuals
ECV100-145034A 4 Cycle Vertical Engine View Diagrams & Manuals
ECV100-145035A 4 Cycle Vertical Engine View Diagrams & Manuals
ECV100-145036A 4 Cycle Vertical Engine View Diagrams & Manuals
ECV100-145037A 4 Cycle Vertical Engine View Diagrams & Manuals
ECV100-145038A 4 Cycle Vertical Engine View Diagrams & Manuals
ECV100-145039A 4 Cycle Vertical Engine View Diagrams & Manuals
ECV100-145040A 4 Cycle Vertical Engine View Diagrams & Manuals
ECV100-145041A 4 Cycle Vertical Engine View Diagrams & Manuals
ECV100-145045A 4 Cycle Vertical Engine View Diagrams & Manuals
ECV100-145046A 4 Cycle Vertical Engine View Diagrams & Manuals
ECV100-145047A 4 Cycle Vertical Engine View Diagrams & Manuals
ECV100-145048A 4 Cycle Vertical Engine View Diagrams & Manuals
ECV100-145049A 4 Cycle Vertical Engine View Diagrams & Manuals
ECV100-145050A 4 Cycle Vertical Engine View Diagrams & Manuals
ECV100-145051A 4 Cycle Vertical Engine View Diagrams & Manuals
ECV100-145052A 4 Cycle Vertical Engine View Diagrams & Manuals
ECV100-145053A 4 Cycle Vertical Engine View Diagrams & Manuals
ECV100-145054A 4 Cycle Vertical Engine View Diagrams & Manuals
ECV100-145057A 4 Cycle Vertical Engine View Diagrams & Manuals
ECV100-145058A 4 Cycle Vertical Engine View Diagrams & Manuals
ECV100-145058B 4 Cycle Vertical Engine View Diagrams & Manuals
ECV100-145058C 4 Cycle Vertical Engine View Diagrams & Manuals
ECV100-145058D 4 Cycle Vertical Engine View Diagrams & Manuals
ECV100-145059A 4 Cycle Vertical Engine View Diagrams & Manuals
ECV100-145060A 4 Cycle Vertical Engine View Diagrams & Manuals
ECV100-145061A 4 Cycle Vertical Engine View Diagrams & Manuals
ECV100-145062A 4 Cycle Vertical Engine View Diagrams & Manuals
ECV100-145062B 4 Cycle Vertical Engine View Diagrams & Manuals
ECV100-145063A 4 Cycle Vertical Engine View Diagrams & Manuals
ECV100-145064A 4 Cycle Vertical Engine View Diagrams & Manuals
ECV100-145065A 4 Cycle Vertical Engine View Diagrams & Manuals
ECV100-145066A 4 Cycle Vertical Engine View Diagrams & Manuals
ECV100-145067A 4 Cycle Vertical Engine View Diagrams & Manuals
ECV100-145069A 4 Cycle Vertical Engine View Diagrams & Manuals
ECV100-145070A 4 Cycle Vertical Engine View Diagrams & Manuals
ECV100-145071A 4 Cycle Vertical Engine View Diagrams & Manuals
ECV100-145072A 4 Cycle Vertical Engine View Diagrams & Manuals
ECV100-145073A 4 Cycle Vertical Engine View Diagrams & Manuals
ECV100-145074A 4 Cycle Vertical Engine View Diagrams & Manuals
ECV100-145075A 4 Cycle Vertical Engine View Diagrams & Manuals
ECV100-145075B 4 Cycle Vertical Engine View Diagrams & Manuals
ECV100-145075C 4 Cycle Vertical Engine View Diagrams & Manuals
ECV100-145075D 4 Cycle Vertical Engine View Diagrams & Manuals
ECV100-145076A 4 Cycle Vertical Engine View Diagrams & Manuals
ECV100-145077A 4 Cycle Vertical Engine View Diagrams & Manuals
ECV100-145078A 4 Cycle Vertical Engine View Diagrams & Manuals
ECV100-145079A 4 Cycle Vertical Engine View Diagrams & Manuals
ECV100-145080A 4 Cycle Vertical Engine View Diagrams & Manuals
ECV100-145081A 4 Cycle Vertical Engine View Diagrams & Manuals
ECV100-145083A 4 Cycle Vertical Engine View Diagrams & Manuals
ECV100-145084A 4 Cycle Vertical Engine View Diagrams & Manuals
ECV100-145085A 4 Cycle Vertical Engine View Diagrams & Manuals
ECV100-145085C 4 Cycle Vertical Engine View Diagrams & Manuals
ECV100-145085D 4 Cycle Vertical Engine View Diagrams & Manuals
ECV100-145085E 4 Cycle Vertical Engine View Diagrams & Manuals
ECV100-145086A 4 Cycle Vertical Engine View Diagrams & Manuals
ECV100-145086B 4 Cycle Vertical Engine View Diagrams & Manuals
ECV100-145087A 4 Cycle Vertical Engine View Diagrams & Manuals
ECV100-145087B 4 Cycle Vertical Engine View Diagrams & Manuals
ECV100-145087C 4 Cycle Vertical Engine View Diagrams & Manuals
ECV100-145088A 4 Cycle Vertical Engine View Diagrams & Manuals
ECV100-145089A 4 Cycle Vertical Engine View Diagrams & Manuals
ECV100-145090A 4 Cycle Vertical Engine View Diagrams & Manuals
ECV100-145091A 4 Cycle Vertical Engine View Diagrams & Manuals
ECV100-145092A 4 Cycle Vertical Engine View Diagrams & Manuals
ECV100-145092B 4 Cycle Vertical Engine View Diagrams & Manuals
ECV100-145093A 4 Cycle Vertical Engine View Diagrams & Manuals
ECV100-145093B 4 Cycle Vertical Engine View Diagrams & Manuals
ECV100-145093C 4 Cycle Vertical Engine View Diagrams & Manuals
ECV100-145094A 4 Cycle Vertical Engine View Diagrams & Manuals
ECV100-145094B 4 Cycle Vertical Engine View Diagrams & Manuals
ECV100-145095A 4 Cycle Vertical Engine View Diagrams & Manuals
ECV100-145095B 4 Cycle Vertical Engine View Diagrams & Manuals
ECV100-145096A 4 Cycle Vertical Engine View Diagrams & Manuals
ECV100-145096B 4 Cycle Vertical Engine View Diagrams & Manuals
ECV100-145097A 4 Cycle Vertical Engine View Diagrams & Manuals
ECV100-145097B 4 Cycle Vertical Engine View Diagrams & Manuals
ECV100-145098A 4 Cycle Vertical Engine View Diagrams & Manuals
ECV100-145098B 4 Cycle Vertical Engine View Diagrams & Manuals
ECV100-145101A 4 Cycle Vertical Engine View Diagrams & Manuals
ECV100-145102A 4 Cycle Vertical Engine View Diagrams & Manuals
ECV100-145103A 4 Cycle Vertical Engine View Diagrams & Manuals
ECV100-145104A 4 Cycle Vertical Engine View Diagrams & Manuals
ECV100-145106A 4 Cycle Vertical Engine View Diagrams & Manuals
ECV100-145106B 4 Cycle Vertical Engine View Diagrams & Manuals
ECV100-145106C 4 Cycle Vertical Engine View Diagrams & Manuals
ECV100-145106D 4 Cycle Vertical Engine View Diagrams & Manuals
ECV100-145106E 4 Cycle Vertical Engine View Diagrams & Manuals
ECV100-145106F 4 Cycle Vertical Engine View Diagrams & Manuals
ECV100-145107A 4 Cycle Vertical Engine View Diagrams & Manuals
ECV100-145107B 4 Cycle Vertical Engine View Diagrams & Manuals
ECV100-145107C 4 Cycle Vertical Engine View Diagrams & Manuals
ECV100-145107D 4 Cycle Vertical Engine View Diagrams & Manuals
ECV100-145107E 4 Cycle Vertical Engine View Diagrams & Manuals
ECV100-145107F 4 Cycle Vertical Engine View Diagrams & Manuals
ECV100-145108A 4 Cycle Vertical Engine View Diagrams & Manuals
ECV100-145108B 4 Cycle Vertical Engine View Diagrams & Manuals
ECV100-145108C 4 Cycle Vertical Engine View Diagrams & Manuals
ECV100-145108D 4 Cycle Vertical Engine View Diagrams & Manuals
ECV100-145108E 4 Cycle Vertical Engine View Diagrams & Manuals
ECV100-145108F 4 Cycle Vertical Engine View Diagrams & Manuals
ECV100-145109A 4 Cycle Vertical Engine View Diagrams & Manuals
ECV100-145109B 4 Cycle Vertical Engine View Diagrams & Manuals
ECV100-145109C 4 Cycle Vertical Engine View Diagrams & Manuals
ECV100-145109D 4 Cycle Vertical Engine View Diagrams & Manuals
ECV100-145109E 4 Cycle Vertical Engine View Diagrams & Manuals
ECV100-145109F 4 Cycle Vertical Engine View Diagrams & Manuals
ECV100-145110A 4 Cycle Vertical Engine View Diagrams & Manuals
ECV100-145110B 4 Cycle Vertical Engine View Diagrams & Manuals
ECV100-145110C 4 Cycle Vertical Engine View Diagrams & Manuals
ECV100-145110D 4 Cycle Vertical Engine View Diagrams & Manuals
ECV100-145110E 4 Cycle Vertical Engine View Diagrams & Manuals
ECV100-145110F 4 Cycle Vertical Engine View Diagrams & Manuals
ECV100-145111A 4 Cycle Vertical Engine View Diagrams & Manuals
ECV100-145111B 4 Cycle Vertical Engine View Diagrams & Manuals
ECV100-145111C 4 Cycle Vertical Engine View Diagrams & Manuals
ECV100-145111D 4 Cycle Vertical Engine View Diagrams & Manuals
ECV100-145111E 4 Cycle Vertical Engine View Diagrams & Manuals
ECV100-145111F 4 Cycle Vertical Engine View Diagrams & Manuals
ECV100-145112A 4 Cycle Vertical Engine View Diagrams & Manuals
ECV100-145112B 4 Cycle Vertical Engine View Diagrams & Manuals
ECV100-145112C 4 Cycle Vertical Engine View Diagrams & Manuals
ECV100-145112D 4 Cycle Vertical Engine View Diagrams & Manuals
ECV100-145112E 4 Cycle Vertical Engine View Diagrams & Manuals
ECV100-145112F 4 Cycle Vertical Engine View Diagrams & Manuals
ECV100-145113A 4 Cycle Vertical Engine View Diagrams & Manuals
ECV100-145113B 4 Cycle Vertical Engine View Diagrams & Manuals
ECV100-145114A 4 Cycle Vertical Engine View Diagrams & Manuals
ECV100-145114B 4 Cycle Vertical Engine View Diagrams & Manuals
ECV100-145115A 4 Cycle Vertical Engine View Diagrams & Manuals
ECV100-145115B 4 Cycle Vertical Engine View Diagrams & Manuals
ECV100-145115C 4 Cycle Vertical Engine View Diagrams & Manuals
ECV100-145115D 4 Cycle Vertical Engine View Diagrams & Manuals
ECV100-145115E 4 Cycle Vertical Engine View Diagrams & Manuals
ECV100-145116A 4 Cycle Vertical Engine View Diagrams & Manuals
ECV100-145116B 4 Cycle Vertical Engine View Diagrams & Manuals
ECV100-145116C 4 Cycle Vertical Engine View Diagrams & Manuals
ECV100-145116D 4 Cycle Vertical Engine View Diagrams & Manuals
ECV100-145116E 4 Cycle Vertical Engine View Diagrams & Manuals
ECV100-145116F 4 Cycle Vertical Engine View Diagrams & Manuals
ECV100-145117A 4 Cycle Vertical Engine View Diagrams & Manuals
ECV100-145117B 4 Cycle Vertical Engine View Diagrams & Manuals
ECV100-145118A 4 Cycle Vertical Engine View Diagrams & Manuals
ECV100-145118B 4 Cycle Vertical Engine View Diagrams & Manuals
ECV100-145119B 4 Cycle Vertical Engine View Diagrams & Manuals
ECV100-145120B 4 Cycle Vertical Engine View Diagrams & Manuals
ECV100-145122B 4 Cycle Vertical Engine View Diagrams & Manuals
ECV100-145123B 4 Cycle Vertical Engine View Diagrams & Manuals
ECV100-145124B 4 Cycle Vertical Engine View Diagrams & Manuals
ECV100-145125B 4 Cycle Vertical Engine View Diagrams & Manuals
ECV100-145126B 4 Cycle Vertical Engine View Diagrams & Manuals
ECV100-145126C 4 Cycle Vertical Engine View Diagrams & Manuals
ECV100-145127B 4 Cycle Vertical Engine View Diagrams & Manuals
ECV100-145129B 4 Cycle Vertical Engine View Diagrams & Manuals
ECV100-145131B 4 Cycle Vertical Engine View Diagrams & Manuals
ECV100-145131C 4 Cycle Vertical Engine View Diagrams & Manuals
ECV100-145131D 4 Cycle Vertical Engine View Diagrams & Manuals
ECV100-145131F 4 Cycle Vertical Engine View Diagrams & Manuals
ECV100-145132B 4 Cycle Vertical Engine View Diagrams & Manuals
ECV100-145133B 4 Cycle Vertical Engine View Diagrams & Manuals
ECV100-145134B 4 Cycle Vertical Engine View Diagrams & Manuals
ECV100-145134C 4 Cycle Vertical Engine View Diagrams & Manuals
ECV100-145135B 4 Cycle Vertical Engine View Diagrams & Manuals
ECV100-145135C 4 Cycle Vertical Engine View Diagrams & Manuals
ECV100-145137B 4 Cycle Vertical Engine View Diagrams & Manuals
ECV100-145137D 4 Cycle Vertical Engine View Diagrams & Manuals
ECV100-145137E 4 Cycle Vertical Engine View Diagrams & Manuals
ECV100-145137F 4 Cycle Vertical Engine View Diagrams & Manuals
ECV100-145138B 4 Cycle Vertical Engine View Diagrams & Manuals
ECV100-145139B 4 Cycle Vertical Engine View Diagrams & Manuals
ECV100-145139C 4 Cycle Vertical Engine View Diagrams & Manuals
ECV100-145139D 4 Cycle Vertical Engine View Diagrams & Manuals
ECV100-145139E 4 Cycle Vertical Engine View Diagrams & Manuals
ECV100-145139F 4 Cycle Vertical Engine View Diagrams & Manuals
ECV100-145140C 4 Cycle Vertical Engine View Diagrams & Manuals
ECV100-145141C 4 Cycle Vertical Engine View Diagrams & Manuals
ECV100-145142C 4 Cycle Vertical Engine View Diagrams & Manuals
ECV100-145143C 4 Cycle Vertical Engine View Diagrams & Manuals
ECV100-145144C 4 Cycle Vertical Engine View Diagrams & Manuals
ECV100-145145C 4 Cycle Vertical Engine View Diagrams & Manuals
ECV100-145146D 4 Cycle Vertical Engine View Diagrams & Manuals
ECV100-145147C 4 Cycle Vertical Engine View Diagrams & Manuals
ECV100-145147D 4 Cycle Vertical Engine View Diagrams & Manuals
ECV100-145147E 4 Cycle Vertical Engine View Diagrams & Manuals
ECV100-145148C 4 Cycle Vertical Engine View Diagrams & Manuals
ECV100-145148D 4 Cycle Vertical Engine View Diagrams & Manuals
ECV100-145148E 4 Cycle Vertical Engine View Diagrams & Manuals
ECV100-145148F 4 Cycle Vertical Engine View Diagrams & Manuals
ECV100-145149C 4 Cycle Vertical Engine View Diagrams & Manuals
ECV100-145149D 4 Cycle Vertical Engine View Diagrams & Manuals
ECV100-145150C 4 Cycle Vertical Engine View Diagrams & Manuals
ECV100-145151C 4 Cycle Vertical Engine View Diagrams & Manuals
ECV100-145151D 4 Cycle Vertical Engine View Diagrams & Manuals
ECV100-145152D 4 Cycle Vertical Engine View Diagrams & Manuals
ECV100-145155D 4 Cycle Vertical Engine View Diagrams & Manuals
ECV100-145156D 4 Cycle Vertical Engine View Diagrams & Manuals
ECV100-145157D 4 Cycle Vertical Engine View Diagrams & Manuals
ECV100-145158D 4 Cycle Vertical Engine View Diagrams & Manuals
ECV100-145159D 4 Cycle Vertical Engine View Diagrams & Manuals
ECV100-145160D 4 Cycle Vertical Engine View Diagrams & Manuals
ECV100-145161D 4 Cycle Vertical Engine View Diagrams & Manuals
ECV100-145163D 4 Cycle Vertical Engine View Diagrams & Manuals
ECV100-145163E 4 Cycle Vertical Engine View Diagrams & Manuals
ECV100-145164D 4 Cycle Vertical Engine View Diagrams & Manuals
ECV100-145164E 4 Cycle Vertical Engine View Diagrams & Manuals
ECV100-145166D 4 Cycle Vertical Engine View Diagrams & Manuals
ECV100-145166E 4 Cycle Vertical Engine View Diagrams & Manuals
ECV100-145168D 4 Cycle Vertical Engine View Diagrams & Manuals
ECV100-145168E 4 Cycle Vertical Engine View Diagrams & Manuals
ECV100-145169D 4 Cycle Vertical Engine View Diagrams & Manuals
ECV100-145169E 4 Cycle Vertical Engine View Diagrams & Manuals
ECV100-145170D 4 Cycle Vertical Engine View Diagrams & Manuals
ECV100-145170E 4 Cycle Vertical Engine View Diagrams & Manuals
ECV100-145171D 4 Cycle Vertical Engine View Diagrams & Manuals
ECV100-145171E 4 Cycle Vertical Engine View Diagrams & Manuals
ECV100-145172D 4 Cycle Vertical Engine View Diagrams & Manuals
ECV100-145172E 4 Cycle Vertical Engine View Diagrams & Manuals
ECV100-145173D 4 Cycle Vertical Engine View Diagrams & Manuals
ECV100-145173E 4 Cycle Vertical Engine View Diagrams & Manuals
ECV100-145174D 4 Cycle Vertical Engine View Diagrams & Manuals
ECV100-145174E 4 Cycle Vertical Engine View Diagrams & Manuals
ECV100-145174F 4 Cycle Vertical Engine View Diagrams & Manuals
ECV100-145175D 4 Cycle Vertical Engine View Diagrams & Manuals
ECV100-145176D 4 Cycle Vertical Engine View Diagrams & Manuals
ECV100-145176E 4 Cycle Vertical Engine View Diagrams & Manuals
ECV100-145177D 4 Cycle Vertical Engine View Diagrams & Manuals
ECV100-145177E 4 Cycle Vertical Engine View Diagrams & Manuals
ECV100-145178D 4 Cycle Vertical Engine View Diagrams & Manuals
ECV100-145178E 4 Cycle Vertical Engine View Diagrams & Manuals
ECV100-145179D 4 Cycle Vertical Engine View Diagrams & Manuals
ECV100-145179E 4 Cycle Vertical Engine View Diagrams & Manuals
ECV100-145180D 4 Cycle Vertical Engine View Diagrams & Manuals
ECV100-145180E 4 Cycle Vertical Engine View Diagrams & Manuals
ECV100-145181D 4 Cycle Vertical Engine View Diagrams & Manuals
ECV100-145181E 4 Cycle Vertical Engine View Diagrams & Manuals
ECV100-145182D 4 Cycle Vertical Engine View Diagrams & Manuals
ECV100-145182E 4 Cycle Vertical Engine View Diagrams & Manuals
ECV100-145183D 4 Cycle Vertical Engine View Diagrams & Manuals
ECV100-145183E 4 Cycle Vertical Engine View Diagrams & Manuals
ECV100-145184E 4 Cycle Vertical Engine View Diagrams & Manuals
ECV100-145185E 4 Cycle Vertical Engine View Diagrams & Manuals
ECV100-145186E 4 Cycle Vertical Engine View Diagrams & Manuals
ECV100-145187E 4 Cycle Vertical Engine View Diagrams & Manuals
ECV100-145188E 4 Cycle Vertical Engine View Diagrams & Manuals
ECV100-145189E 4 Cycle Vertical Engine View Diagrams & Manuals
ECV100-145190E 4 Cycle Vertical Engine View Diagrams & Manuals
ECV100-145191E 4 Cycle Vertical Engine View Diagrams & Manuals
ECV100-145192E 4 Cycle Vertical Engine View Diagrams & Manuals
ECV100-145193E 4 Cycle Vertical Engine View Diagrams & Manuals
ECV100-145194E 4 Cycle Vertical Engine View Diagrams & Manuals
ECV100-145195E 4 Cycle Vertical Engine View Diagrams & Manuals
ECV100-145196E 4 Cycle Vertical Engine View Diagrams & Manuals
ECV100-145197E 4 Cycle Vertical Engine View Diagrams & Manuals
ECV100-145199E 4 Cycle Vertical Engine View Diagrams & Manuals
ECV100-145200E 4 Cycle Vertical Engine View Diagrams & Manuals
ECV100-145200F 4 Cycle Vertical Engine View Diagrams & Manuals
ECV100-145201E 4 Cycle Vertical Engine View Diagrams & Manuals
ECV100-145202E 4 Cycle Vertical Engine View Diagrams & Manuals
ECV100-145202F 4 Cycle Vertical Engine View Diagrams & Manuals
ECV100-145203E 4 Cycle Vertical Engine View Diagrams & Manuals
ECV100-145204E 4 Cycle Vertical Engine View Diagrams & Manuals
ECV100-145205E 4 Cycle Vertical Engine View Diagrams & Manuals
ECV100-145205F 4 Cycle Vertical Engine View Diagrams & Manuals
ECV100-145207F 4 Cycle Vertical Engine View Diagrams & Manuals
ECV100-145208F 4 Cycle Vertical Engine View Diagrams & Manuals
ECV100-145210F 4 Cycle Vertical Engine View Diagrams & Manuals
ECV100-145211F 4 Cycle Vertical Engine View Diagrams & Manuals
ECV100-145213F 4 Cycle Vertical Engine View Diagrams & Manuals
ECV100-145214F 4 Cycle Vertical Engine View Diagrams & Manuals
ECV100-145215F 4 Cycle Vertical Engine View Diagrams & Manuals
ECV100-145216F 4 Cycle Vertical Engine View Diagrams & Manuals
ECV100-145217F 4 Cycle Vertical Engine View Diagrams & Manuals
ECV100-145218F 4 Cycle Vertical Engine View Diagrams & Manuals
ECV100-145219F 4 Cycle Vertical Engine View Diagrams & Manuals
ECV100-145220F 4 Cycle Vertical Engine View Diagrams & Manuals
ECV100-145221F 4 Cycle Vertical Engine View Diagrams & Manuals
ECV100-145222F 4 Cycle Vertical Engine View Diagrams & Manuals
ECV100-145223F 4 Cycle Vertical Engine View Diagrams & Manuals
ECV100-145224F 4 Cycle Vertical Engine View Diagrams & Manuals
ECV100-145225F 4 Cycle Vertical Engine View Diagrams & Manuals
ECV100-145226F 4 Cycle Vertical Engine View Diagrams & Manuals
ECV100-145227F 4 Cycle Vertical Engine View Diagrams & Manuals
ECV100-145228F 4 Cycle Vertical Engine View Diagrams & Manuals
ECV100-145229F 4 Cycle Vertical Engine View Diagrams & Manuals
ECV100-145230F 4 Cycle Vertical Engine View Diagrams & Manuals
ECV100-145231F 4 Cycle Vertical Engine View Diagrams & Manuals
ECV100-145232F 4 Cycle Vertical Engine View Diagrams & Manuals
ECV100-145233F 4 Cycle Vertical Engine View Diagrams & Manuals
ECV100-145234F 4 Cycle Vertical Engine View Diagrams & Manuals
ECV100-145235F 4 Cycle Vertical Engine View Diagrams & Manuals
ECV100-145236F 4 Cycle Vertical Engine View Diagrams & Manuals
ECV100-145237F 4 Cycle Vertical Engine View Diagrams & Manuals
ECV100-145238F 4 Cycle Vertical Engine View Diagrams & Manuals
ECV100-145239F 4 Cycle Vertical Engine View Diagrams & Manuals
ECV100-145240F 4 Cycle Vertical Engine View Diagrams & Manuals
ECV100-145241F 4 Cycle Vertical Engine View Diagrams & Manuals
ECV100-145242F 4 Cycle Vertical Engine View Diagrams & Manuals
ECV100-145243F 4 Cycle Vertical Engine View Diagrams & Manuals
ECV100-145244F 4 Cycle Vertical Engine View Diagrams & Manuals
ECV100-145245F 4 Cycle Vertical Engine View Diagrams & Manuals
ECV100-145246F 4 Cycle Vertical Engine View Diagrams & Manuals
ECV100-145247F 4 Cycle Vertical Engine View Diagrams & Manuals
ECV100-145248F 4 Cycle Vertical Engine View Diagrams & Manuals
ECV100-145249F 4 Cycle Vertical Engine View Diagrams & Manuals
ECV100-145251F 4 Cycle Vertical Engine View Diagrams & Manuals
ECV100-145253F 4 Cycle Vertical Engine View Diagrams & Manuals
ECV100-145254F 4 Cycle Vertical Engine View Diagrams & Manuals
ECV100-145255F 4 Cycle Vertical Engine View Diagrams & Manuals
ECV100-145256F 4 Cycle Vertical Engine View Diagrams & Manuals
ECV100-145257F 4 Cycle Vertical Engine View Diagrams & Manuals
ECV100-145258F 4 Cycle Vertical Engine View Diagrams & Manuals
ECV100-145258G 4 Cycle Vertical Engine View Diagrams & Manuals
ECV100-145259F 4 Cycle Vertical Engine View Diagrams & Manuals
ECV100-145260F 4 Cycle Vertical Engine View Diagrams & Manuals
ECV100-145261F 4 Cycle Vertical Engine View Diagrams & Manuals
ECV100-145262F 4 Cycle Vertical Engine View Diagrams & Manuals
ECV100-145263F 4 Cycle Vertical Engine View Diagrams & Manuals
ECV100-145264F 4 Cycle Vertical Engine View Diagrams & Manuals
ECV100-145265F 4 Cycle Vertical Engine View Diagrams & Manuals
ECV100-145266F 4 Cycle Vertical Engine View Diagrams & Manuals
ECV100-145266G 4 Cycle Vertical Engine View Diagrams & Manuals
ECV100-145267F 4 Cycle Vertical Engine View Diagrams & Manuals
ECV100-145268F 4 Cycle Vertical Engine View Diagrams & Manuals
ECV100-145269F 4 Cycle Vertical Engine View Diagrams & Manuals
ECV100-145270F 4 Cycle Vertical Engine View Diagrams & Manuals
ECV100-145271F 4 Cycle Vertical Engine View Diagrams & Manuals
ECV100-145273F 4 Cycle Vertical Engine View Diagrams & Manuals
ECV100-145273G 4 Cycle Vertical Engine View Diagrams & Manuals
ECV100-145274F 4 Cycle Vertical Engine View Diagrams & Manuals
ECV100-145275F 4 Cycle Vertical Engine View Diagrams & Manuals
ECV100-145276F 4 Cycle Vertical Engine View Diagrams & Manuals
ECV100-145277F 4 Cycle Vertical Engine View Diagrams & Manuals
ECV100-145278F 4 Cycle Vertical Engine View Diagrams & Manuals
ECV100-145279F 4 Cycle Vertical Engine View Diagrams & Manuals
ECV100-145280F 4 Cycle Vertical Engine View Diagrams & Manuals
ECV100-145281F 4 Cycle Vertical Engine View Diagrams & Manuals
ECV100-145282F 4 Cycle Vertical Engine View Diagrams & Manuals
ECV100-145283F 4 Cycle Vertical Engine View Diagrams & Manuals
ECV100-145284F 4 Cycle Vertical Engine View Diagrams & Manuals
ECV100-145285F 4 Cycle Vertical Engine View Diagrams & Manuals
ECV100-145285G 4 Cycle Vertical Engine View Diagrams & Manuals
ECV100-145286F 4 Cycle Vertical Engine View Diagrams & Manuals
ECV100-145286G 4 Cycle Vertical Engine View Diagrams & Manuals
ECV100-145287F 4 Cycle Vertical Engine View Diagrams & Manuals
ECV100-145287G 4 Cycle Vertical Engine View Diagrams & Manuals
ECV100-145288F 4 Cycle Vertical Engine View Diagrams & Manuals
ECV100-145288G 4 Cycle Vertical Engine View Diagrams & Manuals
ECV100-145289F 4 Cycle Vertical Engine View Diagrams & Manuals
ECV100-145289G 4 Cycle Vertical Engine View Diagrams & Manuals
ECV100-145290F 4 Cycle Vertical Engine View Diagrams & Manuals
ECV100-145290G 4 Cycle Vertical Engine View Diagrams & Manuals
ECV100-145291F 4 Cycle Vertical Engine View Diagrams & Manuals
ECV100-145291G 4 Cycle Vertical Engine View Diagrams & Manuals
ECV100-145292F 4 Cycle Vertical Engine View Diagrams & Manuals
ECV100-145292G 4 Cycle Vertical Engine View Diagrams & Manuals
ECV100-145293F 4 Cycle Vertical Engine View Diagrams & Manuals
ECV100-145293G 4 Cycle Vertical Engine View Diagrams & Manuals
ECV100-145294F 4 Cycle Vertical Engine View Diagrams & Manuals
ECV100-145294G 4 Cycle Vertical Engine View Diagrams & Manuals
ECV100-145295F 4 Cycle Vertical Engine View Diagrams & Manuals
ECV100-145295G 4 Cycle Vertical Engine View Diagrams & Manuals
ECV100-145296F 4 Cycle Vertical Engine View Diagrams & Manuals
ECV100-145296G 4 Cycle Vertical Engine View Diagrams & Manuals
ECV100-145297F 4 Cycle Vertical Engine View Diagrams & Manuals
ECV100-145297G 4 Cycle Vertical Engine View Diagrams & Manuals
ECV100-145298F 4 Cycle Vertical Engine View Diagrams & Manuals
ECV100-145299F 4 Cycle Vertical Engine View Diagrams & Manuals
ECV100-145300F 4 Cycle Vertical Engine View Diagrams & Manuals
ECV100-145301F 4 Cycle Vertical Engine View Diagrams & Manuals
ECV100-145302F 4 Cycle Vertical Engine View Diagrams & Manuals
ECV100-145303F 4 Cycle Vertical Engine View Diagrams & Manuals
ECV100-145304F 4 Cycle Vertical Engine View Diagrams & Manuals
ECV100-145305F 4 Cycle Vertical Engine View Diagrams & Manuals
ECV100-145306F 4 Cycle Vertical Engine View Diagrams & Manuals
ECV100-145307F 4 Cycle Vertical Engine View Diagrams & Manuals
ECV100-145308F 4 Cycle Vertical Engine View Diagrams & Manuals
ECV100-145309F 4 Cycle Vertical Engine View Diagrams & Manuals
ECV100-145310F 4 Cycle Vertical Engine View Diagrams & Manuals
ECV100-145310G 4 Cycle Vertical Engine View Diagrams & Manuals
ECV100-145311F 4 Cycle Vertical Engine View Diagrams & Manuals
ECV100-145312F 4 Cycle Vertical Engine View Diagrams & Manuals
ECV100-145313G 4 Cycle Vertical Engine View Diagrams & Manuals
ECV100-145314G 4 Cycle Vertical Engine View Diagrams & Manuals
ECV100-145315G 4 Cycle Vertical Engine View Diagrams & Manuals
ECV100-145316G 4 Cycle Vertical Engine View Diagrams & Manuals
ECV100-145317G 4 Cycle Vertical Engine View Diagrams & Manuals
ECV100-145318G 4 Cycle Vertical Engine View Diagrams & Manuals
ECV100-145319G 4 Cycle Vertical Engine View Diagrams & Manuals
ECV100-145320G 4 Cycle Vertical Engine View Diagrams & Manuals
ECV100-145321G 4 Cycle Vertical Engine View Diagrams & Manuals
ECV100-145322G 4 Cycle Vertical Engine View Diagrams & Manuals
ECV100-145323G 4 Cycle Vertical Engine View Diagrams & Manuals
ECV100-145324G 4 Cycle Vertical Engine View Diagrams & Manuals
ECV100-145325G 4 Cycle Vertical Engine View Diagrams & Manuals
ECV100-145326G 4 Cycle Vertical Engine View Diagrams & Manuals
ECV100-145327G 4 Cycle Vertical Engine View Diagrams & Manuals
ECV100-145329G 4 Cycle Vertical Engine View Diagrams & Manuals
ECV100-145330G 4 Cycle Vertical Engine View Diagrams & Manuals
ECV100-145331G 4 Cycle Vertical Engine View Diagrams & Manuals
ECV100-145332G 4 Cycle Vertical Engine View Diagrams & Manuals
ECV100-145333G 4 Cycle Vertical Engine View Diagrams & Manuals
ECV100-145334G 4 Cycle Vertical Engine View Diagrams & Manuals
ECV100-145334H 4 Cycle Vertical Engine View Diagrams & Manuals
ECV100-145335G 4 Cycle Vertical Engine View Diagrams & Manuals
ECV100-145335H 4 Cycle Vertical Engine View Diagrams & Manuals
ECV100-145336G 4 Cycle Vertical Engine View Diagrams & Manuals
ECV100-145337G 4 Cycle Vertical Engine View Diagrams & Manuals
ECV100-145337H 4 Cycle Vertical Engine View Diagrams & Manuals
ECV100-145338G 4 Cycle Vertical Engine View Diagrams & Manuals
ECV100-145338H 4 Cycle Vertical Engine View Diagrams & Manuals
ECV100-145339G 4 Cycle Vertical Engine View Diagrams & Manuals
ECV100-145339H 4 Cycle Vertical Engine View Diagrams & Manuals
ECV100-145340G 4 Cycle Vertical Engine View Diagrams & Manuals
ECV100-145340H 4 Cycle Vertical Engine View Diagrams & Manuals
ECV100-145341G 4 Cycle Vertical Engine View Diagrams & Manuals
ECV100-145341H 4 Cycle Vertical Engine View Diagrams & Manuals
ECV100-145342G 4 Cycle Vertical Engine View Diagrams & Manuals
ECV100-145342H 4 Cycle Vertical Engine View Diagrams & Manuals
ECV100-145344G 4 Cycle Vertical Engine View Diagrams & Manuals
ECV100-145344H 4 Cycle Vertical Engine View Diagrams & Manuals
ECV100-145345G 4 Cycle Vertical Engine View Diagrams & Manuals
ECV100-145345H 4 Cycle Vertical Engine View Diagrams & Manuals
ECV100-145346G 4 Cycle Vertical Engine View Diagrams & Manuals
ECV100-145346H 4 Cycle Vertical Engine View Diagrams & Manuals
ECV100-145347G 4 Cycle Vertical Engine View Diagrams & Manuals
ECV100-145347H 4 Cycle Vertical Engine View Diagrams & Manuals
ECV100-145348G 4 Cycle Vertical Engine View Diagrams & Manuals
ECV100-145349G 4 Cycle Vertical Engine View Diagrams & Manuals
ECV100-145349H 4 Cycle Vertical Engine View Diagrams & Manuals
ECV105-147001 4 Cycle Vertical Engine View Diagrams & Manuals
ECV105-147002 4 Cycle Vertical Engine View Diagrams & Manuals
ECV105-147004 4 Cycle Vertical Engine View Diagrams & Manuals
ECV105-147005 4 Cycle Vertical Engine View Diagrams & Manuals
ECV105-147006 4 Cycle Vertical Engine View Diagrams & Manuals
ECV105-147007 4 Cycle Vertical Engine View Diagrams & Manuals
ECV105-147008 4 Cycle Vertical Engine View Diagrams & Manuals
ECV105-147009 4 Cycle Vertical Engine View Diagrams & Manuals
ECV105-147011 4 Cycle Vertical Engine View Diagrams & Manuals
ECV105-147012 4 Cycle Vertical Engine View Diagrams & Manuals
ECV105-147013 4 Cycle Vertical Engine View Diagrams & Manuals
ECV105-147014 4 Cycle Vertical Engine View Diagrams & Manuals
ECV105-147015 4 Cycle Vertical Engine View Diagrams & Manuals
ECV105-147016 4 Cycle Vertical Engine View Diagrams & Manuals
ECV110-151001 4 Cycle Vertical Engine View Diagrams & Manuals
ECV110-151002 4 Cycle Vertical Engine View Diagrams & Manuals
ECV110-151003 4 Cycle Vertical Engine View Diagrams & Manuals
ECV110-151004 4 Cycle Vertical Engine View Diagrams & Manuals
ECV110-151005 4 Cycle Vertical Engine View Diagrams & Manuals
ECV110-151006 4 Cycle Vertical Engine View Diagrams & Manuals
ECV120-152000A 4 Cycle Vertical Engine View Diagrams & Manuals
ECV120-152000B 4 Cycle Vertical Engine View Diagrams & Manuals
ECV120-152000C 4 Cycle Vertical Engine View Diagrams & Manuals
ECV120-152001 4 Cycle Vertical Engine View Diagrams & Manuals
ECV120-152002 4 Cycle Vertical Engine View Diagrams & Manuals
ECV120-152003 4 Cycle Vertical Engine View Diagrams & Manuals
ECV120-152004 4 Cycle Vertical Engine View Diagrams & Manuals
ECV120-152005 4 Cycle Vertical Engine View Diagrams & Manuals
ECV120-152006 4 Cycle Vertical Engine View Diagrams & Manuals
ECV120-152007 4 Cycle Vertical Engine View Diagrams & Manuals
ECV120-152008 4 Cycle Vertical Engine View Diagrams & Manuals
ECV120-152013 4 Cycle Vertical Engine View Diagrams & Manuals
ECV120-152014 4 Cycle Vertical Engine View Diagrams & Manuals
ECV120-152015 4 Cycle Vertical Engine View Diagrams & Manuals
ECV120-152016 4 Cycle Vertical Engine View Diagrams & Manuals
ECV120-152017 4 Cycle Vertical Engine View Diagrams & Manuals
ECV120-152018 4 Cycle Vertical Engine View Diagrams & Manuals
ECV120-152019 4 Cycle Vertical Engine View Diagrams & Manuals
ECV120-152020 4 Cycle Vertical Engine View Diagrams & Manuals
ECV120-152021 4 Cycle Vertical Engine View Diagrams & Manuals
ECV120-152022 4 Cycle Vertical Engine View Diagrams & Manuals
ECV120-152023A 4 Cycle Vertical Engine View Diagrams & Manuals
ECV120-152024A 4 Cycle Vertical Engine View Diagrams & Manuals
ECV120-152024B 4 Cycle Vertical Engine View Diagrams & Manuals
ECV120-152025A 4 Cycle Vertical Engine View Diagrams & Manuals
ECV120-152025B 4 Cycle Vertical Engine View Diagrams & Manuals
ECV120-152026A 4 Cycle Vertical Engine View Diagrams & Manuals
ECV120-152026B 4 Cycle Vertical Engine View Diagrams & Manuals
ECV120-152026C 4 Cycle Vertical Engine View Diagrams & Manuals
ECV120-152027A 4 Cycle Vertical Engine View Diagrams & Manuals
ECV120-152027B 4 Cycle Vertical Engine View Diagrams & Manuals
ECV120-152027C 4 Cycle Vertical Engine View Diagrams & Manuals
ECV120-152028C 4 Cycle Vertical Engine View Diagrams & Manuals
ECV120-152029C 4 Cycle Vertical Engine View Diagrams & Manuals
ECV120-152030C 4 Cycle Vertical Engine View Diagrams & Manuals
ECV120-152031C 4 Cycle Vertical Engine View Diagrams & Manuals
ECV120-152032C 4 Cycle Vertical Engine View Diagrams & Manuals
ECV120-152033C 4 Cycle Vertical Engine View Diagrams & Manuals
ECV120-152034C 4 Cycle Vertical Engine View Diagrams & Manuals
ECV120-152035C 4 Cycle Vertical Engine View Diagrams & Manuals
ECV120-152036C 4 Cycle Vertical Engine View Diagrams & Manuals
ECV120-152036D 4 Cycle Vertical Engine View Diagrams & Manuals
ECV120-152037C 4 Cycle Vertical Engine View Diagrams & Manuals
ECV120-152038C 4 Cycle Vertical Engine View Diagrams & Manuals
ECV120-152039C 4 Cycle Vertical Engine View Diagrams & Manuals
ECV120-152040C 4 Cycle Vertical Engine View Diagrams & Manuals
ECV120-152041D 4 Cycle Vertical Engine View Diagrams & Manuals
ECV120-152042D 4 Cycle Vertical Engine View Diagrams & Manuals
ECV120-152043C 4 Cycle Vertical Engine View Diagrams & Manuals
ECV120-152044D 4 Cycle Vertical Engine View Diagrams & Manuals
ECV120-152045D 4 Cycle Vertical Engine View Diagrams & Manuals
LAV30-30000G 4 Cycle Vertical Engine View Diagrams & Manuals
LAV30-30000H 4 Cycle Vertical Engine View Diagrams & Manuals
LAV30-30000J 4 Cycle Vertical Engine View Diagrams & Manuals
LAV30-30000K 4 Cycle Vertical Engine View Diagrams & Manuals
LAV30-30000M 4 Cycle Vertical Engine View Diagrams & Manuals
LAV30-30105G 4 Cycle Vertical Engine View Diagrams & Manuals
LAV30-30105K 4 Cycle Vertical Engine View Diagrams & Manuals
LAV30-30149G 4 Cycle Vertical Engine View Diagrams & Manuals
LAV30-30149H 4 Cycle Vertical Engine View Diagrams & Manuals
LAV30-30165G 4 Cycle Vertical Engine View Diagrams & Manuals
LAV30-30168G 4 Cycle Vertical Engine View Diagrams & Manuals
LAV30-30190G 4 Cycle Vertical Engine View Diagrams & Manuals
LAV30-30190H 4 Cycle Vertical Engine View Diagrams & Manuals
LAV30-30245G 4 Cycle Vertical Engine View Diagrams & Manuals
LAV30-30246G 4 Cycle Vertical Engine View Diagrams & Manuals
LAV30-30246H 4 Cycle Vertical Engine View Diagrams & Manuals
LAV30-30249H 4 Cycle Vertical Engine View Diagrams & Manuals
LAV30-30250G 4 Cycle Vertical Engine View Diagrams & Manuals
LAV30-30261G 4 Cycle Vertical Engine View Diagrams & Manuals
LAV30-30262G 4 Cycle Vertical Engine View Diagrams & Manuals
LAV30-30262H 4 Cycle Vertical Engine View Diagrams & Manuals
LAV30-30265G 4 Cycle Vertical Engine View Diagrams & Manuals
LAV30-30268G 4 Cycle Vertical Engine View Diagrams & Manuals
LAV30-30282G 4 Cycle Vertical Engine View Diagrams & Manuals
LAV30-30282H 4 Cycle Vertical Engine View Diagrams & Manuals
LAV30-30282K 4 Cycle Vertical Engine View Diagrams & Manuals
LAV30-30283G 4 Cycle Vertical Engine View Diagrams & Manuals
LAV30-30284G 4 Cycle Vertical Engine View Diagrams & Manuals
LAV30-30284H 4 Cycle Vertical Engine View Diagrams & Manuals
LAV30-30286G 4 Cycle Vertical Engine View Diagrams & Manuals
LAV30-30286H 4 Cycle Vertical Engine View Diagrams & Manuals
LAV30-30287G 4 Cycle Vertical Engine View Diagrams & Manuals
LAV30-30287H 4 Cycle Vertical Engine View Diagrams & Manuals
LAV30-30287J 4 Cycle Vertical Engine View Diagrams & Manuals
LAV30-30287K 4 Cycle Vertical Engine View Diagrams & Manuals
LAV30-30288G 4 Cycle Vertical Engine View Diagrams & Manuals
LAV30-30289G 4 Cycle Vertical Engine View Diagrams & Manuals
LAV30-30301H 4 Cycle Vertical Engine View Diagrams & Manuals
LAV30-30301J 4 Cycle Vertical Engine View Diagrams & Manuals
LAV30-30301K 4 Cycle Vertical Engine View Diagrams & Manuals
LAV30-30302G 4 Cycle Vertical Engine View Diagrams & Manuals
LAV30-30309G 4 Cycle Vertical Engine View Diagrams & Manuals
LAV30-30321G 4 Cycle Vertical Engine View Diagrams & Manuals
LAV30-30321H 4 Cycle Vertical Engine View Diagrams & Manuals
LAV30-30325G 4 Cycle Vertical Engine View Diagrams & Manuals
LAV30-30325H 4 Cycle Vertical Engine View Diagrams & Manuals
LAV30-30339G 4 Cycle Vertical Engine View Diagrams & Manuals
LAV30-30339H 4 Cycle Vertical Engine View Diagrams & Manuals
LAV30-30355G 4 Cycle Vertical Engine View Diagrams & Manuals
LAV30-30355H 4 Cycle Vertical Engine View Diagrams & Manuals
LAV30-30355J 4 Cycle Vertical Engine View Diagrams & Manuals
LAV30-30355K 4 Cycle Vertical Engine View Diagrams & Manuals
LAV30-30360G 4 Cycle Vertical Engine View Diagrams & Manuals
LAV30-30361G 4 Cycle Vertical Engine View Diagrams & Manuals
LAV30-30361H 4 Cycle Vertical Engine View Diagrams & Manuals
LAV30-30362G 4 Cycle Vertical Engine View Diagrams & Manuals
LAV30-30362H 4 Cycle Vertical Engine View Diagrams & Manuals
LAV30-30366G 4 Cycle Vertical Engine View Diagrams & Manuals
LAV30-30366H 4 Cycle Vertical Engine View Diagrams & Manuals
LAV30-30369G 4 Cycle Vertical Engine View Diagrams & Manuals
LAV30-30370G 4 Cycle Vertical Engine View Diagrams & Manuals
LAV30-30370H 4 Cycle Vertical Engine View Diagrams & Manuals
LAV30-30371G 4 Cycle Vertical Engine View Diagrams & Manuals
LAV30-30374G 4 Cycle Vertical Engine View Diagrams & Manuals
LAV30-30374H 4 Cycle Vertical Engine View Diagrams & Manuals
LAV30-30375G 4 Cycle Vertical Engine View Diagrams & Manuals
LAV30-30375H 4 Cycle Vertical Engine View Diagrams & Manuals
LAV30-30376G 4 Cycle Vertical Engine View Diagrams & Manuals
LAV30-30376H 4 Cycle Vertical Engine View Diagrams & Manuals
LAV30-30377G 4 Cycle Vertical Engine View Diagrams & Manuals
LAV30-30379G 4 Cycle Vertical Engine View Diagrams & Manuals
LAV30-30399G 4 Cycle Vertical Engine View Diagrams & Manuals
LAV30-30401G 4 Cycle Vertical Engine View Diagrams & Manuals
LAV30-30402G 4 Cycle Vertical Engine View Diagrams & Manuals
LAV30-30403H 4 Cycle Vertical Engine View Diagrams & Manuals
LAV30-30406G 4 Cycle Vertical Engine View Diagrams & Manuals
LAV30-30408G 4 Cycle Vertical Engine View Diagrams & Manuals
LAV30-30409G 4 Cycle Vertical Engine View Diagrams & Manuals
LAV30-30410G 4 Cycle Vertical Engine View Diagrams & Manuals
LAV30-30411G 4 Cycle Vertical Engine View Diagrams & Manuals
LAV30-30412G 4 Cycle Vertical Engine View Diagrams & Manuals
LAV30-30413G 4 Cycle Vertical Engine View Diagrams & Manuals
LAV30-30414G 4 Cycle Vertical Engine View Diagrams & Manuals
LAV30-30415G 4 Cycle Vertical Engine View Diagrams & Manuals
LAV30-30416G 4 Cycle Vertical Engine View Diagrams & Manuals
LAV30-30416H 4 Cycle Vertical Engine View Diagrams & Manuals
LAV30-30416J 4 Cycle Vertical Engine View Diagrams & Manuals
LAV30-30418G 4 Cycle Vertical Engine View Diagrams & Manuals
LAV30-30421G 4 Cycle Vertical Engine View Diagrams & Manuals
LAV30-30422G 4 Cycle Vertical Engine View Diagrams & Manuals
LAV30-30423G 4 Cycle Vertical Engine View Diagrams & Manuals
LAV30-30424G 4 Cycle Vertical Engine View Diagrams & Manuals
LAV30-30425G 4 Cycle Vertical Engine View Diagrams & Manuals
LAV30-30426G 4 Cycle Vertical Engine View Diagrams & Manuals
LAV30-30427G 4 Cycle Vertical Engine View Diagrams & Manuals
LAV30-30428G 4 Cycle Vertical Engine View Diagrams & Manuals
LAV30-30428H 4 Cycle Vertical Engine View Diagrams & Manuals
LAV30-30429G 4 Cycle Vertical Engine View Diagrams & Manuals
LAV30-30430G 4 Cycle Vertical Engine View Diagrams & Manuals
LAV30-30431G 4 Cycle Vertical Engine View Diagrams & Manuals
LAV30-30431H 4 Cycle Vertical Engine View Diagrams & Manuals
LAV30-30432G 4 Cycle Vertical Engine View Diagrams & Manuals
LAV30-30432H 4 Cycle Vertical Engine View Diagrams & Manuals
LAV30-30433G 4 Cycle Vertical Engine View Diagrams & Manuals
LAV30-30434G 4 Cycle Vertical Engine View Diagrams & Manuals
LAV30-30435G 4 Cycle Vertical Engine View Diagrams & Manuals
LAV30-30436G 4 Cycle Vertical Engine View Diagrams & Manuals
LAV30-30437G 4 Cycle Vertical Engine View Diagrams & Manuals
LAV30-30438G 4 Cycle Vertical Engine View Diagrams & Manuals
LAV30-30439G 4 Cycle Vertical Engine View Diagrams & Manuals
LAV30-30440G 4 Cycle Vertical Engine View Diagrams & Manuals
LAV30-30441G 4 Cycle Vertical Engine View Diagrams & Manuals
LAV30-30442G 4 Cycle Vertical Engine View Diagrams & Manuals
LAV30-30442H 4 Cycle Vertical Engine View Diagrams & Manuals
LAV30-30443G 4 Cycle Vertical Engine View Diagrams & Manuals
LAV30-30443H 4 Cycle Vertical Engine View Diagrams & Manuals
LAV30-30443J 4 Cycle Vertical Engine View Diagrams & Manuals
LAV30-30444H 4 Cycle Vertical Engine View Diagrams & Manuals
LAV30-30445H 4 Cycle Vertical Engine View Diagrams & Manuals
LAV30-30446H 4 Cycle Vertical Engine View Diagrams & Manuals
LAV30-30447H 4 Cycle Vertical Engine View Diagrams & Manuals
LAV30-30448H 4 Cycle Vertical Engine View Diagrams & Manuals
LAV30-30450H 4 Cycle Vertical Engine View Diagrams & Manuals
LAV30-30451H 4 Cycle Vertical Engine View Diagrams & Manuals
LAV30-30452H 4 Cycle Vertical Engine View Diagrams & Manuals
LAV30-30453H 4 Cycle Vertical Engine View Diagrams & Manuals
LAV30-30454H 4 Cycle Vertical Engine View Diagrams & Manuals
LAV30-30454J 4 Cycle Vertical Engine View Diagrams & Manuals
LAV30-30455H 4 Cycle Vertical Engine View Diagrams & Manuals
LAV30-30456H 4 Cycle Vertical Engine View Diagrams & Manuals
LAV30-30456J 4 Cycle Vertical Engine View Diagrams & Manuals
LAV30-30456K 4 Cycle Vertical Engine View Diagrams & Manuals
LAV30-30457H 4 Cycle Vertical Engine View Diagrams & Manuals
LAV30-30458H 4 Cycle Vertical Engine View Diagrams & Manuals
LAV30-30459H 4 Cycle Vertical Engine View Diagrams & Manuals
LAV30-30459J 4 Cycle Vertical Engine View Diagrams & Manuals
LAV30-30459K 4 Cycle Vertical Engine View Diagrams & Manuals
LAV30-30460H 4 Cycle Vertical Engine View Diagrams & Manuals
LAV30-30460K 4 Cycle Vertical Engine View Diagrams & Manuals
LAV30-30461H 4 Cycle Vertical Engine View Diagrams & Manuals
LAV30-30462H 4 Cycle Vertical Engine View Diagrams & Manuals
LAV30-30463H 4 Cycle Vertical Engine View Diagrams & Manuals
LAV30-30463J 4 Cycle Vertical Engine View Diagrams & Manuals
LAV30-30464H 4 Cycle Vertical Engine View Diagrams & Manuals
LAV30-30465H 4 Cycle Vertical Engine View Diagrams & Manuals
LAV30-30465J 4 Cycle Vertical Engine View Diagrams & Manuals
LAV30-30466H 4 Cycle Vertical Engine View Diagrams & Manuals
LAV30-30467H 4 Cycle Vertical Engine View Diagrams & Manuals
LAV30-30468H 4 Cycle Vertical Engine View Diagrams & Manuals
LAV30-30469J 4 Cycle Vertical Engine View Diagrams & Manuals
LAV30-30470J 4 Cycle Vertical Engine View Diagrams & Manuals
LAV30-30471J 4 Cycle Vertical Engine View Diagrams & Manuals
LAV30-30472J 4 Cycle Vertical Engine View Diagrams & Manuals
LAV30-30472K 4 Cycle Vertical Engine View Diagrams & Manuals
LAV30-30473J 4 Cycle Vertical Engine View Diagrams & Manuals
LAV30-30473K 4 Cycle Vertical Engine View Diagrams & Manuals
LAV30-30474J 4 Cycle Vertical Engine View Diagrams & Manuals
LAV30-30475J 4 Cycle Vertical Engine View Diagrams & Manuals
LAV30-30476J 4 Cycle Vertical Engine View Diagrams & Manuals
LAV30-30476K 4 Cycle Vertical Engine View Diagrams & Manuals
LAV30-30477J 4 Cycle Vertical Engine View Diagrams & Manuals
LAV30-30478J 4 Cycle Vertical Engine View Diagrams & Manuals
LAV30-30479J 4 Cycle Vertical Engine View Diagrams & Manuals
LAV30-30480J 4 Cycle Vertical Engine View Diagrams & Manuals
LAV30-30480K 4 Cycle Vertical Engine View Diagrams & Manuals
LAV30-30481J 4 Cycle Vertical Engine View Diagrams & Manuals
LAV30-30481K 4 Cycle Vertical Engine View Diagrams & Manuals
LAV30-30482J 4 Cycle Vertical Engine View Diagrams & Manuals
LAV30-30482K 4 Cycle Vertical Engine View Diagrams & Manuals
LAV30-30483J 4 Cycle Vertical Engine View Diagrams & Manuals
LAV30-30484J 4 Cycle Vertical Engine View Diagrams & Manuals
LAV30-30484K 4 Cycle Vertical Engine View Diagrams & Manuals
LAV30-30486K 4 Cycle Vertical Engine View Diagrams & Manuals
LAV30-30487K 4 Cycle Vertical Engine View Diagrams & Manuals
LAV30-30488K 4 Cycle Vertical Engine View Diagrams & Manuals
LAV30-30489K 4 Cycle Vertical Engine View Diagrams & Manuals
LAV30-30490K 4 Cycle Vertical Engine View Diagrams & Manuals
LAV30-30491K 4 Cycle Vertical Engine View Diagrams & Manuals
LAV30-30492K 4 Cycle Vertical Engine View Diagrams & Manuals
LAV30-30493K 4 Cycle Vertical Engine View Diagrams & Manuals
LAV30-30494K 4 Cycle Vertical Engine View Diagrams & Manuals
LAV30-30495K 4 Cycle Vertical Engine View Diagrams & Manuals
LAV30-30496K 4 Cycle Vertical Engine View Diagrams & Manuals
LAV30-30497K 4 Cycle Vertical Engine View Diagrams & Manuals
LAV30-30498K 4 Cycle Vertical Engine View Diagrams & Manuals
LAV30-30499K 4 Cycle Vertical Engine View Diagrams & Manuals
LAV30-30500K 4 Cycle Vertical Engine View Diagrams & Manuals
LAV30-30501K 4 Cycle Vertical Engine View Diagrams & Manuals
LAV30-30502K 4 Cycle Vertical Engine View Diagrams & Manuals
LAV30-30504K 4 Cycle Vertical Engine View Diagrams & Manuals
LAV30-30505K 4 Cycle Vertical Engine View Diagrams & Manuals
LAV30-30506K 4 Cycle Vertical Engine View Diagrams & Manuals
LAV30-30507K 4 Cycle Vertical Engine View Diagrams & Manuals
LAV30-30508K 4 Cycle Vertical Engine View Diagrams & Manuals
LAV30-30509K 4 Cycle Vertical Engine View Diagrams & Manuals
LAV30-30510K 4 Cycle Vertical Engine View Diagrams & Manuals
LAV30-30511K 4 Cycle Vertical Engine View Diagrams & Manuals
LAV30-30512K 4 Cycle Vertical Engine View Diagrams & Manuals
LAV30-30513K 4 Cycle Vertical Engine View Diagrams & Manuals
LAV30-30514K 4 Cycle Vertical Engine View Diagrams & Manuals
LAV30-30515K 4 Cycle Vertical Engine View Diagrams & Manuals
LAV30-30516J 4 Cycle Vertical Engine View Diagrams & Manuals
LAV30-30516K 4 Cycle Vertical Engine View Diagrams & Manuals
LAV30-30517K 4 Cycle Vertical Engine View Diagrams & Manuals
LAV30-30518K 4 Cycle Vertical Engine View Diagrams & Manuals
LAV30-30519K 4 Cycle Vertical Engine View Diagrams & Manuals
LAV30-30520K 4 Cycle Vertical Engine View Diagrams & Manuals
LAV30-30521K 4 Cycle Vertical Engine View Diagrams & Manuals
LAV30-30522K 4 Cycle Vertical Engine View Diagrams & Manuals
LAV30-30523K 4 Cycle Vertical Engine View Diagrams & Manuals
LAV30-30524K 4 Cycle Vertical Engine View Diagrams & Manuals
LAV30-30526K 4 Cycle Vertical Engine View Diagrams & Manuals
LAV30-30527K 4 Cycle Vertical Engine View Diagrams & Manuals
LAV30-30528K 4 Cycle Vertical Engine View Diagrams & Manuals
LAV30-30529K 4 Cycle Vertical Engine View Diagrams & Manuals
LAV30-30530K 4 Cycle Vertical Engine View Diagrams & Manuals
LAV30-30531K 4 Cycle Vertical Engine View Diagrams & Manuals
LAV30-30532K 4 Cycle Vertical Engine View Diagrams & Manuals
LAV30-30533K 4 Cycle Vertical Engine View Diagrams & Manuals
LAV30-30534K 4 Cycle Vertical Engine View Diagrams & Manuals
LAV30-30535K 4 Cycle Vertical Engine View Diagrams & Manuals
LAV30-30536K 4 Cycle Vertical Engine View Diagrams & Manuals
LAV30-30537K 4 Cycle Vertical Engine View Diagrams & Manuals
LAV30-30538M 4 Cycle Vertical Engine View Diagrams & Manuals
LAV30-30539M 4 Cycle Vertical Engine View Diagrams & Manuals
LAV30-30540M 4 Cycle Vertical Engine View Diagrams & Manuals
LAV35-40000G 4 Cycle Vertical Engine View Diagrams & Manuals
LAV35-40000H 4 Cycle Vertical Engine View Diagrams & Manuals
LAV35-40000J 4 Cycle Vertical Engine View Diagrams & Manuals
LAV35-40000K 4 Cycle Vertical Engine View Diagrams & Manuals
LAV35-40000L 4 Cycle Vertical Engine View Diagrams & Manuals
LAV35-40000M 4 Cycle Vertical Engine View Diagrams & Manuals
LAV35-40015G 4 Cycle Vertical Engine View Diagrams & Manuals
LAV35-40015H 4 Cycle Vertical Engine View Diagrams & Manuals
LAV35-40036G 4 Cycle Vertical Engine View Diagrams & Manuals
LAV35-40036H 4 Cycle Vertical Engine View Diagrams & Manuals
LAV35-40047G 4 Cycle Vertical Engine View Diagrams & Manuals
LAV35-40058G 4 Cycle Vertical Engine View Diagrams & Manuals
LAV35-40058K 4 Cycle Vertical Engine View Diagrams & Manuals
LAV35-40063G 4 Cycle Vertical Engine View Diagrams & Manuals
LAV35-40063K 4 Cycle Vertical Engine View Diagrams & Manuals
LAV35-40104G 4 Cycle Vertical Engine View Diagrams & Manuals
LAV35-40126G 4 Cycle Vertical Engine View Diagrams & Manuals
LAV35-40127G 4 Cycle Vertical Engine View Diagrams & Manuals
LAV35-40127H 4 Cycle Vertical Engine View Diagrams & Manuals
LAV35-40130G 4 Cycle Vertical Engine View Diagrams & Manuals
LAV35-40135G 4 Cycle Vertical Engine View Diagrams & Manuals
LAV35-40139H 4 Cycle Vertical Engine View Diagrams & Manuals
LAV35-40139K 4 Cycle Vertical Engine View Diagrams & Manuals
LAV35-40146H 4 Cycle Vertical Engine View Diagrams & Manuals
LAV35-40146J 4 Cycle Vertical Engine View Diagrams & Manuals
LAV35-40146K 4 Cycle Vertical Engine View Diagrams & Manuals
LAV35-40148G 4 Cycle Vertical Engine View Diagrams & Manuals
LAV35-40148H 4 Cycle Vertical Engine View Diagrams & Manuals
LAV35-40152G 4 Cycle Vertical Engine View Diagrams & Manuals
LAV35-40156G 4 Cycle Vertical Engine View Diagrams & Manuals
LAV35-40158G 4 Cycle Vertical Engine View Diagrams & Manuals
LAV35-40159G 4 Cycle Vertical Engine View Diagrams & Manuals
LAV35-40159H 4 Cycle Vertical Engine View Diagrams & Manuals
LAV35-40168H 4 Cycle Vertical Engine View Diagrams & Manuals
LAV35-40180G 4 Cycle Vertical Engine View Diagrams & Manuals
LAV35-40180H 4 Cycle Vertical Engine View Diagrams & Manuals
LAV35-40187G 4 Cycle Vertical Engine View Diagrams & Manuals
LAV35-40193G 4 Cycle Vertical Engine View Diagrams & Manuals
LAV35-40207H 4 Cycle Vertical Engine View Diagrams & Manuals
LAV35-40207J 4 Cycle Vertical Engine View Diagrams & Manuals
LAV35-40210H 4 Cycle Vertical Engine View Diagrams & Manuals
LAV35-40212H 4 Cycle Vertical Engine View Diagrams & Manuals
LAV35-40214G 4 Cycle Vertical Engine View Diagrams & Manuals
LAV35-40217G 4 Cycle Vertical Engine View Diagrams & Manuals
LAV35-40217H 4 Cycle Vertical Engine View Diagrams & Manuals
LAV35-40229G 4 Cycle Vertical Engine View Diagrams & Manuals
LAV35-40229H 4 Cycle Vertical Engine View Diagrams & Manuals
LAV35-40242G 4 Cycle Vertical Engine View Diagrams & Manuals
LAV35-40247G 4 Cycle Vertical Engine View Diagrams & Manuals
LAV35-40247H 4 Cycle Vertical Engine View Diagrams & Manuals
LAV35-40247J 4 Cycle Vertical Engine View Diagrams & Manuals
LAV35-40249G 4 Cycle Vertical Engine View Diagrams & Manuals
LAV35-40249H 4 Cycle Vertical Engine View Diagrams & Manuals
LAV35-40249J 4 Cycle Vertical Engine View Diagrams & Manuals
LAV35-40250G 4 Cycle Vertical Engine View Diagrams & Manuals
LAV35-40250H 4 Cycle Vertical Engine View Diagrams & Manuals
LAV35-40252G 4 Cycle Vertical Engine View Diagrams & Manuals
LAV35-40253G 4 Cycle Vertical Engine View Diagrams & Manuals
LAV35-40253H 4 Cycle Vertical Engine View Diagrams & Manuals
LAV35-40253J 4 Cycle Vertical Engine View Diagrams & Manuals
LAV35-40254G 4 Cycle Vertical Engine View Diagrams & Manuals
LAV35-40254J 4 Cycle Vertical Engine View Diagrams & Manuals
LAV35-40255G 4 Cycle Vertical Engine View Diagrams & Manuals
LAV35-40256G 4 Cycle Vertical Engine View Diagrams & Manuals
LAV35-40259G 4 Cycle Vertical Engine View Diagrams & Manuals
LAV35-40259H 4 Cycle Vertical Engine View Diagrams & Manuals
LAV35-40260H 4 Cycle Vertical Engine View Diagrams & Manuals
LAV35-40261H 4 Cycle Vertical Engine View Diagrams & Manuals
LAV35-40261J 4 Cycle Vertical Engine View Diagrams & Manuals
LAV35-40261K 4 Cycle Vertical Engine View Diagrams & Manuals
LAV35-40266G 4 Cycle Vertical Engine View Diagrams & Manuals
LAV35-40266H 4 Cycle Vertical Engine View Diagrams & Manuals
LAV35-40268G 4 Cycle Vertical Engine View Diagrams & Manuals
LAV35-40268H 4 Cycle Vertical Engine View Diagrams & Manuals
LAV35-40269G 4 Cycle Vertical Engine View Diagrams & Manuals
LAV35-40269H 4 Cycle Vertical Engine View Diagrams & Manuals
LAV35-40270G 4 Cycle Vertical Engine View Diagrams & Manuals
LAV35-40270H 4 Cycle Vertical Engine View Diagrams & Manuals
LAV35-40271G 4 Cycle Vertical Engine View Diagrams & Manuals
LAV35-40271H 4 Cycle Vertical Engine View Diagrams & Manuals
LAV35-40272G 4 Cycle Vertical Engine View Diagrams & Manuals
LAV35-40272H 4 Cycle Vertical Engine View Diagrams & Manuals
LAV35-40275G 4 Cycle Vertical Engine View Diagrams & Manuals
LAV35-40279G 4 Cycle Vertical Engine View Diagrams & Manuals
LAV35-40279H 4 Cycle Vertical Engine View Diagrams & Manuals
LAV35-40287G 4 Cycle Vertical Engine View Diagrams & Manuals
LAV35-40293G 4 Cycle Vertical Engine View Diagrams & Manuals
LAV35-40293H 4 Cycle Vertical Engine View Diagrams & Manuals
LAV35-40294G 4 Cycle Vertical Engine View Diagrams & Manuals
LAV35-40304G 4 Cycle Vertical Engine View Diagrams & Manuals
LAV35-40305G 4 Cycle Vertical Engine View Diagrams & Manuals
LAV35-40309G 4 Cycle Vertical Engine View Diagrams & Manuals
LAV35-40310G 4 Cycle Vertical Engine View Diagrams & Manuals
LAV35-40318G 4 Cycle Vertical Engine View Diagrams & Manuals
LAV35-40318H 4 Cycle Vertical Engine View Diagrams & Manuals
LAV35-40319G 4 Cycle Vertical Engine View Diagrams & Manuals
LAV35-40319J 4 Cycle Vertical Engine View Diagrams & Manuals
LAV35-40322G 4 Cycle Vertical Engine View Diagrams & Manuals
LAV35-40327G 4 Cycle Vertical Engine View Diagrams & Manuals
LAV35-40327H 4 Cycle Vertical Engine View Diagrams & Manuals
LAV35-40327J 4 Cycle Vertical Engine View Diagrams & Manuals
LAV35-40327K 4 Cycle Vertical Engine View Diagrams & Manuals
LAV35-40336G 4 Cycle Vertical Engine View Diagrams & Manuals
LAV35-40337G 4 Cycle Vertical Engine View Diagrams & Manuals
LAV35-40342G 4 Cycle Vertical Engine View Diagrams & Manuals
LAV35-40347G 4 Cycle Vertical Engine View Diagrams & Manuals
LAV35-40347H 4 Cycle Vertical Engine View Diagrams & Manuals
LAV35-40348G 4 Cycle Vertical Engine View Diagrams & Manuals
LAV35-40350G 4 Cycle Vertical Engine View Diagrams & Manuals
LAV35-40351G 4 Cycle Vertical Engine View Diagrams & Manuals
LAV35-40353G 4 Cycle Vertical Engine View Diagrams & Manuals
LAV35-40354G 4 Cycle Vertical Engine View Diagrams & Manuals
LAV35-40355G 4 Cycle Vertical Engine View Diagrams & Manuals
LAV35-40355H 4 Cycle Vertical Engine View Diagrams & Manuals
LAV35-40355J 4 Cycle Vertical Engine View Diagrams & Manuals
LAV35-40355K 4 Cycle Vertical Engine View Diagrams & Manuals
LAV35-40356G 4 Cycle Vertical Engine View Diagrams & Manuals
LAV35-40357G 4 Cycle Vertical Engine View Diagrams & Manuals
LAV35-40358G 4 Cycle Vertical Engine View Diagrams & Manuals
LAV35-40359G 4 Cycle Vertical Engine View Diagrams & Manuals
LAV35-40359H 4 Cycle Vertical Engine View Diagrams & Manuals
LAV35-40360G 4 Cycle Vertical Engine View Diagrams & Manuals
LAV35-40361G 4 Cycle Vertical Engine View Diagrams & Manuals
LAV35-40362G 4 Cycle Vertical Engine View Diagrams & Manuals
LAV35-40363G 4 Cycle Vertical Engine View Diagrams & Manuals
LAV35-40363H 4 Cycle Vertical Engine View Diagrams & Manuals
LAV35-40364G 4 Cycle Vertical Engine View Diagrams & Manuals
LAV35-40365G 4 Cycle Vertical Engine View Diagrams & Manuals
LAV35-40366G 4 Cycle Vertical Engine View Diagrams & Manuals
LAV35-40367G 4 Cycle Vertical Engine View Diagrams & Manuals
LAV35-40368G 4 Cycle Vertical Engine View Diagrams & Manuals
LAV35-40368H 4 Cycle Vertical Engine View Diagrams & Manuals
LAV35-40368J 4 Cycle Vertical Engine View Diagrams & Manuals
LAV35-40369G 4 Cycle Vertical Engine View Diagrams & Manuals
LAV35-40370G 4 Cycle Vertical Engine View Diagrams & Manuals
LAV35-40370H 4 Cycle Vertical Engine View Diagrams & Manuals
LAV35-40370J 4 Cycle Vertical Engine View Diagrams & Manuals
LAV35-40370K 4 Cycle Vertical Engine View Diagrams & Manuals
LAV35-40370L 4 Cycle Vertical Engine View Diagrams & Manuals
LAV35-40370M 4 Cycle Vertical Engine View Diagrams & Manuals
LAV35-40371G 4 Cycle Vertical Engine View Diagrams & Manuals
LAV35-40371H 4 Cycle Vertical Engine View Diagrams & Manuals
LAV35-40372G 4 Cycle Vertical Engine View Diagrams & Manuals
LAV35-40373G 4 Cycle Vertical Engine View Diagrams & Manuals
LAV35-40374G 4 Cycle Vertical Engine View Diagrams & Manuals
LAV35-40376G 4 Cycle Vertical Engine View Diagrams & Manuals
LAV35-40377G 4 Cycle Vertical Engine View Diagrams & Manuals
LAV35-40378G 4 Cycle Vertical Engine View Diagrams & Manuals
LAV35-40378H 4 Cycle Vertical Engine View Diagrams & Manuals
LAV35-40379G 4 Cycle Vertical Engine View Diagrams & Manuals
LAV35-40380G 4 Cycle Vertical Engine View Diagrams & Manuals
LAV35-40381G 4 Cycle Vertical Engine View Diagrams & Manuals
LAV35-40382G 4 Cycle Vertical Engine View Diagrams & Manuals
LAV35-40382H 4 Cycle Vertical Engine View Diagrams & Manuals
LAV35-40383G 4 Cycle Vertical Engine View Diagrams & Manuals
LAV35-40383H 4 Cycle Vertical Engine View Diagrams & Manuals
LAV35-40383J 4 Cycle Vertical Engine View Diagrams & Manuals
LAV35-40383K 4 Cycle Vertical Engine View Diagrams & Manuals
LAV35-40384G 4 Cycle Vertical Engine View Diagrams & Manuals
LAV35-40385G 4 Cycle Vertical Engine View Diagrams & Manuals
LAV35-40386G 4 Cycle Vertical Engine View Diagrams & Manuals
LAV35-40387G 4 Cycle Vertical Engine View Diagrams & Manuals
LAV35-40388G 4 Cycle Vertical Engine View Diagrams & Manuals
LAV35-40388H 4 Cycle Vertical Engine View Diagrams & Manuals
LAV35-40389G 4 Cycle Vertical Engine View Diagrams & Manuals
LAV35-40390G 4 Cycle Vertical Engine View Diagrams & Manuals
LAV35-40390H 4 Cycle Vertical Engine View Diagrams & Manuals
LAV35-40391G 4 Cycle Vertical Engine View Diagrams & Manuals
LAV35-40391H 4 Cycle Vertical Engine View Diagrams & Manuals
LAV35-40392G 4 Cycle Vertical Engine View Diagrams & Manuals
LAV35-40392H 4 Cycle Vertical Engine View Diagrams & Manuals
LAV35-40393G 4 Cycle Vertical Engine View Diagrams & Manuals
LAV35-40393H 4 Cycle Vertical Engine View Diagrams & Manuals
LAV35-40394G 4 Cycle Vertical Engine View Diagrams & Manuals
LAV35-40394H 4 Cycle Vertical Engine View Diagrams & Manuals
LAV35-40395G 4 Cycle Vertical Engine View Diagrams & Manuals
LAV35-40397G 4 Cycle Vertical Engine View Diagrams & Manuals
LAV35-40397H 4 Cycle Vertical Engine View Diagrams & Manuals
LAV35-40398G 4 Cycle Vertical Engine View Diagrams & Manuals
LAV35-40399G 4 Cycle Vertical Engine View Diagrams & Manuals
LAV35-40399H 4 Cycle Vertical Engine View Diagrams & Manuals
LAV35-40399J 4 Cycle Vertical Engine View Diagrams & Manuals
LAV35-40400G 4 Cycle Vertical Engine View Diagrams & Manuals
LAV35-40400H 4 Cycle Vertical Engine View Diagrams & Manuals
LAV35-40400J 4 Cycle Vertical Engine View Diagrams & Manuals
LAV35-40401G 4 Cycle Vertical Engine View Diagrams & Manuals
LAV35-40402G 4 Cycle Vertical Engine View Diagrams & Manuals
LAV35-40403G 4 Cycle Vertical Engine View Diagrams & Manuals
LAV35-40404G 4 Cycle Vertical Engine View Diagrams & Manuals
LAV35-40405G 4 Cycle Vertical Engine View Diagrams & Manuals
LAV35-40406G 4 Cycle Vertical Engine View Diagrams & Manuals
LAV35-40406H 4 Cycle Vertical Engine View Diagrams & Manuals
LAV35-40407G 4 Cycle Vertical Engine View Diagrams & Manuals
LAV35-40408G 4 Cycle Vertical Engine View Diagrams & Manuals
LAV35-40409G 4 Cycle Vertical Engine View Diagrams & Manuals
LAV35-40410G 4 Cycle Vertical Engine View Diagrams & Manuals
LAV35-40412G 4 Cycle Vertical Engine View Diagrams & Manuals
LAV35-40412H 4 Cycle Vertical Engine View Diagrams & Manuals
LAV35-40413G 4 Cycle Vertical Engine View Diagrams & Manuals
LAV35-40414G 4 Cycle Vertical Engine View Diagrams & Manuals
LAV35-40415G 4 Cycle Vertical Engine View Diagrams & Manuals
LAV35-40416G 4 Cycle Vertical Engine View Diagrams & Manuals
LAV35-40416H 4 Cycle Vertical Engine View Diagrams & Manuals
LAV35-40417G 4 Cycle Vertical Engine View Diagrams & Manuals
LAV35-40417H 4 Cycle Vertical Engine View Diagrams & Manuals
LAV35-40418G 4 Cycle Vertical Engine View Diagrams & Manuals
LAV35-40419G 4 Cycle Vertical Engine View Diagrams & Manuals
LAV35-40419H 4 Cycle Vertical Engine View Diagrams & Manuals
LAV35-40420G 4 Cycle Vertical Engine View Diagrams & Manuals
LAV35-40421G 4 Cycle Vertical Engine View Diagrams & Manuals
LAV35-40422G 4 Cycle Vertical Engine View Diagrams & Manuals
LAV35-40422J 4 Cycle Vertical Engine View Diagrams & Manuals
LAV35-40423G 4 Cycle Vertical Engine View Diagrams & Manuals
LAV35-40423J 4 Cycle Vertical Engine View Diagrams & Manuals
LAV35-40424G 4 Cycle Vertical Engine View Diagrams & Manuals
LAV35-40425G 4 Cycle Vertical Engine View Diagrams & Manuals
LAV35-40426G 4 Cycle Vertical Engine View Diagrams & Manuals
LAV35-40426H 4 Cycle Vertical Engine View Diagrams & Manuals
LAV35-40428G 4 Cycle Vertical Engine View Diagrams & Manuals
LAV35-40429G 4 Cycle Vertical Engine View Diagrams & Manuals
LAV35-40431G 4 Cycle Vertical Engine View Diagrams & Manuals
LAV35-40431K 4 Cycle Vertical Engine View Diagrams & Manuals
LAV35-40431L 4 Cycle Vertical Engine View Diagrams & Manuals
LAV35-40431M 4 Cycle Vertical Engine View Diagrams & Manuals
LAV35-40432G 4 Cycle Vertical Engine View Diagrams & Manuals
LAV35-40433G 4 Cycle Vertical Engine View Diagrams & Manuals
LAV35-40434G 4 Cycle Vertical Engine View Diagrams & Manuals
LAV35-40435G 4 Cycle Vertical Engine View Diagrams & Manuals
LAV35-40436G 4 Cycle Vertical Engine View Diagrams & Manuals
LAV35-40436H 4 Cycle Vertical Engine View Diagrams & Manuals
LAV35-40436J 4 Cycle Vertical Engine View Diagrams & Manuals
LAV35-40436K 4 Cycle Vertical Engine View Diagrams & Manuals
LAV35-40437G 4 Cycle Vertical Engine View Diagrams & Manuals
LAV35-40438G 4 Cycle Vertical Engine View Diagrams & Manuals
LAV35-40439G 4 Cycle Vertical Engine View Diagrams & Manuals
LAV35-40439H 4 Cycle Vertical Engine View Diagrams & Manuals
LAV35-40440G 4 Cycle Vertical Engine View Diagrams & Manuals
LAV35-40441G 4 Cycle Vertical Engine View Diagrams & Manuals
LAV35-40442G 4 Cycle Vertical Engine View Diagrams & Manuals
LAV35-40442J 4 Cycle Vertical Engine View Diagrams & Manuals
LAV35-40442K 4 Cycle Vertical Engine View Diagrams & Manuals
LAV35-40443G 4 Cycle Vertical Engine View Diagrams & Manuals
LAV35-40443H 4 Cycle Vertical Engine View Diagrams & Manuals
LAV35-40444G 4 Cycle Vertical Engine View Diagrams & Manuals
LAV35-40445G 4 Cycle Vertical Engine View Diagrams & Manuals
LAV35-40446G 4 Cycle Vertical Engine View Diagrams & Manuals
LAV35-40447G 4 Cycle Vertical Engine View Diagrams & Manuals
LAV35-40448G 4 Cycle Vertical Engine View Diagrams & Manuals
LAV35-40449G 4 Cycle Vertical Engine View Diagrams & Manuals
LAV35-40450G 4 Cycle Vertical Engine View Diagrams & Manuals
LAV35-40451G 4 Cycle Vertical Engine View Diagrams & Manuals
LAV35-40451H 4 Cycle Vertical Engine View Diagrams & Manuals
LAV35-40452G 4 Cycle Vertical Engine View Diagrams & Manuals
LAV35-40452H 4 Cycle Vertical Engine View Diagrams & Manuals
LAV35-40452K 4 Cycle Vertical Engine View Diagrams & Manuals
LAV35-40453G 4 Cycle Vertical Engine View Diagrams & Manuals
LAV35-40454G 4 Cycle Vertical Engine View Diagrams & Manuals
LAV35-40455H 4 Cycle Vertical Engine View Diagrams & Manuals
LAV35-40456H 4 Cycle Vertical Engine View Diagrams & Manuals
LAV35-40457H 4 Cycle Vertical Engine View Diagrams & Manuals
LAV35-40458H 4 Cycle Vertical Engine View Diagrams & Manuals
LAV35-40459H 4 Cycle Vertical Engine View Diagrams & Manuals
LAV35-40460H 4 Cycle Vertical Engine View Diagrams & Manuals
LAV35-40461H 4 Cycle Vertical Engine View Diagrams & Manuals
LAV35-40462H 4 Cycle Vertical Engine View Diagrams & Manuals
LAV35-40463H 4 Cycle Vertical Engine View Diagrams & Manuals
LAV35-40463J 4 Cycle Vertical Engine View Diagrams & Manuals
LAV35-40463K 4 Cycle Vertical Engine View Diagrams & Manuals
LAV35-40463M 4 Cycle Vertical Engine View Diagrams & Manuals
LAV35-40464H 4 Cycle Vertical Engine View Diagrams & Manuals
LAV35-40468H 4 Cycle Vertical Engine View Diagrams & Manuals
LAV35-40469H 4 Cycle Vertical Engine View Diagrams & Manuals
LAV35-40470H 4 Cycle Vertical Engine View Diagrams & Manuals
LAV35-40471H 4 Cycle Vertical Engine View Diagrams & Manuals
LAV35-40471K 4 Cycle Vertical Engine View Diagrams & Manuals
LAV35-40472H 4 Cycle Vertical Engine View Diagrams & Manuals
LAV35-40472K 4 Cycle Vertical Engine View Diagrams & Manuals
LAV35-40473H 4 Cycle Vertical Engine View Diagrams & Manuals
LAV35-40473K 4 Cycle Vertical Engine View Diagrams & Manuals
LAV35-40474H 4 Cycle Vertical Engine View Diagrams & Manuals
LAV35-40475H 4 Cycle Vertical Engine View Diagrams & Manuals
LAV35-40476H 4 Cycle Vertical Engine View Diagrams & Manuals
LAV35-40477H 4 Cycle Vertical Engine View Diagrams & Manuals
LAV35-40479H 4 Cycle Vertical Engine View Diagrams & Manuals
LAV35-40480H 4 Cycle Vertical Engine View Diagrams & Manuals
LAV35-40481H 4 Cycle Vertical Engine View Diagrams & Manuals
LAV35-40482H 4 Cycle Vertical Engine View Diagrams & Manuals
LAV35-40482J 4 Cycle Vertical Engine View Diagrams & Manuals
LAV35-40482K 4 Cycle Vertical Engine View Diagrams & Manuals
LAV35-40482L 4 Cycle Vertical Engine View Diagrams & Manuals
LAV35-40483H 4 Cycle Vertical Engine View Diagrams & Manuals
LAV35-40484H 4 Cycle Vertical Engine View Diagrams & Manuals
LAV35-40485H 4 Cycle Vertical Engine View Diagrams & Manuals
LAV35-40486H 4 Cycle Vertical Engine View Diagrams & Manuals
LAV35-40487H 4 Cycle Vertical Engine View Diagrams & Manuals
LAV35-40488H 4 Cycle Vertical Engine View Diagrams & Manuals
LAV35-40489H 4 Cycle Vertical Engine View Diagrams & Manuals
LAV35-40490H 4 Cycle Vertical Engine View Diagrams & Manuals
LAV35-40491H 4 Cycle Vertical Engine View Diagrams & Manuals
LAV35-40491J 4 Cycle Vertical Engine View Diagrams & Manuals
LAV35-40492H 4 Cycle Vertical Engine View Diagrams & Manuals
LAV35-40493H 4 Cycle Vertical Engine View Diagrams & Manuals
LAV35-40494H 4 Cycle Vertical Engine View Diagrams & Manuals
LAV35-40495H 4 Cycle Vertical Engine View Diagrams & Manuals
LAV35-40496H 4 Cycle Vertical Engine View Diagrams & Manuals
LAV35-40496J 4 Cycle Vertical Engine View Diagrams & Manuals
LAV35-40496K 4 Cycle Vertical Engine View Diagrams & Manuals
LAV35-40497H 4 Cycle Vertical Engine View Diagrams & Manuals
LAV35-40498H 4 Cycle Vertical Engine View Diagrams & Manuals
LAV35-40499H 4 Cycle Vertical Engine View Diagrams & Manuals
LAV35-40500H 4 Cycle Vertical Engine View Diagrams & Manuals
LAV35-40501H 4 Cycle Vertical Engine View Diagrams & Manuals
LAV35-40502H 4 Cycle Vertical Engine View Diagrams & Manuals
LAV35-40503H 4 Cycle Vertical Engine View Diagrams & Manuals
LAV35-40504H 4 Cycle Vertical Engine View Diagrams & Manuals
LAV35-40505H 4 Cycle Vertical Engine View Diagrams & Manuals
LAV35-40506H 4 Cycle Vertical Engine View Diagrams & Manuals
LAV35-40507H 4 Cycle Vertical Engine View Diagrams & Manuals
LAV35-40507J 4 Cycle Vertical Engine View Diagrams & Manuals
LAV35-40508H 4 Cycle Vertical Engine View Diagrams & Manuals
LAV35-40509H 4 Cycle Vertical Engine View Diagrams & Manuals
LAV35-40510H 4 Cycle Vertical Engine View Diagrams & Manuals
LAV35-40510J 4 Cycle Vertical Engine View Diagrams & Manuals
LAV35-40511H 4 Cycle Vertical Engine View Diagrams & Manuals
LAV35-40512H 4 Cycle Vertical Engine View Diagrams & Manuals
LAV35-40513H 4 Cycle Vertical Engine View Diagrams & Manuals
LAV35-40514H 4 Cycle Vertical Engine View Diagrams & Manuals
LAV35-40515H 4 Cycle Vertical Engine View Diagrams & Manuals
LAV35-40516H 4 Cycle Vertical Engine View Diagrams & Manuals
LAV35-40517H 4 Cycle Vertical Engine View Diagrams & Manuals
LAV35-40518H 4 Cycle Vertical Engine View Diagrams & Manuals
LAV35-40520H 4 Cycle Vertical Engine View Diagrams & Manuals
LAV35-40520J 4 Cycle Vertical Engine View Diagrams & Manuals
LAV35-40520K 4 Cycle Vertical Engine View Diagrams & Manuals
LAV35-40520L 4 Cycle Vertical Engine View Diagrams & Manuals
LAV35-40521H 4 Cycle Vertical Engine View Diagrams & Manuals
LAV35-40522H 4 Cycle Vertical Engine View Diagrams & Manuals
LAV35-40523H 4 Cycle Vertical Engine View Diagrams & Manuals
LAV35-40524H 4 Cycle Vertical Engine View Diagrams & Manuals
LAV35-40525H 4 Cycle Vertical Engine View Diagrams & Manuals
LAV35-40526H 4 Cycle Vertical Engine View Diagrams & Manuals
LAV35-40527H 4 Cycle Vertical Engine View Diagrams & Manuals
LAV35-40528H 4 Cycle Vertical Engine View Diagrams & Manuals
LAV35-40529H 4 Cycle Vertical Engine View Diagrams & Manuals
LAV35-40530H 4 Cycle Vertical Engine View Diagrams & Manuals
LAV35-40531H 4 Cycle Vertical Engine View Diagrams & Manuals
LAV35-40532H 4 Cycle Vertical Engine View Diagrams & Manuals
LAV35-40533H 4 Cycle Vertical Engine View Diagrams & Manuals
LAV35-40533J 4 Cycle Vertical Engine View Diagrams & Manuals
LAV35-40533K 4 Cycle Vertical Engine View Diagrams & Manuals
LAV35-40534H 4 Cycle Vertical Engine View Diagrams & Manuals
LAV35-40535H 4 Cycle Vertical Engine View Diagrams & Manuals
LAV35-40535J 4 Cycle Vertical Engine View Diagrams & Manuals
LAV35-40536H 4 Cycle Vertical Engine View Diagrams & Manuals
LAV35-40536J 4 Cycle Vertical Engine View Diagrams & Manuals
LAV35-40537H 4 Cycle Vertical Engine View Diagrams & Manuals
LAV35-40538H 4 Cycle Vertical Engine View Diagrams & Manuals
LAV35-40539H 4 Cycle Vertical Engine View Diagrams & Manuals
LAV35-40540H 4 Cycle Vertical Engine View Diagrams & Manuals
LAV35-40541H 4 Cycle Vertical Engine View Diagrams & Manuals
LAV35-40541J 4 Cycle Vertical Engine View Diagrams & Manuals
LAV35-40541K 4 Cycle Vertical Engine View Diagrams & Manuals
LAV35-40542H 4 Cycle Vertical Engine View Diagrams & Manuals
LAV35-40542J 4 Cycle Vertical Engine View Diagrams & Manuals
LAV35-40543H 4 Cycle Vertical Engine View Diagrams & Manuals
LAV35-40544H 4 Cycle Vertical Engine View Diagrams & Manuals
LAV35-40545H 4 Cycle Vertical Engine View Diagrams & Manuals
LAV35-40546H 4 Cycle Vertical Engine View Diagrams & Manuals
LAV35-40547H 4 Cycle Vertical Engine View Diagrams & Manuals
LAV35-40548H 4 Cycle Vertical Engine View Diagrams & Manuals
LAV35-40548K 4 Cycle Vertical Engine View Diagrams & Manuals
LAV35-40549H 4 Cycle Vertical Engine View Diagrams & Manuals
LAV35-40550H 4 Cycle Vertical Engine View Diagrams & Manuals
LAV35-40551H 4 Cycle Vertical Engine View Diagrams & Manuals
LAV35-40551K 4 Cycle Vertical Engine View Diagrams & Manuals
LAV35-40552H 4 Cycle Vertical Engine View Diagrams & Manuals
LAV35-40552J 4 Cycle Vertical Engine View Diagrams & Manuals
LAV35-40552K 4 Cycle Vertical Engine View Diagrams & Manuals
LAV35-40553H 4 Cycle Vertical Engine View Diagrams & Manuals
LAV35-40553J 4 Cycle Vertical Engine View Diagrams & Manuals
LAV35-40554H 4 Cycle Vertical Engine View Diagrams & Manuals
LAV35-40554J 4 Cycle Vertical Engine View Diagrams & Manuals
LAV35-40556H 4 Cycle Vertical Engine View Diagrams & Manuals
LAV35-40557H 4 Cycle Vertical Engine View Diagrams & Manuals
LAV35-40558H 4 Cycle Vertical Engine View Diagrams & Manuals
LAV35-40559H 4 Cycle Vertical Engine View Diagrams & Manuals
LAV35-40559J 4 Cycle Vertical Engine View Diagrams & Manuals
LAV35-40559K 4 Cycle Vertical Engine View Diagrams & Manuals
LAV35-40560H 4 Cycle Vertical Engine View Diagrams & Manuals
LAV35-40560J 4 Cycle Vertical Engine View Diagrams & Manuals
LAV35-40561H 4 Cycle Vertical Engine View Diagrams & Manuals
LAV35-40561K 4 Cycle Vertical Engine View Diagrams & Manuals
LAV35-40562H 4 Cycle Vertical Engine View Diagrams & Manuals
LAV35-40563H 4 Cycle Vertical Engine View Diagrams & Manuals
LAV35-40563J 4 Cycle Vertical Engine View Diagrams & Manuals
LAV35-40563K 4 Cycle Vertical Engine View Diagrams & Manuals
LAV35-40564H 4 Cycle Vertical Engine View Diagrams & Manuals
LAV35-40565H 4 Cycle Vertical Engine View Diagrams & Manuals
LAV35-40565J 4 Cycle Vertical Engine View Diagrams & Manuals
LAV35-40566H 4 Cycle Vertical Engine View Diagrams & Manuals
LAV35-40568H 4 Cycle Vertical Engine View Diagrams & Manuals
LAV35-40569H 4 Cycle Vertical Engine View Diagrams & Manuals
LAV35-40569J 4 Cycle Vertical Engine View Diagrams & Manuals
LAV35-40569K 4 Cycle Vertical Engine View Diagrams & Manuals
LAV35-40570H 4 Cycle Vertical Engine View Diagrams & Manuals
LAV35-40571H 4 Cycle Vertical Engine View Diagrams & Manuals
LAV35-40572H 4 Cycle Vertical Engine View Diagrams & Manuals
LAV35-40572J 4 Cycle Vertical Engine View Diagrams & Manuals
LAV35-40572K 4 Cycle Vertical Engine View Diagrams & Manuals
LAV35-40573H 4 Cycle Vertical Engine View Diagrams & Manuals
LAV35-40573J 4 Cycle Vertical Engine View Diagrams & Manuals
LAV35-40574H 4 Cycle Vertical Engine View Diagrams & Manuals
LAV35-40575H 4 Cycle Vertical Engine View Diagrams & Manuals
LAV35-40576H 4 Cycle Vertical Engine View Diagrams & Manuals
LAV35-40577H 4 Cycle Vertical Engine View Diagrams & Manuals
LAV35-40577K 4 Cycle Vertical Engine View Diagrams & Manuals
LAV35-40578H 4 Cycle Vertical Engine View Diagrams & Manuals
LAV35-40578K 4 Cycle Vertical Engine View Diagrams & Manuals
LAV35-40578L 4 Cycle Vertical Engine View Diagrams & Manuals
LAV35-40579H 4 Cycle Vertical Engine View Diagrams & Manuals
LAV35-40580H 4 Cycle Vertical Engine View Diagrams & Manuals
LAV35-40581H 4 Cycle Vertical Engine View Diagrams & Manuals
LAV35-40581J 4 Cycle Vertical Engine View Diagrams & Manuals
LAV35-40581K 4 Cycle Vertical Engine View Diagrams & Manuals
LAV35-40582H 4 Cycle Vertical Engine View Diagrams & Manuals
LAV35-40582J 4 Cycle Vertical Engine View Diagrams & Manuals
LAV35-40582K 4 Cycle Vertical Engine View Diagrams & Manuals
LAV35-40583H 4 Cycle Vertical Engine View Diagrams & Manuals
LAV35-40584H 4 Cycle Vertical Engine View Diagrams & Manuals
LAV35-40585H 4 Cycle Vertical Engine View Diagrams & Manuals
LAV35-40586H 4 Cycle Vertical Engine View Diagrams & Manuals
LAV35-40587H 4 Cycle Vertical Engine View Diagrams & Manuals
LAV35-40589J 4 Cycle Vertical Engine View Diagrams & Manuals
LAV35-40590J 4 Cycle Vertical Engine View Diagrams & Manuals
LAV35-40591H 4 Cycle Vertical Engine View Diagrams & Manuals
LAV35-40591J 4 Cycle Vertical Engine View Diagrams & Manuals
LAV35-40591K 4 Cycle Vertical Engine View Diagrams & Manuals
LAV35-40592H 4 Cycle Vertical Engine View Diagrams & Manuals
LAV35-40593H 4 Cycle Vertical Engine View Diagrams & Manuals
LAV35-40594H 4 Cycle Vertical Engine View Diagrams & Manuals
LAV35-40594J 4 Cycle Vertical Engine View Diagrams & Manuals
LAV35-40594K 4 Cycle Vertical Engine View Diagrams & Manuals
LAV35-40595J 4 Cycle Vertical Engine View Diagrams & Manuals
LAV35-40595K 4 Cycle Vertical Engine View Diagrams & Manuals
LAV35-40595L 4 Cycle Vertical Engine View Diagrams & Manuals
LAV35-40595M 4 Cycle Vertical Engine View Diagrams & Manuals
LAV35-40596J 4 Cycle Vertical Engine View Diagrams & Manuals
LAV35-40597J 4 Cycle Vertical Engine View Diagrams & Manuals
LAV35-40598J 4 Cycle Vertical Engine View Diagrams & Manuals
LAV35-40599J 4 Cycle Vertical Engine View Diagrams & Manuals
LAV35-40599K 4 Cycle Vertical Engine View Diagrams & Manuals
LAV35-40600J 4 Cycle Vertical Engine View Diagrams & Manuals
LAV35-40601J 4 Cycle Vertical Engine View Diagrams & Manuals
LAV35-40601K 4 Cycle Vertical Engine View Diagrams & Manuals
LAV35-40602J 4 Cycle Vertical Engine View Diagrams & Manuals
LAV35-40603J 4 Cycle Vertical Engine View Diagrams & Manuals
LAV35-40604J 4 Cycle Vertical Engine View Diagrams & Manuals
LAV35-40605J 4 Cycle Vertical Engine View Diagrams & Manuals
LAV35-40605K 4 Cycle Vertical Engine View Diagrams & Manuals
LAV35-40606J 4 Cycle Vertical Engine View Diagrams & Manuals
LAV35-40606K 4 Cycle Vertical Engine View Diagrams & Manuals
LAV35-40607J 4 Cycle Vertical Engine View Diagrams & Manuals
LAV35-40608J 4 Cycle Vertical Engine View Diagrams & Manuals
LAV35-40608K 4 Cycle Vertical Engine View Diagrams & Manuals
LAV35-40608L 4 Cycle Vertical Engine View Diagrams & Manuals
LAV35-40609J 4 Cycle Vertical Engine View Diagrams & Manuals
LAV35-40610J 4 Cycle Vertical Engine View Diagrams & Manuals
LAV35-40611J 4 Cycle Vertical Engine View Diagrams & Manuals
LAV35-40611K 4 Cycle Vertical Engine View Diagrams & Manuals
LAV35-40612J 4 Cycle Vertical Engine View Diagrams & Manuals
LAV35-40612K 4 Cycle Vertical Engine View Diagrams & Manuals
LAV35-40612L 4 Cycle Vertical Engine View Diagrams & Manuals
LAV35-40612M 4 Cycle Vertical Engine View Diagrams & Manuals
LAV35-40613J 4 Cycle Vertical Engine View Diagrams & Manuals
LAV35-40613K 4 Cycle Vertical Engine View Diagrams & Manuals
LAV35-40613L 4 Cycle Vertical Engine View Diagrams & Manuals
LAV35-40613M 4 Cycle Vertical Engine View Diagrams & Manuals
LAV35-40614J 4 Cycle Vertical Engine View Diagrams & Manuals
LAV35-40615J 4 Cycle Vertical Engine View Diagrams & Manuals
LAV35-40615K 4 Cycle Vertical Engine View Diagrams & Manuals
LAV35-40615L 4 Cycle Vertical Engine View Diagrams & Manuals
LAV35-40615M 4 Cycle Vertical Engine View Diagrams & Manuals
LAV35-40616J 4 Cycle Vertical Engine View Diagrams & Manuals
LAV35-40616K 4 Cycle Vertical Engine View Diagrams & Manuals
LAV35-40616L 4 Cycle Vertical Engine View Diagrams & Manuals
LAV35-40616M 4 Cycle Vertical Engine View Diagrams & Manuals
LAV35-40617J 4 Cycle Vertical Engine View Diagrams & Manuals
LAV35-40617K 4 Cycle Vertical Engine View Diagrams & Manuals
LAV35-40618J 4 Cycle Vertical Engine View Diagrams & Manuals
LAV35-40619J 4 Cycle Vertical Engine View Diagrams & Manuals
LAV35-40619K 4 Cycle Vertical Engine View Diagrams & Manuals
LAV35-40620J 4 Cycle Vertical Engine View Diagrams & Manuals
LAV35-40620K 4 Cycle Vertical Engine View Diagrams & Manuals
LAV35-40621J 4 Cycle Vertical Engine View Diagrams & Manuals
LAV35-40621K 4 Cycle Vertical Engine View Diagrams & Manuals
LAV35-40622J 4 Cycle Vertical Engine View Diagrams & Manuals
LAV35-40622K 4 Cycle Vertical Engine View Diagrams & Manuals
LAV35-40623J 4 Cycle Vertical Engine View Diagrams & Manuals
LAV35-40623K 4 Cycle Vertical Engine View Diagrams & Manuals
LAV35-40624J 4 Cycle Vertical Engine View Diagrams & Manuals
LAV35-40625J 4 Cycle Vertical Engine View Diagrams & Manuals
LAV35-40626J 4 Cycle Vertical Engine View Diagrams & Manuals
LAV35-40626K 4 Cycle Vertical Engine View Diagrams & Manuals
LAV35-40626L 4 Cycle Vertical Engine View Diagrams & Manuals
LAV35-40627J 4 Cycle Vertical Engine View Diagrams & Manuals
LAV35-40628J 4 Cycle Vertical Engine View Diagrams & Manuals
LAV35-40629J 4 Cycle Vertical Engine View Diagrams & Manuals
LAV35-40630J 4 Cycle Vertical Engine View Diagrams & Manuals
LAV35-40630K 4 Cycle Vertical Engine View Diagrams & Manuals
LAV35-40630L 4 Cycle Vertical Engine View Diagrams & Manuals
LAV35-40631J 4 Cycle Vertical Engine View Diagrams & Manuals
LAV35-40631K 4 Cycle Vertical Engine View Diagrams & Manuals
LAV35-40631L 4 Cycle Vertical Engine View Diagrams & Manuals
LAV35-40631M 4 Cycle Vertical Engine View Diagrams & Manuals
LAV35-40632J 4 Cycle Vertical Engine View Diagrams & Manuals
LAV35-40632K 4 Cycle Vertical Engine View Diagrams & Manuals
LAV35-40632L 4 Cycle Vertical Engine View Diagrams & Manuals
LAV35-40632M 4 Cycle Vertical Engine View Diagrams & Manuals
LAV35-40633J 4 Cycle Vertical Engine View Diagrams & Manuals
LAV35-40633K 4 Cycle Vertical Engine View Diagrams & Manuals
LAV35-40633L 4 Cycle Vertical Engine View Diagrams & Manuals
LAV35-40633M 4 Cycle Vertical Engine View Diagrams & Manuals
LAV35-40634J 4 Cycle Vertical Engine View Diagrams & Manuals
LAV35-40634K 4 Cycle Vertical Engine View Diagrams & Manuals
LAV35-40634L 4 Cycle Vertical Engine View Diagrams & Manuals
LAV35-40634M 4 Cycle Vertical Engine View Diagrams & Manuals
LAV35-40635J 4 Cycle Vertical Engine View Diagrams & Manuals
LAV35-40635K 4 Cycle Vertical Engine View Diagrams & Manuals
LAV35-40636J 4 Cycle Vertical Engine View Diagrams & Manuals
LAV35-40636K 4 Cycle Vertical Engine View Diagrams & Manuals
LAV35-40637J 4 Cycle Vertical Engine View Diagrams & Manuals
LAV35-40637K 4 Cycle Vertical Engine View Diagrams & Manuals
LAV35-40637L 4 Cycle Vertical Engine View Diagrams & Manuals
LAV35-40637M 4 Cycle Vertical Engine View Diagrams & Manuals
LAV35-40638J 4 Cycle Vertical Engine View Diagrams & Manuals
LAV35-40638K 4 Cycle Vertical Engine View Diagrams & Manuals
LAV35-40639J 4 Cycle Vertical Engine View Diagrams & Manuals
LAV35-40639K 4 Cycle Vertical Engine View Diagrams & Manuals
LAV35-40640J 4 Cycle Vertical Engine View Diagrams & Manuals
LAV35-40640K 4 Cycle Vertical Engine View Diagrams & Manuals
LAV35-40641J 4 Cycle Vertical Engine View Diagrams & Manuals
LAV35-40641K 4 Cycle Vertical Engine View Diagrams & Manuals
LAV35-40642J 4 Cycle Vertical Engine View Diagrams & Manuals
LAV35-40642K 4 Cycle Vertical Engine View Diagrams & Manuals
LAV35-40643J 4 Cycle Vertical Engine View Diagrams & Manuals
LAV35-40643K 4 Cycle Vertical Engine View Diagrams & Manuals
LAV35-40644J 4 Cycle Vertical Engine View Diagrams & Manuals
LAV35-40645J 4 Cycle Vertical Engine View Diagrams & Manuals
LAV35-40646J 4 Cycle Vertical Engine View Diagrams & Manuals
LAV35-40646K 4 Cycle Vertical Engine View Diagrams & Manuals
LAV35-40646L 4 Cycle Vertical Engine View Diagrams & Manuals
LAV35-40646M 4 Cycle Vertical Engine View Diagrams & Manuals
LAV35-40647J 4 Cycle Vertical Engine View Diagrams & Manuals
LAV35-40647K 4 Cycle Vertical Engine View Diagrams & Manuals
LAV35-40648J 4 Cycle Vertical Engine View Diagrams & Manuals
LAV35-40649J 4 Cycle Vertical Engine View Diagrams & Manuals
LAV35-40649K 4 Cycle Vertical Engine View Diagrams & Manuals
LAV35-40650K 4 Cycle Vertical Engine View Diagrams & Manuals
LAV35-40651K 4 Cycle Vertical Engine View Diagrams & Manuals
LAV35-40654K 4 Cycle Vertical Engine View Diagrams & Manuals
LAV35-40655J 4 Cycle Vertical Engine View Diagrams & Manuals
LAV35-40656J 4 Cycle Vertical Engine View Diagrams & Manuals
LAV35-40656K 4 Cycle Vertical Engine View Diagrams & Manuals
LAV35-40657K 4 Cycle Vertical Engine View Diagrams & Manuals
LAV35-40658K 4 Cycle Vertical Engine View Diagrams & Manuals
LAV35-40659K 4 Cycle Vertical Engine View Diagrams & Manuals
LAV35-40660K 4 Cycle Vertical Engine View Diagrams & Manuals
LAV35-40661K 4 Cycle Vertical Engine View Diagrams & Manuals
LAV35-40662K 4 Cycle Vertical Engine View Diagrams & Manuals
LAV35-40663K 4 Cycle Vertical Engine View Diagrams & Manuals
LAV35-40664K 4 Cycle Vertical Engine View Diagrams & Manuals
LAV35-40665K 4 Cycle Vertical Engine View Diagrams & Manuals
LAV35-40666K 4 Cycle Vertical Engine View Diagrams & Manuals
LAV35-40667K 4 Cycle Vertical Engine View Diagrams & Manuals
LAV35-40667L 4 Cycle Vertical Engine View Diagrams & Manuals
LAV35-40667M 4 Cycle Vertical Engine View Diagrams & Manuals
LAV35-40668K 4 Cycle Vertical Engine View Diagrams & Manuals
LAV35-40668L 4 Cycle Vertical Engine View Diagrams & Manuals
LAV35-40669K 4 Cycle Vertical Engine View Diagrams & Manuals
LAV35-40669L 4 Cycle Vertical Engine View Diagrams & Manuals
LAV35-40669M 4 Cycle Vertical Engine View Diagrams & Manuals
LAV35-40670K 4 Cycle Vertical Engine View Diagrams & Manuals
LAV35-40671K 4 Cycle Vertical Engine View Diagrams & Manuals
LAV35-40675K 4 Cycle Vertical Engine View Diagrams & Manuals
LAV35-40676K 4 Cycle Vertical Engine View Diagrams & Manuals
LAV35-40677K 4 Cycle Vertical Engine View Diagrams & Manuals
LAV35-40678K 4 Cycle Vertical Engine View Diagrams & Manuals
LAV35-40679K 4 Cycle Vertical Engine View Diagrams & Manuals
LAV35-40680K 4 Cycle Vertical Engine View Diagrams & Manuals
LAV35-40681K 4 Cycle Vertical Engine View Diagrams & Manuals
LAV35-40682K 4 Cycle Vertical Engine View Diagrams & Manuals
LAV35-40683K 4 Cycle Vertical Engine View Diagrams & Manuals
LAV35-40684K 4 Cycle Vertical Engine View Diagrams & Manuals
LAV35-40685K 4 Cycle Vertical Engine View Diagrams & Manuals
LAV35-40686K 4 Cycle Vertical Engine View Diagrams & Manuals
LAV35-40687K 4 Cycle Vertical Engine View Diagrams & Manuals
LAV35-40688K 4 Cycle Vertical Engine View Diagrams & Manuals
LAV35-40689K 4 Cycle Vertical Engine View Diagrams & Manuals
LAV35-40690K 4 Cycle Vertical Engine View Diagrams & Manuals
LAV35-40691K 4 Cycle Vertical Engine View Diagrams & Manuals
LAV35-40692K 4 Cycle Vertical Engine View Diagrams & Manuals
LAV35-40692L 4 Cycle Vertical Engine View Diagrams & Manuals
LAV35-40692M 4 Cycle Vertical Engine View Diagrams & Manuals
LAV35-40693K 4 Cycle Vertical Engine View Diagrams & Manuals
LAV35-40694K 4 Cycle Vertical Engine View Diagrams & Manuals
LAV35-40695K 4 Cycle Vertical Engine View Diagrams & Manuals
LAV35-40695L 4 Cycle Vertical Engine View Diagrams & Manuals
LAV35-40695M 4 Cycle Vertical Engine View Diagrams & Manuals
LAV35-40696K 4 Cycle Vertical Engine View Diagrams & Manuals
LAV35-40697K 4 Cycle Vertical Engine View Diagrams & Manuals
LAV35-40698K 4 Cycle Vertical Engine View Diagrams & Manuals
LAV35-40699K 4 Cycle Vertical Engine View Diagrams & Manuals
LAV35-40700K 4 Cycle Vertical Engine View Diagrams & Manuals
LAV35-40701K 4 Cycle Vertical Engine View Diagrams & Manuals
LAV35-40702K 4 Cycle Vertical Engine View Diagrams & Manuals
LAV35-40703K 4 Cycle Vertical Engine View Diagrams & Manuals
LAV35-40704K 4 Cycle Vertical Engine View Diagrams & Manuals
LAV35-40705K 4 Cycle Vertical Engine View Diagrams & Manuals
LAV35-40706K 4 Cycle Vertical Engine View Diagrams & Manuals
LAV35-40707K 4 Cycle Vertical Engine View Diagrams & Manuals
LAV35-40708K 4 Cycle Vertical Engine View Diagrams & Manuals
LAV35-40709K 4 Cycle Vertical Engine View Diagrams & Manuals
LAV35-40710K 4 Cycle Vertical Engine View Diagrams & Manuals
LAV35-40711K 4 Cycle Vertical Engine View Diagrams & Manuals
LAV35-40712K 4 Cycle Vertical Engine View Diagrams & Manuals
LAV35-40713K 4 Cycle Vertical Engine View Diagrams & Manuals
LAV35-40714K 4 Cycle Vertical Engine View Diagrams & Manuals
LAV35-40715K 4 Cycle Vertical Engine View Diagrams & Manuals
LAV35-40716K 4 Cycle Vertical Engine View Diagrams & Manuals
LAV35-40718K 4 Cycle Vertical Engine View Diagrams & Manuals
LAV35-40720K 4 Cycle Vertical Engine View Diagrams & Manuals
LAV35-40721K 4 Cycle Vertical Engine View Diagrams & Manuals
LAV35-40722K 4 Cycle Vertical Engine View Diagrams & Manuals
LAV35-40723K 4 Cycle Vertical Engine View Diagrams & Manuals
LAV35-40724K 4 Cycle Vertical Engine View Diagrams & Manuals
LAV35-40725K 4 Cycle Vertical Engine View Diagrams & Manuals
LAV35-40725L 4 Cycle Vertical Engine View Diagrams & Manuals
LAV35-40725M 4 Cycle Vertical Engine View Diagrams & Manuals
LAV35-40726K 4 Cycle Vertical Engine View Diagrams & Manuals
LAV35-40727K 4 Cycle Vertical Engine View Diagrams & Manuals
LAV35-40728K 4 Cycle Vertical Engine View Diagrams & Manuals
LAV35-40729K 4 Cycle Vertical Engine View Diagrams & Manuals
LAV35-40730K 4 Cycle Vertical Engine View Diagrams & Manuals
LAV35-40731K 4 Cycle Vertical Engine View Diagrams & Manuals
LAV35-40732K 4 Cycle Vertical Engine View Diagrams & Manuals
LAV35-40735K 4 Cycle Vertical Engine View Diagrams & Manuals
LAV35-40736K 4 Cycle Vertical Engine View Diagrams & Manuals
LAV35-40737K 4 Cycle Vertical Engine View Diagrams & Manuals
LAV35-40738K 4 Cycle Vertical Engine View Diagrams & Manuals
LAV35-40739K 4 Cycle Vertical Engine View Diagrams & Manuals
LAV35-40740K 4 Cycle Vertical Engine View Diagrams & Manuals
LAV35-40741K 4 Cycle Vertical Engine View Diagrams & Manuals
LAV35-40743K 4 Cycle Vertical Engine View Diagrams & Manuals
LAV35-40744K 4 Cycle Vertical Engine View Diagrams & Manuals
LAV35-40745K 4 Cycle Vertical Engine View Diagrams & Manuals
LAV35-40746K 4 Cycle Vertical Engine View Diagrams & Manuals
LAV35-40747K 4 Cycle Vertical Engine View Diagrams & Manuals
LAV35-40747L 4 Cycle Vertical Engine View Diagrams & Manuals
LAV35-40747M 4 Cycle Vertical Engine View Diagrams & Manuals
LAV35-40748K 4 Cycle Vertical Engine View Diagrams & Manuals
LAV35-40748L 4 Cycle Vertical Engine View Diagrams & Manuals
LAV35-40748M 4 Cycle Vertical Engine View Diagrams & Manuals
LAV35-40749K 4 Cycle Vertical Engine View Diagrams & Manuals
LAV35-40750K 4 Cycle Vertical Engine View Diagrams & Manuals
LAV35-40751K 4 Cycle Vertical Engine View Diagrams & Manuals
LAV35-40751L 4 Cycle Vertical Engine View Diagrams & Manuals
LAV35-40751M 4 Cycle Vertical Engine View Diagrams & Manuals
LAV35-40754K 4 Cycle Vertical Engine View Diagrams & Manuals
LAV35-40755K 4 Cycle Vertical Engine View Diagrams & Manuals
LAV35-40756K 4 Cycle Vertical Engine View Diagrams & Manuals
LAV35-40757K 4 Cycle Vertical Engine View Diagrams & Manuals
LAV35-40758K 4 Cycle Vertical Engine View Diagrams & Manuals
LAV35-40759K 4 Cycle Vertical Engine View Diagrams & Manuals
LAV35-40760K 4 Cycle Vertical Engine View Diagrams & Manuals
LAV35-40761K 4 Cycle Vertical Engine View Diagrams & Manuals
LAV35-40762K 4 Cycle Vertical Engine View Diagrams & Manuals
LAV35-40763K 4 Cycle Vertical Engine View Diagrams & Manuals
LAV35-40764K 4 Cycle Vertical Engine View Diagrams & Manuals
LAV35-40765K 4 Cycle Vertical Engine View Diagrams & Manuals
LAV35-40766K 4 Cycle Vertical Engine View Diagrams & Manuals
LAV35-40767K 4 Cycle Vertical Engine View Diagrams & Manuals
LAV35-40768K 4 Cycle Vertical Engine View Diagrams & Manuals
LAV35-40769K 4 Cycle Vertical Engine View Diagrams & Manuals
LAV35-40770K 4 Cycle Vertical Engine View Diagrams & Manuals
LAV35-40771K 4 Cycle Vertical Engine View Diagrams & Manuals
LAV35-40772K 4 Cycle Vertical Engine View Diagrams & Manuals
LAV35-40773K 4 Cycle Vertical Engine View Diagrams & Manuals
LAV35-40774K 4 Cycle Vertical Engine View Diagrams & Manuals
LAV35-40774L 4 Cycle Vertical Engine View Diagrams & Manuals
LAV35-40775K 4 Cycle Vertical Engine View Diagrams & Manuals
LAV35-40776K 4 Cycle Vertical Engine View Diagrams & Manuals
LAV35-40776L 4 Cycle Vertical Engine View Diagrams & Manuals
LAV35-40777K 4 Cycle Vertical Engine View Diagrams & Manuals
LAV35-40778K 4 Cycle Vertical Engine View Diagrams & Manuals
LAV35-40779K 4 Cycle Vertical Engine View Diagrams & Manuals
LAV35-40780K 4 Cycle Vertical Engine View Diagrams & Manuals
LAV35-40781K 4 Cycle Vertical Engine View Diagrams & Manuals
LAV35-40782K 4 Cycle Vertical Engine View Diagrams & Manuals
LAV35-40783K 4 Cycle Vertical Engine View Diagrams & Manuals
LAV35-40784K 4 Cycle Vertical Engine View Diagrams & Manuals
LAV35-40785K 4 Cycle Vertical Engine View Diagrams & Manuals
LAV35-40786K 4 Cycle Vertical Engine View Diagrams & Manuals
LAV35-40787K 4 Cycle Vertical Engine View Diagrams & Manuals
LAV35-40788K 4 Cycle Vertical Engine View Diagrams & Manuals
LAV35-40789K 4 Cycle Vertical Engine View Diagrams & Manuals
LAV35-40790K 4 Cycle Vertical Engine View Diagrams & Manuals
LAV35-40791K 4 Cycle Vertical Engine View Diagrams & Manuals
LAV35-40792K 4 Cycle Vertical Engine View Diagrams & Manuals
LAV35-40793K 4 Cycle Vertical Engine View Diagrams & Manuals
LAV35-40793L 4 Cycle Vertical Engine View Diagrams & Manuals
LAV35-40793M 4 Cycle Vertical Engine View Diagrams & Manuals
LAV35-40794K 4 Cycle Vertical Engine View Diagrams & Manuals
LAV35-40795K 4 Cycle Vertical Engine View Diagrams & Manuals
LAV35-40796K 4 Cycle Vertical Engine View Diagrams & Manuals
LAV35-40797K 4 Cycle Vertical Engine View Diagrams & Manuals
LAV35-40798K 4 Cycle Vertical Engine View Diagrams & Manuals
LAV35-40799K 4 Cycle Vertical Engine View Diagrams & Manuals
LAV35-40800K 4 Cycle Vertical Engine View Diagrams & Manuals
LAV35-40800L 4 Cycle Vertical Engine View Diagrams & Manuals
LAV35-40800M 4 Cycle Vertical Engine View Diagrams & Manuals
LAV35-40801K 4 Cycle Vertical Engine View Diagrams & Manuals
LAV35-40802K 4 Cycle Vertical Engine View Diagrams & Manuals
LAV35-40803K 4 Cycle Vertical Engine View Diagrams & Manuals
LAV35-40804K 4 Cycle Vertical Engine View Diagrams & Manuals
LAV35-40805K 4 Cycle Vertical Engine View Diagrams & Manuals
LAV35-40806K 4 Cycle Vertical Engine View Diagrams & Manuals
LAV35-40807K 4 Cycle Vertical Engine View Diagrams & Manuals
LAV35-40807L 4 Cycle Vertical Engine View Diagrams & Manuals
LAV35-40807M 4 Cycle Vertical Engine View Diagrams & Manuals
LAV35-40808K 4 Cycle Vertical Engine View Diagrams & Manuals
LAV35-40809K 4 Cycle Vertical Engine View Diagrams & Manuals
LAV35-40809L 4 Cycle Vertical Engine View Diagrams & Manuals
LAV35-40810K 4 Cycle Vertical Engine View Diagrams & Manuals
LAV35-40811K 4 Cycle Vertical Engine View Diagrams & Manuals
LAV35-40812K 4 Cycle Vertical Engine View Diagrams & Manuals
LAV35-40813K 4 Cycle Vertical Engine View Diagrams & Manuals
LAV35-40814K 4 Cycle Vertical Engine View Diagrams & Manuals
LAV35-40815K 4 Cycle Vertical Engine View Diagrams & Manuals
LAV35-40816K 4 Cycle Vertical Engine View Diagrams & Manuals
LAV35-40818K 4 Cycle Vertical Engine View Diagrams & Manuals
LAV35-40819K 4 Cycle Vertical Engine View Diagrams & Manuals
LAV35-40820K 4 Cycle Vertical Engine View Diagrams & Manuals
LAV35-40821K 4 Cycle Vertical Engine View Diagrams & Manuals
LAV35-40822K 4 Cycle Vertical Engine View Diagrams & Manuals
LAV35-40823K 4 Cycle Vertical Engine View Diagrams & Manuals
LAV35-40823L 4 Cycle Vertical Engine View Diagrams & Manuals
LAV35-40823M 4 Cycle Vertical Engine View Diagrams & Manuals
LAV35-40824K 4 Cycle Vertical Engine View Diagrams & Manuals
LAV35-40825K 4 Cycle Vertical Engine View Diagrams & Manuals
LAV35-40826K 4 Cycle Vertical Engine View Diagrams & Manuals
LAV35-40827K 4 Cycle Vertical Engine View Diagrams & Manuals
LAV35-40828K 4 Cycle Vertical Engine View Diagrams & Manuals
LAV35-40829K 4 Cycle Vertical Engine View Diagrams & Manuals
LAV35-40831K 4 Cycle Vertical Engine View Diagrams & Manuals
LAV35-40832K 4 Cycle Vertical Engine View Diagrams & Manuals
LAV35-40833K 4 Cycle Vertical Engine View Diagrams & Manuals
LAV35-40834K 4 Cycle Vertical Engine View Diagrams & Manuals
LAV35-40834M 4 Cycle Vertical Engine View Diagrams & Manuals
LAV35-40835K 4 Cycle Vertical Engine View Diagrams & Manuals
LAV35-40836K 4 Cycle Vertical Engine View Diagrams & Manuals
LAV35-40837K 4 Cycle Vertical Engine View Diagrams & Manuals
LAV35-40838K 4 Cycle Vertical Engine View Diagrams & Manuals
LAV35-40839K 4 Cycle Vertical Engine View Diagrams & Manuals
LAV35-40840K 4 Cycle Vertical Engine View Diagrams & Manuals
LAV35-40840L 4 Cycle Vertical Engine View Diagrams & Manuals
LAV35-40841K 4 Cycle Vertical Engine View Diagrams & Manuals
LAV35-40841L 4 Cycle Vertical Engine View Diagrams & Manuals
LAV35-40841M 4 Cycle Vertical Engine View Diagrams & Manuals
LAV35-40842K 4 Cycle Vertical Engine View Diagrams & Manuals
LAV35-40843K 4 Cycle Vertical Engine View Diagrams & Manuals
LAV35-40844K 4 Cycle Vertical Engine View Diagrams & Manuals
LAV35-40845K 4 Cycle Vertical Engine View Diagrams & Manuals
LAV35-40846K 4 Cycle Vertical Engine View Diagrams & Manuals
LAV35-40847K 4 Cycle Vertical Engine View Diagrams & Manuals
LAV35-40848K 4 Cycle Vertical Engine View Diagrams & Manuals
LAV35-40849K 4 Cycle Vertical Engine View Diagrams & Manuals
LAV35-40850K 4 Cycle Vertical Engine View Diagrams & Manuals
LAV35-40851K 4 Cycle Vertical Engine View Diagrams & Manuals
LAV35-40851L 4 Cycle Vertical Engine View Diagrams & Manuals
LAV35-40852K 4 Cycle Vertical Engine View Diagrams & Manuals
LAV35-40852L 4 Cycle Vertical Engine View Diagrams & Manuals
LAV35-40852M 4 Cycle Vertical Engine View Diagrams & Manuals
LAV35-40853K 4 Cycle Vertical Engine View Diagrams & Manuals
LAV35-40853L 4 Cycle Vertical Engine View Diagrams & Manuals
LAV35-40854K 4 Cycle Vertical Engine View Diagrams & Manuals
LAV35-40855K 4 Cycle Vertical Engine View Diagrams & Manuals
LAV35-40856K 4 Cycle Vertical Engine View Diagrams & Manuals
LAV35-40857K 4 Cycle Vertical Engine View Diagrams & Manuals
LAV35-40858K 4 Cycle Vertical Engine View Diagrams & Manuals
LAV35-40858L 4 Cycle Vertical Engine View Diagrams & Manuals
LAV35-40858M 4 Cycle Vertical Engine View Diagrams & Manuals
LAV35-40859K 4 Cycle Vertical Engine View Diagrams & Manuals
LAV35-40859M 4 Cycle Vertical Engine View Diagrams & Manuals
LAV35-40860K 4 Cycle Vertical Engine View Diagrams & Manuals
LAV35-40860L 4 Cycle Vertical Engine View Diagrams & Manuals
LAV35-40860M 4 Cycle Vertical Engine View Diagrams & Manuals
LAV35-40861K 4 Cycle Vertical Engine View Diagrams & Manuals
LAV35-40861M 4 Cycle Vertical Engine View Diagrams & Manuals
LAV35-40862K 4 Cycle Vertical Engine View Diagrams & Manuals
LAV35-40862L 4 Cycle Vertical Engine View Diagrams & Manuals
LAV35-40862M 4 Cycle Vertical Engine View Diagrams & Manuals
LAV35-40863K 4 Cycle Vertical Engine View Diagrams & Manuals
LAV35-40864K 4 Cycle Vertical Engine View Diagrams & Manuals
LAV35-40865K 4 Cycle Vertical Engine View Diagrams & Manuals
LAV35-40866K 4 Cycle Vertical Engine View Diagrams & Manuals
LAV35-40867K 4 Cycle Vertical Engine View Diagrams & Manuals
LAV35-40867L 4 Cycle Vertical Engine View Diagrams & Manuals
LAV35-40868K 4 Cycle Vertical Engine View Diagrams & Manuals
LAV35-40869K 4 Cycle Vertical Engine View Diagrams & Manuals
LAV35-40870K 4 Cycle Vertical Engine View Diagrams & Manuals
LAV35-40871K 4 Cycle Vertical Engine View Diagrams & Manuals
LAV35-40872K 4 Cycle Vertical Engine View Diagrams & Manuals
LAV35-40873K 4 Cycle Vertical Engine View Diagrams & Manuals
LAV35-40874K 4 Cycle Vertical Engine View Diagrams & Manuals
LAV35-40875K 4 Cycle Vertical Engine View Diagrams & Manuals
LAV35-40876K 4 Cycle Vertical Engine View Diagrams & Manuals
LAV35-40877K 4 Cycle Vertical Engine View Diagrams & Manuals
LAV35-40878K 4 Cycle Vertical Engine View Diagrams & Manuals
LAV35-40879K 4 Cycle Vertical Engine View Diagrams & Manuals
LAV35-40880K 4 Cycle Vertical Engine View Diagrams & Manuals
LAV35-40880M 4 Cycle Vertical Engine View Diagrams & Manuals
LAV35-40881K 4 Cycle Vertical Engine View Diagrams & Manuals
LAV35-40882K 4 Cycle Vertical Engine View Diagrams & Manuals
LAV35-40882L 4 Cycle Vertical Engine View Diagrams & Manuals
LAV35-40882M 4 Cycle Vertical Engine View Diagrams & Manuals
LAV35-40883K 4 Cycle Vertical Engine View Diagrams & Manuals
LAV35-40884K 4 Cycle Vertical Engine View Diagrams & Manuals
LAV35-40885K 4 Cycle Vertical Engine View Diagrams & Manuals
LAV35-40886K 4 Cycle Vertical Engine View Diagrams & Manuals
LAV35-40887K 4 Cycle Vertical Engine View Diagrams & Manuals
LAV35-40888K 4 Cycle Vertical Engine View Diagrams & Manuals
LAV35-40889K 4 Cycle Vertical Engine View Diagrams & Manuals
LAV35-40890K 4 Cycle Vertical Engine View Diagrams & Manuals
LAV35-40891K 4 Cycle Vertical Engine View Diagrams & Manuals
LAV35-40892K 4 Cycle Vertical Engine View Diagrams & Manuals
LAV35-40893K 4 Cycle Vertical Engine View Diagrams & Manuals
LAV35-40895K 4 Cycle Vertical Engine View Diagrams & Manuals
LAV35-40896K 4 Cycle Vertical Engine View Diagrams & Manuals
LAV35-40897K 4 Cycle Vertical Engine View Diagrams & Manuals
LAV35-40898K 4 Cycle Vertical Engine View Diagrams & Manuals
LAV35-40899K 4 Cycle Vertical Engine View Diagrams & Manuals
LAV35-40899L 4 Cycle Vertical Engine View Diagrams & Manuals
LAV35-40900K 4 Cycle Vertical Engine View Diagrams & Manuals
LAV35-40901K 4 Cycle Vertical Engine View Diagrams & Manuals
LAV35-40901L 4 Cycle Vertical Engine View Diagrams & Manuals
LAV35-40901M 4 Cycle Vertical Engine View Diagrams & Manuals
LAV35-40902K 4 Cycle Vertical Engine View Diagrams & Manuals
LAV35-40903K 4 Cycle Vertical Engine View Diagrams & Manuals
LAV35-40903L 4 Cycle Vertical Engine View Diagrams & Manuals
LAV35-40904K 4 Cycle Vertical Engine View Diagrams & Manuals
LAV35-40905K 4 Cycle Vertical Engine View Diagrams & Manuals
LAV35-40906K 4 Cycle Vertical Engine View Diagrams & Manuals
LAV35-40906M 4 Cycle Vertical Engine View Diagrams & Manuals
LAV35-40906N 4 Cycle Vertical Engine View Diagrams & Manuals
LAV35-40907K 4 Cycle Vertical Engine View Diagrams & Manuals
LAV35-40907M 4 Cycle Vertical Engine View Diagrams & Manuals
LAV35-40908K 4 Cycle Vertical Engine View Diagrams & Manuals
LAV35-40908M 4 Cycle Vertical Engine View Diagrams & Manuals
LAV35-40908N 4 Cycle Vertical Engine View Diagrams & Manuals
LAV35-40908P 4 Cycle Vertical Engine View Diagrams & Manuals
LAV35-40908R 4 Cycle Vertical Engine View Diagrams & Manuals
LAV35-40908S 4 Cycle Vertical Engine View Diagrams & Manuals
LAV35-40910K 4 Cycle Vertical Engine View Diagrams & Manuals
LAV35-40910M 4 Cycle Vertical Engine View Diagrams & Manuals
LAV35-40910N 4 Cycle Vertical Engine View Diagrams & Manuals
LAV35-40910P 4 Cycle Vertical Engine View Diagrams & Manuals
LAV35-40911K 4 Cycle Vertical Engine View Diagrams & Manuals
LAV35-40912K 4 Cycle Vertical Engine View Diagrams & Manuals
LAV35-40913K 4 Cycle Vertical Engine View Diagrams & Manuals
LAV35-40916K 4 Cycle Vertical Engine View Diagrams & Manuals
LAV35-40917K 4 Cycle Vertical Engine View Diagrams & Manuals
LAV35-40917M 4 Cycle Vertical Engine View Diagrams & Manuals
LAV35-40917N 4 Cycle Vertical Engine View Diagrams & Manuals
LAV35-40917P 4 Cycle Vertical Engine View Diagrams & Manuals
LAV35-40917R 4 Cycle Vertical Engine View Diagrams & Manuals
LAV35-40917S 4 Cycle Vertical Engine View Diagrams & Manuals
LAV35-40918K 4 Cycle Vertical Engine View Diagrams & Manuals
LAV35-40919K 4 Cycle Vertical Engine View Diagrams & Manuals
LAV35-40919L 4 Cycle Vertical Engine View Diagrams & Manuals
LAV35-40919M 4 Cycle Vertical Engine View Diagrams & Manuals
LAV35-40920K 4 Cycle Vertical Engine View Diagrams & Manuals
LAV35-40921K 4 Cycle Vertical Engine View Diagrams & Manuals
LAV35-40922K 4 Cycle Vertical Engine View Diagrams & Manuals
LAV35-40923K 4 Cycle Vertical Engine View Diagrams & Manuals
LAV35-40923M 4 Cycle Vertical Engine View Diagrams & Manuals
LAV35-40924K 4 Cycle Vertical Engine View Diagrams & Manuals
LAV35-40924L 4 Cycle Vertical Engine View Diagrams & Manuals
LAV35-40925K 4 Cycle Vertical Engine View Diagrams & Manuals
LAV35-40925M 4 Cycle Vertical Engine View Diagrams & Manuals
LAV35-40925N 4 Cycle Vertical Engine View Diagrams & Manuals
LAV35-40925P 4 Cycle Vertical Engine View Diagrams & Manuals
LAV35-40926K 4 Cycle Vertical Engine View Diagrams & Manuals
LAV35-40926L 4 Cycle Vertical Engine View Diagrams & Manuals
LAV35-40926M 4 Cycle Vertical Engine View Diagrams & Manuals
LAV35-40927K 4 Cycle Vertical Engine View Diagrams & Manuals
LAV35-40928K 4 Cycle Vertical Engine View Diagrams & Manuals
LAV35-40928M 4 Cycle Vertical Engine View Diagrams & Manuals
LAV35-40928P 4 Cycle Vertical Engine View Diagrams & Manuals
LAV35-40928R 4 Cycle Vertical Engine View Diagrams & Manuals
LAV35-40928S 4 Cycle Vertical Engine View Diagrams & Manuals
LAV35-40930K 4 Cycle Vertical Engine View Diagrams & Manuals
LAV35-40931K 4 Cycle Vertical Engine View Diagrams & Manuals
LAV35-40931L 4 Cycle Vertical Engine View Diagrams & Manuals
LAV35-40931M 4 Cycle Vertical Engine View Diagrams & Manuals
LAV35-40932K 4 Cycle Vertical Engine View Diagrams & Manuals
LAV35-40932L 4 Cycle Vertical Engine View Diagrams & Manuals
LAV35-40932M 4 Cycle Vertical Engine View Diagrams & Manuals
LAV35-40933K 4 Cycle Vertical Engine View Diagrams & Manuals
LAV35-40935L 4 Cycle Vertical Engine View Diagrams & Manuals
LAV35-40936L 4 Cycle Vertical Engine View Diagrams & Manuals
LAV35-40937L 4 Cycle Vertical Engine View Diagrams & Manuals
LAV35-40938L 4 Cycle Vertical Engine View Diagrams & Manuals
LAV35-40938M 4 Cycle Vertical Engine View Diagrams & Manuals
LAV35-40939L 4 Cycle Vertical Engine View Diagrams & Manuals
LAV35-40940L 4 Cycle Vertical Engine View Diagrams & Manuals
LAV35-40941L 4 Cycle Vertical Engine View Diagrams & Manuals
LAV35-40942L 4 Cycle Vertical Engine View Diagrams & Manuals
LAV35-40943L 4 Cycle Vertical Engine View Diagrams & Manuals
LAV35-40944L 4 Cycle Vertical Engine View Diagrams & Manuals
LAV35-40945L 4 Cycle Vertical Engine View Diagrams & Manuals
LAV35-40946L 4 Cycle Vertical Engine View Diagrams & Manuals
LAV35-40947L 4 Cycle Vertical Engine View Diagrams & Manuals
LAV35-40948L 4 Cycle Vertical Engine View Diagrams & Manuals
LAV35-40949L 4 Cycle Vertical Engine View Diagrams & Manuals
LAV35-40950L 4 Cycle Vertical Engine View Diagrams & Manuals
LAV35-40951L 4 Cycle Vertical Engine View Diagrams & Manuals
LAV35-40952L 4 Cycle Vertical Engine View Diagrams & Manuals
LAV35-40953L 4 Cycle Vertical Engine View Diagrams & Manuals
LAV35-40954L 4 Cycle Vertical Engine View Diagrams & Manuals
LAV35-40955L 4 Cycle Vertical Engine View Diagrams & Manuals
LAV35-40956L 4 Cycle Vertical Engine View Diagrams & Manuals
LAV35-40957L 4 Cycle Vertical Engine View Diagrams & Manuals
LAV35-40958K 4 Cycle Vertical Engine View Diagrams & Manuals
LAV35-40959L 4 Cycle Vertical Engine View Diagrams & Manuals
LAV35-40959M 4 Cycle Vertical Engine View Diagrams & Manuals
LAV35-40960L 4 Cycle Vertical Engine View Diagrams & Manuals
LAV35-40961L 4 Cycle Vertical Engine View Diagrams & Manuals
LAV35-40961M 4 Cycle Vertical Engine View Diagrams & Manuals
LAV35-40962L 4 Cycle Vertical Engine View Diagrams & Manuals
LAV35-40962M 4 Cycle Vertical Engine View Diagrams & Manuals
LAV35-40963L 4 Cycle Vertical Engine View Diagrams & Manuals
LAV35-40964L 4 Cycle Vertical Engine View Diagrams & Manuals
LAV35-40964M 4 Cycle Vertical Engine View Diagrams & Manuals
LAV35-40965L 4 Cycle Vertical Engine View Diagrams & Manuals
LAV35-40965M 4 Cycle Vertical Engine View Diagrams & Manuals
LAV35-40965N 4 Cycle Vertical Engine View Diagrams & Manuals
LAV35-40966L 4 Cycle Vertical Engine View Diagrams & Manuals
LAV35-40967L 4 Cycle Vertical Engine View Diagrams & Manuals
LAV35-40968L 4 Cycle Vertical Engine View Diagrams & Manuals
LAV35-40968M 4 Cycle Vertical Engine View Diagrams & Manuals
LAV35-40969M 4 Cycle Vertical Engine View Diagrams & Manuals
LAV35-40970M 4 Cycle Vertical Engine View Diagrams & Manuals
LAV35-40971M 4 Cycle Vertical Engine View Diagrams & Manuals
LAV35-40972M 4 Cycle Vertical Engine View Diagrams & Manuals
LAV35-40973M 4 Cycle Vertical Engine View Diagrams & Manuals
LAV35-40974M 4 Cycle Vertical Engine View Diagrams & Manuals
LAV35-40975M 4 Cycle Vertical Engine View Diagrams & Manuals
LAV35-40976L 4 Cycle Vertical Engine View Diagrams & Manuals
LAV35-40976M 4 Cycle Vertical Engine View Diagrams & Manuals
LAV35-40977M 4 Cycle Vertical Engine View Diagrams & Manuals
LAV35-40979L 4 Cycle Vertical Engine View Diagrams & Manuals
LAV35-40979M 4 Cycle Vertical Engine View Diagrams & Manuals
LAV35-40980M 4 Cycle Vertical Engine View Diagrams & Manuals
LAV35-40981M 4 Cycle Vertical Engine View Diagrams & Manuals
LAV35-40982M 4 Cycle Vertical Engine View Diagrams & Manuals
LAV35-40983L 4 Cycle Vertical Engine View Diagrams & Manuals
LAV35-40983M 4 Cycle Vertical Engine View Diagrams & Manuals
LAV35-40984L 4 Cycle Vertical Engine View Diagrams & Manuals
LAV35-40984M 4 Cycle Vertical Engine View Diagrams & Manuals
LAV35-40986M 4 Cycle Vertical Engine View Diagrams & Manuals
LAV35-40987L 4 Cycle Vertical Engine View Diagrams & Manuals
LAV35-40990M 4 Cycle Vertical Engine View Diagrams & Manuals
LAV35-40991M 4 Cycle Vertical Engine View Diagrams & Manuals
LAV35-40992M 4 Cycle Vertical Engine View Diagrams & Manuals
LAV35-40993M 4 Cycle Vertical Engine View Diagrams & Manuals
LAV35-40994M 4 Cycle Vertical Engine View Diagrams & Manuals
LAV35-40995M 4 Cycle Vertical Engine View Diagrams & Manuals
LAV35-40996M 4 Cycle Vertical Engine View Diagrams & Manuals
LAV35-40997M 4 Cycle Vertical Engine View Diagrams & Manuals
LAV35-40998M 4 Cycle Vertical Engine View Diagrams & Manuals
LAV35-40999M 4 Cycle Vertical Engine View Diagrams & Manuals
LAV35-41000M 4 Cycle Vertical Engine View Diagrams & Manuals
LAV35-41001M 4 Cycle Vertical Engine View Diagrams & Manuals
LAV35-41002M 4 Cycle Vertical Engine View Diagrams & Manuals
LAV35-41003M 4 Cycle Vertical Engine View Diagrams & Manuals
LAV35-41004M 4 Cycle Vertical Engine View Diagrams & Manuals
LAV35-41005M 4 Cycle Vertical Engine View Diagrams & Manuals
LAV35-41006M 4 Cycle Vertical Engine View Diagrams & Manuals
LAV35-41007M 4 Cycle Vertical Engine View Diagrams & Manuals
LAV35-41008M 4 Cycle Vertical Engine View Diagrams & Manuals
LAV35-41008N 4 Cycle Vertical Engine View Diagrams & Manuals
LAV35-41008R 4 Cycle Vertical Engine View Diagrams & Manuals
LAV35-41009M 4 Cycle Vertical Engine View Diagrams & Manuals
LAV35-41010M 4 Cycle Vertical Engine View Diagrams & Manuals
LAV35-41010N 4 Cycle Vertical Engine View Diagrams & Manuals
LAV35-41010P 4 Cycle Vertical Engine View Diagrams & Manuals
LAV35-41010R 4 Cycle Vertical Engine View Diagrams & Manuals
LAV35-41010S 4 Cycle Vertical Engine View Diagrams & Manuals
LAV35-41011M 4 Cycle Vertical Engine View Diagrams & Manuals
LAV35-41011N 4 Cycle Vertical Engine View Diagrams & Manuals
LAV35-41011P 4 Cycle Vertical Engine View Diagrams & Manuals
LAV35-41011R 4 Cycle Vertical Engine View Diagrams & Manuals
LAV35-41011S 4 Cycle Vertical Engine View Diagrams & Manuals
LAV35-41012M 4 Cycle Vertical Engine View Diagrams & Manuals
LAV35-41012N 4 Cycle Vertical Engine View Diagrams & Manuals
LAV35-41013M 4 Cycle Vertical Engine View Diagrams & Manuals
LAV35-41014M 4 Cycle Vertical Engine View Diagrams & Manuals
LAV35-41014N 4 Cycle Vertical Engine View Diagrams & Manuals
LAV35-41014P 4 Cycle Vertical Engine View Diagrams & Manuals
LAV35-41014R 4 Cycle Vertical Engine View Diagrams & Manuals
LAV35-41017P 4 Cycle Vertical Engine View Diagrams & Manuals
LAV35-41017R 4 Cycle Vertical Engine View Diagrams & Manuals
LAV35-41017S 4 Cycle Vertical Engine View Diagrams & Manuals
LAV40-50200 4 Cycle Vertical Engine View Diagrams & Manuals
LAV40-50200A 4 Cycle Vertical Engine View Diagrams & Manuals
LAV40-50200B 4 Cycle Vertical Engine View Diagrams & Manuals
LAV40-50200C 4 Cycle Vertical Engine View Diagrams & Manuals
LAV40-50200D 4 Cycle Vertical Engine View Diagrams & Manuals
LAV40-50200E 4 Cycle Vertical Engine View Diagrams & Manuals
LAV40-50200F 4 Cycle Vertical Engine View Diagrams & Manuals
LAV40-50200G 4 Cycle Vertical Engine View Diagrams & Manuals
LAV40-50200H 4 Cycle Vertical Engine View Diagrams & Manuals
LAV40-50200J 4 Cycle Vertical Engine View Diagrams & Manuals
LAV40-50201 4 Cycle Vertical Engine View Diagrams & Manuals
LAV40-50201A 4 Cycle Vertical Engine View Diagrams & Manuals
LAV40-50201B 4 Cycle Vertical Engine View Diagrams & Manuals
LAV40-50201C 4 Cycle Vertical Engine View Diagrams & Manuals
LAV40-50201D 4 Cycle Vertical Engine View Diagrams & Manuals
LAV40-50203 4 Cycle Vertical Engine View Diagrams & Manuals
LAV40-50203A 4 Cycle Vertical Engine View Diagrams & Manuals
LAV40-50204 4 Cycle Vertical Engine View Diagrams & Manuals
LAV40-50204A 4 Cycle Vertical Engine View Diagrams & Manuals
LAV40-50204B 4 Cycle Vertical Engine View Diagrams & Manuals
LAV40-50205 4 Cycle Vertical Engine View Diagrams & Manuals
LAV40-50205A 4 Cycle Vertical Engine View Diagrams & Manuals
LAV40-50205B 4 Cycle Vertical Engine View Diagrams & Manuals
LAV40-50205C 4 Cycle Vertical Engine View Diagrams & Manuals
LAV40-50206 4 Cycle Vertical Engine View Diagrams & Manuals
LAV40-50207 4 Cycle Vertical Engine View Diagrams & Manuals
LAV40-50207A 4 Cycle Vertical Engine View Diagrams & Manuals
LAV40-50207B 4 Cycle Vertical Engine View Diagrams & Manuals
LAV40-50207C 4 Cycle Vertical Engine View Diagrams & Manuals
LAV40-50208 4 Cycle Vertical Engine View Diagrams & Manuals
LAV40-50209 4 Cycle Vertical Engine View Diagrams & Manuals
LAV40-50210 4 Cycle Vertical Engine View Diagrams & Manuals
LAV40-50210A 4 Cycle Vertical Engine View Diagrams & Manuals
LAV40-50211 4 Cycle Vertical Engine View Diagrams & Manuals
LAV40-50212 4 Cycle Vertical Engine View Diagrams & Manuals
LAV40-50212A 4 Cycle Vertical Engine View Diagrams & Manuals
LAV40-50212B 4 Cycle Vertical Engine View Diagrams & Manuals
LAV40-50212C 4 Cycle Vertical Engine View Diagrams & Manuals
LAV40-50216 4 Cycle Vertical Engine View Diagrams & Manuals
LAV40-50217 4 Cycle Vertical Engine View Diagrams & Manuals
LAV40-50217A 4 Cycle Vertical Engine View Diagrams & Manuals
LAV40-50217C 4 Cycle Vertical Engine View Diagrams & Manuals
LAV40-50218 4 Cycle Vertical Engine View Diagrams & Manuals
LAV40-50219 4 Cycle Vertical Engine View Diagrams & Manuals
LAV40-50220 4 Cycle Vertical Engine View Diagrams & Manuals
LAV40-50221 4 Cycle Vertical Engine View Diagrams & Manuals
LAV40-50221A 4 Cycle Vertical Engine View Diagrams & Manuals
LAV40-50222 4 Cycle Vertical Engine View Diagrams & Manuals
LAV40-50222A 4 Cycle Vertical Engine View Diagrams & Manuals
LAV40-50223 4 Cycle Vertical Engine View Diagrams & Manuals
LAV40-50224 4 Cycle Vertical Engine View Diagrams & Manuals
LAV40-50224A 4 Cycle Vertical Engine View Diagrams & Manuals
LAV40-50224B 4 Cycle Vertical Engine View Diagrams & Manuals
LAV40-50224C 4 Cycle Vertical Engine View Diagrams & Manuals
LAV40-50224D 4 Cycle Vertical Engine View Diagrams & Manuals
LAV40-50225 4 Cycle Vertical Engine View Diagrams & Manuals
LAV40-50226 4 Cycle Vertical Engine View Diagrams & Manuals
LAV40-50227 4 Cycle Vertical Engine View Diagrams & Manuals
LAV40-50227A 4 Cycle Vertical Engine View Diagrams & Manuals
LAV40-50228 4 Cycle Vertical Engine View Diagrams & Manuals
LAV40-50229 4 Cycle Vertical Engine View Diagrams & Manuals
LAV40-50229A 4 Cycle Vertical Engine View Diagrams & Manuals
LAV40-50229B 4 Cycle Vertical Engine View Diagrams & Manuals
LAV40-50229C 4 Cycle Vertical Engine View Diagrams & Manuals
LAV40-50230 4 Cycle Vertical Engine View Diagrams & Manuals
LAV40-50230A 4 Cycle Vertical Engine View Diagrams & Manuals
LAV40-50230B 4 Cycle Vertical Engine View Diagrams & Manuals
LAV40-50230C 4 Cycle Vertical Engine View Diagrams & Manuals
LAV40-50231 4 Cycle Vertical Engine View Diagrams & Manuals
LAV40-50231A 4 Cycle Vertical Engine View Diagrams & Manuals
LAV40-50231C 4 Cycle Vertical Engine View Diagrams & Manuals
LAV40-50231F 4 Cycle Vertical Engine View Diagrams & Manuals
LAV40-50231G 4 Cycle Vertical Engine View Diagrams & Manuals
LAV40-50232 4 Cycle Vertical Engine View Diagrams & Manuals
LAV40-50233 4 Cycle Vertical Engine View Diagrams & Manuals
LAV40-50234 4 Cycle Vertical Engine View Diagrams & Manuals
LAV40-50235 4 Cycle Vertical Engine View Diagrams & Manuals
LAV40-50236 4 Cycle Vertical Engine View Diagrams & Manuals
LAV40-50236A 4 Cycle Vertical Engine View Diagrams & Manuals
LAV40-50237 4 Cycle Vertical Engine View Diagrams & Manuals
LAV40-50237A 4 Cycle Vertical Engine View Diagrams & Manuals
LAV40-50237B 4 Cycle Vertical Engine View Diagrams & Manuals
LAV40-50237C 4 Cycle Vertical Engine View Diagrams & Manuals
LAV40-50237D 4 Cycle Vertical Engine View Diagrams & Manuals
LAV40-50237F 4 Cycle Vertical Engine View Diagrams & Manuals
LAV40-50238 4 Cycle Vertical Engine View Diagrams & Manuals
LAV40-50238A 4 Cycle Vertical Engine View Diagrams & Manuals
LAV40-50238B 4 Cycle Vertical Engine View Diagrams & Manuals
LAV40-50239A 4 Cycle Vertical Engine View Diagrams & Manuals
LAV40-50239B 4 Cycle Vertical Engine View Diagrams & Manuals
LAV40-50240A 4 Cycle Vertical Engine View Diagrams & Manuals
LAV40-50240B 4 Cycle Vertical Engine View Diagrams & Manuals
LAV40-50240C 4 Cycle Vertical Engine View Diagrams & Manuals
LAV40-50240D 4 Cycle Vertical Engine View Diagrams & Manuals
LAV40-50240E 4 Cycle Vertical Engine View Diagrams & Manuals
LAV40-50240F 4 Cycle Vertical Engine View Diagrams & Manuals
LAV40-50240G 4 Cycle Vertical Engine View Diagrams & Manuals
LAV40-50241A 4 Cycle Vertical Engine View Diagrams & Manuals
LAV40-50241B 4 Cycle Vertical Engine View Diagrams & Manuals
LAV40-50242A 4 Cycle Vertical Engine View Diagrams & Manuals
LAV40-50243A 4 Cycle Vertical Engine View Diagrams & Manuals
LAV40-50244A 4 Cycle Vertical Engine View Diagrams & Manuals
LAV40-50245A 4 Cycle Vertical Engine View Diagrams & Manuals
LAV40-50246A 4 Cycle Vertical Engine View Diagrams & Manuals
LAV40-50247A 4 Cycle Vertical Engine View Diagrams & Manuals
LAV40-50247B 4 Cycle Vertical Engine View Diagrams & Manuals
LAV40-50247C 4 Cycle Vertical Engine View Diagrams & Manuals
LAV40-50248A 4 Cycle Vertical Engine View Diagrams & Manuals
LAV40-50249A 4 Cycle Vertical Engine View Diagrams & Manuals
LAV40-50250A 4 Cycle Vertical Engine View Diagrams & Manuals
LAV40-50250B 4 Cycle Vertical Engine View Diagrams & Manuals
LAV40-50251A 4 Cycle Vertical Engine View Diagrams & Manuals
LAV40-50251B 4 Cycle Vertical Engine View Diagrams & Manuals
LAV40-50252A 4 Cycle Vertical Engine View Diagrams & Manuals
LAV40-50253A 4 Cycle Vertical Engine View Diagrams & Manuals
LAV40-50253B 4 Cycle Vertical Engine View Diagrams & Manuals
LAV40-50253C 4 Cycle Vertical Engine View Diagrams & Manuals
LAV40-50253D 4 Cycle Vertical Engine View Diagrams & Manuals
LAV40-50254A 4 Cycle Vertical Engine View Diagrams & Manuals
LAV40-50254B 4 Cycle Vertical Engine View Diagrams & Manuals
LAV40-50254C 4 Cycle Vertical Engine View Diagrams & Manuals
LAV40-50255A 4 Cycle Vertical Engine View Diagrams & Manuals
LAV40-50256A 4 Cycle Vertical Engine View Diagrams & Manuals
LAV40-50256B 4 Cycle Vertical Engine View Diagrams & Manuals
LAV40-50257A 4 Cycle Vertical Engine View Diagrams & Manuals
LAV40-50258A 4 Cycle Vertical Engine View Diagrams & Manuals
LAV40-50259A 4 Cycle Vertical Engine View Diagrams & Manuals
LAV40-50259B 4 Cycle Vertical Engine View Diagrams & Manuals
LAV40-50260B 4 Cycle Vertical Engine View Diagrams & Manuals
LAV40-50261B 4 Cycle Vertical Engine View Diagrams & Manuals
LAV40-50263B 4 Cycle Vertical Engine View Diagrams & Manuals
LAV40-50263C 4 Cycle Vertical Engine View Diagrams & Manuals
LAV40-50264B 4 Cycle Vertical Engine View Diagrams & Manuals
LAV40-50264C 4 Cycle Vertical Engine View Diagrams & Manuals
LAV40-50265B 4 Cycle Vertical Engine View Diagrams & Manuals
LAV40-50267B 4 Cycle Vertical Engine View Diagrams & Manuals
LAV40-50268B 4 Cycle Vertical Engine View Diagrams & Manuals
LAV40-50268C 4 Cycle Vertical Engine View Diagrams & Manuals
LAV40-50269B 4 Cycle Vertical Engine View Diagrams & Manuals
LAV40-50270B 4 Cycle Vertical Engine View Diagrams & Manuals
LAV40-50271B 4 Cycle Vertical Engine View Diagrams & Manuals
LAV40-50272B 4 Cycle Vertical Engine View Diagrams & Manuals
LAV40-50272C 4 Cycle Vertical Engine View Diagrams & Manuals
LAV40-50273B 4 Cycle Vertical Engine View Diagrams & Manuals
LAV40-50273C 4 Cycle Vertical Engine View Diagrams & Manuals
LAV40-50274B 4 Cycle Vertical Engine View Diagrams & Manuals
LAV40-50274C 4 Cycle Vertical Engine View Diagrams & Manuals
LAV40-50275B 4 Cycle Vertical Engine View Diagrams & Manuals
LAV40-50275C 4 Cycle Vertical Engine View Diagrams & Manuals
LAV40-50276B 4 Cycle Vertical Engine View Diagrams & Manuals
LAV40-50276C 4 Cycle Vertical Engine View Diagrams & Manuals
LAV40-50277B 4 Cycle Vertical Engine View Diagrams & Manuals
LAV40-50278B 4 Cycle Vertical Engine View Diagrams & Manuals
LAV40-50278C 4 Cycle Vertical Engine View Diagrams & Manuals
LAV40-50279B 4 Cycle Vertical Engine View Diagrams & Manuals
LAV40-50279C 4 Cycle Vertical Engine View Diagrams & Manuals
LAV40-50280B 4 Cycle Vertical Engine View Diagrams & Manuals
LAV40-50281B 4 Cycle Vertical Engine View Diagrams & Manuals
LAV40-50281C 4 Cycle Vertical Engine View Diagrams & Manuals
LAV40-50282B 4 Cycle Vertical Engine View Diagrams & Manuals
LAV40-50284B 4 Cycle Vertical Engine View Diagrams & Manuals
LAV40-50284C 4 Cycle Vertical Engine View Diagrams & Manuals
LAV40-50285B 4 Cycle Vertical Engine View Diagrams & Manuals
LAV40-50285C 4 Cycle Vertical Engine View Diagrams & Manuals
LAV40-50286B 4 Cycle Vertical Engine View Diagrams & Manuals
LAV40-50287B 4 Cycle Vertical Engine View Diagrams & Manuals
LAV40-50287C 4 Cycle Vertical Engine View Diagrams & Manuals
LAV40-50288B 4 Cycle Vertical Engine View Diagrams & Manuals
LAV40-50289C 4 Cycle Vertical Engine View Diagrams & Manuals
LAV40-50290C 4 Cycle Vertical Engine View Diagrams & Manuals
LAV40-50290F 4 Cycle Vertical Engine View Diagrams & Manuals
LAV40-50290G 4 Cycle Vertical Engine View Diagrams & Manuals
LAV40-50290H 4 Cycle Vertical Engine View Diagrams & Manuals
LAV40-50290J 4 Cycle Vertical Engine View Diagrams & Manuals
LAV40-50290K 4 Cycle Vertical Engine View Diagrams & Manuals
LAV40-50291C 4 Cycle Vertical Engine View Diagrams & Manuals
LAV40-50292C 4 Cycle Vertical Engine View Diagrams & Manuals
LAV40-50293C 4 Cycle Vertical Engine View Diagrams & Manuals
LAV40-50294C 4 Cycle Vertical Engine View Diagrams & Manuals
LAV40-50295C 4 Cycle Vertical Engine View Diagrams & Manuals
LAV40-50296C 4 Cycle Vertical Engine View Diagrams & Manuals
LAV40-50297C 4 Cycle Vertical Engine View Diagrams & Manuals
LAV40-50298C 4 Cycle Vertical Engine View Diagrams & Manuals
LAV40-50299C 4 Cycle Vertical Engine View Diagrams & Manuals
LAV40-50300C 4 Cycle Vertical Engine View Diagrams & Manuals
LAV40-50300D 4 Cycle Vertical Engine View Diagrams & Manuals
LAV40-50300E 4 Cycle Vertical Engine View Diagrams & Manuals
LAV40-50300F 4 Cycle Vertical Engine View Diagrams & Manuals
LAV40-50300G 4 Cycle Vertical Engine View Diagrams & Manuals
LAV40-50300H 4 Cycle Vertical Engine View Diagrams & Manuals
LAV40-50300J 4 Cycle Vertical Engine View Diagrams & Manuals
LAV40-50300K 4 Cycle Vertical Engine View Diagrams & Manuals
LAV40-50300L 4 Cycle Vertical Engine View Diagrams & Manuals
LAV40-50301C 4 Cycle Vertical Engine View Diagrams & Manuals
LAV40-50302C 4 Cycle Vertical Engine View Diagrams & Manuals
LAV40-50303C 4 Cycle Vertical Engine View Diagrams & Manuals
LAV40-50304C 4 Cycle Vertical Engine View Diagrams & Manuals
LAV40-50305C 4 Cycle Vertical Engine View Diagrams & Manuals
LAV40-50306C 4 Cycle Vertical Engine View Diagrams & Manuals
LAV40-50307C 4 Cycle Vertical Engine View Diagrams & Manuals
LAV40-50308C 4 Cycle Vertical Engine View Diagrams & Manuals
LAV40-50309C 4 Cycle Vertical Engine View Diagrams & Manuals
LAV40-50310C 4 Cycle Vertical Engine View Diagrams & Manuals
LAV40-50311C 4 Cycle Vertical Engine View Diagrams & Manuals
LAV40-50312C 4 Cycle Vertical Engine View Diagrams & Manuals
LAV40-50313C 4 Cycle Vertical Engine View Diagrams & Manuals
LAV40-50316C 4 Cycle Vertical Engine View Diagrams & Manuals
LAV40-50317C 4 Cycle Vertical Engine View Diagrams & Manuals
LAV40-50317D 4 Cycle Vertical Engine View Diagrams & Manuals
LAV40-50318C 4 Cycle Vertical Engine View Diagrams & Manuals
LAV40-50319C 4 Cycle Vertical Engine View Diagrams & Manuals
LAV40-50320C 4 Cycle Vertical Engine View Diagrams & Manuals
LAV40-50321C 4 Cycle Vertical Engine View Diagrams & Manuals
LAV40-50322C 4 Cycle Vertical Engine View Diagrams & Manuals
LAV40-50323C 4 Cycle Vertical Engine View Diagrams & Manuals
LAV40-50324C 4 Cycle Vertical Engine View Diagrams & Manuals
LAV40-50325C 4 Cycle Vertical Engine View Diagrams & Manuals
LAV40-50326C 4 Cycle Vertical Engine View Diagrams & Manuals
LAV40-50327C 4 Cycle Vertical Engine View Diagrams & Manuals
LAV40-50327D 4 Cycle Vertical Engine View Diagrams & Manuals
LAV40-50327E 4 Cycle Vertical Engine View Diagrams & Manuals
LAV40-50328C 4 Cycle Vertical Engine View Diagrams & Manuals
LAV40-50328D 4 Cycle Vertical Engine View Diagrams & Manuals
LAV40-50328E 4 Cycle Vertical Engine View Diagrams & Manuals
LAV40-50329C 4 Cycle Vertical Engine View Diagrams & Manuals
LAV40-50330C 4 Cycle Vertical Engine View Diagrams & Manuals
LAV40-50331C 4 Cycle Vertical Engine View Diagrams & Manuals
LAV40-50332C 4 Cycle Vertical Engine View Diagrams & Manuals
LAV40-50333C 4 Cycle Vertical Engine View Diagrams & Manuals
LAV40-50334C 4 Cycle Vertical Engine View Diagrams & Manuals
LAV40-50335C 4 Cycle Vertical Engine View Diagrams & Manuals
LAV40-50336C 4 Cycle Vertical Engine View Diagrams & Manuals
LAV40-50337C 4 Cycle Vertical Engine View Diagrams & Manuals
LAV40-50338C 4 Cycle Vertical Engine View Diagrams & Manuals
LAV40-50339C 4 Cycle Vertical Engine View Diagrams & Manuals
LAV40-50340C 4 Cycle Vertical Engine View Diagrams & Manuals
LAV40-50341C 4 Cycle Vertical Engine View Diagrams & Manuals
LAV40-50341E 4 Cycle Vertical Engine View Diagrams & Manuals
LAV40-50342C 4 Cycle Vertical Engine View Diagrams & Manuals
LAV40-50343C 4 Cycle Vertical Engine View Diagrams & Manuals
LAV40-50343D 4 Cycle Vertical Engine View Diagrams & Manuals
LAV40-50343E 4 Cycle Vertical Engine View Diagrams & Manuals
LAV40-50343F 4 Cycle Vertical Engine View Diagrams & Manuals
LAV40-50344C 4 Cycle Vertical Engine View Diagrams & Manuals
LAV40-50344D 4 Cycle Vertical Engine View Diagrams & Manuals
LAV40-50344E 4 Cycle Vertical Engine View Diagrams & Manuals
LAV40-50344F 4 Cycle Vertical Engine View Diagrams & Manuals
LAV40-50345C 4 Cycle Vertical Engine View Diagrams & Manuals
LAV40-50346C 4 Cycle Vertical Engine View Diagrams & Manuals
LAV40-50347C 4 Cycle Vertical Engine View Diagrams & Manuals
LAV40-50347D 4 Cycle Vertical Engine View Diagrams & Manuals
LAV40-50348C 4 Cycle Vertical Engine View Diagrams & Manuals
LAV40-50348E 4 Cycle Vertical Engine View Diagrams & Manuals
LAV40-50349C 4 Cycle Vertical Engine View Diagrams & Manuals
LAV40-50350C 4 Cycle Vertical Engine View Diagrams & Manuals
LAV40-50351C 4 Cycle Vertical Engine View Diagrams & Manuals
LAV40-50352C 4 Cycle Vertical Engine View Diagrams & Manuals
LAV40-50353C 4 Cycle Vertical Engine View Diagrams & Manuals
LAV40-50354C 4 Cycle Vertical Engine View Diagrams & Manuals
LAV40-50356C 4 Cycle Vertical Engine View Diagrams & Manuals
LAV40-50357C 4 Cycle Vertical Engine View Diagrams & Manuals
LAV40-50358C 4 Cycle Vertical Engine View Diagrams & Manuals
LAV40-50358D 4 Cycle Vertical Engine View Diagrams & Manuals
LAV40-50359C 4 Cycle Vertical Engine View Diagrams & Manuals
LAV40-50359D 4 Cycle Vertical Engine View Diagrams & Manuals
LAV40-50359E 4 Cycle Vertical Engine View Diagrams & Manuals
LAV40-50360C 4 Cycle Vertical Engine View Diagrams & Manuals
LAV40-50361C 4 Cycle Vertical Engine View Diagrams & Manuals
LAV40-50361D 4 Cycle Vertical Engine View Diagrams & Manuals
LAV40-50362C 4 Cycle Vertical Engine View Diagrams & Manuals
LAV40-50363C 4 Cycle Vertical Engine View Diagrams & Manuals
LAV40-50363D 4 Cycle Vertical Engine View Diagrams & Manuals
LAV40-50363E 4 Cycle Vertical Engine View Diagrams & Manuals
LAV40-50363F 4 Cycle Vertical Engine View Diagrams & Manuals
LAV40-50363G 4 Cycle Vertical Engine View Diagrams & Manuals
LAV40-50365D 4 Cycle Vertical Engine View Diagrams & Manuals
LAV40-50365E 4 Cycle Vertical Engine View Diagrams & Manuals
LAV40-50365F 4 Cycle Vertical Engine View Diagrams & Manuals
LAV40-50366D 4 Cycle Vertical Engine View Diagrams & Manuals
LAV40-50366E 4 Cycle Vertical Engine View Diagrams & Manuals
LAV40-50367C 4 Cycle Vertical Engine View Diagrams & Manuals
LAV40-50367D 4 Cycle Vertical Engine View Diagrams & Manuals
LAV40-50368E 4 Cycle Vertical Engine View Diagrams & Manuals
LAV40-50368F 4 Cycle Vertical Engine View Diagrams & Manuals
LAV40-50369D 4 Cycle Vertical Engine View Diagrams & Manuals
LAV40-50369E 4 Cycle Vertical Engine View Diagrams & Manuals
LAV40-50369F 4 Cycle Vertical Engine View Diagrams & Manuals
LAV40-50370C 4 Cycle Vertical Engine View Diagrams & Manuals
LAV40-50370D 4 Cycle Vertical Engine View Diagrams & Manuals
LAV40-50370E 4 Cycle Vertical Engine View Diagrams & Manuals
LAV40-50371C 4 Cycle Vertical Engine View Diagrams & Manuals
LAV40-50372C 4 Cycle Vertical Engine View Diagrams & Manuals
LAV40-50373D 4 Cycle Vertical Engine View Diagrams & Manuals
LAV40-50374D 4 Cycle Vertical Engine View Diagrams & Manuals
LAV40-50375D 4 Cycle Vertical Engine View Diagrams & Manuals
LAV40-50376F 4 Cycle Vertical Engine View Diagrams & Manuals
LAV40-50376G 4 Cycle Vertical Engine View Diagrams & Manuals
LAV40-50377F 4 Cycle Vertical Engine View Diagrams & Manuals
LAV40-50377G 4 Cycle Vertical Engine View Diagrams & Manuals
LAV40-50378F 4 Cycle Vertical Engine View Diagrams & Manuals
LAV40-50378G 4 Cycle Vertical Engine View Diagrams & Manuals
LAV40-50379F 4 Cycle Vertical Engine View Diagrams & Manuals
LAV40-50379G 4 Cycle Vertical Engine View Diagrams & Manuals
LAV40-50380D 4 Cycle Vertical Engine View Diagrams & Manuals
LAV40-50381F 4 Cycle Vertical Engine View Diagrams & Manuals
LAV40-50382D 4 Cycle Vertical Engine View Diagrams & Manuals
LAV40-50383D 4 Cycle Vertical Engine View Diagrams & Manuals
LAV40-50384F 4 Cycle Vertical Engine View Diagrams & Manuals
LAV40-50384G 4 Cycle Vertical Engine View Diagrams & Manuals
LAV40-50384H 4 Cycle Vertical Engine View Diagrams & Manuals
LAV40-50385D 4 Cycle Vertical Engine View Diagrams & Manuals
LAV40-50386D 4 Cycle Vertical Engine View Diagrams & Manuals
LAV40-50387D 4 Cycle Vertical Engine View Diagrams & Manuals
LAV40-50388D 4 Cycle Vertical Engine View Diagrams & Manuals
LAV40-50389E 4 Cycle Vertical Engine View Diagrams & Manuals
LAV40-50390D 4 Cycle Vertical Engine View Diagrams & Manuals
LAV40-50390E 4 Cycle Vertical Engine View Diagrams & Manuals
LAV40-50391D 4 Cycle Vertical Engine View Diagrams & Manuals
LAV40-50392E 4 Cycle Vertical Engine View Diagrams & Manuals
LAV40-50393G 4 Cycle Vertical Engine View Diagrams & Manuals
LAV40-50393H 4 Cycle Vertical Engine View Diagrams & Manuals
LAV40-50393J 4 Cycle Vertical Engine View Diagrams & Manuals
LAV40-50393K 4 Cycle Vertical Engine View Diagrams & Manuals
LAV40-50394H 4 Cycle Vertical Engine View Diagrams & Manuals
LAV40-50394J 4 Cycle Vertical Engine View Diagrams & Manuals
LAV40-50395H 4 Cycle Vertical Engine View Diagrams & Manuals
LAV40-50396H 4 Cycle Vertical Engine View Diagrams & Manuals
LAV40-50397H 4 Cycle Vertical Engine View Diagrams & Manuals
LAV40-50397J 4 Cycle Vertical Engine View Diagrams & Manuals
LAV40-50398H 4 Cycle Vertical Engine View Diagrams & Manuals
LAV40-50398J 4 Cycle Vertical Engine View Diagrams & Manuals
LAV40-50399J 4 Cycle Vertical Engine View Diagrams & Manuals
LAV50-62000 4 Cycle Vertical Engine View Diagrams & Manuals
LAV50-62000A 4 Cycle Vertical Engine View Diagrams & Manuals
LAV50-62000B 4 Cycle Vertical Engine View Diagrams & Manuals
LAV50-62000C 4 Cycle Vertical Engine View Diagrams & Manuals
LAV50-62000D 4 Cycle Vertical Engine View Diagrams & Manuals
LAV50-62000E 4 Cycle Vertical Engine View Diagrams & Manuals
LAV50-62001 4 Cycle Vertical Engine View Diagrams & Manuals
LAV50-62002 4 Cycle Vertical Engine View Diagrams & Manuals
LAV50-62003 4 Cycle Vertical Engine View Diagrams & Manuals
LAV50-62004 4 Cycle Vertical Engine View Diagrams & Manuals
LAV50-62005 4 Cycle Vertical Engine View Diagrams & Manuals
LAV50-62006 4 Cycle Vertical Engine View Diagrams & Manuals
LAV50-62007 4 Cycle Vertical Engine View Diagrams & Manuals
LAV50-62007A 4 Cycle Vertical Engine View Diagrams & Manuals
LAV50-62007B 4 Cycle Vertical Engine View Diagrams & Manuals
LAV50-62008 4 Cycle Vertical Engine View Diagrams & Manuals
LAV50-62009 4 Cycle Vertical Engine View Diagrams & Manuals
LAV50-62010 4 Cycle Vertical Engine View Diagrams & Manuals
LAV50-62011 4 Cycle Vertical Engine View Diagrams & Manuals
LAV50-62012 4 Cycle Vertical Engine View Diagrams & Manuals
LAV50-62013 4 Cycle Vertical Engine View Diagrams & Manuals
LAV50-62014 4 Cycle Vertical Engine View Diagrams & Manuals
LAV50-62014A 4 Cycle Vertical Engine View Diagrams & Manuals
LAV50-62014B 4 Cycle Vertical Engine View Diagrams & Manuals
LAV50-62015 4 Cycle Vertical Engine View Diagrams & Manuals
LAV50-62015A 4 Cycle Vertical Engine View Diagrams & Manuals
LAV50-62015B 4 Cycle Vertical Engine View Diagrams & Manuals
LAV50-62016 4 Cycle Vertical Engine View Diagrams & Manuals
LAV50-62017 4 Cycle Vertical Engine View Diagrams & Manuals
LAV50-62018 4 Cycle Vertical Engine View Diagrams & Manuals
LAV50-62018B 4 Cycle Vertical Engine View Diagrams & Manuals
LAV50-62019 4 Cycle Vertical Engine View Diagrams & Manuals
LAV50-62019B 4 Cycle Vertical Engine View Diagrams & Manuals
LAV50-62019C 4 Cycle Vertical Engine View Diagrams & Manuals
LAV50-62020 4 Cycle Vertical Engine View Diagrams & Manuals
LAV50-62020A 4 Cycle Vertical Engine View Diagrams & Manuals
LAV50-62021 4 Cycle Vertical Engine View Diagrams & Manuals
LAV50-62022 4 Cycle Vertical Engine View Diagrams & Manuals
LAV50-62023 4 Cycle Vertical Engine View Diagrams & Manuals
LAV50-62024 4 Cycle Vertical Engine View Diagrams & Manuals
LAV50-62024B 4 Cycle Vertical Engine View Diagrams & Manuals
LAV50-62024C 4 Cycle Vertical Engine View Diagrams & Manuals
LAV50-62025 4 Cycle Vertical Engine View Diagrams & Manuals
LAV50-62025A 4 Cycle Vertical Engine View Diagrams & Manuals
LAV50-62026 4 Cycle Vertical Engine View Diagrams & Manuals
LAV50-62026A 4 Cycle Vertical Engine View Diagrams & Manuals
LAV50-62026B 4 Cycle Vertical Engine View Diagrams & Manuals
LAV50-62026C 4 Cycle Vertical Engine View Diagrams & Manuals
LAV50-62027 4 Cycle Vertical Engine View Diagrams & Manuals
LAV50-62028 4 Cycle Vertical Engine View Diagrams & Manuals
LAV50-62028A 4 Cycle Vertical Engine View Diagrams & Manuals
LAV50-62029 4 Cycle Vertical Engine View Diagrams & Manuals
LAV50-62029A 4 Cycle Vertical Engine View Diagrams & Manuals
LAV50-62029B 4 Cycle Vertical Engine View Diagrams & Manuals
LAV50-62030A 4 Cycle Vertical Engine View Diagrams & Manuals
LAV50-62030B 4 Cycle Vertical Engine View Diagrams & Manuals
LAV50-62031 4 Cycle Vertical Engine View Diagrams & Manuals
LAV50-62031A 4 Cycle Vertical Engine View Diagrams & Manuals
LAV50-62031B 4 Cycle Vertical Engine View Diagrams & Manuals
LAV50-62031C 4 Cycle Vertical Engine View Diagrams & Manuals
LAV50-62031D 4 Cycle Vertical Engine View Diagrams & Manuals
LAV50-62031E 4 Cycle Vertical Engine View Diagrams & Manuals
LAV50-62031G 4 Cycle Vertical Engine View Diagrams & Manuals
LAV50-62033 4 Cycle Vertical Engine View Diagrams & Manuals
LAV50-62033A 4 Cycle Vertical Engine View Diagrams & Manuals
LAV50-62033B 4 Cycle Vertical Engine View Diagrams & Manuals
LAV50-62034 4 Cycle Vertical Engine View Diagrams & Manuals
LAV50-62035 4 Cycle Vertical Engine View Diagrams & Manuals
LAV50-62036 4 Cycle Vertical Engine View Diagrams & Manuals
LAV50-62036A 4 Cycle Vertical Engine View Diagrams & Manuals
LAV50-62036B 4 Cycle Vertical Engine View Diagrams & Manuals
LAV50-62037 4 Cycle Vertical Engine View Diagrams & Manuals
LAV50-62037A 4 Cycle Vertical Engine View Diagrams & Manuals
LAV50-62037B 4 Cycle Vertical Engine View Diagrams & Manuals
LAV50-62037C 4 Cycle Vertical Engine View Diagrams & Manuals
LAV50-62037D 4 Cycle Vertical Engine View Diagrams & Manuals
LAV50-62037E 4 Cycle Vertical Engine View Diagrams & Manuals
LAV50-62037F 4 Cycle Vertical Engine View Diagrams & Manuals
LAV50-62037G 4 Cycle Vertical Engine View Diagrams & Manuals
LAV50-62038 4 Cycle Vertical Engine View Diagrams & Manuals
LAV50-62039 4 Cycle Vertical Engine View Diagrams & Manuals
LAV50-62039A 4 Cycle Vertical Engine View Diagrams & Manuals
LAV50-62039B 4 Cycle Vertical Engine View Diagrams & Manuals
LAV50-62040 4 Cycle Vertical Engine View Diagrams & Manuals
LAV50-62041 4 Cycle Vertical Engine View Diagrams & Manuals
LAV50-62042 4 Cycle Vertical Engine View Diagrams & Manuals
LAV50-62042A 4 Cycle Vertical Engine View Diagrams & Manuals
LAV50-62042B 4 Cycle Vertical Engine View Diagrams & Manuals
LAV50-62043 4 Cycle Vertical Engine View Diagrams & Manuals
LAV50-62043A 4 Cycle Vertical Engine View Diagrams & Manuals
LAV50-62043B 4 Cycle Vertical Engine View Diagrams & Manuals
LAV50-62043C 4 Cycle Vertical Engine View Diagrams & Manuals
LAV50-62044 4 Cycle Vertical Engine View Diagrams & Manuals
LAV50-62044A 4 Cycle Vertical Engine View Diagrams & Manuals
LAV50-62044B 4 Cycle Vertical Engine View Diagrams & Manuals
LAV50-62045 4 Cycle Vertical Engine View Diagrams & Manuals
LAV50-62045A 4 Cycle Vertical Engine View Diagrams & Manuals
LAV50-62045B 4 Cycle Vertical Engine View Diagrams & Manuals
LAV50-62046 4 Cycle Vertical Engine View Diagrams & Manuals
LAV50-62046A 4 Cycle Vertical Engine View Diagrams & Manuals
LAV50-62046B 4 Cycle Vertical Engine View Diagrams & Manuals
LAV50-62047A 4 Cycle Vertical Engine View Diagrams & Manuals
LAV50-62047B 4 Cycle Vertical Engine View Diagrams & Manuals
LAV50-62048A 4 Cycle Vertical Engine View Diagrams & Manuals
LAV50-62048B 4 Cycle Vertical Engine View Diagrams & Manuals
LAV50-62049A 4 Cycle Vertical Engine View Diagrams & Manuals
LAV50-62049B 4 Cycle Vertical Engine View Diagrams & Manuals
LAV50-62049C 4 Cycle Vertical Engine View Diagrams & Manuals
LAV50-62050B 4 Cycle Vertical Engine View Diagrams & Manuals
LAV50-62050C 4 Cycle Vertical Engine View Diagrams & Manuals
LAV50-62050D 4 Cycle Vertical Engine View Diagrams & Manuals
LAV50-62050F 4 Cycle Vertical Engine View Diagrams & Manuals
LAV50-62051B 4 Cycle Vertical Engine View Diagrams & Manuals
LAV50-62052B 4 Cycle Vertical Engine View Diagrams & Manuals
LAV50-62053B 4 Cycle Vertical Engine View Diagrams & Manuals
LAV50-62053C 4 Cycle Vertical Engine View Diagrams & Manuals
LAV50-62053D 4 Cycle Vertical Engine View Diagrams & Manuals
LAV50-62054 4 Cycle Vertical Engine View Diagrams & Manuals
LAV50-62055 4 Cycle Vertical Engine View Diagrams & Manuals
LAV50-62055A 4 Cycle Vertical Engine View Diagrams & Manuals
LAV50-62055B 4 Cycle Vertical Engine View Diagrams & Manuals
LAV50-62056B 4 Cycle Vertical Engine View Diagrams & Manuals
LAV50-62056C 4 Cycle Vertical Engine View Diagrams & Manuals
LAV50-62057 4 Cycle Vertical Engine View Diagrams & Manuals
LAV50-62057A 4 Cycle Vertical Engine View Diagrams & Manuals
LAV50-62057B 4 Cycle Vertical Engine View Diagrams & Manuals
LAV50-62059B 4 Cycle Vertical Engine View Diagrams & Manuals
LAV50-62060B 4 Cycle Vertical Engine View Diagrams & Manuals
LAV50-62063B 4 Cycle Vertical Engine View Diagrams & Manuals
LAV50-62063C 4 Cycle Vertical Engine View Diagrams & Manuals
LAV50-62064A 4 Cycle Vertical Engine View Diagrams & Manuals
LAV50-62065B 4 Cycle Vertical Engine View Diagrams & Manuals
LAV50-62065C 4 Cycle Vertical Engine View Diagrams & Manuals
LAV50-62065D 4 Cycle Vertical Engine View Diagrams & Manuals
LAV50-62065E 4 Cycle Vertical Engine View Diagrams & Manuals
LAV50-62066B 4 Cycle Vertical Engine View Diagrams & Manuals
LAV50-62066C 4 Cycle Vertical Engine View Diagrams & Manuals
LAV50-62067C 4 Cycle Vertical Engine View Diagrams & Manuals
LAV50-62067D 4 Cycle Vertical Engine View Diagrams & Manuals
LAV50-62067E 4 Cycle Vertical Engine View Diagrams & Manuals
LAV50-62068C 4 Cycle Vertical Engine View Diagrams & Manuals
LAV50-62071C 4 Cycle Vertical Engine View Diagrams & Manuals
LAV50-62071D 4 Cycle Vertical Engine View Diagrams & Manuals
LAV50-62072C 4 Cycle Vertical Engine View Diagrams & Manuals
LAV50-62073C 4 Cycle Vertical Engine View Diagrams & Manuals
LAV50-62074C 4 Cycle Vertical Engine View Diagrams & Manuals
LAV50-62075C 4 Cycle Vertical Engine View Diagrams & Manuals
LAV50-62076D 4 Cycle Vertical Engine View Diagrams & Manuals
LAV50-62076E 4 Cycle Vertical Engine View Diagrams & Manuals
LAV50-62077D 4 Cycle Vertical Engine View Diagrams & Manuals
LAV50-62077E 4 Cycle Vertical Engine View Diagrams & Manuals
LAV50-62077F 4 Cycle Vertical Engine View Diagrams & Manuals
LAV50-62078D 4 Cycle Vertical Engine View Diagrams & Manuals
LAV50-62078E 4 Cycle Vertical Engine View Diagrams & Manuals
LAV50-62079D 4 Cycle Vertical Engine View Diagrams & Manuals
LAV50-62079E 4 Cycle Vertical Engine View Diagrams & Manuals
LAV50-62080D 4 Cycle Vertical Engine View Diagrams & Manuals
LAV50-62080E 4 Cycle Vertical Engine View Diagrams & Manuals
LAV50-62080F 4 Cycle Vertical Engine View Diagrams & Manuals
LAV50-62080G 4 Cycle Vertical Engine View Diagrams & Manuals
LAV50-62081E 4 Cycle Vertical Engine View Diagrams & Manuals
LAV50-62082E 4 Cycle Vertical Engine View Diagrams & Manuals
LAV50-62082G 4 Cycle Vertical Engine View Diagrams & Manuals
LAV50-62083E 4 Cycle Vertical Engine View Diagrams & Manuals
LAV50-62083F 4 Cycle Vertical Engine View Diagrams & Manuals
LAV50-62084F 4 Cycle Vertical Engine View Diagrams & Manuals
LEV100-335002A 4 Cycle Vertical Engine View Diagrams & Manuals
LEV100-335003A 4 Cycle Vertical Engine View Diagrams & Manuals
LEV100-335003B 4 Cycle Vertical Engine View Diagrams & Manuals
LEV100-335003C 4 Cycle Vertical Engine View Diagrams & Manuals
LEV100-335004A 4 Cycle Vertical Engine View Diagrams & Manuals
LEV100-335004B 4 Cycle Vertical Engine View Diagrams & Manuals
LEV100-335004C 4 Cycle Vertical Engine View Diagrams & Manuals
LEV100-335004D 4 Cycle Vertical Engine View Diagrams & Manuals
LEV100-335005A 4 Cycle Vertical Engine View Diagrams & Manuals
LEV100-335005B 4 Cycle Vertical Engine View Diagrams & Manuals
LEV100-335005C 4 Cycle Vertical Engine View Diagrams & Manuals
LEV100-335005E 4 Cycle Vertical Engine View Diagrams & Manuals
LEV100-335006B 4 Cycle Vertical Engine View Diagrams & Manuals
LEV100-335006C 4 Cycle Vertical Engine View Diagrams & Manuals
LEV100-335006D 4 Cycle Vertical Engine View Diagrams & Manuals
LEV100-335007B 4 Cycle Vertical Engine View Diagrams & Manuals
LEV100-335008B 4 Cycle Vertical Engine View Diagrams & Manuals
LEV100-335008C 4 Cycle Vertical Engine View Diagrams & Manuals
LEV100-335009B 4 Cycle Vertical Engine View Diagrams & Manuals
LEV100-335010B 4 Cycle Vertical Engine View Diagrams & Manuals
LEV100-335010C 4 Cycle Vertical Engine View Diagrams & Manuals
LEV100-335010D 4 Cycle Vertical Engine View Diagrams & Manuals
LEV100-335010E 4 Cycle Vertical Engine View Diagrams & Manuals
LEV100-335010F 4 Cycle Vertical Engine View Diagrams & Manuals
LEV100-335011B 4 Cycle Vertical Engine View Diagrams & Manuals
LEV100-335011C 4 Cycle Vertical Engine View Diagrams & Manuals
LEV100-335011D 4 Cycle Vertical Engine View Diagrams & Manuals
LEV100-335011E 4 Cycle Vertical Engine View Diagrams & Manuals
LEV100-335013B 4 Cycle Vertical Engine View Diagrams & Manuals
LEV100-335014B 4 Cycle Vertical Engine View Diagrams & Manuals
LEV100-335015B 4 Cycle Vertical Engine View Diagrams & Manuals
LEV100-335018B 4 Cycle Vertical Engine View Diagrams & Manuals
LEV100-335018C 4 Cycle Vertical Engine View Diagrams & Manuals
LEV100-335019C 4 Cycle Vertical Engine View Diagrams & Manuals
LEV100-335019D 4 Cycle Vertical Engine View Diagrams & Manuals
LEV100-335019E 4 Cycle Vertical Engine View Diagrams & Manuals
LEV100-335020C 4 Cycle Vertical Engine View Diagrams & Manuals
LEV100-335021C 4 Cycle Vertical Engine View Diagrams & Manuals
LEV100-335023C 4 Cycle Vertical Engine View Diagrams & Manuals
LEV100-335023D 4 Cycle Vertical Engine View Diagrams & Manuals
LEV100-335024C 4 Cycle Vertical Engine View Diagrams & Manuals
LEV100-335025C 4 Cycle Vertical Engine View Diagrams & Manuals
LEV100-335026C 4 Cycle Vertical Engine View Diagrams & Manuals
LEV100-335027D 4 Cycle Vertical Engine View Diagrams & Manuals
LEV100-335027E 4 Cycle Vertical Engine View Diagrams & Manuals
LEV100-335028D 4 Cycle Vertical Engine View Diagrams & Manuals
LEV100-335029E 4 Cycle Vertical Engine View Diagrams & Manuals
LEV100-335029F 4 Cycle Vertical Engine View Diagrams & Manuals
LEV100-338001B 4 Cycle Vertical Engine View Diagrams & Manuals
LEV100-338001C 4 Cycle Vertical Engine View Diagrams & Manuals
LEV100-338002B 4 Cycle Vertical Engine View Diagrams & Manuals
LEV100-338002C 4 Cycle Vertical Engine View Diagrams & Manuals
LEV100-338002D 4 Cycle Vertical Engine View Diagrams & Manuals
LEV100-338002E 4 Cycle Vertical Engine View Diagrams & Manuals
LEV100-338002F 4 Cycle Vertical Engine View Diagrams & Manuals
LEV100-338003D 4 Cycle Vertical Engine View Diagrams & Manuals
LEV100-338006B 4 Cycle Vertical Engine View Diagrams & Manuals
LEV100-338006C 4 Cycle Vertical Engine View Diagrams & Manuals
LEV100-338007B 4 Cycle Vertical Engine View Diagrams & Manuals
LEV100-338008B 4 Cycle Vertical Engine View Diagrams & Manuals
LEV100-338008C 4 Cycle Vertical Engine View Diagrams & Manuals
LEV100-338008D 4 Cycle Vertical Engine View Diagrams & Manuals
LEV100-338008E 4 Cycle Vertical Engine View Diagrams & Manuals
LEV100-338008F 4 Cycle Vertical Engine View Diagrams & Manuals
LEV100-338009B 4 Cycle Vertical Engine View Diagrams & Manuals
LEV100-338009C 4 Cycle Vertical Engine View Diagrams & Manuals
LEV100-338009D 4 Cycle Vertical Engine View Diagrams & Manuals
LEV100-338010B 4 Cycle Vertical Engine View Diagrams & Manuals
LEV100-338011B 4 Cycle Vertical Engine View Diagrams & Manuals
LEV100-338011C 4 Cycle Vertical Engine View Diagrams & Manuals
LEV100-338012B 4 Cycle Vertical Engine View Diagrams & Manuals
LEV100-338012C 4 Cycle Vertical Engine View Diagrams & Manuals
LEV100-338012D 4 Cycle Vertical Engine View Diagrams & Manuals
LEV100-338013C 4 Cycle Vertical Engine View Diagrams & Manuals
LEV100-338014C 4 Cycle Vertical Engine View Diagrams & Manuals
LEV100-338014D 4 Cycle Vertical Engine View Diagrams & Manuals
LEV100-338016C 4 Cycle Vertical Engine View Diagrams & Manuals
LEV100-338017C 4 Cycle Vertical Engine View Diagrams & Manuals
LEV100-338017D 4 Cycle Vertical Engine View Diagrams & Manuals
LEV100-338019D 4 Cycle Vertical Engine View Diagrams & Manuals
LEV100-338019E 4 Cycle Vertical Engine View Diagrams & Manuals
LEV100-338020C 4 Cycle Vertical Engine View Diagrams & Manuals
LEV100-338020D 4 Cycle Vertical Engine View Diagrams & Manuals
LEV100-338020E 4 Cycle Vertical Engine View Diagrams & Manuals
LEV100-338021E 4 Cycle Vertical Engine View Diagrams & Manuals
LEV100-338022E 4 Cycle Vertical Engine View Diagrams & Manuals
LEV100-338022F 4 Cycle Vertical Engine View Diagrams & Manuals
LEV100-338024E 4 Cycle Vertical Engine View Diagrams & Manuals
LEV100-338024F 4 Cycle Vertical Engine View Diagrams & Manuals
LEV100-338025E 4 Cycle Vertical Engine View Diagrams & Manuals
LEV100-338026E 4 Cycle Vertical Engine View Diagrams & Manuals
LEV100-338026F 4 Cycle Vertical Engine View Diagrams & Manuals
LEV100-338027E 4 Cycle Vertical Engine View Diagrams & Manuals
LEV100-338028E 4 Cycle Vertical Engine View Diagrams & Manuals
LEV100-338029F 4 Cycle Vertical Engine View Diagrams & Manuals
LEV100-340002A 4 Cycle Vertical Engine View Diagrams & Manuals
LEV100-340003A 4 Cycle Vertical Engine View Diagrams & Manuals
LEV100-340003B 4 Cycle Vertical Engine View Diagrams & Manuals
LEV100-340003C 4 Cycle Vertical Engine View Diagrams & Manuals
LEV100-340005A 4 Cycle Vertical Engine View Diagrams & Manuals
LEV100-340005B 4 Cycle Vertical Engine View Diagrams & Manuals
LEV100-340007B 4 Cycle Vertical Engine View Diagrams & Manuals
LEV100-340010B 4 Cycle Vertical Engine View Diagrams & Manuals
LEV100-340010C 4 Cycle Vertical Engine View Diagrams & Manuals
LEV100-340011B 4 Cycle Vertical Engine View Diagrams & Manuals
LEV100-340011C 4 Cycle Vertical Engine View Diagrams & Manuals
LEV100-340012B 4 Cycle Vertical Engine View Diagrams & Manuals
LEV100-340014B 4 Cycle Vertical Engine View Diagrams & Manuals
LEV100-340015B 4 Cycle Vertical Engine View Diagrams & Manuals
LEV100-340015C 4 Cycle Vertical Engine View Diagrams & Manuals
LEV100-340015D 4 Cycle Vertical Engine View Diagrams & Manuals
LEV100-340015E 4 Cycle Vertical Engine View Diagrams & Manuals
LEV100-340015F 4 Cycle Vertical Engine View Diagrams & Manuals
LEV100-340016B 4 Cycle Vertical Engine View Diagrams & Manuals
LEV100-340016C 4 Cycle Vertical Engine View Diagrams & Manuals
LEV100-340016D 4 Cycle Vertical Engine View Diagrams & Manuals
LEV100-340016E 4 Cycle Vertical Engine View Diagrams & Manuals
LEV100-340017B 4 Cycle Vertical Engine View Diagrams & Manuals
LEV100-340017C 4 Cycle Vertical Engine View Diagrams & Manuals
LEV100-340017E 4 Cycle Vertical Engine View Diagrams & Manuals
LEV100-340018B 4 Cycle Vertical Engine View Diagrams & Manuals
LEV100-340018C 4 Cycle Vertical Engine View Diagrams & Manuals
LEV100-340018D 4 Cycle Vertical Engine View Diagrams & Manuals
LEV100-340019B 4 Cycle Vertical Engine View Diagrams & Manuals
LEV100-340019C 4 Cycle Vertical Engine View Diagrams & Manuals
LEV100-340019D 4 Cycle Vertical Engine View Diagrams & Manuals
LEV100-340020B 4 Cycle Vertical Engine View Diagrams & Manuals
LEV100-340020C 4 Cycle Vertical Engine View Diagrams & Manuals
LEV100-340020D 4 Cycle Vertical Engine View Diagrams & Manuals
LEV100-340021B 4 Cycle Vertical Engine View Diagrams & Manuals
LEV100-340021C 4 Cycle Vertical Engine View Diagrams & Manuals
LEV100-340021E 4 Cycle Vertical Engine View Diagrams & Manuals
LEV100-340022B 4 Cycle Vertical Engine View Diagrams & Manuals
LEV100-340023B 4 Cycle Vertical Engine View Diagrams & Manuals
LEV100-340024B 4 Cycle Vertical Engine View Diagrams & Manuals
LEV100-340024C 4 Cycle Vertical Engine View Diagrams & Manuals
LEV100-340024D 4 Cycle Vertical Engine View Diagrams & Manuals
LEV100-340024E 4 Cycle Vertical Engine View Diagrams & Manuals
LEV100-340026B 4 Cycle Vertical Engine View Diagrams & Manuals
LEV100-340026C 4 Cycle Vertical Engine View Diagrams & Manuals
LEV100-340027B 4 Cycle Vertical Engine View Diagrams & Manuals
LEV100-340028B 4 Cycle Vertical Engine View Diagrams & Manuals
LEV100-340029C 4 Cycle Vertical Engine View Diagrams & Manuals
LEV100-340030C 4 Cycle Vertical Engine View Diagrams & Manuals
LEV100-340031C 4 Cycle Vertical Engine View Diagrams & Manuals
LEV100-340031D 4 Cycle Vertical Engine View Diagrams & Manuals
LEV100-340031E 4 Cycle Vertical Engine View Diagrams & Manuals
LEV100-340032C 4 Cycle Vertical Engine View Diagrams & Manuals
LEV100-340032E 4 Cycle Vertical Engine View Diagrams & Manuals
LEV100-340032F 4 Cycle Vertical Engine View Diagrams & Manuals
LEV100-340033C 4 Cycle Vertical Engine View Diagrams & Manuals
LEV100-340033D 4 Cycle Vertical Engine View Diagrams & Manuals
LEV100-340033E 4 Cycle Vertical Engine View Diagrams & Manuals
LEV100-340033F 4 Cycle Vertical Engine View Diagrams & Manuals
LEV100-340035C 4 Cycle Vertical Engine View Diagrams & Manuals
LEV100-340037C 4 Cycle Vertical Engine View Diagrams & Manuals
LEV100-340037D 4 Cycle Vertical Engine View Diagrams & Manuals
LEV100-340038C 4 Cycle Vertical Engine View Diagrams & Manuals
LEV100-340038D 4 Cycle Vertical Engine View Diagrams & Manuals
LEV100-340039C 4 Cycle Vertical Engine View Diagrams & Manuals
LEV100-340039D 4 Cycle Vertical Engine View Diagrams & Manuals
LEV100-340040C 4 Cycle Vertical Engine View Diagrams & Manuals
LEV100-340041C 4 Cycle Vertical Engine View Diagrams & Manuals
LEV100-340042C 4 Cycle Vertical Engine View Diagrams & Manuals
LEV100-340044D 4 Cycle Vertical Engine View Diagrams & Manuals
LEV100-340044E 4 Cycle Vertical Engine View Diagrams & Manuals
LEV100-340045D 4 Cycle Vertical Engine View Diagrams & Manuals
LEV100-340045E 4 Cycle Vertical Engine View Diagrams & Manuals
LEV100-340046D 4 Cycle Vertical Engine View Diagrams & Manuals
LEV100-340048D 4 Cycle Vertical Engine View Diagrams & Manuals
LEV100-340050D 4 Cycle Vertical Engine View Diagrams & Manuals
LEV100-340051D 4 Cycle Vertical Engine View Diagrams & Manuals
LEV100-340052E 4 Cycle Vertical Engine View Diagrams & Manuals
LEV100-340053E 4 Cycle Vertical Engine View Diagrams & Manuals
LEV100-340054E 4 Cycle Vertical Engine View Diagrams & Manuals
LEV100-340055E 4 Cycle Vertical Engine View Diagrams & Manuals
LEV100-340056E 4 Cycle Vertical Engine View Diagrams & Manuals
LEV100-340057F 4 Cycle Vertical Engine View Diagrams & Manuals
LEV100-345001B 4 Cycle Vertical Engine View Diagrams & Manuals
LEV100-345001C 4 Cycle Vertical Engine View Diagrams & Manuals
LEV100-345001D 4 Cycle Vertical Engine View Diagrams & Manuals
LEV100-345002B 4 Cycle Vertical Engine View Diagrams & Manuals
LEV100-345003B 4 Cycle Vertical Engine View Diagrams & Manuals
LEV100-345004B 4 Cycle Vertical Engine View Diagrams & Manuals
LEV100-345004C 4 Cycle Vertical Engine View Diagrams & Manuals
LEV100-345005B 4 Cycle Vertical Engine View Diagrams & Manuals
LEV100-345005C 4 Cycle Vertical Engine View Diagrams & Manuals
LEV100-345005D 4 Cycle Vertical Engine View Diagrams & Manuals
LEV100-345005E 4 Cycle Vertical Engine View Diagrams & Manuals
LEV100-345005F 4 Cycle Vertical Engine View Diagrams & Manuals
LEV100-345006B 4 Cycle Vertical Engine View Diagrams & Manuals
LEV100-345006C 4 Cycle Vertical Engine View Diagrams & Manuals
LEV100-345006D 4 Cycle Vertical Engine View Diagrams & Manuals
LEV100-345006E 4 Cycle Vertical Engine View Diagrams & Manuals
LEV100-345007B 4 Cycle Vertical Engine View Diagrams & Manuals
LEV100-345008B 4 Cycle Vertical Engine View Diagrams & Manuals
LEV100-345008C 4 Cycle Vertical Engine View Diagrams & Manuals
LEV100-345008D 4 Cycle Vertical Engine View Diagrams & Manuals
LEV100-345009B 4 Cycle Vertical Engine View Diagrams & Manuals
LEV100-345010B 4 Cycle Vertical Engine View Diagrams & Manuals
LEV100-345011B 4 Cycle Vertical Engine View Diagrams & Manuals
LEV100-345012B 4 Cycle Vertical Engine View Diagrams & Manuals
LEV100-345012C 4 Cycle Vertical Engine View Diagrams & Manuals
LEV100-345013C 4 Cycle Vertical Engine View Diagrams & Manuals
LEV100-345014C 4 Cycle Vertical Engine View Diagrams & Manuals
LEV100-345014D 4 Cycle Vertical Engine View Diagrams & Manuals
LEV100-345015C 4 Cycle Vertical Engine View Diagrams & Manuals
LEV100-345016C 4 Cycle Vertical Engine View Diagrams & Manuals
LEV100-345016D 4 Cycle Vertical Engine View Diagrams & Manuals
LEV100-345016E 4 Cycle Vertical Engine View Diagrams & Manuals
LEV100-345017D 4 Cycle Vertical Engine View Diagrams & Manuals
LEV100-345017E 4 Cycle Vertical Engine View Diagrams & Manuals
LEV100-345017F 4 Cycle Vertical Engine View Diagrams & Manuals
LEV100-345018C 4 Cycle Vertical Engine View Diagrams & Manuals
LEV100-345019D 4 Cycle Vertical Engine View Diagrams & Manuals
LEV100-345019E 4 Cycle Vertical Engine View Diagrams & Manuals
LEV100-345020E 4 Cycle Vertical Engine View Diagrams & Manuals
LEV100-345021E 4 Cycle Vertical Engine View Diagrams & Manuals
LEV100-345022E 4 Cycle Vertical Engine View Diagrams & Manuals
LEV100-345022F 4 Cycle Vertical Engine View Diagrams & Manuals
LEV100-345023E 4 Cycle Vertical Engine View Diagrams & Manuals
LEV105-346003B 4 Cycle Vertical Engine View Diagrams & Manuals
LEV105-346003C 4 Cycle Vertical Engine View Diagrams & Manuals
LEV105-347001A 4 Cycle Vertical Engine View Diagrams & Manuals
LEV105-347002A 4 Cycle Vertical Engine View Diagrams & Manuals
LEV105-347003A 4 Cycle Vertical Engine View Diagrams & Manuals
LEV105-347004A 4 Cycle Vertical Engine View Diagrams & Manuals
LEV105-347005B 4 Cycle Vertical Engine View Diagrams & Manuals
LEV105-347005C 4 Cycle Vertical Engine View Diagrams & Manuals
LEV105-347006B 4 Cycle Vertical Engine View Diagrams & Manuals
LEV105-347006C 4 Cycle Vertical Engine View Diagrams & Manuals
LEV105-347007B 4 Cycle Vertical Engine View Diagrams & Manuals
LEV105-347009B 4 Cycle Vertical Engine View Diagrams & Manuals
LEV105-347010B 4 Cycle Vertical Engine View Diagrams & Manuals
LEV105-347011B 4 Cycle Vertical Engine View Diagrams & Manuals
LEV105-347014B 4 Cycle Vertical Engine View Diagrams & Manuals
LEV115-350001A 4 Cycle Vertical Engine View Diagrams & Manuals
LEV115-350001B 4 Cycle Vertical Engine View Diagrams & Manuals
LEV115-350002A 4 Cycle Vertical Engine View Diagrams & Manuals
LEV115-350003A 4 Cycle Vertical Engine View Diagrams & Manuals
LEV115-350004A 4 Cycle Vertical Engine View Diagrams & Manuals
LEV115-350005A 4 Cycle Vertical Engine View Diagrams & Manuals
LEV115-350006A 4 Cycle Vertical Engine View Diagrams & Manuals
LEV115-350007A 4 Cycle Vertical Engine View Diagrams & Manuals
LEV115-350007B 4 Cycle Vertical Engine View Diagrams & Manuals
LEV115-350007C 4 Cycle Vertical Engine View Diagrams & Manuals
LEV115-350008A 4 Cycle Vertical Engine View Diagrams & Manuals
LEV115-350009A 4 Cycle Vertical Engine View Diagrams & Manuals
LEV115-350009B 4 Cycle Vertical Engine View Diagrams & Manuals
LEV115-350010B 4 Cycle Vertical Engine View Diagrams & Manuals
LEV115-350010C 4 Cycle Vertical Engine View Diagrams & Manuals
LEV115-350010D 4 Cycle Vertical Engine View Diagrams & Manuals
LEV115-350010E 4 Cycle Vertical Engine View Diagrams & Manuals
LEV115-350012B 4 Cycle Vertical Engine View Diagrams & Manuals
LEV115-350013B 4 Cycle Vertical Engine View Diagrams & Manuals
LEV115-350014B 4 Cycle Vertical Engine View Diagrams & Manuals
LEV115-350015B 4 Cycle Vertical Engine View Diagrams & Manuals
LEV115-350016B 4 Cycle Vertical Engine View Diagrams & Manuals
LEV115-350017B 4 Cycle Vertical Engine View Diagrams & Manuals
LEV115-350018B 4 Cycle Vertical Engine View Diagrams & Manuals
LEV115-350019B 4 Cycle Vertical Engine View Diagrams & Manuals
LEV115-350020B 4 Cycle Vertical Engine View Diagrams & Manuals
LEV115-350021B 4 Cycle Vertical Engine View Diagrams & Manuals
LEV115-350022B 4 Cycle Vertical Engine View Diagrams & Manuals
LEV115-350023B 4 Cycle Vertical Engine View Diagrams & Manuals
LEV115-350024B 4 Cycle Vertical Engine View Diagrams & Manuals
LEV115-350025B 4 Cycle Vertical Engine View Diagrams & Manuals
LEV115-350029B 4 Cycle Vertical Engine View Diagrams & Manuals
LEV115-350030B 4 Cycle Vertical Engine View Diagrams & Manuals
LEV115-350031B 4 Cycle Vertical Engine View Diagrams & Manuals
LEV115-350032B 4 Cycle Vertical Engine View Diagrams & Manuals
LEV115-350035B 4 Cycle Vertical Engine View Diagrams & Manuals
LEV115-350035C 4 Cycle Vertical Engine View Diagrams & Manuals
LEV115-350035D 4 Cycle Vertical Engine View Diagrams & Manuals
LEV115-350035E 4 Cycle Vertical Engine View Diagrams & Manuals
LEV115-350036B 4 Cycle Vertical Engine View Diagrams & Manuals
LEV115-350036C 4 Cycle Vertical Engine View Diagrams & Manuals
LEV115-350036D 4 Cycle Vertical Engine View Diagrams & Manuals
LEV115-350036E 4 Cycle Vertical Engine View Diagrams & Manuals
LEV115-350037B 4 Cycle Vertical Engine View Diagrams & Manuals
LEV115-350037C 4 Cycle Vertical Engine View Diagrams & Manuals
LEV115-350037D 4 Cycle Vertical Engine View Diagrams & Manuals
LEV115-350037E 4 Cycle Vertical Engine View Diagrams & Manuals
LEV115-350038B 4 Cycle Vertical Engine View Diagrams & Manuals
LEV115-350040B 4 Cycle Vertical Engine View Diagrams & Manuals
LEV115-350041B 4 Cycle Vertical Engine View Diagrams & Manuals
LEV115-350041C 4 Cycle Vertical Engine View Diagrams & Manuals
LEV115-350041D 4 Cycle Vertical Engine View Diagrams & Manuals
LEV115-350041E 4 Cycle Vertical Engine View Diagrams & Manuals
LEV115-350042C 4 Cycle Vertical Engine View Diagrams & Manuals
LEV115-350042D 4 Cycle Vertical Engine View Diagrams & Manuals
LEV115-350043B 4 Cycle Vertical Engine View Diagrams & Manuals
LEV115-350044B 4 Cycle Vertical Engine View Diagrams & Manuals
LEV115-350045B 4 Cycle Vertical Engine View Diagrams & Manuals
LEV115-350046B 4 Cycle Vertical Engine View Diagrams & Manuals
LEV115-350046C 4 Cycle Vertical Engine View Diagrams & Manuals
LEV115-350046D 4 Cycle Vertical Engine View Diagrams & Manuals
LEV115-350047B 4 Cycle Vertical Engine View Diagrams & Manuals
LEV115-350050B 4 Cycle Vertical Engine View Diagrams & Manuals
LEV115-350050C 4 Cycle Vertical Engine View Diagrams & Manuals
LEV115-350050D 4 Cycle Vertical Engine View Diagrams & Manuals
LEV115-350051B 4 Cycle Vertical Engine View Diagrams & Manuals
LEV115-350051C 4 Cycle Vertical Engine View Diagrams & Manuals
LEV115-350051D 4 Cycle Vertical Engine View Diagrams & Manuals
LEV115-350052C 4 Cycle Vertical Engine View Diagrams & Manuals
LEV115-350052D 4 Cycle Vertical Engine View Diagrams & Manuals
LEV115-350056C 4 Cycle Vertical Engine View Diagrams & Manuals
LEV115-350057C 4 Cycle Vertical Engine View Diagrams & Manuals
LEV115-350058C 4 Cycle Vertical Engine View Diagrams & Manuals
LEV115-350059C 4 Cycle Vertical Engine View Diagrams & Manuals
LEV115-350060C 4 Cycle Vertical Engine View Diagrams & Manuals
LEV115-350060D 4 Cycle Vertical Engine View Diagrams & Manuals
LEV115-350060E 4 Cycle Vertical Engine View Diagrams & Manuals
LEV115-350063C 4 Cycle Vertical Engine View Diagrams & Manuals
LEV115-350063D 4 Cycle Vertical Engine View Diagrams & Manuals
LEV115-350064C 4 Cycle Vertical Engine View Diagrams & Manuals
LEV115-350064D 4 Cycle Vertical Engine View Diagrams & Manuals
LEV115-350064E 4 Cycle Vertical Engine View Diagrams & Manuals
LEV115-350069C 4 Cycle Vertical Engine View Diagrams & Manuals
LEV115-350070C 4 Cycle Vertical Engine View Diagrams & Manuals
LEV115-350070D 4 Cycle Vertical Engine View Diagrams & Manuals
LEV115-350071C 4 Cycle Vertical Engine View Diagrams & Manuals
LEV115-350072C 4 Cycle Vertical Engine View Diagrams & Manuals
LEV115-350073C 4 Cycle Vertical Engine View Diagrams & Manuals
LEV115-350074C 4 Cycle Vertical Engine View Diagrams & Manuals
LEV115-350074D 4 Cycle Vertical Engine View Diagrams & Manuals
LEV115-350074E 4 Cycle Vertical Engine View Diagrams & Manuals
LEV115-350075C 4 Cycle Vertical Engine View Diagrams & Manuals
LEV115-350076C 4 Cycle Vertical Engine View Diagrams & Manuals
LEV115-350080C 4 Cycle Vertical Engine View Diagrams & Manuals
LEV115-350081C 4 Cycle Vertical Engine View Diagrams & Manuals
LEV115-350082C 4 Cycle Vertical Engine View Diagrams & Manuals
LEV115-350082D 4 Cycle Vertical Engine View Diagrams & Manuals
LEV115-350083C 4 Cycle Vertical Engine View Diagrams & Manuals
LEV115-350084C 4 Cycle Vertical Engine View Diagrams & Manuals
LEV115-350084D 4 Cycle Vertical Engine View Diagrams & Manuals
LEV115-350084E 4 Cycle Vertical Engine View Diagrams & Manuals
LEV115-350085C 4 Cycle Vertical Engine View Diagrams & Manuals
LEV115-350085D 4 Cycle Vertical Engine View Diagrams & Manuals
LEV115-350085E 4 Cycle Vertical Engine View Diagrams & Manuals
LEV115-350086C 4 Cycle Vertical Engine View Diagrams & Manuals
LEV115-350086D 4 Cycle Vertical Engine View Diagrams & Manuals
LEV115-350087C 4 Cycle Vertical Engine View Diagrams & Manuals
LEV115-350087D 4 Cycle Vertical Engine View Diagrams & Manuals
LEV115-350088C 4 Cycle Vertical Engine View Diagrams & Manuals
LEV115-350088D 4 Cycle Vertical Engine View Diagrams & Manuals
LEV115-350089C 4 Cycle Vertical Engine View Diagrams & Manuals
LEV115-350089D 4 Cycle Vertical Engine View Diagrams & Manuals
LEV115-350089E 4 Cycle Vertical Engine View Diagrams & Manuals
LEV115-350090C 4 Cycle Vertical Engine View Diagrams & Manuals
LEV115-350090D 4 Cycle Vertical Engine View Diagrams & Manuals
LEV115-350090E 4 Cycle Vertical Engine View Diagrams & Manuals
LEV115-350095C 4 Cycle Vertical Engine View Diagrams & Manuals
LEV115-350095D 4 Cycle Vertical Engine View Diagrams & Manuals
LEV115-350095E 4 Cycle Vertical Engine View Diagrams & Manuals
LEV115-350096D 4 Cycle Vertical Engine View Diagrams & Manuals
LEV115-350096E 4 Cycle Vertical Engine View Diagrams & Manuals
LEV115-350097D 4 Cycle Vertical Engine View Diagrams & Manuals
LEV115-350097E 4 Cycle Vertical Engine View Diagrams & Manuals
LEV115-350098C 4 Cycle Vertical Engine View Diagrams & Manuals
LEV115-350098D 4 Cycle Vertical Engine View Diagrams & Manuals
LEV115-350099C 4 Cycle Vertical Engine View Diagrams & Manuals
LEV115-350099D 4 Cycle Vertical Engine View Diagrams & Manuals
LEV115-350099E 4 Cycle Vertical Engine View Diagrams & Manuals
LEV115-350102C 4 Cycle Vertical Engine View Diagrams & Manuals
LEV115-350104C 4 Cycle Vertical Engine View Diagrams & Manuals
LEV115-350105C 4 Cycle Vertical Engine View Diagrams & Manuals
LEV115-350105D 4 Cycle Vertical Engine View Diagrams & Manuals
LEV115-350106C 4 Cycle Vertical Engine View Diagrams & Manuals
LEV115-350106D 4 Cycle Vertical Engine View Diagrams & Manuals
LEV115-350106E 4 Cycle Vertical Engine View Diagrams & Manuals
LEV115-350107C 4 Cycle Vertical Engine View Diagrams & Manuals
LEV115-350108C 4 Cycle Vertical Engine View Diagrams & Manuals
LEV115-350108D 4 Cycle Vertical Engine View Diagrams & Manuals
LEV115-350108E 4 Cycle Vertical Engine View Diagrams & Manuals
LEV115-350109C 4 Cycle Vertical Engine View Diagrams & Manuals
LEV115-350109D 4 Cycle Vertical Engine View Diagrams & Manuals
LEV115-350109E 4 Cycle Vertical Engine View Diagrams & Manuals
LEV115-350110C 4 Cycle Vertical Engine View Diagrams & Manuals
LEV115-350110D 4 Cycle Vertical Engine View Diagrams & Manuals
LEV115-350110E 4 Cycle Vertical Engine View Diagrams & Manuals
LEV115-350111C 4 Cycle Vertical Engine View Diagrams & Manuals
LEV115-350111D 4 Cycle Vertical Engine View Diagrams & Manuals
LEV115-350111E 4 Cycle Vertical Engine View Diagrams & Manuals
LEV115-350112C 4 Cycle Vertical Engine View Diagrams & Manuals
LEV115-350113C 4 Cycle Vertical Engine View Diagrams & Manuals
LEV115-350114D 4 Cycle Vertical Engine View Diagrams & Manuals
LEV115-350115D 4 Cycle Vertical Engine View Diagrams & Manuals
LEV115-350119C 4 Cycle Vertical Engine View Diagrams & Manuals
LEV115-350120D 4 Cycle Vertical Engine View Diagrams & Manuals
LEV115-350120E 4 Cycle Vertical Engine View Diagrams & Manuals
LEV115-350121D 4 Cycle Vertical Engine View Diagrams & Manuals
LEV115-350121E 4 Cycle Vertical Engine View Diagrams & Manuals
LEV115-350122D 4 Cycle Vertical Engine View Diagrams & Manuals
LEV115-350122E 4 Cycle Vertical Engine View Diagrams & Manuals
LEV115-350123D 4 Cycle Vertical Engine View Diagrams & Manuals
LEV115-350123E 4 Cycle Vertical Engine View Diagrams & Manuals
LEV115-350125D 4 Cycle Vertical Engine View Diagrams & Manuals
LEV115-350126D 4 Cycle Vertical Engine View Diagrams & Manuals
LEV115-350126E 4 Cycle Vertical Engine View Diagrams & Manuals
LEV115-350127D 4 Cycle Vertical Engine View Diagrams & Manuals
LEV115-350128D 4 Cycle Vertical Engine View Diagrams & Manuals
LEV115-350128E 4 Cycle Vertical Engine View Diagrams & Manuals
LEV115-350129D 4 Cycle Vertical Engine View Diagrams & Manuals
LEV115-350131D 4 Cycle Vertical Engine View Diagrams & Manuals
LEV115-350131E 4 Cycle Vertical Engine View Diagrams & Manuals
LEV115-350132D 4 Cycle Vertical Engine View Diagrams & Manuals
LEV115-350132E 4 Cycle Vertical Engine View Diagrams & Manuals
LEV115-350133D 4 Cycle Vertical Engine View Diagrams & Manuals
LEV115-350134D 4 Cycle Vertical Engine View Diagrams & Manuals
LEV115-350135D 4 Cycle Vertical Engine View Diagrams & Manuals
LEV115-350138D 4 Cycle Vertical Engine View Diagrams & Manuals
LEV115-350139D 4 Cycle Vertical Engine View Diagrams & Manuals
LEV115-350142D 4 Cycle Vertical Engine View Diagrams & Manuals
LEV115-350144D 4 Cycle Vertical Engine View Diagrams & Manuals
LEV115-350144E 4 Cycle Vertical Engine View Diagrams & Manuals
LEV115-350145E 4 Cycle Vertical Engine View Diagrams & Manuals
LEV115-350146E 4 Cycle Vertical Engine View Diagrams & Manuals
LEV115-350147E 4 Cycle Vertical Engine View Diagrams & Manuals
LEV115-350148D 4 Cycle Vertical Engine View Diagrams & Manuals
LEV115-350150E 4 Cycle Vertical Engine View Diagrams & Manuals
LEV115-350151E 4 Cycle Vertical Engine View Diagrams & Manuals
LEV115-350152E 4 Cycle Vertical Engine View Diagrams & Manuals
LEV115-350153E 4 Cycle Vertical Engine View Diagrams & Manuals
LEV115-350154E 4 Cycle Vertical Engine View Diagrams & Manuals
LEV115-350155E 4 Cycle Vertical Engine View Diagrams & Manuals
LEV115-350156E 4 Cycle Vertical Engine View Diagrams & Manuals
LEV115-350157E 4 Cycle Vertical Engine View Diagrams & Manuals
LEV115-350158E 4 Cycle Vertical Engine View Diagrams & Manuals
LEV115-350159E 4 Cycle Vertical Engine View Diagrams & Manuals
LEV115-350160E 4 Cycle Vertical Engine View Diagrams & Manuals
LEV115-350161E 4 Cycle Vertical Engine View Diagrams & Manuals
LEV115-350162E 4 Cycle Vertical Engine View Diagrams & Manuals
LEV115-350164E 4 Cycle Vertical Engine View Diagrams & Manuals
LEV115-350168E 4 Cycle Vertical Engine View Diagrams & Manuals
LEV115-350169E 4 Cycle Vertical Engine View Diagrams & Manuals
LEV115-350170E 4 Cycle Vertical Engine View Diagrams & Manuals
LEV115-350171E 4 Cycle Vertical Engine View Diagrams & Manuals
LEV115-350172E 4 Cycle Vertical Engine View Diagrams & Manuals
LEV115-350173E 4 Cycle Vertical Engine View Diagrams & Manuals
LEV115-350174E 4 Cycle Vertical Engine View Diagrams & Manuals
LEV115-350175E 4 Cycle Vertical Engine View Diagrams & Manuals
LEV115-350176E 4 Cycle Vertical Engine View Diagrams & Manuals
LEV115-350177E 4 Cycle Vertical Engine View Diagrams & Manuals
LEV115-350178E 4 Cycle Vertical Engine View Diagrams & Manuals
LEV115-350180E 4 Cycle Vertical Engine View Diagrams & Manuals
LEV115-350181E 4 Cycle Vertical Engine View Diagrams & Manuals
LEV115-350182E 4 Cycle Vertical Engine View Diagrams & Manuals
LEV115-350183E 4 Cycle Vertical Engine View Diagrams & Manuals
LEV115-350184E 4 Cycle Vertical Engine View Diagrams & Manuals
LEV115-350186E 4 Cycle Vertical Engine View Diagrams & Manuals
LEV115-350187E 4 Cycle Vertical Engine View Diagrams & Manuals
LEV115-350188E 4 Cycle Vertical Engine View Diagrams & Manuals
LEV115-350189E 4 Cycle Vertical Engine View Diagrams & Manuals
LEV115-350190E 4 Cycle Vertical Engine View Diagrams & Manuals
LEV115-350191E 4 Cycle Vertical Engine View Diagrams & Manuals
LEV115-350192E 4 Cycle Vertical Engine View Diagrams & Manuals
LEV115-350193E 4 Cycle Vertical Engine View Diagrams & Manuals
LEV115-350194E 4 Cycle Vertical Engine View Diagrams & Manuals
LEV115-350195E 4 Cycle Vertical Engine View Diagrams & Manuals
LEV115-350196E 4 Cycle Vertical Engine View Diagrams & Manuals
LEV115-350198E 4 Cycle Vertical Engine View Diagrams & Manuals
LEV115-350199E 4 Cycle Vertical Engine View Diagrams & Manuals
LEV115-350200E 4 Cycle Vertical Engine View Diagrams & Manuals
LEV115-350201E 4 Cycle Vertical Engine View Diagrams & Manuals
LEV115-350202E 4 Cycle Vertical Engine View Diagrams & Manuals
LEV115-350202F 4 Cycle Vertical Engine View Diagrams & Manuals
LEV115-350203E 4 Cycle Vertical Engine View Diagrams & Manuals
LEV115-350204E 4 Cycle Vertical Engine View Diagrams & Manuals
LEV115-350205E 4 Cycle Vertical Engine View Diagrams & Manuals
LEV115-355001A 4 Cycle Vertical Engine View Diagrams & Manuals
LEV115-355002A 4 Cycle Vertical Engine View Diagrams & Manuals
LEV115-355003A 4 Cycle Vertical Engine View Diagrams & Manuals
LEV115-355003B 4 Cycle Vertical Engine View Diagrams & Manuals
LEV115-355003C 4 Cycle Vertical Engine View Diagrams & Manuals
LEV115-355004B 4 Cycle Vertical Engine View Diagrams & Manuals
LEV115-355005B 4 Cycle Vertical Engine View Diagrams & Manuals
LEV115-355006B 4 Cycle Vertical Engine View Diagrams & Manuals
LEV115-355007C 4 Cycle Vertical Engine View Diagrams & Manuals
LEV115-355007D 4 Cycle Vertical Engine View Diagrams & Manuals
LEV115-355008C 4 Cycle Vertical Engine View Diagrams & Manuals
LEV115-355008D 4 Cycle Vertical Engine View Diagrams & Manuals
LEV115-355009D 4 Cycle Vertical Engine View Diagrams & Manuals
LEV115-355010C 4 Cycle Vertical Engine View Diagrams & Manuals
LEV115-355010E 4 Cycle Vertical Engine View Diagrams & Manuals
LEV115-355011C 4 Cycle Vertical Engine View Diagrams & Manuals
LEV115-355011E 4 Cycle Vertical Engine View Diagrams & Manuals
LEV115-355012C 4 Cycle Vertical Engine View Diagrams & Manuals
LEV115-355014C 4 Cycle Vertical Engine View Diagrams & Manuals
LEV115-355014D 4 Cycle Vertical Engine View Diagrams & Manuals
LEV115-355015C 4 Cycle Vertical Engine View Diagrams & Manuals
LEV115-355016D 4 Cycle Vertical Engine View Diagrams & Manuals
LEV115-355017D 4 Cycle Vertical Engine View Diagrams & Manuals
LEV115-355018D 4 Cycle Vertical Engine View Diagrams & Manuals
LEV115-355019D 4 Cycle Vertical Engine View Diagrams & Manuals
LEV115-355019E 4 Cycle Vertical Engine View Diagrams & Manuals
LEV115-355021E 4 Cycle Vertical Engine View Diagrams & Manuals
LEV115-355022E 4 Cycle Vertical Engine View Diagrams & Manuals
LEV115-355023E 4 Cycle Vertical Engine View Diagrams & Manuals
LEV115-355024E 4 Cycle Vertical Engine View Diagrams & Manuals
LEV115-355025E 4 Cycle Vertical Engine View Diagrams & Manuals
LEV115-355026E 4 Cycle Vertical Engine View Diagrams & Manuals
LEV115-355027E 4 Cycle Vertical Engine View Diagrams & Manuals
LEV115-360001A 4 Cycle Vertical Engine View Diagrams & Manuals
LEV115-360002A 4 Cycle Vertical Engine View Diagrams & Manuals
LEV115-360003A 4 Cycle Vertical Engine View Diagrams & Manuals
LEV115-360004A 4 Cycle Vertical Engine View Diagrams & Manuals
LEV115-360005A 4 Cycle Vertical Engine View Diagrams & Manuals
LEV115-360006A 4 Cycle Vertical Engine View Diagrams & Manuals
LEV115-360007A 4 Cycle Vertical Engine View Diagrams & Manuals
LEV115-360008A 4 Cycle Vertical Engine View Diagrams & Manuals
LEV115-360008B 4 Cycle Vertical Engine View Diagrams & Manuals
LEV115-360009A 4 Cycle Vertical Engine View Diagrams & Manuals
LEV115-360009B 4 Cycle Vertical Engine View Diagrams & Manuals
LEV115-360010B 4 Cycle Vertical Engine View Diagrams & Manuals
LEV115-360011B 4 Cycle Vertical Engine View Diagrams & Manuals
LEV115-360012B 4 Cycle Vertical Engine View Diagrams & Manuals
LEV115-360012C 4 Cycle Vertical Engine View Diagrams & Manuals
LEV115-360013B 4 Cycle Vertical Engine View Diagrams & Manuals
LEV115-360014B 4 Cycle Vertical Engine View Diagrams & Manuals
LEV115-360015B 4 Cycle Vertical Engine View Diagrams & Manuals
LEV115-360015C 4 Cycle Vertical Engine View Diagrams & Manuals
LEV115-360016B 4 Cycle Vertical Engine View Diagrams & Manuals
LEV115-360016C 4 Cycle Vertical Engine View Diagrams & Manuals
LEV115-360016D 4 Cycle Vertical Engine View Diagrams & Manuals
LEV115-360017B 4 Cycle Vertical Engine View Diagrams & Manuals
LEV115-360017C 4 Cycle Vertical Engine View Diagrams & Manuals
LEV115-360018B 4 Cycle Vertical Engine View Diagrams & Manuals
LEV115-360019B 4 Cycle Vertical Engine View Diagrams & Manuals
LEV115-360021C 4 Cycle Vertical Engine View Diagrams & Manuals
LEV115-360021D 4 Cycle Vertical Engine View Diagrams & Manuals
LEV115-360022C 4 Cycle Vertical Engine View Diagrams & Manuals
LEV115-360023C 4 Cycle Vertical Engine View Diagrams & Manuals
LEV115-360023D 4 Cycle Vertical Engine View Diagrams & Manuals
LEV115-360024C 4 Cycle Vertical Engine View Diagrams & Manuals
LEV115-360024D 4 Cycle Vertical Engine View Diagrams & Manuals
LEV115-360025C 4 Cycle Vertical Engine View Diagrams & Manuals
LEV115-360025D 4 Cycle Vertical Engine View Diagrams & Manuals
LEV115-360026D 4 Cycle Vertical Engine View Diagrams & Manuals
LEV115-360027D 4 Cycle Vertical Engine View Diagrams & Manuals
LEV115-360028C 4 Cycle Vertical Engine View Diagrams & Manuals
LEV115-360029D 4 Cycle Vertical Engine View Diagrams & Manuals
LEV115-360030D 4 Cycle Vertical Engine View Diagrams & Manuals
LEV115-360031D 4 Cycle Vertical Engine View Diagrams & Manuals
LEV115-360032D 4 Cycle Vertical Engine View Diagrams & Manuals
LEV115-360033D 4 Cycle Vertical Engine View Diagrams & Manuals
LEV115-360034D 4 Cycle Vertical Engine View Diagrams & Manuals
LEV115-360035D 4 Cycle Vertical Engine View Diagrams & Manuals
LEV115-360036D 4 Cycle Vertical Engine View Diagrams & Manuals
LEV120-361002A 4 Cycle Vertical Engine View Diagrams & Manuals
LEV120-361002B 4 Cycle Vertical Engine View Diagrams & Manuals
LEV120-361003A 4 Cycle Vertical Engine View Diagrams & Manuals
LEV120-361004A 4 Cycle Vertical Engine View Diagrams & Manuals
LEV120-361006A 4 Cycle Vertical Engine View Diagrams & Manuals
LEV120-361006B 4 Cycle Vertical Engine View Diagrams & Manuals
LEV120-361007A 4 Cycle Vertical Engine View Diagrams & Manuals
LEV120-361007B 4 Cycle Vertical Engine View Diagrams & Manuals
LEV120-361008A 4 Cycle Vertical Engine View Diagrams & Manuals
LEV120-361008B 4 Cycle Vertical Engine View Diagrams & Manuals
LEV120-361011B 4 Cycle Vertical Engine View Diagrams & Manuals
LEV120-361012A 4 Cycle Vertical Engine View Diagrams & Manuals
LEV120-361012B 4 Cycle Vertical Engine View Diagrams & Manuals
LEV120-361013A 4 Cycle Vertical Engine View Diagrams & Manuals
LEV120-361013B 4 Cycle Vertical Engine View Diagrams & Manuals
LEV120-361013C 4 Cycle Vertical Engine View Diagrams & Manuals
LEV120-361014A 4 Cycle Vertical Engine View Diagrams & Manuals
LEV120-361014B 4 Cycle Vertical Engine View Diagrams & Manuals
LEV120-361015A 4 Cycle Vertical Engine View Diagrams & Manuals
LEV120-361015B 4 Cycle Vertical Engine View Diagrams & Manuals
LEV120-361015C 4 Cycle Vertical Engine View Diagrams & Manuals
LEV120-361016A 4 Cycle Vertical Engine View Diagrams & Manuals
LEV120-361016B 4 Cycle Vertical Engine View Diagrams & Manuals
LEV120-361016C 4 Cycle Vertical Engine View Diagrams & Manuals
LEV120-361017A 4 Cycle Vertical Engine View Diagrams & Manuals
LEV120-361017B 4 Cycle Vertical Engine View Diagrams & Manuals
LEV120-361017C 4 Cycle Vertical Engine View Diagrams & Manuals
LEV120-361018A 4 Cycle Vertical Engine View Diagrams & Manuals
LEV120-361019A 4 Cycle Vertical Engine View Diagrams & Manuals
LEV120-361020A 4 Cycle Vertical Engine View Diagrams & Manuals
LEV120-361020B 4 Cycle Vertical Engine View Diagrams & Manuals
LEV120-361020C 4 Cycle Vertical Engine View Diagrams & Manuals
LEV120-361020D 4 Cycle Vertical Engine View Diagrams & Manuals
LEV120-361021A 4 Cycle Vertical Engine View Diagrams & Manuals
LEV120-361022A 4 Cycle Vertical Engine View Diagrams & Manuals
LEV120-361022B 4 Cycle Vertical Engine View Diagrams & Manuals
LEV120-361022C 4 Cycle Vertical Engine View Diagrams & Manuals
LEV120-361023A 4 Cycle Vertical Engine View Diagrams & Manuals
LEV120-361023B 4 Cycle Vertical Engine View Diagrams & Manuals
LEV120-361023C 4 Cycle Vertical Engine View Diagrams & Manuals
LEV120-361023D 4 Cycle Vertical Engine View Diagrams & Manuals
LEV120-361025A 4 Cycle Vertical Engine View Diagrams & Manuals
LEV120-361026A 4 Cycle Vertical Engine View Diagrams & Manuals
LEV120-361026B 4 Cycle Vertical Engine View Diagrams & Manuals
LEV120-361027A 4 Cycle Vertical Engine View Diagrams & Manuals
LEV120-361027B 4 Cycle Vertical Engine View Diagrams & Manuals
LEV120-361027C 4 Cycle Vertical Engine View Diagrams & Manuals
LEV120-361028A 4 Cycle Vertical Engine View Diagrams & Manuals
LEV120-361028B 4 Cycle Vertical Engine View Diagrams & Manuals
LEV120-361028C 4 Cycle Vertical Engine View Diagrams & Manuals
LEV120-361029A 4 Cycle Vertical Engine View Diagrams & Manuals
LEV120-361029B 4 Cycle Vertical Engine View Diagrams & Manuals
LEV120-361029C 4 Cycle Vertical Engine View Diagrams & Manuals
LEV120-361030A 4 Cycle Vertical Engine View Diagrams & Manuals
LEV120-361030B 4 Cycle Vertical Engine View Diagrams & Manuals
LEV120-361030C 4 Cycle Vertical Engine View Diagrams & Manuals
LEV120-361030D 4 Cycle Vertical Engine View Diagrams & Manuals
LEV120-361031A 4 Cycle Vertical Engine View Diagrams & Manuals
LEV120-361033A 4 Cycle Vertical Engine View Diagrams & Manuals
LEV120-361033B 4 Cycle Vertical Engine View Diagrams & Manuals
LEV120-361033C 4 Cycle Vertical Engine View Diagrams & Manuals
LEV120-361034A 4 Cycle Vertical Engine View Diagrams & Manuals
LEV120-361035B 4 Cycle Vertical Engine View Diagrams & Manuals
LEV120-361036A 4 Cycle Vertical Engine View Diagrams & Manuals
LEV120-361037A 4 Cycle Vertical Engine View Diagrams & Manuals
LEV120-361037B 4 Cycle Vertical Engine View Diagrams & Manuals
LEV120-361037C 4 Cycle Vertical Engine View Diagrams & Manuals
LEV120-361038A 4 Cycle Vertical Engine View Diagrams & Manuals
LEV120-361041B 4 Cycle Vertical Engine View Diagrams & Manuals
LEV120-361042B 4 Cycle Vertical Engine View Diagrams & Manuals
LEV120-361043B 4 Cycle Vertical Engine View Diagrams & Manuals
LEV120-361043C 4 Cycle Vertical Engine View Diagrams & Manuals
LEV120-361044B 4 Cycle Vertical Engine View Diagrams & Manuals
LEV120-361044C 4 Cycle Vertical Engine View Diagrams & Manuals
LEV120-361045B 4 Cycle Vertical Engine View Diagrams & Manuals
LEV120-361045C 4 Cycle Vertical Engine View Diagrams & Manuals
LEV120-361046B 4 Cycle Vertical Engine View Diagrams & Manuals
LEV120-361047B 4 Cycle Vertical Engine View Diagrams & Manuals
LEV120-361047C 4 Cycle Vertical Engine View Diagrams & Manuals
LEV120-361050B 4 Cycle Vertical Engine View Diagrams & Manuals
LEV120-361050C 4 Cycle Vertical Engine View Diagrams & Manuals
LEV120-361051B 4 Cycle Vertical Engine View Diagrams & Manuals
LEV120-361052B 4 Cycle Vertical Engine View Diagrams & Manuals
LEV120-361053B 4 Cycle Vertical Engine View Diagrams & Manuals
LEV120-361054B 4 Cycle Vertical Engine View Diagrams & Manuals
LEV120-361054C 4 Cycle Vertical Engine View Diagrams & Manuals
LEV120-361057C 4 Cycle Vertical Engine View Diagrams & Manuals
LEV120-361058B 4 Cycle Vertical Engine View Diagrams & Manuals
LEV120-361059B 4 Cycle Vertical Engine View Diagrams & Manuals
LEV120-361060B 4 Cycle Vertical Engine View Diagrams & Manuals
LEV120-361061B 4 Cycle Vertical Engine View Diagrams & Manuals
LEV120-361061C 4 Cycle Vertical Engine View Diagrams & Manuals
LEV120-361061D 4 Cycle Vertical Engine View Diagrams & Manuals
LEV120-361063B 4 Cycle Vertical Engine View Diagrams & Manuals
LEV120-361063C 4 Cycle Vertical Engine View Diagrams & Manuals
LEV120-361064B 4 Cycle Vertical Engine View Diagrams & Manuals
LEV120-361064C 4 Cycle Vertical Engine View Diagrams & Manuals
LEV120-361066C 4 Cycle Vertical Engine View Diagrams & Manuals
LEV120-361067C 4 Cycle Vertical Engine View Diagrams & Manuals
LEV120-361068C 4 Cycle Vertical Engine View Diagrams & Manuals
LEV120-361069C 4 Cycle Vertical Engine View Diagrams & Manuals
LEV120-361070B 4 Cycle Vertical Engine View Diagrams & Manuals
LEV120-361071C 4 Cycle Vertical Engine View Diagrams & Manuals
LEV120-361072C 4 Cycle Vertical Engine View Diagrams & Manuals
LEV120-361073C 4 Cycle Vertical Engine View Diagrams & Manuals
LEV120-361074C 4 Cycle Vertical Engine View Diagrams & Manuals
LEV120-361075C 4 Cycle Vertical Engine View Diagrams & Manuals
LEV120-361076C 4 Cycle Vertical Engine View Diagrams & Manuals
LEV120-361077C 4 Cycle Vertical Engine View Diagrams & Manuals
LEV120-361078C 4 Cycle Vertical Engine View Diagrams & Manuals
LEV120-361078D 4 Cycle Vertical Engine View Diagrams & Manuals
LEV120-361079C 4 Cycle Vertical Engine View Diagrams & Manuals
LEV120-361082C 4 Cycle Vertical Engine View Diagrams & Manuals
LEV120-361083C 4 Cycle Vertical Engine View Diagrams & Manuals
LEV120-361084C 4 Cycle Vertical Engine View Diagrams & Manuals
LEV120-361084D 4 Cycle Vertical Engine View Diagrams & Manuals
LEV120-361085C 4 Cycle Vertical Engine View Diagrams & Manuals
LEV120-361087C 4 Cycle Vertical Engine View Diagrams & Manuals
LEV120-361088C 4 Cycle Vertical Engine View Diagrams & Manuals
LEV120-361088D 4 Cycle Vertical Engine View Diagrams & Manuals
LEV120-361090C 4 Cycle Vertical Engine View Diagrams & Manuals
LEV120-361090D 4 Cycle Vertical Engine View Diagrams & Manuals
LEV120-361091C 4 Cycle Vertical Engine View Diagrams & Manuals
LEV120-361091D 4 Cycle Vertical Engine View Diagrams & Manuals
LEV120-361092C 4 Cycle Vertical Engine View Diagrams & Manuals
LEV120-361093C 4 Cycle Vertical Engine View Diagrams & Manuals
LEV120-361093D 4 Cycle Vertical Engine View Diagrams & Manuals
LEV120-361094C 4 Cycle Vertical Engine View Diagrams & Manuals
LEV120-361096C 4 Cycle Vertical Engine View Diagrams & Manuals
LEV120-361097C 4 Cycle Vertical Engine View Diagrams & Manuals
LEV120-361098C 4 Cycle Vertical Engine View Diagrams & Manuals
LEV120-361099C 4 Cycle Vertical Engine View Diagrams & Manuals
LEV120-361099D 4 Cycle Vertical Engine View Diagrams & Manuals
LEV120-361101C 4 Cycle Vertical Engine View Diagrams & Manuals
LEV120-361101D 4 Cycle Vertical Engine View Diagrams & Manuals
LEV120-361102D 4 Cycle Vertical Engine View Diagrams & Manuals
LEV120-361103C 4 Cycle Vertical Engine View Diagrams & Manuals
LEV120-361103D 4 Cycle Vertical Engine View Diagrams & Manuals
LEV120-361104C 4 Cycle Vertical Engine View Diagrams & Manuals
LEV120-361105C 4 Cycle Vertical Engine View Diagrams & Manuals
LEV120-361106D 4 Cycle Vertical Engine View Diagrams & Manuals
LEV120-361107C 4 Cycle Vertical Engine View Diagrams & Manuals
LEV120-361109D 4 Cycle Vertical Engine View Diagrams & Manuals
LEV120-361111D 4 Cycle Vertical Engine View Diagrams & Manuals
LEV120-361112D 4 Cycle Vertical Engine View Diagrams & Manuals
LEV120-361113D 4 Cycle Vertical Engine View Diagrams & Manuals
LEV120-361115D 4 Cycle Vertical Engine View Diagrams & Manuals
LEV120-361116D 4 Cycle Vertical Engine View Diagrams & Manuals
LEV120-361119D 4 Cycle Vertical Engine View Diagrams & Manuals
LEV120-361120D 4 Cycle Vertical Engine View Diagrams & Manuals
LEV120-361121D 4 Cycle Vertical Engine View Diagrams & Manuals
LEV120-361123D 4 Cycle Vertical Engine View Diagrams & Manuals
LEV120-361124D 4 Cycle Vertical Engine View Diagrams & Manuals
LEV120-361125D 4 Cycle Vertical Engine View Diagrams & Manuals
LEV120-361126D 4 Cycle Vertical Engine View Diagrams & Manuals
LEV120-361128D 4 Cycle Vertical Engine View Diagrams & Manuals
LEV120-361130D 4 Cycle Vertical Engine View Diagrams & Manuals
LEV120-361131D 4 Cycle Vertical Engine View Diagrams & Manuals
LEV120-361132D 4 Cycle Vertical Engine View Diagrams & Manuals
LEV120-361133D 4 Cycle Vertical Engine View Diagrams & Manuals
LEV120-361134D 4 Cycle Vertical Engine View Diagrams & Manuals
LEV120-361135D 4 Cycle Vertical Engine View Diagrams & Manuals
LEV120-361136D 4 Cycle Vertical Engine View Diagrams & Manuals
LEV120-361137D 4 Cycle Vertical Engine View Diagrams & Manuals
LEV120-361138D 4 Cycle Vertical Engine View Diagrams & Manuals
LEV120-361139D 4 Cycle Vertical Engine View Diagrams & Manuals
LEV120-361140D 4 Cycle Vertical Engine View Diagrams & Manuals
LEV120-361142D 4 Cycle Vertical Engine View Diagrams & Manuals
LEV120-361143D 4 Cycle Vertical Engine View Diagrams & Manuals
LEV120-361144D 4 Cycle Vertical Engine View Diagrams & Manuals
LEV120-361145D 4 Cycle Vertical Engine View Diagrams & Manuals
LEV120-361146D 4 Cycle Vertical Engine View Diagrams & Manuals
LEV120-361147D 4 Cycle Vertical Engine View Diagrams & Manuals
LEV120-361148C 4 Cycle Vertical Engine View Diagrams & Manuals
LEV120-361501A 4 Cycle Vertical Engine View Diagrams & Manuals
LEV120-361502A 4 Cycle Vertical Engine View Diagrams & Manuals
LEV120-361503A 4 Cycle Vertical Engine View Diagrams & Manuals
LEV120-361504A 4 Cycle Vertical Engine View Diagrams & Manuals
LEV120-361505A 4 Cycle Vertical Engine View Diagrams & Manuals
LEV120-361506A 4 Cycle Vertical Engine View Diagrams & Manuals
LEV120-361507A 4 Cycle Vertical Engine View Diagrams & Manuals
LEV120-361508A 4 Cycle Vertical Engine View Diagrams & Manuals
LEV120-361509A 4 Cycle Vertical Engine View Diagrams & Manuals
LEV120-361510A 4 Cycle Vertical Engine View Diagrams & Manuals
LEV120-361511A 4 Cycle Vertical Engine View Diagrams & Manuals
LEV120-361512A 4 Cycle Vertical Engine View Diagrams & Manuals
LEV120-361512B 4 Cycle Vertical Engine View Diagrams & Manuals
LEV120-361512C 4 Cycle Vertical Engine View Diagrams & Manuals
LEV120-361514A 4 Cycle Vertical Engine View Diagrams & Manuals
LEV120-361515A 4 Cycle Vertical Engine View Diagrams & Manuals
LEV120-361516A 4 Cycle Vertical Engine View Diagrams & Manuals
LEV120-361517A 4 Cycle Vertical Engine View Diagrams & Manuals
LEV120-361518A 4 Cycle Vertical Engine View Diagrams & Manuals
LEV120-361519A 4 Cycle Vertical Engine View Diagrams & Manuals
LEV120-361520A 4 Cycle Vertical Engine View Diagrams & Manuals
LEV120-361521A 4 Cycle Vertical Engine View Diagrams & Manuals
LEV120-361522A 4 Cycle Vertical Engine View Diagrams & Manuals
LEV120-361523A 4 Cycle Vertical Engine View Diagrams & Manuals
LEV120-361523B 4 Cycle Vertical Engine View Diagrams & Manuals
LEV120-361524A 4 Cycle Vertical Engine View Diagrams & Manuals
LEV120-361525A 4 Cycle Vertical Engine View Diagrams & Manuals
LEV120-361526A 4 Cycle Vertical Engine View Diagrams & Manuals
LEV120-361527A 4 Cycle Vertical Engine View Diagrams & Manuals
LEV120-361528A 4 Cycle Vertical Engine View Diagrams & Manuals
LEV120-361528B 4 Cycle Vertical Engine View Diagrams & Manuals
LEV120-361529A 4 Cycle Vertical Engine View Diagrams & Manuals
LEV120-361529B 4 Cycle Vertical Engine View Diagrams & Manuals
LEV120-361530A 4 Cycle Vertical Engine View Diagrams & Manuals
LEV120-361530B 4 Cycle Vertical Engine View Diagrams & Manuals
LEV120-361530C 4 Cycle Vertical Engine View Diagrams & Manuals
LEV120-361531A 4 Cycle Vertical Engine View Diagrams & Manuals
LEV120-361532A 4 Cycle Vertical Engine View Diagrams & Manuals
LEV120-361533A 4 Cycle Vertical Engine View Diagrams & Manuals
LEV120-361534A 4 Cycle Vertical Engine View Diagrams & Manuals
LEV120-361535A 4 Cycle Vertical Engine View Diagrams & Manuals
LEV120-361535B 4 Cycle Vertical Engine View Diagrams & Manuals
LEV120-361536A 4 Cycle Vertical Engine View Diagrams & Manuals
LEV120-361536B 4 Cycle Vertical Engine View Diagrams & Manuals
LEV120-361537A 4 Cycle Vertical Engine View Diagrams & Manuals
LEV120-361537B 4 Cycle Vertical Engine View Diagrams & Manuals
LEV120-361540B 4 Cycle Vertical Engine View Diagrams & Manuals
LEV120-361541B 4 Cycle Vertical Engine View Diagrams & Manuals
LEV120-361542B 4 Cycle Vertical Engine View Diagrams & Manuals
LEV120-361543B 4 Cycle Vertical Engine View Diagrams & Manuals
LEV120-361544B 4 Cycle Vertical Engine View Diagrams & Manuals
LEV120-361545B 4 Cycle Vertical Engine View Diagrams & Manuals
LEV120-361546B 4 Cycle Vertical Engine View Diagrams & Manuals
LEV120-361548B 4 Cycle Vertical Engine View Diagrams & Manuals
LEV120-361549B 4 Cycle Vertical Engine View Diagrams & Manuals
LEV120-361550B 4 Cycle Vertical Engine View Diagrams & Manuals
LEV120-361551B 4 Cycle Vertical Engine View Diagrams & Manuals
LEV120-361553B 4 Cycle Vertical Engine View Diagrams & Manuals
LEV120-361554B 4 Cycle Vertical Engine View Diagrams & Manuals
LEV120-361555B 4 Cycle Vertical Engine View Diagrams & Manuals
LEV120-361555C 4 Cycle Vertical Engine View Diagrams & Manuals
LEV120-361556B 4 Cycle Vertical Engine View Diagrams & Manuals
LEV120-361556C 4 Cycle Vertical Engine View Diagrams & Manuals
LEV120-361557B 4 Cycle Vertical Engine View Diagrams & Manuals
LEV120-361558B 4 Cycle Vertical Engine View Diagrams & Manuals
LEV120-361559B 4 Cycle Vertical Engine View Diagrams & Manuals
LEV120-361560B 4 Cycle Vertical Engine View Diagrams & Manuals
LEV120-361561B 4 Cycle Vertical Engine View Diagrams & Manuals
LEV120-361562B 4 Cycle Vertical Engine View Diagrams & Manuals
LEV120-361563B 4 Cycle Vertical Engine View Diagrams & Manuals
LEV120-361564B 4 Cycle Vertical Engine View Diagrams & Manuals
LEV120-361565C 4 Cycle Vertical Engine View Diagrams & Manuals
LEV120-361566C 4 Cycle Vertical Engine View Diagrams & Manuals
LEV120-361568C 4 Cycle Vertical Engine View Diagrams & Manuals
LEV120-361569C 4 Cycle Vertical Engine View Diagrams & Manuals
LEV120-361570C 4 Cycle Vertical Engine View Diagrams & Manuals
LEV120-361571C 4 Cycle Vertical Engine View Diagrams & Manuals
LEV120-361573C 4 Cycle Vertical Engine View Diagrams & Manuals
LEV120-361574C 4 Cycle Vertical Engine View Diagrams & Manuals
LEV120-361575C 4 Cycle Vertical Engine View Diagrams & Manuals
LEV120-361576C 4 Cycle Vertical Engine View Diagrams & Manuals
LEV120-361577C 4 Cycle Vertical Engine View Diagrams & Manuals
LEV120-361578C 4 Cycle Vertical Engine View Diagrams & Manuals
LEV120-361579C 4 Cycle Vertical Engine View Diagrams & Manuals
LEV120-361580C 4 Cycle Vertical Engine View Diagrams & Manuals
LEV120-361581C 4 Cycle Vertical Engine View Diagrams & Manuals
LEV120-361582C 4 Cycle Vertical Engine View Diagrams & Manuals
LEV120-362001A 4 Cycle Vertical Engine View Diagrams & Manuals
LEV120-362002A 4 Cycle Vertical Engine View Diagrams & Manuals
LEV120-362003A 4 Cycle Vertical Engine View Diagrams & Manuals
LEV120-362004A 4 Cycle Vertical Engine View Diagrams & Manuals
LEV120-362005A 4 Cycle Vertical Engine View Diagrams & Manuals
LEV120-362006A 4 Cycle Vertical Engine View Diagrams & Manuals
LEV120-362008A 4 Cycle Vertical Engine View Diagrams & Manuals
LEV120-362011A 4 Cycle Vertical Engine View Diagrams & Manuals
LEV120-362012A 4 Cycle Vertical Engine View Diagrams & Manuals
LEV120-362014A 4 Cycle Vertical Engine View Diagrams & Manuals
LEV120-362015A 4 Cycle Vertical Engine View Diagrams & Manuals
LEV120-362016A 4 Cycle Vertical Engine View Diagrams & Manuals
LEV120-362017A 4 Cycle Vertical Engine View Diagrams & Manuals
LEV120-362018A 4 Cycle Vertical Engine View Diagrams & Manuals
LEV120-362019A 4 Cycle Vertical Engine View Diagrams & Manuals
LEV120-362020A 4 Cycle Vertical Engine View Diagrams & Manuals
LEV120-362021A 4 Cycle Vertical Engine View Diagrams & Manuals
LEV120-362022A 4 Cycle Vertical Engine View Diagrams & Manuals
LEV120-362023A 4 Cycle Vertical Engine View Diagrams & Manuals
LEV120-362024A 4 Cycle Vertical Engine View Diagrams & Manuals
LEV120-362025A 4 Cycle Vertical Engine View Diagrams & Manuals
LEV120-362026A 4 Cycle Vertical Engine View Diagrams & Manuals
LEV120-362027A 4 Cycle Vertical Engine View Diagrams & Manuals
LEV120-362029A 4 Cycle Vertical Engine View Diagrams & Manuals
LEV120-362033A 4 Cycle Vertical Engine View Diagrams & Manuals
LEV120-362034A 4 Cycle Vertical Engine View Diagrams & Manuals
LEV120-362035A 4 Cycle Vertical Engine View Diagrams & Manuals
LEV120-362040B 4 Cycle Vertical Engine View Diagrams & Manuals
LEV80-333001A 4 Cycle Vertical Engine View Diagrams & Manuals
LEV80-333002A 4 Cycle Vertical Engine View Diagrams & Manuals
LEV80-333002B 4 Cycle Vertical Engine View Diagrams & Manuals
LEV80-333002C 4 Cycle Vertical Engine View Diagrams & Manuals
LEV80-333003A 4 Cycle Vertical Engine View Diagrams & Manuals
LEV80-333004A 4 Cycle Vertical Engine View Diagrams & Manuals
LEV80-333004B 4 Cycle Vertical Engine View Diagrams & Manuals
LEV80-333005A 4 Cycle Vertical Engine View Diagrams & Manuals
LEV80-333005B 4 Cycle Vertical Engine View Diagrams & Manuals
LEV80-333006A 4 Cycle Vertical Engine View Diagrams & Manuals
LEV80-333007A 4 Cycle Vertical Engine View Diagrams & Manuals
LEV80-333008B 4 Cycle Vertical Engine View Diagrams & Manuals
LEV80-333008C 4 Cycle Vertical Engine View Diagrams & Manuals
LEV80-333009A 4 Cycle Vertical Engine View Diagrams & Manuals
LEV80-333010B 4 Cycle Vertical Engine View Diagrams & Manuals
LEV80-333011B 4 Cycle Vertical Engine View Diagrams & Manuals
LEV80-333012B 4 Cycle Vertical Engine View Diagrams & Manuals
LEV80-333013B 4 Cycle Vertical Engine View Diagrams & Manuals
LEV80-333014B 4 Cycle Vertical Engine View Diagrams & Manuals
LEV80-333016B 4 Cycle Vertical Engine View Diagrams & Manuals
LEV80-333016C 4 Cycle Vertical Engine View Diagrams & Manuals
LEV80-333017B 4 Cycle Vertical Engine View Diagrams & Manuals
LEV80-333018B 4 Cycle Vertical Engine View Diagrams & Manuals
LEV80-333019B 4 Cycle Vertical Engine View Diagrams & Manuals
LEV80-333020C 4 Cycle Vertical Engine View Diagrams & Manuals
LEV80-333021B 4 Cycle Vertical Engine View Diagrams & Manuals
LEV90-334001A 4 Cycle Vertical Engine View Diagrams & Manuals
LEV90-334002A 4 Cycle Vertical Engine View Diagrams & Manuals
LEV90-334003A 4 Cycle Vertical Engine View Diagrams & Manuals
LEV90-334004A 4 Cycle Vertical Engine View Diagrams & Manuals
LEV90-334005A 4 Cycle Vertical Engine View Diagrams & Manuals
LEV90-334009A 4 Cycle Vertical Engine View Diagrams & Manuals
LEV90-334010A 4 Cycle Vertical Engine View Diagrams & Manuals
LEV90-334011A 4 Cycle Vertical Engine View Diagrams & Manuals
LEV90-334012A 4 Cycle Vertical Engine View Diagrams & Manuals
LEV90-334013A 4 Cycle Vertical Engine View Diagrams & Manuals
LEV90-334014A 4 Cycle Vertical Engine View Diagrams & Manuals
LEV90-334015A 4 Cycle Vertical Engine View Diagrams & Manuals
LEV90-334016A 4 Cycle Vertical Engine View Diagrams & Manuals
LEV90-334018A 4 Cycle Vertical Engine View Diagrams & Manuals
LEV90-334019A 4 Cycle Vertical Engine View Diagrams & Manuals
LEV90-334020A 4 Cycle Vertical Engine View Diagrams & Manuals
LEV90-334021A 4 Cycle Vertical Engine View Diagrams & Manuals
LEV90-334022A 4 Cycle Vertical Engine View Diagrams & Manuals
LEV90-334024A 4 Cycle Vertical Engine View Diagrams & Manuals
LV148EA-334000B 4 Cycle Vertical Engine View Diagrams & Manuals
LV148EA-334001B 4 Cycle Vertical Engine View Diagrams & Manuals
LV148EA-334001C 4 Cycle Vertical Engine View Diagrams & Manuals
LV148EA-334002B 4 Cycle Vertical Engine View Diagrams & Manuals
LV148EA-334002C 4 Cycle Vertical Engine View Diagrams & Manuals
LV148EA-334003B 4 Cycle Vertical Engine View Diagrams & Manuals
LV148EA-334005B 4 Cycle Vertical Engine View Diagrams & Manuals
LV148EA-334009B 4 Cycle Vertical Engine View Diagrams & Manuals
LV148EA-334012B 4 Cycle Vertical Engine View Diagrams & Manuals
LV148EA-334016B 4 Cycle Vertical Engine View Diagrams & Manuals
LV148EA-334019B 4 Cycle Vertical Engine View Diagrams & Manuals
LV148EA-334019C 4 Cycle Vertical Engine View Diagrams & Manuals
LV148EA-334020B 4 Cycle Vertical Engine View Diagrams & Manuals
LV148EA-334020C 4 Cycle Vertical Engine View Diagrams & Manuals
LV148EA-334021B 4 Cycle Vertical Engine View Diagrams & Manuals
LV148EA-334026B 4 Cycle Vertical Engine View Diagrams & Manuals
LV148EA-334026C 4 Cycle Vertical Engine View Diagrams & Manuals
LV148EA-334029B 4 Cycle Vertical Engine View Diagrams & Manuals
LV148EA-334029C 4 Cycle Vertical Engine View Diagrams & Manuals
LV148EA-334030B 4 Cycle Vertical Engine View Diagrams & Manuals
LV148EA-334031B 4 Cycle Vertical Engine View Diagrams & Manuals
LV148EA-334031C 4 Cycle Vertical Engine View Diagrams & Manuals
LV148EA-334032B 4 Cycle Vertical Engine View Diagrams & Manuals
LV148EA-334033B 4 Cycle Vertical Engine View Diagrams & Manuals
LV148EA-334035B 4 Cycle Vertical Engine View Diagrams & Manuals
LV148EA-334035C 4 Cycle Vertical Engine View Diagrams & Manuals
LV148EA-334036B 4 Cycle Vertical Engine View Diagrams & Manuals
LV148EA-334036C 4 Cycle Vertical Engine View Diagrams & Manuals
LV148EA-334037B 4 Cycle Vertical Engine View Diagrams & Manuals
LV148EA-334037C 4 Cycle Vertical Engine View Diagrams & Manuals
LV148EA-334039B 4 Cycle Vertical Engine View Diagrams & Manuals
LV148EA-334040B 4 Cycle Vertical Engine View Diagrams & Manuals
LV148EA-334040C 4 Cycle Vertical Engine View Diagrams & Manuals
LV148EA-334041B 4 Cycle Vertical Engine View Diagrams & Manuals
LV148EA-334041C 4 Cycle Vertical Engine View Diagrams & Manuals
LV148EA-334042B 4 Cycle Vertical Engine View Diagrams & Manuals
LV148EA-334047C 4 Cycle Vertical Engine View Diagrams & Manuals
LV148EA-334048C 4 Cycle Vertical Engine View Diagrams & Manuals
LV148EA-334049C 4 Cycle Vertical Engine View Diagrams & Manuals
LV148EA-334050C 4 Cycle Vertical Engine View Diagrams & Manuals
LV148EA-334051C 4 Cycle Vertical Engine View Diagrams & Manuals
LV148EA-334052C 4 Cycle Vertical Engine View Diagrams & Manuals
LV148EA-334053C 4 Cycle Vertical Engine View Diagrams & Manuals
LV148EA-334054C 4 Cycle Vertical Engine View Diagrams & Manuals
LV148EA-334055C 4 Cycle Vertical Engine View Diagrams & Manuals
LV148EA-334056C 4 Cycle Vertical Engine View Diagrams & Manuals
LV148EA-334057C 4 Cycle Vertical Engine View Diagrams & Manuals
LV148SA-334501B 4 Cycle Vertical Engine View Diagrams & Manuals
LV148SA-334502B 4 Cycle Vertical Engine View Diagrams & Manuals
LV148SA-334503B 4 Cycle Vertical Engine View Diagrams & Manuals
LV195EA-361512D 4 Cycle Vertical Engine View Diagrams & Manuals
LV195EA-361513D 4 Cycle Vertical Engine View Diagrams & Manuals
LV195EA-361530E 4 Cycle Vertical Engine View Diagrams & Manuals
LV195EA-361540D 4 Cycle Vertical Engine View Diagrams & Manuals
LV195EA-361540E 4 Cycle Vertical Engine View Diagrams & Manuals
LV195EA-361555D 4 Cycle Vertical Engine View Diagrams & Manuals
LV195EA-361556D 4 Cycle Vertical Engine View Diagrams & Manuals
LV195EA-361556E 4 Cycle Vertical Engine View Diagrams & Manuals
LV195EA-361565D 4 Cycle Vertical Engine View Diagrams & Manuals
LV195EA-361566D 4 Cycle Vertical Engine View Diagrams & Manuals
LV195EA-361569D 4 Cycle Vertical Engine View Diagrams & Manuals
LV195EA-361570D 4 Cycle Vertical Engine View Diagrams & Manuals
LV195EA-361570E 4 Cycle Vertical Engine View Diagrams & Manuals
LV195EA-361571D 4 Cycle Vertical Engine View Diagrams & Manuals
LV195EA-361571E 4 Cycle Vertical Engine View Diagrams & Manuals
LV195EA-361574D 4 Cycle Vertical Engine View Diagrams & Manuals
LV195EA-361577D 4 Cycle Vertical Engine View Diagrams & Manuals
LV195EA-361577E 4 Cycle Vertical Engine View Diagrams & Manuals
LV195EA-361579D 4 Cycle Vertical Engine View Diagrams & Manuals
LV195EA-361579E 4 Cycle Vertical Engine View Diagrams & Manuals
LV195EA-361580D 4 Cycle Vertical Engine View Diagrams & Manuals
LV195EA-361581D 4 Cycle Vertical Engine View Diagrams & Manuals
LV195EA-361581E 4 Cycle Vertical Engine View Diagrams & Manuals
LV195EA-361583D 4 Cycle Vertical Engine View Diagrams & Manuals
LV195EA-361583E 4 Cycle Vertical Engine View Diagrams & Manuals
LV195EA-361584D 4 Cycle Vertical Engine View Diagrams & Manuals
LV195EA-361585D 4 Cycle Vertical Engine View Diagrams & Manuals
LV195EA-361586D 4 Cycle Vertical Engine View Diagrams & Manuals
LV195EA-361586E 4 Cycle Vertical Engine View Diagrams & Manuals
LV195EA-361587D 4 Cycle Vertical Engine View Diagrams & Manuals
LV195EA-361587E 4 Cycle Vertical Engine View Diagrams & Manuals
LV195EA-361588D 4 Cycle Vertical Engine View Diagrams & Manuals
LV195EA-361589D 4 Cycle Vertical Engine View Diagrams & Manuals
LV195EA-361590D 4 Cycle Vertical Engine View Diagrams & Manuals
LV195EA-361590E 4 Cycle Vertical Engine View Diagrams & Manuals
LV195EA-361591D 4 Cycle Vertical Engine View Diagrams & Manuals
LV195EA-361592D 4 Cycle Vertical Engine View Diagrams & Manuals
LV195EA-361593D 4 Cycle Vertical Engine View Diagrams & Manuals
LV195EA-361594D 4 Cycle Vertical Engine View Diagrams & Manuals
LV195EA-361594E 4 Cycle Vertical Engine View Diagrams & Manuals
LV195EA-361595D 4 Cycle Vertical Engine View Diagrams & Manuals
LV195EA-361595E 4 Cycle Vertical Engine View Diagrams & Manuals
LV195EA-361596E 4 Cycle Vertical Engine View Diagrams & Manuals
LV195EA-361598E 4 Cycle Vertical Engine View Diagrams & Manuals
LV195EA-361599E 4 Cycle Vertical Engine View Diagrams & Manuals
LV195EA-361604E 4 Cycle Vertical Engine View Diagrams & Manuals
LV195EA-361605E 4 Cycle Vertical Engine View Diagrams & Manuals
LV195EA-361606E 4 Cycle Vertical Engine View Diagrams & Manuals
LV195EA-362001B 4 Cycle Vertical Engine View Diagrams & Manuals
LV195EA-362001C 4 Cycle Vertical Engine View Diagrams & Manuals
LV195EA-362001D 4 Cycle Vertical Engine View Diagrams & Manuals
LV195EA-362002B 4 Cycle Vertical Engine View Diagrams & Manuals
LV195EA-362002C 4 Cycle Vertical Engine View Diagrams & Manuals
LV195EA-362002D 4 Cycle Vertical Engine View Diagrams & Manuals
LV195EA-362003B 4 Cycle Vertical Engine View Diagrams & Manuals
LV195EA-362003C 4 Cycle Vertical Engine View Diagrams & Manuals
LV195EA-362003D 4 Cycle Vertical Engine View Diagrams & Manuals
LV195EA-362004B 4 Cycle Vertical Engine View Diagrams & Manuals
LV195EA-362004D 4 Cycle Vertical Engine View Diagrams & Manuals
LV195EA-362005B 4 Cycle Vertical Engine View Diagrams & Manuals
LV195EA-362006B 4 Cycle Vertical Engine View Diagrams & Manuals
LV195EA-362011B 4 Cycle Vertical Engine View Diagrams & Manuals
LV195EA-362011C 4 Cycle Vertical Engine View Diagrams & Manuals
LV195EA-362014B 4 Cycle Vertical Engine View Diagrams & Manuals
LV195EA-362014C 4 Cycle Vertical Engine View Diagrams & Manuals
LV195EA-362014D 4 Cycle Vertical Engine View Diagrams & Manuals
LV195EA-362015D 4 Cycle Vertical Engine View Diagrams & Manuals
LV195EA-362017B 4 Cycle Vertical Engine View Diagrams & Manuals
LV195EA-362018B 4 Cycle Vertical Engine View Diagrams & Manuals
LV195EA-362019B 4 Cycle Vertical Engine View Diagrams & Manuals
LV195EA-362020B 4 Cycle Vertical Engine View Diagrams & Manuals
LV195EA-362021B 4 Cycle Vertical Engine View Diagrams & Manuals
LV195EA-362021D 4 Cycle Vertical Engine View Diagrams & Manuals
LV195EA-362027B 4 Cycle Vertical Engine View Diagrams & Manuals
LV195EA-362027C 4 Cycle Vertical Engine View Diagrams & Manuals
LV195EA-362029B 4 Cycle Vertical Engine View Diagrams & Manuals
LV195EA-362029C 4 Cycle Vertical Engine View Diagrams & Manuals
LV195EA-362029D 4 Cycle Vertical Engine View Diagrams & Manuals
LV195EA-362032B 4 Cycle Vertical Engine View Diagrams & Manuals
LV195EA-362032C 4 Cycle Vertical Engine View Diagrams & Manuals
LV195EA-362032D 4 Cycle Vertical Engine View Diagrams & Manuals
LV195EA-362036B 4 Cycle Vertical Engine View Diagrams & Manuals
LV195EA-362036C 4 Cycle Vertical Engine View Diagrams & Manuals
LV195EA-362037B 4 Cycle Vertical Engine View Diagrams & Manuals
LV195EA-362037C 4 Cycle Vertical Engine View Diagrams & Manuals
LV195EA-362037D 4 Cycle Vertical Engine View Diagrams & Manuals
LV195EA-362039B 4 Cycle Vertical Engine View Diagrams & Manuals
LV195EA-362040B 4 Cycle Vertical Engine View Diagrams & Manuals
LV195EA-362040C 4 Cycle Vertical Engine View Diagrams & Manuals
LV195EA-362040D 4 Cycle Vertical Engine View Diagrams & Manuals
LV195EA-362041B 4 Cycle Vertical Engine View Diagrams & Manuals
LV195EA-362041C 4 Cycle Vertical Engine View Diagrams & Manuals
LV195EA-362041D 4 Cycle Vertical Engine View Diagrams & Manuals
LV195EA-362042C 4 Cycle Vertical Engine View Diagrams & Manuals
LV195EA-362042D 4 Cycle Vertical Engine View Diagrams & Manuals
LV195EA-362043B 4 Cycle Vertical Engine View Diagrams & Manuals
LV195EA-362044C 4 Cycle Vertical Engine View Diagrams & Manuals
LV195EA-362044D 4 Cycle Vertical Engine View Diagrams & Manuals
LV195EA-362045C 4 Cycle Vertical Engine View Diagrams & Manuals
LV195EA-362045D 4 Cycle Vertical Engine View Diagrams & Manuals
LV195EA-362046B 4 Cycle Vertical Engine View Diagrams & Manuals
LV195EA-362046C 4 Cycle Vertical Engine View Diagrams & Manuals
LV195EA-362046D 4 Cycle Vertical Engine View Diagrams & Manuals
LV195EA-362047C 4 Cycle Vertical Engine View Diagrams & Manuals
LV195EA-362048C 4 Cycle Vertical Engine View Diagrams & Manuals
LV195EA-362049C 4 Cycle Vertical Engine View Diagrams & Manuals
LV195EA-362049D 4 Cycle Vertical Engine View Diagrams & Manuals
LV195EA-362050C 4 Cycle Vertical Engine View Diagrams & Manuals
LV195EA-362054C 4 Cycle Vertical Engine View Diagrams & Manuals
LV195EA-362054D 4 Cycle Vertical Engine View Diagrams & Manuals
LV195EA-362055C 4 Cycle Vertical Engine View Diagrams & Manuals
LV195EA-362056C 4 Cycle Vertical Engine View Diagrams & Manuals
LV195EA-362056D 4 Cycle Vertical Engine View Diagrams & Manuals
LV195EA-362057C 4 Cycle Vertical Engine View Diagrams & Manuals
LV195EA-362059C 4 Cycle Vertical Engine View Diagrams & Manuals
LV195EA-362060C 4 Cycle Vertical Engine View Diagrams & Manuals
LV195EA-362061C 4 Cycle Vertical Engine View Diagrams & Manuals
LV195EA-362062D 4 Cycle Vertical Engine View Diagrams & Manuals
LV195EA-362063D 4 Cycle Vertical Engine View Diagrams & Manuals
LV195EA-362064D 4 Cycle Vertical Engine View Diagrams & Manuals
LV195EA-362065D 4 Cycle Vertical Engine View Diagrams & Manuals
LV195EA-362066D 4 Cycle Vertical Engine View Diagrams & Manuals
LV195EA-362067D 4 Cycle Vertical Engine View Diagrams & Manuals
LV195EA-362068D 4 Cycle Vertical Engine View Diagrams & Manuals
LV195EA-362069D 4 Cycle Vertical Engine View Diagrams & Manuals
LV195EA-362071D 4 Cycle Vertical Engine View Diagrams & Manuals
LV195EA-362073D 4 Cycle Vertical Engine View Diagrams & Manuals
LV195EA-362074D 4 Cycle Vertical Engine View Diagrams & Manuals
LV195EA-362076D 4 Cycle Vertical Engine View Diagrams & Manuals
LV195EA-362077D 4 Cycle Vertical Engine View Diagrams & Manuals
LV195EA-362078D 4 Cycle Vertical Engine View Diagrams & Manuals
LV195EA-362079D 4 Cycle Vertical Engine View Diagrams & Manuals
LV195EA-362080D 4 Cycle Vertical Engine View Diagrams & Manuals
LV195EA-362082D 4 Cycle Vertical Engine View Diagrams & Manuals
LV195EA-362083D 4 Cycle Vertical Engine View Diagrams & Manuals
LV195EA-362085D 4 Cycle Vertical Engine View Diagrams & Manuals
LV195EA-362086D 4 Cycle Vertical Engine View Diagrams & Manuals
LV195EA-362089D 4 Cycle Vertical Engine View Diagrams & Manuals
LV195EA-362090D 4 Cycle Vertical Engine View Diagrams & Manuals
LV195EA-362091D 4 Cycle Vertical Engine View Diagrams & Manuals
OV195EA-23001B 4 Cycle Vertical Engine View Diagrams & Manuals
OV195EA-23501A 4 Cycle Vertical Engine View Diagrams & Manuals
OV195EA-23501B 4 Cycle Vertical Engine View Diagrams & Manuals
OV195EA-23502A 4 Cycle Vertical Engine View Diagrams & Manuals
OV195EA-23502B 4 Cycle Vertical Engine View Diagrams & Manuals
OV195EA-23503A 4 Cycle Vertical Engine View Diagrams & Manuals
OV195EA-23503B 4 Cycle Vertical Engine View Diagrams & Manuals
OV195EA-23504A 4 Cycle Vertical Engine View Diagrams & Manuals
OV195EA-23505A 4 Cycle Vertical Engine View Diagrams & Manuals
OV195EA-23505B 4 Cycle Vertical Engine View Diagrams & Manuals
OV195EA-23506B 4 Cycle Vertical Engine View Diagrams & Manuals
OV195EA-23507B 4 Cycle Vertical Engine View Diagrams & Manuals
OV195EA-23508B 4 Cycle Vertical Engine View Diagrams & Manuals
OV195EA-23509B 4 Cycle Vertical Engine View Diagrams & Manuals
OV195EA-23510B 4 Cycle Vertical Engine View Diagrams & Manuals
OV195EA-23511B 4 Cycle Vertical Engine View Diagrams & Manuals
OV195EA-23512A 4 Cycle Vertical Engine View Diagrams & Manuals
OV195EA-23512B 4 Cycle Vertical Engine View Diagrams & Manuals
OV195EA-23513A 4 Cycle Vertical Engine View Diagrams & Manuals
OV195EA-23513B 4 Cycle Vertical Engine View Diagrams & Manuals
OV195EA-23514B 4 Cycle Vertical Engine View Diagrams & Manuals
OV195EA-23515B 4 Cycle Vertical Engine View Diagrams & Manuals
OV195EA-23517B 4 Cycle Vertical Engine View Diagrams & Manuals
OV195EA-23519B 4 Cycle Vertical Engine View Diagrams & Manuals
OV195EA-23520B 4 Cycle Vertical Engine View Diagrams & Manuals
OVRM105-20501A 4 Cycle Vertical Engine View Diagrams & Manuals
OVRM105-20503A 4 Cycle Vertical Engine View Diagrams & Manuals
OVRM105-21012E 4 Cycle Vertical Engine View Diagrams & Manuals
OVRM105-21012F 4 Cycle Vertical Engine View Diagrams & Manuals
OVRM105-21013E 4 Cycle Vertical Engine View Diagrams & Manuals
OVRM105-21014E 4 Cycle Vertical Engine View Diagrams & Manuals
OVRM105-21014F 4 Cycle Vertical Engine View Diagrams & Manuals
OVRM105-21015F 4 Cycle Vertical Engine View Diagrams & Manuals
OVRM105-21016E 4 Cycle Vertical Engine View Diagrams & Manuals
OVRM105-21016F 4 Cycle Vertical Engine View Diagrams & Manuals
OVRM105-21018E 4 Cycle Vertical Engine View Diagrams & Manuals
OVRM105-21018F 4 Cycle Vertical Engine View Diagrams & Manuals
OVRM105-21024E 4 Cycle Vertical Engine View Diagrams & Manuals
OVRM105-21024F 4 Cycle Vertical Engine View Diagrams & Manuals
OVRM105-21025E 4 Cycle Vertical Engine View Diagrams & Manuals
OVRM105-21025F 4 Cycle Vertical Engine View Diagrams & Manuals
OVRM105-21027E 4 Cycle Vertical Engine View Diagrams & Manuals
OVRM105-21027F 4 Cycle Vertical Engine View Diagrams & Manuals
OVRM105-21029E 4 Cycle Vertical Engine View Diagrams & Manuals
OVRM105-21029F 4 Cycle Vertical Engine View Diagrams & Manuals
OVRM105-21030E 4 Cycle Vertical Engine View Diagrams & Manuals
OVRM105-21030F 4 Cycle Vertical Engine View Diagrams & Manuals
OVRM105-21031E 4 Cycle Vertical Engine View Diagrams & Manuals
OVRM105-21031F 4 Cycle Vertical Engine View Diagrams & Manuals
OVRM105-21032E 4 Cycle Vertical Engine View Diagrams & Manuals
OVRM105-21032F 4 Cycle Vertical Engine View Diagrams & Manuals
OVRM105-21033F 4 Cycle Vertical Engine View Diagrams & Manuals
OVRM105-21034F 4 Cycle Vertical Engine View Diagrams & Manuals
OVRM105-21035E 4 Cycle Vertical Engine View Diagrams & Manuals
OVRM105-21035F 4 Cycle Vertical Engine View Diagrams & Manuals
OVRM105-21037E 4 Cycle Vertical Engine View Diagrams & Manuals
OVRM105-21037F 4 Cycle Vertical Engine View Diagrams & Manuals
OVRM105-21038F 4 Cycle Vertical Engine View Diagrams & Manuals
OVRM105-21039F 4 Cycle Vertical Engine View Diagrams & Manuals
OVRM105-21042F 4 Cycle Vertical Engine View Diagrams & Manuals
OVRM105-21043F 4 Cycle Vertical Engine View Diagrams & Manuals
OVRM105-21044F 4 Cycle Vertical Engine View Diagrams & Manuals
OVRM105-21045F 4 Cycle Vertical Engine View Diagrams & Manuals
OVRM105-21047F 4 Cycle Vertical Engine View Diagrams & Manuals
OVRM105-21048F 4 Cycle Vertical Engine View Diagrams & Manuals
OVRM105-21049F 4 Cycle Vertical Engine View Diagrams & Manuals
OVRM105-21051F 4 Cycle Vertical Engine View Diagrams & Manuals
OVRM105-21052F 4 Cycle Vertical Engine View Diagrams & Manuals
OVRM105-21053F 4 Cycle Vertical Engine View Diagrams & Manuals
OVRM105-21055F 4 Cycle Vertical Engine View Diagrams & Manuals
OVRM120-22010C 4 Cycle Vertical Engine View Diagrams & Manuals
OVRM120-22010D 4 Cycle Vertical Engine View Diagrams & Manuals
OVRM120-22013C 4 Cycle Vertical Engine View Diagrams & Manuals
OVRM120-22013D 4 Cycle Vertical Engine View Diagrams & Manuals
OVRM120-22032D 4 Cycle Vertical Engine View Diagrams & Manuals
OVRM120-22032E 4 Cycle Vertical Engine View Diagrams & Manuals
OVRM120-22033D 4 Cycle Vertical Engine View Diagrams & Manuals
OVRM120-22035D 4 Cycle Vertical Engine View Diagrams & Manuals
OVRM120-22035E 4 Cycle Vertical Engine View Diagrams & Manuals
OVRM120-22035F 4 Cycle Vertical Engine View Diagrams & Manuals
OVRM120-22035G 4 Cycle Vertical Engine View Diagrams & Manuals
OVRM120-22036D 4 Cycle Vertical Engine View Diagrams & Manuals
OVRM120-22036E 4 Cycle Vertical Engine View Diagrams & Manuals
OVRM120-22036F 4 Cycle Vertical Engine View Diagrams & Manuals
OVRM120-22039E 4 Cycle Vertical Engine View Diagrams & Manuals
OVRM120-22041E 4 Cycle Vertical Engine View Diagrams & Manuals
OVRM120-22042E 4 Cycle Vertical Engine View Diagrams & Manuals
OVRM120-22043E 4 Cycle Vertical Engine View Diagrams & Manuals
OVRM120-22044E 4 Cycle Vertical Engine View Diagrams & Manuals
OVRM120-22045E 4 Cycle Vertical Engine View Diagrams & Manuals
OVRM120-22047E 4 Cycle Vertical Engine View Diagrams & Manuals
OVRM120-22047F 4 Cycle Vertical Engine View Diagrams & Manuals
OVRM120-22048E 4 Cycle Vertical Engine View Diagrams & Manuals
OVRM120-22049E 4 Cycle Vertical Engine View Diagrams & Manuals
OVRM120-22054F 4 Cycle Vertical Engine View Diagrams & Manuals
OVRM120-22055F 4 Cycle Vertical Engine View Diagrams & Manuals
OVRM120-22058F 4 Cycle Vertical Engine View Diagrams & Manuals
OVRM120-22059F 4 Cycle Vertical Engine View Diagrams & Manuals
OVRM120-22059G 4 Cycle Vertical Engine View Diagrams & Manuals
OVRM120-22060F 4 Cycle Vertical Engine View Diagrams & Manuals
OVRM120-22060H 4 Cycle Vertical Engine View Diagrams & Manuals
OVRM120-22062F 4 Cycle Vertical Engine View Diagrams & Manuals
OVRM120-22062G 4 Cycle Vertical Engine View Diagrams & Manuals
OVRM120-22063F 4 Cycle Vertical Engine View Diagrams & Manuals
OVRM120-22063G 4 Cycle Vertical Engine View Diagrams & Manuals
OVRM120-22063H 4 Cycle Vertical Engine View Diagrams & Manuals
OVRM120-22065H 4 Cycle Vertical Engine View Diagrams & Manuals
OVRM120-22069H 4 Cycle Vertical Engine View Diagrams & Manuals
OVRM40-42001 4 Cycle Vertical Engine View Diagrams & Manuals
OVRM40-42002 4 Cycle Vertical Engine View Diagrams & Manuals
OVRM40-42003 4 Cycle Vertical Engine View Diagrams & Manuals
OVRM40-42004 4 Cycle Vertical Engine View Diagrams & Manuals
OVRM40-42005 4 Cycle Vertical Engine View Diagrams & Manuals
OVRM40-42006 4 Cycle Vertical Engine View Diagrams & Manuals
OVRM40-42007 4 Cycle Vertical Engine View Diagrams & Manuals
OVRM40-42008 4 Cycle Vertical Engine View Diagrams & Manuals
OVRM40-42009 4 Cycle Vertical Engine View Diagrams & Manuals
OVRM40-42010 4 Cycle Vertical Engine View Diagrams & Manuals
OVRM40-42011 4 Cycle Vertical Engine View Diagrams & Manuals
OVRM40-42012 4 Cycle Vertical Engine View Diagrams & Manuals
OVRM40-42602 4 Cycle Vertical Engine View Diagrams & Manuals
OVRM40-42603 4 Cycle Vertical Engine View Diagrams & Manuals
OVRM40-42604 4 Cycle Vertical Engine View Diagrams & Manuals
OVRM40-42605 4 Cycle Vertical Engine View Diagrams & Manuals
OVRM40-42607 4 Cycle Vertical Engine View Diagrams & Manuals
OVRM40-42608 4 Cycle Vertical Engine View Diagrams & Manuals
OVRM40-42609 4 Cycle Vertical Engine View Diagrams & Manuals
OVRM40-42611 4 Cycle Vertical Engine View Diagrams & Manuals
OVRM40-42612 4 Cycle Vertical Engine View Diagrams & Manuals
OVRM40-42613 4 Cycle Vertical Engine View Diagrams & Manuals
OVRM40-42614 4 Cycle Vertical Engine View Diagrams & Manuals
OVRM40-42615 4 Cycle Vertical Engine View Diagrams & Manuals
OVRM40-42616B 4 Cycle Vertical Engine View Diagrams & Manuals
OVRM40-42901A 4 Cycle Vertical Engine View Diagrams & Manuals
OVRM50-52601 4 Cycle Vertical Engine View Diagrams & Manuals
OVRM50-52602 4 Cycle Vertical Engine View Diagrams & Manuals
OVRM50-52606 4 Cycle Vertical Engine View Diagrams & Manuals
OVRM50-52608 4 Cycle Vertical Engine View Diagrams & Manuals
OVRM50-52609 4 Cycle Vertical Engine View Diagrams & Manuals
OVRM50-52609A 4 Cycle Vertical Engine View Diagrams & Manuals
OVRM50-52611 4 Cycle Vertical Engine View Diagrams & Manuals
OVRM50-52612 4 Cycle Vertical Engine View Diagrams & Manuals
OVRM50-52615 4 Cycle Vertical Engine View Diagrams & Manuals
OVRM50-52615A 4 Cycle Vertical Engine View Diagrams & Manuals
OVRM50-52617A 4 Cycle Vertical Engine View Diagrams & Manuals
OVRM50-52618A 4 Cycle Vertical Engine View Diagrams & Manuals
OVRM50-52619B 4 Cycle Vertical Engine View Diagrams & Manuals
OVRM50-52620B 4 Cycle Vertical Engine View Diagrams & Manuals
OVRM50-52801A 4 Cycle Vertical Engine View Diagrams & Manuals
OVRM50-52802A 4 Cycle Vertical Engine View Diagrams & Manuals
OVRM50-52802B 4 Cycle Vertical Engine View Diagrams & Manuals
OVRM50-52901 4 Cycle Vertical Engine View Diagrams & Manuals
OVRM50-52902A 4 Cycle Vertical Engine View Diagrams & Manuals
OVRM50-52902B 4 Cycle Vertical Engine View Diagrams & Manuals
OVRM50-52903A 4 Cycle Vertical Engine View Diagrams & Manuals
OVRM50-52904A 4 Cycle Vertical Engine View Diagrams & Manuals
OVRM50-52905B 4 Cycle Vertical Engine View Diagrams & Manuals
OVRM55-20001A 4 Cycle Vertical Engine View Diagrams & Manuals
OVRM55-52615C 4 Cycle Vertical Engine View Diagrams & Manuals
OVRM55-52620C 4 Cycle Vertical Engine View Diagrams & Manuals
OVRM55-52621C 4 Cycle Vertical Engine View Diagrams & Manuals
OVRM55-52802C 4 Cycle Vertical Engine View Diagrams & Manuals
OVRM55-52902C 4 Cycle Vertical Engine View Diagrams & Manuals
OVRM60-21003C 4 Cycle Vertical Engine View Diagrams & Manuals
OVRM60-21005C 4 Cycle Vertical Engine View Diagrams & Manuals
OVRM60-21005D 4 Cycle Vertical Engine View Diagrams & Manuals
OVRM60-21008C 4 Cycle Vertical Engine View Diagrams & Manuals
OVRM60-21009C 4 Cycle Vertical Engine View Diagrams & Manuals
OVRM60-21010C 4 Cycle Vertical Engine View Diagrams & Manuals
OVRM60-21012D 4 Cycle Vertical Engine View Diagrams & Manuals
OVRM60-21013D 4 Cycle Vertical Engine View Diagrams & Manuals
OVRM60-21014D 4 Cycle Vertical Engine View Diagrams & Manuals
OVRM60-21016D 4 Cycle Vertical Engine View Diagrams & Manuals
OVRM60-21018D 4 Cycle Vertical Engine View Diagrams & Manuals
OVRM60-21020D 4 Cycle Vertical Engine View Diagrams & Manuals
OVRM60-21021D 4 Cycle Vertical Engine View Diagrams & Manuals
OVRM60-21801 4 Cycle Vertical Engine View Diagrams & Manuals
OVRM60-21801A 4 Cycle Vertical Engine View Diagrams & Manuals
OVRM60-21802A 4 Cycle Vertical Engine View Diagrams & Manuals
OVRM60-21802B 4 Cycle Vertical Engine View Diagrams & Manuals
OVRM60-21802C 4 Cycle Vertical Engine View Diagrams & Manuals
OVRM60-21803A 4 Cycle Vertical Engine View Diagrams & Manuals
OVRM60-21803B 4 Cycle Vertical Engine View Diagrams & Manuals
OVRM60-21803C 4 Cycle Vertical Engine View Diagrams & Manuals
OVRM60-21804A 4 Cycle Vertical Engine View Diagrams & Manuals
OVRM60-21806B 4 Cycle Vertical Engine View Diagrams & Manuals
OVRM60-21807B 4 Cycle Vertical Engine View Diagrams & Manuals
OVRM60-21807C 4 Cycle Vertical Engine View Diagrams & Manuals
OVRM60-21808C 4 Cycle Vertical Engine View Diagrams & Manuals
OVRM65-22009B 4 Cycle Vertical Engine View Diagrams & Manuals
OVRM65-22010B 4 Cycle Vertical Engine View Diagrams & Manuals
OVRM65-22011B 4 Cycle Vertical Engine View Diagrams & Manuals
OVRM65-22013B 4 Cycle Vertical Engine View Diagrams & Manuals
OVRM65-22015B 4 Cycle Vertical Engine View Diagrams & Manuals
OVRM65-22016B 4 Cycle Vertical Engine View Diagrams & Manuals
OVRM65-22017B 4 Cycle Vertical Engine View Diagrams & Manuals
OVRM65-22018B 4 Cycle Vertical Engine View Diagrams & Manuals
OVRM65-22019B 4 Cycle Vertical Engine View Diagrams & Manuals
OVRM65-22020B 4 Cycle Vertical Engine View Diagrams & Manuals
OVRM65-22021B 4 Cycle Vertical Engine View Diagrams & Manuals
OVRM65-22023B 4 Cycle Vertical Engine View Diagrams & Manuals
OVRM65-22024B 4 Cycle Vertical Engine View Diagrams & Manuals
OVRM65-22026B 4 Cycle Vertical Engine View Diagrams & Manuals
OVRM65-22027B 4 Cycle Vertical Engine View Diagrams & Manuals
OVRM65-22028B 4 Cycle Vertical Engine View Diagrams & Manuals
OVRM65-22029B 4 Cycle Vertical Engine View Diagrams & Manuals
OVRM65-22030B 4 Cycle Vertical Engine View Diagrams & Manuals
TNT100-10040C 4 Cycle Vertical Engine View Diagrams & Manuals
TNT100-10040D 4 Cycle Vertical Engine View Diagrams & Manuals
TNT100-10040E 4 Cycle Vertical Engine View Diagrams & Manuals
TNT100-10041 4 Cycle Vertical Engine View Diagrams & Manuals
TNT100-10041C 4 Cycle Vertical Engine View Diagrams & Manuals
TNT100-10041D 4 Cycle Vertical Engine View Diagrams & Manuals
TNT100-10041E 4 Cycle Vertical Engine View Diagrams & Manuals
TNT100-10042 4 Cycle Vertical Engine View Diagrams & Manuals
TNT100-10043 4 Cycle Vertical Engine View Diagrams & Manuals
TNT100-10044 4 Cycle Vertical Engine View Diagrams & Manuals
TNT100-10045 4 Cycle Vertical Engine View Diagrams & Manuals
TNT100-10045A 4 Cycle Vertical Engine View Diagrams & Manuals
TNT100-10046 4 Cycle Vertical Engine View Diagrams & Manuals
TNT100-10046A 4 Cycle Vertical Engine View Diagrams & Manuals
TNT100-10047 4 Cycle Vertical Engine View Diagrams & Manuals
TNT100-10047A 4 Cycle Vertical Engine View Diagrams & Manuals
TNT100-10048A 4 Cycle Vertical Engine View Diagrams & Manuals
TNT100-10048B 4 Cycle Vertical Engine View Diagrams & Manuals
TNT100-10048C 4 Cycle Vertical Engine View Diagrams & Manuals
TNT100-10048D 4 Cycle Vertical Engine View Diagrams & Manuals
TNT100-10048E 4 Cycle Vertical Engine View Diagrams & Manuals
TNT100-10049A 4 Cycle Vertical Engine View Diagrams & Manuals
TNT100-10049B 4 Cycle Vertical Engine View Diagrams & Manuals
TNT100-10049C 4 Cycle Vertical Engine View Diagrams & Manuals
TNT100-10050A 4 Cycle Vertical Engine View Diagrams & Manuals
TNT100-10051A 4 Cycle Vertical Engine View Diagrams & Manuals
TNT100-10052A 4 Cycle Vertical Engine View Diagrams & Manuals
TNT100-10054A 4 Cycle Vertical Engine View Diagrams & Manuals
TNT100-10055A 4 Cycle Vertical Engine View Diagrams & Manuals
TNT100-10055B 4 Cycle Vertical Engine View Diagrams & Manuals
TNT100-10055C 4 Cycle Vertical Engine View Diagrams & Manuals
TNT100-10056A 4 Cycle Vertical Engine View Diagrams & Manuals
TNT100-10056B 4 Cycle Vertical Engine View Diagrams & Manuals
TNT100-10056C 4 Cycle Vertical Engine View Diagrams & Manuals
TNT100-10056D 4 Cycle Vertical Engine View Diagrams & Manuals
TNT100-10056E 4 Cycle Vertical Engine View Diagrams & Manuals
TNT100-10057A 4 Cycle Vertical Engine View Diagrams & Manuals
TNT100-10057B 4 Cycle Vertical Engine View Diagrams & Manuals
TNT100-10057C 4 Cycle Vertical Engine View Diagrams & Manuals
TNT100-10057D 4 Cycle Vertical Engine View Diagrams & Manuals
TNT100-10057E 4 Cycle Vertical Engine View Diagrams & Manuals
TNT100-10058A 4 Cycle Vertical Engine View Diagrams & Manuals
TNT100-10058B 4 Cycle Vertical Engine View Diagrams & Manuals
TNT100-10058C 4 Cycle Vertical Engine View Diagrams & Manuals
TNT100-10058D 4 Cycle Vertical Engine View Diagrams & Manuals
TNT100-10058E 4 Cycle Vertical Engine View Diagrams & Manuals
TNT100-10059B 4 Cycle Vertical Engine View Diagrams & Manuals
TNT100-10059C 4 Cycle Vertical Engine View Diagrams & Manuals
TNT100-10060C 4 Cycle Vertical Engine View Diagrams & Manuals
TNT100-10061C 4 Cycle Vertical Engine View Diagrams & Manuals
TNT100-10061D 4 Cycle Vertical Engine View Diagrams & Manuals
TNT100-10061E 4 Cycle Vertical Engine View Diagrams & Manuals
TNT100-10062C 4 Cycle Vertical Engine View Diagrams & Manuals
TNT100-10063C 4 Cycle Vertical Engine View Diagrams & Manuals
TNT100-10063D 4 Cycle Vertical Engine View Diagrams & Manuals
TNT100-10064C 4 Cycle Vertical Engine View Diagrams & Manuals
TNT100-10065C 4 Cycle Vertical Engine View Diagrams & Manuals
TNT100-10065D 4 Cycle Vertical Engine View Diagrams & Manuals
TNT100-10066C 4 Cycle Vertical Engine View Diagrams & Manuals
TNT100-10066D 4 Cycle Vertical Engine View Diagrams & Manuals
TNT100-10068C 4 Cycle Vertical Engine View Diagrams & Manuals
TNT100-10068D 4 Cycle Vertical Engine View Diagrams & Manuals
TNT100-10069C 4 Cycle Vertical Engine View Diagrams & Manuals
TNT100-10069D 4 Cycle Vertical Engine View Diagrams & Manuals
TNT100-10070C 4 Cycle Vertical Engine View Diagrams & Manuals
TNT100-10070D 4 Cycle Vertical Engine View Diagrams & Manuals
TNT100-10071C 4 Cycle Vertical Engine View Diagrams & Manuals
TNT100-10071D 4 Cycle Vertical Engine View Diagrams & Manuals
TNT100-10072C 4 Cycle Vertical Engine View Diagrams & Manuals
TNT100-10072D 4 Cycle Vertical Engine View Diagrams & Manuals
TNT100-10073C 4 Cycle Vertical Engine View Diagrams & Manuals
TNT100-10074D 4 Cycle Vertical Engine View Diagrams & Manuals
TNT100-10075D 4 Cycle Vertical Engine View Diagrams & Manuals
TNT100-10076D 4 Cycle Vertical Engine View Diagrams & Manuals
TNT100-10077D 4 Cycle Vertical Engine View Diagrams & Manuals
TNT100-10077E 4 Cycle Vertical Engine View Diagrams & Manuals
TNT100-10078D 4 Cycle Vertical Engine View Diagrams & Manuals
TNT100-10078E 4 Cycle Vertical Engine View Diagrams & Manuals
TNT100-10079D 4 Cycle Vertical Engine View Diagrams & Manuals
TNT100-10080D 4 Cycle Vertical Engine View Diagrams & Manuals
TNT100-10081D 4 Cycle Vertical Engine View Diagrams & Manuals
TNT100-10082D 4 Cycle Vertical Engine View Diagrams & Manuals
TNT100-10083D 4 Cycle Vertical Engine View Diagrams & Manuals
TNT100-10083E 4 Cycle Vertical Engine View Diagrams & Manuals
TNT100-10083F 4 Cycle Vertical Engine View Diagrams & Manuals
TNT100-10084E 4 Cycle Vertical Engine View Diagrams & Manuals
TNT100-10085E 4 Cycle Vertical Engine View Diagrams & Manuals
TNT100-10086E 4 Cycle Vertical Engine View Diagrams & Manuals
TNT100-10087E 4 Cycle Vertical Engine View Diagrams & Manuals
TNT100-10088E 4 Cycle Vertical Engine View Diagrams & Manuals
TNT100-10088F 4 Cycle Vertical Engine View Diagrams & Manuals
TNT100-10088G 4 Cycle Vertical Engine View Diagrams & Manuals
TNT100-10089E 4 Cycle Vertical Engine View Diagrams & Manuals
TNT100-10090E 4 Cycle Vertical Engine View Diagrams & Manuals
TNT100-10090F 4 Cycle Vertical Engine View Diagrams & Manuals
TNT100-10090G 4 Cycle Vertical Engine View Diagrams & Manuals
TNT100-10091E 4 Cycle Vertical Engine View Diagrams & Manuals
TNT100-10092E 4 Cycle Vertical Engine View Diagrams & Manuals
TNT100-10092F 4 Cycle Vertical Engine View Diagrams & Manuals
TNT100-10093E 4 Cycle Vertical Engine View Diagrams & Manuals
TNT100-10094E 4 Cycle Vertical Engine View Diagrams & Manuals
TNT100-10094F 4 Cycle Vertical Engine View Diagrams & Manuals
TNT100-10094G 4 Cycle Vertical Engine View Diagrams & Manuals
TNT100-10095E 4 Cycle Vertical Engine View Diagrams & Manuals
TNT100-10096E 4 Cycle Vertical Engine View Diagrams & Manuals
TNT100-10097E 4 Cycle Vertical Engine View Diagrams & Manuals
TNT100-10097F 4 Cycle Vertical Engine View Diagrams & Manuals
TNT100-10098E 4 Cycle Vertical Engine View Diagrams & Manuals
TNT100-10099E 4 Cycle Vertical Engine View Diagrams & Manuals
TNT100-10100E 4 Cycle Vertical Engine View Diagrams & Manuals
TNT100-10100F 4 Cycle Vertical Engine View Diagrams & Manuals
TNT100-10101E 4 Cycle Vertical Engine View Diagrams & Manuals
TNT100-10101F 4 Cycle Vertical Engine View Diagrams & Manuals
TNT100-10102E 4 Cycle Vertical Engine View Diagrams & Manuals
TNT100-10102F 4 Cycle Vertical Engine View Diagrams & Manuals
TNT100-10102G 4 Cycle Vertical Engine View Diagrams & Manuals
TNT100-10104F 4 Cycle Vertical Engine View Diagrams & Manuals
TNT100-10105G 4 Cycle Vertical Engine View Diagrams & Manuals
TNT120-12000C 4 Cycle Vertical Engine View Diagrams & Manuals
TNT120-12000D 4 Cycle Vertical Engine View Diagrams & Manuals
TNT120-12000E 4 Cycle Vertical Engine View Diagrams & Manuals
TNT120-12001 4 Cycle Vertical Engine View Diagrams & Manuals
TNT120-12001C 4 Cycle Vertical Engine View Diagrams & Manuals
TNT120-12001D 4 Cycle Vertical Engine View Diagrams & Manuals
TNT120-12002 4 Cycle Vertical Engine View Diagrams & Manuals
TNT120-12003 4 Cycle Vertical Engine View Diagrams & Manuals
TNT120-12003A 4 Cycle Vertical Engine View Diagrams & Manuals
TNT120-12003B 4 Cycle Vertical Engine View Diagrams & Manuals
TNT120-12003C 4 Cycle Vertical Engine View Diagrams & Manuals
TNT120-12003D 4 Cycle Vertical Engine View Diagrams & Manuals
TNT120-12004 4 Cycle Vertical Engine View Diagrams & Manuals
TNT120-12004A 4 Cycle Vertical Engine View Diagrams & Manuals
TNT120-12004C 4 Cycle Vertical Engine View Diagrams & Manuals
TNT120-12004D 4 Cycle Vertical Engine View Diagrams & Manuals
TNT120-12004E 4 Cycle Vertical Engine View Diagrams & Manuals
TNT120-12005 4 Cycle Vertical Engine View Diagrams & Manuals
TNT120-12005A 4 Cycle Vertical Engine View Diagrams & Manuals
TNT120-12005B 4 Cycle Vertical Engine View Diagrams & Manuals
TNT120-12005C 4 Cycle Vertical Engine View Diagrams & Manuals
TNT120-12005D 4 Cycle Vertical Engine View Diagrams & Manuals
TNT120-12005E 4 Cycle Vertical Engine View Diagrams & Manuals
TNT120-12006A 4 Cycle Vertical Engine View Diagrams & Manuals
TNT120-12006B 4 Cycle Vertical Engine View Diagrams & Manuals
TNT120-12006C 4 Cycle Vertical Engine View Diagrams & Manuals
TNT120-12006D 4 Cycle Vertical Engine View Diagrams & Manuals
TNT120-12007A 4 Cycle Vertical Engine View Diagrams & Manuals
TNT120-12007B 4 Cycle Vertical Engine View Diagrams & Manuals
TNT120-12008B 4 Cycle Vertical Engine View Diagrams & Manuals
TNT120-12009E 4 Cycle Vertical Engine View Diagrams & Manuals
TNT120-12009F 4 Cycle Vertical Engine View Diagrams & Manuals
TNT120-12010E 4 Cycle Vertical Engine View Diagrams & Manuals
TNT120-12010F 4 Cycle Vertical Engine View Diagrams & Manuals
TNT120-12011E 4 Cycle Vertical Engine View Diagrams & Manuals
TNT120-12011F 4 Cycle Vertical Engine View Diagrams & Manuals
TNT120-12012E 4 Cycle Vertical Engine View Diagrams & Manuals
TVS100-44000 4 Cycle Vertical Engine View Diagrams & Manuals
TVS100-44001 4 Cycle Vertical Engine View Diagrams & Manuals
TVS100-44002 4 Cycle Vertical Engine View Diagrams & Manuals
TVS100-44003 4 Cycle Vertical Engine View Diagrams & Manuals
TVS100-44004 4 Cycle Vertical Engine View Diagrams & Manuals
TVS100-44005 4 Cycle Vertical Engine View Diagrams & Manuals
TVS100-44006 4 Cycle Vertical Engine View Diagrams & Manuals
TVS100-44007 4 Cycle Vertical Engine View Diagrams & Manuals
TVS100-44008 4 Cycle Vertical Engine View Diagrams & Manuals
TVS100-44009 4 Cycle Vertical Engine View Diagrams & Manuals
TVS100-44010 4 Cycle Vertical Engine View Diagrams & Manuals
TVS100-44010B 4 Cycle Vertical Engine View Diagrams & Manuals
TVS100-44010C 4 Cycle Vertical Engine View Diagrams & Manuals
TVS100-44010D 4 Cycle Vertical Engine View Diagrams & Manuals
TVS100-44010E 4 Cycle Vertical Engine View Diagrams & Manuals
TVS100-44010F 4 Cycle Vertical Engine View Diagrams & Manuals
TVS100-44010G 4 Cycle Vertical Engine View Diagrams & Manuals
TVS100-44010H 4 Cycle Vertical Engine View Diagrams & Manuals
TVS100-44011A 4 Cycle Vertical Engine View Diagrams & Manuals
TVS100-44011B 4 Cycle Vertical Engine View Diagrams & Manuals
TVS100-44011C 4 Cycle Vertical Engine View Diagrams & Manuals
TVS100-44011D 4 Cycle Vertical Engine View Diagrams & Manuals
TVS100-44011E 4 Cycle Vertical Engine View Diagrams & Manuals
TVS100-44011F 4 Cycle Vertical Engine View Diagrams & Manuals
TVS100-44011G 4 Cycle Vertical Engine View Diagrams & Manuals
TVS100-44011H 4 Cycle Vertical Engine View Diagrams & Manuals
TVS100-44012A 4 Cycle Vertical Engine View Diagrams & Manuals
TVS100-44012B 4 Cycle Vertical Engine View Diagrams & Manuals
TVS100-44013A 4 Cycle Vertical Engine View Diagrams & Manuals
TVS100-44013B 4 Cycle Vertical Engine View Diagrams & Manuals
TVS100-44013C 4 Cycle Vertical Engine View Diagrams & Manuals
TVS100-44013D 4 Cycle Vertical Engine View Diagrams & Manuals
TVS100-44013E 4 Cycle Vertical Engine View Diagrams & Manuals
TVS100-44013F 4 Cycle Vertical Engine View Diagrams & Manuals
TVS100-44013G 4 Cycle Vertical Engine View Diagrams & Manuals
TVS100-44014A 4 Cycle Vertical Engine View Diagrams & Manuals
TVS100-44015B 4 Cycle Vertical Engine View Diagrams & Manuals
TVS100-44016B 4 Cycle Vertical Engine View Diagrams & Manuals
TVS100-44018B 4 Cycle Vertical Engine View Diagrams & Manuals
TVS100-44019B 4 Cycle Vertical Engine View Diagrams & Manuals
TVS100-44020B 4 Cycle Vertical Engine View Diagrams & Manuals
TVS100-44021B 4 Cycle Vertical Engine View Diagrams & Manuals
TVS100-44023C 4 Cycle Vertical Engine View Diagrams & Manuals
TVS100-44023D 4 Cycle Vertical Engine View Diagrams & Manuals
TVS100-44023E 4 Cycle Vertical Engine View Diagrams & Manuals
TVS100-44023F 4 Cycle Vertical Engine View Diagrams & Manuals
TVS100-44023H 4 Cycle Vertical Engine View Diagrams & Manuals
TVS100-44024C 4 Cycle Vertical Engine View Diagrams & Manuals
TVS100-44025C 4 Cycle Vertical Engine View Diagrams & Manuals
TVS100-44025D 4 Cycle Vertical Engine View Diagrams & Manuals
TVS100-44025E 4 Cycle Vertical Engine View Diagrams & Manuals
TVS100-44025F 4 Cycle Vertical Engine View Diagrams & Manuals
TVS100-44026D 4 Cycle Vertical Engine View Diagrams & Manuals
TVS100-44028D 4 Cycle Vertical Engine View Diagrams & Manuals
TVS100-44029D 4 Cycle Vertical Engine View Diagrams & Manuals
TVS100-44029E 4 Cycle Vertical Engine View Diagrams & Manuals
TVS100-44029F 4 Cycle Vertical Engine View Diagrams & Manuals
TVS100-44029G 4 Cycle Vertical Engine View Diagrams & Manuals
TVS100-44029H 4 Cycle Vertical Engine View Diagrams & Manuals
TVS100-44030D 4 Cycle Vertical Engine View Diagrams & Manuals
TVS100-44030E 4 Cycle Vertical Engine View Diagrams & Manuals
TVS100-44030F 4 Cycle Vertical Engine View Diagrams & Manuals
TVS100-44030G 4 Cycle Vertical Engine View Diagrams & Manuals
TVS100-44030H 4 Cycle Vertical Engine View Diagrams & Manuals
TVS100-44031D 4 Cycle Vertical Engine View Diagrams & Manuals
TVS100-44031E 4 Cycle Vertical Engine View Diagrams & Manuals
TVS100-44031F 4 Cycle Vertical Engine View Diagrams & Manuals
TVS100-44031G 4 Cycle Vertical Engine View Diagrams & Manuals
TVS100-44031H 4 Cycle Vertical Engine View Diagrams & Manuals
TVS100-44032D 4 Cycle Vertical Engine View Diagrams & Manuals
TVS100-44032E 4 Cycle Vertical Engine View Diagrams & Manuals
TVS100-44032F 4 Cycle Vertical Engine View Diagrams & Manuals
TVS100-44032G 4 Cycle Vertical Engine View Diagrams & Manuals
TVS100-44033D 4 Cycle Vertical Engine View Diagrams & Manuals
TVS100-44033E 4 Cycle Vertical Engine View Diagrams & Manuals
TVS100-44033F 4 Cycle Vertical Engine View Diagrams & Manuals
TVS100-44033G 4 Cycle Vertical Engine View Diagrams & Manuals
TVS100-44033H 4 Cycle Vertical Engine View Diagrams & Manuals
TVS100-44034D 4 Cycle Vertical Engine View Diagrams & Manuals
TVS100-44035D 4 Cycle Vertical Engine View Diagrams & Manuals
TVS100-44035E 4 Cycle Vertical Engine View Diagrams & Manuals
TVS100-44035F 4 Cycle Vertical Engine View Diagrams & Manuals
TVS100-44036E 4 Cycle Vertical Engine View Diagrams & Manuals
TVS100-44036F 4 Cycle Vertical Engine View Diagrams & Manuals
TVS100-44036G 4 Cycle Vertical Engine View Diagrams & Manuals
TVS100-44037E 4 Cycle Vertical Engine View Diagrams & Manuals
TVS100-44037G 4 Cycle Vertical Engine View Diagrams & Manuals
TVS100-44038D 4 Cycle Vertical Engine View Diagrams & Manuals
TVS100-44038E 4 Cycle Vertical Engine View Diagrams & Manuals
TVS100-44038F 4 Cycle Vertical Engine View Diagrams & Manuals
TVS100-44038G 4 Cycle Vertical Engine View Diagrams & Manuals
TVS100-44039D 4 Cycle Vertical Engine View Diagrams & Manuals
TVS100-44039E 4 Cycle Vertical Engine View Diagrams & Manuals
TVS100-44039F 4 Cycle Vertical Engine View Diagrams & Manuals
TVS100-44040D 4 Cycle Vertical Engine View Diagrams & Manuals
TVS100-44040E 4 Cycle Vertical Engine View Diagrams & Manuals
TVS100-44040F 4 Cycle Vertical Engine View Diagrams & Manuals
TVS100-44040G 4 Cycle Vertical Engine View Diagrams & Manuals
TVS100-44041E 4 Cycle Vertical Engine View Diagrams & Manuals
TVS100-44041F 4 Cycle Vertical Engine View Diagrams & Manuals
TVS100-44043D 4 Cycle Vertical Engine View Diagrams & Manuals
TVS100-44043E 4 Cycle Vertical Engine View Diagrams & Manuals
TVS100-44043F 4 Cycle Vertical Engine View Diagrams & Manuals
TVS100-44044D 4 Cycle Vertical Engine View Diagrams & Manuals
TVS100-44044E 4 Cycle Vertical Engine View Diagrams & Manuals
TVS100-44044F 4 Cycle Vertical Engine View Diagrams & Manuals
TVS100-44045D 4 Cycle Vertical Engine View Diagrams & Manuals
TVS100-44045E 4 Cycle Vertical Engine View Diagrams & Manuals
TVS100-44045F 4 Cycle Vertical Engine View Diagrams & Manuals
TVS100-44045G 4 Cycle Vertical Engine View Diagrams & Manuals
TVS100-44046D 4 Cycle Vertical Engine View Diagrams & Manuals
TVS100-44046F 4 Cycle Vertical Engine View Diagrams & Manuals
TVS100-44046G 4 Cycle Vertical Engine View Diagrams & Manuals
TVS100-44048E 4 Cycle Vertical Engine View Diagrams & Manuals
TVS100-44048F 4 Cycle Vertical Engine View Diagrams & Manuals
TVS100-44049F 4 Cycle Vertical Engine View Diagrams & Manuals
TVS100-44049G 4 Cycle Vertical Engine View Diagrams & Manuals
TVS100-44049H 4 Cycle Vertical Engine View Diagrams & Manuals
TVS100-44050F 4 Cycle Vertical Engine View Diagrams & Manuals
TVS100-44050G 4 Cycle Vertical Engine View Diagrams & Manuals
TVS100-44050H 4 Cycle Vertical Engine View Diagrams & Manuals
TVS100-44051G 4 Cycle Vertical Engine View Diagrams & Manuals
TVS100-44051H 4 Cycle Vertical Engine View Diagrams & Manuals
TVS100-44600B 4 Cycle Vertical Engine View Diagrams & Manuals
TVS100-44601A 4 Cycle Vertical Engine View Diagrams & Manuals
TVS100-44601B 4 Cycle Vertical Engine View Diagrams & Manuals
TVS100-44602B 4 Cycle Vertical Engine View Diagrams & Manuals
TVS100-44603B 4 Cycle Vertical Engine View Diagrams & Manuals
TVS100-44604B 4 Cycle Vertical Engine View Diagrams & Manuals
TVS100-44605B 4 Cycle Vertical Engine View Diagrams & Manuals
TVS100-44606B 4 Cycle Vertical Engine View Diagrams & Manuals
TVS100-44606C 4 Cycle Vertical Engine View Diagrams & Manuals
TVS100-44606D 4 Cycle Vertical Engine View Diagrams & Manuals
TVS100-44608B 4 Cycle Vertical Engine View Diagrams & Manuals
TVS100-44609C 4 Cycle Vertical Engine View Diagrams & Manuals
TVS100-44609D 4 Cycle Vertical Engine View Diagrams & Manuals
TVS100-44609E 4 Cycle Vertical Engine View Diagrams & Manuals
TVS100-44610C 4 Cycle Vertical Engine View Diagrams & Manuals
TVS100-44611D 4 Cycle Vertical Engine View Diagrams & Manuals
TVS100-44802E 4 Cycle Vertical Engine View Diagrams & Manuals
TVS100-44802F 4 Cycle Vertical Engine View Diagrams & Manuals
TVS100-44805F 4 Cycle Vertical Engine View Diagrams & Manuals
TVS105-53000 4 Cycle Vertical Engine View Diagrams & Manuals
TVS105-53000A 4 Cycle Vertical Engine View Diagrams & Manuals
TVS105-53000B 4 Cycle Vertical Engine View Diagrams & Manuals
TVS105-53000C 4 Cycle Vertical Engine View Diagrams & Manuals
TVS105-53000D 4 Cycle Vertical Engine View Diagrams & Manuals
TVS105-53001 4 Cycle Vertical Engine View Diagrams & Manuals
TVS105-53002 4 Cycle Vertical Engine View Diagrams & Manuals
TVS105-53003 4 Cycle Vertical Engine View Diagrams & Manuals
TVS105-53003A 4 Cycle Vertical Engine View Diagrams & Manuals
TVS105-53003B 4 Cycle Vertical Engine View Diagrams & Manuals
TVS105-53003C 4 Cycle Vertical Engine View Diagrams & Manuals
TVS105-53004 4 Cycle Vertical Engine View Diagrams & Manuals
TVS105-53004A 4 Cycle Vertical Engine View Diagrams & Manuals
TVS105-53005 4 Cycle Vertical Engine View Diagrams & Manuals
TVS105-53005A 4 Cycle Vertical Engine View Diagrams & Manuals
TVS105-53006A 4 Cycle Vertical Engine View Diagrams & Manuals
TVS105-53006B 4 Cycle Vertical Engine View Diagrams & Manuals
TVS105-53007A 4 Cycle Vertical Engine View Diagrams & Manuals
TVS105-53008A 4 Cycle Vertical Engine View Diagrams & Manuals
TVS105-53009A 4 Cycle Vertical Engine View Diagrams & Manuals
TVS105-53010A 4 Cycle Vertical Engine View Diagrams & Manuals
TVS105-53010B 4 Cycle Vertical Engine View Diagrams & Manuals
TVS105-53010C 4 Cycle Vertical Engine View Diagrams & Manuals
TVS105-53010D 4 Cycle Vertical Engine View Diagrams & Manuals
TVS105-53012A 4 Cycle Vertical Engine View Diagrams & Manuals
TVS105-53013A 4 Cycle Vertical Engine View Diagrams & Manuals
TVS105-53014A 4 Cycle Vertical Engine View Diagrams & Manuals
TVS105-53015A 4 Cycle Vertical Engine View Diagrams & Manuals
TVS105-53016A 4 Cycle Vertical Engine View Diagrams & Manuals
TVS105-53017A 4 Cycle Vertical Engine View Diagrams & Manuals
TVS105-53018A 4 Cycle Vertical Engine View Diagrams & Manuals
TVS105-53018B 4 Cycle Vertical Engine View Diagrams & Manuals
TVS105-53019A 4 Cycle Vertical Engine View Diagrams & Manuals
TVS105-53020A 4 Cycle Vertical Engine View Diagrams & Manuals
TVS105-53020B 4 Cycle Vertical Engine View Diagrams & Manuals
TVS105-53021A 4 Cycle Vertical Engine View Diagrams & Manuals
TVS105-53022A 4 Cycle Vertical Engine View Diagrams & Manuals
TVS105-53022B 4 Cycle Vertical Engine View Diagrams & Manuals
TVS105-53022C 4 Cycle Vertical Engine View Diagrams & Manuals
TVS105-53023A 4 Cycle Vertical Engine View Diagrams & Manuals
TVS105-53023B 4 Cycle Vertical Engine View Diagrams & Manuals
TVS105-53023C 4 Cycle Vertical Engine View Diagrams & Manuals
TVS105-53024A 4 Cycle Vertical Engine View Diagrams & Manuals
TVS105-53025A 4 Cycle Vertical Engine View Diagrams & Manuals
TVS105-53025B 4 Cycle Vertical Engine View Diagrams & Manuals
TVS105-53026A 4 Cycle Vertical Engine View Diagrams & Manuals
TVS105-53027A 4 Cycle Vertical Engine View Diagrams & Manuals
TVS105-53027B 4 Cycle Vertical Engine View Diagrams & Manuals
TVS105-53027C 4 Cycle Vertical Engine View Diagrams & Manuals
TVS105-53028A 4 Cycle Vertical Engine View Diagrams & Manuals
TVS105-53028B 4 Cycle Vertical Engine View Diagrams & Manuals
TVS105-53028D 4 Cycle Vertical Engine View Diagrams & Manuals
TVS105-53029A 4 Cycle Vertical Engine View Diagrams & Manuals
TVS105-53030A 4 Cycle Vertical Engine View Diagrams & Manuals
TVS105-53031A 4 Cycle Vertical Engine View Diagrams & Manuals
TVS105-53031B 4 Cycle Vertical Engine View Diagrams & Manuals
TVS105-53032A 4 Cycle Vertical Engine View Diagrams & Manuals
TVS105-53033A 4 Cycle Vertical Engine View Diagrams & Manuals
TVS105-53034A 4 Cycle Vertical Engine View Diagrams & Manuals
TVS105-53034B 4 Cycle Vertical Engine View Diagrams & Manuals
TVS105-53035A 4 Cycle Vertical Engine View Diagrams & Manuals
TVS105-53035C 4 Cycle Vertical Engine View Diagrams & Manuals
TVS105-53035D 4 Cycle Vertical Engine View Diagrams & Manuals
TVS105-53036A 4 Cycle Vertical Engine View Diagrams & Manuals
TVS105-53036B 4 Cycle Vertical Engine View Diagrams & Manuals
TVS105-53037B 4 Cycle Vertical Engine View Diagrams & Manuals
TVS105-53038C 4 Cycle Vertical Engine View Diagrams & Manuals
TVS105-53038D 4 Cycle Vertical Engine View Diagrams & Manuals
TVS105-53039C 4 Cycle Vertical Engine View Diagrams & Manuals
TVS105-53039D 4 Cycle Vertical Engine View Diagrams & Manuals
TVS105-53040C 4 Cycle Vertical Engine View Diagrams & Manuals
TVS105-53042D 4 Cycle Vertical Engine View Diagrams & Manuals
TVS105-53043D 4 Cycle Vertical Engine View Diagrams & Manuals
TVS105-53044D 4 Cycle Vertical Engine View Diagrams & Manuals
TVS105-53045D 4 Cycle Vertical Engine View Diagrams & Manuals
TVS105-53046D 4 Cycle Vertical Engine View Diagrams & Manuals
TVS105-53046E 4 Cycle Vertical Engine View Diagrams & Manuals
TVS105-53046F 4 Cycle Vertical Engine View Diagrams & Manuals
TVS105-53046G 4 Cycle Vertical Engine View Diagrams & Manuals
TVS105-53047D 4 Cycle Vertical Engine View Diagrams & Manuals
TVS105-53047E 4 Cycle Vertical Engine View Diagrams & Manuals
TVS105-53047F 4 Cycle Vertical Engine View Diagrams & Manuals
TVS105-53048D 4 Cycle Vertical Engine View Diagrams & Manuals
TVS105-53049D 4 Cycle Vertical Engine View Diagrams & Manuals
TVS105-53050D 4 Cycle Vertical Engine View Diagrams & Manuals
TVS105-53050E 4 Cycle Vertical Engine View Diagrams & Manuals
TVS105-53050F 4 Cycle Vertical Engine View Diagrams & Manuals
TVS105-53051D 4 Cycle Vertical Engine View Diagrams & Manuals
TVS105-53052D 4 Cycle Vertical Engine View Diagrams & Manuals
TVS105-53053D 4 Cycle Vertical Engine View Diagrams & Manuals
TVS105-53054D 4 Cycle Vertical Engine View Diagrams & Manuals
TVS105-53055D 4 Cycle Vertical Engine View Diagrams & Manuals
TVS105-53056D 4 Cycle Vertical Engine View Diagrams & Manuals
TVS105-53057D 4 Cycle Vertical Engine View Diagrams & Manuals
TVS105-53058D 4 Cycle Vertical Engine View Diagrams & Manuals
TVS105-53059D 4 Cycle Vertical Engine View Diagrams & Manuals
TVS105-53060D 4 Cycle Vertical Engine View Diagrams & Manuals
TVS105-53061D 4 Cycle Vertical Engine View Diagrams & Manuals
TVS105-53063D 4 Cycle Vertical Engine View Diagrams & Manuals
TVS105-53064D 4 Cycle Vertical Engine View Diagrams & Manuals
TVS105-53065D 4 Cycle Vertical Engine View Diagrams & Manuals
TVS105-53066D 4 Cycle Vertical Engine View Diagrams & Manuals
TVS105-53067D 4 Cycle Vertical Engine View Diagrams & Manuals
TVS105-53068D 4 Cycle Vertical Engine View Diagrams & Manuals
TVS105-53069D 4 Cycle Vertical Engine View Diagrams & Manuals
TVS105-53069F 4 Cycle Vertical Engine View Diagrams & Manuals
TVS105-53069G 4 Cycle Vertical Engine View Diagrams & Manuals
TVS105-53070D 4 Cycle Vertical Engine View Diagrams & Manuals
TVS105-53071D 4 Cycle Vertical Engine View Diagrams & Manuals
TVS105-53072D 4 Cycle Vertical Engine View Diagrams & Manuals
TVS105-53072E 4 Cycle Vertical Engine View Diagrams & Manuals
TVS105-53073D 4 Cycle Vertical Engine View Diagrams & Manuals
TVS105-53074D 4 Cycle Vertical Engine View Diagrams & Manuals
TVS105-53075D 4 Cycle Vertical Engine View Diagrams & Manuals
TVS105-53076D 4 Cycle Vertical Engine View Diagrams & Manuals
TVS105-53077D 4 Cycle Vertical Engine View Diagrams & Manuals
TVS105-53078D 4 Cycle Vertical Engine View Diagrams & Manuals
TVS105-53079D 4 Cycle Vertical Engine View Diagrams & Manuals
TVS105-53080D 4 Cycle Vertical Engine View Diagrams & Manuals
TVS105-53081D 4 Cycle Vertical Engine View Diagrams & Manuals
TVS105-53082D 4 Cycle Vertical Engine View Diagrams & Manuals
TVS105-53082E 4 Cycle Vertical Engine View Diagrams & Manuals
TVS105-53082F 4 Cycle Vertical Engine View Diagrams & Manuals
TVS105-53082G 4 Cycle Vertical Engine View Diagrams & Manuals
TVS105-53083D 4 Cycle Vertical Engine View Diagrams & Manuals
TVS105-53084D 4 Cycle Vertical Engine View Diagrams & Manuals
TVS105-53085D 4 Cycle Vertical Engine View Diagrams & Manuals
TVS105-53085E 4 Cycle Vertical Engine View Diagrams & Manuals
TVS105-53085F 4 Cycle Vertical Engine View Diagrams & Manuals
TVS105-53085G 4 Cycle Vertical Engine View Diagrams & Manuals
TVS105-53086D 4 Cycle Vertical Engine View Diagrams & Manuals
TVS105-53086E 4 Cycle Vertical Engine View Diagrams & Manuals
TVS105-53086F 4 Cycle Vertical Engine View Diagrams & Manuals
TVS105-53086G 4 Cycle Vertical Engine View Diagrams & Manuals
TVS105-53087D 4 Cycle Vertical Engine View Diagrams & Manuals
TVS105-53088D 4 Cycle Vertical Engine View Diagrams & Manuals
TVS105-53088E 4 Cycle Vertical Engine View Diagrams & Manuals
TVS105-53088F 4 Cycle Vertical Engine View Diagrams & Manuals
TVS105-53089D 4 Cycle Vertical Engine View Diagrams & Manuals
TVS105-53089E 4 Cycle Vertical Engine View Diagrams & Manuals
TVS105-53090D 4 Cycle Vertical Engine View Diagrams & Manuals
TVS105-53095E 4 Cycle Vertical Engine View Diagrams & Manuals
TVS105-53095F 4 Cycle Vertical Engine View Diagrams & Manuals
TVS105-53098E 4 Cycle Vertical Engine View Diagrams & Manuals
TVS105-53098F 4 Cycle Vertical Engine View Diagrams & Manuals
TVS105-53099E 4 Cycle Vertical Engine View Diagrams & Manuals
TVS105-53099F 4 Cycle Vertical Engine View Diagrams & Manuals
TVS105-53101E 4 Cycle Vertical Engine View Diagrams & Manuals
TVS105-53102E 4 Cycle Vertical Engine View Diagrams & Manuals
TVS105-53104F 4 Cycle Vertical Engine View Diagrams & Manuals
TVS105-53105F 4 Cycle Vertical Engine View Diagrams & Manuals
TVS105-53106F 4 Cycle Vertical Engine View Diagrams & Manuals
TVS105-53107F 4 Cycle Vertical Engine View Diagrams & Manuals
TVS105-53108F 4 Cycle Vertical Engine View Diagrams & Manuals
TVS105-53109F 4 Cycle Vertical Engine View Diagrams & Manuals
TVS105-53110F 4 Cycle Vertical Engine View Diagrams & Manuals
TVS105-53110G 4 Cycle Vertical Engine View Diagrams & Manuals
TVS105-53111F 4 Cycle Vertical Engine View Diagrams & Manuals
TVS105-53111G 4 Cycle Vertical Engine View Diagrams & Manuals
TVS105-53112F 4 Cycle Vertical Engine View Diagrams & Manuals
TVS105-53113F 4 Cycle Vertical Engine View Diagrams & Manuals
TVS105-53114F 4 Cycle Vertical Engine View Diagrams & Manuals
TVS105-53114G 4 Cycle Vertical Engine View Diagrams & Manuals
TVS105-53115F 4 Cycle Vertical Engine View Diagrams & Manuals
TVS105-53116F 4 Cycle Vertical Engine View Diagrams & Manuals
TVS105-53116G 4 Cycle Vertical Engine View Diagrams & Manuals
TVS105-53116H 4 Cycle Vertical Engine View Diagrams & Manuals
TVS105-53116J 4 Cycle Vertical Engine View Diagrams & Manuals
TVS105-53118F 4 Cycle Vertical Engine View Diagrams & Manuals
TVS105-53118G 4 Cycle Vertical Engine View Diagrams & Manuals
TVS105-53118H 4 Cycle Vertical Engine View Diagrams & Manuals
TVS105-53122G 4 Cycle Vertical Engine View Diagrams & Manuals
TVS105-53123G 4 Cycle Vertical Engine View Diagrams & Manuals
TVS105-53130G 4 Cycle Vertical Engine View Diagrams & Manuals
TVS105-53130H 4 Cycle Vertical Engine View Diagrams & Manuals
TVS105-53131G 4 Cycle Vertical Engine View Diagrams & Manuals
TVS105-53132G 4 Cycle Vertical Engine View Diagrams & Manuals
TVS105-53133G 4 Cycle Vertical Engine View Diagrams & Manuals
TVS105-53134G 4 Cycle Vertical Engine View Diagrams & Manuals
TVS105-53136G 4 Cycle Vertical Engine View Diagrams & Manuals
TVS105-53137G 4 Cycle Vertical Engine View Diagrams & Manuals
TVS105-53138G 4 Cycle Vertical Engine View Diagrams & Manuals
TVS105-53139G 4 Cycle Vertical Engine View Diagrams & Manuals
TVS105-53139H 4 Cycle Vertical Engine View Diagrams & Manuals
TVS105-53140G 4 Cycle Vertical Engine View Diagrams & Manuals
TVS105-53141G 4 Cycle Vertical Engine View Diagrams & Manuals
TVS105-53143G 4 Cycle Vertical Engine View Diagrams & Manuals
TVS105-53147G 4 Cycle Vertical Engine View Diagrams & Manuals
TVS105-53148G 4 Cycle Vertical Engine View Diagrams & Manuals
TVS105-53149G 4 Cycle Vertical Engine View Diagrams & Manuals
TVS105-53150G 4 Cycle Vertical Engine View Diagrams & Manuals
TVS105-53151G 4 Cycle Vertical Engine View Diagrams & Manuals
TVS105-53151H 4 Cycle Vertical Engine View Diagrams & Manuals
TVS105-53152G 4 Cycle Vertical Engine View Diagrams & Manuals
TVS105-53153G 4 Cycle Vertical Engine View Diagrams & Manuals
TVS105-53153H 4 Cycle Vertical Engine View Diagrams & Manuals
TVS105-53153J 4 Cycle Vertical Engine View Diagrams & Manuals
TVS105-53154G 4 Cycle Vertical Engine View Diagrams & Manuals
TVS105-53155G 4 Cycle Vertical Engine View Diagrams & Manuals
TVS105-53156G 4 Cycle Vertical Engine View Diagrams & Manuals
TVS105-53156H 4 Cycle Vertical Engine View Diagrams & Manuals
TVS105-53156J 4 Cycle Vertical Engine View Diagrams & Manuals
TVS105-53157G 4 Cycle Vertical Engine View Diagrams & Manuals
TVS105-53157H 4 Cycle Vertical Engine View Diagrams & Manuals
TVS105-53157J 4 Cycle Vertical Engine View Diagrams & Manuals
TVS105-53158G 4 Cycle Vertical Engine View Diagrams & Manuals
TVS105-53158H 4 Cycle Vertical Engine View Diagrams & Manuals
TVS105-53158J 4 Cycle Vertical Engine View Diagrams & Manuals
TVS105-53160H 4 Cycle Vertical Engine View Diagrams & Manuals
TVS105-53161H 4 Cycle Vertical Engine View Diagrams & Manuals
TVS105-53162H 4 Cycle Vertical Engine View Diagrams & Manuals
TVS105-53163H 4 Cycle Vertical Engine View Diagrams & Manuals
TVS105-53163J 4 Cycle Vertical Engine View Diagrams & Manuals
TVS105-53163K 4 Cycle Vertical Engine View Diagrams & Manuals
TVS105-53163L 4 Cycle Vertical Engine View Diagrams & Manuals
TVS105-53163M 4 Cycle Vertical Engine View Diagrams & Manuals
TVS105-53164H 4 Cycle Vertical Engine View Diagrams & Manuals
TVS105-53165H 4 Cycle Vertical Engine View Diagrams & Manuals
TVS105-53166J 4 Cycle Vertical Engine View Diagrams & Manuals
TVS105-53167H 4 Cycle Vertical Engine View Diagrams & Manuals
TVS105-53168H 4 Cycle Vertical Engine View Diagrams & Manuals
TVS105-53169H 4 Cycle Vertical Engine View Diagrams & Manuals
TVS105-53171H 4 Cycle Vertical Engine View Diagrams & Manuals
TVS105-53172H 4 Cycle Vertical Engine View Diagrams & Manuals
TVS105-53175H 4 Cycle Vertical Engine View Diagrams & Manuals
TVS105-53176H 4 Cycle Vertical Engine View Diagrams & Manuals
TVS105-53177H 4 Cycle Vertical Engine View Diagrams & Manuals
TVS105-53178H 4 Cycle Vertical Engine View Diagrams & Manuals
TVS105-53180J 4 Cycle Vertical Engine View Diagrams & Manuals
TVS105-53181J 4 Cycle Vertical Engine View Diagrams & Manuals
TVS105-53182J 4 Cycle Vertical Engine View Diagrams & Manuals
TVS105-53183J 4 Cycle Vertical Engine View Diagrams & Manuals
TVS105-53184J 4 Cycle Vertical Engine View Diagrams & Manuals
TVS105-53185L 4 Cycle Vertical Engine View Diagrams & Manuals
TVS105-53185M 4 Cycle Vertical Engine View Diagrams & Manuals
TVS105-53601E 4 Cycle Vertical Engine View Diagrams & Manuals
TVS105-53602E 4 Cycle Vertical Engine View Diagrams & Manuals
TVS105-53602F 4 Cycle Vertical Engine View Diagrams & Manuals
TVS105-53603F 4 Cycle Vertical Engine View Diagrams & Manuals
TVS105-53604F 4 Cycle Vertical Engine View Diagrams & Manuals
TVS105-53604G 4 Cycle Vertical Engine View Diagrams & Manuals
TVS105-53605F 4 Cycle Vertical Engine View Diagrams & Manuals
TVS105-53606F 4 Cycle Vertical Engine View Diagrams & Manuals
TVS105-53606H 4 Cycle Vertical Engine View Diagrams & Manuals
TVS105-53607F 4 Cycle Vertical Engine View Diagrams & Manuals
TVS105-53608F 4 Cycle Vertical Engine View Diagrams & Manuals
TVS105-53609F 4 Cycle Vertical Engine View Diagrams & Manuals
TVS105-53609G 4 Cycle Vertical Engine View Diagrams & Manuals
TVS105-53610F 4 Cycle Vertical Engine View Diagrams & Manuals
TVS105-53611F 4 Cycle Vertical Engine View Diagrams & Manuals
TVS105-53612F 4 Cycle Vertical Engine View Diagrams & Manuals
TVS105-53613F 4 Cycle Vertical Engine View Diagrams & Manuals
TVS105-53613G 4 Cycle Vertical Engine View Diagrams & Manuals
TVS105-53614F 4 Cycle Vertical Engine View Diagrams & Manuals
TVS105-53615F 4 Cycle Vertical Engine View Diagrams & Manuals
TVS105-53617F 4 Cycle Vertical Engine View Diagrams & Manuals
TVS105-53618F 4 Cycle Vertical Engine View Diagrams & Manuals
TVS105-53619F 4 Cycle Vertical Engine View Diagrams & Manuals
TVS105-53619G 4 Cycle Vertical Engine View Diagrams & Manuals
TVS105-53619H 4 Cycle Vertical Engine View Diagrams & Manuals
TVS105-53619J 4 Cycle Vertical Engine View Diagrams & Manuals
TVS105-53619K 4 Cycle Vertical Engine View Diagrams & Manuals
TVS105-53620G 4 Cycle Vertical Engine View Diagrams & Manuals
TVS105-53624G 4 Cycle Vertical Engine View Diagrams & Manuals
TVS105-53624H 4 Cycle Vertical Engine View Diagrams & Manuals
TVS105-53624J 4 Cycle Vertical Engine View Diagrams & Manuals
TVS105-53625H 4 Cycle Vertical Engine View Diagrams & Manuals
TVS105-53626H 4 Cycle Vertical Engine View Diagrams & Manuals
TVS105-53628J 4 Cycle Vertical Engine View Diagrams & Manuals
TVS105-53629J 4 Cycle Vertical Engine View Diagrams & Manuals
TVS105-53630J 4 Cycle Vertical Engine View Diagrams & Manuals
TVS105-53631L 4 Cycle Vertical Engine View Diagrams & Manuals
TVS105-53631N 4 Cycle Vertical Engine View Diagrams & Manuals
TVS105-53802M 4 Cycle Vertical Engine View Diagrams & Manuals
TVS105-53901G 4 Cycle Vertical Engine View Diagrams & Manuals
TVS105-53901H 4 Cycle Vertical Engine View Diagrams & Manuals
TVS105-53902G 4 Cycle Vertical Engine View Diagrams & Manuals
TVS105-53902H 4 Cycle Vertical Engine View Diagrams & Manuals
TVS105-53903G 4 Cycle Vertical Engine View Diagrams & Manuals
TVS105-53903H 4 Cycle Vertical Engine View Diagrams & Manuals
TVS105-53904G 4 Cycle Vertical Engine View Diagrams & Manuals
TVS105-53905G 4 Cycle Vertical Engine View Diagrams & Manuals
TVS105-53906G 4 Cycle Vertical Engine View Diagrams & Manuals
TVS105-53907G 4 Cycle Vertical Engine View Diagrams & Manuals
TVS105-53907H 4 Cycle Vertical Engine View Diagrams & Manuals
TVS105-53908H 4 Cycle Vertical Engine View Diagrams & Manuals
TVS105-53909H 4 Cycle Vertical Engine View Diagrams & Manuals
TVS105-53910H 4 Cycle Vertical Engine View Diagrams & Manuals
TVS105-53911H 4 Cycle Vertical Engine View Diagrams & Manuals
TVS105-53912H 4 Cycle Vertical Engine View Diagrams & Manuals
TVS105-53912J 4 Cycle Vertical Engine View Diagrams & Manuals
TVS105-53912L 4 Cycle Vertical Engine View Diagrams & Manuals
TVS105-53913H 4 Cycle Vertical Engine View Diagrams & Manuals
TVS105-53913J 4 Cycle Vertical Engine View Diagrams & Manuals
TVS105-53913K 4 Cycle Vertical Engine View Diagrams & Manuals
TVS105-53913L 4 Cycle Vertical Engine View Diagrams & Manuals
TVS105-53913M 4 Cycle Vertical Engine View Diagrams & Manuals
TVS105-53914H 4 Cycle Vertical Engine View Diagrams & Manuals
TVS105-53916J 4 Cycle Vertical Engine View Diagrams & Manuals
TVS105-53916K 4 Cycle Vertical Engine View Diagrams & Manuals
TVS105-53917J 4 Cycle Vertical Engine View Diagrams & Manuals
TVS105-53920J 4 Cycle Vertical Engine View Diagrams & Manuals
TVS105-53921K 4 Cycle Vertical Engine View Diagrams & Manuals
TVS105-53922K 4 Cycle Vertical Engine View Diagrams & Manuals
TVS105-56001 4 Cycle Vertical Engine View Diagrams & Manuals
TVS105-56003 4 Cycle Vertical Engine View Diagrams & Manuals
TVS105-56004 4 Cycle Vertical Engine View Diagrams & Manuals
TVS105-56005 4 Cycle Vertical Engine View Diagrams & Manuals
TVS105-56006 4 Cycle Vertical Engine View Diagrams & Manuals
TVS105-56007 4 Cycle Vertical Engine View Diagrams & Manuals
TVS105-56008 4 Cycle Vertical Engine View Diagrams & Manuals
TVS105-56009 4 Cycle Vertical Engine View Diagrams & Manuals
TVS105-56901 4 Cycle Vertical Engine View Diagrams & Manuals
TVS105-56902 4 Cycle Vertical Engine View Diagrams & Manuals
TVS105-56904 4 Cycle Vertical Engine View Diagrams & Manuals
TVS105-56905 4 Cycle Vertical Engine View Diagrams & Manuals
TVS105-56906 4 Cycle Vertical Engine View Diagrams & Manuals
TVS105-56907 4 Cycle Vertical Engine View Diagrams & Manuals
TVS105-56908 4 Cycle Vertical Engine View Diagrams & Manuals
TVS105-56910 4 Cycle Vertical Engine View Diagrams & Manuals
TVS115-56001A 4 Cycle Vertical Engine View Diagrams & Manuals
TVS115-56007A 4 Cycle Vertical Engine View Diagrams & Manuals
TVS115-56010A 4 Cycle Vertical Engine View Diagrams & Manuals
TVS115-56010B 4 Cycle Vertical Engine View Diagrams & Manuals
TVS115-56011A 4 Cycle Vertical Engine View Diagrams & Manuals
TVS115-56012A 4 Cycle Vertical Engine View Diagrams & Manuals
TVS115-56012B 4 Cycle Vertical Engine View Diagrams & Manuals
TVS115-56013A 4 Cycle Vertical Engine View Diagrams & Manuals
TVS115-56013B 4 Cycle Vertical Engine View Diagrams & Manuals
TVS115-56013C 4 Cycle Vertical Engine View Diagrams & Manuals
TVS115-56014A 4 Cycle Vertical Engine View Diagrams & Manuals
TVS115-56014B 4 Cycle Vertical Engine View Diagrams & Manuals
TVS115-56015A 4 Cycle Vertical Engine View Diagrams & Manuals
TVS115-56015B 4 Cycle Vertical Engine View Diagrams & Manuals
TVS115-56016A 4 Cycle Vertical Engine View Diagrams & Manuals
TVS115-56016B 4 Cycle Vertical Engine View Diagrams & Manuals
TVS115-56017A 4 Cycle Vertical Engine View Diagrams & Manuals
TVS115-56018B 4 Cycle Vertical Engine View Diagrams & Manuals
TVS115-56019A 4 Cycle Vertical Engine View Diagrams & Manuals
TVS115-56019D 4 Cycle Vertical Engine View Diagrams & Manuals
TVS115-56020A 4 Cycle Vertical Engine View Diagrams & Manuals
TVS115-56020B 4 Cycle Vertical Engine View Diagrams & Manuals
TVS115-56020D 4 Cycle Vertical Engine View Diagrams & Manuals
TVS115-56022A 4 Cycle Vertical Engine View Diagrams & Manuals
TVS115-56022B 4 Cycle Vertical Engine View Diagrams & Manuals
TVS115-56023A 4 Cycle Vertical Engine View Diagrams & Manuals
TVS115-56023B 4 Cycle Vertical Engine View Diagrams & Manuals
TVS115-56024A 4 Cycle Vertical Engine View Diagrams & Manuals
TVS115-56026A 4 Cycle Vertical Engine View Diagrams & Manuals
TVS115-56027A 4 Cycle Vertical Engine View Diagrams & Manuals
TVS115-56027B 4 Cycle Vertical Engine View Diagrams & Manuals
TVS115-56027C 4 Cycle Vertical Engine View Diagrams & Manuals
TVS115-56027D 4 Cycle Vertical Engine View Diagrams & Manuals
TVS115-56027E 4 Cycle Vertical Engine View Diagrams & Manuals
TVS115-56028A 4 Cycle Vertical Engine View Diagrams & Manuals
TVS115-56029A 4 Cycle Vertical Engine View Diagrams & Manuals
TVS115-56029B 4 Cycle Vertical Engine View Diagrams & Manuals
TVS115-56029D 4 Cycle Vertical Engine View Diagrams & Manuals
TVS115-56030A 4 Cycle Vertical Engine View Diagrams & Manuals
TVS115-56030B 4 Cycle Vertical Engine View Diagrams & Manuals
TVS115-56030C 4 Cycle Vertical Engine View Diagrams & Manuals
TVS115-56030E 4 Cycle Vertical Engine View Diagrams & Manuals
TVS115-56031A 4 Cycle Vertical Engine View Diagrams & Manuals
TVS115-56031B 4 Cycle Vertical Engine View Diagrams & Manuals
TVS115-56032B 4 Cycle Vertical Engine View Diagrams & Manuals
TVS115-56033B 4 Cycle Vertical Engine View Diagrams & Manuals
TVS115-56033C 4 Cycle Vertical Engine View Diagrams & Manuals
TVS115-56034B 4 Cycle Vertical Engine View Diagrams & Manuals
TVS115-56036B 4 Cycle Vertical Engine View Diagrams & Manuals
TVS115-56036C 4 Cycle Vertical Engine View Diagrams & Manuals
TVS115-56036D 4 Cycle Vertical Engine View Diagrams & Manuals
TVS115-56037B 4 Cycle Vertical Engine View Diagrams & Manuals
TVS115-56037C 4 Cycle Vertical Engine View Diagrams & Manuals
TVS115-56039B 4 Cycle Vertical Engine View Diagrams & Manuals
TVS115-56041B 4 Cycle Vertical Engine View Diagrams & Manuals
TVS115-56042B 4 Cycle Vertical Engine View Diagrams & Manuals
TVS115-56043B 4 Cycle Vertical Engine View Diagrams & Manuals
TVS115-56044B 4 Cycle Vertical Engine View Diagrams & Manuals
TVS115-56044C 4 Cycle Vertical Engine View Diagrams & Manuals
TVS115-56045B 4 Cycle Vertical Engine View Diagrams & Manuals
TVS115-56046B 4 Cycle Vertical Engine View Diagrams & Manuals
TVS115-56046C 4 Cycle Vertical Engine View Diagrams & Manuals
TVS115-56047B 4 Cycle Vertical Engine View Diagrams & Manuals
TVS115-56047C 4 Cycle Vertical Engine View Diagrams & Manuals
TVS115-56047D 4 Cycle Vertical Engine View Diagrams & Manuals
TVS115-56047E 4 Cycle Vertical Engine View Diagrams & Manuals
TVS115-56048B 4 Cycle Vertical Engine View Diagrams & Manuals
TVS115-56048C 4 Cycle Vertical Engine View Diagrams & Manuals
TVS115-56048D 4 Cycle Vertical Engine View Diagrams & Manuals
TVS115-56048E 4 Cycle Vertical Engine View Diagrams & Manuals
TVS115-56049C 4 Cycle Vertical Engine View Diagrams & Manuals
TVS115-56050B 4 Cycle Vertical Engine View Diagrams & Manuals
TVS115-56050C 4 Cycle Vertical Engine View Diagrams & Manuals
TVS115-56051C 4 Cycle Vertical Engine View Diagrams & Manuals
TVS115-56052C 4 Cycle Vertical Engine View Diagrams & Manuals
TVS115-56057C 4 Cycle Vertical Engine View Diagrams & Manuals
TVS115-56057D 4 Cycle Vertical Engine View Diagrams & Manuals
TVS115-56058C 4 Cycle Vertical Engine View Diagrams & Manuals
TVS115-56059C 4 Cycle Vertical Engine View Diagrams & Manuals
TVS115-56059D 4 Cycle Vertical Engine View Diagrams & Manuals
TVS115-56060C 4 Cycle Vertical Engine View Diagrams & Manuals
TVS115-56061C 4 Cycle Vertical Engine View Diagrams & Manuals
TVS115-56062C 4 Cycle Vertical Engine View Diagrams & Manuals
TVS115-56062D 4 Cycle Vertical Engine View Diagrams & Manuals
TVS115-56063C 4 Cycle Vertical Engine View Diagrams & Manuals
TVS115-56064D 4 Cycle Vertical Engine View Diagrams & Manuals
TVS115-56065D 4 Cycle Vertical Engine View Diagrams & Manuals
TVS115-56066D 4 Cycle Vertical Engine View Diagrams & Manuals
TVS115-56067D 4 Cycle Vertical Engine View Diagrams & Manuals
TVS115-56068D 4 Cycle Vertical Engine View Diagrams & Manuals
TVS115-56069D 4 Cycle Vertical Engine View Diagrams & Manuals
TVS115-56069E 4 Cycle Vertical Engine View Diagrams & Manuals
TVS115-56070D 4 Cycle Vertical Engine View Diagrams & Manuals
TVS115-56070E 4 Cycle Vertical Engine View Diagrams & Manuals
TVS115-56070F 4 Cycle Vertical Engine View Diagrams & Manuals
TVS115-56071D 4 Cycle Vertical Engine View Diagrams & Manuals
TVS115-56071E 4 Cycle Vertical Engine View Diagrams & Manuals
TVS115-56072D 4 Cycle Vertical Engine View Diagrams & Manuals
TVS115-56073D 4 Cycle Vertical Engine View Diagrams & Manuals
TVS115-56073E 4 Cycle Vertical Engine View Diagrams & Manuals
TVS115-56074D 4 Cycle Vertical Engine View Diagrams & Manuals
TVS115-56074E 4 Cycle Vertical Engine View Diagrams & Manuals
TVS115-56076D 4 Cycle Vertical Engine View Diagrams & Manuals
TVS115-56077D 4 Cycle Vertical Engine View Diagrams & Manuals
TVS115-56077E 4 Cycle Vertical Engine View Diagrams & Manuals
TVS115-56078D 4 Cycle Vertical Engine View Diagrams & Manuals
TVS115-56079D 4 Cycle Vertical Engine View Diagrams & Manuals
TVS115-56080D 4 Cycle Vertical Engine View Diagrams & Manuals
TVS115-56080E 4 Cycle Vertical Engine View Diagrams & Manuals
TVS115-56081D 4 Cycle Vertical Engine View Diagrams & Manuals
TVS115-56081E 4 Cycle Vertical Engine View Diagrams & Manuals
TVS115-56082D 4 Cycle Vertical Engine View Diagrams & Manuals
TVS115-56083D 4 Cycle Vertical Engine View Diagrams & Manuals
TVS115-56084D 4 Cycle Vertical Engine View Diagrams & Manuals
TVS115-56085E 4 Cycle Vertical Engine View Diagrams & Manuals
TVS115-56086E 4 Cycle Vertical Engine View Diagrams & Manuals
TVS115-56087E 4 Cycle Vertical Engine View Diagrams & Manuals
TVS115-56089E 4 Cycle Vertical Engine View Diagrams & Manuals
TVS115-56090E 4 Cycle Vertical Engine View Diagrams & Manuals
TVS115-56091E 4 Cycle Vertical Engine View Diagrams & Manuals
TVS115-56091F 4 Cycle Vertical Engine View Diagrams & Manuals
TVS115-56091G 4 Cycle Vertical Engine View Diagrams & Manuals
TVS115-56092E 4 Cycle Vertical Engine View Diagrams & Manuals
TVS115-56093E 4 Cycle Vertical Engine View Diagrams & Manuals
TVS115-56094E 4 Cycle Vertical Engine View Diagrams & Manuals
TVS115-56095E 4 Cycle Vertical Engine View Diagrams & Manuals
TVS115-56096E 4 Cycle Vertical Engine View Diagrams & Manuals
TVS115-56097E 4 Cycle Vertical Engine View Diagrams & Manuals
TVS115-56098E 4 Cycle Vertical Engine View Diagrams & Manuals
TVS115-56099E 4 Cycle Vertical Engine View Diagrams & Manuals
TVS115-56099F 4 Cycle Vertical Engine View Diagrams & Manuals
TVS115-56100E 4 Cycle Vertical Engine View Diagrams & Manuals
TVS115-56101E 4 Cycle Vertical Engine View Diagrams & Manuals
TVS115-56102E 4 Cycle Vertical Engine View Diagrams & Manuals
TVS115-56103E 4 Cycle Vertical Engine View Diagrams & Manuals
TVS115-56104E 4 Cycle Vertical Engine View Diagrams & Manuals
TVS115-56107G 4 Cycle Vertical Engine View Diagrams & Manuals
TVS115-56602A 4 Cycle Vertical Engine View Diagrams & Manuals
TVS115-56603A 4 Cycle Vertical Engine View Diagrams & Manuals
TVS115-56604A 4 Cycle Vertical Engine View Diagrams & Manuals
TVS115-56604B 4 Cycle Vertical Engine View Diagrams & Manuals
TVS115-56605B 4 Cycle Vertical Engine View Diagrams & Manuals
TVS115-56606B 4 Cycle Vertical Engine View Diagrams & Manuals
TVS115-56607B 4 Cycle Vertical Engine View Diagrams & Manuals
TVS115-56607C 4 Cycle Vertical Engine View Diagrams & Manuals
TVS115-56607D 4 Cycle Vertical Engine View Diagrams & Manuals
TVS115-56608B 4 Cycle Vertical Engine View Diagrams & Manuals
TVS115-56609C 4 Cycle Vertical Engine View Diagrams & Manuals
TVS115-56610C 4 Cycle Vertical Engine View Diagrams & Manuals
TVS115-56611C 4 Cycle Vertical Engine View Diagrams & Manuals
TVS115-56801B 4 Cycle Vertical Engine View Diagrams & Manuals
TVS115-56802D 4 Cycle Vertical Engine View Diagrams & Manuals
TVS115-56901A 4 Cycle Vertical Engine View Diagrams & Manuals
TVS115-56901B 4 Cycle Vertical Engine View Diagrams & Manuals
TVS115-56901C 4 Cycle Vertical Engine View Diagrams & Manuals
TVS115-56902A 4 Cycle Vertical Engine View Diagrams & Manuals
TVS115-56902B 4 Cycle Vertical Engine View Diagrams & Manuals
TVS115-56902C 4 Cycle Vertical Engine View Diagrams & Manuals
TVS115-56906A 4 Cycle Vertical Engine View Diagrams & Manuals
TVS115-56911A 4 Cycle Vertical Engine View Diagrams & Manuals
TVS115-56912B 4 Cycle Vertical Engine View Diagrams & Manuals
TVS115-56912C 4 Cycle Vertical Engine View Diagrams & Manuals
TVS115-57001 4 Cycle Vertical Engine View Diagrams & Manuals
TVS115-57002 4 Cycle Vertical Engine View Diagrams & Manuals
TVS115-57002A 4 Cycle Vertical Engine View Diagrams & Manuals
TVS115-57002B 4 Cycle Vertical Engine View Diagrams & Manuals
TVS115-57002C 4 Cycle Vertical Engine View Diagrams & Manuals
TVS115-57003 4 Cycle Vertical Engine View Diagrams & Manuals
TVS115-57003A 4 Cycle Vertical Engine View Diagrams & Manuals
TVS115-57003B 4 Cycle Vertical Engine View Diagrams & Manuals
TVS115-57004 4 Cycle Vertical Engine View Diagrams & Manuals
TVS115-57004A 4 Cycle Vertical Engine View Diagrams & Manuals
TVS115-57004B 4 Cycle Vertical Engine View Diagrams & Manuals
TVS115-57004C 4 Cycle Vertical Engine View Diagrams & Manuals
TVS115-57004D 4 Cycle Vertical Engine View Diagrams & Manuals
TVS115-57005 4 Cycle Vertical Engine View Diagrams & Manuals
TVS115-57006 4 Cycle Vertical Engine View Diagrams & Manuals
TVS115-57006A 4 Cycle Vertical Engine View Diagrams & Manuals
TVS115-57006B 4 Cycle Vertical Engine View Diagrams & Manuals
TVS115-57006C 4 Cycle Vertical Engine View Diagrams & Manuals
TVS115-57007 4 Cycle Vertical Engine View Diagrams & Manuals
TVS115-57007A 4 Cycle Vertical Engine View Diagrams & Manuals
TVS115-57008 4 Cycle Vertical Engine View Diagrams & Manuals
TVS115-57010A 4 Cycle Vertical Engine View Diagrams & Manuals
TVS115-57010B 4 Cycle Vertical Engine View Diagrams & Manuals
TVS115-57011A 4 Cycle Vertical Engine View Diagrams & Manuals
TVS115-57011B 4 Cycle Vertical Engine View Diagrams & Manuals
TVS115-57012A 4 Cycle Vertical Engine View Diagrams & Manuals
TVS115-57013B 4 Cycle Vertical Engine View Diagrams & Manuals
TVS115-57016A 4 Cycle Vertical Engine View Diagrams & Manuals
TVS115-57016B 4 Cycle Vertical Engine View Diagrams & Manuals
TVS115-57016C 4 Cycle Vertical Engine View Diagrams & Manuals
TVS115-57018B 4 Cycle Vertical Engine View Diagrams & Manuals
TVS115-57019A 4 Cycle Vertical Engine View Diagrams & Manuals
TVS115-57020B 4 Cycle Vertical Engine View Diagrams & Manuals
TVS115-57022B 4 Cycle Vertical Engine View Diagrams & Manuals
TVS115-57023B 4 Cycle Vertical Engine View Diagrams & Manuals
TVS115-57023C 4 Cycle Vertical Engine View Diagrams & Manuals
TVS115-57023D 4 Cycle Vertical Engine View Diagrams & Manuals
TVS115-57024B 4 Cycle Vertical Engine View Diagrams & Manuals
TVS115-57025B 4 Cycle Vertical Engine View Diagrams & Manuals
TVS115-57027B 4 Cycle Vertical Engine View Diagrams & Manuals
TVS115-57028B 4 Cycle Vertical Engine View Diagrams & Manuals
TVS115-57028C 4 Cycle Vertical Engine View Diagrams & Manuals
TVS115-57029C 4 Cycle Vertical Engine View Diagrams & Manuals
TVS115-57029D 4 Cycle Vertical Engine View Diagrams & Manuals
TVS115-57029E 4 Cycle Vertical Engine View Diagrams & Manuals
TVS115-57030B 4 Cycle Vertical Engine View Diagrams & Manuals
TVS115-57030C 4 Cycle Vertical Engine View Diagrams & Manuals
TVS115-57030D 4 Cycle Vertical Engine View Diagrams & Manuals
TVS115-57031C 4 Cycle Vertical Engine View Diagrams & Manuals
TVS115-57031D 4 Cycle Vertical Engine View Diagrams & Manuals
TVS115-57032C 4 Cycle Vertical Engine View Diagrams & Manuals
TVS115-57032D 4 Cycle Vertical Engine View Diagrams & Manuals
TVS115-57033C 4 Cycle Vertical Engine View Diagrams & Manuals
TVS115-57037C 4 Cycle Vertical Engine View Diagrams & Manuals
TVS115-57037D 4 Cycle Vertical Engine View Diagrams & Manuals
TVS115-57038C 4 Cycle Vertical Engine View Diagrams & Manuals
TVS115-57038D 4 Cycle Vertical Engine View Diagrams & Manuals
TVS115-57039C 4 Cycle Vertical Engine View Diagrams & Manuals
TVS115-57040D 4 Cycle Vertical Engine View Diagrams & Manuals
TVS115-57042D 4 Cycle Vertical Engine View Diagrams & Manuals
TVS115-57043D 4 Cycle Vertical Engine View Diagrams & Manuals
TVS115-57045D 4 Cycle Vertical Engine View Diagrams & Manuals
TVS115-57046D 4 Cycle Vertical Engine View Diagrams & Manuals
TVS115-57046E 4 Cycle Vertical Engine View Diagrams & Manuals
TVS115-57047D 4 Cycle Vertical Engine View Diagrams & Manuals
TVS115-57047E 4 Cycle Vertical Engine View Diagrams & Manuals
TVS115-57048E 4 Cycle Vertical Engine View Diagrams & Manuals
TVS115-57049E 4 Cycle Vertical Engine View Diagrams & Manuals
TVS115-57050E 4 Cycle Vertical Engine View Diagrams & Manuals
TVS115-57051E 4 Cycle Vertical Engine View Diagrams & Manuals
TVS115-57052E 4 Cycle Vertical Engine View Diagrams & Manuals
TVS115-57053E 4 Cycle Vertical Engine View Diagrams & Manuals
TVS115-57054E 4 Cycle Vertical Engine View Diagrams & Manuals
TVS115-57056F 4 Cycle Vertical Engine View Diagrams & Manuals
TVS115-57056G 4 Cycle Vertical Engine View Diagrams & Manuals
TVS115-57057F 4 Cycle Vertical Engine View Diagrams & Manuals
TVS115-57058F 4 Cycle Vertical Engine View Diagrams & Manuals
TVS115-57058G 4 Cycle Vertical Engine View Diagrams & Manuals
TVS115-57059F 4 Cycle Vertical Engine View Diagrams & Manuals
TVS115-57059G 4 Cycle Vertical Engine View Diagrams & Manuals
TVS115-57060F 4 Cycle Vertical Engine View Diagrams & Manuals
TVS115-57060G 4 Cycle Vertical Engine View Diagrams & Manuals
TVS115-57061F 4 Cycle Vertical Engine View Diagrams & Manuals
TVS115-57061G 4 Cycle Vertical Engine View Diagrams & Manuals
TVS115-57063G 4 Cycle Vertical Engine View Diagrams & Manuals
TVS115-57064G 4 Cycle Vertical Engine View Diagrams & Manuals
TVS115-57065G 4 Cycle Vertical Engine View Diagrams & Manuals
TVS115-57601 4 Cycle Vertical Engine View Diagrams & Manuals
TVS115-57602A 4 Cycle Vertical Engine View Diagrams & Manuals
TVS115-57603B 4 Cycle Vertical Engine View Diagrams & Manuals
TVS115-57603C 4 Cycle Vertical Engine View Diagrams & Manuals
TVS115-57604B 4 Cycle Vertical Engine View Diagrams & Manuals
TVS115-57801A 4 Cycle Vertical Engine View Diagrams & Manuals
TVS115-57801B 4 Cycle Vertical Engine View Diagrams & Manuals
TVS115-57802B 4 Cycle Vertical Engine View Diagrams & Manuals
TVS115-57802C 4 Cycle Vertical Engine View Diagrams & Manuals
TVS115-57803B 4 Cycle Vertical Engine View Diagrams & Manuals
TVS115-57804C 4 Cycle Vertical Engine View Diagrams & Manuals
TVS115-57805C 4 Cycle Vertical Engine View Diagrams & Manuals
TVS115-57806C 4 Cycle Vertical Engine View Diagrams & Manuals
TVS115-57807D 4 Cycle Vertical Engine View Diagrams & Manuals
TVS115-57807E 4 Cycle Vertical Engine View Diagrams & Manuals
TVS115-57808D 4 Cycle Vertical Engine View Diagrams & Manuals
TVS115-57809D 4 Cycle Vertical Engine View Diagrams & Manuals
TVS115-57901A 4 Cycle Vertical Engine View Diagrams & Manuals
TVS115-57901B 4 Cycle Vertical Engine View Diagrams & Manuals
TVS115-57902A 4 Cycle Vertical Engine View Diagrams & Manuals
TVS115-57903A 4 Cycle Vertical Engine View Diagrams & Manuals
TVS115-57903B 4 Cycle Vertical Engine View Diagrams & Manuals
TVS115-57903C 4 Cycle Vertical Engine View Diagrams & Manuals
TVS115-57903D 4 Cycle Vertical Engine View Diagrams & Manuals
TVS115-57903E 4 Cycle Vertical Engine View Diagrams & Manuals
TVS115-57904B 4 Cycle Vertical Engine View Diagrams & Manuals
TVS115-57904C 4 Cycle Vertical Engine View Diagrams & Manuals
TVS115-57905C 4 Cycle Vertical Engine View Diagrams & Manuals
TVS115-57905D 4 Cycle Vertical Engine View Diagrams & Manuals
TVS115-57905E 4 Cycle Vertical Engine View Diagrams & Manuals
TVS115-61001 4 Cycle Vertical Engine View Diagrams & Manuals
TVS115-61002 4 Cycle Vertical Engine View Diagrams & Manuals
TVS115-61002A 4 Cycle Vertical Engine View Diagrams & Manuals
TVS115-61003A 4 Cycle Vertical Engine View Diagrams & Manuals
TVS115-61005A 4 Cycle Vertical Engine View Diagrams & Manuals
TVS115-61006 4 Cycle Vertical Engine View Diagrams & Manuals
TVS115-61006A 4 Cycle Vertical Engine View Diagrams & Manuals
TVS115-61007 4 Cycle Vertical Engine View Diagrams & Manuals
TVS115-61007A 4 Cycle Vertical Engine View Diagrams & Manuals
TVS115-61007B 4 Cycle Vertical Engine View Diagrams & Manuals
TVS115-61007C 4 Cycle Vertical Engine View Diagrams & Manuals
TVS115-61007D 4 Cycle Vertical Engine View Diagrams & Manuals
TVS115-61008 4 Cycle Vertical Engine View Diagrams & Manuals
TVS115-61008A 4 Cycle Vertical Engine View Diagrams & Manuals
TVS115-61008B 4 Cycle Vertical Engine View Diagrams & Manuals
TVS115-61008C 4 Cycle Vertical Engine View Diagrams & Manuals
TVS115-61008D 4 Cycle Vertical Engine View Diagrams & Manuals
TVS115-61009 4 Cycle Vertical Engine View Diagrams & Manuals
TVS115-61010 4 Cycle Vertical Engine View Diagrams & Manuals
TVS115-61011 4 Cycle Vertical Engine View Diagrams & Manuals
TVS115-61011A 4 Cycle Vertical Engine View Diagrams & Manuals
TVS115-61011B 4 Cycle Vertical Engine View Diagrams & Manuals
TVS115-61011C 4 Cycle Vertical Engine View Diagrams & Manuals
TVS115-61012 4 Cycle Vertical Engine View Diagrams & Manuals
TVS115-61012A 4 Cycle Vertical Engine View Diagrams & Manuals
TVS115-61012B 4 Cycle Vertical Engine View Diagrams & Manuals
TVS115-61012C 4 Cycle Vertical Engine View Diagrams & Manuals
TVS115-61012D 4 Cycle Vertical Engine View Diagrams & Manuals
TVS115-61013A 4 Cycle Vertical Engine View Diagrams & Manuals
TVS115-61014 4 Cycle Vertical Engine View Diagrams & Manuals
TVS115-61015 4 Cycle Vertical Engine View Diagrams & Manuals
TVS115-61015A 4 Cycle Vertical Engine View Diagrams & Manuals
TVS115-61015B 4 Cycle Vertical Engine View Diagrams & Manuals
TVS115-61015C 4 Cycle Vertical Engine View Diagrams & Manuals
TVS115-61015D 4 Cycle Vertical Engine View Diagrams & Manuals
TVS115-61016 4 Cycle Vertical Engine View Diagrams & Manuals
TVS115-61016A 4 Cycle Vertical Engine View Diagrams & Manuals
TVS115-61016B 4 Cycle Vertical Engine View Diagrams & Manuals
TVS115-61016C 4 Cycle Vertical Engine View Diagrams & Manuals
TVS115-61016D 4 Cycle Vertical Engine View Diagrams & Manuals
TVS115-61017 4 Cycle Vertical Engine View Diagrams & Manuals
TVS115-61018 4 Cycle Vertical Engine View Diagrams & Manuals
TVS115-61019 4 Cycle Vertical Engine View Diagrams & Manuals
TVS115-61020 4 Cycle Vertical Engine View Diagrams & Manuals
TVS115-61020A 4 Cycle Vertical Engine View Diagrams & Manuals
TVS115-61020B 4 Cycle Vertical Engine View Diagrams & Manuals
TVS115-61020C 4 Cycle Vertical Engine View Diagrams & Manuals
TVS115-61021A 4 Cycle Vertical Engine View Diagrams & Manuals
TVS115-61021B 4 Cycle Vertical Engine View Diagrams & Manuals
TVS115-61021C 4 Cycle Vertical Engine View Diagrams & Manuals
TVS115-61022A 4 Cycle Vertical Engine View Diagrams & Manuals
TVS115-61023A 4 Cycle Vertical Engine View Diagrams & Manuals
TVS115-61024A 4 Cycle Vertical Engine View Diagrams & Manuals
TVS115-61024B 4 Cycle Vertical Engine View Diagrams & Manuals
TVS115-61025B 4 Cycle Vertical Engine View Diagrams & Manuals
TVS115-61026A 4 Cycle Vertical Engine View Diagrams & Manuals
TVS115-61026B 4 Cycle Vertical Engine View Diagrams & Manuals
TVS115-61026C 4 Cycle Vertical Engine View Diagrams & Manuals
TVS115-61026D 4 Cycle Vertical Engine View Diagrams & Manuals
TVS115-61027A 4 Cycle Vertical Engine View Diagrams & Manuals
TVS115-61027B 4 Cycle Vertical Engine View Diagrams & Manuals
TVS115-61027C 4 Cycle Vertical Engine View Diagrams & Manuals
TVS115-61027D 4 Cycle Vertical Engine View Diagrams & Manuals
TVS115-61028B 4 Cycle Vertical Engine View Diagrams & Manuals
TVS115-61028C 4 Cycle Vertical Engine View Diagrams & Manuals
TVS115-61028D 4 Cycle Vertical Engine View Diagrams & Manuals
TVS115-61029B 4 Cycle Vertical Engine View Diagrams & Manuals
TVS115-61030A 4 Cycle Vertical Engine View Diagrams & Manuals
TVS115-61030B 4 Cycle Vertical Engine View Diagrams & Manuals
TVS115-61031B 4 Cycle Vertical Engine View Diagrams & Manuals
TVS115-61031D 4 Cycle Vertical Engine View Diagrams & Manuals
TVS115-61032B 4 Cycle Vertical Engine View Diagrams & Manuals
TVS115-61033B 4 Cycle Vertical Engine View Diagrams & Manuals
TVS115-61035B 4 Cycle Vertical Engine View Diagrams & Manuals
TVS115-61037B 4 Cycle Vertical Engine View Diagrams & Manuals
TVS115-61037C 4 Cycle Vertical Engine View Diagrams & Manuals
TVS115-61037D 4 Cycle Vertical Engine View Diagrams & Manuals
TVS115-61038B 4 Cycle Vertical Engine View Diagrams & Manuals
TVS115-61039B 4 Cycle Vertical Engine View Diagrams & Manuals
TVS115-61040A 4 Cycle Vertical Engine View Diagrams & Manuals
TVS115-61040B 4 Cycle Vertical Engine View Diagrams & Manuals
TVS115-61041B 4 Cycle Vertical Engine View Diagrams & Manuals
TVS115-61042C 4 Cycle Vertical Engine View Diagrams & Manuals
TVS115-61042D 4 Cycle Vertical Engine View Diagrams & Manuals
TVS115-61042E 4 Cycle Vertical Engine View Diagrams & Manuals
TVS115-61043C 4 Cycle Vertical Engine View Diagrams & Manuals
TVS115-61043D 4 Cycle Vertical Engine View Diagrams & Manuals
TVS115-61046C 4 Cycle Vertical Engine View Diagrams & Manuals
TVS115-61046D 4 Cycle Vertical Engine View Diagrams & Manuals
TVS115-61047C 4 Cycle Vertical Engine View Diagrams & Manuals
TVS115-61047D 4 Cycle Vertical Engine View Diagrams & Manuals
TVS115-61048C 4 Cycle Vertical Engine View Diagrams & Manuals
TVS115-61048D 4 Cycle Vertical Engine View Diagrams & Manuals
TVS115-61049C 4 Cycle Vertical Engine View Diagrams & Manuals
TVS115-61050C 4 Cycle Vertical Engine View Diagrams & Manuals
TVS115-61051C 4 Cycle Vertical Engine View Diagrams & Manuals
TVS115-61051D 4 Cycle Vertical Engine View Diagrams & Manuals
TVS115-61052C 4 Cycle Vertical Engine View Diagrams & Manuals
TVS115-61053C 4 Cycle Vertical Engine View Diagrams & Manuals
TVS115-61054C 4 Cycle Vertical Engine View Diagrams & Manuals
TVS115-61055C 4 Cycle Vertical Engine View Diagrams & Manuals
TVS115-61056C 4 Cycle Vertical Engine View Diagrams & Manuals
TVS115-61056D 4 Cycle Vertical Engine View Diagrams & Manuals
TVS115-61057C 4 Cycle Vertical Engine View Diagrams & Manuals
TVS115-61058C 4 Cycle Vertical Engine View Diagrams & Manuals
TVS115-61058D 4 Cycle Vertical Engine View Diagrams & Manuals
TVS115-61059C 4 Cycle Vertical Engine View Diagrams & Manuals
TVS115-61059D 4 Cycle Vertical Engine View Diagrams & Manuals
TVS115-61059E 4 Cycle Vertical Engine View Diagrams & Manuals
TVS115-61059F 4 Cycle Vertical Engine View Diagrams & Manuals
TVS115-61060D 4 Cycle Vertical Engine View Diagrams & Manuals
TVS115-61061D 4 Cycle Vertical Engine View Diagrams & Manuals
TVS115-61062D 4 Cycle Vertical Engine View Diagrams & Manuals
TVS115-61062E 4 Cycle Vertical Engine View Diagrams & Manuals
TVS115-61063D 4 Cycle Vertical Engine View Diagrams & Manuals
TVS115-61064D 4 Cycle Vertical Engine View Diagrams & Manuals
TVS115-61065D 4 Cycle Vertical Engine View Diagrams & Manuals
TVS115-61066D 4 Cycle Vertical Engine View Diagrams & Manuals
TVS115-61067D 4 Cycle Vertical Engine View Diagrams & Manuals
TVS115-61067E 4 Cycle Vertical Engine View Diagrams & Manuals
TVS115-61070D 4 Cycle Vertical Engine View Diagrams & Manuals
TVS115-61070E 4 Cycle Vertical Engine View Diagrams & Manuals
TVS115-61070F 4 Cycle Vertical Engine View Diagrams & Manuals
TVS115-61071D 4 Cycle Vertical Engine View Diagrams & Manuals
TVS115-61072D 4 Cycle Vertical Engine View Diagrams & Manuals
TVS115-61073D 4 Cycle Vertical Engine View Diagrams & Manuals
TVS115-61074D 4 Cycle Vertical Engine View Diagrams & Manuals
TVS115-61076D 4 Cycle Vertical Engine View Diagrams & Manuals
TVS115-61077D 4 Cycle Vertical Engine View Diagrams & Manuals
TVS115-61077E 4 Cycle Vertical Engine View Diagrams & Manuals
TVS115-61079D 4 Cycle Vertical Engine View Diagrams & Manuals
TVS115-61079E 4 Cycle Vertical Engine View Diagrams & Manuals
TVS115-61080D 4 Cycle Vertical Engine View Diagrams & Manuals
TVS115-61081D 4 Cycle Vertical Engine View Diagrams & Manuals
TVS115-61082D 4 Cycle Vertical Engine View Diagrams & Manuals
TVS115-61083E 4 Cycle Vertical Engine View Diagrams & Manuals
TVS115-61085E 4 Cycle Vertical Engine View Diagrams & Manuals
TVS115-61086E 4 Cycle Vertical Engine View Diagrams & Manuals
TVS115-61086F 4 Cycle Vertical Engine View Diagrams & Manuals
TVS115-61087E 4 Cycle Vertical Engine View Diagrams & Manuals
TVS115-61087F 4 Cycle Vertical Engine View Diagrams & Manuals
TVS115-61088E 4 Cycle Vertical Engine View Diagrams & Manuals
TVS115-61088F 4 Cycle Vertical Engine View Diagrams & Manuals
TVS115-61089E 4 Cycle Vertical Engine View Diagrams & Manuals
TVS115-61089F 4 Cycle Vertical Engine View Diagrams & Manuals
TVS115-61090E 4 Cycle Vertical Engine View Diagrams & Manuals
TVS115-61090F 4 Cycle Vertical Engine View Diagrams & Manuals
TVS115-61091F 4 Cycle Vertical Engine View Diagrams & Manuals
TVS115-61092F 4 Cycle Vertical Engine View Diagrams & Manuals
TVS115-61093F 4 Cycle Vertical Engine View Diagrams & Manuals
TVS115-61094F 4 Cycle Vertical Engine View Diagrams & Manuals
TVS115-61096F 4 Cycle Vertical Engine View Diagrams & Manuals
TVS115-61097F 4 Cycle Vertical Engine View Diagrams & Manuals
TVS115-61098F 4 Cycle Vertical Engine View Diagrams & Manuals
TVS115-61601 4 Cycle Vertical Engine View Diagrams & Manuals
TVS115-61601A 4 Cycle Vertical Engine View Diagrams & Manuals
TVS115-61601B 4 Cycle Vertical Engine View Diagrams & Manuals
TVS115-61602 4 Cycle Vertical Engine View Diagrams & Manuals
TVS115-61602A 4 Cycle Vertical Engine View Diagrams & Manuals
TVS115-61603 4 Cycle Vertical Engine View Diagrams & Manuals
TVS115-61603A 4 Cycle Vertical Engine View Diagrams & Manuals
TVS115-61603B 4 Cycle Vertical Engine View Diagrams & Manuals
TVS115-61604 4 Cycle Vertical Engine View Diagrams & Manuals
TVS115-61604A 4 Cycle Vertical Engine View Diagrams & Manuals
TVS115-61605 4 Cycle Vertical Engine View Diagrams & Manuals
TVS115-61606 4 Cycle Vertical Engine View Diagrams & Manuals
TVS115-61606A 4 Cycle Vertical Engine View Diagrams & Manuals
TVS115-61606B 4 Cycle Vertical Engine View Diagrams & Manuals
TVS115-61607 4 Cycle Vertical Engine View Diagrams & Manuals
TVS115-61608 4 Cycle Vertical Engine View Diagrams & Manuals
TVS115-61609 4 Cycle Vertical Engine View Diagrams & Manuals
TVS115-61610 4 Cycle Vertical Engine View Diagrams & Manuals
TVS115-61610B 4 Cycle Vertical Engine View Diagrams & Manuals
TVS115-61613 4 Cycle Vertical Engine View Diagrams & Manuals
TVS115-61613B 4 Cycle Vertical Engine View Diagrams & Manuals
TVS115-61614A 4 Cycle Vertical Engine View Diagrams & Manuals
TVS115-61616A 4 Cycle Vertical Engine View Diagrams & Manuals
TVS115-61617A 4 Cycle Vertical Engine View Diagrams & Manuals
TVS115-61618A 4 Cycle Vertical Engine View Diagrams & Manuals
TVS115-61619A 4 Cycle Vertical Engine View Diagrams & Manuals
TVS115-61620B 4 Cycle Vertical Engine View Diagrams & Manuals
TVS115-61621B 4 Cycle Vertical Engine View Diagrams & Manuals
TVS115-61621C 4 Cycle Vertical Engine View Diagrams & Manuals
TVS115-61622B 4 Cycle Vertical Engine View Diagrams & Manuals
TVS115-61622C 4 Cycle Vertical Engine View Diagrams & Manuals
TVS115-61801 4 Cycle Vertical Engine View Diagrams & Manuals
TVS115-61801A 4 Cycle Vertical Engine View Diagrams & Manuals
TVS115-61802A 4 Cycle Vertical Engine View Diagrams & Manuals
TVS115-61802B 4 Cycle Vertical Engine View Diagrams & Manuals
TVS115-61803A 4 Cycle Vertical Engine View Diagrams & Manuals
TVS115-61803B 4 Cycle Vertical Engine View Diagrams & Manuals
TVS115-61803C 4 Cycle Vertical Engine View Diagrams & Manuals
TVS115-61803D 4 Cycle Vertical Engine View Diagrams & Manuals
TVS115-61803E 4 Cycle Vertical Engine View Diagrams & Manuals
TVS115-61803F 4 Cycle Vertical Engine View Diagrams & Manuals
TVS115-61804A 4 Cycle Vertical Engine View Diagrams & Manuals
TVS115-61804B 4 Cycle Vertical Engine View Diagrams & Manuals
TVS115-61804C 4 Cycle Vertical Engine View Diagrams & Manuals
TVS115-61805A 4 Cycle Vertical Engine View Diagrams & Manuals
TVS115-61805B 4 Cycle Vertical Engine View Diagrams & Manuals
TVS115-61806B 4 Cycle Vertical Engine View Diagrams & Manuals
TVS115-61807B 4 Cycle Vertical Engine View Diagrams & Manuals
TVS115-61807C 4 Cycle Vertical Engine View Diagrams & Manuals
TVS115-61807D 4 Cycle Vertical Engine View Diagrams & Manuals
TVS115-61808B 4 Cycle Vertical Engine View Diagrams & Manuals
TVS115-61811B 4 Cycle Vertical Engine View Diagrams & Manuals
TVS115-61814B 4 Cycle Vertical Engine View Diagrams & Manuals
TVS115-61815C 4 Cycle Vertical Engine View Diagrams & Manuals
TVS115-61816C 4 Cycle Vertical Engine View Diagrams & Manuals
TVS115-61817D 4 Cycle Vertical Engine View Diagrams & Manuals
TVS115-61901 4 Cycle Vertical Engine View Diagrams & Manuals
TVS115-61901A 4 Cycle Vertical Engine View Diagrams & Manuals
TVS115-61902 4 Cycle Vertical Engine View Diagrams & Manuals
TVS115-61903 4 Cycle Vertical Engine View Diagrams & Manuals
TVS115-61904 4 Cycle Vertical Engine View Diagrams & Manuals
TVS115-61904A 4 Cycle Vertical Engine View Diagrams & Manuals
TVS115-61906 4 Cycle Vertical Engine View Diagrams & Manuals
TVS115-61906A 4 Cycle Vertical Engine View Diagrams & Manuals
TVS115-61906B 4 Cycle Vertical Engine View Diagrams & Manuals
TVS115-61907B 4 Cycle Vertical Engine View Diagrams & Manuals
TVS115-61908C 4 Cycle Vertical Engine View Diagrams & Manuals
TVS115-62101A 4 Cycle Vertical Engine View Diagrams & Manuals
TVS115-62102A 4 Cycle Vertical Engine View Diagrams & Manuals
TVS115-62103A 4 Cycle Vertical Engine View Diagrams & Manuals
TVS115-62103B 4 Cycle Vertical Engine View Diagrams & Manuals
TVS115-62104A 4 Cycle Vertical Engine View Diagrams & Manuals
TVS115-62105A 4 Cycle Vertical Engine View Diagrams & Manuals
TVS115-62106B 4 Cycle Vertical Engine View Diagrams & Manuals
TVS115-62107B 4 Cycle Vertical Engine View Diagrams & Manuals
TVS115-62108B 4 Cycle Vertical Engine View Diagrams & Manuals
TVS115-62109B 4 Cycle Vertical Engine View Diagrams & Manuals
TVS115-62110B 4 Cycle Vertical Engine View Diagrams & Manuals
TVS115-62111B 4 Cycle Vertical Engine View Diagrams & Manuals
TVS115-62112B 4 Cycle Vertical Engine View Diagrams & Manuals
TVS115-62113B 4 Cycle Vertical Engine View Diagrams & Manuals
TVS115-62114B 4 Cycle Vertical Engine View Diagrams & Manuals
TVS115-62115C 4 Cycle Vertical Engine View Diagrams & Manuals
TVS115-62115D 4 Cycle Vertical Engine View Diagrams & Manuals
TVS115-62116C 4 Cycle Vertical Engine View Diagrams & Manuals
TVS115-62117C 4 Cycle Vertical Engine View Diagrams & Manuals
TVS115-62118C 4 Cycle Vertical Engine View Diagrams & Manuals
TVS115-62119C 4 Cycle Vertical Engine View Diagrams & Manuals
TVS115-62120C 4 Cycle Vertical Engine View Diagrams & Manuals
TVS115-62120D 4 Cycle Vertical Engine View Diagrams & Manuals
TVS115-62122D 4 Cycle Vertical Engine View Diagrams & Manuals
TVS115-62124D 4 Cycle Vertical Engine View Diagrams & Manuals
TVS115-62901A 4 Cycle Vertical Engine View Diagrams & Manuals
TVS115-62902A 4 Cycle Vertical Engine View Diagrams & Manuals
TVS120-63000 4 Cycle Vertical Engine View Diagrams & Manuals
TVS120-63000A 4 Cycle Vertical Engine View Diagrams & Manuals
TVS120-63000B 4 Cycle Vertical Engine View Diagrams & Manuals
TVS120-63000C 4 Cycle Vertical Engine View Diagrams & Manuals
TVS120-63000D 4 Cycle Vertical Engine View Diagrams & Manuals
TVS120-63001A 4 Cycle Vertical Engine View Diagrams & Manuals
TVS120-63001B 4 Cycle Vertical Engine View Diagrams & Manuals
TVS120-63001C 4 Cycle Vertical Engine View Diagrams & Manuals
TVS120-63001D 4 Cycle Vertical Engine View Diagrams & Manuals
TVS120-63002A 4 Cycle Vertical Engine View Diagrams & Manuals
TVS120-63003A 4 Cycle Vertical Engine View Diagrams & Manuals
TVS120-63003B 4 Cycle Vertical Engine View Diagrams & Manuals
TVS120-63004A 4 Cycle Vertical Engine View Diagrams & Manuals
TVS120-63004B 4 Cycle Vertical Engine View Diagrams & Manuals
TVS120-63005A 4 Cycle Vertical Engine View Diagrams & Manuals
TVS120-63006A 4 Cycle Vertical Engine View Diagrams & Manuals
TVS120-63007A 4 Cycle Vertical Engine View Diagrams & Manuals
TVS120-63008A 4 Cycle Vertical Engine View Diagrams & Manuals
TVS120-63009A 4 Cycle Vertical Engine View Diagrams & Manuals
TVS120-63010A 4 Cycle Vertical Engine View Diagrams & Manuals
TVS120-63010B 4 Cycle Vertical Engine View Diagrams & Manuals
TVS120-63010C 4 Cycle Vertical Engine View Diagrams & Manuals
TVS120-63010D 4 Cycle Vertical Engine View Diagrams & Manuals
TVS120-63011A 4 Cycle Vertical Engine View Diagrams & Manuals
TVS120-63012A 4 Cycle Vertical Engine View Diagrams & Manuals
TVS120-63012B 4 Cycle Vertical Engine View Diagrams & Manuals
TVS120-63012C 4 Cycle Vertical Engine View Diagrams & Manuals
TVS120-63012D 4 Cycle Vertical Engine View Diagrams & Manuals
TVS120-63013A 4 Cycle Vertical Engine View Diagrams & Manuals
TVS120-63013D 4 Cycle Vertical Engine View Diagrams & Manuals
TVS120-63013F 4 Cycle Vertical Engine View Diagrams & Manuals
TVS120-63014A 4 Cycle Vertical Engine View Diagrams & Manuals
TVS120-63015A 4 Cycle Vertical Engine View Diagrams & Manuals
TVS120-63016A 4 Cycle Vertical Engine View Diagrams & Manuals
TVS120-63017A 4 Cycle Vertical Engine View Diagrams & Manuals
TVS120-63018A 4 Cycle Vertical Engine View Diagrams & Manuals
TVS120-63019A 4 Cycle Vertical Engine View Diagrams & Manuals
TVS120-63019B 4 Cycle Vertical Engine View Diagrams & Manuals
TVS120-63019C 4 Cycle Vertical Engine View Diagrams & Manuals
TVS120-63019D 4 Cycle Vertical Engine View Diagrams & Manuals
TVS120-63020A 4 Cycle Vertical Engine View Diagrams & Manuals
TVS120-63020C 4 Cycle Vertical Engine View Diagrams & Manuals
TVS120-63020D 4 Cycle Vertical Engine View Diagrams & Manuals
TVS120-63021B 4 Cycle Vertical Engine View Diagrams & Manuals
TVS120-63022B 4 Cycle Vertical Engine View Diagrams & Manuals
TVS120-63022C 4 Cycle Vertical Engine View Diagrams & Manuals
TVS120-63023B 4 Cycle Vertical Engine View Diagrams & Manuals
TVS120-63024B 4 Cycle Vertical Engine View Diagrams & Manuals
TVS120-63025C 4 Cycle Vertical Engine View Diagrams & Manuals
TVS120-63026C 4 Cycle Vertical Engine View Diagrams & Manuals
TVS120-63027C 4 Cycle Vertical Engine View Diagrams & Manuals
TVS120-63028C 4 Cycle Vertical Engine View Diagrams & Manuals
TVS120-63029D 4 Cycle Vertical Engine View Diagrams & Manuals
TVS120-63030D 4 Cycle Vertical Engine View Diagrams & Manuals
TVS120-63031D 4 Cycle Vertical Engine View Diagrams & Manuals
TVS120-63032D 4 Cycle Vertical Engine View Diagrams & Manuals
TVS120-63033D 4 Cycle Vertical Engine View Diagrams & Manuals
TVS120-63034D 4 Cycle Vertical Engine View Diagrams & Manuals
TVS120-63034E 4 Cycle Vertical Engine View Diagrams & Manuals
TVS120-63034F 4 Cycle Vertical Engine View Diagrams & Manuals
TVS120-63035D 4 Cycle Vertical Engine View Diagrams & Manuals
TVS120-63035E 4 Cycle Vertical Engine View Diagrams & Manuals
TVS120-63035F 4 Cycle Vertical Engine View Diagrams & Manuals
TVS120-63035G 4 Cycle Vertical Engine View Diagrams & Manuals
TVS120-63035H 4 Cycle Vertical Engine View Diagrams & Manuals
TVS120-63036D 4 Cycle Vertical Engine View Diagrams & Manuals
TVS120-63036F 4 Cycle Vertical Engine View Diagrams & Manuals
TVS120-63037D 4 Cycle Vertical Engine View Diagrams & Manuals
TVS120-63037E 4 Cycle Vertical Engine View Diagrams & Manuals
TVS120-63037F 4 Cycle Vertical Engine View Diagrams & Manuals
TVS120-63037G 4 Cycle Vertical Engine View Diagrams & Manuals
TVS120-63038D 4 Cycle Vertical Engine View Diagrams & Manuals
TVS120-63038F 4 Cycle Vertical Engine View Diagrams & Manuals
TVS120-63039D 4 Cycle Vertical Engine View Diagrams & Manuals
TVS120-63040D 4 Cycle Vertical Engine View Diagrams & Manuals
TVS120-63041D 4 Cycle Vertical Engine View Diagrams & Manuals
TVS120-63042D 4 Cycle Vertical Engine View Diagrams & Manuals
TVS120-63043D 4 Cycle Vertical Engine View Diagrams & Manuals
TVS120-63043E 4 Cycle Vertical Engine View Diagrams & Manuals
TVS120-63043F 4 Cycle Vertical Engine View Diagrams & Manuals
TVS120-63043G 4 Cycle Vertical Engine View Diagrams & Manuals
TVS120-63043H 4 Cycle Vertical Engine View Diagrams & Manuals
TVS120-63044D 4 Cycle Vertical Engine View Diagrams & Manuals
TVS120-63044E 4 Cycle Vertical Engine View Diagrams & Manuals
TVS120-63044F 4 Cycle Vertical Engine View Diagrams & Manuals
TVS120-63044H 4 Cycle Vertical Engine View Diagrams & Manuals
TVS120-63045D 4 Cycle Vertical Engine View Diagrams & Manuals
TVS120-63045E 4 Cycle Vertical Engine View Diagrams & Manuals
TVS120-63045F 4 Cycle Vertical Engine View Diagrams & Manuals
TVS120-63045G 4 Cycle Vertical Engine View Diagrams & Manuals
TVS120-63045H 4 Cycle Vertical Engine View Diagrams & Manuals
TVS120-63046D 4 Cycle Vertical Engine View Diagrams & Manuals
TVS120-63047D 4 Cycle Vertical Engine View Diagrams & Manuals
TVS120-63047E 4 Cycle Vertical Engine View Diagrams & Manuals
TVS120-63047F 4 Cycle Vertical Engine View Diagrams & Manuals
TVS120-63047H 4 Cycle Vertical Engine View Diagrams & Manuals
TVS120-63048D 4 Cycle Vertical Engine View Diagrams & Manuals
TVS120-63049D 4 Cycle Vertical Engine View Diagrams & Manuals
TVS120-63050D 4 Cycle Vertical Engine View Diagrams & Manuals
TVS120-63051D 4 Cycle Vertical Engine View Diagrams & Manuals
TVS120-63052D 4 Cycle Vertical Engine View Diagrams & Manuals
TVS120-63053D 4 Cycle Vertical Engine View Diagrams & Manuals
TVS120-63054D 4 Cycle Vertical Engine View Diagrams & Manuals
TVS120-63055D 4 Cycle Vertical Engine View Diagrams & Manuals
TVS120-63056D 4 Cycle Vertical Engine View Diagrams & Manuals
TVS120-63057D 4 Cycle Vertical Engine View Diagrams & Manuals
TVS120-63058D 4 Cycle Vertical Engine View Diagrams & Manuals
TVS120-63058E 4 Cycle Vertical Engine View Diagrams & Manuals
TVS120-63058F 4 Cycle Vertical Engine View Diagrams & Manuals
TVS120-63058H 4 Cycle Vertical Engine View Diagrams & Manuals
TVS120-63059D 4 Cycle Vertical Engine View Diagrams & Manuals
TVS120-63060D 4 Cycle Vertical Engine View Diagrams & Manuals
TVS120-63061D 4 Cycle Vertical Engine View Diagrams & Manuals
TVS120-63062D 4 Cycle Vertical Engine View Diagrams & Manuals
TVS120-63062E 4 Cycle Vertical Engine View Diagrams & Manuals
TVS120-63062F 4 Cycle Vertical Engine View Diagrams & Manuals
TVS120-63063D 4 Cycle Vertical Engine View Diagrams & Manuals
TVS120-63063E 4 Cycle Vertical Engine View Diagrams & Manuals
TVS120-63063F 4 Cycle Vertical Engine View Diagrams & Manuals
TVS120-63064D 4 Cycle Vertical Engine View Diagrams & Manuals
TVS120-63064E 4 Cycle Vertical Engine View Diagrams & Manuals
TVS120-63064F 4 Cycle Vertical Engine View Diagrams & Manuals
TVS120-63065D 4 Cycle Vertical Engine View Diagrams & Manuals
TVS120-63065E 4 Cycle Vertical Engine View Diagrams & Manuals
TVS120-63066D 4 Cycle Vertical Engine View Diagrams & Manuals
TVS120-63067D 4 Cycle Vertical Engine View Diagrams & Manuals
TVS120-63067E 4 Cycle Vertical Engine View Diagrams & Manuals
TVS120-63068D 4 Cycle Vertical Engine View Diagrams & Manuals
TVS120-63069D 4 Cycle Vertical Engine View Diagrams & Manuals
TVS120-63070D 4 Cycle Vertical Engine View Diagrams & Manuals
TVS120-63071E 4 Cycle Vertical Engine View Diagrams & Manuals
TVS120-63071F 4 Cycle Vertical Engine View Diagrams & Manuals
TVS120-63071H 4 Cycle Vertical Engine View Diagrams & Manuals
TVS120-63072E 4 Cycle Vertical Engine View Diagrams & Manuals
TVS120-63073E 4 Cycle Vertical Engine View Diagrams & Manuals
TVS120-63074E 4 Cycle Vertical Engine View Diagrams & Manuals
TVS120-63075E 4 Cycle Vertical Engine View Diagrams & Manuals
TVS120-63075F 4 Cycle Vertical Engine View Diagrams & Manuals
TVS120-63076E 4 Cycle Vertical Engine View Diagrams & Manuals
TVS120-63076F 4 Cycle Vertical Engine View Diagrams & Manuals
TVS120-63077E 4 Cycle Vertical Engine View Diagrams & Manuals
TVS120-63078E 4 Cycle Vertical Engine View Diagrams & Manuals
TVS120-63079E 4 Cycle Vertical Engine View Diagrams & Manuals
TVS120-63080E 4 Cycle Vertical Engine View Diagrams & Manuals
TVS120-63080F 4 Cycle Vertical Engine View Diagrams & Manuals
TVS120-63080G 4 Cycle Vertical Engine View Diagrams & Manuals
TVS120-63080H 4 Cycle Vertical Engine View Diagrams & Manuals
TVS120-63080J 4 Cycle Vertical Engine View Diagrams & Manuals
TVS120-63080K 4 Cycle Vertical Engine View Diagrams & Manuals
TVS120-63080L 4 Cycle Vertical Engine View Diagrams & Manuals
TVS120-63081E 4 Cycle Vertical Engine View Diagrams & Manuals
TVS120-63081F 4 Cycle Vertical Engine View Diagrams & Manuals
TVS120-63081G 4 Cycle Vertical Engine View Diagrams & Manuals
TVS120-63082E 4 Cycle Vertical Engine View Diagrams & Manuals
TVS120-63082F 4 Cycle Vertical Engine View Diagrams & Manuals
TVS120-63083E 4 Cycle Vertical Engine View Diagrams & Manuals
TVS120-63083F 4 Cycle Vertical Engine View Diagrams & Manuals
TVS120-63083G 4 Cycle Vertical Engine View Diagrams & Manuals
TVS120-63084F 4 Cycle Vertical Engine View Diagrams & Manuals
TVS120-63086F 4 Cycle Vertical Engine View Diagrams & Manuals
TVS120-63087F 4 Cycle Vertical Engine View Diagrams & Manuals
TVS120-63088F 4 Cycle Vertical Engine View Diagrams & Manuals
TVS120-63089F 4 Cycle Vertical Engine View Diagrams & Manuals
TVS120-63090F 4 Cycle Vertical Engine View Diagrams & Manuals
TVS120-63090G 4 Cycle Vertical Engine View Diagrams & Manuals
TVS120-63090H 4 Cycle Vertical Engine View Diagrams & Manuals
TVS120-63090J 4 Cycle Vertical Engine View Diagrams & Manuals
TVS120-63090K 4 Cycle Vertical Engine View Diagrams & Manuals
TVS120-63090L 4 Cycle Vertical Engine View Diagrams & Manuals
TVS120-63091F 4 Cycle Vertical Engine View Diagrams & Manuals
TVS120-63092F 4 Cycle Vertical Engine View Diagrams & Manuals
TVS120-63093F 4 Cycle Vertical Engine View Diagrams & Manuals
TVS120-63094F 4 Cycle Vertical Engine View Diagrams & Manuals
TVS120-63096F 4 Cycle Vertical Engine View Diagrams & Manuals
TVS120-63097F 4 Cycle Vertical Engine View Diagrams & Manuals
TVS120-63098F 4 Cycle Vertical Engine View Diagrams & Manuals
TVS120-63099F 4 Cycle Vertical Engine View Diagrams & Manuals
TVS120-63101F 4 Cycle Vertical Engine View Diagrams & Manuals
TVS120-63102F 4 Cycle Vertical Engine View Diagrams & Manuals
TVS120-63102G 4 Cycle Vertical Engine View Diagrams & Manuals
TVS120-63102H 4 Cycle Vertical Engine View Diagrams & Manuals
TVS120-63103F 4 Cycle Vertical Engine View Diagrams & Manuals
TVS120-63103G 4 Cycle Vertical Engine View Diagrams & Manuals
TVS120-63105F 4 Cycle Vertical Engine View Diagrams & Manuals
TVS120-63107F 4 Cycle Vertical Engine View Diagrams & Manuals
TVS120-63108F 4 Cycle Vertical Engine View Diagrams & Manuals
TVS120-63108G 4 Cycle Vertical Engine View Diagrams & Manuals
TVS120-63110F 4 Cycle Vertical Engine View Diagrams & Manuals
TVS120-63111F 4 Cycle Vertical Engine View Diagrams & Manuals
TVS120-63111G 4 Cycle Vertical Engine View Diagrams & Manuals
TVS120-63112F 4 Cycle Vertical Engine View Diagrams & Manuals
TVS120-63112G 4 Cycle Vertical Engine View Diagrams & Manuals
TVS120-63114F 4 Cycle Vertical Engine View Diagrams & Manuals
TVS120-63115F 4 Cycle Vertical Engine View Diagrams & Manuals
TVS120-63115G 4 Cycle Vertical Engine View Diagrams & Manuals
TVS120-63117F 4 Cycle Vertical Engine View Diagrams & Manuals
TVS120-63120F 4 Cycle Vertical Engine View Diagrams & Manuals
TVS120-63120G 4 Cycle Vertical Engine View Diagrams & Manuals
TVS120-63122G 4 Cycle Vertical Engine View Diagrams & Manuals
TVS120-63123G 4 Cycle Vertical Engine View Diagrams & Manuals
TVS120-63123H 4 Cycle Vertical Engine View Diagrams & Manuals
TVS120-63124G 4 Cycle Vertical Engine View Diagrams & Manuals
TVS120-63127G 4 Cycle Vertical Engine View Diagrams & Manuals
TVS120-63129H 4 Cycle Vertical Engine View Diagrams & Manuals
TVS120-63130H 4 Cycle Vertical Engine View Diagrams & Manuals
TVS120-63131H 4 Cycle Vertical Engine View Diagrams & Manuals
TVS120-63133H 4 Cycle Vertical Engine View Diagrams & Manuals
TVS120-63133J 4 Cycle Vertical Engine View Diagrams & Manuals
TVS120-63133K 4 Cycle Vertical Engine View Diagrams & Manuals
TVS120-63133L 4 Cycle Vertical Engine View Diagrams & Manuals
TVS120-63134H 4 Cycle Vertical Engine View Diagrams & Manuals
TVS120-63135H 4 Cycle Vertical Engine View Diagrams & Manuals
TVS120-63136H 4 Cycle Vertical Engine View Diagrams & Manuals
TVS120-63137H 4 Cycle Vertical Engine View Diagrams & Manuals
TVS120-63138H 4 Cycle Vertical Engine View Diagrams & Manuals
TVS120-63139H 4 Cycle Vertical Engine View Diagrams & Manuals
TVS120-63140H 4 Cycle Vertical Engine View Diagrams & Manuals
TVS120-63140J 4 Cycle Vertical Engine View Diagrams & Manuals
TVS120-63141H 4 Cycle Vertical Engine View Diagrams & Manuals
TVS120-63141J 4 Cycle Vertical Engine View Diagrams & Manuals
TVS120-63142H 4 Cycle Vertical Engine View Diagrams & Manuals
TVS120-63143L 4 Cycle Vertical Engine View Diagrams & Manuals
TVS120-63144L 4 Cycle Vertical Engine View Diagrams & Manuals
TVS120-63145L 4 Cycle Vertical Engine View Diagrams & Manuals
TVS120-63146M 4 Cycle Vertical Engine View Diagrams & Manuals
TVS120-63146N 4 Cycle Vertical Engine View Diagrams & Manuals
TVS120-63200 4 Cycle Vertical Engine View Diagrams & Manuals
TVS120-63200A 4 Cycle Vertical Engine View Diagrams & Manuals
TVS120-63201 4 Cycle Vertical Engine View Diagrams & Manuals
TVS120-63202 4 Cycle Vertical Engine View Diagrams & Manuals
TVS120-63203 4 Cycle Vertical Engine View Diagrams & Manuals
TVS120-63203A 4 Cycle Vertical Engine View Diagrams & Manuals
TVS120-63204 4 Cycle Vertical Engine View Diagrams & Manuals
TVS120-63205 4 Cycle Vertical Engine View Diagrams & Manuals
TVS120-63206 4 Cycle Vertical Engine View Diagrams & Manuals
TVS120-63207 4 Cycle Vertical Engine View Diagrams & Manuals
TVS120-63207A 4 Cycle Vertical Engine View Diagrams & Manuals
TVS120-63208 4 Cycle Vertical Engine View Diagrams & Manuals
TVS120-63209A 4 Cycle Vertical Engine View Diagrams & Manuals
TVS120-63210A 4 Cycle Vertical Engine View Diagrams & Manuals
TVS120-63211A 4 Cycle Vertical Engine View Diagrams & Manuals
TVS120-63212A 4 Cycle Vertical Engine View Diagrams & Manuals
TVS120-63601E 4 Cycle Vertical Engine View Diagrams & Manuals
TVS120-63601F 4 Cycle Vertical Engine View Diagrams & Manuals
TVS120-63602E 4 Cycle Vertical Engine View Diagrams & Manuals
TVS120-63602F 4 Cycle Vertical Engine View Diagrams & Manuals
TVS120-63603E 4 Cycle Vertical Engine View Diagrams & Manuals
TVS120-63603F 4 Cycle Vertical Engine View Diagrams & Manuals
TVS120-63604E 4 Cycle Vertical Engine View Diagrams & Manuals
TVS120-63604F 4 Cycle Vertical Engine View Diagrams & Manuals
TVS120-63605F 4 Cycle Vertical Engine View Diagrams & Manuals
TVS120-63606F 4 Cycle Vertical Engine View Diagrams & Manuals
TVS120-63606G 4 Cycle Vertical Engine View Diagrams & Manuals
TVS120-63607F 4 Cycle Vertical Engine View Diagrams & Manuals
TVS120-63607G 4 Cycle Vertical Engine View Diagrams & Manuals
TVS120-63607H 4 Cycle Vertical Engine View Diagrams & Manuals
TVS120-63609F 4 Cycle Vertical Engine View Diagrams & Manuals
TVS120-63609G 4 Cycle Vertical Engine View Diagrams & Manuals
TVS120-63609H 4 Cycle Vertical Engine View Diagrams & Manuals
TVS120-63610F 4 Cycle Vertical Engine View Diagrams & Manuals
TVS120-63611F 4 Cycle Vertical Engine View Diagrams & Manuals
TVS120-63612F 4 Cycle Vertical Engine View Diagrams & Manuals
TVS120-63613F 4 Cycle Vertical Engine View Diagrams & Manuals
TVS120-63614F 4 Cycle Vertical Engine View Diagrams & Manuals
TVS120-63615F 4 Cycle Vertical Engine View Diagrams & Manuals
TVS120-63616F 4 Cycle Vertical Engine View Diagrams & Manuals
TVS120-63616H 4 Cycle Vertical Engine View Diagrams & Manuals
TVS120-63617F 4 Cycle Vertical Engine View Diagrams & Manuals
TVS120-63620F 4 Cycle Vertical Engine View Diagrams & Manuals
TVS120-63620G 4 Cycle Vertical Engine View Diagrams & Manuals
TVS120-63621F 4 Cycle Vertical Engine View Diagrams & Manuals
TVS120-63621G 4 Cycle Vertical Engine View Diagrams & Manuals
TVS120-63622F 4 Cycle Vertical Engine View Diagrams & Manuals
TVS120-63622G 4 Cycle Vertical Engine View Diagrams & Manuals
TVS120-63622H 4 Cycle Vertical Engine View Diagrams & Manuals
TVS120-63624F 4 Cycle Vertical Engine View Diagrams & Manuals
TVS120-63625F 4 Cycle Vertical Engine View Diagrams & Manuals
TVS120-63626F 4 Cycle Vertical Engine View Diagrams & Manuals
TVS120-63627F 4 Cycle Vertical Engine View Diagrams & Manuals
TVS120-63627G 4 Cycle Vertical Engine View Diagrams & Manuals
TVS120-63627H 4 Cycle Vertical Engine View Diagrams & Manuals
TVS120-63630G 4 Cycle Vertical Engine View Diagrams & Manuals
TVS120-63630H 4 Cycle Vertical Engine View Diagrams & Manuals
TVS120-63631F 4 Cycle Vertical Engine View Diagrams & Manuals
TVS120-63632F 4 Cycle Vertical Engine View Diagrams & Manuals
TVS120-63633F 4 Cycle Vertical Engine View Diagrams & Manuals
TVS120-63633G 4 Cycle Vertical Engine View Diagrams & Manuals
TVS120-63634G 4 Cycle Vertical Engine View Diagrams & Manuals
TVS120-63635G 4 Cycle Vertical Engine View Diagrams & Manuals
TVS120-63636G 4 Cycle Vertical Engine View Diagrams & Manuals
TVS120-63637G 4 Cycle Vertical Engine View Diagrams & Manuals
TVS120-63637H 4 Cycle Vertical Engine View Diagrams & Manuals
TVS120-63638G 4 Cycle Vertical Engine View Diagrams & Manuals
TVS120-63639G 4 Cycle Vertical Engine View Diagrams & Manuals
TVS120-63639H 4 Cycle Vertical Engine View Diagrams & Manuals
TVS120-63640H 4 Cycle Vertical Engine View Diagrams & Manuals
TVS120-63641H 4 Cycle Vertical Engine View Diagrams & Manuals
TVS120-63642H 4 Cycle Vertical Engine View Diagrams & Manuals
TVS120-63643H 4 Cycle Vertical Engine View Diagrams & Manuals
TVS120-63645J 4 Cycle Vertical Engine View Diagrams & Manuals
TVS120-63901F 4 Cycle Vertical Engine View Diagrams & Manuals
TVS120-63902F 4 Cycle Vertical Engine View Diagrams & Manuals
TVS120-63902G 4 Cycle Vertical Engine View Diagrams & Manuals
TVS120-63902H 4 Cycle Vertical Engine View Diagrams & Manuals
TVS120-63903F 4 Cycle Vertical Engine View Diagrams & Manuals
TVS120-63904G 4 Cycle Vertical Engine View Diagrams & Manuals
TVS120-63905G 4 Cycle Vertical Engine View Diagrams & Manuals
TVS120-63907G 4 Cycle Vertical Engine View Diagrams & Manuals
TVS120-63908H 4 Cycle Vertical Engine View Diagrams & Manuals
TVS120-63909H 4 Cycle Vertical Engine View Diagrams & Manuals
TVS120-63910H 4 Cycle Vertical Engine View Diagrams & Manuals
TVS120-63911H 4 Cycle Vertical Engine View Diagrams & Manuals
TVS120-63913H 4 Cycle Vertical Engine View Diagrams & Manuals
TVS120-63914H 4 Cycle Vertical Engine View Diagrams & Manuals
TVS120-63915H 4 Cycle Vertical Engine View Diagrams & Manuals
TVS120-63916H 4 Cycle Vertical Engine View Diagrams & Manuals
TVS120-63917J 4 Cycle Vertical Engine View Diagrams & Manuals
TVS120-63918J 4 Cycle Vertical Engine View Diagrams & Manuals
TVS120-63918K 4 Cycle Vertical Engine View Diagrams & Manuals
TVS120-63919K 4 Cycle Vertical Engine View Diagrams & Manuals
TVS120-63920K 4 Cycle Vertical Engine View Diagrams & Manuals
TVS120-63920L 4 Cycle Vertical Engine View Diagrams & Manuals
TVS120-63920M 4 Cycle Vertical Engine View Diagrams & Manuals
TVS120-63921K 4 Cycle Vertical Engine View Diagrams & Manuals
TVS120-63921L 4 Cycle Vertical Engine View Diagrams & Manuals
TVS120-63922K 4 Cycle Vertical Engine View Diagrams & Manuals
TVS120-63923K 4 Cycle Vertical Engine View Diagrams & Manuals
TVS120-63924K 4 Cycle Vertical Engine View Diagrams & Manuals
TVS120-63924L 4 Cycle Vertical Engine View Diagrams & Manuals
TVS120-63924M 4 Cycle Vertical Engine View Diagrams & Manuals
TVS120-63925L 4 Cycle Vertical Engine View Diagrams & Manuals
TVS120-63926L 4 Cycle Vertical Engine View Diagrams & Manuals
TVS120-63926M 4 Cycle Vertical Engine View Diagrams & Manuals
TVS120-63926N 4 Cycle Vertical Engine View Diagrams & Manuals
TVS120-63927L 4 Cycle Vertical Engine View Diagrams & Manuals
TVS120-63927M 4 Cycle Vertical Engine View Diagrams & Manuals
TVS120-63927N 4 Cycle Vertical Engine View Diagrams & Manuals
TVS120-63927P 4 Cycle Vertical Engine View Diagrams & Manuals
TVS120-63929M 4 Cycle Vertical Engine View Diagrams & Manuals
TVS120-63930M 4 Cycle Vertical Engine View Diagrams & Manuals
TVS120-63931M 4 Cycle Vertical Engine View Diagrams & Manuals
TVS120-63932M 4 Cycle Vertical Engine View Diagrams & Manuals
TVS120-63932P 4 Cycle Vertical Engine View Diagrams & Manuals
TVS120-63932R 4 Cycle Vertical Engine View Diagrams & Manuals
TVS120-66001A 4 Cycle Vertical Engine View Diagrams & Manuals
TVS120-66002A 4 Cycle Vertical Engine View Diagrams & Manuals
TVS120-66004A 4 Cycle Vertical Engine View Diagrams & Manuals
TVS120-66005A 4 Cycle Vertical Engine View Diagrams & Manuals
TVS120-66006A 4 Cycle Vertical Engine View Diagrams & Manuals
TVS120-66007A 4 Cycle Vertical Engine View Diagrams & Manuals
TVS120-66008B 4 Cycle Vertical Engine View Diagrams & Manuals
TVS120-66008C 4 Cycle Vertical Engine View Diagrams & Manuals
TVS120-66009B 4 Cycle Vertical Engine View Diagrams & Manuals
TVS120-66009C 4 Cycle Vertical Engine View Diagrams & Manuals
TVS120-66010B 4 Cycle Vertical Engine View Diagrams & Manuals
TVS120-66011B 4 Cycle Vertical Engine View Diagrams & Manuals
TVS120-66011C 4 Cycle Vertical Engine View Diagrams & Manuals
TVS120-66012B 4 Cycle Vertical Engine View Diagrams & Manuals
TVS120-66013B 4 Cycle Vertical Engine View Diagrams & Manuals
TVS120-66014B 4 Cycle Vertical Engine View Diagrams & Manuals
TVS120-66014C 4 Cycle Vertical Engine View Diagrams & Manuals
TVS120-66015C 4 Cycle Vertical Engine View Diagrams & Manuals
TVS120-66016C 4 Cycle Vertical Engine View Diagrams & Manuals
TVS120-66017C 4 Cycle Vertical Engine View Diagrams & Manuals
TVS120-66018C 4 Cycle Vertical Engine View Diagrams & Manuals
TVS120-66019C 4 Cycle Vertical Engine View Diagrams & Manuals
TVS120-66020C 4 Cycle Vertical Engine View Diagrams & Manuals
TVS120-66021C 4 Cycle Vertical Engine View Diagrams & Manuals
TVS120-66101A 4 Cycle Vertical Engine View Diagrams & Manuals
TVS120-66102A 4 Cycle Vertical Engine View Diagrams & Manuals
TVS120-66103A 4 Cycle Vertical Engine View Diagrams & Manuals
TVS120-66104B 4 Cycle Vertical Engine View Diagrams & Manuals
TVS120-66104C 4 Cycle Vertical Engine View Diagrams & Manuals
TVS120-66105B 4 Cycle Vertical Engine View Diagrams & Manuals
TVS120-66105C 4 Cycle Vertical Engine View Diagrams & Manuals
TVS120-66106B 4 Cycle Vertical Engine View Diagrams & Manuals
TVS120-66107C 4 Cycle Vertical Engine View Diagrams & Manuals
TVS120-66901A 4 Cycle Vertical Engine View Diagrams & Manuals
TVS75-33000 4 Cycle Vertical Engine View Diagrams & Manuals
TVS75-33000A 4 Cycle Vertical Engine View Diagrams & Manuals
TVS75-33000B 4 Cycle Vertical Engine View Diagrams & Manuals
TVS75-33000C 4 Cycle Vertical Engine View Diagrams & Manuals
TVS75-33000D 4 Cycle Vertical Engine View Diagrams & Manuals
TVS75-33001A 4 Cycle Vertical Engine View Diagrams & Manuals
TVS75-33002A 4 Cycle Vertical Engine View Diagrams & Manuals
TVS75-33003A 4 Cycle Vertical Engine View Diagrams & Manuals
TVS75-33004A 4 Cycle Vertical Engine View Diagrams & Manuals
TVS75-33005A 4 Cycle Vertical Engine View Diagrams & Manuals
TVS75-33005B 4 Cycle Vertical Engine View Diagrams & Manuals
TVS75-33005C 4 Cycle Vertical Engine View Diagrams & Manuals
TVS75-33006A 4 Cycle Vertical Engine View Diagrams & Manuals
TVS75-33007A 4 Cycle Vertical Engine View Diagrams & Manuals
TVS75-33008A 4 Cycle Vertical Engine View Diagrams & Manuals
TVS75-33008B 4 Cycle Vertical Engine View Diagrams & Manuals
TVS75-33008C 4 Cycle Vertical Engine View Diagrams & Manuals
TVS75-33009B 4 Cycle Vertical Engine View Diagrams & Manuals
TVS75-33009C 4 Cycle Vertical Engine View Diagrams & Manuals
TVS75-33010B 4 Cycle Vertical Engine View Diagrams & Manuals
TVS75-33010C 4 Cycle Vertical Engine View Diagrams & Manuals
TVS75-33011B 4 Cycle Vertical Engine View Diagrams & Manuals
TVS75-33011C 4 Cycle Vertical Engine View Diagrams & Manuals
TVS75-33012B 4 Cycle Vertical Engine View Diagrams & Manuals
TVS75-33012C 4 Cycle Vertical Engine View Diagrams & Manuals
TVS75-33012D 4 Cycle Vertical Engine View Diagrams & Manuals
TVS75-33013B 4 Cycle Vertical Engine View Diagrams & Manuals
TVS75-33013C 4 Cycle Vertical Engine View Diagrams & Manuals
TVS75-33014B 4 Cycle Vertical Engine View Diagrams & Manuals
TVS75-33014C 4 Cycle Vertical Engine View Diagrams & Manuals
TVS75-33015B 4 Cycle Vertical Engine View Diagrams & Manuals
TVS75-33015C 4 Cycle Vertical Engine View Diagrams & Manuals
TVS75-33016B 4 Cycle Vertical Engine View Diagrams & Manuals
TVS75-33016C 4 Cycle Vertical Engine View Diagrams & Manuals
TVS75-33017B 4 Cycle Vertical Engine View Diagrams & Manuals
TVS75-33017C 4 Cycle Vertical Engine View Diagrams & Manuals
TVS75-33018C 4 Cycle Vertical Engine View Diagrams & Manuals
TVS75-33018D 4 Cycle Vertical Engine View Diagrams & Manuals
TVS75-33019C 4 Cycle Vertical Engine View Diagrams & Manuals
TVS75-33019D 4 Cycle Vertical Engine View Diagrams & Manuals
TVS75-33020C 4 Cycle Vertical Engine View Diagrams & Manuals
TVS75-33020D 4 Cycle Vertical Engine View Diagrams & Manuals
TVS75-33021C 4 Cycle Vertical Engine View Diagrams & Manuals
TVS75-33022D 4 Cycle Vertical Engine View Diagrams & Manuals
TVS75-33023C 4 Cycle Vertical Engine View Diagrams & Manuals
TVS75-33024D 4 Cycle Vertical Engine View Diagrams & Manuals
TVS75-33025D 4 Cycle Vertical Engine View Diagrams & Manuals
TVS75-33026D 4 Cycle Vertical Engine View Diagrams & Manuals
TVS75-33027D 4 Cycle Vertical Engine View Diagrams & Manuals
TVS75-33028D 4 Cycle Vertical Engine View Diagrams & Manuals
TVS75-33029D 4 Cycle Vertical Engine View Diagrams & Manuals
TVS75-33030D 4 Cycle Vertical Engine View Diagrams & Manuals
TVS75-33031D 4 Cycle Vertical Engine View Diagrams & Manuals
TVS75-33032D 4 Cycle Vertical Engine View Diagrams & Manuals
TVS75-33032E 4 Cycle Vertical Engine View Diagrams & Manuals
TVS75-33033D 4 Cycle Vertical Engine View Diagrams & Manuals
TVS75-33034D 4 Cycle Vertical Engine View Diagrams & Manuals
TVS75-33035D 4 Cycle Vertical Engine View Diagrams & Manuals
TVS75-33036D 4 Cycle Vertical Engine View Diagrams & Manuals
TVS75-33037D 4 Cycle Vertical Engine View Diagrams & Manuals
TVS75-33038D 4 Cycle Vertical Engine View Diagrams & Manuals
TVS75-33039D 4 Cycle Vertical Engine View Diagrams & Manuals
TVS75-33040D 4 Cycle Vertical Engine View Diagrams & Manuals
TVS75-33041D 4 Cycle Vertical Engine View Diagrams & Manuals
TVS75-33042D 4 Cycle Vertical Engine View Diagrams & Manuals
TVS75-33043D 4 Cycle Vertical Engine View Diagrams & Manuals
TVS75-33044D 4 Cycle Vertical Engine View Diagrams & Manuals
TVS75-33045D 4 Cycle Vertical Engine View Diagrams & Manuals
TVS75-33045E 4 Cycle Vertical Engine View Diagrams & Manuals
TVS75-33046D 4 Cycle Vertical Engine View Diagrams & Manuals
TVS75-33047D 4 Cycle Vertical Engine View Diagrams & Manuals
TVS75-33048D 4 Cycle Vertical Engine View Diagrams & Manuals
TVS75-33049D 4 Cycle Vertical Engine View Diagrams & Manuals
TVS75-33050D 4 Cycle Vertical Engine View Diagrams & Manuals
TVS75-33051D 4 Cycle Vertical Engine View Diagrams & Manuals
TVS75-33051E 4 Cycle Vertical Engine View Diagrams & Manuals
TVS75-33051F 4 Cycle Vertical Engine View Diagrams & Manuals
TVS75-33052D 4 Cycle Vertical Engine View Diagrams & Manuals
TVS75-33053D 4 Cycle Vertical Engine View Diagrams & Manuals
TVS75-33054D 4 Cycle Vertical Engine View Diagrams & Manuals
TVS75-33056E 4 Cycle Vertical Engine View Diagrams & Manuals
TVS75-33057E 4 Cycle Vertical Engine View Diagrams & Manuals
TVS75-33058E 4 Cycle Vertical Engine View Diagrams & Manuals
TVS75-33059E 4 Cycle Vertical Engine View Diagrams & Manuals
TVS75-33059F 4 Cycle Vertical Engine View Diagrams & Manuals
TVS75-33060E 4 Cycle Vertical Engine View Diagrams & Manuals
TVS75-33061F 4 Cycle Vertical Engine View Diagrams & Manuals
TVS75-33065F 4 Cycle Vertical Engine View Diagrams & Manuals
TVS75-33066F 4 Cycle Vertical Engine View Diagrams & Manuals
TVS75-33068F 4 Cycle Vertical Engine View Diagrams & Manuals
TVS75-33069F 4 Cycle Vertical Engine View Diagrams & Manuals
TVS90-43000 4 Cycle Vertical Engine View Diagrams & Manuals
TVS90-43000A 4 Cycle Vertical Engine View Diagrams & Manuals
TVS90-43000B 4 Cycle Vertical Engine View Diagrams & Manuals
TVS90-43000C 4 Cycle Vertical Engine View Diagrams & Manuals
TVS90-43000D 4 Cycle Vertical Engine View Diagrams & Manuals
TVS90-43000K 4 Cycle Vertical Engine View Diagrams & Manuals
TVS90-43001 4 Cycle Vertical Engine View Diagrams & Manuals
TVS90-43002 4 Cycle Vertical Engine View Diagrams & Manuals
TVS90-43003 4 Cycle Vertical Engine View Diagrams & Manuals
TVS90-43004 4 Cycle Vertical Engine View Diagrams & Manuals
TVS90-43004A 4 Cycle Vertical Engine View Diagrams & Manuals
TVS90-43005 4 Cycle Vertical Engine View Diagrams & Manuals
TVS90-43006 4 Cycle Vertical Engine View Diagrams & Manuals
TVS90-43007 4 Cycle Vertical Engine View Diagrams & Manuals
TVS90-43007A 4 Cycle Vertical Engine View Diagrams & Manuals
TVS90-43008 4 Cycle Vertical Engine View Diagrams & Manuals
TVS90-43009 4 Cycle Vertical Engine View Diagrams & Manuals
TVS90-43010 4 Cycle Vertical Engine View Diagrams & Manuals
TVS90-43011 4 Cycle Vertical Engine View Diagrams & Manuals
TVS90-43012 4 Cycle Vertical Engine View Diagrams & Manuals
TVS90-43013 4 Cycle Vertical Engine View Diagrams & Manuals
TVS90-43013A 4 Cycle Vertical Engine View Diagrams & Manuals
TVS90-43013B 4 Cycle Vertical Engine View Diagrams & Manuals
TVS90-43014A 4 Cycle Vertical Engine View Diagrams & Manuals
TVS90-43015A 4 Cycle Vertical Engine View Diagrams & Manuals
TVS90-43016A 4 Cycle Vertical Engine View Diagrams & Manuals
TVS90-43017A 4 Cycle Vertical Engine View Diagrams & Manuals
TVS90-43018A 4 Cycle Vertical Engine View Diagrams & Manuals
TVS90-43019A 4 Cycle Vertical Engine View Diagrams & Manuals
TVS90-43019B 4 Cycle Vertical Engine View Diagrams & Manuals
TVS90-43019D 4 Cycle Vertical Engine View Diagrams & Manuals
TVS90-43020A 4 Cycle Vertical Engine View Diagrams & Manuals
TVS90-43020B 4 Cycle Vertical Engine View Diagrams & Manuals
TVS90-43020C 4 Cycle Vertical Engine View Diagrams & Manuals
TVS90-43021A 4 Cycle Vertical Engine View Diagrams & Manuals
TVS90-43022A 4 Cycle Vertical Engine View Diagrams & Manuals
TVS90-43022B 4 Cycle Vertical Engine View Diagrams & Manuals
TVS90-43023A 4 Cycle Vertical Engine View Diagrams & Manuals
TVS90-43023B 4 Cycle Vertical Engine View Diagrams & Manuals
TVS90-43024A 4 Cycle Vertical Engine View Diagrams & Manuals
TVS90-43025A 4 Cycle Vertical Engine View Diagrams & Manuals
TVS90-43025B 4 Cycle Vertical Engine View Diagrams & Manuals
TVS90-43025C 4 Cycle Vertical Engine View Diagrams & Manuals
TVS90-43026A 4 Cycle Vertical Engine View Diagrams & Manuals
TVS90-43028A 4 Cycle Vertical Engine View Diagrams & Manuals
TVS90-43030A 4 Cycle Vertical Engine View Diagrams & Manuals
TVS90-43031A 4 Cycle Vertical Engine View Diagrams & Manuals
TVS90-43032A 4 Cycle Vertical Engine View Diagrams & Manuals
TVS90-43032B 4 Cycle Vertical Engine View Diagrams & Manuals
TVS90-43033A 4 Cycle Vertical Engine View Diagrams & Manuals
TVS90-43033B 4 Cycle Vertical Engine View Diagrams & Manuals
TVS90-43036A 4 Cycle Vertical Engine View Diagrams & Manuals
TVS90-43037A 4 Cycle Vertical Engine View Diagrams & Manuals
TVS90-43038A 4 Cycle Vertical Engine View Diagrams & Manuals
TVS90-43039A 4 Cycle Vertical Engine View Diagrams & Manuals
TVS90-43040A 4 Cycle Vertical Engine View Diagrams & Manuals
TVS90-43040B 4 Cycle Vertical Engine View Diagrams & Manuals
TVS90-43041A 4 Cycle Vertical Engine View Diagrams & Manuals
TVS90-43042A 4 Cycle Vertical Engine View Diagrams & Manuals
TVS90-43043A 4 Cycle Vertical Engine View Diagrams & Manuals
TVS90-43044A 4 Cycle Vertical Engine View Diagrams & Manuals
TVS90-43044B 4 Cycle Vertical Engine View Diagrams & Manuals
TVS90-43045A 4 Cycle Vertical Engine View Diagrams & Manuals
TVS90-43046A 4 Cycle Vertical Engine View Diagrams & Manuals
TVS90-43046C 4 Cycle Vertical Engine View Diagrams & Manuals
TVS90-43047A 4 Cycle Vertical Engine View Diagrams & Manuals
TVS90-43047B 4 Cycle Vertical Engine View Diagrams & Manuals
TVS90-43048A 4 Cycle Vertical Engine View Diagrams & Manuals
TVS90-43048B 4 Cycle Vertical Engine View Diagrams & Manuals
TVS90-43049A 4 Cycle Vertical Engine View Diagrams & Manuals
TVS90-43050A 4 Cycle Vertical Engine View Diagrams & Manuals
TVS90-43050B 4 Cycle Vertical Engine View Diagrams & Manuals
TVS90-43050C 4 Cycle Vertical Engine View Diagrams & Manuals
TVS90-43050D 4 Cycle Vertical Engine View Diagrams & Manuals
TVS90-43051A 4 Cycle Vertical Engine View Diagrams & Manuals
TVS90-43051B 4 Cycle Vertical Engine View Diagrams & Manuals
TVS90-43051C 4 Cycle Vertical Engine View Diagrams & Manuals
TVS90-43051D 4 Cycle Vertical Engine View Diagrams & Manuals
TVS90-43052A 4 Cycle Vertical Engine View Diagrams & Manuals
TVS90-43052B 4 Cycle Vertical Engine View Diagrams & Manuals
TVS90-43052C 4 Cycle Vertical Engine View Diagrams & Manuals
TVS90-43052D 4 Cycle Vertical Engine View Diagrams & Manuals
TVS90-43053A 4 Cycle Vertical Engine View Diagrams & Manuals
TVS90-43054A 4 Cycle Vertical Engine View Diagrams & Manuals
TVS90-43054B 4 Cycle Vertical Engine View Diagrams & Manuals
TVS90-43054C 4 Cycle Vertical Engine View Diagrams & Manuals
TVS90-43054D 4 Cycle Vertical Engine View Diagrams & Manuals
TVS90-43055A 4 Cycle Vertical Engine View Diagrams & Manuals
TVS90-43056A 4 Cycle Vertical Engine View Diagrams & Manuals
TVS90-43057A 4 Cycle Vertical Engine View Diagrams & Manuals
TVS90-43058A 4 Cycle Vertical Engine View Diagrams & Manuals
TVS90-43059A 4 Cycle Vertical Engine View Diagrams & Manuals
TVS90-43059B 4 Cycle Vertical Engine View Diagrams & Manuals
TVS90-43059D 4 Cycle Vertical Engine View Diagrams & Manuals
TVS90-43060A 4 Cycle Vertical Engine View Diagrams & Manuals
TVS90-43060D 4 Cycle Vertical Engine View Diagrams & Manuals
TVS90-43061A 4 Cycle Vertical Engine View Diagrams & Manuals
TVS90-43061B 4 Cycle Vertical Engine View Diagrams & Manuals
TVS90-43061D 4 Cycle Vertical Engine View Diagrams & Manuals
TVS90-43062A 4 Cycle Vertical Engine View Diagrams & Manuals
TVS90-43062B 4 Cycle Vertical Engine View Diagrams & Manuals
TVS90-43062C 4 Cycle Vertical Engine View Diagrams & Manuals
TVS90-43062D 4 Cycle Vertical Engine View Diagrams & Manuals
TVS90-43063A 4 Cycle Vertical Engine View Diagrams & Manuals
TVS90-43063B 4 Cycle Vertical Engine View Diagrams & Manuals
TVS90-43063C 4 Cycle Vertical Engine View Diagrams & Manuals
TVS90-43064A 4 Cycle Vertical Engine View Diagrams & Manuals
TVS90-43065A 4 Cycle Vertical Engine View Diagrams & Manuals
TVS90-43066A 4 Cycle Vertical Engine View Diagrams & Manuals
TVS90-43066B 4 Cycle Vertical Engine View Diagrams & Manuals
TVS90-43067A 4 Cycle Vertical Engine View Diagrams & Manuals
TVS90-43068A 4 Cycle Vertical Engine View Diagrams & Manuals
TVS90-43068B 4 Cycle Vertical Engine View Diagrams & Manuals
TVS90-43068D 4 Cycle Vertical Engine View Diagrams & Manuals
TVS90-43069A 4 Cycle Vertical Engine View Diagrams & Manuals
TVS90-43070A 4 Cycle Vertical Engine View Diagrams & Manuals
TVS90-43070B 4 Cycle Vertical Engine View Diagrams & Manuals
TVS90-43070C 4 Cycle Vertical Engine View Diagrams & Manuals
TVS90-43071A 4 Cycle Vertical Engine View Diagrams & Manuals
TVS90-43072A 4 Cycle Vertical Engine View Diagrams & Manuals
TVS90-43073A 4 Cycle Vertical Engine View Diagrams & Manuals
TVS90-43074A 4 Cycle Vertical Engine View Diagrams & Manuals
TVS90-43075A 4 Cycle Vertical Engine View Diagrams & Manuals
TVS90-43076A 4 Cycle Vertical Engine View Diagrams & Manuals
TVS90-43076B 4 Cycle Vertical Engine View Diagrams & Manuals
TVS90-43076C 4 Cycle Vertical Engine View Diagrams & Manuals
TVS90-43076D 4 Cycle Vertical Engine View Diagrams & Manuals
TVS90-43077A 4 Cycle Vertical Engine View Diagrams & Manuals
TVS90-43078A 4 Cycle Vertical Engine View Diagrams & Manuals
TVS90-43078B 4 Cycle Vertical Engine View Diagrams & Manuals
TVS90-43078C 4 Cycle Vertical Engine View Diagrams & Manuals
TVS90-43078D 4 Cycle Vertical Engine View Diagrams & Manuals
TVS90-43079A 4 Cycle Vertical Engine View Diagrams & Manuals
TVS90-43079B 4 Cycle Vertical Engine View Diagrams & Manuals
TVS90-43080A 4 Cycle Vertical Engine View Diagrams & Manuals
TVS90-43080B 4 Cycle Vertical Engine View Diagrams & Manuals
TVS90-43080C 4 Cycle Vertical Engine View Diagrams & Manuals
TVS90-43081A 4 Cycle Vertical Engine View Diagrams & Manuals
TVS90-43081B 4 Cycle Vertical Engine View Diagrams & Manuals
TVS90-43081C 4 Cycle Vertical Engine View Diagrams & Manuals
TVS90-43081D 4 Cycle Vertical Engine View Diagrams & Manuals
TVS90-43081E 4 Cycle Vertical Engine View Diagrams & Manuals
TVS90-43082A 4 Cycle Vertical Engine View Diagrams & Manuals
TVS90-43082B 4 Cycle Vertical Engine View Diagrams & Manuals
TVS90-43082C 4 Cycle Vertical Engine View Diagrams & Manuals
TVS90-43082D 4 Cycle Vertical Engine View Diagrams & Manuals
TVS90-43083A 4 Cycle Vertical Engine View Diagrams & Manuals
TVS90-43084A 4 Cycle Vertical Engine View Diagrams & Manuals
TVS90-43084B 4 Cycle Vertical Engine View Diagrams & Manuals
TVS90-43084C 4 Cycle Vertical Engine View Diagrams & Manuals
TVS90-43084D 4 Cycle Vertical Engine View Diagrams & Manuals
TVS90-43085A 4 Cycle Vertical Engine View Diagrams & Manuals
TVS90-43086A 4 Cycle Vertical Engine View Diagrams & Manuals
TVS90-43086B 4 Cycle Vertical Engine View Diagrams & Manuals
TVS90-43086C 4 Cycle Vertical Engine View Diagrams & Manuals
TVS90-43086D 4 Cycle Vertical Engine View Diagrams & Manuals
TVS90-43087A 4 Cycle Vertical Engine View Diagrams & Manuals
TVS90-43088A 4 Cycle Vertical Engine View Diagrams & Manuals
TVS90-43088B 4 Cycle Vertical Engine View Diagrams & Manuals
TVS90-43089A 4 Cycle Vertical Engine View Diagrams & Manuals
TVS90-43090A 4 Cycle Vertical Engine View Diagrams & Manuals
TVS90-43091A 4 Cycle Vertical Engine View Diagrams & Manuals
TVS90-43092A 4 Cycle Vertical Engine View Diagrams & Manuals
TVS90-43093A 4 Cycle Vertical Engine View Diagrams & Manuals
TVS90-43094A 4 Cycle Vertical Engine View Diagrams & Manuals
TVS90-43094B 4 Cycle Vertical Engine View Diagrams & Manuals
TVS90-43095A 4 Cycle Vertical Engine View Diagrams & Manuals
TVS90-43095B 4 Cycle Vertical Engine View Diagrams & Manuals
TVS90-43096A 4 Cycle Vertical Engine View Diagrams & Manuals
TVS90-43096B 4 Cycle Vertical Engine View Diagrams & Manuals
TVS90-43100A 4 Cycle Vertical Engine View Diagrams & Manuals
TVS90-43101A 4 Cycle Vertical Engine View Diagrams & Manuals
TVS90-43102A 4 Cycle Vertical Engine View Diagrams & Manuals
TVS90-43102B 4 Cycle Vertical Engine View Diagrams & Manuals
TVS90-43102C 4 Cycle Vertical Engine View Diagrams & Manuals
TVS90-43103A 4 Cycle Vertical Engine View Diagrams & Manuals
TVS90-43103B 4 Cycle Vertical Engine View Diagrams & Manuals
TVS90-43103C 4 Cycle Vertical Engine View Diagrams & Manuals
TVS90-43103D 4 Cycle Vertical Engine View Diagrams & Manuals
TVS90-43104A 4 Cycle Vertical Engine View Diagrams & Manuals
TVS90-43104B 4 Cycle Vertical Engine View Diagrams & Manuals
TVS90-43104C 4 Cycle Vertical Engine View Diagrams & Manuals
TVS90-43104D 4 Cycle Vertical Engine View Diagrams & Manuals
TVS90-43105A 4 Cycle Vertical Engine View Diagrams & Manuals
TVS90-43105B 4 Cycle Vertical Engine View Diagrams & Manuals
TVS90-43105C 4 Cycle Vertical Engine View Diagrams & Manuals
TVS90-43105D 4 Cycle Vertical Engine View Diagrams & Manuals
TVS90-43105E 4 Cycle Vertical Engine View Diagrams & Manuals
TVS90-43105F 4 Cycle Vertical Engine View Diagrams & Manuals
TVS90-43105H 4 Cycle Vertical Engine View Diagrams & Manuals
TVS90-43105J 4 Cycle Vertical Engine View Diagrams & Manuals
TVS90-43106A 4 Cycle Vertical Engine View Diagrams & Manuals
TVS90-43107A 4 Cycle Vertical Engine View Diagrams & Manuals
TVS90-43107B 4 Cycle Vertical Engine View Diagrams & Manuals
TVS90-43108A 4 Cycle Vertical Engine View Diagrams & Manuals
TVS90-43108B 4 Cycle Vertical Engine View Diagrams & Manuals
TVS90-43108D 4 Cycle Vertical Engine View Diagrams & Manuals
TVS90-43109A 4 Cycle Vertical Engine View Diagrams & Manuals
TVS90-43110A 4 Cycle Vertical Engine View Diagrams & Manuals
TVS90-43111A 4 Cycle Vertical Engine View Diagrams & Manuals
TVS90-43111B 4 Cycle Vertical Engine View Diagrams & Manuals
TVS90-43112A 4 Cycle Vertical Engine View Diagrams & Manuals
TVS90-43112B 4 Cycle Vertical Engine View Diagrams & Manuals
TVS90-43113A 4 Cycle Vertical Engine View Diagrams & Manuals
TVS90-43114A 4 Cycle Vertical Engine View Diagrams & Manuals
TVS90-43115A 4 Cycle Vertical Engine View Diagrams & Manuals
TVS90-43116A 4 Cycle Vertical Engine View Diagrams & Manuals
TVS90-43116B 4 Cycle Vertical Engine View Diagrams & Manuals
TVS90-43116C 4 Cycle Vertical Engine View Diagrams & Manuals
TVS90-43116D 4 Cycle Vertical Engine View Diagrams & Manuals
TVS90-43117A 4 Cycle Vertical Engine View Diagrams & Manuals
TVS90-43118A 4 Cycle Vertical Engine View Diagrams & Manuals
TVS90-43119A 4 Cycle Vertical Engine View Diagrams & Manuals
TVS90-43120A 4 Cycle Vertical Engine View Diagrams & Manuals
TVS90-43121A 4 Cycle Vertical Engine View Diagrams & Manuals
TVS90-43121B 4 Cycle Vertical Engine View Diagrams & Manuals
TVS90-43121C 4 Cycle Vertical Engine View Diagrams & Manuals
TVS90-43121D 4 Cycle Vertical Engine View Diagrams & Manuals
TVS90-43122A 4 Cycle Vertical Engine View Diagrams & Manuals
TVS90-43122B 4 Cycle Vertical Engine View Diagrams & Manuals
TVS90-43123A 4 Cycle Vertical Engine View Diagrams & Manuals
TVS90-43123B 4 Cycle Vertical Engine View Diagrams & Manuals
TVS90-43124A 4 Cycle Vertical Engine View Diagrams & Manuals
TVS90-43124B 4 Cycle Vertical Engine View Diagrams & Manuals
TVS90-43125A 4 Cycle Vertical Engine View Diagrams & Manuals
TVS90-43125B 4 Cycle Vertical Engine View Diagrams & Manuals
TVS90-43125C 4 Cycle Vertical Engine View Diagrams & Manuals
TVS90-43126A 4 Cycle Vertical Engine View Diagrams & Manuals
TVS90-43126B 4 Cycle Vertical Engine View Diagrams & Manuals
TVS90-43126C 4 Cycle Vertical Engine View Diagrams & Manuals
TVS90-43127A 4 Cycle Vertical Engine View Diagrams & Manuals
TVS90-43128A 4 Cycle Vertical Engine View Diagrams & Manuals
TVS90-43128C 4 Cycle Vertical Engine View Diagrams & Manuals
TVS90-43128D 4 Cycle Vertical Engine View Diagrams & Manuals
TVS90-43129A 4 Cycle Vertical Engine View Diagrams & Manuals
TVS90-43130A 4 Cycle Vertical Engine View Diagrams & Manuals
TVS90-43130B 4 Cycle Vertical Engine View Diagrams & Manuals
TVS90-43130C 4 Cycle Vertical Engine View Diagrams & Manuals
TVS90-43131A 4 Cycle Vertical Engine View Diagrams & Manuals
TVS90-43131B 4 Cycle Vertical Engine View Diagrams & Manuals
TVS90-43131C 4 Cycle Vertical Engine View Diagrams & Manuals
TVS90-43131D 4 Cycle Vertical Engine View Diagrams & Manuals
TVS90-43132B 4 Cycle Vertical Engine View Diagrams & Manuals
TVS90-43134B 4 Cycle Vertical Engine View Diagrams & Manuals
TVS90-43135B 4 Cycle Vertical Engine View Diagrams & Manuals
TVS90-43135C 4 Cycle Vertical Engine View Diagrams & Manuals
TVS90-43136B 4 Cycle Vertical Engine View Diagrams & Manuals
TVS90-43136C 4 Cycle Vertical Engine View Diagrams & Manuals
TVS90-43137B 4 Cycle Vertical Engine View Diagrams & Manuals
TVS90-43137C 4 Cycle Vertical Engine View Diagrams & Manuals
TVS90-43138B 4 Cycle Vertical Engine View Diagrams & Manuals
TVS90-43138C 4 Cycle Vertical Engine View Diagrams & Manuals
TVS90-43139B 4 Cycle Vertical Engine View Diagrams & Manuals
TVS90-43139C 4 Cycle Vertical Engine View Diagrams & Manuals
TVS90-43139D 4 Cycle Vertical Engine View Diagrams & Manuals
TVS90-43140B 4 Cycle Vertical Engine View Diagrams & Manuals
TVS90-43140D 4 Cycle Vertical Engine View Diagrams & Manuals
TVS90-43141B 4 Cycle Vertical Engine View Diagrams & Manuals
TVS90-43141D 4 Cycle Vertical Engine View Diagrams & Manuals
TVS90-43142B 4 Cycle Vertical Engine View Diagrams & Manuals
TVS90-43142C 4 Cycle Vertical Engine View Diagrams & Manuals
TVS90-43142D 4 Cycle Vertical Engine View Diagrams & Manuals
TVS90-43143B 4 Cycle Vertical Engine View Diagrams & Manuals
TVS90-43143D 4 Cycle Vertical Engine View Diagrams & Manuals
TVS90-43144B 4 Cycle Vertical Engine View Diagrams & Manuals
TVS90-43144C 4 Cycle Vertical Engine View Diagrams & Manuals
TVS90-43144D 4 Cycle Vertical Engine View Diagrams & Manuals
TVS90-43145B 4 Cycle Vertical Engine View Diagrams & Manuals
TVS90-43145D 4 Cycle Vertical Engine View Diagrams & Manuals
TVS90-43146B 4 Cycle Vertical Engine View Diagrams & Manuals
TVS90-43146C 4 Cycle Vertical Engine View Diagrams & Manuals
TVS90-43147B 4 Cycle Vertical Engine View Diagrams & Manuals
TVS90-43148B 4 Cycle Vertical Engine View Diagrams & Manuals
TVS90-43148C 4 Cycle Vertical Engine View Diagrams & Manuals
TVS90-43149B 4 Cycle Vertical Engine View Diagrams & Manuals
TVS90-43149C 4 Cycle Vertical Engine View Diagrams & Manuals
TVS90-43150B 4 Cycle Vertical Engine View Diagrams & Manuals
TVS90-43151B 4 Cycle Vertical Engine View Diagrams & Manuals
TVS90-43152B 4 Cycle Vertical Engine View Diagrams & Manuals
TVS90-43153B 4 Cycle Vertical Engine View Diagrams & Manuals
TVS90-43154B 4 Cycle Vertical Engine View Diagrams & Manuals
TVS90-43154C 4 Cycle Vertical Engine View Diagrams & Manuals
TVS90-43155B 4 Cycle Vertical Engine View Diagrams & Manuals
TVS90-43155C 4 Cycle Vertical Engine View Diagrams & Manuals
TVS90-43156B 4 Cycle Vertical Engine View Diagrams & Manuals
TVS90-43156D 4 Cycle Vertical Engine View Diagrams & Manuals
TVS90-43157B 4 Cycle Vertical Engine View Diagrams & Manuals
TVS90-43158C 4 Cycle Vertical Engine View Diagrams & Manuals
TVS90-43158D 4 Cycle Vertical Engine View Diagrams & Manuals
TVS90-43159C 4 Cycle Vertical Engine View Diagrams & Manuals
TVS90-43159D 4 Cycle Vertical Engine View Diagrams & Manuals
TVS90-43161C 4 Cycle Vertical Engine View Diagrams & Manuals
TVS90-43162C 4 Cycle Vertical Engine View Diagrams & Manuals
TVS90-43162D 4 Cycle Vertical Engine View Diagrams & Manuals
TVS90-43163C 4 Cycle Vertical Engine View Diagrams & Manuals
TVS90-43164C 4 Cycle Vertical Engine View Diagrams & Manuals
TVS90-43164D 4 Cycle Vertical Engine View Diagrams & Manuals
TVS90-43165C 4 Cycle Vertical Engine View Diagrams & Manuals
TVS90-43165D 4 Cycle Vertical Engine View Diagrams & Manuals
TVS90-43166C 4 Cycle Vertical Engine View Diagrams & Manuals
TVS90-43167C 4 Cycle Vertical Engine View Diagrams & Manuals
TVS90-43168C 4 Cycle Vertical Engine View Diagrams & Manuals
TVS90-43169C 4 Cycle Vertical Engine View Diagrams & Manuals
TVS90-43170C 4 Cycle Vertical Engine View Diagrams & Manuals
TVS90-43171C 4 Cycle Vertical Engine View Diagrams & Manuals
TVS90-43172C 4 Cycle Vertical Engine View Diagrams & Manuals
TVS90-43173D 4 Cycle Vertical Engine View Diagrams & Manuals
TVS90-43174D 4 Cycle Vertical Engine View Diagrams & Manuals
TVS90-43175D 4 Cycle Vertical Engine View Diagrams & Manuals
TVS90-43176D 4 Cycle Vertical Engine View Diagrams & Manuals
TVS90-43177D 4 Cycle Vertical Engine View Diagrams & Manuals
TVS90-43178D 4 Cycle Vertical Engine View Diagrams & Manuals
TVS90-43179C 4 Cycle Vertical Engine View Diagrams & Manuals
TVS90-43179D 4 Cycle Vertical Engine View Diagrams & Manuals
TVS90-43180C 4 Cycle Vertical Engine View Diagrams & Manuals
TVS90-43180D 4 Cycle Vertical Engine View Diagrams & Manuals
TVS90-43181C 4 Cycle Vertical Engine View Diagrams & Manuals
TVS90-43182C 4 Cycle Vertical Engine View Diagrams & Manuals
TVS90-43183D 4 Cycle Vertical Engine View Diagrams & Manuals
TVS90-43184D 4 Cycle Vertical Engine View Diagrams & Manuals
TVS90-43185C 4 Cycle Vertical Engine View Diagrams & Manuals
TVS90-43187D 4 Cycle Vertical Engine View Diagrams & Manuals
TVS90-43188D 4 Cycle Vertical Engine View Diagrams & Manuals
TVS90-43189D 4 Cycle Vertical Engine View Diagrams & Manuals
TVS90-43190D 4 Cycle Vertical Engine View Diagrams & Manuals
TVS90-43191D 4 Cycle Vertical Engine View Diagrams & Manuals
TVS90-43192D 4 Cycle Vertical Engine View Diagrams & Manuals
TVS90-43192E 4 Cycle Vertical Engine View Diagrams & Manuals
TVS90-43192F 4 Cycle Vertical Engine View Diagrams & Manuals
TVS90-43192G 4 Cycle Vertical Engine View Diagrams & Manuals
TVS90-43193D 4 Cycle Vertical Engine View Diagrams & Manuals
TVS90-43194D 4 Cycle Vertical Engine View Diagrams & Manuals
TVS90-43194E 4 Cycle Vertical Engine View Diagrams & Manuals
TVS90-43194F 4 Cycle Vertical Engine View Diagrams & Manuals
TVS90-43194G 4 Cycle Vertical Engine View Diagrams & Manuals
TVS90-43194H 4 Cycle Vertical Engine View Diagrams & Manuals
TVS90-43194J 4 Cycle Vertical Engine View Diagrams & Manuals
TVS90-43194K 4 Cycle Vertical Engine View Diagrams & Manuals
TVS90-43194L 4 Cycle Vertical Engine View Diagrams & Manuals
TVS90-43194M 4 Cycle Vertical Engine View Diagrams & Manuals
TVS90-43194N 4 Cycle Vertical Engine View Diagrams & Manuals
TVS90-43195D 4 Cycle Vertical Engine View Diagrams & Manuals
TVS90-43196D 4 Cycle Vertical Engine View Diagrams & Manuals
TVS90-43197D 4 Cycle Vertical Engine View Diagrams & Manuals
TVS90-43198D 4 Cycle Vertical Engine View Diagrams & Manuals
TVS90-43199D 4 Cycle Vertical Engine View Diagrams & Manuals
TVS90-43199E 4 Cycle Vertical Engine View Diagrams & Manuals
TVS90-43199F 4 Cycle Vertical Engine View Diagrams & Manuals
TVS90-43200D 4 Cycle Vertical Engine View Diagrams & Manuals
TVS90-43201D 4 Cycle Vertical Engine View Diagrams & Manuals
TVS90-43202D 4 Cycle Vertical Engine View Diagrams & Manuals
TVS90-43203D 4 Cycle Vertical Engine View Diagrams & Manuals
TVS90-43204D 4 Cycle Vertical Engine View Diagrams & Manuals
TVS90-43205D 4 Cycle Vertical Engine View Diagrams & Manuals
TVS90-43205F 4 Cycle Vertical Engine View Diagrams & Manuals
TVS90-43206D 4 Cycle Vertical Engine View Diagrams & Manuals
TVS90-43207D 4 Cycle Vertical Engine View Diagrams & Manuals
TVS90-43208D 4 Cycle Vertical Engine View Diagrams & Manuals
TVS90-43209D 4 Cycle Vertical Engine View Diagrams & Manuals
TVS90-43210D 4 Cycle Vertical Engine View Diagrams & Manuals
TVS90-43211D 4 Cycle Vertical Engine View Diagrams & Manuals
TVS90-43212D 4 Cycle Vertical Engine View Diagrams & Manuals
TVS90-43213D 4 Cycle Vertical Engine View Diagrams & Manuals
TVS90-43214D 4 Cycle Vertical Engine View Diagrams & Manuals
TVS90-43215D 4 Cycle Vertical Engine View Diagrams & Manuals
TVS90-43215E 4 Cycle Vertical Engine View Diagrams & Manuals
TVS90-43215F 4 Cycle Vertical Engine View Diagrams & Manuals
TVS90-43215G 4 Cycle Vertical Engine View Diagrams & Manuals
TVS90-43215H 4 Cycle Vertical Engine View Diagrams & Manuals
TVS90-43215J 4 Cycle Vertical Engine View Diagrams & Manuals
TVS90-43215K 4 Cycle Vertical Engine View Diagrams & Manuals
TVS90-43215L 4 Cycle Vertical Engine View Diagrams & Manuals
TVS90-43215M 4 Cycle Vertical Engine View Diagrams & Manuals
TVS90-43216D 4 Cycle Vertical Engine View Diagrams & Manuals
TVS90-43217D 4 Cycle Vertical Engine View Diagrams & Manuals
TVS90-43218D 4 Cycle Vertical Engine View Diagrams & Manuals
TVS90-43219D 4 Cycle Vertical Engine View Diagrams & Manuals
TVS90-43220D 4 Cycle Vertical Engine View Diagrams & Manuals
TVS90-43221D 4 Cycle Vertical Engine View Diagrams & Manuals
TVS90-43222D 4 Cycle Vertical Engine View Diagrams & Manuals
TVS90-43223D 4 Cycle Vertical Engine View Diagrams & Manuals
TVS90-43223E 4 Cycle Vertical Engine View Diagrams & Manuals
TVS90-43223F 4 Cycle Vertical Engine View Diagrams & Manuals
TVS90-43223G 4 Cycle Vertical Engine View Diagrams & Manuals
TVS90-43223H 4 Cycle Vertical Engine View Diagrams & Manuals
TVS90-43223J 4 Cycle Vertical Engine View Diagrams & Manuals
TVS90-43223K 4 Cycle Vertical Engine View Diagrams & Manuals
TVS90-43223L 4 Cycle Vertical Engine View Diagrams & Manuals
TVS90-43223M 4 Cycle Vertical Engine View Diagrams & Manuals
TVS90-43223N 4 Cycle Vertical Engine View Diagrams & Manuals
TVS90-43224D 4 Cycle Vertical Engine View Diagrams & Manuals
TVS90-43225D 4 Cycle Vertical Engine View Diagrams & Manuals
TVS90-43226D 4 Cycle Vertical Engine View Diagrams & Manuals
TVS90-43227D 4 Cycle Vertical Engine View Diagrams & Manuals
TVS90-43227E 4 Cycle Vertical Engine View Diagrams & Manuals
TVS90-43228D 4 Cycle Vertical Engine View Diagrams & Manuals
TVS90-43229D 4 Cycle Vertical Engine View Diagrams & Manuals
TVS90-43230D 4 Cycle Vertical Engine View Diagrams & Manuals
TVS90-43232D 4 Cycle Vertical Engine View Diagrams & Manuals
TVS90-43233D 4 Cycle Vertical Engine View Diagrams & Manuals
TVS90-43234D 4 Cycle Vertical Engine View Diagrams & Manuals
TVS90-43234E 4 Cycle Vertical Engine View Diagrams & Manuals
TVS90-43234F 4 Cycle Vertical Engine View Diagrams & Manuals
TVS90-43234G 4 Cycle Vertical Engine View Diagrams & Manuals
TVS90-43234H 4 Cycle Vertical Engine View Diagrams & Manuals
TVS90-43235D 4 Cycle Vertical Engine View Diagrams & Manuals
TVS90-43235E 4 Cycle Vertical Engine View Diagrams & Manuals
TVS90-43235F 4 Cycle Vertical Engine View Diagrams & Manuals
TVS90-43235G 4 Cycle Vertical Engine View Diagrams & Manuals
TVS90-43235H 4 Cycle Vertical Engine View Diagrams & Manuals
TVS90-43236D 4 Cycle Vertical Engine View Diagrams & Manuals
TVS90-43236E 4 Cycle Vertical Engine View Diagrams & Manuals
TVS90-43236F 4 Cycle Vertical Engine View Diagrams & Manuals
TVS90-43237D 4 Cycle Vertical Engine View Diagrams & Manuals
TVS90-43237E 4 Cycle Vertical Engine View Diagrams & Manuals
TVS90-43237F 4 Cycle Vertical Engine View Diagrams & Manuals
TVS90-43238D 4 Cycle Vertical Engine View Diagrams & Manuals
TVS90-43238E 4 Cycle Vertical Engine View Diagrams & Manuals
TVS90-43238F 4 Cycle Vertical Engine View Diagrams & Manuals
TVS90-43239D 4 Cycle Vertical Engine View Diagrams & Manuals
TVS90-43240D 4 Cycle Vertical Engine View Diagrams & Manuals
TVS90-43240E 4 Cycle Vertical Engine View Diagrams & Manuals
TVS90-43240F 4 Cycle Vertical Engine View Diagrams & Manuals
TVS90-43241D 4 Cycle Vertical Engine View Diagrams & Manuals
TVS90-43241E 4 Cycle Vertical Engine View Diagrams & Manuals
TVS90-43241F 4 Cycle Vertical Engine View Diagrams & Manuals
TVS90-43242D 4 Cycle Vertical Engine View Diagrams & Manuals
TVS90-43242E 4 Cycle Vertical Engine View Diagrams & Manuals
TVS90-43243D 4 Cycle Vertical Engine View Diagrams & Manuals
TVS90-43243E 4 Cycle Vertical Engine View Diagrams & Manuals
TVS90-43243F 4 Cycle Vertical Engine View Diagrams & Manuals
TVS90-43244D 4 Cycle Vertical Engine View Diagrams & Manuals
TVS90-43244E 4 Cycle Vertical Engine View Diagrams & Manuals
TVS90-43244F 4 Cycle Vertical Engine View Diagrams & Manuals
TVS90-43245D 4 Cycle Vertical Engine View Diagrams & Manuals
TVS90-43246D 4 Cycle Vertical Engine View Diagrams & Manuals
TVS90-43246F 4 Cycle Vertical Engine View Diagrams & Manuals
TVS90-43247D 4 Cycle Vertical Engine View Diagrams & Manuals
TVS90-43247F 4 Cycle Vertical Engine View Diagrams & Manuals
TVS90-43248D 4 Cycle Vertical Engine View Diagrams & Manuals
TVS90-43249D 4 Cycle Vertical Engine View Diagrams & Manuals
TVS90-43250D 4 Cycle Vertical Engine View Diagrams & Manuals
TVS90-43251D 4 Cycle Vertical Engine View Diagrams & Manuals
TVS90-43252D 4 Cycle Vertical Engine View Diagrams & Manuals
TVS90-43253D 4 Cycle Vertical Engine View Diagrams & Manuals
TVS90-43254D 4 Cycle Vertical Engine View Diagrams & Manuals
TVS90-43255D 4 Cycle Vertical Engine View Diagrams & Manuals
TVS90-43256D 4 Cycle Vertical Engine View Diagrams & Manuals
TVS90-43257D 4 Cycle Vertical Engine View Diagrams & Manuals
TVS90-43258D 4 Cycle Vertical Engine View Diagrams & Manuals
TVS90-43259D 4 Cycle Vertical Engine View Diagrams & Manuals
TVS90-43259E 4 Cycle Vertical Engine View Diagrams & Manuals
TVS90-43259F 4 Cycle Vertical Engine View Diagrams & Manuals
TVS90-43259G 4 Cycle Vertical Engine View Diagrams & Manuals
TVS90-43260D 4 Cycle Vertical Engine View Diagrams & Manuals
TVS90-43261D 4 Cycle Vertical Engine View Diagrams & Manuals
TVS90-43262D 4 Cycle Vertical Engine View Diagrams & Manuals
TVS90-43263D 4 Cycle Vertical Engine View Diagrams & Manuals
TVS90-43264D 4 Cycle Vertical Engine View Diagrams & Manuals
TVS90-43265D 4 Cycle Vertical Engine View Diagrams & Manuals
TVS90-43265E 4 Cycle Vertical Engine View Diagrams & Manuals
TVS90-43265F 4 Cycle Vertical Engine View Diagrams & Manuals
TVS90-43265G 4 Cycle Vertical Engine View Diagrams & Manuals
TVS90-43265H 4 Cycle Vertical Engine View Diagrams & Manuals
TVS90-43266D 4 Cycle Vertical Engine View Diagrams & Manuals
TVS90-43267D 4 Cycle Vertical Engine View Diagrams & Manuals
TVS90-43268D 4 Cycle Vertical Engine View Diagrams & Manuals
TVS90-43269D 4 Cycle Vertical Engine View Diagrams & Manuals
TVS90-43270D 4 Cycle Vertical Engine View Diagrams & Manuals
TVS90-43271D 4 Cycle Vertical Engine View Diagrams & Manuals
TVS90-43272D 4 Cycle Vertical Engine View Diagrams & Manuals
TVS90-43273D 4 Cycle Vertical Engine View Diagrams & Manuals
TVS90-43274D 4 Cycle Vertical Engine View Diagrams & Manuals
TVS90-43275D 4 Cycle Vertical Engine View Diagrams & Manuals
TVS90-43276D 4 Cycle Vertical Engine View Diagrams & Manuals
TVS90-43277D 4 Cycle Vertical Engine View Diagrams & Manuals
TVS90-43278D 4 Cycle Vertical Engine View Diagrams & Manuals
TVS90-43279D 4 Cycle Vertical Engine View Diagrams & Manuals
TVS90-43280D 4 Cycle Vertical Engine View Diagrams & Manuals
TVS90-43281D 4 Cycle Vertical Engine View Diagrams & Manuals
TVS90-43282D 4 Cycle Vertical Engine View Diagrams & Manuals
TVS90-43283D 4 Cycle Vertical Engine View Diagrams & Manuals
TVS90-43283E 4 Cycle Vertical Engine View Diagrams & Manuals
TVS90-43283F 4 Cycle Vertical Engine View Diagrams & Manuals
TVS90-43284D 4 Cycle Vertical Engine View Diagrams & Manuals
TVS90-43285D 4 Cycle Vertical Engine View Diagrams & Manuals
TVS90-43286D 4 Cycle Vertical Engine View Diagrams & Manuals
TVS90-43287D 4 Cycle Vertical Engine View Diagrams & Manuals
TVS90-43288D 4 Cycle Vertical Engine View Diagrams & Manuals
TVS90-43289D 4 Cycle Vertical Engine View Diagrams & Manuals
TVS90-43290D 4 Cycle Vertical Engine View Diagrams & Manuals
TVS90-43291D 4 Cycle Vertical Engine View Diagrams & Manuals
TVS90-43292D 4 Cycle Vertical Engine View Diagrams & Manuals
TVS90-43293D 4 Cycle Vertical Engine View Diagrams & Manuals
TVS90-43294D 4 Cycle Vertical Engine View Diagrams & Manuals
TVS90-43295D 4 Cycle Vertical Engine View Diagrams & Manuals
TVS90-43296D 4 Cycle Vertical Engine View Diagrams & Manuals
TVS90-43297D 4 Cycle Vertical Engine View Diagrams & Manuals
TVS90-43298D 4 Cycle Vertical Engine View Diagrams & Manuals
TVS90-43298H 4 Cycle Vertical Engine View Diagrams & Manuals
TVS90-43298J 4 Cycle Vertical Engine View Diagrams & Manuals
TVS90-43298K 4 Cycle Vertical Engine View Diagrams & Manuals
TVS90-43298L 4 Cycle Vertical Engine View Diagrams & Manuals
TVS90-43299D 4 Cycle Vertical Engine View Diagrams & Manuals
TVS90-43299G 4 Cycle Vertical Engine View Diagrams & Manuals
TVS90-43299H 4 Cycle Vertical Engine View Diagrams & Manuals
TVS90-43299J 4 Cycle Vertical Engine View Diagrams & Manuals
TVS90-43299K 4 Cycle Vertical Engine View Diagrams & Manuals
TVS90-43300D 4 Cycle Vertical Engine View Diagrams & Manuals
TVS90-43301D 4 Cycle Vertical Engine View Diagrams & Manuals
TVS90-43302D 4 Cycle Vertical Engine View Diagrams & Manuals
TVS90-43303D 4 Cycle Vertical Engine View Diagrams & Manuals
TVS90-43303E 4 Cycle Vertical Engine View Diagrams & Manuals
TVS90-43303F 4 Cycle Vertical Engine View Diagrams & Manuals
TVS90-43304D 4 Cycle Vertical Engine View Diagrams & Manuals
TVS90-43305D 4 Cycle Vertical Engine View Diagrams & Manuals
TVS90-43306D 4 Cycle Vertical Engine View Diagrams & Manuals
TVS90-43307D 4 Cycle Vertical Engine View Diagrams & Manuals
TVS90-43307E 4 Cycle Vertical Engine View Diagrams & Manuals
TVS90-43309D 4 Cycle Vertical Engine View Diagrams & Manuals
TVS90-43309F 4 Cycle Vertical Engine View Diagrams & Manuals
TVS90-43310D 4 Cycle Vertical Engine View Diagrams & Manuals
TVS90-43310F 4 Cycle Vertical Engine View Diagrams & Manuals
TVS90-43311D 4 Cycle Vertical Engine View Diagrams & Manuals
TVS90-43312D 4 Cycle Vertical Engine View Diagrams & Manuals
TVS90-43313D 4 Cycle Vertical Engine View Diagrams & Manuals
TVS90-43314D 4 Cycle Vertical Engine View Diagrams & Manuals
TVS90-43314E 4 Cycle Vertical Engine View Diagrams & Manuals
TVS90-43314F 4 Cycle Vertical Engine View Diagrams & Manuals
TVS90-43314G 4 Cycle Vertical Engine View Diagrams & Manuals
TVS90-43314H 4 Cycle Vertical Engine View Diagrams & Manuals
TVS90-43315D 4 Cycle Vertical Engine View Diagrams & Manuals
TVS90-43316D 4 Cycle Vertical Engine View Diagrams & Manuals
TVS90-43317D 4 Cycle Vertical Engine View Diagrams & Manuals
TVS90-43318D 4 Cycle Vertical Engine View Diagrams & Manuals
TVS90-43319D 4 Cycle Vertical Engine View Diagrams & Manuals
TVS90-43320D 4 Cycle Vertical Engine View Diagrams & Manuals
TVS90-43321D 4 Cycle Vertical Engine View Diagrams & Manuals
TVS90-43322D 4 Cycle Vertical Engine View Diagrams & Manuals
TVS90-43323D 4 Cycle Vertical Engine View Diagrams & Manuals
TVS90-43324D 4 Cycle Vertical Engine View Diagrams & Manuals
TVS90-43325D 4 Cycle Vertical Engine View Diagrams & Manuals
TVS90-43326D 4 Cycle Vertical Engine View Diagrams & Manuals
TVS90-43327D 4 Cycle Vertical Engine View Diagrams & Manuals
TVS90-43328D 4 Cycle Vertical Engine View Diagrams & Manuals
TVS90-43329D 4 Cycle Vertical Engine View Diagrams & Manuals
TVS90-43329E 4 Cycle Vertical Engine View Diagrams & Manuals
TVS90-43330D 4 Cycle Vertical Engine View Diagrams & Manuals
TVS90-43331D 4 Cycle Vertical Engine View Diagrams & Manuals
TVS90-43332D 4 Cycle Vertical Engine View Diagrams & Manuals
TVS90-43333D 4 Cycle Vertical Engine View Diagrams & Manuals
TVS90-43334D 4 Cycle Vertical Engine View Diagrams & Manuals
TVS90-43335D 4 Cycle Vertical Engine View Diagrams & Manuals
TVS90-43336D 4 Cycle Vertical Engine View Diagrams & Manuals
TVS90-43337D 4 Cycle Vertical Engine View Diagrams & Manuals
TVS90-43338D 4 Cycle Vertical Engine View Diagrams & Manuals
TVS90-43339D 4 Cycle Vertical Engine View Diagrams & Manuals
TVS90-43340D 4 Cycle Vertical Engine View Diagrams & Manuals
TVS90-43341D 4 Cycle Vertical Engine View Diagrams & Manuals
TVS90-43342D 4 Cycle Vertical Engine View Diagrams & Manuals
TVS90-43342E 4 Cycle Vertical Engine View Diagrams & Manuals
TVS90-43342F 4 Cycle Vertical Engine View Diagrams & Manuals
TVS90-43343D 4 Cycle Vertical Engine View Diagrams & Manuals
TVS90-43343E 4 Cycle Vertical Engine View Diagrams & Manuals
TVS90-43343F 4 Cycle Vertical Engine View Diagrams & Manuals
TVS90-43344D 4 Cycle Vertical Engine View Diagrams & Manuals
TVS90-43344E 4 Cycle Vertical Engine View Diagrams & Manuals
TVS90-43344F 4 Cycle Vertical Engine View Diagrams & Manuals
TVS90-43346E 4 Cycle Vertical Engine View Diagrams & Manuals
TVS90-43346F 4 Cycle Vertical Engine View Diagrams & Manuals
TVS90-43347E 4 Cycle Vertical Engine View Diagrams & Manuals
TVS90-43347F 4 Cycle Vertical Engine View Diagrams & Manuals
TVS90-43348E 4 Cycle Vertical Engine View Diagrams & Manuals
TVS90-43348F 4 Cycle Vertical Engine View Diagrams & Manuals
TVS90-43349D 4 Cycle Vertical Engine View Diagrams & Manuals
TVS90-43350D 4 Cycle Vertical Engine View Diagrams & Manuals
TVS90-43350E 4 Cycle Vertical Engine View Diagrams & Manuals
TVS90-43351D 4 Cycle Vertical Engine View Diagrams & Manuals
TVS90-43352E 4 Cycle Vertical Engine View Diagrams & Manuals
TVS90-43353E 4 Cycle Vertical Engine View Diagrams & Manuals
TVS90-43354E 4 Cycle Vertical Engine View Diagrams & Manuals
TVS90-43356E 4 Cycle Vertical Engine View Diagrams & Manuals
TVS90-43358E 4 Cycle Vertical Engine View Diagrams & Manuals
TVS90-43359E 4 Cycle Vertical Engine View Diagrams & Manuals
TVS90-43360E 4 Cycle Vertical Engine View Diagrams & Manuals
TVS90-43361E 4 Cycle Vertical Engine View Diagrams & Manuals
TVS90-43362E 4 Cycle Vertical Engine View Diagrams & Manuals
TVS90-43364E 4 Cycle Vertical Engine View Diagrams & Manuals
TVS90-43364F 4 Cycle Vertical Engine View Diagrams & Manuals
TVS90-43364G 4 Cycle Vertical Engine View Diagrams & Manuals
TVS90-43364H 4 Cycle Vertical Engine View Diagrams & Manuals
TVS90-43364J 4 Cycle Vertical Engine View Diagrams & Manuals
TVS90-43364K 4 Cycle Vertical Engine View Diagrams & Manuals
TVS90-43365E 4 Cycle Vertical Engine View Diagrams & Manuals
TVS90-43366E 4 Cycle Vertical Engine View Diagrams & Manuals
TVS90-43367E 4 Cycle Vertical Engine View Diagrams & Manuals
TVS90-43367F 4 Cycle Vertical Engine View Diagrams & Manuals
TVS90-43368E 4 Cycle Vertical Engine View Diagrams & Manuals
TVS90-43368F 4 Cycle Vertical Engine View Diagrams & Manuals
TVS90-43369E 4 Cycle Vertical Engine View Diagrams & Manuals
TVS90-43369F 4 Cycle Vertical Engine View Diagrams & Manuals
TVS90-43370E 4 Cycle Vertical Engine View Diagrams & Manuals
TVS90-43371E 4 Cycle Vertical Engine View Diagrams & Manuals
TVS90-43372E 4 Cycle Vertical Engine View Diagrams & Manuals
TVS90-43373E 4 Cycle Vertical Engine View Diagrams & Manuals
TVS90-43375E 4 Cycle Vertical Engine View Diagrams & Manuals
TVS90-43375F 4 Cycle Vertical Engine View Diagrams & Manuals
TVS90-43375G 4 Cycle Vertical Engine View Diagrams & Manuals
TVS90-43375H 4 Cycle Vertical Engine View Diagrams & Manuals
TVS90-43375J 4 Cycle Vertical Engine View Diagrams & Manuals
TVS90-43375K 4 Cycle Vertical Engine View Diagrams & Manuals
TVS90-43375L 4 Cycle Vertical Engine View Diagrams & Manuals
TVS90-43376E 4 Cycle Vertical Engine View Diagrams & Manuals
TVS90-43376F 4 Cycle Vertical Engine View Diagrams & Manuals
TVS90-43377E 4 Cycle Vertical Engine View Diagrams & Manuals
TVS90-43378E 4 Cycle Vertical Engine View Diagrams & Manuals
TVS90-43378F 4 Cycle Vertical Engine View Diagrams & Manuals
TVS90-43379F 4 Cycle Vertical Engine View Diagrams & Manuals
TVS90-43380F 4 Cycle Vertical Engine View Diagrams & Manuals
TVS90-43381F 4 Cycle Vertical Engine View Diagrams & Manuals
TVS90-43382F 4 Cycle Vertical Engine View Diagrams & Manuals
TVS90-43383F 4 Cycle Vertical Engine View Diagrams & Manuals
TVS90-43384F 4 Cycle Vertical Engine View Diagrams & Manuals
TVS90-43385F 4 Cycle Vertical Engine View Diagrams & Manuals
TVS90-43386F 4 Cycle Vertical Engine View Diagrams & Manuals
TVS90-43387F 4 Cycle Vertical Engine View Diagrams & Manuals
TVS90-43388F 4 Cycle Vertical Engine View Diagrams & Manuals
TVS90-43389E 4 Cycle Vertical Engine View Diagrams & Manuals
TVS90-43389F 4 Cycle Vertical Engine View Diagrams & Manuals
TVS90-43389G 4 Cycle Vertical Engine View Diagrams & Manuals
TVS90-43389H 4 Cycle Vertical Engine View Diagrams & Manuals
TVS90-43390F 4 Cycle Vertical Engine View Diagrams & Manuals
TVS90-43392F 4 Cycle Vertical Engine View Diagrams & Manuals
TVS90-43393F 4 Cycle Vertical Engine View Diagrams & Manuals
TVS90-43395F 4 Cycle Vertical Engine View Diagrams & Manuals
TVS90-43396F 4 Cycle Vertical Engine View Diagrams & Manuals
TVS90-43397F 4 Cycle Vertical Engine View Diagrams & Manuals
TVS90-43398F 4 Cycle Vertical Engine View Diagrams & Manuals
TVS90-43399F 4 Cycle Vertical Engine View Diagrams & Manuals
TVS90-43400F 4 Cycle Vertical Engine View Diagrams & Manuals
TVS90-43400G 4 Cycle Vertical Engine View Diagrams & Manuals
TVS90-43400H 4 Cycle Vertical Engine View Diagrams & Manuals
TVS90-43400J 4 Cycle Vertical Engine View Diagrams & Manuals
TVS90-43401F 4 Cycle Vertical Engine View Diagrams & Manuals
TVS90-43402F 4 Cycle Vertical Engine View Diagrams & Manuals
TVS90-43403F 4 Cycle Vertical Engine View Diagrams & Manuals
TVS90-43404F 4 Cycle Vertical Engine View Diagrams & Manuals
TVS90-43405F 4 Cycle Vertical Engine View Diagrams & Manuals
TVS90-43406F 4 Cycle Vertical Engine View Diagrams & Manuals
TVS90-43407F 4 Cycle Vertical Engine View Diagrams & Manuals
TVS90-43407G 4 Cycle Vertical Engine View Diagrams & Manuals
TVS90-43407H 4 Cycle Vertical Engine View Diagrams & Manuals
TVS90-43407J 4 Cycle Vertical Engine View Diagrams & Manuals
TVS90-43408F 4 Cycle Vertical Engine View Diagrams & Manuals
TVS90-43408G 4 Cycle Vertical Engine View Diagrams & Manuals
TVS90-43409F 4 Cycle Vertical Engine View Diagrams & Manuals
TVS90-43410F 4 Cycle Vertical Engine View Diagrams & Manuals
TVS90-43411F 4 Cycle Vertical Engine View Diagrams & Manuals
TVS90-43412F 4 Cycle Vertical Engine View Diagrams & Manuals
TVS90-43413F 4 Cycle Vertical Engine View Diagrams & Manuals
TVS90-43414F 4 Cycle Vertical Engine View Diagrams & Manuals
TVS90-43415F 4 Cycle Vertical Engine View Diagrams & Manuals
TVS90-43416F 4 Cycle Vertical Engine View Diagrams & Manuals
TVS90-43416G 4 Cycle Vertical Engine View Diagrams & Manuals
TVS90-43417F 4 Cycle Vertical Engine View Diagrams & Manuals
TVS90-43418F 4 Cycle Vertical Engine View Diagrams & Manuals
TVS90-43419F 4 Cycle Vertical Engine View Diagrams & Manuals
TVS90-43420F 4 Cycle Vertical Engine View Diagrams & Manuals
TVS90-43421F 4 Cycle Vertical Engine View Diagrams & Manuals
TVS90-43422F 4 Cycle Vertical Engine View Diagrams & Manuals
TVS90-43423F 4 Cycle Vertical Engine View Diagrams & Manuals
TVS90-43424F 4 Cycle Vertical Engine View Diagrams & Manuals
TVS90-43425F 4 Cycle Vertical Engine View Diagrams & Manuals
TVS90-43426F 4 Cycle Vertical Engine View Diagrams & Manuals
TVS90-43428F 4 Cycle Vertical Engine View Diagrams & Manuals
TVS90-43432F 4 Cycle Vertical Engine View Diagrams & Manuals
TVS90-43432G 4 Cycle Vertical Engine View Diagrams & Manuals
TVS90-43432H 4 Cycle Vertical Engine View Diagrams & Manuals
TVS90-43432J 4 Cycle Vertical Engine View Diagrams & Manuals
TVS90-43432K 4 Cycle Vertical Engine View Diagrams & Manuals
TVS90-43432L 4 Cycle Vertical Engine View Diagrams & Manuals
TVS90-43433F 4 Cycle Vertical Engine View Diagrams & Manuals
TVS90-43437F 4 Cycle Vertical Engine View Diagrams & Manuals
TVS90-43438F 4 Cycle Vertical Engine View Diagrams & Manuals
TVS90-43441F 4 Cycle Vertical Engine View Diagrams & Manuals
TVS90-43443F 4 Cycle Vertical Engine View Diagrams & Manuals
TVS90-43444F 4 Cycle Vertical Engine View Diagrams & Manuals
TVS90-43445F 4 Cycle Vertical Engine View Diagrams & Manuals
TVS90-43446F 4 Cycle Vertical Engine View Diagrams & Manuals
TVS90-43448F 4 Cycle Vertical Engine View Diagrams & Manuals
TVS90-43451F 4 Cycle Vertical Engine View Diagrams & Manuals
TVS90-43453F 4 Cycle Vertical Engine View Diagrams & Manuals
TVS90-43453G 4 Cycle Vertical Engine View Diagrams & Manuals
TVS90-43453H 4 Cycle Vertical Engine View Diagrams & Manuals
TVS90-43453J 4 Cycle Vertical Engine View Diagrams & Manuals
TVS90-43453K 4 Cycle Vertical Engine View Diagrams & Manuals
TVS90-43453L 4 Cycle Vertical Engine View Diagrams & Manuals
TVS90-43453M 4 Cycle Vertical Engine View Diagrams & Manuals
TVS90-43453N 4 Cycle Vertical Engine View Diagrams & Manuals
TVS90-43453P 4 Cycle Vertical Engine View Diagrams & Manuals
TVS90-43453R 4 Cycle Vertical Engine View Diagrams & Manuals
TVS90-43454F 4 Cycle Vertical Engine View Diagrams & Manuals
TVS90-43455F 4 Cycle Vertical Engine View Diagrams & Manuals
TVS90-43456F 4 Cycle Vertical Engine View Diagrams & Manuals
TVS90-43457F 4 Cycle Vertical Engine View Diagrams & Manuals
TVS90-43458F 4 Cycle Vertical Engine View Diagrams & Manuals
TVS90-43459F 4 Cycle Vertical Engine View Diagrams & Manuals
TVS90-43468F 4 Cycle Vertical Engine View Diagrams & Manuals
TVS90-43468G 4 Cycle Vertical Engine View Diagrams & Manuals
TVS90-43468H 4 Cycle Vertical Engine View Diagrams & Manuals
TVS90-43468J 4 Cycle Vertical Engine View Diagrams & Manuals
TVS90-43468K 4 Cycle Vertical Engine View Diagrams & Manuals
TVS90-43476F 4 Cycle Vertical Engine View Diagrams & Manuals
TVS90-43477F 4 Cycle Vertical Engine View Diagrams & Manuals
TVS90-43484F 4 Cycle Vertical Engine View Diagrams & Manuals
TVS90-43485F 4 Cycle Vertical Engine View Diagrams & Manuals
TVS90-43486F 4 Cycle Vertical Engine View Diagrams & Manuals
TVS90-43490F 4 Cycle Vertical Engine View Diagrams & Manuals
TVS90-43491F 4 Cycle Vertical Engine View Diagrams & Manuals
TVS90-43492F 4 Cycle Vertical Engine View Diagrams & Manuals
TVS90-43492G 4 Cycle Vertical Engine View Diagrams & Manuals
TVS90-43494F 4 Cycle Vertical Engine View Diagrams & Manuals
TVS90-43494G 4 Cycle Vertical Engine View Diagrams & Manuals
TVS90-43496F 4 Cycle Vertical Engine View Diagrams & Manuals
TVS90-43496G 4 Cycle Vertical Engine View Diagrams & Manuals
TVS90-43497F 4 Cycle Vertical Engine View Diagrams & Manuals
TVS90-43497G 4 Cycle Vertical Engine View Diagrams & Manuals
TVS90-43497H 4 Cycle Vertical Engine View Diagrams & Manuals
TVS90-43497J 4 Cycle Vertical Engine View Diagrams & Manuals
TVS90-43498F 4 Cycle Vertical Engine View Diagrams & Manuals
TVS90-43499F 4 Cycle Vertical Engine View Diagrams & Manuals
TVS90-43500F 4 Cycle Vertical Engine View Diagrams & Manuals
TVS90-43501F 4 Cycle Vertical Engine View Diagrams & Manuals
TVS90-43502F 4 Cycle Vertical Engine View Diagrams & Manuals
TVS90-43502G 4 Cycle Vertical Engine View Diagrams & Manuals
TVS90-43502H 4 Cycle Vertical Engine View Diagrams & Manuals
TVS90-43502K 4 Cycle Vertical Engine View Diagrams & Manuals
TVS90-43504F 4 Cycle Vertical Engine View Diagrams & Manuals
TVS90-43504G 4 Cycle Vertical Engine View Diagrams & Manuals
TVS90-43504H 4 Cycle Vertical Engine View Diagrams & Manuals
TVS90-43504J 4 Cycle Vertical Engine View Diagrams & Manuals
TVS90-43508F 4 Cycle Vertical Engine View Diagrams & Manuals
TVS90-43508J 4 Cycle Vertical Engine View Diagrams & Manuals
TVS90-43508K 4 Cycle Vertical Engine View Diagrams & Manuals
TVS90-43508L 4 Cycle Vertical Engine View Diagrams & Manuals
TVS90-43509F 4 Cycle Vertical Engine View Diagrams & Manuals
TVS90-43512G 4 Cycle Vertical Engine View Diagrams & Manuals
TVS90-43512J 4 Cycle Vertical Engine View Diagrams & Manuals
TVS90-43512K 4 Cycle Vertical Engine View Diagrams & Manuals
TVS90-43512L 4 Cycle Vertical Engine View Diagrams & Manuals
TVS90-43513G 4 Cycle Vertical Engine View Diagrams & Manuals
TVS90-43513H 4 Cycle Vertical Engine View Diagrams & Manuals
TVS90-43513J 4 Cycle Vertical Engine View Diagrams & Manuals
TVS90-43513K 4 Cycle Vertical Engine View Diagrams & Manuals
TVS90-43513L 4 Cycle Vertical Engine View Diagrams & Manuals
TVS90-43514G 4 Cycle Vertical Engine View Diagrams & Manuals
TVS90-43514H 4 Cycle Vertical Engine View Diagrams & Manuals
TVS90-43514J 4 Cycle Vertical Engine View Diagrams & Manuals
TVS90-43514K 4 Cycle Vertical Engine View Diagrams & Manuals
TVS90-43514L 4 Cycle Vertical Engine View Diagrams & Manuals
TVS90-43515G 4 Cycle Vertical Engine View Diagrams & Manuals
TVS90-43515H 4 Cycle Vertical Engine View Diagrams & Manuals
TVS90-43515J 4 Cycle Vertical Engine View Diagrams & Manuals
TVS90-43515K 4 Cycle Vertical Engine View Diagrams & Manuals
TVS90-43515L 4 Cycle Vertical Engine View Diagrams & Manuals
TVS90-43515M 4 Cycle Vertical Engine View Diagrams & Manuals
TVS90-43515N 4 Cycle Vertical Engine View Diagrams & Manuals
TVS90-43516J 4 Cycle Vertical Engine View Diagrams & Manuals
TVS90-43517G 4 Cycle Vertical Engine View Diagrams & Manuals
TVS90-43518G 4 Cycle Vertical Engine View Diagrams & Manuals
TVS90-43518H 4 Cycle Vertical Engine View Diagrams & Manuals
TVS90-43518J 4 Cycle Vertical Engine View Diagrams & Manuals
TVS90-43518K 4 Cycle Vertical Engine View Diagrams & Manuals
TVS90-43518L 4 Cycle Vertical Engine View Diagrams & Manuals
TVS90-43518M 4 Cycle Vertical Engine View Diagrams & Manuals
TVS90-43518N 4 Cycle Vertical Engine View Diagrams & Manuals
TVS90-43519G 4 Cycle Vertical Engine View Diagrams & Manuals
TVS90-43521G 4 Cycle Vertical Engine View Diagrams & Manuals
TVS90-43522G 4 Cycle Vertical Engine View Diagrams & Manuals
TVS90-43525G 4 Cycle Vertical Engine View Diagrams & Manuals
TVS90-43526G 4 Cycle Vertical Engine View Diagrams & Manuals
TVS90-43526H 4 Cycle Vertical Engine View Diagrams & Manuals
TVS90-43526J 4 Cycle Vertical Engine View Diagrams & Manuals
TVS90-43528G 4 Cycle Vertical Engine View Diagrams & Manuals
TVS90-43528H 4 Cycle Vertical Engine View Diagrams & Manuals
TVS90-43528J 4 Cycle Vertical Engine View Diagrams & Manuals
TVS90-43529G 4 Cycle Vertical Engine View Diagrams & Manuals
TVS90-43530G 4 Cycle Vertical Engine View Diagrams & Manuals
TVS90-43531G 4 Cycle Vertical Engine View Diagrams & Manuals
TVS90-43532G 4 Cycle Vertical Engine View Diagrams & Manuals
TVS90-43534G 4 Cycle Vertical Engine View Diagrams & Manuals
TVS90-43536G 4 Cycle Vertical Engine View Diagrams & Manuals
TVS90-43536H 4 Cycle Vertical Engine View Diagrams & Manuals
TVS90-43536J 4 Cycle Vertical Engine View Diagrams & Manuals
TVS90-43536K 4 Cycle Vertical Engine View Diagrams & Manuals
TVS90-43537G 4 Cycle Vertical Engine View Diagrams & Manuals
TVS90-43538G 4 Cycle Vertical Engine View Diagrams & Manuals
TVS90-43538H 4 Cycle Vertical Engine View Diagrams & Manuals
TVS90-43538J 4 Cycle Vertical Engine View Diagrams & Manuals
TVS90-43538K 4 Cycle Vertical Engine View Diagrams & Manuals
TVS90-43539G 4 Cycle Vertical Engine View Diagrams & Manuals
TVS90-43540G 4 Cycle Vertical Engine View Diagrams & Manuals
TVS90-43540H 4 Cycle Vertical Engine View Diagrams & Manuals
TVS90-43540J 4 Cycle Vertical Engine View Diagrams & Manuals
TVS90-43540K 4 Cycle Vertical Engine View Diagrams & Manuals
TVS90-43541H 4 Cycle Vertical Engine View Diagrams & Manuals
TVS90-43542H 4 Cycle Vertical Engine View Diagrams & Manuals
TVS90-43544J 4 Cycle Vertical Engine View Diagrams & Manuals
TVS90-43544K 4 Cycle Vertical Engine View Diagrams & Manuals
TVS90-43545H 4 Cycle Vertical Engine View Diagrams & Manuals
TVS90-43546H 4 Cycle Vertical Engine View Diagrams & Manuals
TVS90-43547H 4 Cycle Vertical Engine View Diagrams & Manuals
TVS90-43549H 4 Cycle Vertical Engine View Diagrams & Manuals
TVS90-43549J 4 Cycle Vertical Engine View Diagrams & Manuals
TVS90-43550H 4 Cycle Vertical Engine View Diagrams & Manuals
TVS90-43551H 4 Cycle Vertical Engine View Diagrams & Manuals
TVS90-43552H 4 Cycle Vertical Engine View Diagrams & Manuals
TVS90-43552J 4 Cycle Vertical Engine View Diagrams & Manuals
TVS90-43552K 4 Cycle Vertical Engine View Diagrams & Manuals
TVS90-43552L 4 Cycle Vertical Engine View Diagrams & Manuals
TVS90-43552N 4 Cycle Vertical Engine View Diagrams & Manuals
TVS90-43553H 4 Cycle Vertical Engine View Diagrams & Manuals
TVS90-43553J 4 Cycle Vertical Engine View Diagrams & Manuals
TVS90-43554H 4 Cycle Vertical Engine View Diagrams & Manuals
TVS90-43555H 4 Cycle Vertical Engine View Diagrams & Manuals
TVS90-43556H 4 Cycle Vertical Engine View Diagrams & Manuals
TVS90-43557H 4 Cycle Vertical Engine View Diagrams & Manuals
TVS90-43558H 4 Cycle Vertical Engine View Diagrams & Manuals
TVS90-43559H 4 Cycle Vertical Engine View Diagrams & Manuals
TVS90-43560H 4 Cycle Vertical Engine View Diagrams & Manuals
TVS90-43561H 4 Cycle Vertical Engine View Diagrams & Manuals
TVS90-43562H 4 Cycle Vertical Engine View Diagrams & Manuals
TVS90-43566H 4 Cycle Vertical Engine View Diagrams & Manuals
TVS90-43566J 4 Cycle Vertical Engine View Diagrams & Manuals
TVS90-43566K 4 Cycle Vertical Engine View Diagrams & Manuals
TVS90-43567J 4 Cycle Vertical Engine View Diagrams & Manuals
TVS90-43568H 4 Cycle Vertical Engine View Diagrams & Manuals
TVS90-43569H 4 Cycle Vertical Engine View Diagrams & Manuals
TVS90-43569K 4 Cycle Vertical Engine View Diagrams & Manuals
TVS90-43571H 4 Cycle Vertical Engine View Diagrams & Manuals
TVS90-43572J 4 Cycle Vertical Engine View Diagrams & Manuals
TVS90-43572K 4 Cycle Vertical Engine View Diagrams & Manuals
TVS90-43573J 4 Cycle Vertical Engine View Diagrams & Manuals
TVS90-43574J 4 Cycle Vertical Engine View Diagrams & Manuals
TVS90-43574K 4 Cycle Vertical Engine View Diagrams & Manuals
TVS90-43575J 4 Cycle Vertical Engine View Diagrams & Manuals
TVS90-43575K 4 Cycle Vertical Engine View Diagrams & Manuals
TVS90-43575L 4 Cycle Vertical Engine View Diagrams & Manuals
TVS90-43576J 4 Cycle Vertical Engine View Diagrams & Manuals
TVS90-43576K 4 Cycle Vertical Engine View Diagrams & Manuals
TVS90-43576L 4 Cycle Vertical Engine View Diagrams & Manuals
TVS90-43576M 4 Cycle Vertical Engine View Diagrams & Manuals
TVS90-43576N 4 Cycle Vertical Engine View Diagrams & Manuals
TVS90-43577J 4 Cycle Vertical Engine View Diagrams & Manuals
TVS90-43577K 4 Cycle Vertical Engine View Diagrams & Manuals
TVS90-43578J 4 Cycle Vertical Engine View Diagrams & Manuals
TVS90-43578K 4 Cycle Vertical Engine View Diagrams & Manuals
TVS90-43581J 4 Cycle Vertical Engine View Diagrams & Manuals
TVS90-43581K 4 Cycle Vertical Engine View Diagrams & Manuals
TVS90-43582J 4 Cycle Vertical Engine View Diagrams & Manuals
TVS90-43583J 4 Cycle Vertical Engine View Diagrams & Manuals
TVS90-43584J 4 Cycle Vertical Engine View Diagrams & Manuals
TVS90-43585J 4 Cycle Vertical Engine View Diagrams & Manuals
TVS90-43585K 4 Cycle Vertical Engine View Diagrams & Manuals
TVS90-43586J 4 Cycle Vertical Engine View Diagrams & Manuals
TVS90-43587K 4 Cycle Vertical Engine View Diagrams & Manuals
TVS90-43587L 4 Cycle Vertical Engine View Diagrams & Manuals
TVS90-43588K 4 Cycle Vertical Engine View Diagrams & Manuals
TVS90-43589K 4 Cycle Vertical Engine View Diagrams & Manuals
TVS90-43589L 4 Cycle Vertical Engine View Diagrams & Manuals
TVS90-43590K 4 Cycle Vertical Engine View Diagrams & Manuals
TVS90-43591K 4 Cycle Vertical Engine View Diagrams & Manuals
TVS90-43592K 4 Cycle Vertical Engine View Diagrams & Manuals
TVS90-43592L 4 Cycle Vertical Engine View Diagrams & Manuals
TVS90-43592M 4 Cycle Vertical Engine View Diagrams & Manuals
TVS90-43592N 4 Cycle Vertical Engine View Diagrams & Manuals
TVS90-43592P 4 Cycle Vertical Engine View Diagrams & Manuals
TVS90-43593K 4 Cycle Vertical Engine View Diagrams & Manuals
TVS90-43594K 4 Cycle Vertical Engine View Diagrams & Manuals
TVS90-43594L 4 Cycle Vertical Engine View Diagrams & Manuals
TVS90-43594M 4 Cycle Vertical Engine View Diagrams & Manuals
TVS90-43594N 4 Cycle Vertical Engine View Diagrams & Manuals
TVS90-43595K 4 Cycle Vertical Engine View Diagrams & Manuals
TVS90-43597K 4 Cycle Vertical Engine View Diagrams & Manuals
TVS90-43599K 4 Cycle Vertical Engine View Diagrams & Manuals
TVS90-43600E 4 Cycle Vertical Engine View Diagrams & Manuals
TVS90-43602E 4 Cycle Vertical Engine View Diagrams & Manuals
TVS90-43603E 4 Cycle Vertical Engine View Diagrams & Manuals
TVS90-43603F 4 Cycle Vertical Engine View Diagrams & Manuals
TVS90-43604F 4 Cycle Vertical Engine View Diagrams & Manuals
TVS90-43604H 4 Cycle Vertical Engine View Diagrams & Manuals
TVS90-43605E 4 Cycle Vertical Engine View Diagrams & Manuals
TVS90-43605F 4 Cycle Vertical Engine View Diagrams & Manuals
TVS90-43606E 4 Cycle Vertical Engine View Diagrams & Manuals
TVS90-43606F 4 Cycle Vertical Engine View Diagrams & Manuals
TVS90-43607F 4 Cycle Vertical Engine View Diagrams & Manuals
TVS90-43608F 4 Cycle Vertical Engine View Diagrams & Manuals
TVS90-43609F 4 Cycle Vertical Engine View Diagrams & Manuals
TVS90-43610F 4 Cycle Vertical Engine View Diagrams & Manuals
TVS90-43611F 4 Cycle Vertical Engine View Diagrams & Manuals
TVS90-43612F 4 Cycle Vertical Engine View Diagrams & Manuals
TVS90-43613F 4 Cycle Vertical Engine View Diagrams & Manuals
TVS90-43614F 4 Cycle Vertical Engine View Diagrams & Manuals
TVS90-43615F 4 Cycle Vertical Engine View Diagrams & Manuals
TVS90-43616F 4 Cycle Vertical Engine View Diagrams & Manuals
TVS90-43617F 4 Cycle Vertical Engine View Diagrams & Manuals
TVS90-43618F 4 Cycle Vertical Engine View Diagrams & Manuals
TVS90-43619F 4 Cycle Vertical Engine View Diagrams & Manuals
TVS90-43620F 4 Cycle Vertical Engine View Diagrams & Manuals
TVS90-43621F 4 Cycle Vertical Engine View Diagrams & Manuals
TVS90-43622F 4 Cycle Vertical Engine View Diagrams & Manuals
TVS90-43622G 4 Cycle Vertical Engine View Diagrams & Manuals
TVS90-43622H 4 Cycle Vertical Engine View Diagrams & Manuals
TVS90-43622K 4 Cycle Vertical Engine View Diagrams & Manuals
TVS90-43624F 4 Cycle Vertical Engine View Diagrams & Manuals
TVS90-43624G 4 Cycle Vertical Engine View Diagrams & Manuals
TVS90-43625F 4 Cycle Vertical Engine View Diagrams & Manuals
TVS90-43625G 4 Cycle Vertical Engine View Diagrams & Manuals
TVS90-43626F 4 Cycle Vertical Engine View Diagrams & Manuals
TVS90-43626G 4 Cycle Vertical Engine View Diagrams & Manuals
TVS90-43627F 4 Cycle Vertical Engine View Diagrams & Manuals
TVS90-43628F 4 Cycle Vertical Engine View Diagrams & Manuals
TVS90-43628G 4 Cycle Vertical Engine View Diagrams & Manuals
TVS90-43630F 4 Cycle Vertical Engine View Diagrams & Manuals
TVS90-43630G 4 Cycle Vertical Engine View Diagrams & Manuals
TVS90-43631F 4 Cycle Vertical Engine View Diagrams & Manuals
TVS90-43632F 4 Cycle Vertical Engine View Diagrams & Manuals
TVS90-43633G 4 Cycle Vertical Engine View Diagrams & Manuals
TVS90-43634H 4 Cycle Vertical Engine View Diagrams & Manuals
TVS90-43635H 4 Cycle Vertical Engine View Diagrams & Manuals
TVS90-43636H 4 Cycle Vertical Engine View Diagrams & Manuals
TVS90-43637H 4 Cycle Vertical Engine View Diagrams & Manuals
TVS90-43637J 4 Cycle Vertical Engine View Diagrams & Manuals
TVS90-43638H 4 Cycle Vertical Engine View Diagrams & Manuals
TVS90-43639H 4 Cycle Vertical Engine View Diagrams & Manuals
TVS90-43639J 4 Cycle Vertical Engine View Diagrams & Manuals
TVS90-43700K 4 Cycle Vertical Engine View Diagrams & Manuals
TVS90-43700L 4 Cycle Vertical Engine View Diagrams & Manuals
TVS90-43701L 4 Cycle Vertical Engine View Diagrams & Manuals
TVS90-43701M 4 Cycle Vertical Engine View Diagrams & Manuals
TVS90-43701N 4 Cycle Vertical Engine View Diagrams & Manuals
TVS90-43701P 4 Cycle Vertical Engine View Diagrams & Manuals
TVS90-43702K 4 Cycle Vertical Engine View Diagrams & Manuals
TVS90-43703L 4 Cycle Vertical Engine View Diagrams & Manuals
TVS90-43703M 4 Cycle Vertical Engine View Diagrams & Manuals
TVS90-43703N 4 Cycle Vertical Engine View Diagrams & Manuals
TVS90-43703P 4 Cycle Vertical Engine View Diagrams & Manuals
TVS90-43703R 4 Cycle Vertical Engine View Diagrams & Manuals
TVS90-43704L 4 Cycle Vertical Engine View Diagrams & Manuals
TVS90-43704M 4 Cycle Vertical Engine View Diagrams & Manuals
TVS90-43704N 4 Cycle Vertical Engine View Diagrams & Manuals
TVS90-43704P 4 Cycle Vertical Engine View Diagrams & Manuals
TVS90-43705L 4 Cycle Vertical Engine View Diagrams & Manuals
TVS90-43705M 4 Cycle Vertical Engine View Diagrams & Manuals
TVS90-43705N 4 Cycle Vertical Engine View Diagrams & Manuals
TVS90-43705P 4 Cycle Vertical Engine View Diagrams & Manuals
TVS90-43705R 4 Cycle Vertical Engine View Diagrams & Manuals
TVS90-43706L 4 Cycle Vertical Engine View Diagrams & Manuals
TVS90-43706M 4 Cycle Vertical Engine View Diagrams & Manuals
TVS90-43707L 4 Cycle Vertical Engine View Diagrams & Manuals
TVS90-43709L 4 Cycle Vertical Engine View Diagrams & Manuals
TVS90-43709M 4 Cycle Vertical Engine View Diagrams & Manuals
TVS90-43709N 4 Cycle Vertical Engine View Diagrams & Manuals
TVS90-43710L 4 Cycle Vertical Engine View Diagrams & Manuals
TVS90-43710M 4 Cycle Vertical Engine View Diagrams & Manuals
TVS90-43710N 4 Cycle Vertical Engine View Diagrams & Manuals
TVS90-43711L 4 Cycle Vertical Engine View Diagrams & Manuals
TVS90-43711M 4 Cycle Vertical Engine View Diagrams & Manuals
TVS90-43711N 4 Cycle Vertical Engine View Diagrams & Manuals
TVS90-43713L 4 Cycle Vertical Engine View Diagrams & Manuals
TVS90-43714L 4 Cycle Vertical Engine View Diagrams & Manuals
TVS90-43715L 4 Cycle Vertical Engine View Diagrams & Manuals
TVS90-43716L 4 Cycle Vertical Engine View Diagrams & Manuals
TVS90-43717L 4 Cycle Vertical Engine View Diagrams & Manuals
TVS90-43718L 4 Cycle Vertical Engine View Diagrams & Manuals
TVS90-43719L 4 Cycle Vertical Engine View Diagrams & Manuals
TVS90-43721L 4 Cycle Vertical Engine View Diagrams & Manuals
TVS90-43722L 4 Cycle Vertical Engine View Diagrams & Manuals
TVS90-43722M 4 Cycle Vertical Engine View Diagrams & Manuals
TVS90-43722N 4 Cycle Vertical Engine View Diagrams & Manuals
TVS90-43725L 4 Cycle Vertical Engine View Diagrams & Manuals
TVS90-43726L 4 Cycle Vertical Engine View Diagrams & Manuals
TVS90-43726M 4 Cycle Vertical Engine View Diagrams & Manuals
TVS90-43726N 4 Cycle Vertical Engine View Diagrams & Manuals
TVS90-43726P 4 Cycle Vertical Engine View Diagrams & Manuals
TVS90-43727M 4 Cycle Vertical Engine View Diagrams & Manuals
TVS90-43727N 4 Cycle Vertical Engine View Diagrams & Manuals
TVS90-43729M 4 Cycle Vertical Engine View Diagrams & Manuals
TVS90-43729N 4 Cycle Vertical Engine View Diagrams & Manuals
TVS90-43730M 4 Cycle Vertical Engine View Diagrams & Manuals
TVS90-43731M 4 Cycle Vertical Engine View Diagrams & Manuals
TVS90-43731N 4 Cycle Vertical Engine View Diagrams & Manuals
TVS90-43731P 4 Cycle Vertical Engine View Diagrams & Manuals
TVS90-43732M 4 Cycle Vertical Engine View Diagrams & Manuals
TVS90-43732N 4 Cycle Vertical Engine View Diagrams & Manuals
TVS90-43732P 4 Cycle Vertical Engine View Diagrams & Manuals
TVS90-43732R 4 Cycle Vertical Engine View Diagrams & Manuals
TVS90-43733M 4 Cycle Vertical Engine View Diagrams & Manuals
TVS90-43734M 4 Cycle Vertical Engine View Diagrams & Manuals
TVS90-43734N 4 Cycle Vertical Engine View Diagrams & Manuals
TVS90-43734P 4 Cycle Vertical Engine View Diagrams & Manuals
TVS90-43734R 4 Cycle Vertical Engine View Diagrams & Manuals
TVS90-43736M 4 Cycle Vertical Engine View Diagrams & Manuals
TVS90-43737M 4 Cycle Vertical Engine View Diagrams & Manuals
TVS90-43738M 4 Cycle Vertical Engine View Diagrams & Manuals
TVS90-43739M 4 Cycle Vertical Engine View Diagrams & Manuals
TVS90-43739N 4 Cycle Vertical Engine View Diagrams & Manuals
TVS90-43742N 4 Cycle Vertical Engine View Diagrams & Manuals
TVS90-43744N 4 Cycle Vertical Engine View Diagrams & Manuals
TVS90-43745N 4 Cycle Vertical Engine View Diagrams & Manuals
TVS90-43746N 4 Cycle Vertical Engine View Diagrams & Manuals
TVS90-43746P 4 Cycle Vertical Engine View Diagrams & Manuals
TVS90-43746R 4 Cycle Vertical Engine View Diagrams & Manuals
TVS90-43747N 4 Cycle Vertical Engine View Diagrams & Manuals
TVS90-43748N 4 Cycle Vertical Engine View Diagrams & Manuals
TVS90-43749N 4 Cycle Vertical Engine View Diagrams & Manuals
TVS90-43750N 4 Cycle Vertical Engine View Diagrams & Manuals
TVS90-43751N 4 Cycle Vertical Engine View Diagrams & Manuals
TVS90-43751P 4 Cycle Vertical Engine View Diagrams & Manuals
TVS90-43751R 4 Cycle Vertical Engine View Diagrams & Manuals
TVS90-43752N 4 Cycle Vertical Engine View Diagrams & Manuals
TVS90-43752P 4 Cycle Vertical Engine View Diagrams & Manuals
TVS90-43754N 4 Cycle Vertical Engine View Diagrams & Manuals
TVS90-43754P 4 Cycle Vertical Engine View Diagrams & Manuals
TVS90-43754R 4 Cycle Vertical Engine View Diagrams & Manuals
TVS90-43755N 4 Cycle Vertical Engine View Diagrams & Manuals
TVS90-43756P 4 Cycle Vertical Engine View Diagrams & Manuals
TVS90-43756R 4 Cycle Vertical Engine View Diagrams & Manuals
TVS90-43757P 4 Cycle Vertical Engine View Diagrams & Manuals
TVS90-43757R 4 Cycle Vertical Engine View Diagrams & Manuals
TVS90-43758P 4 Cycle Vertical Engine View Diagrams & Manuals
TVS90-43758R 4 Cycle Vertical Engine View Diagrams & Manuals
TVS90-43759P 4 Cycle Vertical Engine View Diagrams & Manuals
TVS90-43760P 4 Cycle Vertical Engine View Diagrams & Manuals
TVS90-43760R 4 Cycle Vertical Engine View Diagrams & Manuals
TVS90-43761P 4 Cycle Vertical Engine View Diagrams & Manuals
TVS90-43762P 4 Cycle Vertical Engine View Diagrams & Manuals
TVS90-43762R 4 Cycle Vertical Engine View Diagrams & Manuals
TVS90-43763P 4 Cycle Vertical Engine View Diagrams & Manuals
TVS90-43763R 4 Cycle Vertical Engine View Diagrams & Manuals
TVS90-43766R 4 Cycle Vertical Engine View Diagrams & Manuals
TVS90-43766S 4 Cycle Vertical Engine View Diagrams & Manuals
TVS90-43767R 4 Cycle Vertical Engine View Diagrams & Manuals
TVS90-43767S 4 Cycle Vertical Engine View Diagrams & Manuals
TVS90-43768R 4 Cycle Vertical Engine View Diagrams & Manuals
TVS90-43770R 4 Cycle Vertical Engine View Diagrams & Manuals
TVS90-43770S 4 Cycle Vertical Engine View Diagrams & Manuals
TVS90-43771R 4 Cycle Vertical Engine View Diagrams & Manuals
TVS90-43773R 4 Cycle Vertical Engine View Diagrams & Manuals
TVS90-43775R 4 Cycle Vertical Engine View Diagrams & Manuals
TVS90-43901G 4 Cycle Vertical Engine View Diagrams & Manuals
TVS90-46001 4 Cycle Vertical Engine View Diagrams & Manuals
TVS90-46001A 4 Cycle Vertical Engine View Diagrams & Manuals
TVS90-46002 4 Cycle Vertical Engine View Diagrams & Manuals
TVS90-46002A 4 Cycle Vertical Engine View Diagrams & Manuals
TVS90-46003 4 Cycle Vertical Engine View Diagrams & Manuals
TVS90-46005 4 Cycle Vertical Engine View Diagrams & Manuals
TVS90-46006 4 Cycle Vertical Engine View Diagrams & Manuals
TVS90-46006A 4 Cycle Vertical Engine View Diagrams & Manuals
TVS90-46007 4 Cycle Vertical Engine View Diagrams & Manuals
TVS90-46008 4 Cycle Vertical Engine View Diagrams & Manuals
TVS90-46008A 4 Cycle Vertical Engine View Diagrams & Manuals
TVS90-46008B 4 Cycle Vertical Engine View Diagrams & Manuals
TVS90-46009 4 Cycle Vertical Engine View Diagrams & Manuals
TVS90-46009A 4 Cycle Vertical Engine View Diagrams & Manuals
TVS90-46009B 4 Cycle Vertical Engine View Diagrams & Manuals
TVS90-46009C 4 Cycle Vertical Engine View Diagrams & Manuals
TVS90-46010 4 Cycle Vertical Engine View Diagrams & Manuals
TVS90-46010A 4 Cycle Vertical Engine View Diagrams & Manuals
TVS90-46010B 4 Cycle Vertical Engine View Diagrams & Manuals
TVS90-46011 4 Cycle Vertical Engine View Diagrams & Manuals
TVS90-46012 4 Cycle Vertical Engine View Diagrams & Manuals
TVS90-46013 4 Cycle Vertical Engine View Diagrams & Manuals
TVS90-46015 4 Cycle Vertical Engine View Diagrams & Manuals
TVS90-46017 4 Cycle Vertical Engine View Diagrams & Manuals
TVS90-46018 4 Cycle Vertical Engine View Diagrams & Manuals
TVS90-46019 4 Cycle Vertical Engine View Diagrams & Manuals
TVS90-46021 4 Cycle Vertical Engine View Diagrams & Manuals
TVS90-46021A 4 Cycle Vertical Engine View Diagrams & Manuals
TVS90-46022 4 Cycle Vertical Engine View Diagrams & Manuals
TVS90-46024 4 Cycle Vertical Engine View Diagrams & Manuals
TVS90-46024A 4 Cycle Vertical Engine View Diagrams & Manuals
TVS90-46025 4 Cycle Vertical Engine View Diagrams & Manuals
TVS90-46026 4 Cycle Vertical Engine View Diagrams & Manuals
TVS90-46027 4 Cycle Vertical Engine View Diagrams & Manuals
TVS90-46028 4 Cycle Vertical Engine View Diagrams & Manuals
TVS90-46028B 4 Cycle Vertical Engine View Diagrams & Manuals
TVS90-46029A 4 Cycle Vertical Engine View Diagrams & Manuals
TVS90-46030A 4 Cycle Vertical Engine View Diagrams & Manuals
TVS90-46031A 4 Cycle Vertical Engine View Diagrams & Manuals
TVS90-46032A 4 Cycle Vertical Engine View Diagrams & Manuals
TVS90-46035A 4 Cycle Vertical Engine View Diagrams & Manuals
TVS90-46035B 4 Cycle Vertical Engine View Diagrams & Manuals
TVS90-46035C 4 Cycle Vertical Engine View Diagrams & Manuals
TVS90-46036A 4 Cycle Vertical Engine View Diagrams & Manuals
TVS90-46036B 4 Cycle Vertical Engine View Diagrams & Manuals
TVS90-46037A 4 Cycle Vertical Engine View Diagrams & Manuals
TVS90-46039A 4 Cycle Vertical Engine View Diagrams & Manuals
TVS90-46041A 4 Cycle Vertical Engine View Diagrams & Manuals
TVS90-46042A 4 Cycle Vertical Engine View Diagrams & Manuals
TVS90-46042B 4 Cycle Vertical Engine View Diagrams & Manuals
TVS90-46043A 4 Cycle Vertical Engine View Diagrams & Manuals
TVS90-46043B 4 Cycle Vertical Engine View Diagrams & Manuals
TVS90-46043C 4 Cycle Vertical Engine View Diagrams & Manuals
TVS90-46043D 4 Cycle Vertical Engine View Diagrams & Manuals
TVS90-46043E 4 Cycle Vertical Engine View Diagrams & Manuals
TVS90-46043F 4 Cycle Vertical Engine View Diagrams & Manuals
TVS90-46044A 4 Cycle Vertical Engine View Diagrams & Manuals
TVS90-46044B 4 Cycle Vertical Engine View Diagrams & Manuals
TVS90-46045A 4 Cycle Vertical Engine View Diagrams & Manuals
TVS90-46046B 4 Cycle Vertical Engine View Diagrams & Manuals
TVS90-46046C 4 Cycle Vertical Engine View Diagrams & Manuals
TVS90-46046D 4 Cycle Vertical Engine View Diagrams & Manuals
TVS90-46047B 4 Cycle Vertical Engine View Diagrams & Manuals
TVS90-46048B 4 Cycle Vertical Engine View Diagrams & Manuals
TVS90-46049B 4 Cycle Vertical Engine View Diagrams & Manuals
TVS90-46049D 4 Cycle Vertical Engine View Diagrams & Manuals
TVS90-46049E 4 Cycle Vertical Engine View Diagrams & Manuals
TVS90-46051B 4 Cycle Vertical Engine View Diagrams & Manuals
TVS90-46052A 4 Cycle Vertical Engine View Diagrams & Manuals
TVS90-46052B 4 Cycle Vertical Engine View Diagrams & Manuals
TVS90-46054B 4 Cycle Vertical Engine View Diagrams & Manuals
TVS90-46055B 4 Cycle Vertical Engine View Diagrams & Manuals
TVS90-46055D 4 Cycle Vertical Engine View Diagrams & Manuals
TVS90-46056B 4 Cycle Vertical Engine View Diagrams & Manuals
TVS90-46057B 4 Cycle Vertical Engine View Diagrams & Manuals
TVS90-46057C 4 Cycle Vertical Engine View Diagrams & Manuals
TVS90-46058B 4 Cycle Vertical Engine View Diagrams & Manuals
TVS90-46059B 4 Cycle Vertical Engine View Diagrams & Manuals
TVS90-46059C 4 Cycle Vertical Engine View Diagrams & Manuals
TVS90-46060B 4 Cycle Vertical Engine View Diagrams & Manuals
TVS90-46060C 4 Cycle Vertical Engine View Diagrams & Manuals
TVS90-46061B 4 Cycle Vertical Engine View Diagrams & Manuals
TVS90-46062B 4 Cycle Vertical Engine View Diagrams & Manuals
TVS90-46063B 4 Cycle Vertical Engine View Diagrams & Manuals
TVS90-46064B 4 Cycle Vertical Engine View Diagrams & Manuals
TVS90-46064D 4 Cycle Vertical Engine View Diagrams & Manuals
TVS90-46065B 4 Cycle Vertical Engine View Diagrams & Manuals
TVS90-46066C 4 Cycle Vertical Engine View Diagrams & Manuals
TVS90-46066D 4 Cycle Vertical Engine View Diagrams & Manuals
TVS90-46066E 4 Cycle Vertical Engine View Diagrams & Manuals
TVS90-46067C 4 Cycle Vertical Engine View Diagrams & Manuals
TVS90-46067D 4 Cycle Vertical Engine View Diagrams & Manuals
TVS90-46068C 4 Cycle Vertical Engine View Diagrams & Manuals
TVS90-46069C 4 Cycle Vertical Engine View Diagrams & Manuals
TVS90-46069D 4 Cycle Vertical Engine View Diagrams & Manuals
TVS90-46069E 4 Cycle Vertical Engine View Diagrams & Manuals
TVS90-46070C 4 Cycle Vertical Engine View Diagrams & Manuals
TVS90-46071C 4 Cycle Vertical Engine View Diagrams & Manuals
TVS90-46072C 4 Cycle Vertical Engine View Diagrams & Manuals
TVS90-46072D 4 Cycle Vertical Engine View Diagrams & Manuals
TVS90-46074C 4 Cycle Vertical Engine View Diagrams & Manuals
TVS90-46075C 4 Cycle Vertical Engine View Diagrams & Manuals
TVS90-46076C 4 Cycle Vertical Engine View Diagrams & Manuals
TVS90-46077C 4 Cycle Vertical Engine View Diagrams & Manuals
TVS90-46078C 4 Cycle Vertical Engine View Diagrams & Manuals
TVS90-46078D 4 Cycle Vertical Engine View Diagrams & Manuals
TVS90-46079C 4 Cycle Vertical Engine View Diagrams & Manuals
TVS90-46080C 4 Cycle Vertical Engine View Diagrams & Manuals
TVS90-46081C 4 Cycle Vertical Engine View Diagrams & Manuals
TVS90-46081D 4 Cycle Vertical Engine View Diagrams & Manuals
TVS90-46082C 4 Cycle Vertical Engine View Diagrams & Manuals
TVS90-46082D 4 Cycle Vertical Engine View Diagrams & Manuals
TVS90-46083D 4 Cycle Vertical Engine View Diagrams & Manuals
TVS90-46084D 4 Cycle Vertical Engine View Diagrams & Manuals
TVS90-46084F 4 Cycle Vertical Engine View Diagrams & Manuals
TVS90-46085D 4 Cycle Vertical Engine View Diagrams & Manuals
TVS90-46086D 4 Cycle Vertical Engine View Diagrams & Manuals
TVS90-46087D 4 Cycle Vertical Engine View Diagrams & Manuals
TVS90-46088D 4 Cycle Vertical Engine View Diagrams & Manuals
TVS90-46088E 4 Cycle Vertical Engine View Diagrams & Manuals
TVS90-46088F 4 Cycle Vertical Engine View Diagrams & Manuals
TVS90-46089D 4 Cycle Vertical Engine View Diagrams & Manuals
TVS90-46090D 4 Cycle Vertical Engine View Diagrams & Manuals
TVS90-46091D 4 Cycle Vertical Engine View Diagrams & Manuals
TVS90-46092D 4 Cycle Vertical Engine View Diagrams & Manuals
TVS90-46092E 4 Cycle Vertical Engine View Diagrams & Manuals
TVS90-46092F 4 Cycle Vertical Engine View Diagrams & Manuals
TVS90-46093D 4 Cycle Vertical Engine View Diagrams & Manuals
TVS90-46094D 4 Cycle Vertical Engine View Diagrams & Manuals
TVS90-46095D 4 Cycle Vertical Engine View Diagrams & Manuals
TVS90-46096D 4 Cycle Vertical Engine View Diagrams & Manuals
TVS90-46096E 4 Cycle Vertical Engine View Diagrams & Manuals
TVS90-46096F 4 Cycle Vertical Engine View Diagrams & Manuals
TVS90-46097D 4 Cycle Vertical Engine View Diagrams & Manuals
TVS90-46098D 4 Cycle Vertical Engine View Diagrams & Manuals
TVS90-46099D 4 Cycle Vertical Engine View Diagrams & Manuals
TVS90-46100D 4 Cycle Vertical Engine View Diagrams & Manuals
TVS90-46100E 4 Cycle Vertical Engine View Diagrams & Manuals
TVS90-46101D 4 Cycle Vertical Engine View Diagrams & Manuals
TVS90-46101E 4 Cycle Vertical Engine View Diagrams & Manuals
TVS90-46103E 4 Cycle Vertical Engine View Diagrams & Manuals
TVS90-46103F 4 Cycle Vertical Engine View Diagrams & Manuals
TVS90-46104E 4 Cycle Vertical Engine View Diagrams & Manuals
TVS90-46104F 4 Cycle Vertical Engine View Diagrams & Manuals
TVS90-46104G 4 Cycle Vertical Engine View Diagrams & Manuals
TVS90-46105E 4 Cycle Vertical Engine View Diagrams & Manuals
TVS90-46105F 4 Cycle Vertical Engine View Diagrams & Manuals
TVS90-46105G 4 Cycle Vertical Engine View Diagrams & Manuals
TVS90-46106E 4 Cycle Vertical Engine View Diagrams & Manuals
TVS90-46107E 4 Cycle Vertical Engine View Diagrams & Manuals
TVS90-46109E 4 Cycle Vertical Engine View Diagrams & Manuals
TVS90-46110E 4 Cycle Vertical Engine View Diagrams & Manuals
TVS90-46111E 4 Cycle Vertical Engine View Diagrams & Manuals
TVS90-46111F 4 Cycle Vertical Engine View Diagrams & Manuals
TVS90-46112E 4 Cycle Vertical Engine View Diagrams & Manuals
TVS90-46113E 4 Cycle Vertical Engine View Diagrams & Manuals
TVS90-46113F 4 Cycle Vertical Engine View Diagrams & Manuals
TVS90-46114E 4 Cycle Vertical Engine View Diagrams & Manuals
TVS90-46114F 4 Cycle Vertical Engine View Diagrams & Manuals
TVS90-46115E 4 Cycle Vertical Engine View Diagrams & Manuals
TVS90-46115F 4 Cycle Vertical Engine View Diagrams & Manuals
TVS90-46116E 4 Cycle Vertical Engine View Diagrams & Manuals
TVS90-46116F 4 Cycle Vertical Engine View Diagrams & Manuals
TVS90-46117F 4 Cycle Vertical Engine View Diagrams & Manuals
TVS90-46118F 4 Cycle Vertical Engine View Diagrams & Manuals
TVS90-46118G 4 Cycle Vertical Engine View Diagrams & Manuals
TVS90-46119F 4 Cycle Vertical Engine View Diagrams & Manuals
TVS90-46120F 4 Cycle Vertical Engine View Diagrams & Manuals
TVS90-46120G 4 Cycle Vertical Engine View Diagrams & Manuals
TVS90-46121F 4 Cycle Vertical Engine View Diagrams & Manuals
TVS90-46126F 4 Cycle Vertical Engine View Diagrams & Manuals
TVS90-46127F 4 Cycle Vertical Engine View Diagrams & Manuals
TVS90-46128F 4 Cycle Vertical Engine View Diagrams & Manuals
TVS90-46129F 4 Cycle Vertical Engine View Diagrams & Manuals
TVS90-46130F 4 Cycle Vertical Engine View Diagrams & Manuals
TVS90-46131F 4 Cycle Vertical Engine View Diagrams & Manuals
TVS90-46132F 4 Cycle Vertical Engine View Diagrams & Manuals
TVS90-46132G 4 Cycle Vertical Engine View Diagrams & Manuals
TVS90-46133F 4 Cycle Vertical Engine View Diagrams & Manuals
TVS90-46133G 4 Cycle Vertical Engine View Diagrams & Manuals
TVS90-46134G 4 Cycle Vertical Engine View Diagrams & Manuals
TVS90-46601A 4 Cycle Vertical Engine View Diagrams & Manuals
TVS90-46601B 4 Cycle Vertical Engine View Diagrams & Manuals
TVS90-48001A 4 Cycle Vertical Engine View Diagrams & Manuals
TVS90-48003A 4 Cycle Vertical Engine View Diagrams & Manuals
TVS90-48005A 4 Cycle Vertical Engine View Diagrams & Manuals
TVS90-48006A 4 Cycle Vertical Engine View Diagrams & Manuals
TVS90-48007A 4 Cycle Vertical Engine View Diagrams & Manuals
TVS90-48008A 4 Cycle Vertical Engine View Diagrams & Manuals
TVS90-48008B 4 Cycle Vertical Engine View Diagrams & Manuals
TVS90-48008C 4 Cycle Vertical Engine View Diagrams & Manuals
TVS90-48008D 4 Cycle Vertical Engine View Diagrams & Manuals
TVS90-48009B 4 Cycle Vertical Engine View Diagrams & Manuals
TVS90-48010A 4 Cycle Vertical Engine View Diagrams & Manuals
TVS90-48010B 4 Cycle Vertical Engine View Diagrams & Manuals
TVS90-48010C 4 Cycle Vertical Engine View Diagrams & Manuals
TVS90-48011B 4 Cycle Vertical Engine View Diagrams & Manuals
TVS90-48012B 4 Cycle Vertical Engine View Diagrams & Manuals
TVS90-48012C 4 Cycle Vertical Engine View Diagrams & Manuals
TVS90-48013B 4 Cycle Vertical Engine View Diagrams & Manuals
TVS90-48014B 4 Cycle Vertical Engine View Diagrams & Manuals
TVS90-48015B 4 Cycle Vertical Engine View Diagrams & Manuals
TVS90-48016B 4 Cycle Vertical Engine View Diagrams & Manuals
TVS90-48017B 4 Cycle Vertical Engine View Diagrams & Manuals
TVS90-48018B 4 Cycle Vertical Engine View Diagrams & Manuals
TVS90-48018C 4 Cycle Vertical Engine View Diagrams & Manuals
TVS90-48018D 4 Cycle Vertical Engine View Diagrams & Manuals
TVS90-48019B 4 Cycle Vertical Engine View Diagrams & Manuals
TVS90-48020B 4 Cycle Vertical Engine View Diagrams & Manuals
TVS90-48021B 4 Cycle Vertical Engine View Diagrams & Manuals
TVS90-48021C 4 Cycle Vertical Engine View Diagrams & Manuals
TVS90-48022B 4 Cycle Vertical Engine View Diagrams & Manuals
TVS90-48022C 4 Cycle Vertical Engine View Diagrams & Manuals
TVS90-48023B 4 Cycle Vertical Engine View Diagrams & Manuals
TVS90-48024B 4 Cycle Vertical Engine View Diagrams & Manuals
TVS90-48025B 4 Cycle Vertical Engine View Diagrams & Manuals
TVS90-48027B 4 Cycle Vertical Engine View Diagrams & Manuals
TVS90-48027C 4 Cycle Vertical Engine View Diagrams & Manuals
TVS90-48028B 4 Cycle Vertical Engine View Diagrams & Manuals
TVS90-48028C 4 Cycle Vertical Engine View Diagrams & Manuals
TVS90-48029B 4 Cycle Vertical Engine View Diagrams & Manuals
TVS90-48030C 4 Cycle Vertical Engine View Diagrams & Manuals
TVS90-48031C 4 Cycle Vertical Engine View Diagrams & Manuals
TVS90-48031D 4 Cycle Vertical Engine View Diagrams & Manuals
TVS90-48032C 4 Cycle Vertical Engine View Diagrams & Manuals
TVS90-48033C 4 Cycle Vertical Engine View Diagrams & Manuals
TVS90-48034C 4 Cycle Vertical Engine View Diagrams & Manuals
TVS90-48034D 4 Cycle Vertical Engine View Diagrams & Manuals
TVS90-48036C 4 Cycle Vertical Engine View Diagrams & Manuals
TVS90-48036D 4 Cycle Vertical Engine View Diagrams & Manuals
TVS90-48037C 4 Cycle Vertical Engine View Diagrams & Manuals
TVS90-48037D 4 Cycle Vertical Engine View Diagrams & Manuals
TVS90-48038C 4 Cycle Vertical Engine View Diagrams & Manuals
TVS90-48039D 4 Cycle Vertical Engine View Diagrams & Manuals
TVS90-48040D 4 Cycle Vertical Engine View Diagrams & Manuals
TVS90-48041D 4 Cycle Vertical Engine View Diagrams & Manuals
TVS90-48042D 4 Cycle Vertical Engine View Diagrams & Manuals
TVS90-48043D 4 Cycle Vertical Engine View Diagrams & Manuals
TVS90-48044D 4 Cycle Vertical Engine View Diagrams & Manuals
TVS90-48045D 4 Cycle Vertical Engine View Diagrams & Manuals
TVS90-48046D 4 Cycle Vertical Engine View Diagrams & Manuals
TVS90-48047D 4 Cycle Vertical Engine View Diagrams & Manuals
TVS90-48048D 4 Cycle Vertical Engine View Diagrams & Manuals
TVS90-48050D 4 Cycle Vertical Engine View Diagrams & Manuals
TVS90-48050E 4 Cycle Vertical Engine View Diagrams & Manuals
TVXL105-54000 4 Cycle Vertical Engine View Diagrams & Manuals
TVXL105-54000A 4 Cycle Vertical Engine View Diagrams & Manuals
TVXL105-54000B 4 Cycle Vertical Engine View Diagrams & Manuals
TVXL105-54001 4 Cycle Vertical Engine View Diagrams & Manuals
TVXL105-54001A 4 Cycle Vertical Engine View Diagrams & Manuals
TVXL105-54001B 4 Cycle Vertical Engine View Diagrams & Manuals
TVXL105-54002 4 Cycle Vertical Engine View Diagrams & Manuals
TVXL105-54002A 4 Cycle Vertical Engine View Diagrams & Manuals
TVXL105-54002B 4 Cycle Vertical Engine View Diagrams & Manuals
TVXL105-54003 4 Cycle Vertical Engine View Diagrams & Manuals
TVXL105-54003A 4 Cycle Vertical Engine View Diagrams & Manuals
TVXL105-54003B 4 Cycle Vertical Engine View Diagrams & Manuals
TVXL105-54004 4 Cycle Vertical Engine View Diagrams & Manuals
TVXL105-54004A 4 Cycle Vertical Engine View Diagrams & Manuals
TVXL105-54005 4 Cycle Vertical Engine View Diagrams & Manuals
TVXL105-54005A 4 Cycle Vertical Engine View Diagrams & Manuals
TVXL105-54006 4 Cycle Vertical Engine View Diagrams & Manuals
TVXL105-54006A 4 Cycle Vertical Engine View Diagrams & Manuals
TVXL105-54007 4 Cycle Vertical Engine View Diagrams & Manuals
TVXL105-54007A 4 Cycle Vertical Engine View Diagrams & Manuals
TVXL105-54007B 4 Cycle Vertical Engine View Diagrams & Manuals
TVXL105-54008 4 Cycle Vertical Engine View Diagrams & Manuals
TVXL105-54008A 4 Cycle Vertical Engine View Diagrams & Manuals
TVXL105-54008B 4 Cycle Vertical Engine View Diagrams & Manuals
TVXL105-54009A 4 Cycle Vertical Engine View Diagrams & Manuals
TVXL105-54010A 4 Cycle Vertical Engine View Diagrams & Manuals
TVXL105-54011A 4 Cycle Vertical Engine View Diagrams & Manuals
TVXL105-54012B 4 Cycle Vertical Engine View Diagrams & Manuals
TVXL105-54013B 4 Cycle Vertical Engine View Diagrams & Manuals
TVXL105-54014B 4 Cycle Vertical Engine View Diagrams & Manuals
TVXL105-54015B 4 Cycle Vertical Engine View Diagrams & Manuals
TVXL105-54016B 4 Cycle Vertical Engine View Diagrams & Manuals
TVXL105-54017B 4 Cycle Vertical Engine View Diagrams & Manuals
TVXL105-54018B 4 Cycle Vertical Engine View Diagrams & Manuals
TVXL105-54018C 4 Cycle Vertical Engine View Diagrams & Manuals
TVXL105-54019B 4 Cycle Vertical Engine View Diagrams & Manuals
TVXL105-54020B 4 Cycle Vertical Engine View Diagrams & Manuals
TVXL105-54021B 4 Cycle Vertical Engine View Diagrams & Manuals
TVXL105-54022B 4 Cycle Vertical Engine View Diagrams & Manuals
TVXL105-54023B 4 Cycle Vertical Engine View Diagrams & Manuals
TVXL105-54024B 4 Cycle Vertical Engine View Diagrams & Manuals
TVXL105-54025B 4 Cycle Vertical Engine View Diagrams & Manuals
TVXL105-54025D 4 Cycle Vertical Engine View Diagrams & Manuals
TVXL105-54025E 4 Cycle Vertical Engine View Diagrams & Manuals
TVXL105-54025F 4 Cycle Vertical Engine View Diagrams & Manuals
TVXL105-54026B 4 Cycle Vertical Engine View Diagrams & Manuals
TVXL105-54026C 4 Cycle Vertical Engine View Diagrams & Manuals
TVXL105-54026D 4 Cycle Vertical Engine View Diagrams & Manuals
TVXL105-54026E 4 Cycle Vertical Engine View Diagrams & Manuals
TVXL105-54026F 4 Cycle Vertical Engine View Diagrams & Manuals
TVXL105-54027B 4 Cycle Vertical Engine View Diagrams & Manuals
TVXL105-54028B 4 Cycle Vertical Engine View Diagrams & Manuals
TVXL105-54029B 4 Cycle Vertical Engine View Diagrams & Manuals
TVXL105-54030B 4 Cycle Vertical Engine View Diagrams & Manuals
TVXL105-54032D 4 Cycle Vertical Engine View Diagrams & Manuals
TVXL105-54032E 4 Cycle Vertical Engine View Diagrams & Manuals
TVXL105-54033B 4 Cycle Vertical Engine View Diagrams & Manuals
TVXL105-54033E 4 Cycle Vertical Engine View Diagrams & Manuals
TVXL105-54033F 4 Cycle Vertical Engine View Diagrams & Manuals
TVXL105-54034D 4 Cycle Vertical Engine View Diagrams & Manuals
TVXL105-54034E 4 Cycle Vertical Engine View Diagrams & Manuals
TVXL105-54034F 4 Cycle Vertical Engine View Diagrams & Manuals
TVXL105-54035D 4 Cycle Vertical Engine View Diagrams & Manuals
TVXL105-54036D 4 Cycle Vertical Engine View Diagrams & Manuals
TVXL105-54037D 4 Cycle Vertical Engine View Diagrams & Manuals
TVXL105-54039E 4 Cycle Vertical Engine View Diagrams & Manuals
TVXL105-54039F 4 Cycle Vertical Engine View Diagrams & Manuals
TVXL105-54039G 4 Cycle Vertical Engine View Diagrams & Manuals
TVXL105-54040E 4 Cycle Vertical Engine View Diagrams & Manuals
TVXL105-54040F 4 Cycle Vertical Engine View Diagrams & Manuals
TVXL105-54043F 4 Cycle Vertical Engine View Diagrams & Manuals
TVXL105-54044F 4 Cycle Vertical Engine View Diagrams & Manuals
TVXL105-54045F 4 Cycle Vertical Engine View Diagrams & Manuals
TVXL105-54045G 4 Cycle Vertical Engine View Diagrams & Manuals
TVXL115-56018A 4 Cycle Vertical Engine View Diagrams & Manuals
TVXL115-56025A 4 Cycle Vertical Engine View Diagrams & Manuals
TVXL115-57013A 4 Cycle Vertical Engine View Diagrams & Manuals
TVXL115-57014A 4 Cycle Vertical Engine View Diagrams & Manuals
TVXL115-57015A 4 Cycle Vertical Engine View Diagrams & Manuals
TVXL115-57017A 4 Cycle Vertical Engine View Diagrams & Manuals
TVXL115-57018A 4 Cycle Vertical Engine View Diagrams & Manuals
TVXL115-61003 4 Cycle Vertical Engine View Diagrams & Manuals
TVXL115-61004 4 Cycle Vertical Engine View Diagrams & Manuals
TVXL115-61005 4 Cycle Vertical Engine View Diagrams & Manuals
TVXL115-61013 4 Cycle Vertical Engine View Diagrams & Manuals
TVXL115-61611 4 Cycle Vertical Engine View Diagrams & Manuals
TVXL115-61612 4 Cycle Vertical Engine View Diagrams & Manuals
TVXL90-46014 4 Cycle Vertical Engine View Diagrams & Manuals
ULT50-500031B 4 Cycle Vertical Engine View Diagrams & Manuals
ULT50-500031D 4 Cycle Vertical Engine View Diagrams & Manuals
ULT50-500032B 4 Cycle Vertical Engine View Diagrams & Manuals
ULT50-500032C 4 Cycle Vertical Engine View Diagrams & Manuals
ULT50-500032D 4 Cycle Vertical Engine View Diagrams & Manuals
ULT50-500033B 4 Cycle Vertical Engine View Diagrams & Manuals
ULT50-500033C 4 Cycle Vertical Engine View Diagrams & Manuals
ULT50-500033D 4 Cycle Vertical Engine View Diagrams & Manuals
ULT55-501050A 4 Cycle Vertical Engine View Diagrams & Manuals
ULT55-501051A 4 Cycle Vertical Engine View Diagrams & Manuals
ULT55-501051B 4 Cycle Vertical Engine View Diagrams & Manuals
ULT55-501051C 4 Cycle Vertical Engine View Diagrams & Manuals
ULT55-501052A 4 Cycle Vertical Engine View Diagrams & Manuals
ULT55-501052B 4 Cycle Vertical Engine View Diagrams & Manuals
ULT55-501052C 4 Cycle Vertical Engine View Diagrams & Manuals
ULT55-501053A 4 Cycle Vertical Engine View Diagrams & Manuals
ULT60-502049C 4 Cycle Vertical Engine View Diagrams & Manuals
ULT60-502050C 4 Cycle Vertical Engine View Diagrams & Manuals
ULT60-502053C 4 Cycle Vertical Engine View Diagrams & Manuals
ULT60-502053D 4 Cycle Vertical Engine View Diagrams & Manuals
ULT60-502054C 4 Cycle Vertical Engine View Diagrams & Manuals
VLV126-500036F 4 Cycle Vertical Engine View Diagrams & Manuals
VLV126-500036G 4 Cycle Vertical Engine View Diagrams & Manuals
VLV126-500037F 4 Cycle Vertical Engine View Diagrams & Manuals
VLV126-500038G 4 Cycle Vertical Engine View Diagrams & Manuals
VLV126-501012E 4 Cycle Vertical Engine View Diagrams & Manuals
VLV126-501061E 4 Cycle Vertical Engine View Diagrams & Manuals
VLV126-501061F 4 Cycle Vertical Engine View Diagrams & Manuals
VLV126-502005E 4 Cycle Vertical Engine View Diagrams & Manuals
VLV126-502016E 4 Cycle Vertical Engine View Diagrams & Manuals
VLV126-502016F 4 Cycle Vertical Engine View Diagrams & Manuals
VLV126-502019E 4 Cycle Vertical Engine View Diagrams & Manuals
VLV126-502019F 4 Cycle Vertical Engine View Diagrams & Manuals
VLV126-502030E 4 Cycle Vertical Engine View Diagrams & Manuals
VLV126-502030F 4 Cycle Vertical Engine View Diagrams & Manuals
VLV126-502031E 4 Cycle Vertical Engine View Diagrams & Manuals
VLV126-502031F 4 Cycle Vertical Engine View Diagrams & Manuals
VLV126-502032E 4 Cycle Vertical Engine View Diagrams & Manuals
VLV126-502037F 4 Cycle Vertical Engine View Diagrams & Manuals
VLV126-502039E 4 Cycle Vertical Engine View Diagrams & Manuals
VLV126-502040F 4 Cycle Vertical Engine View Diagrams & Manuals
VLV126-502041F 4 Cycle Vertical Engine View Diagrams & Manuals
VLV126-502042E 4 Cycle Vertical Engine View Diagrams & Manuals
VLV126-502043E 4 Cycle Vertical Engine View Diagrams & Manuals
VLV126-502043F 4 Cycle Vertical Engine View Diagrams & Manuals
VLV126-502044F 4 Cycle Vertical Engine View Diagrams & Manuals
VLV126-502045E 4 Cycle Vertical Engine View Diagrams & Manuals
VLV126-502045F 4 Cycle Vertical Engine View Diagrams & Manuals
VLV126-502046E 4 Cycle Vertical Engine View Diagrams & Manuals
VLV126-502052E 4 Cycle Vertical Engine View Diagrams & Manuals
VLV126-502052F 4 Cycle Vertical Engine View Diagrams & Manuals
VLV126-502056E 4 Cycle Vertical Engine View Diagrams & Manuals
VLV126-502056F 4 Cycle Vertical Engine View Diagrams & Manuals
VLV126-502058E 4 Cycle Vertical Engine View Diagrams & Manuals
VLV126-502058F 4 Cycle Vertical Engine View Diagrams & Manuals
VLV126-502060E 4 Cycle Vertical Engine View Diagrams & Manuals
VLV126-502060F 4 Cycle Vertical Engine View Diagrams & Manuals
VLV126-502069E 4 Cycle Vertical Engine View Diagrams & Manuals
VLV126-502070E 4 Cycle Vertical Engine View Diagrams & Manuals
VLV126-502071E 4 Cycle Vertical Engine View Diagrams & Manuals
VLV126-502072E 4 Cycle Vertical Engine View Diagrams & Manuals
VLV126-502073E 4 Cycle Vertical Engine View Diagrams & Manuals
VLV126-502078E 4 Cycle Vertical Engine View Diagrams & Manuals
VLV126-502078F 4 Cycle Vertical Engine View Diagrams & Manuals
VLV126-502080E 4 Cycle Vertical Engine View Diagrams & Manuals
VLV126-502081E 4 Cycle Vertical Engine View Diagrams & Manuals
VLV126-502082E 4 Cycle Vertical Engine View Diagrams & Manuals
VLV126-502083E 4 Cycle Vertical Engine View Diagrams & Manuals
VLV126-502083F 4 Cycle Vertical Engine View Diagrams & Manuals
VLV126-502084E 4 Cycle Vertical Engine View Diagrams & Manuals
VLV126-502085E 4 Cycle Vertical Engine View Diagrams & Manuals
VLV126-502085F 4 Cycle Vertical Engine View Diagrams & Manuals
VLV126-502086E 4 Cycle Vertical Engine View Diagrams & Manuals
VLV126-502086F 4 Cycle Vertical Engine View Diagrams & Manuals
VLV126-502088E 4 Cycle Vertical Engine View Diagrams & Manuals
VLV126-502088F 4 Cycle Vertical Engine View Diagrams & Manuals
VLV126-502089E 4 Cycle Vertical Engine View Diagrams & Manuals
VLV126-502090F 4 Cycle Vertical Engine View Diagrams & Manuals
VLV126-502091F 4 Cycle Vertical Engine View Diagrams & Manuals
VLV126-502092F 4 Cycle Vertical Engine View Diagrams & Manuals
VLV126-502520D 4 Cycle Vertical Engine View Diagrams & Manuals
VLV126-502522D 4 Cycle Vertical Engine View Diagrams & Manuals
VLV126-502522E 4 Cycle Vertical Engine View Diagrams & Manuals
VLV126-502523D 4 Cycle Vertical Engine View Diagrams & Manuals
VLV126-502523E 4 Cycle Vertical Engine View Diagrams & Manuals
VLV126-502524D 4 Cycle Vertical Engine View Diagrams & Manuals
VLV126-502525D 4 Cycle Vertical Engine View Diagrams & Manuals
VLV126-502526D 4 Cycle Vertical Engine View Diagrams & Manuals
VLV126-502527D 4 Cycle Vertical Engine View Diagrams & Manuals
VLV126-502527E 4 Cycle Vertical Engine View Diagrams & Manuals
VLV126-502528D 4 Cycle Vertical Engine View Diagrams & Manuals
VLV126-502529D 4 Cycle Vertical Engine View Diagrams & Manuals
VLV126-502530D 4 Cycle Vertical Engine View Diagrams & Manuals
VLV126-502530E 4 Cycle Vertical Engine View Diagrams & Manuals
VLV126-502531D 4 Cycle Vertical Engine View Diagrams & Manuals
VLV126-502532E 4 Cycle Vertical Engine View Diagrams & Manuals
VLV126-502533E 4 Cycle Vertical Engine View Diagrams & Manuals
VLV126-502534E 4 Cycle Vertical Engine View Diagrams & Manuals
VLV40-400004A 4 Cycle Vertical Engine View Diagrams & Manuals
VLV50-500001 4 Cycle Vertical Engine View Diagrams & Manuals
VLV50-500002 4 Cycle Vertical Engine View Diagrams & Manuals
VLV50-500003 4 Cycle Vertical Engine View Diagrams & Manuals
VLV50-500004 4 Cycle Vertical Engine View Diagrams & Manuals
VLV50-500005 4 Cycle Vertical Engine View Diagrams & Manuals
VLV50-500006 4 Cycle Vertical Engine View Diagrams & Manuals
VLV50-500007 4 Cycle Vertical Engine View Diagrams & Manuals
VLV50-500007A 4 Cycle Vertical Engine View Diagrams & Manuals
VLV50-500008 4 Cycle Vertical Engine View Diagrams & Manuals
VLV50-500008A 4 Cycle Vertical Engine View Diagrams & Manuals
VLV50-500009 4 Cycle Vertical Engine View Diagrams & Manuals
VLV50-500010 4 Cycle Vertical Engine View Diagrams & Manuals
VLV50-500012A 4 Cycle Vertical Engine View Diagrams & Manuals
VLV50-500013A 4 Cycle Vertical Engine View Diagrams & Manuals
VLV50-500014A 4 Cycle Vertical Engine View Diagrams & Manuals
VLV50-500015B 4 Cycle Vertical Engine View Diagrams & Manuals
VLV50-500016A 4 Cycle Vertical Engine View Diagrams & Manuals
VLV50-500017A 4 Cycle Vertical Engine View Diagrams & Manuals
VLV50-500019A 4 Cycle Vertical Engine View Diagrams & Manuals
VLV50-500020A 4 Cycle Vertical Engine View Diagrams & Manuals
VLV50-500021A 4 Cycle Vertical Engine View Diagrams & Manuals
VLV50-500022B 4 Cycle Vertical Engine View Diagrams & Manuals
VLV50-500023B 4 Cycle Vertical Engine View Diagrams & Manuals
VLV50-500024B 4 Cycle Vertical Engine View Diagrams & Manuals
VLV50-500025B 4 Cycle Vertical Engine View Diagrams & Manuals
VLV50-500026B 4 Cycle Vertical Engine View Diagrams & Manuals
VLV50-500028B 4 Cycle Vertical Engine View Diagrams & Manuals
VLV50-500029B 4 Cycle Vertical Engine View Diagrams & Manuals
VLV50-500030B 4 Cycle Vertical Engine View Diagrams & Manuals
VLV50-500034C 4 Cycle Vertical Engine View Diagrams & Manuals
VLV50-500036E 4 Cycle Vertical Engine View Diagrams & Manuals
VLV55-501001 4 Cycle Vertical Engine View Diagrams & Manuals
VLV55-501001A 4 Cycle Vertical Engine View Diagrams & Manuals
VLV55-501002 4 Cycle Vertical Engine View Diagrams & Manuals
VLV55-501002A 4 Cycle Vertical Engine View Diagrams & Manuals
VLV55-501003 4 Cycle Vertical Engine View Diagrams & Manuals
VLV55-501004 4 Cycle Vertical Engine View Diagrams & Manuals
VLV55-501004A 4 Cycle Vertical Engine View Diagrams & Manuals
VLV55-501005 4 Cycle Vertical Engine View Diagrams & Manuals
VLV55-501007 4 Cycle Vertical Engine View Diagrams & Manuals
VLV55-501007A 4 Cycle Vertical Engine View Diagrams & Manuals
VLV55-501008 4 Cycle Vertical Engine View Diagrams & Manuals
VLV55-501009A 4 Cycle Vertical Engine View Diagrams & Manuals
VLV55-501010 4 Cycle Vertical Engine View Diagrams & Manuals
VLV55-501010A 4 Cycle Vertical Engine View Diagrams & Manuals
VLV55-501011A 4 Cycle Vertical Engine View Diagrams & Manuals
VLV55-501012A 4 Cycle Vertical Engine View Diagrams & Manuals
VLV55-501012B 4 Cycle Vertical Engine View Diagrams & Manuals
VLV55-501012C 4 Cycle Vertical Engine View Diagrams & Manuals
VLV55-501012D 4 Cycle Vertical Engine View Diagrams & Manuals
VLV55-501013 4 Cycle Vertical Engine View Diagrams & Manuals
VLV55-501013A 4 Cycle Vertical Engine View Diagrams & Manuals
VLV55-501014A 4 Cycle Vertical Engine View Diagrams & Manuals
VLV55-501015A 4 Cycle Vertical Engine View Diagrams & Manuals
VLV55-501016 4 Cycle Vertical Engine View Diagrams & Manuals
VLV55-501016B 4 Cycle Vertical Engine View Diagrams & Manuals
VLV55-501017A 4 Cycle Vertical Engine View Diagrams & Manuals
VLV55-501017B 4 Cycle Vertical Engine View Diagrams & Manuals
VLV55-501017C 4 Cycle Vertical Engine View Diagrams & Manuals
VLV55-501017D 4 Cycle Vertical Engine View Diagrams & Manuals
VLV55-501018A 4 Cycle Vertical Engine View Diagrams & Manuals
VLV55-501018B 4 Cycle Vertical Engine View Diagrams & Manuals
VLV55-501018C 4 Cycle Vertical Engine View Diagrams & Manuals
VLV55-501018D 4 Cycle Vertical Engine View Diagrams & Manuals
VLV55-501019A 4 Cycle Vertical Engine View Diagrams & Manuals
VLV55-501019B 4 Cycle Vertical Engine View Diagrams & Manuals
VLV55-501020A 4 Cycle Vertical Engine View Diagrams & Manuals
VLV55-501021A 4 Cycle Vertical Engine View Diagrams & Manuals
VLV55-501022A 4 Cycle Vertical Engine View Diagrams & Manuals
VLV55-501023A 4 Cycle Vertical Engine View Diagrams & Manuals
VLV55-501024A 4 Cycle Vertical Engine View Diagrams & Manuals
VLV55-501025A 4 Cycle Vertical Engine View Diagrams & Manuals
VLV55-501026A 4 Cycle Vertical Engine View Diagrams & Manuals
VLV55-501027A 4 Cycle Vertical Engine View Diagrams & Manuals
VLV55-501028A 4 Cycle Vertical Engine View Diagrams & Manuals
VLV55-501029A 4 Cycle Vertical Engine View Diagrams & Manuals
VLV55-501030A 4 Cycle Vertical Engine View Diagrams & Manuals
VLV55-501031A 4 Cycle Vertical Engine View Diagrams & Manuals
VLV55-501032A 4 Cycle Vertical Engine View Diagrams & Manuals
VLV55-501033A 4 Cycle Vertical Engine View Diagrams & Manuals
VLV55-501034A 4 Cycle Vertical Engine View Diagrams & Manuals
VLV55-501035A 4 Cycle Vertical Engine View Diagrams & Manuals
VLV55-501036A 4 Cycle Vertical Engine View Diagrams & Manuals
VLV55-501037A 4 Cycle Vertical Engine View Diagrams & Manuals
VLV55-501039A 4 Cycle Vertical Engine View Diagrams & Manuals
VLV55-501039B 4 Cycle Vertical Engine View Diagrams & Manuals
VLV55-501039C 4 Cycle Vertical Engine View Diagrams & Manuals
VLV55-501042A 4 Cycle Vertical Engine View Diagrams & Manuals
VLV55-501043A 4 Cycle Vertical Engine View Diagrams & Manuals
VLV55-501044A 4 Cycle Vertical Engine View Diagrams & Manuals
VLV55-501045A 4 Cycle Vertical Engine View Diagrams & Manuals
VLV55-501047A 4 Cycle Vertical Engine View Diagrams & Manuals
VLV55-501048A 4 Cycle Vertical Engine View Diagrams & Manuals
VLV55-501049A 4 Cycle Vertical Engine View Diagrams & Manuals
VLV55-501055A 4 Cycle Vertical Engine View Diagrams & Manuals
VLV55-501056A 4 Cycle Vertical Engine View Diagrams & Manuals
VLV55-501057A 4 Cycle Vertical Engine View Diagrams & Manuals
VLV55-501057B 4 Cycle Vertical Engine View Diagrams & Manuals
VLV55-501058A 4 Cycle Vertical Engine View Diagrams & Manuals
VLV55-501059A 4 Cycle Vertical Engine View Diagrams & Manuals
VLV55-501059B 4 Cycle Vertical Engine View Diagrams & Manuals
VLV55-501059C 4 Cycle Vertical Engine View Diagrams & Manuals
VLV55-501060B 4 Cycle Vertical Engine View Diagrams & Manuals
VLV55-501061B 4 Cycle Vertical Engine View Diagrams & Manuals
VLV55-501061C 4 Cycle Vertical Engine View Diagrams & Manuals
VLV55-501061D 4 Cycle Vertical Engine View Diagrams & Manuals
VLV55-501062B 4 Cycle Vertical Engine View Diagrams & Manuals
VLV55-501062C 4 Cycle Vertical Engine View Diagrams & Manuals
VLV55-501062D 4 Cycle Vertical Engine View Diagrams & Manuals
VLV55-501063B 4 Cycle Vertical Engine View Diagrams & Manuals
VLV55-501064B 4 Cycle Vertical Engine View Diagrams & Manuals
VLV55-501064C 4 Cycle Vertical Engine View Diagrams & Manuals
VLV55-501066C 4 Cycle Vertical Engine View Diagrams & Manuals
VLV55-501067B 4 Cycle Vertical Engine View Diagrams & Manuals
VLV55-501068C 4 Cycle Vertical Engine View Diagrams & Manuals
VLV55-501069C 4 Cycle Vertical Engine View Diagrams & Manuals
VLV60-502001A 4 Cycle Vertical Engine View Diagrams & Manuals
VLV60-502001B 4 Cycle Vertical Engine View Diagrams & Manuals
VLV60-502002A 4 Cycle Vertical Engine View Diagrams & Manuals
VLV60-502002B 4 Cycle Vertical Engine View Diagrams & Manuals
VLV60-502003A 4 Cycle Vertical Engine View Diagrams & Manuals
VLV60-502004A 4 Cycle Vertical Engine View Diagrams & Manuals
VLV60-502005A 4 Cycle Vertical Engine View Diagrams & Manuals
VLV60-502005B 4 Cycle Vertical Engine View Diagrams & Manuals
VLV60-502005C 4 Cycle Vertical Engine View Diagrams & Manuals
VLV60-502005D 4 Cycle Vertical Engine View Diagrams & Manuals
VLV60-502007A 4 Cycle Vertical Engine View Diagrams & Manuals
VLV60-502007B 4 Cycle Vertical Engine View Diagrams & Manuals
VLV60-502008A 4 Cycle Vertical Engine View Diagrams & Manuals
VLV60-502008B 4 Cycle Vertical Engine View Diagrams & Manuals
VLV60-502009A 4 Cycle Vertical Engine View Diagrams & Manuals
VLV60-502009B 4 Cycle Vertical Engine View Diagrams & Manuals
VLV60-502010A 4 Cycle Vertical Engine View Diagrams & Manuals
VLV60-502010B 4 Cycle Vertical Engine View Diagrams & Manuals
VLV60-502010C 4 Cycle Vertical Engine View Diagrams & Manuals
VLV60-502011B 4 Cycle Vertical Engine View Diagrams & Manuals
VLV60-502011C 4 Cycle Vertical Engine View Diagrams & Manuals
VLV60-502012A 4 Cycle Vertical Engine View Diagrams & Manuals
VLV60-502013B 4 Cycle Vertical Engine View Diagrams & Manuals
VLV60-502013C 4 Cycle Vertical Engine View Diagrams & Manuals
VLV60-502013D 4 Cycle Vertical Engine View Diagrams & Manuals
VLV60-502014B 4 Cycle Vertical Engine View Diagrams & Manuals
VLV60-502014C 4 Cycle Vertical Engine View Diagrams & Manuals
VLV60-502014D 4 Cycle Vertical Engine View Diagrams & Manuals
VLV60-502015B 4 Cycle Vertical Engine View Diagrams & Manuals
VLV60-502015C 4 Cycle Vertical Engine View Diagrams & Manuals
VLV60-502016B 4 Cycle Vertical Engine View Diagrams & Manuals
VLV60-502016D 4 Cycle Vertical Engine View Diagrams & Manuals
VLV60-502017B 4 Cycle Vertical Engine View Diagrams & Manuals
VLV60-502017C 4 Cycle Vertical Engine View Diagrams & Manuals
VLV60-502018B 4 Cycle Vertical Engine View Diagrams & Manuals
VLV60-502018C 4 Cycle Vertical Engine View Diagrams & Manuals
VLV60-502019B 4 Cycle Vertical Engine View Diagrams & Manuals
VLV60-502019C 4 Cycle Vertical Engine View Diagrams & Manuals
VLV60-502019D 4 Cycle Vertical Engine View Diagrams & Manuals
VLV60-502020B 4 Cycle Vertical Engine View Diagrams & Manuals
VLV60-502021B 4 Cycle Vertical Engine View Diagrams & Manuals
VLV60-502022B 4 Cycle Vertical Engine View Diagrams & Manuals
VLV60-502022C 4 Cycle Vertical Engine View Diagrams & Manuals
VLV60-502023B 4 Cycle Vertical Engine View Diagrams & Manuals
VLV60-502024B 4 Cycle Vertical Engine View Diagrams & Manuals
VLV60-502025B 4 Cycle Vertical Engine View Diagrams & Manuals
VLV60-502025C 4 Cycle Vertical Engine View Diagrams & Manuals
VLV60-502026B 4 Cycle Vertical Engine View Diagrams & Manuals
VLV60-502027B 4 Cycle Vertical Engine View Diagrams & Manuals
VLV60-502027C 4 Cycle Vertical Engine View Diagrams & Manuals
VLV60-502027D 4 Cycle Vertical Engine View Diagrams & Manuals
VLV60-502028B 4 Cycle Vertical Engine View Diagrams & Manuals
VLV60-502028C 4 Cycle Vertical Engine View Diagrams & Manuals
VLV60-502028D 4 Cycle Vertical Engine View Diagrams & Manuals
VLV60-502029B 4 Cycle Vertical Engine View Diagrams & Manuals
VLV60-502029C 4 Cycle Vertical Engine View Diagrams & Manuals
VLV60-502030B 4 Cycle Vertical Engine View Diagrams & Manuals
VLV60-502030C 4 Cycle Vertical Engine View Diagrams & Manuals
VLV60-502030D 4 Cycle Vertical Engine View Diagrams & Manuals
VLV60-502031B 4 Cycle Vertical Engine View Diagrams & Manuals
VLV60-502031C 4 Cycle Vertical Engine View Diagrams & Manuals
VLV60-502032B 4 Cycle Vertical Engine View Diagrams & Manuals
VLV60-502032C 4 Cycle Vertical Engine View Diagrams & Manuals
VLV60-502033B 4 Cycle Vertical Engine View Diagrams & Manuals
VLV60-502034C 4 Cycle Vertical Engine View Diagrams & Manuals
VLV60-502035C 4 Cycle Vertical Engine View Diagrams & Manuals
VLV60-502037C 4 Cycle Vertical Engine View Diagrams & Manuals
VLV60-502037D 4 Cycle Vertical Engine View Diagrams & Manuals
VLV60-502039C 4 Cycle Vertical Engine View Diagrams & Manuals
VLV60-502039D 4 Cycle Vertical Engine View Diagrams & Manuals
VLV60-502040D 4 Cycle Vertical Engine View Diagrams & Manuals
VLV60-502041C 4 Cycle Vertical Engine View Diagrams & Manuals
VLV60-502041D 4 Cycle Vertical Engine View Diagrams & Manuals
VLV60-502042C 4 Cycle Vertical Engine View Diagrams & Manuals
VLV60-502042D 4 Cycle Vertical Engine View Diagrams & Manuals
VLV60-502044C 4 Cycle Vertical Engine View Diagrams & Manuals
VLV60-502044D 4 Cycle Vertical Engine View Diagrams & Manuals
VLV60-502045C 4 Cycle Vertical Engine View Diagrams & Manuals
VLV60-502045D 4 Cycle Vertical Engine View Diagrams & Manuals
VLV60-502046C 4 Cycle Vertical Engine View Diagrams & Manuals
VLV60-502046D 4 Cycle Vertical Engine View Diagrams & Manuals
VLV60-502047C 4 Cycle Vertical Engine View Diagrams & Manuals
VLV60-502051C 4 Cycle Vertical Engine View Diagrams & Manuals
VLV60-502052C 4 Cycle Vertical Engine View Diagrams & Manuals
VLV60-502052D 4 Cycle Vertical Engine View Diagrams & Manuals
VLV60-502055C 4 Cycle Vertical Engine View Diagrams & Manuals
VLV60-502055D 4 Cycle Vertical Engine View Diagrams & Manuals
VLV60-502056D 4 Cycle Vertical Engine View Diagrams & Manuals
VLV60-502058D 4 Cycle Vertical Engine View Diagrams & Manuals
VLV60-502060D 4 Cycle Vertical Engine View Diagrams & Manuals
VLV60-502062D 4 Cycle Vertical Engine View Diagrams & Manuals
VLV60-502068D 4 Cycle Vertical Engine View Diagrams & Manuals
VLV60-502069D 4 Cycle Vertical Engine View Diagrams & Manuals
VLV60-502070D 4 Cycle Vertical Engine View Diagrams & Manuals
VLV60-502071D 4 Cycle Vertical Engine View Diagrams & Manuals
VLV60-502072D 4 Cycle Vertical Engine View Diagrams & Manuals
VLV60-502073D 4 Cycle Vertical Engine View Diagrams & Manuals
VLV60-502074C 4 Cycle Vertical Engine View Diagrams & Manuals
VLV60-502076D 4 Cycle Vertical Engine View Diagrams & Manuals
VLV60-502504A 4 Cycle Vertical Engine View Diagrams & Manuals
VLV60-502505A 4 Cycle Vertical Engine View Diagrams & Manuals
VLV65-502501A 4 Cycle Vertical Engine View Diagrams & Manuals
VLV65-502502A 4 Cycle Vertical Engine View Diagrams & Manuals
VLV65-502503A 4 Cycle Vertical Engine View Diagrams & Manuals
VLV65-502504A 4 Cycle Vertical Engine View Diagrams & Manuals
VLV65-502505A 4 Cycle Vertical Engine View Diagrams & Manuals
VLV65-502506B 4 Cycle Vertical Engine View Diagrams & Manuals
VLV65-502510B 4 Cycle Vertical Engine View Diagrams & Manuals
VLV65-502520C 4 Cycle Vertical Engine View Diagrams & Manuals
VLV65-502521C 4 Cycle Vertical Engine View Diagrams & Manuals
VLV66-502505B 4 Cycle Vertical Engine View Diagrams & Manuals
VLV66-502505C 4 Cycle Vertical Engine View Diagrams & Manuals
VLV66-502507B 4 Cycle Vertical Engine View Diagrams & Manuals
VLV66-502508B 4 Cycle Vertical Engine View Diagrams & Manuals
VLV66-502509B 4 Cycle Vertical Engine View Diagrams & Manuals
VLV66-502511B 4 Cycle Vertical Engine View Diagrams & Manuals
VLV66-502512B 4 Cycle Vertical Engine View Diagrams & Manuals
VLV66-502513B 4 Cycle Vertical Engine View Diagrams & Manuals
VLV66-502514C 4 Cycle Vertical Engine View Diagrams & Manuals
VLV66-502515C 4 Cycle Vertical Engine View Diagrams & Manuals
VLV66-502516C 4 Cycle Vertical Engine View Diagrams & Manuals
VLV66-502517C 4 Cycle Vertical Engine View Diagrams & Manuals
VLV66-502518C 4 Cycle Vertical Engine View Diagrams & Manuals
VLV66-502523C 4 Cycle Vertical Engine View Diagrams & Manuals
VLXL50-500008A 4 Cycle Vertical Engine View Diagrams & Manuals
VLXL50-500015A 4 Cycle Vertical Engine View Diagrams & Manuals
VLXL50-500018A 4 Cycle Vertical Engine View Diagrams & Manuals
VLXL50-500019A 4 Cycle Vertical Engine View Diagrams & Manuals
VLXL50-500021A 4 Cycle Vertical Engine View Diagrams & Manuals
VLXL55-501009 4 Cycle Vertical Engine View Diagrams & Manuals
VLXL55-501011 4 Cycle Vertical Engine View Diagrams & Manuals
VLXL55-501012 4 Cycle Vertical Engine View Diagrams & Manuals
VLXL55-501016 4 Cycle Vertical Engine View Diagrams & Manuals
VSK100-338501A 4 Cycle Vertical Engine View Diagrams & Manuals
VSK100-338502A 4 Cycle Vertical Engine View Diagrams & Manuals
VSK100-338503A 4 Cycle Vertical Engine View Diagrams & Manuals
VSK100-338503B 4 Cycle Vertical Engine View Diagrams & Manuals
VSK100-338504B 4 Cycle Vertical Engine View Diagrams & Manuals
VSK90-334501A 4 Cycle Vertical Engine View Diagrams & Manuals
VSK90-334502A 4 Cycle Vertical Engine View Diagrams & Manuals
VSK90-334503A 4 Cycle Vertical Engine View Diagrams & Manuals
SBV-5730A Short Block View Diagrams & Manuals
LEV80-FR333016B Engine View Diagrams & Manuals
ECV100-145004A (143-204102) 4 Cycle Vertical Engine View Diagrams & Manuals
ECV100-145005A (143-204062) 4 Cycle Vertical Engine View Diagrams & Manuals
ECV100-145008A (143-204022) 4 Cycle Vertical Engine View Diagrams & Manuals
ECV100-145010A (143-204132) 4 Cycle Vertical Engine View Diagrams & Manuals
ECV100-145013A (143-204202) 4 Cycle Vertical Engine View Diagrams & Manuals
ECV100-145015A (143-214042) 4 Cycle Vertical Engine View Diagrams & Manuals
ECV100-145016A (143-214052) 4 Cycle Vertical Engine View Diagrams & Manuals
ECV100-145017A (143-214062) 4 Cycle Vertical Engine View Diagrams & Manuals
ECV100-145018A (143-214072) 4 Cycle Vertical Engine View Diagrams & Manuals
ECV100-145019A (143-214262) 4 Cycle Vertical Engine View Diagrams & Manuals
ECV100-145020A (143-214282) 4 Cycle Vertical Engine View Diagrams & Manuals
ECV100-145021A (143-214272) 4 Cycle Vertical Engine View Diagrams & Manuals
ECV100-145022A (143-214312) 4 Cycle Vertical Engine View Diagrams & Manuals
ECV100-145023A (143-214322) 4 Cycle Vertical Engine View Diagrams & Manuals
ECV100-145024A (143-224032) 4 Cycle Vertical Engine View Diagrams & Manuals
ECV100-145026A (143-214352) 4 Cycle Vertical Engine View Diagrams & Manuals
ECV100-145028A (143-224232) 4 Cycle Vertical Engine View Diagrams & Manuals
ECV100-145029A (143-224242) 4 Cycle Vertical Engine View Diagrams & Manuals
ECV100-145030A (143-224292) 4 Cycle Vertical Engine View Diagrams & Manuals
ECV100-145031A (143-224302) 4 Cycle Vertical Engine View Diagrams & Manuals
ECV100-145032A (143-224352) 4 Cycle Vertical Engine View Diagrams & Manuals
ECV100-145033A (143-224362) 4 Cycle Vertical Engine View Diagrams & Manuals
ECV100-145034A (143-224432) 4 Cycle Vertical Engine View Diagrams & Manuals
ECV100-145035A (143-234062) 4 Cycle Vertical Engine View Diagrams & Manuals
ECV100-145036A (143-234072) 4 Cycle Vertical Engine View Diagrams & Manuals
ECV100-145037A (143-234082) 4 Cycle Vertical Engine View Diagrams & Manuals
ECV100-145038A (143-234092) 4 Cycle Vertical Engine View Diagrams & Manuals
ECV100-145039A (143-234212) 4 Cycle Vertical Engine View Diagrams & Manuals
ECV100-145040A (143-234222) 4 Cycle Vertical Engine View Diagrams & Manuals
ECV100-145041A (143-234232) 4 Cycle Vertical Engine View Diagrams & Manuals
ECV100-145045A (143-234182) 4 Cycle Vertical Engine View Diagrams & Manuals
ECV100-145046A (143-244042) 4 Cycle Vertical Engine View Diagrams & Manuals
ECV100-145047A (143-244052) 4 Cycle Vertical Engine View Diagrams & Manuals
ECV100-145048A (143-244062) 4 Cycle Vertical Engine View Diagrams & Manuals
ECV100-145049A (143-244122) 4 Cycle Vertical Engine View Diagrams & Manuals
ECV100-145050A (143-244132) 4 Cycle Vertical Engine View Diagrams & Manuals
ECV100-145051A (143-244142) 4 Cycle Vertical Engine View Diagrams & Manuals
ECV100-145052A (143-244322) 4 Cycle Vertical Engine View Diagrams & Manuals
ECV100-145053A (143-244312) 4 Cycle Vertical Engine View Diagrams & Manuals
ECV100-145054A (143-244302) 4 Cycle Vertical Engine View Diagrams & Manuals
ECV100-145057A (143-244212) 4 Cycle Vertical Engine View Diagrams & Manuals
ECV100-145058A (143-244242) 4 Cycle Vertical Engine View Diagrams & Manuals
ECV100-145058B (143-274072) 4 Cycle Vertical Engine View Diagrams & Manuals
ECV100-145058C (143-284332) 4 Cycle Vertical Engine View Diagrams & Manuals
ECV100-145058D (143-294222) 4 Cycle Vertical Engine View Diagrams & Manuals
ECV100-145059A (143-244252) 4 Cycle Vertical Engine View Diagrams & Manuals
ECV100-145060A (143-244292) 4 Cycle Vertical Engine View Diagrams & Manuals
ECV100-145061A (143-244332) 4 Cycle Vertical Engine View Diagrams & Manuals
ECV100-145062A (143-254142) 4 Cycle Vertical Engine View Diagrams & Manuals
ECV100-145062B (143-274692) 4 Cycle Vertical Engine View Diagrams & Manuals
ECV100-145063A (143-254152) 4 Cycle Vertical Engine View Diagrams & Manuals
ECV100-145064A (143-254162) 4 Cycle Vertical Engine View Diagrams & Manuals
ECV100-145065A (143-254172) 4 Cycle Vertical Engine View Diagrams & Manuals
ECV100-145066A (143-254182) 4 Cycle Vertical Engine View Diagrams & Manuals
ECV100-145067A (143-254192) 4 Cycle Vertical Engine View Diagrams & Manuals
ECV100-145069A (143-254062) 4 Cycle Vertical Engine View Diagrams & Manuals
ECV100-145070A (143-254232) 4 Cycle Vertical Engine View Diagrams & Manuals
ECV100-145071A (143-254242) 4 Cycle Vertical Engine View Diagrams & Manuals
ECV100-145072A (143-254252) 4 Cycle Vertical Engine View Diagrams & Manuals
ECV100-145073A (143-254262) 4 Cycle Vertical Engine View Diagrams & Manuals
ECV100-145074A (143-254272) 4 Cycle Vertical Engine View Diagrams & Manuals
ECV100-145075A (143-254282) 4 Cycle Vertical Engine View Diagrams & Manuals
ECV100-145075B (143-274542) 4 Cycle Vertical Engine View Diagrams & Manuals
ECV100-145075C (143-284672) 4 Cycle Vertical Engine View Diagrams & Manuals
ECV100-145075D (143-294542) 4 Cycle Vertical Engine View Diagrams & Manuals
ECV100-145076A (143-254292) 4 Cycle Vertical Engine View Diagrams & Manuals
ECV100-145077A (143-254322) 4 Cycle Vertical Engine View Diagrams & Manuals
ECV100-145078A (143-254342) 4 Cycle Vertical Engine View Diagrams & Manuals
ECV100-145079A (143-254352) 4 Cycle Vertical Engine View Diagrams & Manuals
ECV100-145080A (143-254372) 4 Cycle Vertical Engine View Diagrams & Manuals
ECV100-145081A (143-254382) 4 Cycle Vertical Engine View Diagrams & Manuals
ECV100-145083A (143-254412) 4 Cycle Vertical Engine View Diagrams & Manuals
ECV100-145084A (143-254402) 4 Cycle Vertical Engine View Diagrams & Manuals
ECV100-145085A (143-254442) 4 Cycle Vertical Engine View Diagrams & Manuals
ECV100-145085C (143-284372) 4 Cycle Vertical Engine View Diagrams & Manuals
ECV100-145085D (143-294232) 4 Cycle Vertical Engine View Diagrams & Manuals
ECV100-145085E (143-314602) 4 Cycle Vertical Engine View Diagrams & Manuals
ECV100-145086A (143-254462) 4 Cycle Vertical Engine View Diagrams & Manuals
ECV100-145086B (143-274142) 4 Cycle Vertical Engine View Diagrams & Manuals
ECV100-145087A (143-254492) 4 Cycle Vertical Engine View Diagrams & Manuals
ECV100-145087B (143-274422) 4 Cycle Vertical Engine View Diagrams & Manuals
ECV100-145087C (143-284642) 4 Cycle Vertical Engine View Diagrams & Manuals
ECV100-145088A (143-264052) 4 Cycle Vertical Engine View Diagrams & Manuals
ECV100-145089A (143-264062) 4 Cycle Vertical Engine View Diagrams & Manuals
ECV100-145090A (143-264072) 4 Cycle Vertical Engine View Diagrams & Manuals
ECV100-145091A (143-264082) 4 Cycle Vertical Engine View Diagrams & Manuals
ECV100-145092A (143-264102) 4 Cycle Vertical Engine View Diagrams & Manuals
ECV100-145092B (143-274152) 4 Cycle Vertical Engine View Diagrams & Manuals
ECV100-145093A (143-264352) 4 Cycle Vertical Engine View Diagrams & Manuals
ECV100-145093B (143-274042) 4 Cycle Vertical Engine View Diagrams & Manuals
ECV100-145093C (143-284342) 4 Cycle Vertical Engine View Diagrams & Manuals
ECV100-145094A (143-264362) 4 Cycle Vertical Engine View Diagrams & Manuals
ECV100-145094B (143-274052) 4 Cycle Vertical Engine View Diagrams & Manuals
ECV100-145095A (143-264372) 4 Cycle Vertical Engine View Diagrams & Manuals
ECV100-145095B (143-274432) 4 Cycle Vertical Engine View Diagrams & Manuals
ECV100-145096A (143-264392) 4 Cycle Vertical Engine View Diagrams & Manuals
ECV100-145096B (143-274032) 4 Cycle Vertical Engine View Diagrams & Manuals
ECV100-145097A (143-264402) 4 Cycle Vertical Engine View Diagrams & Manuals
ECV100-145097B (143-274062) 4 Cycle Vertical Engine View Diagrams & Manuals
ECV100-145098A (143-264412) 4 Cycle Vertical Engine View Diagrams & Manuals
ECV100-145098B (143-274242) 4 Cycle Vertical Engine View Diagrams & Manuals
ECV100-145101A (143-264452) 4 Cycle Vertical Engine View Diagrams & Manuals
ECV100-145102A (143-264462) 4 Cycle Vertical Engine View Diagrams & Manuals
ECV100-145103A (143-264482) 4 Cycle Vertical Engine View Diagrams & Manuals
ECV100-145104A (143-264512) 4 Cycle Vertical Engine View Diagrams & Manuals
ECV100-145106A (143-264562) 4 Cycle Vertical Engine View Diagrams & Manuals
ECV100-145106B (143-274442) 4 Cycle Vertical Engine View Diagrams & Manuals
ECV100-145106C (143-284682) 4 Cycle Vertical Engine View Diagrams & Manuals
ECV100-145106D (143-294392) 4 Cycle Vertical Engine View Diagrams & Manuals
ECV100-145106E (143-314632) 4 Cycle Vertical Engine View Diagrams & Manuals
ECV100-145107A (143-264572) 4 Cycle Vertical Engine View Diagrams & Manuals
ECV100-145107B (143-274782) 4 Cycle Vertical Engine View Diagrams & Manuals
ECV100-145107C (143-284782) 4 Cycle Vertical Engine View Diagrams & Manuals
ECV100-145107D (143-294672) 4 Cycle Vertical Engine View Diagrams & Manuals
ECV100-145107E (143-314672) 4 Cycle Vertical Engine View Diagrams & Manuals
ECV100-145108A (143-264582) 4 Cycle Vertical Engine View Diagrams & Manuals
ECV100-145108B (143-274622) 4 Cycle Vertical Engine View Diagrams & Manuals
ECV100-145108C (143-284752) 4 Cycle Vertical Engine View Diagrams & Manuals
ECV100-145108D (143-294412) 4 Cycle Vertical Engine View Diagrams & Manuals
ECV100-145108E (143-314662) 4 Cycle Vertical Engine View Diagrams & Manuals
ECV100-145109A (143-264592) 4 Cycle Vertical Engine View Diagrams & Manuals
ECV100-145109B (143-274262) 4 Cycle Vertical Engine View Diagrams & Manuals
ECV100-145109C (143-284352) 4 Cycle Vertical Engine View Diagrams & Manuals
ECV100-145109D (143-294382) 4 Cycle Vertical Engine View Diagrams & Manuals
ECV100-145109E (143-314652) 4 Cycle Vertical Engine View Diagrams & Manuals
ECV100-145110A (143-264602) 4 Cycle Vertical Engine View Diagrams & Manuals
ECV100-145110B (143-274602) 4 Cycle Vertical Engine View Diagrams & Manuals
ECV100-145110C (143-284692) 4 Cycle Vertical Engine View Diagrams & Manuals
ECV100-145110D (143-294352) 4 Cycle Vertical Engine View Diagrams & Manuals
ECV100-145110E (143-314612) 4 Cycle Vertical Engine View Diagrams & Manuals
ECV100-145111A (143-264612) 4 Cycle Vertical Engine View Diagrams & Manuals
ECV100-145111B (143-274452) 4 Cycle Vertical Engine View Diagrams & Manuals
ECV100-145111C (143-284362) 4 Cycle Vertical Engine View Diagrams & Manuals
ECV100-145111D (143-294402) 4 Cycle Vertical Engine View Diagrams & Manuals
ECV100-145111E (143-314642) 4 Cycle Vertical Engine View Diagrams & Manuals
ECV100-145112A (143-264622) 4 Cycle Vertical Engine View Diagrams & Manuals
ECV100-145112B (143-274022) 4 Cycle Vertical Engine View Diagrams & Manuals
ECV100-145112C (143-284382) 4 Cycle Vertical Engine View Diagrams & Manuals
ECV100-145112D (143-294362) 4 Cycle Vertical Engine View Diagrams & Manuals
ECV100-145112E (143-314682) 4 Cycle Vertical Engine View Diagrams & Manuals
ECV100-145113A (143-264632) 4 Cycle Vertical Engine View Diagrams & Manuals
ECV100-145113B (143-274632) 4 Cycle Vertical Engine View Diagrams & Manuals
ECV100-145114A (143-264642) 4 Cycle Vertical Engine View Diagrams & Manuals
ECV100-145114B (143-274482) 4 Cycle Vertical Engine View Diagrams & Manuals
ECV100-145115A (143-264652) 4 Cycle Vertical Engine View Diagrams & Manuals
ECV100-145115B (143-274612) 4 Cycle Vertical Engine View Diagrams & Manuals
ECV100-145115C (143-284772) 4 Cycle Vertical Engine View Diagrams & Manuals
ECV100-145115D (143-294572) 4 Cycle Vertical Engine View Diagrams & Manuals
ECV100-145115E (143-314622) 4 Cycle Vertical Engine View Diagrams & Manuals
ECV100-145116A (143-264672) 4 Cycle Vertical Engine View Diagrams & Manuals
ECV100-145116B (143-274462) 4 Cycle Vertical Engine View Diagrams & Manuals
ECV100-145116C (143-284702) 4 Cycle Vertical Engine View Diagrams & Manuals
ECV100-145116D (143-294372) 4 Cycle Vertical Engine View Diagrams & Manuals
ECV100-145116E (143-314692) 4 Cycle Vertical Engine View Diagrams & Manuals
ECV100-145117A (143-274202) 4 Cycle Vertical Engine View Diagrams & Manuals
ECV100-145117B (143-274212) 4 Cycle Vertical Engine View Diagrams & Manuals
ECV100-145118A (143-274222) 4 Cycle Vertical Engine View Diagrams & Manuals
ECV100-145118B (143-274232) 4 Cycle Vertical Engine View Diagrams & Manuals
ECV100-145119B (143-274342) 4 Cycle Vertical Engine View Diagrams & Manuals
ECV100-145120B (143-274362) 4 Cycle Vertical Engine View Diagrams & Manuals
ECV100-145122B (143-274392) 4 Cycle Vertical Engine View Diagrams & Manuals
ECV100-145123B (143-274402) 4 Cycle Vertical Engine View Diagrams & Manuals
ECV100-145124B (143-274412) 4 Cycle Vertical Engine View Diagrams & Manuals
ECV100-145125B (143-274502) 4 Cycle Vertical Engine View Diagrams & Manuals
ECV100-145126B (143-274512) 4 Cycle Vertical Engine View Diagrams & Manuals
ECV100-145126C (143-284492) 4 Cycle Vertical Engine View Diagrams & Manuals
ECV100-145127B (143-274522) 4 Cycle Vertical Engine View Diagrams & Manuals
ECV100-145129B (143-274562) 4 Cycle Vertical Engine View Diagrams & Manuals
ECV100-145131B (143-274582) 4 Cycle Vertical Engine View Diagrams & Manuals
ECV100-145131C (143-284622) 4 Cycle Vertical Engine View Diagrams & Manuals
ECV100-145131D (143-294662) 4 Cycle Vertical Engine View Diagrams & Manuals
ECV100-145132B (143-274652) 4 Cycle Vertical Engine View Diagrams & Manuals
ECV100-145133B (143-274672) 4 Cycle Vertical Engine View Diagrams & Manuals
ECV100-145134B (143-274712) 4 Cycle Vertical Engine View Diagrams & Manuals
ECV100-145134C (143-284472) 4 Cycle Vertical Engine View Diagrams & Manuals
ECV100-145135B (143-274722) 4 Cycle Vertical Engine View Diagrams & Manuals
ECV100-145135C (143-284432) 4 Cycle Vertical Engine View Diagrams & Manuals
ECV100-145137B (143-274742) 4 Cycle Vertical Engine View Diagrams & Manuals
ECV100-145137D (143-304352) 4 Cycle Vertical Engine View Diagrams & Manuals
ECV100-145137E (143-314812) 4 Cycle Vertical Engine View Diagrams & Manuals
ECV100-145138B (143-274752) 4 Cycle Vertical Engine View Diagrams & Manuals
ECV100-145139B (143-274762) 4 Cycle Vertical Engine View Diagrams & Manuals
ECV100-145139C (143-284452) 4 Cycle Vertical Engine View Diagrams & Manuals
ECV100-145139D (143-294582) 4 Cycle Vertical Engine View Diagrams & Manuals
ECV100-145139E (143-314202) 4 Cycle Vertical Engine View Diagrams & Manuals
ECV100-145140C (143-284042) 4 Cycle Vertical Engine View Diagrams & Manuals
ECV100-145141C (143-284072) 4 Cycle Vertical Engine View Diagrams & Manuals
ECV100-145142C (143-284102) 4 Cycle Vertical Engine View Diagrams & Manuals
ECV100-145143C (143-284212) 4 Cycle Vertical Engine View Diagrams & Manuals
ECV100-145144C (143-284262) 4 Cycle Vertical Engine View Diagrams & Manuals
ECV100-145145C (143-284462) 4 Cycle Vertical Engine View Diagrams & Manuals
ECV100-145146D (143-284502) 4 Cycle Vertical Engine View Diagrams & Manuals
ECV100-145147C (143-284532) 4 Cycle Vertical Engine View Diagrams & Manuals
ECV100-145147D (143-294592) 4 Cycle Vertical Engine View Diagrams & Manuals
ECV100-145147E (143-314212) 4 Cycle Vertical Engine View Diagrams & Manuals
ECV100-145148C (143-284582) 4 Cycle Vertical Engine View Diagrams & Manuals
ECV100-145148D (143-294482) 4 Cycle Vertical Engine View Diagrams & Manuals
ECV100-145148E (143-314222) 4 Cycle Vertical Engine View Diagrams & Manuals
ECV100-145149C (143-284602) 4 Cycle Vertical Engine View Diagrams & Manuals
ECV100-145149D (143-294732) 4 Cycle Vertical Engine View Diagrams & Manuals
ECV100-145150C (143-284612) 4 Cycle Vertical Engine View Diagrams & Manuals
ECV100-145151C (143-284742) 4 Cycle Vertical Engine View Diagrams & Manuals
ECV100-145151D (143-294422) 4 Cycle Vertical Engine View Diagrams & Manuals
ECV100-145152D (143-294472) 4 Cycle Vertical Engine View Diagrams & Manuals
ECV100-145155D (143-294142) 4 Cycle Vertical Engine View Diagrams & Manuals
ECV100-145156D (143-294152) 4 Cycle Vertical Engine View Diagrams & Manuals
ECV100-145157D (143-294162) 4 Cycle Vertical Engine View Diagrams & Manuals
ECV100-145158D (143-294172) 4 Cycle Vertical Engine View Diagrams & Manuals
ECV100-145159D (143-294332) 4 Cycle Vertical Engine View Diagrams & Manuals
ECV100-145160D (143-294682) 4 Cycle Vertical Engine View Diagrams & Manuals
ECV100-145161D (143-294722) 4 Cycle Vertical Engine View Diagrams & Manuals
ECV100-145163D (143-304032) 4 Cycle Vertical Engine View Diagrams & Manuals
ECV100-145163E (143-314122) 4 Cycle Vertical Engine View Diagrams & Manuals
ECV100-145164D (143-304042) 4 Cycle Vertical Engine View Diagrams & Manuals
ECV100-145164E (143-314132) 4 Cycle Vertical Engine View Diagrams & Manuals
ECV100-145166D (143-304072) 4 Cycle Vertical Engine View Diagrams & Manuals
ECV100-145166E (143-314782) 4 Cycle Vertical Engine View Diagrams & Manuals
ECV100-145168D (143-294742) 4 Cycle Vertical Engine View Diagrams & Manuals
ECV100-145168E (143-314582) 4 Cycle Vertical Engine View Diagrams & Manuals
ECV100-145169D (143-304102) 4 Cycle Vertical Engine View Diagrams & Manuals
ECV100-145169E (143-314142) 4 Cycle Vertical Engine View Diagrams & Manuals
ECV100-145170D (143-304112) 4 Cycle Vertical Engine View Diagrams & Manuals
ECV100-145170E (143-314152) 4 Cycle Vertical Engine View Diagrams & Manuals
ECV100-145171D (143-304122) 4 Cycle Vertical Engine View Diagrams & Manuals
ECV100-145171E (143-314172) 4 Cycle Vertical Engine View Diagrams & Manuals
ECV100-145172D (143-304142) 4 Cycle Vertical Engine View Diagrams & Manuals
ECV100-145172E (143-314422) 4 Cycle Vertical Engine View Diagrams & Manuals
ECV100-145173D (143-304152) 4 Cycle Vertical Engine View Diagrams & Manuals
ECV100-145173E (143-314232) 4 Cycle Vertical Engine View Diagrams & Manuals
ECV100-145174D (143-304132) 4 Cycle Vertical Engine View Diagrams & Manuals
ECV100-145174E (143-314242) 4 Cycle Vertical Engine View Diagrams & Manuals
ECV100-145175D (143-304162) 4 Cycle Vertical Engine View Diagrams & Manuals
ECV100-145176D (143-304172) 4 Cycle Vertical Engine View Diagrams & Manuals
ECV100-145176E (143-314462) 4 Cycle Vertical Engine View Diagrams & Manuals
ECV100-145177D (143-304182) 4 Cycle Vertical Engine View Diagrams & Manuals
ECV100-145177E (143-314452) 4 Cycle Vertical Engine View Diagrams & Manuals
ECV100-145178D (143-304192) 4 Cycle Vertical Engine View Diagrams & Manuals
ECV100-145178E (143-314802) 4 Cycle Vertical Engine View Diagrams & Manuals
ECV100-145179D (143-304282) 4 Cycle Vertical Engine View Diagrams & Manuals
ECV100-145179E (143-314312) 4 Cycle Vertical Engine View Diagrams & Manuals
ECV100-145180D (143-304312) 4 Cycle Vertical Engine View Diagrams & Manuals
ECV100-145180E (143-314162) 4 Cycle Vertical Engine View Diagrams & Manuals
ECV100-145181E (143-314472) 4 Cycle Vertical Engine View Diagrams & Manuals
ECV100-145182D (143-304322) 4 Cycle Vertical Engine View Diagrams & Manuals
ECV100-145182E (143-314252) 4 Cycle Vertical Engine View Diagrams & Manuals
ECV100-145183D (143-304332) 4 Cycle Vertical Engine View Diagrams & Manuals
ECV100-145183E (143-314442) 4 Cycle Vertical Engine View Diagrams & Manuals
ECV100-145184E (143-314012) 4 Cycle Vertical Engine View Diagrams & Manuals
ECV100-145185E (143-314022) 4 Cycle Vertical Engine View Diagrams & Manuals
ECV100-145186E (143-314192) 4 Cycle Vertical Engine View Diagrams & Manuals
ECV100-145187E (143-314372) 4 Cycle Vertical Engine View Diagrams & Manuals
ECV100-145188E (143-314392) 4 Cycle Vertical Engine View Diagrams & Manuals
ECV100-145190E (143-314502) 4 Cycle Vertical Engine View Diagrams & Manuals
ECV100-145191E (143-314512) 4 Cycle Vertical Engine View Diagrams & Manuals
ECV100-145192E (143-314522) 4 Cycle Vertical Engine View Diagrams & Manuals
ECV100-145193E (143-324012) 4 Cycle Vertical Engine View Diagrams & Manuals
ECV100-145194E (143-324022) 4 Cycle Vertical Engine View Diagrams & Manuals
ECV100-145195E (143-324042) 4 Cycle Vertical Engine View Diagrams & Manuals
ECV100-145196E (143-324062) 4 Cycle Vertical Engine View Diagrams & Manuals
ECV100-145197E (143-324082) 4 Cycle Vertical Engine View Diagrams & Manuals
ECV100-145199E (143-324102) 4 Cycle Vertical Engine View Diagrams & Manuals
ECV100-145200E (143-324072) 4 Cycle Vertical Engine View Diagrams & Manuals
ECV100-145200F (143-334172) 4 Cycle Vertical Engine View Diagrams & Manuals
ECV100-145201E (143-324132) 4 Cycle Vertical Engine View Diagrams & Manuals
ECV100-145202E (143-324202) 4 Cycle Vertical Engine View Diagrams & Manuals
ECV100-145202F (143-334342) 4 Cycle Vertical Engine View Diagrams & Manuals
ECV100-145203E (143-324212) 4 Cycle Vertical Engine View Diagrams & Manuals
ECV100-145204E (143-324222) 4 Cycle Vertical Engine View Diagrams & Manuals
ECV100-145205E (143-324232) 4 Cycle Vertical Engine View Diagrams & Manuals
ECV100-145207F (143-334042) 4 Cycle Vertical Engine View Diagrams & Manuals
ECV100-145210F (143-334102) 4 Cycle Vertical Engine View Diagrams & Manuals
ECV100-145211F (143-334132) 4 Cycle Vertical Engine View Diagrams & Manuals
ECV100-145213F (143-334182) 4 Cycle Vertical Engine View Diagrams & Manuals
ECV100-145214F (143-334212) 4 Cycle Vertical Engine View Diagrams & Manuals
ECV100-145215F (143-334222) 4 Cycle Vertical Engine View Diagrams & Manuals
ECV100-145216F (143-334242) 4 Cycle Vertical Engine View Diagrams & Manuals
ECV100-145217F (143-334232) 4 Cycle Vertical Engine View Diagrams & Manuals
ECV100-145218F (143-334252) 4 Cycle Vertical Engine View Diagrams & Manuals
ECV100-145219F (143-334322) 4 Cycle Vertical Engine View Diagrams & Manuals
ECV100-145220F (143-344062) 4 Cycle Vertical Engine View Diagrams & Manuals
ECV100-145221F (143-344052) 4 Cycle Vertical Engine View Diagrams & Manuals
ECV100-145222F (143-344082) 4 Cycle Vertical Engine View Diagrams & Manuals
ECV100-145223F (143-344092) 4 Cycle Vertical Engine View Diagrams & Manuals
ECV100-145224F (143-344122) 4 Cycle Vertical Engine View Diagrams & Manuals
ECV100-145225F (143-344132) 4 Cycle Vertical Engine View Diagrams & Manuals
ECV100-145226F (143-344152) 4 Cycle Vertical Engine View Diagrams & Manuals
ECV100-145227F (143-344172) 4 Cycle Vertical Engine View Diagrams & Manuals
ECV100-145228F (143-344232) 4 Cycle Vertical Engine View Diagrams & Manuals
ECV100-145229F (143-344242) 4 Cycle Vertical Engine View Diagrams & Manuals
ECV100-145230F (143-344252) 4 Cycle Vertical Engine View Diagrams & Manuals
ECV100-145231F (143-344262) 4 Cycle Vertical Engine View Diagrams & Manuals
ECV100-145232F (143-344272) 4 Cycle Vertical Engine View Diagrams & Manuals
ECV100-145233F (143-344282) 4 Cycle Vertical Engine View Diagrams & Manuals
ECV100-145234F (143-344292) 4 Cycle Vertical Engine View Diagrams & Manuals
ECV100-145235F (143-344302) 4 Cycle Vertical Engine View Diagrams & Manuals
ECV100-145236F (143-344312) 4 Cycle Vertical Engine View Diagrams & Manuals
ECV100-145237F (143-344322) 4 Cycle Vertical Engine View Diagrams & Manuals
ECV100-145238F (143-344332) 4 Cycle Vertical Engine View Diagrams & Manuals
ECV100-145239F (143-344342) 4 Cycle Vertical Engine View Diagrams & Manuals
ECV100-145240F (143-344352) 4 Cycle Vertical Engine View Diagrams & Manuals
ECV100-145241F (143-344362) 4 Cycle Vertical Engine View Diagrams & Manuals
ECV100-145242F (143-344372) 4 Cycle Vertical Engine View Diagrams & Manuals
ECV100-145243F (143-344382) 4 Cycle Vertical Engine View Diagrams & Manuals
ECV100-145244F (143-344392) 4 Cycle Vertical Engine View Diagrams & Manuals
ECV100-145245F (143-344452) 4 Cycle Vertical Engine View Diagrams & Manuals
ECV100-145246F (143-344472) 4 Cycle Vertical Engine View Diagrams & Manuals
ECV100-145248F (143-354022) 4 Cycle Vertical Engine View Diagrams & Manuals
ECV100-145249F (143-354032) 4 Cycle Vertical Engine View Diagrams & Manuals
ECV100-145251F (143-354052) 4 Cycle Vertical Engine View Diagrams & Manuals
ECV100-145253F (143-354082) 4 Cycle Vertical Engine View Diagrams & Manuals
ECV100-145254F (143-354112) 4 Cycle Vertical Engine View Diagrams & Manuals
ECV100-145255F (143-354152) 4 Cycle Vertical Engine View Diagrams & Manuals
ECV100-145256F (143-354222) 4 Cycle Vertical Engine View Diagrams & Manuals
ECV100-145257F (143-354242) 4 Cycle Vertical Engine View Diagrams & Manuals
ECV100-145258G (143-384222) 4 Cycle Vertical Engine View Diagrams & Manuals
ECV100-145259F (143-354262) 4 Cycle Vertical Engine View Diagrams & Manuals
ECV100-145260F (143-354272) 4 Cycle Vertical Engine View Diagrams & Manuals
ECV100-145261F (143-354442) 4 Cycle Vertical Engine View Diagrams & Manuals
ECV100-145262F (143-354302) 4 Cycle Vertical Engine View Diagrams & Manuals
ECV100-145263F (143-354362) 4 Cycle Vertical Engine View Diagrams & Manuals
ECV100-145264F (143-354372) 4 Cycle Vertical Engine View Diagrams & Manuals
ECV100-145265F (143-354382) 4 Cycle Vertical Engine View Diagrams & Manuals
ECV100-145266F (143-354392) 4 Cycle Vertical Engine View Diagrams & Manuals
ECV100-145266G (143-384492) 4 Cycle Vertical Engine View Diagrams & Manuals
ECV100-145267F (143-354422) 4 Cycle Vertical Engine View Diagrams & Manuals
ECV100-145268F (143-354432) 4 Cycle Vertical Engine View Diagrams & Manuals
ECV100-145269F (143-354452) 4 Cycle Vertical Engine View Diagrams & Manuals
ECV100-145270F (143-354402) 4 Cycle Vertical Engine View Diagrams & Manuals
ECV100-145271F (143-354412) 4 Cycle Vertical Engine View Diagrams & Manuals
ECV100-145273F (143-354462) 4 Cycle Vertical Engine View Diagrams & Manuals
ECV100-145273G (143-384462) 4 Cycle Vertical Engine View Diagrams & Manuals
ECV100-145274F (143-364022) 4 Cycle Vertical Engine View Diagrams & Manuals
ECV100-145275F (143-364032) 4 Cycle Vertical Engine View Diagrams & Manuals
ECV100-145276F (143-364042) 4 Cycle Vertical Engine View Diagrams & Manuals
ECV100-145277F (143-364052) 4 Cycle Vertical Engine View Diagrams & Manuals
ECV100-145278F (143-364062) 4 Cycle Vertical Engine View Diagrams & Manuals
ECV100-145279F (143-364072) 4 Cycle Vertical Engine View Diagrams & Manuals
ECV100-145280F (143-364092) 4 Cycle Vertical Engine View Diagrams & Manuals
ECV100-145281F (143-364162) 4 Cycle Vertical Engine View Diagrams & Manuals
ECV100-145282F (143-364172) 4 Cycle Vertical Engine View Diagrams & Manuals
ECV100-145283F (143-364182) 4 Cycle Vertical Engine View Diagrams & Manuals
ECV100-145284F (143-364192) 4 Cycle Vertical Engine View Diagrams & Manuals
ECV100-145285F (143-364212) 4 Cycle Vertical Engine View Diagrams & Manuals
ECV100-145285G (143-384352) 4 Cycle Vertical Engine View Diagrams & Manuals
ECV100-145286F (143-364232) 4 Cycle Vertical Engine View Diagrams & Manuals
ECV100-145286G (143-384252) 4 Cycle Vertical Engine View Diagrams & Manuals
ECV100-145287F (143-364242) 4 Cycle Vertical Engine View Diagrams & Manuals
ECV100-145287G (143-384262) 4 Cycle Vertical Engine View Diagrams & Manuals
ECV100-145288F (143-364252) 4 Cycle Vertical Engine View Diagrams & Manuals
ECV100-145288G (143-384512) 4 Cycle Vertical Engine View Diagrams & Manuals
ECV100-145289F (143-364282) 4 Cycle Vertical Engine View Diagrams & Manuals
ECV100-145289G (143-384532) 4 Cycle Vertical Engine View Diagrams & Manuals
ECV100-145290F (143-364272) 4 Cycle Vertical Engine View Diagrams & Manuals
ECV100-145290G (143-384502) 4 Cycle Vertical Engine View Diagrams & Manuals
ECV100-145291F (143-364292) 4 Cycle Vertical Engine View Diagrams & Manuals
ECV100-145291G (143-384472) 4 Cycle Vertical Engine View Diagrams & Manuals
ECV100-145292F (143-364302) 4 Cycle Vertical Engine View Diagrams & Manuals
ECV100-145292G (143-384482) 4 Cycle Vertical Engine View Diagrams & Manuals
ECV100-145293F (143-364312) 4 Cycle Vertical Engine View Diagrams & Manuals
ECV100-145293G (143-384372) 4 Cycle Vertical Engine View Diagrams & Manuals
ECV100-145294F (143-364322) 4 Cycle Vertical Engine View Diagrams & Manuals
ECV100-145294G (143-384362) 4 Cycle Vertical Engine View Diagrams & Manuals
ECV100-145295F (143-364332) 4 Cycle Vertical Engine View Diagrams & Manuals
ECV100-145295G (143-384232) 4 Cycle Vertical Engine View Diagrams & Manuals
ECV100-145296F (143-364342) 4 Cycle Vertical Engine View Diagrams & Manuals
ECV100-145296G (143-384242) 4 Cycle Vertical Engine View Diagrams & Manuals
ECV100-145297F (143-364382) 4 Cycle Vertical Engine View Diagrams & Manuals
ECV100-145297G (143-384522) 4 Cycle Vertical Engine View Diagrams & Manuals
ECV100-145298F (143-374092) 4 Cycle Vertical Engine View Diagrams & Manuals
ECV100-145299F (143-374102) 4 Cycle Vertical Engine View Diagrams & Manuals
ECV100-145300F (143-374112) 4 Cycle Vertical Engine View Diagrams & Manuals
ECV100-145301F (143-374122) 4 Cycle Vertical Engine View Diagrams & Manuals
ECV100-145302F (143-374132) 4 Cycle Vertical Engine View Diagrams & Manuals
ECV100-145303F (143-374142) 4 Cycle Vertical Engine View Diagrams & Manuals
ECV100-145304F (143-374152) 4 Cycle Vertical Engine View Diagrams & Manuals
ECV100-145305F (143-374162) 4 Cycle Vertical Engine View Diagrams & Manuals
ECV100-145306F (143-374172) 4 Cycle Vertical Engine View Diagrams & Manuals
ECV100-145307F (143-374182) 4 Cycle Vertical Engine View Diagrams & Manuals
ECV100-145308F (143-374192) 4 Cycle Vertical Engine View Diagrams & Manuals
ECV100-145309F (143-374202) 4 Cycle Vertical Engine View Diagrams & Manuals
ECV100-145310F (143-374342) 4 Cycle Vertical Engine View Diagrams & Manuals
ECV100-145310G (143-384542) 4 Cycle Vertical Engine View Diagrams & Manuals
ECV100-145311F (143-374412) 4 Cycle Vertical Engine View Diagrams & Manuals
ECV100-145312F (143-374402) 4 Cycle Vertical Engine View Diagrams & Manuals
ECV100-145313G (143-384092) 4 Cycle Vertical Engine View Diagrams & Manuals
ECV100-145314G (143-384102) 4 Cycle Vertical Engine View Diagrams & Manuals
ECV100-145315G (143-384112) 4 Cycle Vertical Engine View Diagrams & Manuals
ECV100-145316G (143-384122) 4 Cycle Vertical Engine View Diagrams & Manuals
ECV100-145317G (143-384172) 4 Cycle Vertical Engine View Diagrams & Manuals
ECV100-145318G (143-384202) 4 Cycle Vertical Engine View Diagrams & Manuals
ECV100-145319G (143-384212) 4 Cycle Vertical Engine View Diagrams & Manuals
ECV100-145320G (143-384562) 4 Cycle Vertical Engine View Diagrams & Manuals
ECV100-145321G (143-384322) 4 Cycle Vertical Engine View Diagrams & Manuals
ECV100-145322G (143-384332) 4 Cycle Vertical Engine View Diagrams & Manuals
ECV100-145323G (143-394012) 4 Cycle Vertical Engine View Diagrams & Manuals
ECV100-145324G (143-394082) 4 Cycle Vertical Engine View Diagrams & Manuals
ECV100-145325G (143-394232) 4 Cycle Vertical Engine View Diagrams & Manuals
ECV100-145326G (143-394222) 4 Cycle Vertical Engine View Diagrams & Manuals
ECV100-145327G (143-394172) 4 Cycle Vertical Engine View Diagrams & Manuals
ECV100-145329G (143-394282) 4 Cycle Vertical Engine View Diagrams & Manuals
ECV100-145330G (143-394252) 4 Cycle Vertical Engine View Diagrams & Manuals
ECV100-145331G (143-394272) 4 Cycle Vertical Engine View Diagrams & Manuals
ECV100-145332G (143-394262) 4 Cycle Vertical Engine View Diagrams & Manuals
ECV100-145333G (143-394162) 4 Cycle Vertical Engine View Diagrams & Manuals
ECV100-145334G (143-394342) 4 Cycle Vertical Engine View Diagrams & Manuals
ECV100-145334H (143-414092) 4 Cycle Vertical Engine View Diagrams & Manuals
ECV100-145335G (143-394352) 4 Cycle Vertical Engine View Diagrams & Manuals
ECV100-145335H (143-414102) 4 Cycle Vertical Engine View Diagrams & Manuals
ECV100-145336G (143-394362) 4 Cycle Vertical Engine View Diagrams & Manuals
ECV100-145337G (143-394372) 4 Cycle Vertical Engine View Diagrams & Manuals
ECV100-145337H (143-414192) 4 Cycle Vertical Engine View Diagrams & Manuals
ECV100-145338G (143-394382) 4 Cycle Vertical Engine View Diagrams & Manuals
ECV100-145338H (143-414202) 4 Cycle Vertical Engine View Diagrams & Manuals
ECV100-145339G (143-394392) 4 Cycle Vertical Engine View Diagrams & Manuals
ECV100-145339H (143-414112) 4 Cycle Vertical Engine View Diagrams & Manuals
ECV100-145340G (143-394402) 4 Cycle Vertical Engine View Diagrams & Manuals
ECV100-145340H (143-414122) 4 Cycle Vertical Engine View Diagrams & Manuals
ECV100-145341G (143-394412) 4 Cycle Vertical Engine View Diagrams & Manuals
ECV100-145341H (143-414132) 4 Cycle Vertical Engine View Diagrams & Manuals
ECV100-145342G (143-394422) 4 Cycle Vertical Engine View Diagrams & Manuals
ECV100-145342H (143-414142) 4 Cycle Vertical Engine View Diagrams & Manuals
ECV100-145344G (143-394442) 4 Cycle Vertical Engine View Diagrams & Manuals
ECV100-145344H (143-414152) 4 Cycle Vertical Engine View Diagrams & Manuals
ECV100-145345G (143-394452) 4 Cycle Vertical Engine View Diagrams & Manuals
ECV100-145345H (143-414162) 4 Cycle Vertical Engine View Diagrams & Manuals
ECV100-145346G (143-394462) 4 Cycle Vertical Engine View Diagrams & Manuals
ECV100-145346H (143-414262) 4 Cycle Vertical Engine View Diagrams & Manuals
ECV100-145347G (143-394472) 4 Cycle Vertical Engine View Diagrams & Manuals
ECV100-145347H (143-414272) 4 Cycle Vertical Engine View Diagrams & Manuals
ECV100-145348G (143-394482) 4 Cycle Vertical Engine View Diagrams & Manuals
ECV100-145349G (143-394512) 4 Cycle Vertical Engine View Diagrams & Manuals
ECV100-145349H (143-414682) 4 Cycle Vertical Engine View Diagrams & Manuals
ECV105-147008 (143-207062) 4 Cycle Vertical Engine View Diagrams & Manuals
ECV105-147009 (143-207082) 4 Cycle Vertical Engine View Diagrams & Manuals
ECV105-147012 (143-217012) 4 Cycle Vertical Engine View Diagrams & Manuals
ECV105-147013 (143-217022) 4 Cycle Vertical Engine View Diagrams & Manuals
ECV105-147014 (143-217032) 4 Cycle Vertical Engine View Diagrams & Manuals
ECV105-147015 (143-217092) 4 Cycle Vertical Engine View Diagrams & Manuals
ECV105-147016 (143-237032) 4 Cycle Vertical Engine View Diagrams & Manuals
ECV110-151001 (143-227012) 4 Cycle Vertical Engine View Diagrams & Manuals
ECV110-151002 (143-227022) 4 Cycle Vertical Engine View Diagrams & Manuals
ECV110-151003 (143-227062) 4 Cycle Vertical Engine View Diagrams & Manuals
ECV110-151004 (143-227072) 4 Cycle Vertical Engine View Diagrams & Manuals
ECV110-151005 (143-237012) 4 Cycle Vertical Engine View Diagrams & Manuals
ECV110-151006 (143-237022) 4 Cycle Vertical Engine View Diagrams & Manuals
ECV120-152001 (143-225012) 4 Cycle Vertical Engine View Diagrams & Manuals
ECV120-152002 (143-225022) 4 Cycle Vertical Engine View Diagrams & Manuals
ECV120-152003 (143-225062) 4 Cycle Vertical Engine View Diagrams & Manuals
ECV120-152004 (143-225072) 4 Cycle Vertical Engine View Diagrams & Manuals
ECV120-152005 (143-235012) 4 Cycle Vertical Engine View Diagrams & Manuals
ECV120-152006 (143-235022) 4 Cycle Vertical Engine View Diagrams & Manuals
ECV120-152007 (143-235042) 4 Cycle Vertical Engine View Diagrams & Manuals
ECV120-152008 (143-235052) 4 Cycle Vertical Engine View Diagrams & Manuals
ECV120-152013 (143-245102) 4 Cycle Vertical Engine View Diagrams & Manuals
ECV120-152014 (143-245112) 4 Cycle Vertical Engine View Diagrams & Manuals
ECV120-152015 (143-245072) 4 Cycle Vertical Engine View Diagrams & Manuals
ECV120-152016 (143-245082) 4 Cycle Vertical Engine View Diagrams & Manuals
ECV120-152017 (143-245122) 4 Cycle Vertical Engine View Diagrams & Manuals
ECV120-152018 (143-245132) 4 Cycle Vertical Engine View Diagrams & Manuals
ECV120-152019 (143-245052) 4 Cycle Vertical Engine View Diagrams & Manuals
ECV120-152020 (143-245062) 4 Cycle Vertical Engine View Diagrams & Manuals
ECV120-152021 (143-245162) 4 Cycle Vertical Engine View Diagrams & Manuals
ECV120-152022 (143-245192) 4 Cycle Vertical Engine View Diagrams & Manuals
ECV120-152023A (143-295042) 4 Cycle Vertical Engine View Diagrams & Manuals
ECV120-152024A (143-305012) 4 Cycle Vertical Engine View Diagrams & Manuals
ECV120-152024B (143-315012) 4 Cycle Vertical Engine View Diagrams & Manuals
ECV120-152025A (143-305022) 4 Cycle Vertical Engine View Diagrams & Manuals
ECV120-152025B (143-315132) 4 Cycle Vertical Engine View Diagrams & Manuals
ECV120-152026A (143-305032) 4 Cycle Vertical Engine View Diagrams & Manuals
ECV120-152026B (143-315082) 4 Cycle Vertical Engine View Diagrams & Manuals
ECV120-152027A (143-305052) 4 Cycle Vertical Engine View Diagrams & Manuals
ECV120-152027B (143-315052) 4 Cycle Vertical Engine View Diagrams & Manuals
ECV120-152028C (143-335012) 4 Cycle Vertical Engine View Diagrams & Manuals
ECV120-152029C (143-335022) 4 Cycle Vertical Engine View Diagrams & Manuals
ECV120-152030C (143-345022) 4 Cycle Vertical Engine View Diagrams & Manuals
ECV120-152031C (143-345012) 4 Cycle Vertical Engine View Diagrams & Manuals
ECV120-152032C (143-345052) 4 Cycle Vertical Engine View Diagrams & Manuals
ECV120-152034C (143-345062) 4 Cycle Vertical Engine View Diagrams & Manuals
ECV120-152035C (143-355022) 4 Cycle Vertical Engine View Diagrams & Manuals
ECV120-152036D (143-385032) 4 Cycle Vertical Engine View Diagrams & Manuals
ECV120-152037C (143-365012) 4 Cycle Vertical Engine View Diagrams & Manuals
ECV120-152038C (143-365022) 4 Cycle Vertical Engine View Diagrams & Manuals
ECV120-152039C (143-375012) 4 Cycle Vertical Engine View Diagrams & Manuals
ECV120-152040C (143-375022) 4 Cycle Vertical Engine View Diagrams & Manuals
ECV120-152041D (143-385012) 4 Cycle Vertical Engine View Diagrams & Manuals
ECV120-152042D (143-385022) 4 Cycle Vertical Engine View Diagrams & Manuals
ECV120-152043C (143-375052) 4 Cycle Vertical Engine View Diagrams & Manuals
ECV120-152044D (143-395012) 4 Cycle Vertical Engine View Diagrams & Manuals
ECV120-152045D (143-395022) 4 Cycle Vertical Engine View Diagrams & Manuals
LAV30-30105K (143-223042) 4 Cycle Vertical Engine View Diagrams & Manuals
LAV30-30282K (143-243052) 4 Cycle Vertical Engine View Diagrams & Manuals
LAV30-30287J (143-213022) 4 Cycle Vertical Engine View Diagrams & Manuals
LAV30-30287K (143-223022) 4 Cycle Vertical Engine View Diagrams & Manuals
LAV30-30460H (143-203012) 4 Cycle Vertical Engine View Diagrams & Manuals
LAV30-30460K (143-224142) 4 Cycle Vertical Engine View Diagrams & Manuals
LAV30-30462H (143-201032) 4 Cycle Vertical Engine View Diagrams & Manuals
LAV30-30467H (143-201042) 4 Cycle Vertical Engine View Diagrams & Manuals
LAV30-30468H (143-213012) 4 Cycle Vertical Engine View Diagrams & Manuals
LAV30-30488K (143-223012) 4 Cycle Vertical Engine View Diagrams & Manuals
LAV30-30489K (143-223032) 4 Cycle Vertical Engine View Diagrams & Manuals
LAV30-30496K (143-223052) 4 Cycle Vertical Engine View Diagrams & Manuals
LAV30-30502K (143-233012) 4 Cycle Vertical Engine View Diagrams & Manuals
LAV30-30504K (143-233032) 4 Cycle Vertical Engine View Diagrams & Manuals
LAV30-30510K (143-233042) 4 Cycle Vertical Engine View Diagrams & Manuals
LAV30-30523K (143-243012) 4 Cycle Vertical Engine View Diagrams & Manuals
LAV30-30524K (143-243022) 4 Cycle Vertical Engine View Diagrams & Manuals
LAV30-30527K (143-243042) 4 Cycle Vertical Engine View Diagrams & Manuals
LAV30-30533K (143-243062) 4 Cycle Vertical Engine View Diagrams & Manuals
LAV30-30534K (143-243072) 4 Cycle Vertical Engine View Diagrams & Manuals
LAV30-30535K (143-243082) 4 Cycle Vertical Engine View Diagrams & Manuals
LAV30-30538M (143-284222) 4 Cycle Vertical Engine View Diagrams & Manuals
LAV30-30539M (143-284442) 4 Cycle Vertical Engine View Diagrams & Manuals
LAV35-40058K (143-224422) 4 Cycle Vertical Engine View Diagrams & Manuals
LAV35-40063K (143-224382) 4 Cycle Vertical Engine View Diagrams & Manuals
LAV35-40139K (143-224392) 4 Cycle Vertical Engine View Diagrams & Manuals
LAV35-40168H (143-204092) 4 Cycle Vertical Engine View Diagrams & Manuals
LAV35-40254J (143-214102) 4 Cycle Vertical Engine View Diagrams & Manuals
LAV35-40319J (143-214242) 4 Cycle Vertical Engine View Diagrams & Manuals
LAV35-40355J (143-214092) 4 Cycle Vertical Engine View Diagrams & Manuals
LAV35-40355K (143-224162) 4 Cycle Vertical Engine View Diagrams & Manuals
LAV35-40383J (143-214192) 4 Cycle Vertical Engine View Diagrams & Manuals
LAV35-40442J (143-214122) 4 Cycle Vertical Engine View Diagrams & Manuals
LAV35-40442K (143-224322) 4 Cycle Vertical Engine View Diagrams & Manuals
LAV35-40463J (143-214132) 4 Cycle Vertical Engine View Diagrams & Manuals
LAV35-40463K (143-224312) 4 Cycle Vertical Engine View Diagrams & Manuals
LAV35-40463M (143-284762) 4 Cycle Vertical Engine View Diagrams & Manuals
LAV35-40531H (143-204042) 4 Cycle Vertical Engine View Diagrams & Manuals
LAV35-40532H (143-204072) 4 Cycle Vertical Engine View Diagrams & Manuals
LAV35-40541H (143-204032) 4 Cycle Vertical Engine View Diagrams & Manuals
LAV35-40541J (143-214112) 4 Cycle Vertical Engine View Diagrams & Manuals
LAV35-40541K (143-224192) 4 Cycle Vertical Engine View Diagrams & Manuals
LAV35-40544H (143-204052) 4 Cycle Vertical Engine View Diagrams & Manuals
LAV35-40545H (143-204082) 4 Cycle Vertical Engine View Diagrams & Manuals
LAV35-40559H (143-204162) 4 Cycle Vertical Engine View Diagrams & Manuals
LAV35-40559J (143-214082) 4 Cycle Vertical Engine View Diagrams & Manuals
LAV35-40559K (143-224112) 4 Cycle Vertical Engine View Diagrams & Manuals
LAV35-40568H (143-204172) 4 Cycle Vertical Engine View Diagrams & Manuals
LAV35-40571H (143-204182) 4 Cycle Vertical Engine View Diagrams & Manuals
LAV35-40589J (143-214012) 4 Cycle Vertical Engine View Diagrams & Manuals
LAV35-40590J (143-214022) 4 Cycle Vertical Engine View Diagrams & Manuals
LAV35-40591H (143-214032) 4 Cycle Vertical Engine View Diagrams & Manuals
LAV35-40591K (143-224132) 4 Cycle Vertical Engine View Diagrams & Manuals
LAV35-40597J (143-214232) 4 Cycle Vertical Engine View Diagrams & Manuals
LAV35-40598J (143-214222) 4 Cycle Vertical Engine View Diagrams & Manuals
LAV35-40599J (143-214212) 4 Cycle Vertical Engine View Diagrams & Manuals
LAV35-40599K (143-224252) 4 Cycle Vertical Engine View Diagrams & Manuals
LAV35-40611J (143-214252) 4 Cycle Vertical Engine View Diagrams & Manuals
LAV35-40611K (143-234252) 4 Cycle Vertical Engine View Diagrams & Manuals
LAV35-40618J (143-214292) 4 Cycle Vertical Engine View Diagrams & Manuals
LAV35-40626J (143-214302) 4 Cycle Vertical Engine View Diagrams & Manuals
LAV35-40626K (143-224122) 4 Cycle Vertical Engine View Diagrams & Manuals
LAV35-40626L (143-274642) 4 Cycle Vertical Engine View Diagrams & Manuals
LAV35-40644J (143-214332) 4 Cycle Vertical Engine View Diagrams & Manuals
LAV35-40649K (143-224412) 4 Cycle Vertical Engine View Diagrams & Manuals
LAV35-40650K (143-224012) 4 Cycle Vertical Engine View Diagrams & Manuals
LAV35-40651K (143-224022) 4 Cycle Vertical Engine View Diagrams & Manuals
LAV35-40654K (143-224062) 4 Cycle Vertical Engine View Diagrams & Manuals
LAV35-40657K (143-224092) 4 Cycle Vertical Engine View Diagrams & Manuals
LAV35-40661K (143-244092) 4 Cycle Vertical Engine View Diagrams & Manuals
LAV35-40662K (143-224182) 4 Cycle Vertical Engine View Diagrams & Manuals
LAV35-40675K (143-224222) 4 Cycle Vertical Engine View Diagrams & Manuals
LAV35-40676K (143-224262) 4 Cycle Vertical Engine View Diagrams & Manuals
LAV35-40677K (143-224272) 4 Cycle Vertical Engine View Diagrams & Manuals
LAV35-40678K (143-224282) 4 Cycle Vertical Engine View Diagrams & Manuals
LAV35-40687K (143-224332) 4 Cycle Vertical Engine View Diagrams & Manuals
LAV35-40688K (143-224342) 4 Cycle Vertical Engine View Diagrams & Manuals
LAV35-40689K (143-224372) 4 Cycle Vertical Engine View Diagrams & Manuals
LAV35-40699K (143-224402) 4 Cycle Vertical Engine View Diagrams & Manuals
LAV35-40718K (143-234022) 4 Cycle Vertical Engine View Diagrams & Manuals
LAV35-40720K (143-234042) 4 Cycle Vertical Engine View Diagrams & Manuals
LAV35-40721K (143-234052) 4 Cycle Vertical Engine View Diagrams & Manuals
LAV35-40728K (143-234102) 4 Cycle Vertical Engine View Diagrams & Manuals
LAV35-40735K (143-234112) 4 Cycle Vertical Engine View Diagrams & Manuals
LAV35-40736K (143-234122) 4 Cycle Vertical Engine View Diagrams & Manuals
LAV35-40737K (143-234132) 4 Cycle Vertical Engine View Diagrams & Manuals
LAV35-40738K (143-234142) 4 Cycle Vertical Engine View Diagrams & Manuals
LAV35-40741K (143-234162) 4 Cycle Vertical Engine View Diagrams & Manuals
LAV35-40750K (143-234192) 4 Cycle Vertical Engine View Diagrams & Manuals
LAV35-40751K (143-234202) 4 Cycle Vertical Engine View Diagrams & Manuals
LAV35-40751L (143-274252) 4 Cycle Vertical Engine View Diagrams & Manuals
LAV35-40751M (143-284392) 4 Cycle Vertical Engine View Diagrams & Manuals
LAV35-40756K (143-234242) 4 Cycle Vertical Engine View Diagrams & Manuals
LAV35-40772K (143-234262) 4 Cycle Vertical Engine View Diagrams & Manuals
LAV35-40773K (143-244012) 4 Cycle Vertical Engine View Diagrams & Manuals
LAV35-40774K (143-244032) 4 Cycle Vertical Engine View Diagrams & Manuals
LAV35-40774L (143-274792) 4 Cycle Vertical Engine View Diagrams & Manuals
LAV35-40775K (143-244022) 4 Cycle Vertical Engine View Diagrams & Manuals
LAV35-40777K (143-244072) 4 Cycle Vertical Engine View Diagrams & Manuals
LAV35-40789K (143-244082) 4 Cycle Vertical Engine View Diagrams & Manuals
LAV35-40791K (143-244102) 4 Cycle Vertical Engine View Diagrams & Manuals
LAV35-40792K (143-244112) 4 Cycle Vertical Engine View Diagrams & Manuals
LAV35-40796K (143-244202) 4 Cycle Vertical Engine View Diagrams & Manuals
LAV35-40797K (143-244222) 4 Cycle Vertical Engine View Diagrams & Manuals
LAV35-40798K (143-244232) 4 Cycle Vertical Engine View Diagrams & Manuals
LAV35-40799K (143-244262) 4 Cycle Vertical Engine View Diagrams & Manuals
LAV35-40801K (143-244272) 4 Cycle Vertical Engine View Diagrams & Manuals
LAV35-40802K (143-244282) 4 Cycle Vertical Engine View Diagrams & Manuals
LAV35-40810K (143-254012) 4 Cycle Vertical Engine View Diagrams & Manuals
LAV35-40811K (143-254072) 4 Cycle Vertical Engine View Diagrams & Manuals
LAV35-40812K (143-254082) 4 Cycle Vertical Engine View Diagrams & Manuals
LAV35-40813K (143-254092) 4 Cycle Vertical Engine View Diagrams & Manuals
LAV35-40814K (143-254102) 4 Cycle Vertical Engine View Diagrams & Manuals
LAV35-40815K (143-254112) 4 Cycle Vertical Engine View Diagrams & Manuals
LAV35-40816K (143-254122) 4 Cycle Vertical Engine View Diagrams & Manuals
LAV35-40818K (143-254022) 4 Cycle Vertical Engine View Diagrams & Manuals
LAV35-40819K (143-254032) 4 Cycle Vertical Engine View Diagrams & Manuals
LAV35-40820K (143-254042) 4 Cycle Vertical Engine View Diagrams & Manuals
LAV35-40821K (143-254052) 4 Cycle Vertical Engine View Diagrams & Manuals
LAV35-40829K (143-254212) 4 Cycle Vertical Engine View Diagrams & Manuals
LAV35-40839K (143-254222) 4 Cycle Vertical Engine View Diagrams & Manuals
LAV35-40846K (143-254302) 4 Cycle Vertical Engine View Diagrams & Manuals
LAV35-40847K (143-254312) 4 Cycle Vertical Engine View Diagrams & Manuals
LAV35-40857K (143-254332) 4 Cycle Vertical Engine View Diagrams & Manuals
LAV35-40858K (143-254362) 4 Cycle Vertical Engine View Diagrams & Manuals
LAV35-40858L (143-274492) 4 Cycle Vertical Engine View Diagrams & Manuals
LAV35-40858M (143-284322) 4 Cycle Vertical Engine View Diagrams & Manuals
LAV35-40859K (143-254392) 4 Cycle Vertical Engine View Diagrams & Manuals
LAV35-40859M (143-284732) 4 Cycle Vertical Engine View Diagrams & Manuals
LAV35-40872K (143-254432) 4 Cycle Vertical Engine View Diagrams & Manuals
LAV35-40875K (143-254452) 4 Cycle Vertical Engine View Diagrams & Manuals
LAV35-40877K (143-254472) 4 Cycle Vertical Engine View Diagrams & Manuals
LAV35-40879K (143-254482) 4 Cycle Vertical Engine View Diagrams & Manuals
LAV35-40881K (143-254502) 4 Cycle Vertical Engine View Diagrams & Manuals
LAV35-40882K (143-254512) 4 Cycle Vertical Engine View Diagrams & Manuals
LAV35-40882L (143-274682) 4 Cycle Vertical Engine View Diagrams & Manuals
LAV35-40882M (143-284312) 4 Cycle Vertical Engine View Diagrams & Manuals
LAV35-40883K (143-254522) 4 Cycle Vertical Engine View Diagrams & Manuals
LAV35-40884K (143-254532) 4 Cycle Vertical Engine View Diagrams & Manuals
LAV35-40888K (143-264012) 4 Cycle Vertical Engine View Diagrams & Manuals
LAV35-40889K (143-264022) 4 Cycle Vertical Engine View Diagrams & Manuals
LAV35-40890K (143-264032) 4 Cycle Vertical Engine View Diagrams & Manuals
LAV35-40891K (143-264042) 4 Cycle Vertical Engine View Diagrams & Manuals
LAV35-40893K (143-264092) 4 Cycle Vertical Engine View Diagrams & Manuals
LAV35-40896K (143-264232) 4 Cycle Vertical Engine View Diagrams & Manuals
LAV35-40897K (143-264242) 4 Cycle Vertical Engine View Diagrams & Manuals
LAV35-40898K (143-264252) 4 Cycle Vertical Engine View Diagrams & Manuals
LAV35-40899K (143-264262) 4 Cycle Vertical Engine View Diagrams & Manuals
LAV35-40899L (143-274162) 4 Cycle Vertical Engine View Diagrams & Manuals
LAV35-40900K (143-264272) 4 Cycle Vertical Engine View Diagrams & Manuals
LAV35-40902K (143-264282) 4 Cycle Vertical Engine View Diagrams & Manuals
LAV35-40905K (143-264302) 4 Cycle Vertical Engine View Diagrams & Manuals
LAV35-40906K (143-264292) 4 Cycle Vertical Engine View Diagrams & Manuals
LAV35-40906M (143-304362) 4 Cycle Vertical Engine View Diagrams & Manuals
LAV35-40906N (143-314702) 4 Cycle Vertical Engine View Diagrams & Manuals
LAV35-40911K (143-264312) 4 Cycle Vertical Engine View Diagrams & Manuals
LAV35-40912K (143-264322) 4 Cycle Vertical Engine View Diagrams & Manuals
LAV35-40913K (143-264332) 4 Cycle Vertical Engine View Diagrams & Manuals
LAV35-40916K (143-264382) 4 Cycle Vertical Engine View Diagrams & Manuals
LAV35-40917K (143-264422) 4 Cycle Vertical Engine View Diagrams & Manuals
LAV35-40917M (143-284722) 4 Cycle Vertical Engine View Diagrams & Manuals
LAV35-40917N (143-314432) 4 Cycle Vertical Engine View Diagrams & Manuals
LAV35-40917P (143-334192) 4 Cycle Vertical Engine View Diagrams & Manuals
LAV35-40917R (143-354282) 4 Cycle Vertical Engine View Diagrams & Manuals
LAV35-40917S (143-394502) 4 Cycle Vertical Engine View Diagrams & Manuals
LAV35-40922K (143-264472) 4 Cycle Vertical Engine View Diagrams & Manuals
LAV35-40923K (143-264492) 4 Cycle Vertical Engine View Diagrams & Manuals
LAV35-40923M (143-284652) 4 Cycle Vertical Engine View Diagrams & Manuals
LAV35-40924K (143-264502) 4 Cycle Vertical Engine View Diagrams & Manuals
LAV35-40924L (143-274772) 4 Cycle Vertical Engine View Diagrams & Manuals
LAV35-40926K (143-264662) 4 Cycle Vertical Engine View Diagrams & Manuals
LAV35-40926L (143-274702) 4 Cycle Vertical Engine View Diagrams & Manuals
LAV35-40926M (143-284712) 4 Cycle Vertical Engine View Diagrams & Manuals
LAV35-40927K (143-264522) 4 Cycle Vertical Engine View Diagrams & Manuals
LAV35-40930K (143-264542) 4 Cycle Vertical Engine View Diagrams & Manuals
LAV35-40933K (143-264682) 4 Cycle Vertical Engine View Diagrams & Manuals
LAV35-40938L (143-274092) 4 Cycle Vertical Engine View Diagrams & Manuals
LAV35-40938M (143-284662) 4 Cycle Vertical Engine View Diagrams & Manuals
LAV35-40939L (143-274102) 4 Cycle Vertical Engine View Diagrams & Manuals
LAV35-40940L (143-274112) 4 Cycle Vertical Engine View Diagrams & Manuals
LAV35-40941L (143-274122) 4 Cycle Vertical Engine View Diagrams & Manuals
LAV35-40942L (143-274132) 4 Cycle Vertical Engine View Diagrams & Manuals
LAV35-40943L (143-274172) 4 Cycle Vertical Engine View Diagrams & Manuals
LAV35-40944L (143-274182) 4 Cycle Vertical Engine View Diagrams & Manuals
LAV35-40948L (143-274272) 4 Cycle Vertical Engine View Diagrams & Manuals
LAV35-40949L (143-274282) 4 Cycle Vertical Engine View Diagrams & Manuals
LAV35-40950L (143-274292) 4 Cycle Vertical Engine View Diagrams & Manuals
LAV35-40951L (143-274302) 4 Cycle Vertical Engine View Diagrams & Manuals
LAV35-40952L (143-274312) 4 Cycle Vertical Engine View Diagrams & Manuals
LAV35-40953L (143-274322) 4 Cycle Vertical Engine View Diagrams & Manuals
LAV35-40954L (143-274332) 4 Cycle Vertical Engine View Diagrams & Manuals
LAV35-40955L (143-274352) 4 Cycle Vertical Engine View Diagrams & Manuals
LAV35-40956L (143-274372) 4 Cycle Vertical Engine View Diagrams & Manuals
LAV35-40957L (143-274472) 4 Cycle Vertical Engine View Diagrams & Manuals
LAV35-40961L (143-274552) 4 Cycle Vertical Engine View Diagrams & Manuals
LAV35-40961M (143-284482) 4 Cycle Vertical Engine View Diagrams & Manuals
LAV35-40962L (143-274592) 4 Cycle Vertical Engine View Diagrams & Manuals
LAV35-40962M (143-284422) 4 Cycle Vertical Engine View Diagrams & Manuals
LAV35-40967L (143-274662) 4 Cycle Vertical Engine View Diagrams & Manuals
LAV35-40969M (143-284012) 4 Cycle Vertical Engine View Diagrams & Manuals
LAV35-40970M (143-284022) 4 Cycle Vertical Engine View Diagrams & Manuals
LAV35-40971M (143-284032) 4 Cycle Vertical Engine View Diagrams & Manuals
LAV35-40972M (143-284052) 4 Cycle Vertical Engine View Diagrams & Manuals
LAV35-40973M (143-284062) 4 Cycle Vertical Engine View Diagrams & Manuals
LAV35-40974M (143-284082) 4 Cycle Vertical Engine View Diagrams & Manuals
LAV35-40975M (143-284092) 4 Cycle Vertical Engine View Diagrams & Manuals
LAV35-40977M (143-284112) 4 Cycle Vertical Engine View Diagrams & Manuals
LAV35-40980M (143-284142) 4 Cycle Vertical Engine View Diagrams & Manuals
LAV35-40981M (143-284152) 4 Cycle Vertical Engine View Diagrams & Manuals
LAV35-40982M (143-284162) 4 Cycle Vertical Engine View Diagrams & Manuals
LAV35-40986M (143-284182) 4 Cycle Vertical Engine View Diagrams & Manuals
LAV35-40990M (143-284242) 4 Cycle Vertical Engine View Diagrams & Manuals
LAV35-40991M (143-284252) 4 Cycle Vertical Engine View Diagrams & Manuals
LAV35-40992M (143-284282) 4 Cycle Vertical Engine View Diagrams & Manuals
LAV35-40993M (143-284292) 4 Cycle Vertical Engine View Diagrams & Manuals
LAV35-40994M (143-284302) 4 Cycle Vertical Engine View Diagrams & Manuals
LAV35-40995M (143-284402) 4 Cycle Vertical Engine View Diagrams & Manuals
LAV35-40996M (143-284412) 4 Cycle Vertical Engine View Diagrams & Manuals
LAV35-40997M (143-284512) 4 Cycle Vertical Engine View Diagrams & Manuals
LAV35-40998M (143-284522) 4 Cycle Vertical Engine View Diagrams & Manuals
LAV35-40999M (143-284542) 4 Cycle Vertical Engine View Diagrams & Manuals
LAV35-41000M (143-284552) 4 Cycle Vertical Engine View Diagrams & Manuals
LAV35-41001M (143-284562) 4 Cycle Vertical Engine View Diagrams & Manuals
LAV35-41002M (143-284572) 4 Cycle Vertical Engine View Diagrams & Manuals
LAV35-41003M (143-284592) 4 Cycle Vertical Engine View Diagrams & Manuals
LAV35-41006M (143-284632) 4 Cycle Vertical Engine View Diagrams & Manuals
LAV40-50201B (143-207052) 4 Cycle Vertical Engine View Diagrams & Manuals
LAV40-50201C (143-217072) 4 Cycle Vertical Engine View Diagrams & Manuals
LAV40-50201D (143-257042) 4 Cycle Vertical Engine View Diagrams & Manuals
LAV40-50205B (143-207022) 4 Cycle Vertical Engine View Diagrams & Manuals
LAV40-50207B (143-207032) 4 Cycle Vertical Engine View Diagrams & Manuals
LAV40-50207C (143-217062) 4 Cycle Vertical Engine View Diagrams & Manuals
LAV40-50217C (143-217102) 4 Cycle Vertical Engine View Diagrams & Manuals
LAV40-50254B (143-207042) 4 Cycle Vertical Engine View Diagrams & Manuals
LAV40-50254C (143-217042) 4 Cycle Vertical Engine View Diagrams & Manuals
LAV40-50270B (143-207072) 4 Cycle Vertical Engine View Diagrams & Manuals
LAV40-50336C (143-237042) 4 Cycle Vertical Engine View Diagrams & Manuals
LAV40-50358C (143-257022) 4 Cycle Vertical Engine View Diagrams & Manuals
LAV40-50358D (143-257012) 4 Cycle Vertical Engine View Diagrams & Manuals
LAV40-50366D (143-257032) 4 Cycle Vertical Engine View Diagrams & Manuals
LAV40-50366E (143-257072) 4 Cycle Vertical Engine View Diagrams & Manuals
LAV40-50368E (143-267012) 4 Cycle Vertical Engine View Diagrams & Manuals
LAV40-50368F (143-267022) 4 Cycle Vertical Engine View Diagrams & Manuals
LAV40-50369D (143-257052) 4 Cycle Vertical Engine View Diagrams & Manuals
LAV40-50369E (143-257062) 4 Cycle Vertical Engine View Diagrams & Manuals
LAV40-50369F (143-267042) 4 Cycle Vertical Engine View Diagrams & Manuals
LAV40-50382D (143-277022) 4 Cycle Vertical Engine View Diagrams & Manuals
LAV40-50387D (143-277012) 4 Cycle Vertical Engine View Diagrams & Manuals
LAV40-50389E (143-287012) 4 Cycle Vertical Engine View Diagrams & Manuals
LAV40-50391D (143-287022) 4 Cycle Vertical Engine View Diagrams & Manuals
LAV40-50392E (143-287032) 4 Cycle Vertical Engine View Diagrams & Manuals
LAV50-62002 (143-235032) 4 Cycle Vertical Engine View Diagrams & Manuals
LAV50-62010 (143-235072) 4 Cycle Vertical Engine View Diagrams & Manuals
LAV50-62012 (143-245012) 4 Cycle Vertical Engine View Diagrams & Manuals
LAV50-62015 (143-245092) 4 Cycle Vertical Engine View Diagrams & Manuals
LAV50-62015A (143-265012) 4 Cycle Vertical Engine View Diagrams & Manuals
LAV50-62015B (143-265082) 4 Cycle Vertical Engine View Diagrams & Manuals
LAV50-62018 (143-245142) 4 Cycle Vertical Engine View Diagrams & Manuals
LAV50-62018B (143-275042) 4 Cycle Vertical Engine View Diagrams & Manuals
LAV50-62019 (143-245152) 4 Cycle Vertical Engine View Diagrams & Manuals
LAV50-62019B (143-275072) 4 Cycle Vertical Engine View Diagrams & Manuals
LAV50-62023 (143-245172) 4 Cycle Vertical Engine View Diagrams & Manuals
LAV50-62024 (143-245182) 4 Cycle Vertical Engine View Diagrams & Manuals
LAV50-62024B (143-265172) 4 Cycle Vertical Engine View Diagrams & Manuals
LAV50-62024C (143-285022) 4 Cycle Vertical Engine View Diagrams & Manuals
LAV50-62027 (143-255012) 4 Cycle Vertical Engine View Diagrams & Manuals
LAV50-62029 (143-255022) 4 Cycle Vertical Engine View Diagrams & Manuals
LAV50-62029A (143-255102) 4 Cycle Vertical Engine View Diagrams & Manuals
LAV50-62029B (143-265092) 4 Cycle Vertical Engine View Diagrams & Manuals
LAV50-62030A (143-265042) 4 Cycle Vertical Engine View Diagrams & Manuals
LAV50-62037 (143-255042) 4 Cycle Vertical Engine View Diagrams & Manuals
LAV50-62037A (143-255092) 4 Cycle Vertical Engine View Diagrams & Manuals
LAV50-62037B (143-265112) 4 Cycle Vertical Engine View Diagrams & Manuals
LAV50-62037C (143-285072) 4 Cycle Vertical Engine View Diagrams & Manuals
LAV50-62037D (143-315092) 4 Cycle Vertical Engine View Diagrams & Manuals
LAV50-62037E (143-335032) 4 Cycle Vertical Engine View Diagrams & Manuals
LAV50-62037F (143-375042) 4 Cycle Vertical Engine View Diagrams & Manuals
LAV50-62037G (143-385042) 4 Cycle Vertical Engine View Diagrams & Manuals
LAV50-62039A (143-255112) 4 Cycle Vertical Engine View Diagrams & Manuals
LAV50-62039B (143-265062) 4 Cycle Vertical Engine View Diagrams & Manuals
LAV50-62043 (143-255062) 4 Cycle Vertical Engine View Diagrams & Manuals
LAV50-62043A (143-255072) 4 Cycle Vertical Engine View Diagrams & Manuals
LAV50-62043B (143-265122) 4 Cycle Vertical Engine View Diagrams & Manuals
LAV50-62043C (143-285102) 4 Cycle Vertical Engine View Diagrams & Manuals
LAV50-62047A (143-265032) 4 Cycle Vertical Engine View Diagrams & Manuals
LAV50-62047B (143-265072) 4 Cycle Vertical Engine View Diagrams & Manuals
LAV50-62049A (143-265052) 4 Cycle Vertical Engine View Diagrams & Manuals
LAV50-62049B (143-265192) 4 Cycle Vertical Engine View Diagrams & Manuals
LAV50-62049C (143-285042) 4 Cycle Vertical Engine View Diagrams & Manuals
LAV50-62050B (143-265132) 4 Cycle Vertical Engine View Diagrams & Manuals
LAV50-62050C (143-285012) 4 Cycle Vertical Engine View Diagrams & Manuals
LAV50-62050D (143-315112) 4 Cycle Vertical Engine View Diagrams & Manuals
LAV50-62050F (143-355032) 4 Cycle Vertical Engine View Diagrams & Manuals
LAV50-62051B (143-265142) 4 Cycle Vertical Engine View Diagrams & Manuals
LAV50-62052B (143-265152) 4 Cycle Vertical Engine View Diagrams & Manuals
LAV50-62053B (143-265162) 4 Cycle Vertical Engine View Diagrams & Manuals
LAV50-62053C (143-295032) 4 Cycle Vertical Engine View Diagrams & Manuals
LAV50-62053D (143-315102) 4 Cycle Vertical Engine View Diagrams & Manuals
LAV50-62059B (143-275012) 4 Cycle Vertical Engine View Diagrams & Manuals
LAV50-62060B (143-275022) 4 Cycle Vertical Engine View Diagrams & Manuals
LAV50-62063B (143-275052) 4 Cycle Vertical Engine View Diagrams & Manuals
LAV50-62063C (143-285082) 4 Cycle Vertical Engine View Diagrams & Manuals
LAV50-62065B (143-275062) 4 Cycle Vertical Engine View Diagrams & Manuals
LAV50-62065C (143-285062) 4 Cycle Vertical Engine View Diagrams & Manuals
LAV50-62065D (143-315062) 4 Cycle Vertical Engine View Diagrams & Manuals
LAV50-62065E (143-335062) 4 Cycle Vertical Engine View Diagrams & Manuals
LAV50-62066B (143-275082) 4 Cycle Vertical Engine View Diagrams & Manuals
LAV50-62066C (143-285032) 4 Cycle Vertical Engine View Diagrams & Manuals
LAV50-62067C (143-285052) 4 Cycle Vertical Engine View Diagrams & Manuals
LAV50-62067D (143-315122) 4 Cycle Vertical Engine View Diagrams & Manuals
LAV50-62067E (143-335042) 4 Cycle Vertical Engine View Diagrams & Manuals
LAV50-62068C (143-285092) 4 Cycle Vertical Engine View Diagrams & Manuals
LAV50-62071C (143-295012) 4 Cycle Vertical Engine View Diagrams & Manuals
LAV50-62071D (143-315022) 4 Cycle Vertical Engine View Diagrams & Manuals
LAV50-62072C (143-295022) 4 Cycle Vertical Engine View Diagrams & Manuals
LAV50-62073C (143-305042) 4 Cycle Vertical Engine View Diagrams & Manuals
LAV50-62074C (143-305062) 4 Cycle Vertical Engine View Diagrams & Manuals
LAV50-62082E (143-345042) 4 Cycle Vertical Engine View Diagrams & Manuals
LAV50-62082G (143-385052) 4 Cycle Vertical Engine View Diagrams & Manuals
LEV100-335009B (143-983500) 4 Cycle Vertical Engine View Diagrams & Manuals
LEV100-335010B (143-983502) 4 Cycle Vertical Engine View Diagrams & Manuals
LEV100-335010C (143-993502) 4 Cycle Vertical Engine View Diagrams & Manuals
LEV100-335010D (143-003502) 4 Cycle Vertical Engine View Diagrams & Manuals
LEV100-335010E (143-013502) 4 Cycle Vertical Engine View Diagrams & Manuals
LEV100-335010F (143-023500) 4 Cycle Vertical Engine View Diagrams & Manuals
LEV100-335011B (143-983504) 4 Cycle Vertical Engine View Diagrams & Manuals
LEV100-335011C (143-993506) 4 Cycle Vertical Engine View Diagrams & Manuals
LEV100-335011D (143-003508) 4 Cycle Vertical Engine View Diagrams & Manuals
LEV100-335011E (143-013500) 4 Cycle Vertical Engine View Diagrams & Manuals
LEV100-335015B (143-983508) 4 Cycle Vertical Engine View Diagrams & Manuals
LEV100-335018B (143-983510) 4 Cycle Vertical Engine View Diagrams & Manuals
LEV100-335018C (143-993500) 4 Cycle Vertical Engine View Diagrams & Manuals
LEV100-335020C (143-993504) 4 Cycle Vertical Engine View Diagrams & Manuals
LEV100-335023C (143-993512) 4 Cycle Vertical Engine View Diagrams & Manuals
LEV100-335023D (143-003500) 4 Cycle Vertical Engine View Diagrams & Manuals
LEV100-338007B (143-983800) 4 Cycle Vertical Engine View Diagrams & Manuals
LEV100-338012B (143-983804) 4 Cycle Vertical Engine View Diagrams & Manuals
LEV100-338012C (143-993800) 4 Cycle Vertical Engine View Diagrams & Manuals
LEV100-338012D (143-003802) 4 Cycle Vertical Engine View Diagrams & Manuals
LEV100-338022E (143-013802) 4 Cycle Vertical Engine View Diagrams & Manuals
LEV100-338022F (143-023802) 4 Cycle Vertical Engine View Diagrams & Manuals
LEV100-340002A (143-974022) 4 Cycle Vertical Engine View Diagrams & Manuals
LEV100-340012B (143-984008) 4 Cycle Vertical Engine View Diagrams & Manuals
LEV100-340014B (143-984012) 4 Cycle Vertical Engine View Diagrams & Manuals
LEV100-340015B (143-984014) 4 Cycle Vertical Engine View Diagrams & Manuals
LEV100-340015C (143-994018) 4 Cycle Vertical Engine View Diagrams & Manuals
LEV100-340015D (143-004014) 4 Cycle Vertical Engine View Diagrams & Manuals
LEV100-340015E (143-014006) 4 Cycle Vertical Engine View Diagrams & Manuals
LEV100-340015F (143-024000) 4 Cycle Vertical Engine View Diagrams & Manuals
LEV100-340016B (143-984016) 4 Cycle Vertical Engine View Diagrams & Manuals
LEV100-340016C (143-994010) 4 Cycle Vertical Engine View Diagrams & Manuals
LEV100-340016D (143-004016) 4 Cycle Vertical Engine View Diagrams & Manuals
LEV100-340016E (143-014008) 4 Cycle Vertical Engine View Diagrams & Manuals
LEV100-340017B (143-984018) 4 Cycle Vertical Engine View Diagrams & Manuals
LEV100-340017C (143-994012) 4 Cycle Vertical Engine View Diagrams & Manuals
LEV100-340017E (143-014010) 4 Cycle Vertical Engine View Diagrams & Manuals
LEV100-340021B (143-984020) 4 Cycle Vertical Engine View Diagrams & Manuals
LEV100-340021C (143-994008) 4 Cycle Vertical Engine View Diagrams & Manuals
LEV100-340021E (143-014012) 4 Cycle Vertical Engine View Diagrams & Manuals
LEV100-340022B (143-984022) 4 Cycle Vertical Engine View Diagrams & Manuals
LEV100-340024B (143-984024) 4 Cycle Vertical Engine View Diagrams & Manuals
LEV100-340024C (143-994024) 4 Cycle Vertical Engine View Diagrams & Manuals
LEV100-340024D (143-004004) 4 Cycle Vertical Engine View Diagrams & Manuals
LEV100-340024E (143-014014) 4 Cycle Vertical Engine View Diagrams & Manuals
LEV100-340026B (143-984026) 4 Cycle Vertical Engine View Diagrams & Manuals
LEV100-340026C (143-994000) 4 Cycle Vertical Engine View Diagrams & Manuals
LEV100-340027B (143-984028) 4 Cycle Vertical Engine View Diagrams & Manuals
LEV100-340028B (143-984030) 4 Cycle Vertical Engine View Diagrams & Manuals
LEV100-340029C (143-994002) 4 Cycle Vertical Engine View Diagrams & Manuals
LEV100-340030C (143-994004) 4 Cycle Vertical Engine View Diagrams & Manuals
LEV100-340031C (143-994006) 4 Cycle Vertical Engine View Diagrams & Manuals
LEV100-340031D (143-004010) 4 Cycle Vertical Engine View Diagrams & Manuals
LEV100-340031E (143-014000) 4 Cycle Vertical Engine View Diagrams & Manuals
LEV100-340032C (143-994014) 4 Cycle Vertical Engine View Diagrams & Manuals
LEV100-340032E (143-014002) 4 Cycle Vertical Engine View Diagrams & Manuals
LEV100-340032F (143-024004) 4 Cycle Vertical Engine View Diagrams & Manuals
LEV100-340033C (143-994016) 4 Cycle Vertical Engine View Diagrams & Manuals
LEV100-340033D (143-004012) 4 Cycle Vertical Engine View Diagrams & Manuals
LEV100-340033E (143-014004) 4 Cycle Vertical Engine View Diagrams & Manuals
LEV100-340033F (143-024002) 4 Cycle Vertical Engine View Diagrams & Manuals
LEV100-340037C (143-994022) 4 Cycle Vertical Engine View Diagrams & Manuals
LEV100-340037D (143-004002) 4 Cycle Vertical Engine View Diagrams & Manuals
LEV100-340048D (143-004000) 4 Cycle Vertical Engine View Diagrams & Manuals
LEV100-340052E (143-014016) 4 Cycle Vertical Engine View Diagrams & Manuals
LEV100-345002B (143-984502) 4 Cycle Vertical Engine View Diagrams & Manuals
LEV100-345003B (143-984500) 4 Cycle Vertical Engine View Diagrams & Manuals
LEV100-345006B (143-984504) 4 Cycle Vertical Engine View Diagrams & Manuals
LEV100-345006C (143-994504) 4 Cycle Vertical Engine View Diagrams & Manuals
LEV100-345006D (143-004504) 4 Cycle Vertical Engine View Diagrams & Manuals
LEV100-345006E (143-014502) 4 Cycle Vertical Engine View Diagrams & Manuals
LEV100-345009B (143-984508) 4 Cycle Vertical Engine View Diagrams & Manuals
LEV100-345010B (143-984510) 4 Cycle Vertical Engine View Diagrams & Manuals
LEV100-345011B (143-984512) 4 Cycle Vertical Engine View Diagrams & Manuals
LEV100-345012B (143-984514) 4 Cycle Vertical Engine View Diagrams & Manuals
LEV100-345012C (143-994502) 4 Cycle Vertical Engine View Diagrams & Manuals
LEV100-345013C (143-994500) 4 Cycle Vertical Engine View Diagrams & Manuals
LEV100-345014C (143-994508) 4 Cycle Vertical Engine View Diagrams & Manuals
LEV100-345014D (143-004502) 4 Cycle Vertical Engine View Diagrams & Manuals
LEV100-345021E (143-014504) 4 Cycle Vertical Engine View Diagrams & Manuals
LEV105-347001A (143-024200) 4 Cycle Vertical Engine View Diagrams & Manuals
LEV105-347002A (143-024202) 4 Cycle Vertical Engine View Diagrams & Manuals
LEV105-347003A (143-024204) 4 Cycle Vertical Engine View Diagrams & Manuals
LEV105-347004A (143-024206) 4 Cycle Vertical Engine View Diagrams & Manuals
LEV105-347009B (143-036000) 4 Cycle Vertical Engine View Diagrams & Manuals
LEV115-350002A (143-964010) 4 Cycle Vertical Engine View Diagrams & Manuals
LEV115-350003A (143-964512) 4 Cycle Vertical Engine View Diagrams & Manuals
LEV115-350004A (143-965016) 4 Cycle Vertical Engine View Diagrams & Manuals
LEV115-350005A (143-964510) 4 Cycle Vertical Engine View Diagrams & Manuals
LEV115-350006A (143-965018) 4 Cycle Vertical Engine View Diagrams & Manuals
LEV115-350008A (143-964012) 4 Cycle Vertical Engine View Diagrams & Manuals
LEV115-350009A (143-963506) 4 Cycle Vertical Engine View Diagrams & Manuals
LEV115-350009B (143-973504) 4 Cycle Vertical Engine View Diagrams & Manuals
LEV115-350012B (143-975002) 4 Cycle Vertical Engine View Diagrams & Manuals
LEV115-350015B (143-965024) 4 Cycle Vertical Engine View Diagrams & Manuals
LEV115-350029B (143-974504) 4 Cycle Vertical Engine View Diagrams & Manuals
LEV115-350030B (143-974506) 4 Cycle Vertical Engine View Diagrams & Manuals
LEV115-350031B (143-975024) 4 Cycle Vertical Engine View Diagrams & Manuals
LEV115-350032B (143-975026) 4 Cycle Vertical Engine View Diagrams & Manuals
LEV115-350040B (143-973804) 4 Cycle Vertical Engine View Diagrams & Manuals
LEV115-350043B (143-973512) 4 Cycle Vertical Engine View Diagrams & Manuals
LEV115-350044B (143-974020) 4 Cycle Vertical Engine View Diagrams & Manuals
LEV115-350045B (143-974030) 4 Cycle Vertical Engine View Diagrams & Manuals
LEV115-350047B (143-975034) 4 Cycle Vertical Engine View Diagrams & Manuals
LEV115-350056C (143-984000) 4 Cycle Vertical Engine View Diagrams & Manuals
LEV115-350057C (143-984002) 4 Cycle Vertical Engine View Diagrams & Manuals
LEV115-350058C (143-984004) 4 Cycle Vertical Engine View Diagrams & Manuals
LEV115-350059C (143-984006) 4 Cycle Vertical Engine View Diagrams & Manuals
LEV115-350060C (143-985000) 4 Cycle Vertical Engine View Diagrams & Manuals
LEV115-350060D (143-995008) 4 Cycle Vertical Engine View Diagrams & Manuals
LEV115-350060E (143-005008) 4 Cycle Vertical Engine View Diagrams & Manuals
LEV115-350070C (143-985004) 4 Cycle Vertical Engine View Diagrams & Manuals
LEV115-350070D (143-995012) 4 Cycle Vertical Engine View Diagrams & Manuals
LEV115-350071C (143-985006) 4 Cycle Vertical Engine View Diagrams & Manuals
LEV115-350072C (143-985008) 4 Cycle Vertical Engine View Diagrams & Manuals
LEV115-350073C (143-985002) 4 Cycle Vertical Engine View Diagrams & Manuals
LEV115-350090C (143-985012) 4 Cycle Vertical Engine View Diagrams & Manuals
LEV115-350090D (143-995002) 4 Cycle Vertical Engine View Diagrams & Manuals
LEV115-350090E (143-005006) 4 Cycle Vertical Engine View Diagrams & Manuals
LEV115-350114D (143-995000) 4 Cycle Vertical Engine View Diagrams & Manuals
LEV115-350119C (143-985016) 4 Cycle Vertical Engine View Diagrams & Manuals
LEV115-350121D (143-995006) 4 Cycle Vertical Engine View Diagrams & Manuals
LEV115-350121E (143-015000) 4 Cycle Vertical Engine View Diagrams & Manuals
LEV115-350128D (143-995014) 4 Cycle Vertical Engine View Diagrams & Manuals
LEV115-350128E (143-005004) 4 Cycle Vertical Engine View Diagrams & Manuals
LEV115-350129D (143-994020) 4 Cycle Vertical Engine View Diagrams & Manuals
LEV115-350144D (143-993514) 4 Cycle Vertical Engine View Diagrams & Manuals
LEV115-350144E (143-003504) 4 Cycle Vertical Engine View Diagrams & Manuals
LEV115-350159E (143-004008) 4 Cycle Vertical Engine View Diagrams & Manuals
LEV115-350168E (143-004018) 4 Cycle Vertical Engine View Diagrams & Manuals
LEV115-350189E (143-015002) 4 Cycle Vertical Engine View Diagrams & Manuals
LEV115-350192E (143-015004) 4 Cycle Vertical Engine View Diagrams & Manuals
LEV115-355002A (143-965506) 4 Cycle Vertical Engine View Diagrams & Manuals
LEV115-355005B (143-975508) 4 Cycle Vertical Engine View Diagrams & Manuals
LEV115-355006B (143-975510) 4 Cycle Vertical Engine View Diagrams & Manuals
LEV115-355007C (143-985502) 4 Cycle Vertical Engine View Diagrams & Manuals
LEV115-355007D (143-995504) 4 Cycle Vertical Engine View Diagrams & Manuals
LEV115-355008C (143-985500) 4 Cycle Vertical Engine View Diagrams & Manuals
LEV115-355008D (143-995500) 4 Cycle Vertical Engine View Diagrams & Manuals
LEV115-355012C (143-985510) 4 Cycle Vertical Engine View Diagrams & Manuals
LEV115-355014C (143-985512) 4 Cycle Vertical Engine View Diagrams & Manuals
LEV115-355014D (143-995506) 4 Cycle Vertical Engine View Diagrams & Manuals
LEV115-355016D (143-995502) 4 Cycle Vertical Engine View Diagrams & Manuals
LEV115-355021E (143-005504) 4 Cycle Vertical Engine View Diagrams & Manuals
LEV115-355022E (143-005510) 4 Cycle Vertical Engine View Diagrams & Manuals
LEV115-355026E (143-015500) 4 Cycle Vertical Engine View Diagrams & Manuals
LEV115-360005A (143-976254) 4 Cycle Vertical Engine View Diagrams & Manuals
LEV115-360007A (143-976256) 4 Cycle Vertical Engine View Diagrams & Manuals
LEV115-360008A (143-976258) 4 Cycle Vertical Engine View Diagrams & Manuals
LEV115-360008B (143-986250) 4 Cycle Vertical Engine View Diagrams & Manuals
LEV115-360012B (143-986002) 4 Cycle Vertical Engine View Diagrams & Manuals
LEV115-360012C (143-996000) 4 Cycle Vertical Engine View Diagrams & Manuals
LEV115-360013B (143-986004) 4 Cycle Vertical Engine View Diagrams & Manuals
LEV115-360014B (143-986000) 4 Cycle Vertical Engine View Diagrams & Manuals
LEV115-360015B (143-986006) 4 Cycle Vertical Engine View Diagrams & Manuals
LEV115-360015C (143-996002) 4 Cycle Vertical Engine View Diagrams & Manuals
LEV115-360021C (143-996004) 4 Cycle Vertical Engine View Diagrams & Manuals
LEV115-360021D (143-006000) 4 Cycle Vertical Engine View Diagrams & Manuals
LEV115-360024C (143-996010) 4 Cycle Vertical Engine View Diagrams & Manuals
LEV115-360024D (143-006006) 4 Cycle Vertical Engine View Diagrams & Manuals
LEV115-360025C (143-996012) 4 Cycle Vertical Engine View Diagrams & Manuals
LEV115-360025D (143-006004) 4 Cycle Vertical Engine View Diagrams & Manuals
LEV115-360026D (143-006200) 4 Cycle Vertical Engine View Diagrams & Manuals
LEV115-360028C (143-996200) 4 Cycle Vertical Engine View Diagrams & Manuals
LEV115-360030D (143-006206) 4 Cycle Vertical Engine View Diagrams & Manuals
LEV115-360031D (143-016200) 4 Cycle Vertical Engine View Diagrams & Manuals
LEV115-360033D (143-016000) 4 Cycle Vertical Engine View Diagrams & Manuals
LEV115-360034D (143-016002) 4 Cycle Vertical Engine View Diagrams & Manuals
LEV115-360035D (143-016004) 4 Cycle Vertical Engine View Diagrams & Manuals
LEV120-361012A (143-986500) 4 Cycle Vertical Engine View Diagrams & Manuals
LEV120-361012B (143-996502) 4 Cycle Vertical Engine View Diagrams & Manuals
LEV120-361013A (143-986502) 4 Cycle Vertical Engine View Diagrams & Manuals
LEV120-361013B (143-996504) 4 Cycle Vertical Engine View Diagrams & Manuals
LEV120-361013C (143-006504) 4 Cycle Vertical Engine View Diagrams & Manuals
LEV120-361019A (143-986252) 4 Cycle Vertical Engine View Diagrams & Manuals
LEV120-361021A (143-986504) 4 Cycle Vertical Engine View Diagrams & Manuals
LEV120-361031A (143-986512) 4 Cycle Vertical Engine View Diagrams & Manuals
LEV120-361037A (143-986514) 4 Cycle Vertical Engine View Diagrams & Manuals
LEV120-361037B (143-996514) 4 Cycle Vertical Engine View Diagrams & Manuals
LEV120-361037C (143-006512) 4 Cycle Vertical Engine View Diagrams & Manuals
LEV120-361038A (143-985018) 4 Cycle Vertical Engine View Diagrams & Manuals
LEV120-361041B (143-996506) 4 Cycle Vertical Engine View Diagrams & Manuals
LEV120-361042B (143-996508) 4 Cycle Vertical Engine View Diagrams & Manuals
LEV120-361044B (143-996510) 4 Cycle Vertical Engine View Diagrams & Manuals
LEV120-361044C (143-006502) 4 Cycle Vertical Engine View Diagrams & Manuals
LEV120-361045B (143-996512) 4 Cycle Vertical Engine View Diagrams & Manuals
LEV120-361045C (143-006510) 4 Cycle Vertical Engine View Diagrams & Manuals
LEV120-361046B (143-995004) 4 Cycle Vertical Engine View Diagrams & Manuals
LEV120-361047B (143-996516) 4 Cycle Vertical Engine View Diagrams & Manuals
LEV120-361047C (143-006508) 4 Cycle Vertical Engine View Diagrams & Manuals
LEV120-361053B (143-994510) 4 Cycle Vertical Engine View Diagrams & Manuals
LEV120-361054B (143-996524) 4 Cycle Vertical Engine View Diagrams & Manuals
LEV120-361054C (143-006506) 4 Cycle Vertical Engine View Diagrams & Manuals
LEV120-361069C (143-004500) 4 Cycle Vertical Engine View Diagrams & Manuals
LEV120-361075C (143-005512) 4 Cycle Vertical Engine View Diagrams & Manuals
LEV120-361082C (143-014500) 4 Cycle Vertical Engine View Diagrams & Manuals
LEV120-361093C (143-016502) 4 Cycle Vertical Engine View Diagrams & Manuals
LEV120-361093D (143-026500) 4 Cycle Vertical Engine View Diagrams & Manuals
LEV120-361096C (143-015502) 4 Cycle Vertical Engine View Diagrams & Manuals
LEV120-361097C (143-015504) 4 Cycle Vertical Engine View Diagrams & Manuals
LEV120-361102D (143-024500) 4 Cycle Vertical Engine View Diagrams & Manuals
LEV120-361105C (143-014506) 4 Cycle Vertical Engine View Diagrams & Manuals
LEV120-361116D (143-026200) 4 Cycle Vertical Engine View Diagrams & Manuals
LEV120-361119D (143-026202) 4 Cycle Vertical Engine View Diagrams & Manuals
LEV120-361143D (143-025500) 4 Cycle Vertical Engine View Diagrams & Manuals
LEV120-361144D (143-025000) 4 Cycle Vertical Engine View Diagrams & Manuals
LEV120-361145D (143-026002) 4 Cycle Vertical Engine View Diagrams & Manuals
LEV120-361501A (143-006700) 4 Cycle Vertical Engine View Diagrams & Manuals
LEV120-361502A (143-006702) 4 Cycle Vertical Engine View Diagrams & Manuals
LEV120-361503A (143-006712) 4 Cycle Vertical Engine View Diagrams & Manuals
LEV120-361504A (143-005508) 4 Cycle Vertical Engine View Diagrams & Manuals
LEV120-361505A (143-006204) 4 Cycle Vertical Engine View Diagrams & Manuals
LEV120-361509A (143-006714) 4 Cycle Vertical Engine View Diagrams & Manuals
LEV120-361510A (143-006716) 4 Cycle Vertical Engine View Diagrams & Manuals
LEV120-361515A (143-016700) 4 Cycle Vertical Engine View Diagrams & Manuals
LEV120-361517A (143-016702) 4 Cycle Vertical Engine View Diagrams & Manuals
LEV120-361518A (143-016704) 4 Cycle Vertical Engine View Diagrams & Manuals
LEV120-361519A (143-016202) 4 Cycle Vertical Engine View Diagrams & Manuals
LEV120-361520A (143-016706) 4 Cycle Vertical Engine View Diagrams & Manuals
LEV120-361521A (143-016708) 4 Cycle Vertical Engine View Diagrams & Manuals
LEV120-361522A (143-016710) 4 Cycle Vertical Engine View Diagrams & Manuals
LEV120-361523A (143-016712) 4 Cycle Vertical Engine View Diagrams & Manuals
LEV120-361523B (143-026708) 4 Cycle Vertical Engine View Diagrams & Manuals
LEV120-361524A (143-016714) 4 Cycle Vertical Engine View Diagrams & Manuals
LEV120-361526A (143-016718) 4 Cycle Vertical Engine View Diagrams & Manuals
LEV120-361527A (143-016720) 4 Cycle Vertical Engine View Diagrams & Manuals
LEV120-361528A (143-016722) 4 Cycle Vertical Engine View Diagrams & Manuals
LEV120-361528B (143-026710) 4 Cycle Vertical Engine View Diagrams & Manuals
LEV120-361529A (143-016724) 4 Cycle Vertical Engine View Diagrams & Manuals
LEV120-361529B (143-026712) 4 Cycle Vertical Engine View Diagrams & Manuals
LEV120-361530A (143-016726) 4 Cycle Vertical Engine View Diagrams & Manuals
LEV120-361530B (143-026702) 4 Cycle Vertical Engine View Diagrams & Manuals
LEV120-361530C (143-036702) 4 Cycle Vertical Engine View Diagrams & Manuals
LEV120-361531A (143-016728) 4 Cycle Vertical Engine View Diagrams & Manuals
LEV120-361532A (143-016730) 4 Cycle Vertical Engine View Diagrams & Manuals
LEV120-361533A (143-016732) 4 Cycle Vertical Engine View Diagrams & Manuals
LEV120-361534A (143-016734) 4 Cycle Vertical Engine View Diagrams & Manuals
LEV120-361535A (143-016736) 4 Cycle Vertical Engine View Diagrams & Manuals
LEV120-361535B (143-026704) 4 Cycle Vertical Engine View Diagrams & Manuals
LEV120-361536A (143-016738) 4 Cycle Vertical Engine View Diagrams & Manuals
LEV120-361536B (143-026700) 4 Cycle Vertical Engine View Diagrams & Manuals
LEV120-361537A (143-016504) 4 Cycle Vertical Engine View Diagrams & Manuals
LEV120-361537B (143-026502) 4 Cycle Vertical Engine View Diagrams & Manuals
LEV120-361553B (143-026706) 4 Cycle Vertical Engine View Diagrams & Manuals
LEV120-361557B (143-026714) 4 Cycle Vertical Engine View Diagrams & Manuals
LEV120-361558B (143-024208) 4 Cycle Vertical Engine View Diagrams & Manuals
LEV120-361559B (143-024210) 4 Cycle Vertical Engine View Diagrams & Manuals
LEV120-361562B (143-026716) 4 Cycle Vertical Engine View Diagrams & Manuals
LEV120-361563B (143-026718) 4 Cycle Vertical Engine View Diagrams & Manuals
LEV120-361568C (143-036706) 4 Cycle Vertical Engine View Diagrams & Manuals
LEV120-361574C (143-034508) 4 Cycle Vertical Engine View Diagrams & Manuals
LEV120-361575C (143-036500) 4 Cycle Vertical Engine View Diagrams & Manuals
LEV120-362008A (143-036202) 4 Cycle Vertical Engine View Diagrams & Manuals
LEV120-362011A (143-036700) 4 Cycle Vertical Engine View Diagrams & Manuals
LEV120-362016A (143-036704) 4 Cycle Vertical Engine View Diagrams & Manuals
LEV120-362021A (143-036708) 4 Cycle Vertical Engine View Diagrams & Manuals
LEV120-362025A (143-036710) 4 Cycle Vertical Engine View Diagrams & Manuals
LEV80-333003A (143-993510) 4 Cycle Vertical Engine View Diagrams & Manuals
LEV90-334010A (143-033700) 4 Cycle Vertical Engine View Diagrams & Manuals
LEV90-334011A (143-034502) 4 Cycle Vertical Engine View Diagrams & Manuals
LEV90-334012A (143-034504) 4 Cycle Vertical Engine View Diagrams & Manuals
LEV90-334016A (143-034506) 4 Cycle Vertical Engine View Diagrams & Manuals
LV148EA-334012B (143-044500) 4 Cycle Vertical Engine View Diagrams & Manuals
LV148EA-334016B (143-044508) 4 Cycle Vertical Engine View Diagrams & Manuals
LV148EA-334033B (143-044510) 4 Cycle Vertical Engine View Diagrams & Manuals
LV148EA-334039B (143-054500) 4 Cycle Vertical Engine View Diagrams & Manuals
LV148EA-334040B (143-054502) 4 Cycle Vertical Engine View Diagrams & Manuals
LV148EA-334040C (143-064500) 4 Cycle Vertical Engine View Diagrams & Manuals
LV148SA-334502B (143-053802) 4 Cycle Vertical Engine View Diagrams & Manuals
LV148SA-334503B (143-053800) 4 Cycle Vertical Engine View Diagrams & Manuals
LV156XA-331015A (143-074500) 4 Cycle Vertical Engine View Diagrams & Manuals
LV195EA-361530E (143-066702) 4 Cycle Vertical Engine View Diagrams & Manuals
LV195EA-361574D (143-044504) 4 Cycle Vertical Engine View Diagrams & Manuals
LV195EA-361589D (143-046500) 4 Cycle Vertical Engine View Diagrams & Manuals
LV195EA-361593D (143-044506) 4 Cycle Vertical Engine View Diagrams & Manuals
LV195EA-361594D (143-054504) 4 Cycle Vertical Engine View Diagrams & Manuals
LV195EA-361594E (143-064502) 4 Cycle Vertical Engine View Diagrams & Manuals
LV195EA-362011B (143-046702) 4 Cycle Vertical Engine View Diagrams & Manuals
LV195EA-362011C (143-056700) 4 Cycle Vertical Engine View Diagrams & Manuals
LV195EA-362021B (143-046706) 4 Cycle Vertical Engine View Diagrams & Manuals
LV195EA-362021D (143-066704) 4 Cycle Vertical Engine View Diagrams & Manuals
LV195EA-362032B (143-046700) 4 Cycle Vertical Engine View Diagrams & Manuals
LV195EA-362032C (143-056704) 4 Cycle Vertical Engine View Diagrams & Manuals
LV195EA-362032D (143-066700) 4 Cycle Vertical Engine View Diagrams & Manuals
LV195EA-362059C (143-056702) 4 Cycle Vertical Engine View Diagrams & Manuals
OVRM105-21024E (143-996702) 4 Cycle Vertical Engine View Diagrams & Manuals
OVRM105-21024F (143-006708) 4 Cycle Vertical Engine View Diagrams & Manuals
OVRM105-21033F (143-005500) 4 Cycle Vertical Engine View Diagrams & Manuals
OVRM105-21034F (143-005502) 4 Cycle Vertical Engine View Diagrams & Manuals
OVRM105-21043F (143-006008) 4 Cycle Vertical Engine View Diagrams & Manuals
OVRM40-42001 (143-384152) 4 Cycle Vertical Engine View Diagrams & Manuals
OVRM40-42002 (143-384132) 4 Cycle Vertical Engine View Diagrams & Manuals
OVRM40-42003 (143-384142) 4 Cycle Vertical Engine View Diagrams & Manuals
OVRM40-42004 (143-384162) 4 Cycle Vertical Engine View Diagrams & Manuals
OVRM40-42005 (143-384182) 4 Cycle Vertical Engine View Diagrams & Manuals
OVRM40-42006 (143-384192) 4 Cycle Vertical Engine View Diagrams & Manuals
OVRM40-42007 (143-394192) 4 Cycle Vertical Engine View Diagrams & Manuals
OVRM40-42008 (143-394092) 4 Cycle Vertical Engine View Diagrams & Manuals
OVRM40-42009 (143-394202) 4 Cycle Vertical Engine View Diagrams & Manuals
OVRM40-42010 (143-394102) 4 Cycle Vertical Engine View Diagrams & Manuals
OVRM40-42011 (143-394112) 4 Cycle Vertical Engine View Diagrams & Manuals
OVRM40-42012 (143-394212) 4 Cycle Vertical Engine View Diagrams & Manuals
OVRM50-52901 (143-404112) 4 Cycle Vertical Engine View Diagrams & Manuals
OVRM65-22016B (143-986702) 4 Cycle Vertical Engine View Diagrams & Manuals
OVRM65-22017B (143-986704) 4 Cycle Vertical Engine View Diagrams & Manuals
OVRM65-22020B (143-986714) 4 Cycle Vertical Engine View Diagrams & Manuals
OVRM65-22026B (143-986716) 4 Cycle Vertical Engine View Diagrams & Manuals
OVRM65-22029B (143-986718) 4 Cycle Vertical Engine View Diagrams & Manuals
TVS100-44026D (143-424072) 4 Cycle Vertical Engine View Diagrams & Manuals
TVS100-44029D (143-424112) 4 Cycle Vertical Engine View Diagrams & Manuals
TVS100-44029E (143-434542) 4 Cycle Vertical Engine View Diagrams & Manuals
TVS100-44029F (143-943820) 4 Cycle Vertical Engine View Diagrams & Manuals
TVS100-44029G (143-953802) 4 Cycle Vertical Engine View Diagrams & Manuals
TVS100-44029H (143-963802) 4 Cycle Vertical Engine View Diagrams & Manuals
TVS100-44030D (143-424122) 4 Cycle Vertical Engine View Diagrams & Manuals
TVS100-44030E (143-434442) 4 Cycle Vertical Engine View Diagrams & Manuals
TVS100-44030F (143-943832) 4 Cycle Vertical Engine View Diagrams & Manuals
TVS100-44030G (143-953818) 4 Cycle Vertical Engine View Diagrams & Manuals
TVS100-44030H (143-963810) 4 Cycle Vertical Engine View Diagrams & Manuals
TVS100-44031D (143-424132) 4 Cycle Vertical Engine View Diagrams & Manuals
TVS100-44031E (143-434382) 4 Cycle Vertical Engine View Diagrams & Manuals
TVS100-44031F (143-943834) 4 Cycle Vertical Engine View Diagrams & Manuals
TVS100-44031G (143-953804) 4 Cycle Vertical Engine View Diagrams & Manuals
TVS100-44031H (143-963800) 4 Cycle Vertical Engine View Diagrams & Manuals
TVS100-44032D (143-424182) 4 Cycle Vertical Engine View Diagrams & Manuals
TVS100-44032E (143-434462) 4 Cycle Vertical Engine View Diagrams & Manuals
TVS100-44032F (143-943844) 4 Cycle Vertical Engine View Diagrams & Manuals
TVS100-44032G (143-953824) 4 Cycle Vertical Engine View Diagrams & Manuals
TVS100-44033D (143-424192) 4 Cycle Vertical Engine View Diagrams & Manuals
TVS100-44033E (143-434362) 4 Cycle Vertical Engine View Diagrams & Manuals
TVS100-44033F (143-943838) 4 Cycle Vertical Engine View Diagrams & Manuals
TVS100-44033G (143-953820) 4 Cycle Vertical Engine View Diagrams & Manuals
TVS100-44033H (143-963806) 4 Cycle Vertical Engine View Diagrams & Manuals
TVS100-44036E (143-434472) 4 Cycle Vertical Engine View Diagrams & Manuals
TVS100-44036F (143-943802) 4 Cycle Vertical Engine View Diagrams & Manuals
TVS100-44036G (143-953806) 4 Cycle Vertical Engine View Diagrams & Manuals
TVS100-44037E (143-434342) 4 Cycle Vertical Engine View Diagrams & Manuals
TVS100-44037G (143-953808) 4 Cycle Vertical Engine View Diagrams & Manuals
TVS100-44038D (143-424462) 4 Cycle Vertical Engine View Diagrams & Manuals
TVS100-44038E (143-434452) 4 Cycle Vertical Engine View Diagrams & Manuals
TVS100-44038F (143-943818) 4 Cycle Vertical Engine View Diagrams & Manuals
TVS100-44038G (143-953812) 4 Cycle Vertical Engine View Diagrams & Manuals
TVS100-44043D (143-424532) 4 Cycle Vertical Engine View Diagrams & Manuals
TVS100-44043E (143-434422) 4 Cycle Vertical Engine View Diagrams & Manuals
TVS100-44043F (143-943810) 4 Cycle Vertical Engine View Diagrams & Manuals
TVS100-44045D (143-424542) 4 Cycle Vertical Engine View Diagrams & Manuals
TVS100-44045E (143-434552) 4 Cycle Vertical Engine View Diagrams & Manuals
TVS100-44045F (143-943842) 4 Cycle Vertical Engine View Diagrams & Manuals
TVS100-44045G (143-953822) 4 Cycle Vertical Engine View Diagrams & Manuals
TVS100-44046D (143-424552) 4 Cycle Vertical Engine View Diagrams & Manuals
TVS100-44046F (143-943830) 4 Cycle Vertical Engine View Diagrams & Manuals
TVS100-44046G (143-953810) 4 Cycle Vertical Engine View Diagrams & Manuals
TVS100-44048E (143-434582) 4 Cycle Vertical Engine View Diagrams & Manuals
TVS100-44048F (143-943800) 4 Cycle Vertical Engine View Diagrams & Manuals
TVS100-44604B (143-384432) 4 Cycle Vertical Engine View Diagrams & Manuals
TVS100-44605B (143-394522) 4 Cycle Vertical Engine View Diagrams & Manuals
TVS105-53006A (143-297012) 4 Cycle Vertical Engine View Diagrams & Manuals
TVS105-53006B (143-315072) 4 Cycle Vertical Engine View Diagrams & Manuals
TVS105-53012A (143-294552) 4 Cycle Vertical Engine View Diagrams & Manuals
TVS105-53013A (143-294562) 4 Cycle Vertical Engine View Diagrams & Manuals
TVS105-53016A (143-294642) 4 Cycle Vertical Engine View Diagrams & Manuals
TVS105-53017A (143-294622) 4 Cycle Vertical Engine View Diagrams & Manuals
TVS105-53018A (143-294632) 4 Cycle Vertical Engine View Diagrams & Manuals
TVS105-53018B (143-315032) 4 Cycle Vertical Engine View Diagrams & Manuals
TVS105-53025A (143-294702) 4 Cycle Vertical Engine View Diagrams & Manuals
TVS105-53025B (143-315042) 4 Cycle Vertical Engine View Diagrams & Manuals
TVS105-53059D (143-344442) 4 Cycle Vertical Engine View Diagrams & Manuals
TVS105-53067D (143-344462) 4 Cycle Vertical Engine View Diagrams & Manuals
TVS105-53077D (143-354482) 4 Cycle Vertical Engine View Diagrams & Manuals
TVS105-53083D (143-354492) 4 Cycle Vertical Engine View Diagrams & Manuals
TVS105-53084D (143-354502) 4 Cycle Vertical Engine View Diagrams & Manuals
TVS105-53087D (143-364262) 4 Cycle Vertical Engine View Diagrams & Manuals
TVS105-53090D (143-364402) 4 Cycle Vertical Engine View Diagrams & Manuals
TVS105-53101E (143-374312) 4 Cycle Vertical Engine View Diagrams & Manuals
TVS105-53102E (143-374422) 4 Cycle Vertical Engine View Diagrams & Manuals
TVS105-53107F (143-384402) 4 Cycle Vertical Engine View Diagrams & Manuals
TVS105-53123G (143-404042) 4 Cycle Vertical Engine View Diagrams & Manuals
TVS105-53130G (143-404132) 4 Cycle Vertical Engine View Diagrams & Manuals
TVS105-53130H (143-414312) 4 Cycle Vertical Engine View Diagrams & Manuals
TVS105-53131G (143-404172) 4 Cycle Vertical Engine View Diagrams & Manuals
TVS105-53132G (143-404162) 4 Cycle Vertical Engine View Diagrams & Manuals
TVS105-53133G (143-404242) 4 Cycle Vertical Engine View Diagrams & Manuals
TVS105-53134G (143-404252) 4 Cycle Vertical Engine View Diagrams & Manuals
TVS105-53136G (143-404202) 4 Cycle Vertical Engine View Diagrams & Manuals
TVS105-53137G (143-404222) 4 Cycle Vertical Engine View Diagrams & Manuals
TVS105-53138G (143-404232) 4 Cycle Vertical Engine View Diagrams & Manuals
TVS105-53139G (143-404282) 4 Cycle Vertical Engine View Diagrams & Manuals
TVS105-53139H (143-414482) 4 Cycle Vertical Engine View Diagrams & Manuals
TVS105-53140G (143-404312) 4 Cycle Vertical Engine View Diagrams & Manuals
TVS105-53143G (143-404362) 4 Cycle Vertical Engine View Diagrams & Manuals
TVS105-53147G (143-404412) 4 Cycle Vertical Engine View Diagrams & Manuals
TVS105-53148G (143-404422) 4 Cycle Vertical Engine View Diagrams & Manuals
TVS105-53149G (143-404432) 4 Cycle Vertical Engine View Diagrams & Manuals
TVS105-53150G (143-404442) 4 Cycle Vertical Engine View Diagrams & Manuals
TVS105-53151G (143-404452) 4 Cycle Vertical Engine View Diagrams & Manuals
TVS105-53151H (143-414382) 4 Cycle Vertical Engine View Diagrams & Manuals
TVS105-53152G (143-404462) 4 Cycle Vertical Engine View Diagrams & Manuals
TVS105-53153G (143-404322) 4 Cycle Vertical Engine View Diagrams & Manuals
TVS105-53153H (143-414292) 4 Cycle Vertical Engine View Diagrams & Manuals
TVS105-53153J (143-424042) 4 Cycle Vertical Engine View Diagrams & Manuals
TVS105-53162H (143-414022) 4 Cycle Vertical Engine View Diagrams & Manuals
TVS105-53163H (143-414062) 4 Cycle Vertical Engine View Diagrams & Manuals
TVS105-53163J (143-424262) 4 Cycle Vertical Engine View Diagrams & Manuals
TVS105-53163K (143-434502) 4 Cycle Vertical Engine View Diagrams & Manuals
TVS105-53163L (143-944000) 4 Cycle Vertical Engine View Diagrams & Manuals
TVS105-53163M (143-954004) 4 Cycle Vertical Engine View Diagrams & Manuals
TVS105-53165H (143-414072) 4 Cycle Vertical Engine View Diagrams & Manuals
TVS105-53167H (143-414222) 4 Cycle Vertical Engine View Diagrams & Manuals
TVS105-53168H (143-414412) 4 Cycle Vertical Engine View Diagrams & Manuals
TVS105-53169H (143-414372) 4 Cycle Vertical Engine View Diagrams & Manuals
TVS105-53175H (143-414652) 4 Cycle Vertical Engine View Diagrams & Manuals
TVS105-53176H (143-414662) 4 Cycle Vertical Engine View Diagrams & Manuals
TVS105-53177H (143-414672) 4 Cycle Vertical Engine View Diagrams & Manuals
TVS105-53180J (143-424352) 4 Cycle Vertical Engine View Diagrams & Manuals
TVS105-53601E (143-374292) 4 Cycle Vertical Engine View Diagrams & Manuals
TVS105-53602E (143-374372) 4 Cycle Vertical Engine View Diagrams & Manuals
TVS105-53602F (143-384412) 4 Cycle Vertical Engine View Diagrams & Manuals
TVS105-53607F (143-384422) 4 Cycle Vertical Engine View Diagrams & Manuals
TVS105-53901G (143-404082) 4 Cycle Vertical Engine View Diagrams & Manuals
TVS105-53901H (143-414322) 4 Cycle Vertical Engine View Diagrams & Manuals
TVS105-53902G (143-404092) 4 Cycle Vertical Engine View Diagrams & Manuals
TVS105-53902H (143-414402) 4 Cycle Vertical Engine View Diagrams & Manuals
TVS105-53903G (143-404142) 4 Cycle Vertical Engine View Diagrams & Manuals
TVS105-53903H (143-414342) 4 Cycle Vertical Engine View Diagrams & Manuals
TVS105-53904G (143-404332) 4 Cycle Vertical Engine View Diagrams & Manuals
TVS105-53905G (143-404372) 4 Cycle Vertical Engine View Diagrams & Manuals
TVS105-53906G (143-404382) 4 Cycle Vertical Engine View Diagrams & Manuals
TVS105-53907G (143-404392) 4 Cycle Vertical Engine View Diagrams & Manuals
TVS105-53907H (143-414542) 4 Cycle Vertical Engine View Diagrams & Manuals
TVS105-53910H (143-414582) 4 Cycle Vertical Engine View Diagrams & Manuals
TVS105-53911H (143-414362) 4 Cycle Vertical Engine View Diagrams & Manuals
TVS105-53912H (143-414592) 4 Cycle Vertical Engine View Diagrams & Manuals
TVS105-53912J (143-424282) 4 Cycle Vertical Engine View Diagrams & Manuals
TVS105-53912L (143-944008) 4 Cycle Vertical Engine View Diagrams & Manuals
TVS105-53913H (143-414602) 4 Cycle Vertical Engine View Diagrams & Manuals
TVS105-53913J (143-424292) 4 Cycle Vertical Engine View Diagrams & Manuals
TVS105-53913K (143-434492) 4 Cycle Vertical Engine View Diagrams & Manuals
TVS105-53913L (143-944026) 4 Cycle Vertical Engine View Diagrams & Manuals
TVS105-53913M (143-954006) 4 Cycle Vertical Engine View Diagrams & Manuals
TVS105-53914H (143-414632) 4 Cycle Vertical Engine View Diagrams & Manuals
TVS105-53920J (143-424492) 4 Cycle Vertical Engine View Diagrams & Manuals
TVS105-56001 (143-424022) 4 Cycle Vertical Engine View Diagrams & Manuals
TVS105-56005 (143-424312) 4 Cycle Vertical Engine View Diagrams & Manuals
TVS105-56006 (143-424322) 4 Cycle Vertical Engine View Diagrams & Manuals
TVS105-56007 (143-424382) 4 Cycle Vertical Engine View Diagrams & Manuals
TVS105-56904 (143-424082) 4 Cycle Vertical Engine View Diagrams & Manuals
TVS105-56905 (143-424142) 4 Cycle Vertical Engine View Diagrams & Manuals
TVS105-56906 (143-424162) 4 Cycle Vertical Engine View Diagrams & Manuals
TVS105-56907 (143-424392) 4 Cycle Vertical Engine View Diagrams & Manuals
TVS115-56001A (143-434162) 4 Cycle Vertical Engine View Diagrams & Manuals
TVS115-56007A (143-434042) 4 Cycle Vertical Engine View Diagrams & Manuals
TVS115-56010A (143-434122) 4 Cycle Vertical Engine View Diagrams & Manuals
TVS115-56010B (143-944012) 4 Cycle Vertical Engine View Diagrams & Manuals
TVS115-56011A (143-434082) 4 Cycle Vertical Engine View Diagrams & Manuals
TVS115-56012A (143-434052) 4 Cycle Vertical Engine View Diagrams & Manuals
TVS115-56012B (143-944010) 4 Cycle Vertical Engine View Diagrams & Manuals
TVS115-56016A (143-434232) 4 Cycle Vertical Engine View Diagrams & Manuals
TVS115-56016B (143-944018) 4 Cycle Vertical Engine View Diagrams & Manuals
TVS115-56017A (143-434182) 4 Cycle Vertical Engine View Diagrams & Manuals
TVS115-56031A (143-434602) 4 Cycle Vertical Engine View Diagrams & Manuals
TVS115-56031B (143-944004) 4 Cycle Vertical Engine View Diagrams & Manuals
TVS115-56032B (143-944002) 4 Cycle Vertical Engine View Diagrams & Manuals
TVS115-56033B (143-944006) 4 Cycle Vertical Engine View Diagrams & Manuals
TVS115-56033C (143-954000) 4 Cycle Vertical Engine View Diagrams & Manuals
TVS115-56036B (143-944014) 4 Cycle Vertical Engine View Diagrams & Manuals
TVS115-56036C (143-954002) 4 Cycle Vertical Engine View Diagrams & Manuals
TVS115-56036D (143-964002) 4 Cycle Vertical Engine View Diagrams & Manuals
TVS115-56037B (143-944016) 4 Cycle Vertical Engine View Diagrams & Manuals
TVS115-56037C (143-954008) 4 Cycle Vertical Engine View Diagrams & Manuals
TVS115-56042B (143-944024) 4 Cycle Vertical Engine View Diagrams & Manuals
TVS115-56043B (143-944022) 4 Cycle Vertical Engine View Diagrams & Manuals
TVS115-56044B (143-944028) 4 Cycle Vertical Engine View Diagrams & Manuals
TVS115-56044C (143-954018) 4 Cycle Vertical Engine View Diagrams & Manuals
TVS115-56046B (143-944030) 4 Cycle Vertical Engine View Diagrams & Manuals
TVS115-56046C (143-954026) 4 Cycle Vertical Engine View Diagrams & Manuals
TVS115-56047B (143-944034) 4 Cycle Vertical Engine View Diagrams & Manuals
TVS115-56047C (143-954022) 4 Cycle Vertical Engine View Diagrams & Manuals
TVS115-56047D (143-964000) 4 Cycle Vertical Engine View Diagrams & Manuals
TVS115-56047E (143-974012) 4 Cycle Vertical Engine View Diagrams & Manuals
TVS115-56048B (143-944036) 4 Cycle Vertical Engine View Diagrams & Manuals
TVS115-56048C (143-954024) 4 Cycle Vertical Engine View Diagrams & Manuals
TVS115-56048D (143-964004) 4 Cycle Vertical Engine View Diagrams & Manuals
TVS115-56048E (143-974004) 4 Cycle Vertical Engine View Diagrams & Manuals
TVS115-56051C (143-954010) 4 Cycle Vertical Engine View Diagrams & Manuals
TVS115-56071D (143-964014) 4 Cycle Vertical Engine View Diagrams & Manuals
TVS115-56071E (143-974024) 4 Cycle Vertical Engine View Diagrams & Manuals
TVS115-56072D (143-964016) 4 Cycle Vertical Engine View Diagrams & Manuals
TVS115-56073D (143-964018) 4 Cycle Vertical Engine View Diagrams & Manuals
TVS115-56073E (143-974018) 4 Cycle Vertical Engine View Diagrams & Manuals
TVS115-56074D (143-964020) 4 Cycle Vertical Engine View Diagrams & Manuals
TVS115-56074E (143-974026) 4 Cycle Vertical Engine View Diagrams & Manuals
TVS115-56076D (143-964026) 4 Cycle Vertical Engine View Diagrams & Manuals
TVS115-56077D (143-964024) 4 Cycle Vertical Engine View Diagrams & Manuals
TVS115-56077E (143-974034) 4 Cycle Vertical Engine View Diagrams & Manuals
TVS115-56078D (143-964022) 4 Cycle Vertical Engine View Diagrams & Manuals
TVS115-56082D (143-964028) 4 Cycle Vertical Engine View Diagrams & Manuals
TVS115-56089E (143-974002) 4 Cycle Vertical Engine View Diagrams & Manuals
TVS115-56090E (143-974010) 4 Cycle Vertical Engine View Diagrams & Manuals
TVS115-56094E (143-974014) 4 Cycle Vertical Engine View Diagrams & Manuals
TVS115-56095E (143-974016) 4 Cycle Vertical Engine View Diagrams & Manuals
TVS115-56906A (143-434152) 4 Cycle Vertical Engine View Diagrams & Manuals
TVS115-56911A (143-434592) 4 Cycle Vertical Engine View Diagrams & Manuals
TVS115-56912B (143-944032) 4 Cycle Vertical Engine View Diagrams & Manuals
TVS115-56912C (143-954020) 4 Cycle Vertical Engine View Diagrams & Manuals
TVS115-57012A (143-434202) 4 Cycle Vertical Engine View Diagrams & Manuals
TVS115-57020B (143-944500) 4 Cycle Vertical Engine View Diagrams & Manuals
TVS115-57023B (143-944502) 4 Cycle Vertical Engine View Diagrams & Manuals
TVS115-57023C (143-954502) 4 Cycle Vertical Engine View Diagrams & Manuals
TVS115-57023D (143-964500) 4 Cycle Vertical Engine View Diagrams & Manuals
TVS115-57028B (143-944504) 4 Cycle Vertical Engine View Diagrams & Manuals
TVS115-57028C (143-954516) 4 Cycle Vertical Engine View Diagrams & Manuals
TVS115-57030B (143-944506) 4 Cycle Vertical Engine View Diagrams & Manuals
TVS115-57030C (143-954506) 4 Cycle Vertical Engine View Diagrams & Manuals
TVS115-57030D (143-964504) 4 Cycle Vertical Engine View Diagrams & Manuals
TVS115-57031C (143-954500) 4 Cycle Vertical Engine View Diagrams & Manuals
TVS115-57031D (143-964502) 4 Cycle Vertical Engine View Diagrams & Manuals
TVS115-57032C (143-954504) 4 Cycle Vertical Engine View Diagrams & Manuals
TVS115-57032D (143-964506) 4 Cycle Vertical Engine View Diagrams & Manuals
TVS115-57033C (143-954508) 4 Cycle Vertical Engine View Diagrams & Manuals
TVS115-57048E (143-974500) 4 Cycle Vertical Engine View Diagrams & Manuals
TVS115-57049E (143-974502) 4 Cycle Vertical Engine View Diagrams & Manuals
TVS115-57054E (143-974508) 4 Cycle Vertical Engine View Diagrams & Manuals
TVS115-57057F (143-984506) 4 Cycle Vertical Engine View Diagrams & Manuals
TVS115-57064G (143-994506) 4 Cycle Vertical Engine View Diagrams & Manuals
TVS115-57065G (143-004506) 4 Cycle Vertical Engine View Diagrams & Manuals
TVS115-57902A (143-434062) 4 Cycle Vertical Engine View Diagrams & Manuals
TVS115-61002 (143-434102) 4 Cycle Vertical Engine View Diagrams & Manuals
TVS115-61002A (143-945014) 4 Cycle Vertical Engine View Diagrams & Manuals
TVS115-61016 (143-434512) 4 Cycle Vertical Engine View Diagrams & Manuals
TVS115-61016A (143-945012) 4 Cycle Vertical Engine View Diagrams & Manuals
TVS115-61016B (143-955008) 4 Cycle Vertical Engine View Diagrams & Manuals
TVS115-61016C (143-965008) 4 Cycle Vertical Engine View Diagrams & Manuals
TVS115-61016D (143-975032) 4 Cycle Vertical Engine View Diagrams & Manuals
TVS115-61021A (143-945004) 4 Cycle Vertical Engine View Diagrams & Manuals
TVS115-61021B (143-955010) 4 Cycle Vertical Engine View Diagrams & Manuals
TVS115-61021C (143-965004) 4 Cycle Vertical Engine View Diagrams & Manuals
TVS115-61022A (143-945006) 4 Cycle Vertical Engine View Diagrams & Manuals
TVS115-61024A (143-945016) 4 Cycle Vertical Engine View Diagrams & Manuals
TVS115-61024B (143-955002) 4 Cycle Vertical Engine View Diagrams & Manuals
TVS115-61026A (143-945018) 4 Cycle Vertical Engine View Diagrams & Manuals
TVS115-61026B (143-955022) 4 Cycle Vertical Engine View Diagrams & Manuals
TVS115-61026C (143-965012) 4 Cycle Vertical Engine View Diagrams & Manuals
TVS115-61026D (143-975008) 4 Cycle Vertical Engine View Diagrams & Manuals
TVS115-61027A (143-945020) 4 Cycle Vertical Engine View Diagrams & Manuals
TVS115-61027B (143-955020) 4 Cycle Vertical Engine View Diagrams & Manuals
TVS115-61027C (143-965020) 4 Cycle Vertical Engine View Diagrams & Manuals
TVS115-61027D (143-975006) 4 Cycle Vertical Engine View Diagrams & Manuals
TVS115-61032B (143-955004) 4 Cycle Vertical Engine View Diagrams & Manuals
TVS115-61037B (143-955016) 4 Cycle Vertical Engine View Diagrams & Manuals
TVS115-61037C (143-965014) 4 Cycle Vertical Engine View Diagrams & Manuals
TVS115-61037D (143-975000) 4 Cycle Vertical Engine View Diagrams & Manuals
TVS115-61039B (143-955018) 4 Cycle Vertical Engine View Diagrams & Manuals
TVS115-61041B (143-955024) 4 Cycle Vertical Engine View Diagrams & Manuals
TVS115-61049C (143-965002) 4 Cycle Vertical Engine View Diagrams & Manuals
TVS115-61050C (143-965006) 4 Cycle Vertical Engine View Diagrams & Manuals
TVS115-61051C (143-965010) 4 Cycle Vertical Engine View Diagrams & Manuals
TVS115-61051D (143-975004) 4 Cycle Vertical Engine View Diagrams & Manuals
TVS115-61056C (143-965022) 4 Cycle Vertical Engine View Diagrams & Manuals
TVS115-61056D (143-975010) 4 Cycle Vertical Engine View Diagrams & Manuals
TVS115-61063D (143-975012) 4 Cycle Vertical Engine View Diagrams & Manuals
TVS115-61064D (143-975014) 4 Cycle Vertical Engine View Diagrams & Manuals
TVS115-61065D (143-975016) 4 Cycle Vertical Engine View Diagrams & Manuals
TVS115-61071D (143-975030) 4 Cycle Vertical Engine View Diagrams & Manuals
TVS115-61072D (143-975028) 4 Cycle Vertical Engine View Diagrams & Manuals
TVS115-61081D (143-975036) 4 Cycle Vertical Engine View Diagrams & Manuals
TVS115-61082D (143-975038) 4 Cycle Vertical Engine View Diagrams & Manuals
TVS115-61083E (143-985014) 4 Cycle Vertical Engine View Diagrams & Manuals
TVS115-61085E (143-985010) 4 Cycle Vertical Engine View Diagrams & Manuals
TVS115-61901 (143-434132) 4 Cycle Vertical Engine View Diagrams & Manuals
TVS115-61901A (143-945002) 4 Cycle Vertical Engine View Diagrams & Manuals
TVS115-61902 (143-434032) 4 Cycle Vertical Engine View Diagrams & Manuals
TVS115-61906 (143-434522) 4 Cycle Vertical Engine View Diagrams & Manuals
TVS115-61906A (143-945010) 4 Cycle Vertical Engine View Diagrams & Manuals
TVS115-61906B (143-955006) 4 Cycle Vertical Engine View Diagrams & Manuals
TVS115-61907B (143-955000) 4 Cycle Vertical Engine View Diagrams & Manuals
TVS115-62106B (143-975500) 4 Cycle Vertical Engine View Diagrams & Manuals
TVS115-62107B (143-975502) 4 Cycle Vertical Engine View Diagrams & Manuals
TVS115-62108B (143-975504) 4 Cycle Vertical Engine View Diagrams & Manuals
TVS115-62110B (143-975506) 4 Cycle Vertical Engine View Diagrams & Manuals
TVS115-62114B (143-975516) 4 Cycle Vertical Engine View Diagrams & Manuals
TVS115-62116C (143-985504) 4 Cycle Vertical Engine View Diagrams & Manuals
TVS115-62117C (143-985506) 4 Cycle Vertical Engine View Diagrams & Manuals
TVS115-62118C (143-985508) 4 Cycle Vertical Engine View Diagrams & Manuals
TVS115-62122D (143-995508) 4 Cycle Vertical Engine View Diagrams & Manuals
TVS115-62124D (143-005506) 4 Cycle Vertical Engine View Diagrams & Manuals
TVS115-62901A (143-965504) 4 Cycle Vertical Engine View Diagrams & Manuals
TVS115-62902A (143-965508) 4 Cycle Vertical Engine View Diagrams & Manuals
TVS120-63114F (143-404122) 4 Cycle Vertical Engine View Diagrams & Manuals
TVS120-63115F (143-404152) 4 Cycle Vertical Engine View Diagrams & Manuals
TVS120-63115G (143-414422) 4 Cycle Vertical Engine View Diagrams & Manuals
TVS120-63117F (143-404292) 4 Cycle Vertical Engine View Diagrams & Manuals
TVS120-63120F (143-404472) 4 Cycle Vertical Engine View Diagrams & Manuals
TVS120-63120G (143-414492) 4 Cycle Vertical Engine View Diagrams & Manuals
TVS120-63124G (143-414302) 4 Cycle Vertical Engine View Diagrams & Manuals
TVS120-63127G (143-414622) 4 Cycle Vertical Engine View Diagrams & Manuals
TVS120-63129H (143-424062) 4 Cycle Vertical Engine View Diagrams & Manuals
TVS120-63130H (143-424172) 4 Cycle Vertical Engine View Diagrams & Manuals
TVS120-63134H (143-424332) 4 Cycle Vertical Engine View Diagrams & Manuals
TVS120-63135H (143-424342) 4 Cycle Vertical Engine View Diagrams & Manuals
TVS120-63137H (143-424482) 4 Cycle Vertical Engine View Diagrams & Manuals
TVS120-63209A (143-335052) 4 Cycle Vertical Engine View Diagrams & Manuals
TVS120-63210A (143-335072) 4 Cycle Vertical Engine View Diagrams & Manuals
TVS120-63211A (143-345032) 4 Cycle Vertical Engine View Diagrams & Manuals
TVS120-63901F (143-404182) 4 Cycle Vertical Engine View Diagrams & Manuals
TVS120-63902F (143-404402) 4 Cycle Vertical Engine View Diagrams & Manuals
TVS120-63902G (143-414572) 4 Cycle Vertical Engine View Diagrams & Manuals
TVS120-63902H (143-424402) 4 Cycle Vertical Engine View Diagrams & Manuals
TVS120-63903F (143-404482) 4 Cycle Vertical Engine View Diagrams & Manuals
TVS120-63907G (143-414642) 4 Cycle Vertical Engine View Diagrams & Manuals
TVS120-63910H (143-424102) 4 Cycle Vertical Engine View Diagrams & Manuals
TVS120-63911H (143-424152) 4 Cycle Vertical Engine View Diagrams & Manuals
TVS120-63915H (143-424502) 4 Cycle Vertical Engine View Diagrams & Manuals
TVS120-63916H (143-424582) 4 Cycle Vertical Engine View Diagrams & Manuals
TVS120-63917J (143-434282) 4 Cycle Vertical Engine View Diagrams & Manuals
TVS120-63918J (143-434332) 4 Cycle Vertical Engine View Diagrams & Manuals
TVS120-63918K (143-945300) 4 Cycle Vertical Engine View Diagrams & Manuals
TVS120-63919K (143-945302) 4 Cycle Vertical Engine View Diagrams & Manuals
TVS120-63920K (143-945504) 4 Cycle Vertical Engine View Diagrams & Manuals
TVS120-63920L (143-955500) 4 Cycle Vertical Engine View Diagrams & Manuals
TVS120-63920M (143-965502) 4 Cycle Vertical Engine View Diagrams & Manuals
TVS120-63921K (143-945502) 4 Cycle Vertical Engine View Diagrams & Manuals
TVS120-63921L (143-955506) 4 Cycle Vertical Engine View Diagrams & Manuals
TVS120-63922K (143-945506) 4 Cycle Vertical Engine View Diagrams & Manuals
TVS120-63923K (143-945508) 4 Cycle Vertical Engine View Diagrams & Manuals
TVS120-63924K (143-945510) 4 Cycle Vertical Engine View Diagrams & Manuals
TVS120-63924L (143-955300) 4 Cycle Vertical Engine View Diagrams & Manuals
TVS120-63924M (143-966012) 4 Cycle Vertical Engine View Diagrams & Manuals
TVS120-63925L (143-955502) 4 Cycle Vertical Engine View Diagrams & Manuals
TVS120-63929M (143-966004) 4 Cycle Vertical Engine View Diagrams & Manuals
TVS120-63930M (143-966010) 4 Cycle Vertical Engine View Diagrams & Manuals
TVS120-66011B (143-986010) 4 Cycle Vertical Engine View Diagrams & Manuals
TVS120-66011C (143-996008) 4 Cycle Vertical Engine View Diagrams & Manuals
TVS120-66018C (143-996006) 4 Cycle Vertical Engine View Diagrams & Manuals
TVS120-66020C (143-006202) 4 Cycle Vertical Engine View Diagrams & Manuals
TVS120-66021C (143-006002) 4 Cycle Vertical Engine View Diagrams & Manuals
TVS120-66101A (143-976250) 4 Cycle Vertical Engine View Diagrams & Manuals
TVS120-66102A (143-976252) 4 Cycle Vertical Engine View Diagrams & Manuals
TVS120-66103A (143-976260) 4 Cycle Vertical Engine View Diagrams & Manuals
TVS120-66104B (143-986506) 4 Cycle Vertical Engine View Diagrams & Manuals
TVS120-66104C (143-996518) 4 Cycle Vertical Engine View Diagrams & Manuals
TVS120-66105B (143-986508) 4 Cycle Vertical Engine View Diagrams & Manuals
TVS120-66105C (143-996520) 4 Cycle Vertical Engine View Diagrams & Manuals
TVS120-66107C (143-996522) 4 Cycle Vertical Engine View Diagrams & Manuals
TVS120-66901A (143-976002) 4 Cycle Vertical Engine View Diagrams & Manuals
TVS75-33002A (143-293012) 4 Cycle Vertical Engine View Diagrams & Manuals
TVS75-33010B (143-313012) 4 Cycle Vertical Engine View Diagrams & Manuals
TVS75-33010C (143-321012) 4 Cycle Vertical Engine View Diagrams & Manuals
TVS75-33012B (143-313022) 4 Cycle Vertical Engine View Diagrams & Manuals
TVS75-33012C (143-321022) 4 Cycle Vertical Engine View Diagrams & Manuals
TVS75-33012D (143-331022) 4 Cycle Vertical Engine View Diagrams & Manuals
TVS75-33025D (143-331012) 4 Cycle Vertical Engine View Diagrams & Manuals
TVS75-33039D (143-341012) 4 Cycle Vertical Engine View Diagrams & Manuals
TVS75-33046D (143-351012) 4 Cycle Vertical Engine View Diagrams & Manuals
TVS75-33052D (143-351022) 4 Cycle Vertical Engine View Diagrams & Manuals
TVS75-33054D (143-361012) 4 Cycle Vertical Engine View Diagrams & Manuals
TVS75-33056E (143-371012) 4 Cycle Vertical Engine View Diagrams & Manuals
TVS75-33057E (143-371022) 4 Cycle Vertical Engine View Diagrams & Manuals
TVS75-33059E (143-371032) 4 Cycle Vertical Engine View Diagrams & Manuals
TVS75-33059F (143-381022) 4 Cycle Vertical Engine View Diagrams & Manuals
TVS75-33061F (143-381012) 4 Cycle Vertical Engine View Diagrams & Manuals
TVS75-33066F (143-391012) 4 Cycle Vertical Engine View Diagrams & Manuals
TVS90-43001 (143-284232) 4 Cycle Vertical Engine View Diagrams & Manuals
TVS90-43002 (143-284272) 4 Cycle Vertical Engine View Diagrams & Manuals
TVS90-43017A (143-294192) 4 Cycle Vertical Engine View Diagrams & Manuals
TVS90-43018A (143-294202) 4 Cycle Vertical Engine View Diagrams & Manuals
TVS90-43019A (143-294212) 4 Cycle Vertical Engine View Diagrams & Manuals
TVS90-43019B (143-314292) 4 Cycle Vertical Engine View Diagrams & Manuals
TVS90-43019D (143-334152) 4 Cycle Vertical Engine View Diagrams & Manuals
TVS90-43020A (143-294012) 4 Cycle Vertical Engine View Diagrams & Manuals
TVS90-43020B (143-314032) 4 Cycle Vertical Engine View Diagrams & Manuals
TVS90-43020C (143-324052) 4 Cycle Vertical Engine View Diagrams & Manuals
TVS90-43021A (143-294022) 4 Cycle Vertical Engine View Diagrams & Manuals
TVS90-43022A (143-294032) 4 Cycle Vertical Engine View Diagrams & Manuals
TVS90-43022B (143-314042) 4 Cycle Vertical Engine View Diagrams & Manuals
TVS90-43023A (143-294042) 4 Cycle Vertical Engine View Diagrams & Manuals
TVS90-43023B (143-314052) 4 Cycle Vertical Engine View Diagrams & Manuals
TVS90-43024A (143-294052) 4 Cycle Vertical Engine View Diagrams & Manuals
TVS90-43025A (143-294062) 4 Cycle Vertical Engine View Diagrams & Manuals
TVS90-43025B (143-314062) 4 Cycle Vertical Engine View Diagrams & Manuals
TVS90-43025C (143-324162) 4 Cycle Vertical Engine View Diagrams & Manuals
TVS90-43026A (143-294072) 4 Cycle Vertical Engine View Diagrams & Manuals
TVS90-43028A (143-294092) 4 Cycle Vertical Engine View Diagrams & Manuals
TVS90-43030A (143-294112) 4 Cycle Vertical Engine View Diagrams & Manuals
TVS90-43031A (143-294122) 4 Cycle Vertical Engine View Diagrams & Manuals
TVS90-43032A (143-294132) 4 Cycle Vertical Engine View Diagrams & Manuals
TVS90-43032B (143-314072) 4 Cycle Vertical Engine View Diagrams & Manuals
TVS90-43033A (143-294182) 4 Cycle Vertical Engine View Diagrams & Manuals
TVS90-43033B (143-314082) 4 Cycle Vertical Engine View Diagrams & Manuals
TVS90-43036A (143-294242) 4 Cycle Vertical Engine View Diagrams & Manuals
TVS90-43037A (143-294252) 4 Cycle Vertical Engine View Diagrams & Manuals
TVS90-43038A (143-294262) 4 Cycle Vertical Engine View Diagrams & Manuals
TVS90-43039A (143-294272) 4 Cycle Vertical Engine View Diagrams & Manuals
TVS90-43040A (143-294282) 4 Cycle Vertical Engine View Diagrams & Manuals
TVS90-43040B (143-314322) 4 Cycle Vertical Engine View Diagrams & Manuals
TVS90-43041A (143-294292) 4 Cycle Vertical Engine View Diagrams & Manuals
TVS90-43042A (143-294302) 4 Cycle Vertical Engine View Diagrams & Manuals
TVS90-43043A (143-294312) 4 Cycle Vertical Engine View Diagrams & Manuals
TVS90-43044A (143-294322) 4 Cycle Vertical Engine View Diagrams & Manuals
TVS90-43044B (143-314382) 4 Cycle Vertical Engine View Diagrams & Manuals
TVS90-43045A (143-294342) 4 Cycle Vertical Engine View Diagrams & Manuals
TVS90-43055A (143-294432) 4 Cycle Vertical Engine View Diagrams & Manuals
TVS90-43057A (143-294442) 4 Cycle Vertical Engine View Diagrams & Manuals
TVS90-43058A (143-294452) 4 Cycle Vertical Engine View Diagrams & Manuals
TVS90-43059A (143-294462) 4 Cycle Vertical Engine View Diagrams & Manuals
TVS90-43059B (143-314262) 4 Cycle Vertical Engine View Diagrams & Manuals
TVS90-43061A (143-294492) 4 Cycle Vertical Engine View Diagrams & Manuals
TVS90-43061B (143-314272) 4 Cycle Vertical Engine View Diagrams & Manuals
TVS90-43065A (143-294502) 4 Cycle Vertical Engine View Diagrams & Manuals
TVS90-43066A (143-294512) 4 Cycle Vertical Engine View Diagrams & Manuals
TVS90-43066B (143-314542) 4 Cycle Vertical Engine View Diagrams & Manuals
TVS90-43067A (143-294522) 4 Cycle Vertical Engine View Diagrams & Manuals
TVS90-43068A (143-294532) 4 Cycle Vertical Engine View Diagrams & Manuals
TVS90-43068B (143-314402) 4 Cycle Vertical Engine View Diagrams & Manuals
TVS90-43068D (143-334142) 4 Cycle Vertical Engine View Diagrams & Manuals
TVS90-43071A (143-294602) 4 Cycle Vertical Engine View Diagrams & Manuals
TVS90-43072A (143-294612) 4 Cycle Vertical Engine View Diagrams & Manuals
TVS90-43073A (143-294652) 4 Cycle Vertical Engine View Diagrams & Manuals
TVS90-43088A (143-294692) 4 Cycle Vertical Engine View Diagrams & Manuals
TVS90-43088B (143-314552) 4 Cycle Vertical Engine View Diagrams & Manuals
TVS90-43092A (143-294712) 4 Cycle Vertical Engine View Diagrams & Manuals
TVS90-43094A (143-304012) 4 Cycle Vertical Engine View Diagrams & Manuals
TVS90-43094B (143-314092) 4 Cycle Vertical Engine View Diagrams & Manuals
TVS90-43095A (143-304052) 4 Cycle Vertical Engine View Diagrams & Manuals
TVS90-43095B (143-314102) 4 Cycle Vertical Engine View Diagrams & Manuals
TVS90-43096A (143-304092) 4 Cycle Vertical Engine View Diagrams & Manuals
TVS90-43096B (143-314112) 4 Cycle Vertical Engine View Diagrams & Manuals
TVS90-43102A (143-314792) 4 Cycle Vertical Engine View Diagrams & Manuals
TVS90-43107A (143-304202) 4 Cycle Vertical Engine View Diagrams & Manuals
TVS90-43107B (143-314282) 4 Cycle Vertical Engine View Diagrams & Manuals
TVS90-43108A (143-304212) 4 Cycle Vertical Engine View Diagrams & Manuals
TVS90-43108B (143-314412) 4 Cycle Vertical Engine View Diagrams & Manuals
TVS90-43109A (143-304222) 4 Cycle Vertical Engine View Diagrams & Manuals
TVS90-43110A (143-304232) 4 Cycle Vertical Engine View Diagrams & Manuals
TVS90-43111A (143-304242) 4 Cycle Vertical Engine View Diagrams & Manuals
TVS90-43111B (143-314342) 4 Cycle Vertical Engine View Diagrams & Manuals
TVS90-43112A (143-304252) 4 Cycle Vertical Engine View Diagrams & Manuals
TVS90-43112B (143-314332) 4 Cycle Vertical Engine View Diagrams & Manuals
TVS90-43113A (143-304262) 4 Cycle Vertical Engine View Diagrams & Manuals
TVS90-43115A (143-304272) 4 Cycle Vertical Engine View Diagrams & Manuals
TVS90-43116A (143-304302) 4 Cycle Vertical Engine View Diagrams & Manuals
TVS90-43116B (143-314562) 4 Cycle Vertical Engine View Diagrams & Manuals
TVS90-43116C (143-324112) 4 Cycle Vertical Engine View Diagrams & Manuals
TVS90-43116D (143-334202) 4 Cycle Vertical Engine View Diagrams & Manuals
TVS90-43121A (143-304342) 4 Cycle Vertical Engine View Diagrams & Manuals
TVS90-43121B (143-314182) 4 Cycle Vertical Engine View Diagrams & Manuals
TVS90-43121C (143-324152) 4 Cycle Vertical Engine View Diagrams & Manuals
TVS90-43121D (143-334352) 4 Cycle Vertical Engine View Diagrams & Manuals
TVS90-43134B (143-314302) 4 Cycle Vertical Engine View Diagrams & Manuals
TVS90-43139B (143-314722) 4 Cycle Vertical Engine View Diagrams & Manuals
TVS90-43139C (143-324142) 4 Cycle Vertical Engine View Diagrams & Manuals
TVS90-43139D (143-334262) 4 Cycle Vertical Engine View Diagrams & Manuals
TVS90-43140B (143-314732) 4 Cycle Vertical Engine View Diagrams & Manuals
TVS90-43140D (143-334272) 4 Cycle Vertical Engine View Diagrams & Manuals
TVS90-43141B (143-314742) 4 Cycle Vertical Engine View Diagrams & Manuals
TVS90-43141D (143-334282) 4 Cycle Vertical Engine View Diagrams & Manuals
TVS90-43142B (143-314752) 4 Cycle Vertical Engine View Diagrams & Manuals
TVS90-43142C (143-324172) 4 Cycle Vertical Engine View Diagrams & Manuals
TVS90-43142D (143-334292) 4 Cycle Vertical Engine View Diagrams & Manuals
TVS90-43143B (143-314762) 4 Cycle Vertical Engine View Diagrams & Manuals
TVS90-43143D (143-334302) 4 Cycle Vertical Engine View Diagrams & Manuals
TVS90-43144B (143-314772) 4 Cycle Vertical Engine View Diagrams & Manuals
TVS90-43144C (143-324192) 4 Cycle Vertical Engine View Diagrams & Manuals
TVS90-43144D (143-334312) 4 Cycle Vertical Engine View Diagrams & Manuals
TVS90-43145B (143-314362) 4 Cycle Vertical Engine View Diagrams & Manuals
TVS90-43145D (143-334162) 4 Cycle Vertical Engine View Diagrams & Manuals
TVS90-43150B (143-314482) 4 Cycle Vertical Engine View Diagrams & Manuals
TVS90-43173D (143-334022) 4 Cycle Vertical Engine View Diagrams & Manuals
TVS90-43174D (143-334032) 4 Cycle Vertical Engine View Diagrams & Manuals
TVS90-43175D (143-334062) 4 Cycle Vertical Engine View Diagrams & Manuals
TVS90-43176D (143-334072) 4 Cycle Vertical Engine View Diagrams & Manuals
TVS90-43177D (143-334112) 4 Cycle Vertical Engine View Diagrams & Manuals
TVS90-43178D (143-334122) 4 Cycle Vertical Engine View Diagrams & Manuals
TVS90-43201D (143-334332) 4 Cycle Vertical Engine View Diagrams & Manuals
TVS90-43213D (143-344022) 4 Cycle Vertical Engine View Diagrams & Manuals
TVS90-43214D (143-344032) 4 Cycle Vertical Engine View Diagrams & Manuals
TVS90-43215D (143-334362) 4 Cycle Vertical Engine View Diagrams & Manuals
TVS90-43215E (143-374382) 4 Cycle Vertical Engine View Diagrams & Manuals
TVS90-43215F (143-384302) 4 Cycle Vertical Engine View Diagrams & Manuals
TVS90-43215G (143-414252) 4 Cycle Vertical Engine View Diagrams & Manuals
TVS90-43215H (143-424202) 4 Cycle Vertical Engine View Diagrams & Manuals
TVS90-43215J (143-434432) 4 Cycle Vertical Engine View Diagrams & Manuals
TVS90-43215K (143-943506) 4 Cycle Vertical Engine View Diagrams & Manuals
TVS90-43215L (143-953504) 4 Cycle Vertical Engine View Diagrams & Manuals
TVS90-43215M (143-963502) 4 Cycle Vertical Engine View Diagrams & Manuals
TVS90-43219D (143-344072) 4 Cycle Vertical Engine View Diagrams & Manuals
TVS90-43220D (143-334372) 4 Cycle Vertical Engine View Diagrams & Manuals
TVS90-43221D (143-344042) 4 Cycle Vertical Engine View Diagrams & Manuals
TVS90-43222D (143-344102) 4 Cycle Vertical Engine View Diagrams & Manuals
TVS90-43226D (143-334382) 4 Cycle Vertical Engine View Diagrams & Manuals
TVS90-43230D (143-344142) 4 Cycle Vertical Engine View Diagrams & Manuals
TVS90-43250D (143-344162) 4 Cycle Vertical Engine View Diagrams & Manuals
TVS90-43252D (143-344182) 4 Cycle Vertical Engine View Diagrams & Manuals
TVS90-43253D (143-344192) 4 Cycle Vertical Engine View Diagrams & Manuals
TVS90-43254D (143-344202) 4 Cycle Vertical Engine View Diagrams & Manuals
TVS90-43255D (143-344212) 4 Cycle Vertical Engine View Diagrams & Manuals
TVS90-43256D (143-344222) 4 Cycle Vertical Engine View Diagrams & Manuals
TVS90-43268D (143-344422) 4 Cycle Vertical Engine View Diagrams & Manuals
TVS90-43269D (143-344432) 4 Cycle Vertical Engine View Diagrams & Manuals
TVS90-43288D (143-354172) 4 Cycle Vertical Engine View Diagrams & Manuals
TVS90-43289D (143-354162) 4 Cycle Vertical Engine View Diagrams & Manuals
TVS90-43290D (143-354012) 4 Cycle Vertical Engine View Diagrams & Manuals
TVS90-43291D (143-354062) 4 Cycle Vertical Engine View Diagrams & Manuals
TVS90-43292D (143-354092) 4 Cycle Vertical Engine View Diagrams & Manuals
TVS90-43293D (143-354102) 4 Cycle Vertical Engine View Diagrams & Manuals
TVS90-43294D (143-354122) 4 Cycle Vertical Engine View Diagrams & Manuals
TVS90-43295D (143-354142) 4 Cycle Vertical Engine View Diagrams & Manuals
TVS90-43296D (143-354182) 4 Cycle Vertical Engine View Diagrams & Manuals
TVS90-43297D (143-354192) 4 Cycle Vertical Engine View Diagrams & Manuals
TVS90-43298D (143-354202) 4 Cycle Vertical Engine View Diagrams & Manuals
TVS90-43298H (143-424512) 4 Cycle Vertical Engine View Diagrams & Manuals
TVS90-43298J (143-434412) 4 Cycle Vertical Engine View Diagrams & Manuals
TVS90-43298K (143-943510) 4 Cycle Vertical Engine View Diagrams & Manuals
TVS90-43298L (143-953516) 4 Cycle Vertical Engine View Diagrams & Manuals
TVS90-43299D (143-354212) 4 Cycle Vertical Engine View Diagrams & Manuals
TVS90-43299G (143-414182) 4 Cycle Vertical Engine View Diagrams & Manuals
TVS90-43299H (143-424572) 4 Cycle Vertical Engine View Diagrams & Manuals
TVS90-43299J (143-434562) 4 Cycle Vertical Engine View Diagrams & Manuals
TVS90-43299K (143-943528) 4 Cycle Vertical Engine View Diagrams & Manuals
TVS90-43300D (143-354232) 4 Cycle Vertical Engine View Diagrams & Manuals
TVS90-43307D (143-354292) 4 Cycle Vertical Engine View Diagrams & Manuals
TVS90-43307E (143-374362) 4 Cycle Vertical Engine View Diagrams & Manuals
TVS90-43312D (143-354312) 4 Cycle Vertical Engine View Diagrams & Manuals
TVS90-43315D (143-354322) 4 Cycle Vertical Engine View Diagrams & Manuals
TVS90-43316D (143-354332) 4 Cycle Vertical Engine View Diagrams & Manuals
TVS90-43321D (143-354342) 4 Cycle Vertical Engine View Diagrams & Manuals
TVS90-43322D (143-354352) 4 Cycle Vertical Engine View Diagrams & Manuals
TVS90-43333D (143-364012) 4 Cycle Vertical Engine View Diagrams & Manuals
TVS90-43334D (143-364082) 4 Cycle Vertical Engine View Diagrams & Manuals
TVS90-43335D (143-364102) 4 Cycle Vertical Engine View Diagrams & Manuals
TVS90-43336D (143-364112) 4 Cycle Vertical Engine View Diagrams & Manuals
TVS90-43337D (143-364122) 4 Cycle Vertical Engine View Diagrams & Manuals
TVS90-43338D (143-364132) 4 Cycle Vertical Engine View Diagrams & Manuals
TVS90-43339D (143-364142) 4 Cycle Vertical Engine View Diagrams & Manuals
TVS90-43341D (143-364202) 4 Cycle Vertical Engine View Diagrams & Manuals
TVS90-43342D (143-364222) 4 Cycle Vertical Engine View Diagrams & Manuals
TVS90-43342E (143-374322) 4 Cycle Vertical Engine View Diagrams & Manuals
TVS90-43342F (143-384272) 4 Cycle Vertical Engine View Diagrams & Manuals
TVS90-43346E (143-364352) 4 Cycle Vertical Engine View Diagrams & Manuals
TVS90-43346F (143-384292) 4 Cycle Vertical Engine View Diagrams & Manuals
TVS90-43347E (143-364362) 4 Cycle Vertical Engine View Diagrams & Manuals
TVS90-43347F (143-384282) 4 Cycle Vertical Engine View Diagrams & Manuals
TVS90-43348E (143-364372) 4 Cycle Vertical Engine View Diagrams & Manuals
TVS90-43348F (143-384342) 4 Cycle Vertical Engine View Diagrams & Manuals
TVS90-43351D (143-364392) 4 Cycle Vertical Engine View Diagrams & Manuals
TVS90-43352E (143-374012) 4 Cycle Vertical Engine View Diagrams & Manuals
TVS90-43353E (143-374022) 4 Cycle Vertical Engine View Diagrams & Manuals
TVS90-43354E (143-374032) 4 Cycle Vertical Engine View Diagrams & Manuals
TVS90-43356E (143-374052) 4 Cycle Vertical Engine View Diagrams & Manuals
TVS90-43358E (143-374072) 4 Cycle Vertical Engine View Diagrams & Manuals
TVS90-43359E (143-374082) 4 Cycle Vertical Engine View Diagrams & Manuals
TVS90-43360E (143-374212) 4 Cycle Vertical Engine View Diagrams & Manuals
TVS90-43361E (143-374222) 4 Cycle Vertical Engine View Diagrams & Manuals
TVS90-43362E (143-374232) 4 Cycle Vertical Engine View Diagrams & Manuals
TVS90-43371E (143-374302) 4 Cycle Vertical Engine View Diagrams & Manuals
TVS90-43375E (143-374332) 4 Cycle Vertical Engine View Diagrams & Manuals
TVS90-43375F (143-384452) 4 Cycle Vertical Engine View Diagrams & Manuals
TVS90-43375G (143-414242) 4 Cycle Vertical Engine View Diagrams & Manuals
TVS90-43375H (143-424232) 4 Cycle Vertical Engine View Diagrams & Manuals
TVS90-43375J (143-434352) 4 Cycle Vertical Engine View Diagrams & Manuals
TVS90-43375K (143-943512) 4 Cycle Vertical Engine View Diagrams & Manuals
TVS90-43375L (143-953510) 4 Cycle Vertical Engine View Diagrams & Manuals
TVS90-43379F (143-384012) 4 Cycle Vertical Engine View Diagrams & Manuals
TVS90-43380F (143-384022) 4 Cycle Vertical Engine View Diagrams & Manuals
TVS90-43381F (143-384032) 4 Cycle Vertical Engine View Diagrams & Manuals
TVS90-43382F (143-384042) 4 Cycle Vertical Engine View Diagrams & Manuals
TVS90-43383F (143-384052) 4 Cycle Vertical Engine View Diagrams & Manuals
TVS90-43384F (143-384062) 4 Cycle Vertical Engine View Diagrams & Manuals
TVS90-43385F (143-384072) 4 Cycle Vertical Engine View Diagrams & Manuals
TVS90-43386F (143-384082) 4 Cycle Vertical Engine View Diagrams & Manuals
TVS90-43389E (143-374432) 4 Cycle Vertical Engine View Diagrams & Manuals
TVS90-43389F (143-384552) 4 Cycle Vertical Engine View Diagrams & Manuals
TVS90-43389G (143-414212) 4 Cycle Vertical Engine View Diagrams & Manuals
TVS90-43389H (143-424562) 4 Cycle Vertical Engine View Diagrams & Manuals
TVS90-43396F (143-384312) 4 Cycle Vertical Engine View Diagrams & Manuals
TVS90-43402F (143-384382) 4 Cycle Vertical Engine View Diagrams & Manuals
TVS90-43403F (143-384392) 4 Cycle Vertical Engine View Diagrams & Manuals
TVS90-43405F (143-384442) 4 Cycle Vertical Engine View Diagrams & Manuals
TVS90-43415F (143-384572) 4 Cycle Vertical Engine View Diagrams & Manuals
TVS90-43420F (143-394022) 4 Cycle Vertical Engine View Diagrams & Manuals
TVS90-43421F (143-394132) 4 Cycle Vertical Engine View Diagrams & Manuals
TVS90-43422F (143-394032) 4 Cycle Vertical Engine View Diagrams & Manuals
TVS90-43423F (143-394042) 4 Cycle Vertical Engine View Diagrams & Manuals
TVS90-43424F (143-394052) 4 Cycle Vertical Engine View Diagrams & Manuals
TVS90-43425F (143-394062) 4 Cycle Vertical Engine View Diagrams & Manuals
TVS90-43426F (143-394072) 4 Cycle Vertical Engine View Diagrams & Manuals
TVS90-43428F (143-394142) 4 Cycle Vertical Engine View Diagrams & Manuals
TVS90-43438F (143-394122) 4 Cycle Vertical Engine View Diagrams & Manuals
TVS90-43443F (143-394152) 4 Cycle Vertical Engine View Diagrams & Manuals
TVS90-43451F (143-394242) 4 Cycle Vertical Engine View Diagrams & Manuals
TVS90-43454F (143-394302) 4 Cycle Vertical Engine View Diagrams & Manuals
TVS90-43455F (143-394312) 4 Cycle Vertical Engine View Diagrams & Manuals
TVS90-43456F (143-394322) 4 Cycle Vertical Engine View Diagrams & Manuals
TVS90-43457F (143-394332) 4 Cycle Vertical Engine View Diagrams & Manuals
TVS90-43458F (143-394492) 4 Cycle Vertical Engine View Diagrams & Manuals
TVS90-43490F (143-404022) 4 Cycle Vertical Engine View Diagrams & Manuals
TVS90-43491F (143-404032) 4 Cycle Vertical Engine View Diagrams & Manuals
TVS90-43497F (143-404532) 4 Cycle Vertical Engine View Diagrams & Manuals
TVS90-43497G (143-414082) 4 Cycle Vertical Engine View Diagrams & Manuals
TVS90-43497H (143-424032) 4 Cycle Vertical Engine View Diagrams & Manuals
TVS90-43497J (143-434142) 4 Cycle Vertical Engine View Diagrams & Manuals
TVS90-43498F (143-404342) 4 Cycle Vertical Engine View Diagrams & Manuals
TVS90-43499F (143-404352) 4 Cycle Vertical Engine View Diagrams & Manuals
TVS90-43504F (143-404502) 4 Cycle Vertical Engine View Diagrams & Manuals
TVS90-43504G (143-414332) 4 Cycle Vertical Engine View Diagrams & Manuals
TVS90-43504H (143-424012) 4 Cycle Vertical Engine View Diagrams & Manuals
TVS90-43504J (143-434012) 4 Cycle Vertical Engine View Diagrams & Manuals
TVS90-43512G (143-414012) 4 Cycle Vertical Engine View Diagrams & Manuals
TVS90-43512J (143-434572) 4 Cycle Vertical Engine View Diagrams & Manuals
TVS90-43512K (143-943526) 4 Cycle Vertical Engine View Diagrams & Manuals
TVS90-43512L (143-953512) 4 Cycle Vertical Engine View Diagrams & Manuals
TVS90-43513G (143-414032) 4 Cycle Vertical Engine View Diagrams & Manuals
TVS90-43513H (143-424222) 4 Cycle Vertical Engine View Diagrams & Manuals
TVS90-43513J (143-434372) 4 Cycle Vertical Engine View Diagrams & Manuals
TVS90-43513K (143-943504) 4 Cycle Vertical Engine View Diagrams & Manuals
TVS90-43513L (143-953502) 4 Cycle Vertical Engine View Diagrams & Manuals
TVS90-43514G (143-414042) 4 Cycle Vertical Engine View Diagrams & Manuals
TVS90-43514H (143-424212) 4 Cycle Vertical Engine View Diagrams & Manuals
TVS90-43514J (143-434532) 4 Cycle Vertical Engine View Diagrams & Manuals
TVS90-43514K (143-943530) 4 Cycle Vertical Engine View Diagrams & Manuals
TVS90-43514L (143-953514) 4 Cycle Vertical Engine View Diagrams & Manuals
TVS90-43515G (143-414052) 4 Cycle Vertical Engine View Diagrams & Manuals
TVS90-43515H (143-424472) 4 Cycle Vertical Engine View Diagrams & Manuals
TVS90-43515J (143-434392) 4 Cycle Vertical Engine View Diagrams & Manuals
TVS90-43515K (143-943502) 4 Cycle Vertical Engine View Diagrams & Manuals
TVS90-43515L (143-953506) 4 Cycle Vertical Engine View Diagrams & Manuals
TVS90-43515M (143-963500) 4 Cycle Vertical Engine View Diagrams & Manuals
TVS90-43515N (143-973508) 4 Cycle Vertical Engine View Diagrams & Manuals
TVS90-43526G (143-414232) 4 Cycle Vertical Engine View Diagrams & Manuals
TVS90-43526H (143-424052) 4 Cycle Vertical Engine View Diagrams & Manuals
TVS90-43526J (143-434022) 4 Cycle Vertical Engine View Diagrams & Manuals
TVS90-43528G (143-414282) 4 Cycle Vertical Engine View Diagrams & Manuals
TVS90-43528H (143-424252) 4 Cycle Vertical Engine View Diagrams & Manuals
TVS90-43528J (143-434482) 4 Cycle Vertical Engine View Diagrams & Manuals
TVS90-43534G (143-414502) 4 Cycle Vertical Engine View Diagrams & Manuals
TVS90-43537G (143-414612) 4 Cycle Vertical Engine View Diagrams & Manuals
TVS90-43553H (143-424242) 4 Cycle Vertical Engine View Diagrams & Manuals
TVS90-43553J (143-434402) 4 Cycle Vertical Engine View Diagrams & Manuals
TVS90-43555H (143-424362) 4 Cycle Vertical Engine View Diagrams & Manuals
TVS90-43556H (143-424372) 4 Cycle Vertical Engine View Diagrams & Manuals
TVS90-43558H (143-424412) 4 Cycle Vertical Engine View Diagrams & Manuals
TVS90-43572J (143-434072) 4 Cycle Vertical Engine View Diagrams & Manuals
TVS90-43572K (143-943508) 4 Cycle Vertical Engine View Diagrams & Manuals
TVS90-43576J (143-434212) 4 Cycle Vertical Engine View Diagrams & Manuals
TVS90-43576K (143-943514) 4 Cycle Vertical Engine View Diagrams & Manuals
TVS90-43576L (143-953500) 4 Cycle Vertical Engine View Diagrams & Manuals
TVS90-43576M (143-963504) 4 Cycle Vertical Engine View Diagrams & Manuals
TVS90-43576N (143-973500) 4 Cycle Vertical Engine View Diagrams & Manuals
TVS90-43700K (143-943532) 4 Cycle Vertical Engine View Diagrams & Manuals
TVS90-43700L (143-953508) 4 Cycle Vertical Engine View Diagrams & Manuals
TVS90-43729M (143-963508) 4 Cycle Vertical Engine View Diagrams & Manuals
TVS90-43729N (143-973502) 4 Cycle Vertical Engine View Diagrams & Manuals
TVS90-43746N (143-973510) 4 Cycle Vertical Engine View Diagrams & Manuals
TVS90-43746P (143-983506) 4 Cycle Vertical Engine View Diagrams & Manuals
TVS90-43746R (143-993508) 4 Cycle Vertical Engine View Diagrams & Manuals
TVS90-43775R (143-003506) 4 Cycle Vertical Engine View Diagrams & Manuals
TVS90-43901G (143-414522) 4 Cycle Vertical Engine View Diagrams & Manuals
TVS90-46003 (143-434192) 4 Cycle Vertical Engine View Diagrams & Manuals
TVS90-46005 (143-434092) 4 Cycle Vertical Engine View Diagrams & Manuals
TVS90-46007 (143-434262) 4 Cycle Vertical Engine View Diagrams & Manuals
TVS90-46012 (143-434222) 4 Cycle Vertical Engine View Diagrams & Manuals
TVS90-46013 (143-434242) 4 Cycle Vertical Engine View Diagrams & Manuals
TVS90-46015 (143-434272) 4 Cycle Vertical Engine View Diagrams & Manuals
TVS90-46017 (143-434292) 4 Cycle Vertical Engine View Diagrams & Manuals
TVS90-46018 (143-434302) 4 Cycle Vertical Engine View Diagrams & Manuals
TVS90-46019 (143-434312) 4 Cycle Vertical Engine View Diagrams & Manuals
TVS90-46030A (143-943804) 4 Cycle Vertical Engine View Diagrams & Manuals
TVS90-46031A (143-943806) 4 Cycle Vertical Engine View Diagrams & Manuals
TVS90-46032A (143-943808) 4 Cycle Vertical Engine View Diagrams & Manuals
TVS90-46035A (143-943812) 4 Cycle Vertical Engine View Diagrams & Manuals
TVS90-46035B (143-953814) 4 Cycle Vertical Engine View Diagrams & Manuals
TVS90-46035C (143-963808) 4 Cycle Vertical Engine View Diagrams & Manuals
TVS90-46036A (143-943814) 4 Cycle Vertical Engine View Diagrams & Manuals
TVS90-46036B (143-953800) 4 Cycle Vertical Engine View Diagrams & Manuals
TVS90-46037A (143-943816) 4 Cycle Vertical Engine View Diagrams & Manuals
TVS90-46068C (143-963804) 4 Cycle Vertical Engine View Diagrams & Manuals
TVS90-46081C (143-963812) 4 Cycle Vertical Engine View Diagrams & Manuals
TVS90-46081D (143-973802) 4 Cycle Vertical Engine View Diagrams & Manuals
TVS90-46083D (143-973800) 4 Cycle Vertical Engine View Diagrams & Manuals
TVS90-46111E (143-983806) 4 Cycle Vertical Engine View Diagrams & Manuals
TVS90-46111F (143-993802) 4 Cycle Vertical Engine View Diagrams & Manuals
TVS90-46129F (143-003804) 4 Cycle Vertical Engine View Diagrams & Manuals
TVS90-48001A (143-964006) 4 Cycle Vertical Engine View Diagrams & Manuals
TVS90-48005A (143-964008) 4 Cycle Vertical Engine View Diagrams & Manuals
TVS90-48013B (143-974008) 4 Cycle Vertical Engine View Diagrams & Manuals
TVS90-48014B (143-974006) 4 Cycle Vertical Engine View Diagrams & Manuals
TVS90-48023B (143-974032) 4 Cycle Vertical Engine View Diagrams & Manuals
TVS90-48029B (143-974036) 4 Cycle Vertical Engine View Diagrams & Manuals
TVS90-48048D (143-004006) 4 Cycle Vertical Engine View Diagrams & Manuals
TVXL105-54009A (143-324182) 4 Cycle Vertical Engine View Diagrams & Manuals
TVXL105-54012B (143-334052) 4 Cycle Vertical Engine View Diagrams & Manuals
TVXL105-54017B (143-344112) 4 Cycle Vertical Engine View Diagrams & Manuals
TVXL105-54020B (143-344402) 4 Cycle Vertical Engine View Diagrams & Manuals
TVXL105-54021B (143-344412) 4 Cycle Vertical Engine View Diagrams & Manuals
TVXL105-54024B (143-354132) 4 Cycle Vertical Engine View Diagrams & Manuals
TVXL105-54029B (143-64152) 4 Cycle Vertical Engine View Diagrams & Manuals
VLV126-502522D (143-996500) 4 Cycle Vertical Engine View Diagrams & Manuals
VLV126-502522E (143-006500) 4 Cycle Vertical Engine View Diagrams & Manuals
VLV126-502523D (143-996706) 4 Cycle Vertical Engine View Diagrams & Manuals
VLV126-502523E (143-006710) 4 Cycle Vertical Engine View Diagrams & Manuals
VLV126-502524D (143-996700) 4 Cycle Vertical Engine View Diagrams & Manuals
VLV126-502525D (143-996704) 4 Cycle Vertical Engine View Diagrams & Manuals
VLV126-502526D (143-996708) 4 Cycle Vertical Engine View Diagrams & Manuals
VLV126-502527D (143-996710) 4 Cycle Vertical Engine View Diagrams & Manuals
VLV126-502527E (143-006704) 4 Cycle Vertical Engine View Diagrams & Manuals
VLV126-502528D (143-996712) 4 Cycle Vertical Engine View Diagrams & Manuals
VLV126-502533E (143-006706) 4 Cycle Vertical Engine View Diagrams & Manuals
VLV126-502534E (143-016500) 4 Cycle Vertical Engine View Diagrams & Manuals
VLV55-501004 (143-434112) 4 Cycle Vertical Engine View Diagrams & Manuals
VLV55-501004A (143-945500) 4 Cycle Vertical Engine View Diagrams & Manuals
VLV55-501008 (143-434252) 4 Cycle Vertical Engine View Diagrams & Manuals
VLV55-501068C (143-975512) 4 Cycle Vertical Engine View Diagrams & Manuals
VLV55-501069C (143-975514) 4 Cycle Vertical Engine View Diagrams & Manuals
VLV60-502003A (143-956000) 4 Cycle Vertical Engine View Diagrams & Manuals
VLV60-502004A (143-956002) 4 Cycle Vertical Engine View Diagrams & Manuals
VLV60-502012A (143-956006) 4 Cycle Vertical Engine View Diagrams & Manuals
VLV60-502015B (143-966000) 4 Cycle Vertical Engine View Diagrams & Manuals
VLV60-502015C (143-976000) 4 Cycle Vertical Engine View Diagrams & Manuals
VLV60-502023B (143-966006) 4 Cycle Vertical Engine View Diagrams & Manuals
VLV60-502024B (143-966008) 4 Cycle Vertical Engine View Diagrams & Manuals
VLV60-502047C (143-976006) 4 Cycle Vertical Engine View Diagrams & Manuals
VLV60-502055C (143-976008) 4 Cycle Vertical Engine View Diagrams & Manuals
VLV60-502055D (143-986008) 4 Cycle Vertical Engine View Diagrams & Manuals
VLV60-502504A (143-966506) 4 Cycle Vertical Engine View Diagrams & Manuals
VLV60-502505A (143-966508) 4 Cycle Vertical Engine View Diagrams & Manuals
VLV65-502501A (143-966500) 4 Cycle Vertical Engine View Diagrams & Manuals
VLV65-502502A (143-966502) 4 Cycle Vertical Engine View Diagrams & Manuals
VLV65-502503A (143-966504) 4 Cycle Vertical Engine View Diagrams & Manuals
VLV65-502504A (143-966506) 4 Cycle Vertical Engine View Diagrams & Manuals
VLV65-502505A (143-966508) 4 Cycle Vertical Engine View Diagrams & Manuals
VLV65-502506B (143-976500) 4 Cycle Vertical Engine View Diagrams & Manuals
VLV65-502510B (143-976502) 4 Cycle Vertical Engine View Diagrams & Manuals
VLV65-502521C (143-986516) 4 Cycle Vertical Engine View Diagrams & Manuals
VLV66-502505B (143-976604) 4 Cycle Vertical Engine View Diagrams & Manuals
VLV66-502505C (143-986600) 4 Cycle Vertical Engine View Diagrams & Manuals
VLV66-502507B (143-976600) 4 Cycle Vertical Engine View Diagrams & Manuals
VLV66-502508B (143-976602) 4 Cycle Vertical Engine View Diagrams & Manuals
VLV66-502509B (143-976606) 4 Cycle Vertical Engine View Diagrams & Manuals
VLV66-502511B (143-976608) 4 Cycle Vertical Engine View Diagrams & Manuals
VLV66-502512B (143-976610) 4 Cycle Vertical Engine View Diagrams & Manuals
VLV66-502513B (143-976612) 4 Cycle Vertical Engine View Diagrams & Manuals
VLV66-502514C (143-986700) 4 Cycle Vertical Engine View Diagrams & Manuals
VLV66-502515C (143-986706) 4 Cycle Vertical Engine View Diagrams & Manuals
VLV66-502516C (143-986708) 4 Cycle Vertical Engine View Diagrams & Manuals
VLV66-502517C (143-986710) 4 Cycle Vertical Engine View Diagrams & Manuals
VLV66-502518C (143-986712) 4 Cycle Vertical Engine View Diagrams & Manuals
VLV66-502523C (143-986720) 4 Cycle Vertical Engine View Diagrams & Manuals
VSK100-338501A (143-003800) 4 Cycle Vertical Engine View Diagrams & Manuals
VSK100-338502A (143-013800) 4 Cycle Vertical Engine View Diagrams & Manuals
VSK100-338503A (143-023800) 4 Cycle Vertical Engine View Diagrams & Manuals
VSK100-338503B (143-033800) 4 Cycle Vertical Engine View Diagrams & Manuals
VSK90-334502A (143-043800) 4 Cycle Vertical Engine View Diagrams & Manuals
VSK90-334503A (143-043802) 4 Cycle Vertical Engine View Diagrams & Manuals
MTD
24AF561C099 (247.794510)(2002) Chipper View Diagrams & Manuals
Show More Compatible Models
This item works with the following types of products:
- Engine Parts
- Lawn Mower Parts
- Lawn Tractor Parts
Questions & Answers ?
Our customer Service team is at the ready daily to answer your part and product questions.

Ask our Team
We have a dedicated staff with decades of collective experience in helping customers just like you purchase parts to repair their products.
Does this fit my product?Questions & Answers for Oil Pump Assembly
No questions have been asked yet
Customer Repair Instructions ?
All our customer repair instructions are solicited directly from other customers just like you who have purchased and replaced this exact part.
Gasket blown , oil slinger found to be broken broken ( The nylon delron part ) Oil leak and noise.
leonard - August 25, 2018
Tool Type
Lawn Mower
Difficulty
Easy
Time
30-60 minutes
Tools Used
Screwdriver, Wrench Set, Nutdriver, Torque rod
1.Disassemble the starter assembly .
1B. pull the spark plug lead. Leave the plug in the engine.
2.Disconnect the started circuit cable and the the throttle cable .
2b. remove the gas tank and the muffler . Also the oil filler .
3.Clean off the engine , fill will oil , look for oil pressure leak.
4. Find oil leak on bottom gasket.
5. Remove blade , blade guard ,drop the drive belt.
6, One more bolt holds engine release ( and support engine while undoing the bolt.)
7. lift engine free . Not very heavy . 6,5 hp Tecumseh weighs the same as bag of dog chow.
8. You now have just the engine to mount on the work bench.
9. clean it off with rags , remove all the lint.
10. remove the spark plus and look for soot. Replace.
11. Starting with the leaking gasket on the crank case side, undo the bolts , crisscross to maintain the torque.
12. The case cover might be stubborn, a rubber mallet tap will release it.
13. At this point take a rest . The motor is now crankcase up , I used a paint bucket to support it in place.
14. Gently pull the case off, try not to pry with metal , it will promote leaks later.
Lifting the case off you will feel inside, the oil slinger ( pump ) , it might fall out.
15. With the cover off place it on a clean towel or mat . Make sure that the oil pump is seated correctly back in its place ( there is a chamfered edge on the bottom, this is the oil way )
16.On the case cover make sure the two dowels are still there , they are steel dowels which are important . They can fall out . Set them aside.
17. Pulling sideways on the oil slinger will open any cracks .This is the part that needs to be repaired.
18. Clean out the oil in the case with gas or carb cleaner and mop it clean with lint free cloths. Inspect the crank and bearing and the valve lifters . Look for metal particles in the oil.!!!
19. Make sure that the timing tick and circle on the assembly for the crank / piston are aligned still .
20 .put some lint free cloth in the case and now scrape ( gently ) the old gasket away , remove the cloth and debris . Look for debris and move it .
21. Drop in the new oil pump ( slinger.) Get the nylon part flat side up. The channeled edge is down.
22. Using any engine re assembly oil make sure everything is oiled . Move the cylinder up and down and lube it too. Get the bearings . The re assembly oil will not harm the engine.
23. Replace the oil pump with the new and push in the dowels on the engine .Engine side. Put gasket in place .
24. Again check the timing marks as correct. New gasket installed .
25. Reaching under the case as you drop it on , make sure the oil slinger is in its dome( the round end. With your fingers arrange the gear so that the case drops on comfortably. Do not force it. It will click in.This is the fiddly bit and can take a few minutes of on and off until it works.
26. Replace the bolts , criss cross and tighten to the correct torque. Mine was ten inch pounds approx . I think.
27. Providing that you used enough reassembly oil , you can now turn the engine on its side and crank it via the nut on the starter side. IT should turn with little effort .
28. Remount the motor and fill with oil. Let it sit , look for leaks.
29. Crank it without the plug to make sure it does not seize.
30. Mount plug and start the machine , run it for a while and then look for leaks on the new gasket.
Did you find this story helpful?
Thanks for voting and helping fellow customers!
OEM stands for Original Equipment Manufacturer and means the part you’re buying is sourced directly from the manufacturer who made your product. At eReplacementParts, we sell only genuine OEM parts, guaranteeing the part you’re purchasing is of better design and of higher quality than aftermarket parts.
Our product descriptions are a combination of data sourced directly from the manufacturers who made your product as well as content researched and curated by our content & customer service teams. This content is edited and reviewed internally before being made public to customers.
Our customer service team are at the ready daily to answer your part and product questions. We have a dedicated staff with decades of collective experience in helping customers just like you purchase parts to repair their products.
All our part reviews are solicited directly from other customers who have purchased this exact part. While we moderate these reviews for profanity, offensive language or personally identifiable information, these reviews are posted exactly as submitted and no alterations are made by our team.
All our customer repair instructions are solicited directly from other customers just like you who have purchased and replaced this exact part. While we moderate these reviews for profanity, offensive language or personally identifiable information, these reviews are posted exactly as submitted and no alterations are made by our team.
Based on data from past customer purchasing behaviors, these parts are most commonly purchased together along with the part you are viewing. These parts may be necessary or helpful to replace to complete your current repair.
All our installation videos are created and produced in collaboration with our in-house repair technician, Mark Sodja, who has helped millions of eReplacementParts customers over the last 13 years repair their products. Mark has years of experience in selling and repairing both commercial and residential products with a specialty in gas-powered equipment.
This data is collected from customers who submitted a repair instruction after replacing this exact part. Customers can rate how easy the repair was to complete and how long it took. We aggregate this data to provide a repair rating that allows customers to quickly determine the difficulty and time needed to perform their own repair.