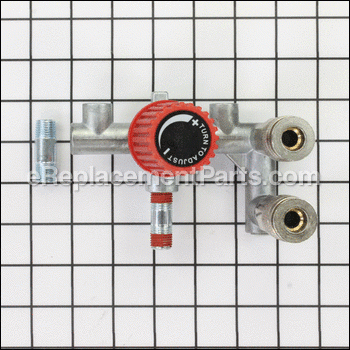

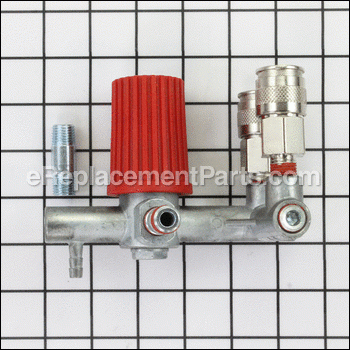

This authentic OEM manifold assembly for your air compressor functions as a central hub, featuring the regulator and quick connects for hose attachment. It is made of heavy duty aluminum and accomodates tank and regulated gauges. Typically found on the check valve, it ensures proper pressure levels and directs compressed air to various outlets regulating airflow to connected tools. Signs of a compromised manifold include air leaks, pressure inconsistencies, and difficulty in regulating airflow. Damaged valves or ports indicate a need for replacement. To replace the manifold, start by releasing all air from the compressor. Remove the plastic cover and air cleaner, along with the air filter. Disconnect the rubber hose from the old manifold by cutting off the clamp. Remove the old bottom quick connect, pressure gauges, and blow-off valve. Reassemble the air compressor and use Teflon tape or thread sealant on any necessary connections. Turn on the compressor to fill it with air and check for leaks. Please note that this replacement part is sold separately from other accessories like the pressure gauges and the safety valve.
Manifold E106920
OEM part for: Husky
Part Number: E106920
Jump To:
Frequently Purchased Together ?

Compatibility
This part will fit the following 2 machines
Husky
This item works with the following types of products:
Customer Part Reviews ?
- 1
Questions & Answers ?
Our customer Service team is at the ready daily to answer your part and product questions.

Ask our Team
We have a dedicated staff with decades of collective experience in helping customers just like you purchase parts to repair their products.
Does this fit my product?Questions & Answers for Manifold
Customer Repair Instructions ?
All our customer repair instructions are solicited directly from other customers just like you who have purchased and replaced this exact part.
Manifold had blew a seal behind the pressure adjustment knob.
Tool Type
Compressor
Difficulty
Easy
Time
15-30 minutes
Tools Used
Screwdriver, Pliers, Wrench Set, Adjustable Wrench, None
Parts Used
Manifold on C331H compressor was rusted/dusty and would not hold a charge on the tank...leaking through tool side
Tool Type
Compressor
Difficulty
Easy
Time
15-30 minutes
Tools Used
Wrench Set, Nutdriver
Parts Used
2. Removed plastic cover over gauges
3. Removed plastic housing over motor and hoses
4. Drained air from tank and valves (fully)
5. Removed flexible hose connecting switch to manifold (used screw driver to loosen clamp)
6. Removed bad manifold
7. Removed the pop-off valve from old manifold
8. Removed gauges from old manifold
9. Used plumbers tape on fittings of gauges and pop-off valve
10 Installed gauges and pop-off valve on new manifold
11. Installed manifold onto tank
12. Used new adjustable clamp on rubber/flexible hose and installed to manifold
13. Pressurized tank to 165 psi to test
14. Ran tools and refilled tank to see if all points held
15. Heard some popping as fittings seated under pressure...ok
16. Use as normal
Regulator adjustment knob broke and wouldn't seal, causing all air to leak out
Tool Type
Compressor
Difficulty
Easy
Time
Less than 15 minutes
Tools Used
Screwdriver, Wrench Set
Parts Used
manifold leaking
Tool Type
Compressor
Difficulty
Easy
Time
30-60 minutes
Tools Used
Screwdriver, Pliers, Wrench Set
Parts Used
2. Remove plastic cover and air cleaner. three torx self taping screws for the cover, just unscrew air filter.
3. Remove the rubber hose connected to the old manifold by cutting off old clamp.
4. Remove bottom quick connect from old manifold, remove old pressure gauges,remove blow off valve then remove old manifold.
To install new manifold:
1. Remove bottom quick connect install new manifold, then install the quick connect, gauges, blow off, and rubber hose with new hose clamp.
2. Put the plastic cover back together using the 3 self taping screws.
3. install the air filter.
Ensure you teflon tape or thread sealant on all connections that require it*****
Turn compressor on and let it fill up with air, check for leaks.
Drain Valve blew out.
Tool Type
Compressor
Difficulty
Easy
Time
Less than 15 minutes
Tools Used
Adjustable Wrench
Parts Used
2 Removed old valve with adjustable wrench.
3 Replaced with new valve.
4 Stand tank back up.
5 Checked for air leak.
Manifold leaking air
Tool Type
Compressor
Difficulty
Easy
Time
1-2 hours
Tools Used
Screwdriver, Pliers, Wrench Set, Adjustable Wrench
Parts Used
2. Removed handle.
3.Removed old manifold.
4. Installed new manifold using teflon tape.
5. Fan was broke, replaced fan.
6. re-installed outer cover.
Worn out manifold.
Tool Type
Compressor
Difficulty
Easy
Time
30-60 minutes
Tools Used
Pliers, Wrench Set, Adjustable Wrench, Clamping tool
Parts Used
air leaking out of air manifold
Tool Type
Compressor
Difficulty
Easy
Time
15-30 minutes
Tools Used
Screwdriver, Pliers, Wrench Set
Parts Used
Regulator leaked and drained 33gallon tank.
Tool Type
Compressor
Difficulty
Easy
Time
15-30 minutes
Tools Used
Screwdriver, Pliers, Wrench Set, Nutdriver, Adjustable Wrench
Parts Used
The regulator on the manifold was leaking air.
Tool Type
Compressor
Difficulty
Easy
Time
15-30 minutes
Tools Used
Screwdriver, Wrench Set, Adjustable Wrench
Parts Used
OEM stands for Original Equipment Manufacturer and means the part you’re buying is sourced directly from the manufacturer who made your product. At eReplacementParts, we sell only genuine OEM parts, guaranteeing the part you’re purchasing is of better design and of higher quality than aftermarket parts.
Our product descriptions are a combination of data sourced directly from the manufacturers who made your product as well as content researched and curated by our content & customer service teams. This content is edited and reviewed internally before being made public to customers.
Our customer service team are at the ready daily to answer your part and product questions. We have a dedicated staff with decades of collective experience in helping customers just like you purchase parts to repair their products.
All our part reviews are solicited directly from other customers who have purchased this exact part. While we moderate these reviews for profanity, offensive language or personally identifiable information, these reviews are posted exactly as submitted and no alterations are made by our team.
All our customer repair instructions are solicited directly from other customers just like you who have purchased and replaced this exact part. While we moderate these reviews for profanity, offensive language or personally identifiable information, these reviews are posted exactly as submitted and no alterations are made by our team.
Based on data from past customer purchasing behaviors, these parts are most commonly purchased together along with the part you are viewing. These parts may be necessary or helpful to replace to complete your current repair.
All our installation videos are created and produced in collaboration with our in-house repair technician, Mark Sodja, who has helped millions of eReplacementParts customers over the last 13 years repair their products. Mark has years of experience in selling and repairing both commercial and residential products with a specialty in gas-powered equipment.
This data is collected from customers who submitted a repair instruction after replacing this exact part. Customers can rate how easy the repair was to complete and how long it took. We aggregate this data to provide a repair rating that allows customers to quickly determine the difficulty and time needed to perform their own repair.