
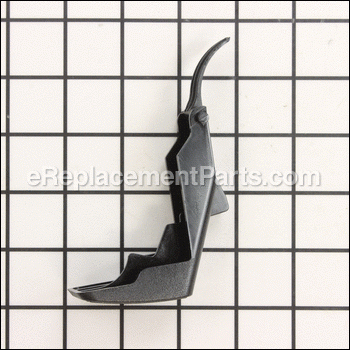
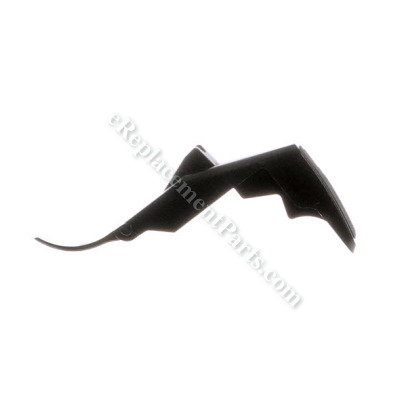


The release lever attaches to the top cover and is used to put the vacuum cleaner in different positions. This part is available individually and is a genuine replacement part sourced from the original manufacturer for use with Bissell bagless upright vacuums. It is made out of plastic and will require replacing if it breaks. While replacing this part a screwdriver may be needed.
Lever Release B-203-1223
OEM part for: Bissell
Part Number: B-203-1223
$5.19
In Stock
Jump To:
Frequently Purchased Together ?
Compatibility
This part will fit the following 4 machines
Bissell
6585 Powerforce Turbo Bagless Upright Vacuum View Diagrams & Manuals
6579 Powerforce Cleaners Bagless Upright Vacuum View Diagrams & Manuals
6594 Powerforce Cleaners Bagless Upright Vacuum View Diagrams & Manuals
6596 PowerForce Bagless Turbo Upright Vacuum View Diagrams & Manuals
This item works with the following types of products:
- Vacuum Parts
Customer Part Reviews ?
Average Rating (out of 5):
Click to filter by ratings:
5 stars
3
4 stars
1
3 stars
0
2 stars
0
1 stars
0
< PREV
- 1
Great part
My repair was simple from the start. Ordering, pricing, speed of delivery and installation ereplacement parts made it simple.
Guest -
May 11, 2023
Verified Purchase
Great resource to verify correct part
Best resource I found to verify correct part for my vacuum with an accurate parts list. Simple order process, fulfillment and shipping confirmed quickly and received promptly. Very pleased with parts list, process, delivery, and product.
Guest -
February 1, 2022
Verified Purchase
Great service, easy ordering
Ordered a hard to find lever for my Bissell at eReplacementParts, they had it in stock, sent it FAST, and the part was perfect! Very happy, love their website and how they keep me informed about my order.
Lee -
November 17, 2020
Verified Purchase
Great part
One corner of tail side was broken. But it is working.
Guest -
June 2, 2020
Verified Purchase
t
t
t -
t days ago
Verified Purchase
eReplacementParts Team
t
Questions & Answers ?
Our customer Service team is at the ready daily to answer your part and product questions.

Ask our Team
We have a dedicated staff with decades of collective experience in helping customers just like you purchase parts to repair their products.
Does this fit my product?Questions & Answers for Lever Release
No questions have been asked yet
Customer Repair Instructions ?
All our customer repair instructions are solicited directly from other customers just like you who have purchased and replaced this exact part.
Foot lever release broke
Robert - October 12, 2016
👍 6 of 7 people found this instruction helpful
Tool Type
Vacuum
Difficulty
Medium
Time
Less than 15 minutes
Tools Used
Screwdriver
Parts Used
Removed old lever by squeezing both plastic tabs together with screwdrivers. New one just pushes in. A little tricky squeezing both enough without breaking.
Did you find this story helpful?
Thanks for voting and helping fellow customers!
lever release broke
Bob - February 14, 2017
👍 3 of 4 people found this instruction helpful
Tool Type
Vacuum
Difficulty
Easy
Time
Less than 15 minutes
Tools Used
Screwdriver, additional screwdriver for total of 2
Parts Used
1. Look at YouTube and got all the information for the repair.
2. Slid both screwdrivers under old lever release.
3. Squeezed them together.
4. Pulled the old lever out and slipped the new one in.
2. Slid both screwdrivers under old lever release.
3. Squeezed them together.
4. Pulled the old lever out and slipped the new one in.
Did you find this story helpful?
Thanks for voting and helping fellow customers!
Release lever broke.
Larry - March 23, 2016
👍 5 of 8 people found this instruction helpful
Tool Type
Vacuum
Difficulty
Medium
Time
15-30 minutes
Tools Used
Screwdriver
Parts Used
Make sure you remove the belt before separating the lower wheel/beater bar assembly from the top unit.
Did you find this story helpful?
Thanks for voting and helping fellow customers!
Vacuum lever that allows the vacuum to stand upright was broken on a hoover vacuum. This part is made of plastic and can wear out as mine did.
John - March 14, 2019
Tool Type
Vacuum
Difficulty
Easy
Time
Less than 15 minutes
Tools Used
Screwdriver
Parts Used
Removed two screws and plastic piece on top and then pulled out the broken lever release. Popped the new part into place and reattached the plastic piece on top with two screws. Works perfect and will stand upright when not in use.
Did you find this story helpful?
Thanks for voting and helping fellow customers!
Worn out lever release.
David - February 5, 2018
Tool Type
Vacuum
Difficulty
Easy
Time
Less than 15 minutes
Tools Used
Screwdriver
Parts Used
1. Removed the old lever release.
2. Replaced with the new lever release.
2. Replaced with the new lever release.
Did you find this story helpful?
Thanks for voting and helping fellow customers!
Broken lever.
Michael - January 15, 2018
Tool Type
Vacuum
Difficulty
Easy
Time
Less than 15 minutes
Tools Used
Parts Used
It is very easy to replace.
Did you find this story helpful?
Thanks for voting and helping fellow customers!
Broken release.
Ronald - December 30, 2017
Tool Type
Vacuum
Difficulty
Medium
Time
15-30 minutes
Tools Used
Screwdriver
Parts Used
Replaced with the new.
Did you find this story helpful?
Thanks for voting and helping fellow customers!
Plastic lock broke
David - March 3, 2017
👍 2 of 4 people found this instruction helpful
Tool Type
Vacuum
Difficulty
Easy
Time
15-30 minutes
Tools Used
Screwdriver, Pliers
Parts Used
Removed the belt and four screws holding the main motor , took a screwdriver and popped old part off and pressed the new part in and re assembled the vacuum.
Did you find this story helpful?
Thanks for voting and helping fellow customers!
OEM stands for Original Equipment Manufacturer and means the part you’re buying is sourced directly from the manufacturer who made your product. At eReplacementParts, we sell only genuine OEM parts, guaranteeing the part you’re purchasing is of better design and of higher quality than aftermarket parts.
Our product descriptions are a combination of data sourced directly from the manufacturers who made your product as well as content researched and curated by our content & customer service teams. This content is edited and reviewed internally before being made public to customers.
Our customer service team are at the ready daily to answer your part and product questions. We have a dedicated staff with decades of collective experience in helping customers just like you purchase parts to repair their products.
All our part reviews are solicited directly from other customers who have purchased this exact part. While we moderate these reviews for profanity, offensive language or personally identifiable information, these reviews are posted exactly as submitted and no alterations are made by our team.
All our customer repair instructions are solicited directly from other customers just like you who have purchased and replaced this exact part. While we moderate these reviews for profanity, offensive language or personally identifiable information, these reviews are posted exactly as submitted and no alterations are made by our team.
Based on data from past customer purchasing behaviors, these parts are most commonly purchased together along with the part you are viewing. These parts may be necessary or helpful to replace to complete your current repair.
All our installation videos are created and produced in collaboration with our in-house repair technician, Mark Sodja, who has helped millions of eReplacementParts customers over the last 13 years repair their products. Mark has years of experience in selling and repairing both commercial and residential products with a specialty in gas-powered equipment.
This data is collected from customers who submitted a repair instruction after replacing this exact part. Customers can rate how easy the repair was to complete and how long it took. We aggregate this data to provide a repair rating that allows customers to quickly determine the difficulty and time needed to perform their own repair.