
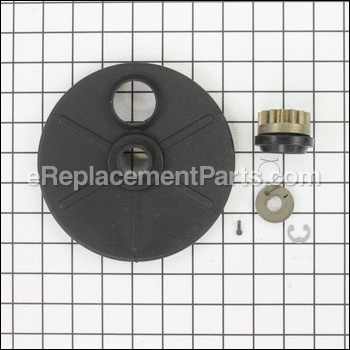
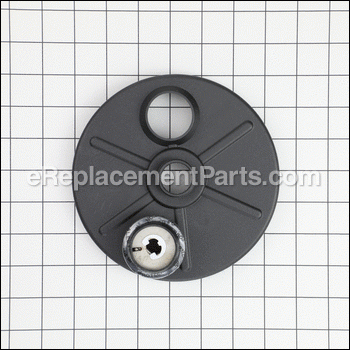
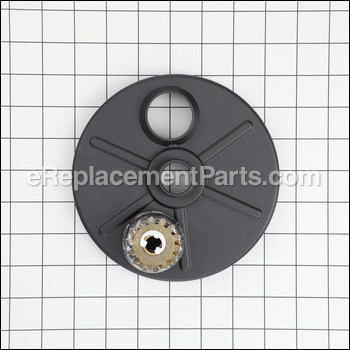

Pinion Assembly, Lh 532193366
OEM part for: Husqvarna, Craftsman
Part Number: 532193366
$54.78
In Stock
Jump To:
Frequently Purchased Together ?

Compatibility
This part will fit the following 41 machines
Husqvarna
5521 CHA (954223234) (2003-06) Walk Mower View Diagrams & Manuals
5521 CHB (954223234) (2003-03) Walk Mower View Diagrams & Manuals
5521 CHVA (954223883) (2004-07) Walk Mower View Diagrams & Manuals
5521 RSB (954223470) (2004-07) Lawn Mower View Diagrams & Manuals
PR7R21A (2004-07) Lawn Mower: Consumer Walk Behind View Diagrams & Manuals
5521 RS (954223470, 532180868) (2003-09) A Lawn Mower: Consumer Walk Behind View Diagrams & Manuals
Craftsman
917378921 Gas Walk Behind Lawn Mower View Diagrams & Manuals
917378401 Walk Behind Lawn Mower View Diagrams & Manuals
917378493 Rotary Lawn Mower View Diagrams & Manuals
917.377792 Rotary Lawn Mower View Diagrams & Manuals
917378644 Gas, Walk Behind Lawn Mower View Diagrams & Manuals
917378482 Walk Behind Lawnmower View Diagrams & Manuals
917371440 Lawn Mower View Diagrams & Manuals
917371500 Lawn Mower View Diagrams & Manuals
917377660 Lawn Mower View Diagrams & Manuals
917377661 Lawn Mower View Diagrams & Manuals
917377662 Lawn Mower View Diagrams & Manuals
917377663 Lawn Mower View Diagrams & Manuals
917377792 Lawn Mower View Diagrams & Manuals
917377680 Lawn Tractor View Diagrams & Manuals
917377681 Lawn Tractor View Diagrams & Manuals
917377682 Lawn Tractor View Diagrams & Manuals
917377780 Lawn Tractor View Diagrams & Manuals
917377791 Lawn Tractor View Diagrams & Manuals
917378400 Lawn Tractor View Diagrams & Manuals
917378402 Lawn Tractor View Diagrams & Manuals
917378403 Lawn Tractor View Diagrams & Manuals
917378404 Lawn Tractor View Diagrams & Manuals
917378494 Lawn Tractor View Diagrams & Manuals
917378500 Lawn Tractor View Diagrams & Manuals
917378501 Lawn Tractor View Diagrams & Manuals
917378492 Lawn Mower View Diagrams & Manuals
917378640 Lawn Mower View Diagrams & Manuals
917378641 Lawn Mower View Diagrams & Manuals
917378643 Lawn Mower View Diagrams & Manuals
917378920 Lawn Mower View Diagrams & Manuals
917378940 Lawn Mower View Diagrams & Manuals
917378941 Lawn Mower View Diagrams & Manuals
917378930 Lawn Mower View Diagrams & Manuals
917.378642 Rotary Gas Walk Behind Lawn Mower View Diagrams & Manuals
917.378941 Gas Walk Behind Lawn Mower View Diagrams & Manuals
Show More Compatible Models
This item works with the following types of products:
- Lawn Mower Parts
- Lawn Tractor Parts
This part replaces obsolete part #: 193366, 5321882-92, 188292, 532188292
Questions & Answers ?
Our customer Service team is at the ready daily to answer your part and product questions.

Ask our Team
We have a dedicated staff with decades of collective experience in helping customers just like you purchase parts to repair their products.
Does this fit my product?Questions & Answers for Pinion Assembly, Lh
No questions have been asked yet
Customer Repair Instructions ?
All our customer repair instructions are solicited directly from other customers just like you who have purchased and replaced this exact part.
The Front Drive Wheels were worn out, and the right front wheel had the drive cover shield broken, which had permitted grass to enter the inside of the drive wheel and cause rust on existing axle part
Rubbie - October 11, 2018
Tool Type
Lawn Mower
Difficulty
Medium
Time
30-60 minutes
Tools Used
Screwdriver, Pliers, Socket set, WD-40, emory paper, small hammer
1) Raised and supported the center of the lawnmower frame, freeing the wheels from the surface of the floor. ( I used a 1 gal. paint can, which provided a wide surface, and weight to hold the mower from moving. Didn't have to block the back wheels.)
2) Used a screwdriver to help remove the plastic wheel covers (pop off hub caps) and exposed the nut on the wheel, and used a socket set to remove the nut from the wheel axle.
3) Removed the wheel, and the washer between the wheel and the inside of the broken shield, and cleaned the crud from the washer surfaces.
4) Cleaned the crud from the E-Ring, used the straight edged screwdriver blade and the small hammer to tap the E-Ring from the pinion gear axle. Then removed the old pinion gear and corroded parts, and finially the broken plastic inside wheel cover behind the pinion gear.
5) Cleaned and removed all of the crud and rust from the wheel axle as well as the pinion gear area of the drive axle, then lubricated the axle parts with WD-40 to help in the reassembly process. Carefully cleaned the crud from the small E-Ring groove on the drive axle to enable the new E-Ring to fit and lock the new pinion gear assembly in position.
6) Installed the new plastic Pinion Gear shield over the two axles, making sure to work it back over the drive axle hub, then installed the new pinion gear pieces on the drive axle and finally the new E-Ring to hold that in place.
7) Installed the washer over the Wheel axle, then installed the new wheel, meshing the inside teeth on the drive wheel to the pinion gear teeth. Reinstalled the flanged wheel nut, and tightened it, then reinstalled the plastic hub cap.
(Note that there is a "You Tube" Video covering the wheel replacement process that might give some confidence to a novice attempting these repairs)
Did you find this story helpful?
Thanks for voting and helping fellow customers!
OEM stands for Original Equipment Manufacturer and means the part you’re buying is sourced directly from the manufacturer who made your product. At eReplacementParts, we sell only genuine OEM parts, guaranteeing the part you’re purchasing is of better design and of higher quality than aftermarket parts.
Our product descriptions are a combination of data sourced directly from the manufacturers who made your product as well as content researched and curated by our content & customer service teams. This content is edited and reviewed internally before being made public to customers.
Our customer service team are at the ready daily to answer your part and product questions. We have a dedicated staff with decades of collective experience in helping customers just like you purchase parts to repair their products.
All our part reviews are solicited directly from other customers who have purchased this exact part. While we moderate these reviews for profanity, offensive language or personally identifiable information, these reviews are posted exactly as submitted and no alterations are made by our team.
All our customer repair instructions are solicited directly from other customers just like you who have purchased and replaced this exact part. While we moderate these reviews for profanity, offensive language or personally identifiable information, these reviews are posted exactly as submitted and no alterations are made by our team.
Based on data from past customer purchasing behaviors, these parts are most commonly purchased together along with the part you are viewing. These parts may be necessary or helpful to replace to complete your current repair.
All our installation videos are created and produced in collaboration with our in-house repair technician, Mark Sodja, who has helped millions of eReplacementParts customers over the last 13 years repair their products. Mark has years of experience in selling and repairing both commercial and residential products with a specialty in gas-powered equipment.
This data is collected from customers who submitted a repair instruction after replacing this exact part. Customers can rate how easy the repair was to complete and how long it took. We aggregate this data to provide a repair rating that allows customers to quickly determine the difficulty and time needed to perform their own repair.