
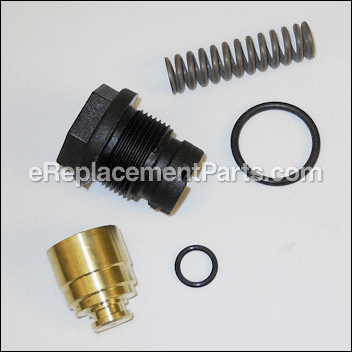
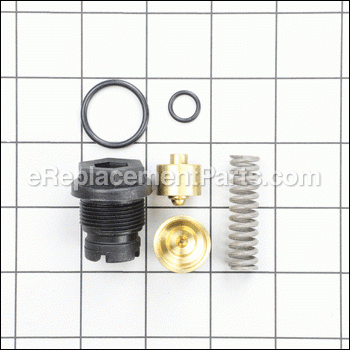

This is an original replacement part sourced directly from the manufacturer. The unloader kit is commonly found in pressure washers from Briggs & Stratton. This part includes a plug made of high-quality plastic, a metal valve and spring, and two flexible rubber O-rings. You may require a wrench when replacing these parts.
Kit, Unloader 187879GS
OEM part for: Briggs and Stratton
Part Number: 187879GS
$35.21
In Stock
Compatibility
This part will fit the following 32 machines
Briggs and Stratton
1418-0 3,000 PSI Pressure Washer View Diagrams & Manuals
1439-0 2,100 PSI Pressure Washer View Diagrams & Manuals
1440-0 2,400 PSI Pressure Washer View Diagrams & Manuals
1536-1 2,100 PSI Pressure Washer View Diagrams & Manuals
1537-0 2,400 PSI Pressure Washer View Diagrams & Manuals
1537-1 2,400 PSI Pressure Washer View Diagrams & Manuals
1538-0 2,500 PSI Pressure Washer View Diagrams & Manuals
1550-0 2,300 PSI Pressure Washer View Diagrams & Manuals
1579-0 2,300 PSI Pressure Washer View Diagrams & Manuals
1580-0 3,000 PSI Pressure Washer View Diagrams & Manuals
1676-1 2,700 PSI Pressure Washer View Diagrams & Manuals
1581-0 3,500 PSI Pressure Washer View Diagrams & Manuals
1587-0 2,400 PSI Pressure Washer View Diagrams & Manuals
0763-0 1,750 PSI Pressure Washer View Diagrams & Manuals
0763-1 1,750 PSI Pressure Washer View Diagrams & Manuals
0778-0 1,500 PSI Pressure Washer View Diagrams & Manuals
0778-1 1,500 PSI Pressure Washer View Diagrams & Manuals
0790-2 1,650 PSI Pressure Washer View Diagrams & Manuals
1052-0 1,800 PSI Pressure Washer View Diagrams & Manuals
1067-0 1,500 PSI Pressure Washer View Diagrams & Manuals
1120-0 1,750 PSI Pressure Washer View Diagrams & Manuals
1139-0 1,800 PSI Pressure Washer View Diagrams & Manuals
1171-0 1,500 PSI Pressure Washer View Diagrams & Manuals
1195-0 1,800 PSI Pressure Washer View Diagrams & Manuals
1441-0 2,600 PSI Pressure Washer View Diagrams & Manuals
1450-0 2,400 PSI Pressure Washer View Diagrams & Manuals
1456-0 2,400 PSI Pressure Washer View Diagrams & Manuals
1467-1 1,700 PSI Pressure Washer View Diagrams & Manuals
1467-2 1,700 PSI Pressure Washer View Diagrams & Manuals
1467-3 1,700 PSI Pressure Washer View Diagrams & Manuals
1536-0 2,100 PSI Pressure Washer View Diagrams & Manuals
1538-1 2,500 PSI Pressure Washer View Diagrams & Manuals
Show More Compatible Models
This item works with the following types of products:
- Pressure Washer Parts
This part replaces obsolete part #: B1253GS, 97846GS
Questions & Answers ?
Our customer Service team is at the ready daily to answer your part and product questions.

Ask our Team
We have a dedicated staff with decades of collective experience in helping customers just like you purchase parts to repair their products.
Does this fit my product?Questions & Answers for Kit, Unloader
No questions have been asked yet
Customer Repair Instructions ?
All our customer repair instructions are solicited directly from other customers just like you who have purchased and replaced this exact part.
Engine stalled when trigger was released.
Howard - September 9, 2016
👍 11 of 11 people found this instruction helpful
Tool Type
Pressure Washer
Difficulty
Medium
Time
1-2 hours
Tools Used
Power Drill, Socket set, Dremel abrasive cutting disc for removing plastic plug.
Parts Used
1. Remove the plastic cap. This is easier said then done. Mine could not be turned so I had to drill and cut it out. The kit includes a replacement plug.
2. Remove the old valve spring and two brass valve parts. I was able to push them out by using a long bolt inserted through the outlet to the wand.
3.The valve chamber is likely fouled with mineral deposits. I put a cork in the outlet to the wand and filled the chamber with mineral remover overnight. I them checked to be sure the chamber was clean.
4. Insert the kit components.
5. Install the new plastic plug. This was difficult because you must use pressure to overcome the spring's resistance while insuring that the plastic plug is not cross threaded. I jury rigged a lever to apply straight pressure while I turned the plug..
Did you find this story helpful?
Thanks for voting and helping fellow customers!
OEM stands for Original Equipment Manufacturer and means the part you’re buying is sourced directly from the manufacturer who made your product. At eReplacementParts, we sell only genuine OEM parts, guaranteeing the part you’re purchasing is of better design and of higher quality than aftermarket parts.
Our product descriptions are a combination of data sourced directly from the manufacturers who made your product as well as content researched and curated by our content & customer service teams. This content is edited and reviewed internally before being made public to customers.
Our customer service team are at the ready daily to answer your part and product questions. We have a dedicated staff with decades of collective experience in helping customers just like you purchase parts to repair their products.
All our part reviews are solicited directly from other customers who have purchased this exact part. While we moderate these reviews for profanity, offensive language or personally identifiable information, these reviews are posted exactly as submitted and no alterations are made by our team.
All our customer repair instructions are solicited directly from other customers just like you who have purchased and replaced this exact part. While we moderate these reviews for profanity, offensive language or personally identifiable information, these reviews are posted exactly as submitted and no alterations are made by our team.
Based on data from past customer purchasing behaviors, these parts are most commonly purchased together along with the part you are viewing. These parts may be necessary or helpful to replace to complete your current repair.
All our installation videos are created and produced in collaboration with our in-house repair technician, Mark Sodja, who has helped millions of eReplacementParts customers over the last 13 years repair their products. Mark has years of experience in selling and repairing both commercial and residential products with a specialty in gas-powered equipment.
This data is collected from customers who submitted a repair instruction after replacing this exact part. Customers can rate how easy the repair was to complete and how long it took. We aggregate this data to provide a repair rating that allows customers to quickly determine the difficulty and time needed to perform their own repair.