eReplacementParts.com
877-346-4814
Kohler Parts
Repair Parts Home
  
Lawn Equipment Parts
  
Kohler Parts
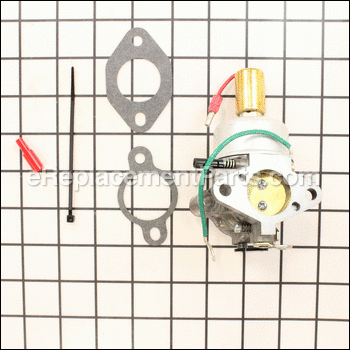
  12 853 118-S Kit, Carburetor W/Gaskets

Kit,​ Carburetor W/​Gaskets 12 853 118-S

OEM part for: Kohler

Part Number: 12 853 118-S


Install
Videos!
Grid squares measure 1x1 inch
$102.80
In Stock
Ships within 1 business day
Easy 15-30 minutes (1 rated repairs)?
OEM: Original Equipment Manufacturer ?
Kohler
Does this d-block d-md-none fit my product?

Product Description ?

The carburetor kit is sold as a set that contains all the necessary parts. These are genuine Kohler replacement parts used in compatible engines. A wrench might be required during the replacement of these items. They may become broken and will need to be replaced. They are made out of plastic and metal.

  • Classification: Part
  • Weight: 0.67 lbs.
  • Shipping: Ships Worldwide

Compatibility

This part will fit the following 27 machines

Kohler

CV492-27506 Command Pro Single Engine View Diagrams & Manuals
CV492-27516 Command Pro Single Engine View Diagrams & Manuals
CV492-27517 Command Pro Single Engine View Diagrams & Manuals
CV492-27518 Command Pro Single Engine View Diagrams & Manuals
CV491-27502 Command Pro Engine View Diagrams & Manuals
CV490 (27508) Command Engine View Diagrams & Manuals
CV490-27508 Small Engine View Diagrams & Manuals
CV490-27504 17 HP Engine View Diagrams & Manuals
CV490-27507 17 HP Engine View Diagrams & Manuals
CV490-27511 17 HP Engine View Diagrams & Manuals
CV490-27532 17 HP Engine View Diagrams & Manuals
CV490-27541 17 HP Engine View Diagrams & Manuals
CV492-27535 18 HP Engine View Diagrams & Manuals
CV492-27544 18 HP Engine View Diagrams & Manuals
27504 Command PRO Engine, MTD, 17hp, 12.7kW View Diagrams & Manuals
27507 Command PRO Engine, Husqvarna, 17hp, 12.7kW View Diagrams & Manuals
27508 Husqvarna 17 HP (12.7 kW) View Diagrams & Manuals
27511 Command PRO Engine, Husqvarna, 17hp, 12.7kW View Diagrams & Manuals
27532 Command PRO Engine, Husqvarna, 17hp, 12.7kW View Diagrams & Manuals
27541 MTD 17 HP (12.7 kW) View Diagrams & Manuals
27502 Command PRO Engine, 17hp, 12.7kW View Diagrams & Manuals
27506 Command PRO Engine, Husqvarna, 18hp, 13.4kW View Diagrams & Manuals
27516 Command PRO Engine, Husqvarna, 18hp, 13.4kW View Diagrams & Manuals
27517 Command PRO Engine, MTD, 18hp, 13.4kW View Diagrams & Manuals
27518 Command PRO Engine, 18hp, 13.4kW View Diagrams & Manuals
27535 Command PRO Engine, MTD, 18hp, 13.4kW View Diagrams & Manuals
27544 Command PRO Engine, Mtd, 18hp, 13.4kW View Diagrams & Manuals
Show More Compatible Models
Don't see yours? Try searching our site for :

This item works with the following types of products:

  • Engine Parts

Customer Part Reviews ?

5
Average Rating (out of 5):
3 Reviews
Click to filter by ratings:
5 stars
3
4 stars
0
3 stars
0
2 stars
0
1 stars
0
  • Highest Rating
  • Most Recent
< PREV
  • 1
NEXT >
  • The part received was an exact replacement to original part. I did add an inline fuel shutoff to fuel line. After adding fuel, mower started right up!
    Part was an exact replacement for the original, a quality product!
    Guest - June 5, 2023 Verified Purchase
    Hopefully will fix the problem for a long time
    My neighbor was given a Craftsman 42" riding mower with a 17hp Kohler single cylinder engine that was 19 years old. It had a large amount of gas in the crankcase. I pulled the carburetor and found the tip of the fuel shutoff solenoid had been cut off. Evidently someone had assumed the engine wasn't getting gas and thought this was the problem and didn't diagnose the actual cause. This probably led to the problem with gas in the engine but it also indicated that the needle valve in the float was also damaged. I considered rebuilding the carburetor but I'm getting old and tired of spending so much time on repairs. I considered using a cheap Chinese replacement carburetor but decided to bite the bullet one time and replace it with this genuine Walbro carburetor. Because of the age of the mower and the damage from ethanol I also replaced the fuel line and fuel filter and added a fuel shutoff valve. After flushing the crankcase with oil I replaced the oil filter and added new oil. It appears the engine never ran after ingesting gas and it runs fine now. I told my neighbor to only use non-ethanol fuel, to shut off the fuel when he isn't going to use the mower in a while and run the fuel out of the carburetor when he finishes with the mower at the end of the season. In the long run I've found that it is usually best to use quality parts if you don't want to repeat the same job again.
    James - August 7, 2021 Verified Purchase
    Needed new carburator.
    Fast service and parts were exact fit. Will be using them again in future.
    robert - April 28, 2021 Verified Purchase
    t
    t
    t - t days ago Verified Purchase
    eReplacementParts Team
    t

    Questions & Answers ?

    Our customer Service team is at the ready daily to answer your part and product questions.

    photo of team member
    Ask our Team

    We have a dedicated staff with decades of collective experience in helping customers just like you purchase parts to repair their products.

    Does this fit my product?

    Questions & Answers for Kit,​ Carburetor W/​Gaskets


    No questions have been asked yet

    Customer Repair Instructions ?

    All our customer repair instructions are solicited directly from other customers just like you who have purchased and replaced this exact part.

    Easy 15-30 minutes (1 rated repairs)?

    poor carburetor performance/difficult to start

    James - October 15, 2021
    👍 1 of 1 people found this instruction helpful
    Tool Type

    Lawn Tractor

    Difficulty

    Easy

    Time

    15-30 minutes

    Tools Used

    Screwdriver, Pliers, Socket set

    1. Remove air filter cover and air filter.
    2. Be sure fuel tank is empty. (I turn it sideways below the steering column so the outlet is below the fuel filter.)
    3. Remove fuel filter from fuel line and disconnect fuel line from carburetor.
    4. Remove ground wire and disconnect wiring from bottom of carburetor float bowl.
    5. Use socket or nut driver to remove 2 nuts holding carburetor on engine.
    6. Gently slide carb off bolts and carefully remove choke and throttle cables (requires some jiggling around).
    7. Reverse steps to install carburetor.
    8. Install new fuel filter in fuel line (be sure flow arrow is correct).
    Did you find this story helpful?
    Thanks for voting and helping fellow customers!

    OEM stands for Original Equipment Manufacturer and means the part you’re buying is sourced directly from the manufacturer who made your product. At eReplacementParts, we sell only genuine OEM parts, guaranteeing the part you’re purchasing is of better design and of higher quality than aftermarket parts.

    Our product descriptions are a combination of data sourced directly from the manufacturers who made your product as well as content researched and curated by our content & customer service teams. This content is edited and reviewed internally before being made public to customers.

    Our customer service team are at the ready daily to answer your part and product questions. We have a dedicated staff with decades of collective experience in helping customers just like you purchase parts to repair their products.

    All our part reviews are solicited directly from other customers who have purchased this exact part. While we moderate these reviews for profanity, offensive language or personally identifiable information, these reviews are posted exactly as submitted and no alterations are made by our team.

    All our customer repair instructions are solicited directly from other customers just like you who have purchased and replaced this exact part. While we moderate these reviews for profanity, offensive language or personally identifiable information, these reviews are posted exactly as submitted and no alterations are made by our team.

    Based on data from past customer purchasing behaviors, these parts are most commonly purchased together along with the part you are viewing. These parts may be necessary or helpful to replace to complete your current repair.

    All our installation videos are created and produced in collaboration with our in-house repair technician, Mark Sodja, who has helped millions of eReplacementParts customers over the last 13 years repair their products. Mark has years of experience in selling and repairing both commercial and residential products with a specialty in gas-powered equipment.

    This data is collected from customers who submitted a repair instruction after replacing this exact part. Customers can rate how easy the repair was to complete and how long it took. We aggregate this data to provide a repair rating that allows customers to quickly determine the difficulty and time needed to perform their own repair.

    eReplacementParts.com
    7174 South 400 West
    Suite 5
    Midvale, UT 84047
    visa mastercard discover american express PayPal