

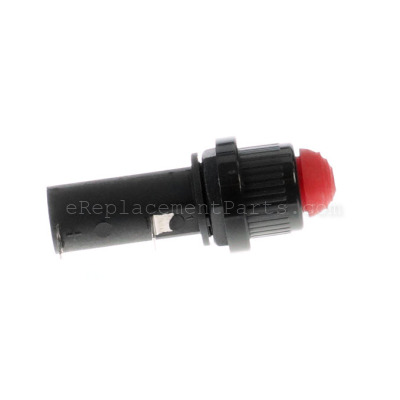


This is an authentic OEM sourced replacement part designed for Weber gas grills. This part has a plastic body and it is sold individually. Ignition module produces the spark to ignite the burner. It has two (2) flat connectors. Requires a AA battery (not included).
Replacing this Electronic Ignition Module is easy and does not require any additional tools
• Unplug the wires from the old ignition module
• Unscrew the button that holds it to the unit
• Place a new module in place
• Install a AA battery and secure the module with the button
• Connect the wires
Ignition Switch 42053
OEM part for: Weber
Part Number: 42053
$20.52
In Stock
Product Description ?
- Classification: Part
- Weight: 0.02 lbs.
- Shipping: Ships Worldwide
Compatibility
This part will fit the following 38 machines
Weber
21281 Summit Side Burner View Diagrams & Manuals
21282 Summit Side Burner View Diagrams & Manuals
21321 Summit Side Burner View Diagrams & Manuals
21322 Summit Side Burner View Diagrams & Manuals
5230001 Summit Silver C Gas Grill View Diagrams & Manuals
5240001 Summit Silver D Gas Grill View Diagrams & Manuals
5240501 Summit Silver D Built-In Gas Grill View Diagrams & Manuals
5270001 Summit Gold B Gas Grill View Diagrams & Manuals
5290001 Summit Gold D Gas Grill View Diagrams & Manuals
5290501 Summit Gold D Built-In Gas Grill View Diagrams & Manuals
5330001 Summit Silver C Gas Grill View Diagrams & Manuals
5340001 Summit Silver D Gas Grill View Diagrams & Manuals
5340501 Summit Silver D Built-In Gas Grill View Diagrams & Manuals
5370001 Summit Gold B Gas Grill View Diagrams & Manuals
5390501 Summit Gold D Built-In Gas Grill View Diagrams & Manuals
5730001 (2005) Summit Gold/Platinum C4 Gas Grill View Diagrams & Manuals
5740001 Summit Gold/Platinum D4 Gas Grill View Diagrams & Manuals
5770001 (2005) Summit Gold/Platinum B6 Gas Grill View Diagrams & Manuals
5790001 (2005) Summit Gold/Platinum D6 Gas Grill View Diagrams & Manuals
5830001 (2005) Summit Gold/Platinum C4 Gas Grill View Diagrams & Manuals
5840001 Summit Gold/Platinum D4 Gas Grill View Diagrams & Manuals
5870001 (2005) Summit Gold/Platinum B6 Gas Grill View Diagrams & Manuals
5890001 Summit Gold D6 Gas Grill View Diagrams & Manuals
7730001 (2005) Summit Gold/Platinum C4 Gas Grill View Diagrams & Manuals
7740001 Summit Gold/Platinum D4 Gas Grill View Diagrams & Manuals
7740501 Summit Platinum D4 Built-In Gas Grill View Diagrams & Manuals
7770001 (2005) Summit Gold/Platinum B6 Gas Grill View Diagrams & Manuals
7790001 (2005) Summit Gold/Platinum D6 Gas Grill View Diagrams & Manuals
7790501 (2006) Summit Platinum D6 Built-In Gas Grill View Diagrams & Manuals
7830001 (2005) Summit Gold/Platinum C4 Gas Grill View Diagrams & Manuals
7840001 Summit Gold/Platinum D4 Gas Grill View Diagrams & Manuals
7840501 Summit Platinum D4 Built-In Gas Grill View Diagrams & Manuals
7870001 (2005) Summit Gold/Platinum B6 Gas Grill View Diagrams & Manuals
7890001 Summit Platinum D6 Gas Grill View Diagrams & Manuals
7890501 (2006) Summit Platinum D6 Built-In Gas Grill View Diagrams & Manuals
5210501 Summit Silver A Lp Ss Built-In View Diagrams & Manuals
5390001 Summit Gold D Ng Ss View Diagrams & Manuals
7810002 Grill View Diagrams & Manuals
Show More Compatible Models
This item works with the following types of products:
- Outdoor Grill Parts
Repair Videos ?

Articles:
|
Having trouble getting your grill to light up? A common cause of this issue is a defective ignition switch. We'll sho...
November 08, 2012
|

Customer Part Reviews ?
Average Rating (out of 5):
Click to filter by ratings:
5 stars
2
4 stars
0
3 stars
0
2 stars
0
1 stars
0
< PREV
- 1
perfect replacement
This part was an exact fit, and my grill is up and running again. I ordered from eReplacement because it was the easiest site on which to find my part and the pictures and specs assured me it was the right part. Thanks for an easy buying experience.
Guest -
November 25, 2021
Verified Purchase
Light my fire
Worked as expected
Robert -
July 2, 2019
Verified Purchase
t
t
t -
t days ago
Verified Purchase
eReplacementParts Team
t
Questions & Answers ?
Our customer Service team is at the ready daily to answer your part and product questions.

Ask our Team
We have a dedicated staff with decades of collective experience in helping customers just like you purchase parts to repair their products.
Does this fit my product?Questions & Answers for Ignition Switch
No questions have been asked yet
Customer Repair Instructions ?
All our customer repair instructions are solicited directly from other customers just like you who have purchased and replaced this exact part.
Waterproof rubber boot over ignition switch deteriorated.
A.G. - July 6, 2022
Tool Type
Outdoor Grill
Difficulty
Easy
Time
Less than 15 minutes
Tools Used
, Bare hands.
Parts Used
1. Unscrewed ignition switch cover and boot.
2. Checked piezo battery within ignition switch. Checked good.
3. Installed new switch cover and boot.
2. Checked piezo battery within ignition switch. Checked good.
3. Installed new switch cover and boot.
Did you find this story helpful?
Thanks for voting and helping fellow customers!
Rubber disintegrated and spring fell out.
Fred - April 22, 2019
Tool Type
Outdoor Grill
Difficulty
Easy
Time
Less than 15 minutes
Tools Used
, Hands
Parts Used
Did you find this story helpful?
Thanks for voting and helping fellow customers!
Internal spring pushed through rubber button.
Nicholas - May 24, 2017
Tool Type
Outdoor Grill
Difficulty
Easy
Time
Less than 15 minutes
Tools Used
Screwdriver, Adjustable Wrench
Parts Used
1. Dismantled covers on the front of the grill using a Phillip's head screwdriver.
2. Removed button caps and the batteries contained within.
3. Using an adjustable wrench, I removed plastic retaining nuts from ignition switches.
4. Removed the two wires from ignition posts.
5. Removed ignition switches.
6. Prepared new switches by removing button and retaining nut.
7. Connected wires to new switches before installing switch housing.
8. Installed new switches by replacing old ones and using the retaining nut to firmly place.
9. Placed batteries in with the positive side first.
10. Screwed button caps on and tested.
11. Put the grill back together.
Did you find this story helpful?
Thanks for voting and helping fellow customers!
Ignitor button top broke off
GARY - September 3, 2016
Tool Type
Outdoor Grill
Difficulty
Easy
Time
Less than 15 minutes
Tools Used
Pliers, hands
Parts Used
Unscrew the old broken igniter. Transfer the two plugs ends to the new igniter reinstall the igniter and tighten the nut first then screw on the cap with a new battery inside. BOOM your done! Test the igniter.
Did you find this story helpful?
Thanks for voting and helping fellow customers!
Dry rotted
Roney - July 20, 2016
Tool Type
Outdoor Grill
Difficulty
Easy
Time
Less than 15 minutes
Tools Used
, None
Parts Used
I unscrewed to old and screwed on the new.
Did you find this story helpful?
Thanks for voting and helping fellow customers!
Button was worn out
dave - July 15, 2016
Tool Type
Outdoor Grill
Difficulty
Easy
Time
Less than 15 minutes
Tools Used
Pliers
Parts Used
Replaced red rubber button
Did you find this story helpful?
Thanks for voting and helping fellow customers!
Needed new ignition switch
Joseph - May 26, 2016
👍 1 of 2 people found this instruction helpful
Tool Type
Outdoor Grill
Difficulty
Easy
Time
Less than 15 minutes
Tools Used
Parts Used
Unscrewed the top cap of the ignitor. Removed the battery and spring, then removed the nut holding the igniter to the grill. I then replace the wires on the new one the same way they were on the old on. Then secured the new ignitor with the nut and placed the new spring and still good battery in and screwed on the cap.
Did you find this story helpful?
Thanks for voting and helping fellow customers!
Ignitor Failed on Weber Grill Genissis Silver 6 BURNER
William - January 2, 2016
Tool Type
Outdoor Grill
Difficulty
Easy
Time
Less than 15 minutes
Tools Used
Pliers
Parts Used
Locate igniter which has battery inside, unscrew plastic nut, remove, disconnect two wires (make sure they go back to the same prongs), remove old igniter and install in reverse. Make sure to put the battery in the right direction. Note: battery is inside igniter.
Lay on ground while doing this since igniter at least in my case is below grill. Wear goggles to minimize debris in eye. Make sure all gas is off at tank and grill. Wait until grill is cool.
Lay on ground while doing this since igniter at least in my case is below grill. Wear goggles to minimize debris in eye. Make sure all gas is off at tank and grill. Wait until grill is cool.
Did you find this story helpful?
Thanks for voting and helping fellow customers!
OEM stands for Original Equipment Manufacturer and means the part you’re buying is sourced directly from the manufacturer who made your product. At eReplacementParts, we sell only genuine OEM parts, guaranteeing the part you’re purchasing is of better design and of higher quality than aftermarket parts.
Our product descriptions are a combination of data sourced directly from the manufacturers who made your product as well as content researched and curated by our content & customer service teams. This content is edited and reviewed internally before being made public to customers.
Our customer service team are at the ready daily to answer your part and product questions. We have a dedicated staff with decades of collective experience in helping customers just like you purchase parts to repair their products.
All our part reviews are solicited directly from other customers who have purchased this exact part. While we moderate these reviews for profanity, offensive language or personally identifiable information, these reviews are posted exactly as submitted and no alterations are made by our team.
All our customer repair instructions are solicited directly from other customers just like you who have purchased and replaced this exact part. While we moderate these reviews for profanity, offensive language or personally identifiable information, these reviews are posted exactly as submitted and no alterations are made by our team.
Based on data from past customer purchasing behaviors, these parts are most commonly purchased together along with the part you are viewing. These parts may be necessary or helpful to replace to complete your current repair.
All our installation videos are created and produced in collaboration with our in-house repair technician, Mark Sodja, who has helped millions of eReplacementParts customers over the last 13 years repair their products. Mark has years of experience in selling and repairing both commercial and residential products with a specialty in gas-powered equipment.
This data is collected from customers who submitted a repair instruction after replacing this exact part. Customers can rate how easy the repair was to complete and how long it took. We aggregate this data to provide a repair rating that allows customers to quickly determine the difficulty and time needed to perform their own repair.