
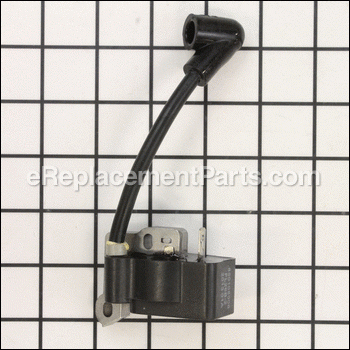
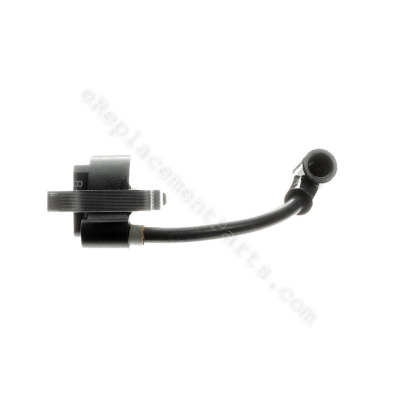


It is an authentic replacement ignition module. It is sourced from original equipment manufacturer for use with Ryobi trimmers/brushcutters. The purpose of an ignition module also known as armature-magneto is to provide electric current for the ignition system by producing pulses of high voltage for the spark plugs. It is made out of metal with rubber spark plug boot. Includes one (1) module per order.
To complete this repair you would need screwdriver set.
• Remove the spark plug boot
• Remove the air filter housing
• Remove other shrouds/housings
• Disconnect ignition wires
• Disconnect spark plug boot
• Face flywheel magnet to ignition module position
• Install new module in place
• Reassemble and test the unit
Ignition Module 850108008
OEM part for: Ryobi
Part Number: 850108008
$16.73
In Stock
Product Description ?
- Classification: Part
- Weight: 0.28 lbs.
- Shipping: Ships Worldwide
Compatibility
This part will fit the following 4 machines
Ryobi
RY28005 26cc String Trimmer View Diagrams & Manuals
RY28025 26cc String Trimmer View Diagrams & Manuals
RY28045 26cc String Trimmer View Diagrams & Manuals
RY28065 26CC Brushcutter View Diagrams & Manuals
This item works with the following types of products:
- Trimmer Parts
Customer Part Reviews ?
Average Rating (out of 5):
Click to filter by ratings:
5 stars
2
4 stars
0
3 stars
1
2 stars
0
1 stars
0
< PREV
- 1
Ignition module
This was in great condition and came in very quickly.
Guest -
July 18, 2023
Verified Purchase
BOLTED RIGHT IN
Typical part from Replacement in that it fits perfectly and bolts right in. I've been doing business with eReplacementParts.com for a long time and have never been disappointed with any of the replacement parts I get from them. And the same applies here with this part.q
Dorald -
June 7, 2021
Verified Purchase
wrong part
Great service and fast shipping but the part I received was not the part I need it for my specific weedeater.
Guest -
August 11, 2021
Verified Purchase
t
t
t -
t days ago
Verified Purchase
eReplacementParts Team
t
Questions & Answers ?
Our customer Service team is at the ready daily to answer your part and product questions.

Ask our Team
We have a dedicated staff with decades of collective experience in helping customers just like you purchase parts to repair their products.
Does this fit my product?Questions & Answers for Ignition Module
I am looking for an ignition coil for my Ryobi (RY253SS) attachment base engine.
Brian
for model number RY253SS
asked on 2022-04-17
Hello Brian, thank you for writing. For us to locate the correct parts, we will require the model number of the engine. Once you have located the model number, please feel free to resubmit the question and we will be happy to help you. We are looking forward to hearing from you!
eReplacementParts Team April 17, 2022
I cannot find a coil for my Ryobi 31 cc 15 inch weed eater I don't have a model number what coil will work
Doug
asked on 2022-04-05
Hello Doug, thank you for contacting us. In order for us to locate the correct parts and repair information we will require the model number of the unit. We strongly recommend you contact the manufacturer, as they would have this information in their system. Ask them for the part number you require and contact back to see if it is something we carry. We hope this helps!
eReplacementParts Team April 05, 2022
Customer Repair Instructions ?
All our customer repair instructions are solicited directly from other customers just like you who have purchased and replaced this exact part.
Bad Magneto
Raymond - June 27, 2018
👍 5 of 7 people found this instruction helpful
Tool Type
Trimmer
Difficulty
Medium
Time
30-60 minutes
Tools Used
, Torx drive set
Parts Used
1. Remove all covers on trimmer motor. This includes the screws that hold the pull start reel to the case
2. Disconnect the two wires for the remote stop switch.
3. Remove the two screws that hold the magneto coil to the engine. Remember how close the old pickups are to the fly wheel. This is very important in that if this adjustment is wrong on the new installation, the motor will not fire.
4. Swap out the old coil with the new one threading the screws into the elongated holes in the coil only slightly tightening the screws.
5. Adjust space between the pickups and the flywheel.
6. Tighten screws on coil mount.
7. Reconnect remote stop wires.
8. Reassembly the case making sure that you properly align the pull start reel with the case. Misalignment will not allow the pull start rope to deploy.
Once assembled, attempt to start trimmer. If no spark, check alignment of the coil to flywheel.
Did you find this story helpful?
Thanks for voting and helping fellow customers!
Trimmer magneto bad
Raymond - October 8, 2023
Tool Type
Trimmer
Difficulty
Easy
Time
15-30 minutes
Tools Used
, Torx driver
Parts Used
Removed plastic covers.
Disconnected wires to magneto.
Removed magneto.
Replaced with new one.
Gapped magneto magnet to the fly wheel with a credit card.
Reassembled covers.
Started engine and fined tuned the carburetor.
Disconnected wires to magneto.
Removed magneto.
Replaced with new one.
Gapped magneto magnet to the fly wheel with a credit card.
Reassembled covers.
Started engine and fined tuned the carburetor.
Did you find this story helpful?
Thanks for voting and helping fellow customers!
Spark plug broken
Richard - September 25, 2020
Tool Type
Trimmer
Difficulty
Medium
Time
15-30 minutes
Tools Used
Screwdriver, Power Drill, Na
Parts Used
Simply remove the old one and replace new one very easy
Did you find this story helpful?
Thanks for voting and helping fellow customers!
Ignition module was bad
Jorge - May 19, 2020
Tool Type
Trimmer
Difficulty
Medium
Time
30-60 minutes
Tools Used
Screwdriver, Pliers, Socket set
Parts Used
I toke the case apart removing the four screws on the front of the machine disconnecting the shut off wire, for me the most important is to set the gap of the magnet to the coil I used a piece of very thing strip of plastic from water bottle to set the gap and it works.I also separated the screws on the order I was taking off so I don’t get confuse as I installing back.
Did you find this story helpful?
Thanks for voting and helping fellow customers!
Trimmer would not start
PHILLIP - November 19, 2016
👍 0 of 2 people found this instruction helpful
Tool Type
Trimmer
Difficulty
Easy
Time
30-60 minutes
Tools Used
Screwdriver, special bits
Parts Used
1. Disconnected spark plug wire
2. Removed spark plug
3. Separated back motor fairing from front motor pulley housing
4. Used special bits to remove Ignition Module.
5. Used business card to gap module and flywheel magnet,tightened screws
6. Rejoined motor fairing and motor housing
7. Installed spark plug
8. Connected spark plug wire
9. Started engine, first pull
Did you find this story helpful?
Thanks for voting and helping fellow customers!
The spark plug wire broke on my trimmer.
Hunter - March 18, 2016
👍 1 of 4 people found this instruction helpful
Tool Type
Trimmer
Difficulty
Medium
Time
30-60 minutes
Tools Used
Screwdriver, Power Drill
Parts Used
I had to remove the motor from the housing and disconnect it from the shaft. Once this was done I removed the ignition module and replaced it with the new one. Then I space the distance between the flywheel and ignition at 0.014, I then put it all back together.
Did you find this story helpful?
Thanks for voting and helping fellow customers!
OEM stands for Original Equipment Manufacturer and means the part you’re buying is sourced directly from the manufacturer who made your product. At eReplacementParts, we sell only genuine OEM parts, guaranteeing the part you’re purchasing is of better design and of higher quality than aftermarket parts.
Our product descriptions are a combination of data sourced directly from the manufacturers who made your product as well as content researched and curated by our content & customer service teams. This content is edited and reviewed internally before being made public to customers.
Our customer service team are at the ready daily to answer your part and product questions. We have a dedicated staff with decades of collective experience in helping customers just like you purchase parts to repair their products.
All our part reviews are solicited directly from other customers who have purchased this exact part. While we moderate these reviews for profanity, offensive language or personally identifiable information, these reviews are posted exactly as submitted and no alterations are made by our team.
All our customer repair instructions are solicited directly from other customers just like you who have purchased and replaced this exact part. While we moderate these reviews for profanity, offensive language or personally identifiable information, these reviews are posted exactly as submitted and no alterations are made by our team.
Based on data from past customer purchasing behaviors, these parts are most commonly purchased together along with the part you are viewing. These parts may be necessary or helpful to replace to complete your current repair.
All our installation videos are created and produced in collaboration with our in-house repair technician, Mark Sodja, who has helped millions of eReplacementParts customers over the last 13 years repair their products. Mark has years of experience in selling and repairing both commercial and residential products with a specialty in gas-powered equipment.
This data is collected from customers who submitted a repair instruction after replacing this exact part. Customers can rate how easy the repair was to complete and how long it took. We aggregate this data to provide a repair rating that allows customers to quickly determine the difficulty and time needed to perform their own repair.