
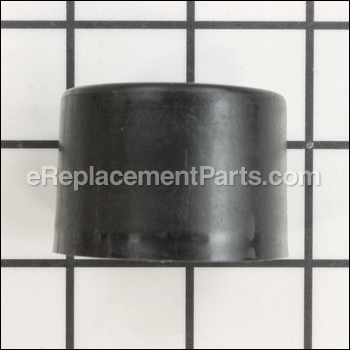


It is a genuine OEM part that is made for Snapper lawn mowers. The cap is secured to the lever and it helps to protect the bearing and the wheel axle from dust and other debris. This will provide an identical replacement for a damaged or a missing component that was installed on a new unit. It is made of a durable material and is sold as an individual item. You may need a flat-head screwdriver and a rubber mallet to remove the old cap and secure the new one. Check the appropriate diagrams of your model for the correct application of this hardware.
Hub Cap 7011022YP
OEM part for: Snapper
Part Number: 7011022YP
$4.99
In Stock
Jump To:
Frequently Purchased Together ?


Compatibility
This part will fit the following 1052 machines
Snapper
2681S 26" 8 Hp Rear Engine Rider View Diagrams & Manuals
3081 30" 8 Hp Rear Engine Rider View Diagrams & Manuals
3081S 30" 8 Hp Rear Engine Rider View Diagrams & Manuals
25062 25" 6 Hp Rear Engine Rider View Diagrams & Manuals
25062S 25" 6 Hp Rear Engine Rider View Diagrams & Manuals
26062 26" 6 Hp Rear Engine Rider View Diagrams & Manuals
26062S 26" 6 Hp Rear Engine Rider View Diagrams & Manuals
2652 26" 5 Hp Rear Engine Rider View Diagrams & Manuals
2652S 26" 5 Hp Rear Engine Rider View Diagrams & Manuals
25063 25" 6 Hp Rear Engine Rider View Diagrams & Manuals
25063S 25" 6 Hp Rear Engine Rider View Diagrams & Manuals
25083 25" 8 Hp Rear Engine Rider View Diagrams & Manuals
25083S 25" 8 Hp Rear Engine Rider View Diagrams & Manuals
2811X5S 28" 11 Hp Extra Tough Rear Engine Rider Series 5 View Diagrams & Manuals
30085 30" 8 Hp Rear Engine Rider Series 5 View Diagrams & Manuals
30085S 30" 8 Hp Rear Engine Rider Series 5 View Diagrams & Manuals
3011X5S 30" 11 Hp Extra Tough Rear Engine Rider Series 5 View Diagrams & Manuals
33115S 33" 11 Hp Rear Engine Rider Series 5 View Diagrams & Manuals
33115SC 33" 11 Hp Commercial Rear Engine Rider Series 5 View Diagrams & Manuals
3311X5S 33" 11 Hp Extra Tough Rear Engine Rider Series 5 View Diagrams & Manuals
41085 41" 8 Hp Rear Engine Rider Series 5 View Diagrams & Manuals
41085S 41" 8 Hp Rear Engine Rider Series 5 View Diagrams & Manuals
41115SC 41" 11 Hp Commercial Rear Engine Rider Series 5 View Diagrams & Manuals
4111X5S 41" 11 Hp Extra Tough Rear Engine Rider Series 5 View Diagrams & Manuals
25066 25" 6 Hp Rear Engine Rider Series 6 View Diagrams & Manuals
25066S 25" 6 Hp Rear Engine Rider Series 6 View Diagrams & Manuals
3012X6SR 30" 12Hp Extra Tough Rear Engine Rider Series 6 View Diagrams & Manuals
3012X6ST 30" 12Hp Extra Tough Rear Engine Rider Series 6 View Diagrams & Manuals
3311X6S 33" 11Hp Extra Tough Rear Engine Rider Series 6 View Diagrams & Manuals
3312X6S 33" 12Hp Extra Tough Rear Engine Rider Series 6 View Diagrams & Manuals
3312X6SR 33" 12Hp Extra Tough Rear Engine Rider Series 6 View Diagrams & Manuals
3312X6ST 33" 12Hp Extra Tough Rear Engine Rider Series 6 View Diagrams & Manuals
4111X6S 41" 11Hp Extra Tough Rear Engine Rider Series 6 View Diagrams & Manuals
4112X6S 41" 12Hp Extra Tough Rear Engine Rider Series 6 View Diagrams & Manuals
4112X6SR 41" 12Hp Extra Tough Rear Engine Rider Series 6 View Diagrams & Manuals
4112X6ST 41" 12Hp Extra Tough Rear Engine Rider Series 6 View Diagrams & Manuals
G25066 25" 6 Hp Rear Engine Rider European Series 6 View Diagrams & Manuals
G28086SB 28" 8 Hp Rear Engine Rider European Series 6 View Diagrams & Manuals
G2812X6S 28" 12 Hp Rear Engine Rider European Series 6 View Diagrams & Manuals
G3312X6S (81799) 33" 12 Hp Rear Engine Rider European Series 6 View Diagrams & Manuals
25657B 25" 6.5 Hp Rear Engine Rider Series 7 View Diagrams & Manuals
25657BE 25" 6.5 Hp Rear Engine Rider Series 7 View Diagrams & Manuals
26657 26" 6.5 Hp Rear Engine Rider Series 7 View Diagrams & Manuals
26657BE 26" 6.5 Hp Rear Engine Rider Series 7 View Diagrams & Manuals
28087B 28" 8 Hp Rear Engine Rider Series 7 View Diagrams & Manuals
28087BE 28" 8 Hp Rear Engine Rider Series 7 View Diagrams & Manuals
25064S 25" 6 Hp Rear Engine Rider Series 4 View Diagrams & Manuals
25084 25" 8 Hp Rear Engine Rider Series 4 View Diagrams & Manuals
25084BS 25" 8 Hp Rear Engine Rider Series 4 View Diagrams & Manuals
25084S 25" 8 Hp Rear Engine Rider Series 4 View Diagrams & Manuals
26064 26" 6 Hp Rear Engine Rider Series 4 View Diagrams & Manuals
26064S 26" 6 Hp Rear Engine Rider Series 4 View Diagrams & Manuals
26084 26" 8 Hp Rear Engine Rider Series 4 View Diagrams & Manuals
26084B 26" 8 Hp Rear Engine Rider Series 4 View Diagrams & Manuals
26084S 26" 8 Hp Rear Engine Rider Series 4 View Diagrams & Manuals
28084 28" 8 Hp Rear Engine Rider Series 4 View Diagrams & Manuals
28084S 28" 8 Hp Rear Engine Rider Series 4 View Diagrams & Manuals
28114S 28" 11 Hp Rear Engine Rider Series 4 View Diagrams & Manuals
30084 30" 8 Hp Rear Engine Rider Series 4 View Diagrams & Manuals
25086 25" 8 Hp Rear Engine Rider Series 6 View Diagrams & Manuals
25086S 25" 8 Hp Rear Engine Rider Series 6 View Diagrams & Manuals
26086 26" 8 Hp Rear Engine Rider Series 6 View Diagrams & Manuals
26086S 26" 8 Hp Rear Engine Rider Series 6 View Diagrams & Manuals
28086 28" 8 Hp Rear Engine Rider Series 6 View Diagrams & Manuals
28086S 28" 8 Hp Rear Engine Rider Series 6 View Diagrams & Manuals
28106S 28" 10 Hp Rear Engine Rider Series 6 View Diagrams & Manuals
2811X6S 28" 11 Hp Extra Tough Rear Engine Rider Series 6 View Diagrams & Manuals
2812X6S 28" 12Hp Extra Tough Rear Engine Rider Series 6 View Diagrams & Manuals
2812X6SR 28" 12Hp Extra Tough Rear Engine Rider Series 6 View Diagrams & Manuals
2812X6ST 28" 12Hp Extra Tough Rear Engine Rider Series 6 View Diagrams & Manuals
30086 30" 8 Hp Rear Engine Rider Series 6 View Diagrams & Manuals
30086S 30" 8 Hp Rear Engine Rider Series 6 View Diagrams & Manuals
30106S 30" 10 Hp Rear Engine Rider Series 6 View Diagrams & Manuals
3011X6S 30" 11Hp Extra Tough Rear Engine Rider Series 6 View Diagrams & Manuals
3012X6S 30" 12Hp Extra Tough Rear Engine Rider Series 6 View Diagrams & Manuals
26063 26" 6 Hp Rear Engine Rider Series 3 View Diagrams & Manuals
26063S 26" 6 Hp Rear Engine Rider Series 3 View Diagrams & Manuals
26083 26" 8 Hp Rear Engine Rider Series 3 View Diagrams & Manuals
26083S 26" 8 Hp Rear Engine Rider Series 3 View Diagrams & Manuals
28083 28" 8 Hp Rear Engine Rider Series 3 View Diagrams & Manuals
28083S 28" 8 Hp Rear Engine Rider Series 3 View Diagrams & Manuals
28113S 28" 11 Hp Rear Engine Rider Series 3 View Diagrams & Manuals
30083 30" 8 Hp Rear Engine Rider Series 3 View Diagrams & Manuals
30083S 30" 8 Hp Rear Engine Rider Series 3 View Diagrams & Manuals
30113S 30" 11 Hp Rear Engine Rider Series 3 View Diagrams & Manuals
33113S (89784) 33" 11 Hp Rear Engine Rider Series 3 View Diagrams & Manuals
4210WS (89284) 42" 10 Hp Rear Engine Rider 3 BladesSeries W View Diagrams & Manuals
42113S 42" 11 Hp Rear Engine Rider Series 3 View Diagrams & Manuals
25064 25" 6 Hp Rear Engine Rider Series 4 View Diagrams & Manuals
28127BE 28" 12 Hp Rear Engine Rider Series 7 View Diagrams & Manuals
30087 30" 8 Hp Rear Engine Rider Series 7 View Diagrams & Manuals
30087BE 30" 8 Hp Rear Engine Rider Series 7 View Diagrams & Manuals
30127BE 30" 12 Hp Rear Engine Rider Series 7 View Diagrams & Manuals
33127BE 33" 12 Hp Rear Engine Rider Series 7 View Diagrams & Manuals
33147BVE 33" 14 Hp Rear Engine Rider Series 7 View Diagrams & Manuals
33147KE 33" 14 Hp Rear Engine Rider Series 7 View Diagrams & Manuals
28088B 28" 8 Hp Rear Engine Rider Series 8 View Diagrams & Manuals
28088BE 28" 8 Hp Rear Engine Rider Series 8 View Diagrams & Manuals
28088T 28" 8 Hp Rear Engine Rider Series 8 View Diagrams & Manuals
28088TE 28" 8 Hp Rear Engine Rider Series 8 View Diagrams & Manuals
28108BE 28" 10 Hp Rear Engine Rider Series 8 View Diagrams & Manuals
28128BE 28" 12 Hp Rear Engine Rider Series 8 View Diagrams & Manuals
28128TVE 28" 12 Hp Rear Engine Rider Series 8 View Diagrams & Manuals
30088B 30" 8 Hp Rear Engine Rider Series 8 View Diagrams & Manuals
30088BE 30" 8 Hp Rear Engine Rider Series 8 View Diagrams & Manuals
30088T 30" 8 Hp Rear Engine Rider Series 8 View Diagrams & Manuals
30084S 30" 8 Hp Rear Engine Rider Series 4 View Diagrams & Manuals
30114S 30" 11 Hp Rear Engine Rider Series 4 View Diagrams & Manuals
33114S 33" 11 Hp Rear Engine Rider Series 4 View Diagrams & Manuals
25065 25" 6 Hp Rear Engine Rider Series 5 View Diagrams & Manuals
25065S 25" 6 Hp Rear Engine Rider Series 5 View Diagrams & Manuals
25085 25" 8 Hp Rear Engine Rider Series 5 View Diagrams & Manuals
25085S 25" 8 Hp Rear Engine Rider Series 5 View Diagrams & Manuals
26085 26" 8 Hp Rear Engine Rider Series 5 View Diagrams & Manuals
26085BS 26" 8 Hp Rear Engine Rider Series 5 View Diagrams & Manuals
26085S 26" 8 Hp Rear Engine Rider Series 5 View Diagrams & Manuals
28085 28" 8 Hp Rear Engine Rider Series 5 View Diagrams & Manuals
28085S 28" 8 Hp Rear Engine Rider Series 5 View Diagrams & Manuals
28115S 28" 11 Hp Rear Engine Rider Series 5 View Diagrams & Manuals
30088TE 30" 8 Hp Rear Engine Rider Series 8 View Diagrams & Manuals
30108BE 30" 10 Hp Rear Engine Rider Series 8 View Diagrams & Manuals
30128BE 30" 12 Hp Rear Engine Rider Series 8 View Diagrams & Manuals
30128RE 30" 12 Hp Rear Engine Rider Series 8 View Diagrams & Manuals
30148KVE 30" 14 Hp Rear Engine Rider Series 8 View Diagrams & Manuals
33128BE 33" 12 Hp Rear Engine Rider Series 8 View Diagrams & Manuals
33128RE 33" 12 Hp Rear Engine Rider Series 8 View Diagrams & Manuals
33128TVE 33" 12 Hp Rear Engine Rider Series 8 View Diagrams & Manuals
33148KVE 33" 14 Hp Rear Engine Rider Series 8 View Diagrams & Manuals
41128BE 41" 12 Hp Rear Engine Rider Series 8 View Diagrams & Manuals
R33148KVE 33" 14 Hp Rear Engine Rider Recycling Series 8 View Diagrams & Manuals
25069T 25" 6 Hp Rear Engine Rider Series 9 View Diagrams & Manuals
25659BE 25" 6.5 Hp Rear Engine Rider Series 9 View Diagrams & Manuals
26069T 26" 6 Hp Rear Engine Rider Series 9 View Diagrams & Manuals
26659BE 26" 6.5 Hp Rear Engine Rider Series 9 View Diagrams & Manuals
250816B 25" 8 Hp Rear Engine Rider Series 16 View Diagrams & Manuals
250816BE 25" 8 Hp Rear Engine Rider Series 16 View Diagrams & Manuals
281016BE 28" 10 Hp Rear Engine Rider Series 16 View Diagrams & Manuals
301016BE 30" 10 Hp Rear Engine Rider Series 16 View Diagrams & Manuals
301216BE 30" 12 Hp Rear Engine Rider Series 16 View Diagrams & Manuals
331416BVE 33" 14 Hp Rear Engine Rider Series 16 View Diagrams & Manuals
331416KVE 33" 14 Hp Rear Engine Rider Series 16 View Diagrams & Manuals
421616BVE (82384) 42" 16 Hp Rear Engine Rider Series 16 View Diagrams & Manuals
E250816BE 25" 8 Hp Rear Engine Rider European Series 16 View Diagrams & Manuals
E281016BE 28" 10 Hp Rear Engine Rider European Series 16 View Diagrams & Manuals
E281216BE 28" 12 Hp Rear Engine Rider European Series 16 View Diagrams & Manuals
E331316BVE 33" 13 Hp Rear Engine Rider European Series 16 View Diagrams & Manuals
E331416KVE 33" 14 Hp Rear Engine Rider European Series 16 View Diagrams & Manuals
N250816B 25" 8 Hp Rear Engine Rider Series 16 View Diagrams & Manuals
N250816BE 25" 8 Hp Rear Engine Rider Series 16 View Diagrams & Manuals
280922B (84697) 28" 9 Hp Rear Engine Rider Series 22 View Diagrams & Manuals
281022BE (84700) 28" 10 Hp Rear Engine Rider Series 22 View Diagrams & Manuals
281222BE (84703) 28" 12 Hp Rear Engine Rider View Diagrams & Manuals
300922B (84699) 30" 9 Hp Rear Engine Rider Series 22 View Diagrams & Manuals
301022BE (84701) 30" 10 Hp Rear Engine Rider Series 22 View Diagrams & Manuals
301222BE (84704) 30" 12 Hp Rear Engine Rider Series 22 View Diagrams & Manuals
3314522BVE (84668) 33" 14.5 Hp Rear Engine Rider Series 22 View Diagrams & Manuals
331522KVE (84677) 33" 15 Hp Rear Engine Rider Series 22 View Diagrams & Manuals
421622BVE (84707) 42" 16 Hp Rear Engine Rider Series 22 View Diagrams & Manuals
E281022BE (84709) 28" 10 Hp Rear Engine Rider Euro Series 22 View Diagrams & Manuals
E281222BE (84710) 28" 12 Hp Rear Engine Rider Euro Series 22 View Diagrams & Manuals
E331522KVE (84711) 33" 15 Hp Rear Engine Rider Euro Series 22 View Diagrams & Manuals
W280922B (84698) 28" 9 Hp Rear Engine Rider Series 22 View Diagrams & Manuals
W301022BE (84702) 30" 10 Hp Rear Engine Rider Series 22 View Diagrams & Manuals
281023BVE (84871) 28" 10 Hp Rear Engine Rider View Diagrams & Manuals
281123BV (7800102) 28" 11 Hp Rear Engine Rider Series 23 View Diagrams & Manuals
281123BVE (84874) 28" 11 Hp Rear Engine Rider Series 23 View Diagrams & Manuals
281123HVE (84883) 28" 11 Hp Rear Engine Rider Series 23 View Diagrams & Manuals
2811523BV (7084940) 28" 11.5 Hp Rear Engine Rider Series 23 View Diagrams & Manuals
281223BVE (85622) 28" 12 Hp Rear Engine Rider View Diagrams & Manuals
2812523BVE (7085622) 28" 12.5 Hp Rear Engine Rider Series 23 View Diagrams & Manuals
281323BVE (84876) 28" 13 Hp Rear Engine Rider Series 23 View Diagrams & Manuals
2813523BVE (7085624) 28" 13.5 Hp Rear Engine Rider Series 23 View Diagrams & Manuals
301123BV (84873) 30" 11 Hp Rear Engine Rider Series 23 View Diagrams & Manuals
301123BVE (84875) 30" 11 Hp Rear Engine Rider Series 23 View Diagrams & Manuals
3011523BV (7084941) 30" 11.5 Hp Rear Engine Rider Series 23 View Diagrams & Manuals
3012523BVE (7085623) 30" 12.5 Hp Rear Engine Rider Series 23 View Diagrams & Manuals
301323BVE (84877) 30" 13 Hp Rear Engine Rider Series 23 View Diagrams & Manuals
3013523BVE (7085625) 30" 13.5 Hp Rear Engine Rider Series 23 View Diagrams & Manuals
331323HVE (84885) 33" 13 Hp Rear Engine Rider Series 23 View Diagrams & Manuals
331523BVE (84878) 33" 15 Hp Rear Engine Rider Series 23 View Diagrams & Manuals
331523KVE (7084879) 33" 15 Hp Rear Engine Rider Series 23 View Diagrams & Manuals
331623BVE (84954) 33" 16 Hp Rear Engine Rider Series 23 View Diagrams & Manuals
331723BVE (7084954) 33" 17 Hp Rear Engine Rider Series 23 View Diagrams & Manuals
3317523BVE (7800254) 33" 17.5 Hp Rear Engine Rider Series 23 View Diagrams & Manuals
421823BVE (84880) 42" 18 Hp Rear Engine Rider Series 23 View Diagrams & Manuals
422023BVE (85684) 42" 20 Hp Rear Engine Rider Series 23 View Diagrams & Manuals
C2811523BV (7800363) 28" 11.5 Hp Rear Engine Rider California Series 23 View Diagrams & Manuals
301214BE Rear Engine Rider Series 14 View Diagrams & Manuals
331314BE Rear Engine Rider Series 14 View Diagrams & Manuals
331414KVE Rear Engine Rider Series 14 View Diagrams & Manuals
421614BVE Rear Engine Rider Series 14 View Diagrams & Manuals
250815B Rear Engine Rider Series 15 View Diagrams & Manuals
250815BE Rear Engine Rider Series 15 View Diagrams & Manuals
280915BE Rear Engine Rider Series 15 View Diagrams & Manuals
300915BE Rear Engine Rider Series 15 View Diagrams & Manuals
301215BE Rear Engine Rider Series 15 View Diagrams & Manuals
331415BVE Rear Engine Rider Series 15 View Diagrams & Manuals
331415KVE Rear Engine Rider Series 15 View Diagrams & Manuals
421615BVE Rear Engine Rider Series 15 View Diagrams & Manuals
421615TVE Rear Engine Rider Series 15 View Diagrams & Manuals
E250815BE (Euro) 25" Rear Engine Rider Series 15 View Diagrams & Manuals
E280915BE (Euro) 28" 9 Hp Rear Engine Rider Series 15 View Diagrams & Manuals
E331315BVE (Euro) 33" 13 Hp Rear Engine Rider Series 15 View Diagrams & Manuals
E331415KVE (Euro) 33" 14 Hp Rear Engine Rider Series 15 View Diagrams & Manuals
331413KVE 33" 14 Hp Rear Engine Rider Series 13 View Diagrams & Manuals
421613BVE 42" 16 Hp Rear Engine Rider Series 13 View Diagrams & Manuals
421613BVE1 42" 16 Hp Rear Engine Rider Series 13 View Diagrams & Manuals
E250813B 25" 8 Hp Rear Engine Rider European Series 13 View Diagrams & Manuals
E250813BE 25" 8 Hp Rear Engine Rider European Series 13 View Diagrams & Manuals
E280813BE 28" 8 Hp Rear Engine Rider European Series 13 View Diagrams & Manuals
E281213BE 28" 12 Hp Rear Engine Rider European Series 13 View Diagrams & Manuals
E3312513BE 33" 12.5 Hp Rear Engine Rider European Series 13 View Diagrams & Manuals
E331313BE 33" 13 Hp Rear Engine Rider European Series 13 View Diagrams & Manuals
E331413KVE 33" 14 Hp Rear Engine Rider European Series 13 View Diagrams & Manuals
E421613BVE 42" 16 Hp Rear Engine Rider European Series 13 View Diagrams & Manuals
R281213BE 28" 12 Hp Rear Engine Rider Recycling Series 13 View Diagrams & Manuals
R3312513BE 33" 12.5 Hp Rear Engine Rider Recycling Series 13 View Diagrams & Manuals
250814B Rear Engine Rider Series 14 View Diagrams & Manuals
250814BE Rear Engine Rider Series 14 View Diagrams & Manuals
280914BE Rear Engine Rider Series 14 View Diagrams & Manuals
281014BE Rear Engine Rider Series 14 View Diagrams & Manuals
300914BE Rear Engine Rider Series 14 View Diagrams & Manuals
301014BE Rear Engine Rider Series 14 View Diagrams & Manuals
7060697 Dump Cart View Diagrams & Manuals
7063080 Kit, Stand/Sit Sulky View Diagrams & Manuals
3317524BVE (7800787) 33" 17.5 Hp Rear Engine Rider Series 24 View Diagrams & Manuals
265X (86685) 26" 5 Hp Rear Engine Rider Comet Series X View Diagrams & Manuals
265XS (86688) 26" 5 Hp Rear Engine Rider Comet Series X View Diagrams & Manuals
268X (86694) 26" 8 Hp Rear Engine Rider Comet Series X View Diagrams & Manuals
268XS (86698) 26" 8 Hp Rear Engine Rider Comet Series X View Diagrams & Manuals
308X (86794) 30" 8 Hp Rear Engine Rider Comet Series X View Diagrams & Manuals
308XS (86798) 30" 8 Hp Rear Engine Rider Comet Series X View Diagrams & Manuals
381450HBVE (84270) 38" 14 Hp Rer Hydro Drive Series 0 View Diagrams & Manuals
381451HBVE (84393) 38" 14 Hp Rer Hydro Drive Series 1 View Diagrams & Manuals
7060947 Bag N-Wagon, 30 Bushel View Diagrams & Manuals
HZ14330BVE 33" 14 Hp Ztr Yard Cruiser Series 0 View Diagrams & Manuals
HZ14380BVE 38" 14 Hp Ztr Yard Cruiser Series 0 View Diagrams & Manuals
HZ15420KVE 42" 15 Hp Ztr Yard Cruiser Series 0 View Diagrams & Manuals
HZ16480BVE 48" 16 Hp Ztr Yard Cruiser Series 0 View Diagrams & Manuals
HZS14330BVE 33" 14 Hp Ztr Yard Cruiser Series 0 View Diagrams & Manuals
BH120G38AB (80479) 38" 12 Hp Gear Drive Bh Tractor Series A View Diagrams & Manuals
BH125G38BB (82356) 38" 12.5 Hp Gear Drive Bh Tractor Series B View Diagrams & Manuals
BH140G42ABV (80480) 42" 14 Hp Gear Drive Bh Tractor Series A View Diagrams & Manuals
BH140H33BBV (80878) 33" 14 Hp Hydro Drive Bh Tractor Series B View Diagrams & Manuals
BH140H38BBV (82361) 38" 14 Hp Hydro Drive Bh Tractor Series B View Diagrams & Manuals
ELT120G30AB 30" 12 Hp Gear Drive Euro Tractor Series "A" View Diagrams & Manuals
ELT120G33AB (80476) 33" 12 Hp Euro Tractor Series "A" View Diagrams & Manuals
ELT125G33AB 33" 12.5 Hp Euro Tractor Series "A" View Diagrams & Manuals
ELT125G33BB 33" 12.5 Hp Gear Drive Tractor Series B View Diagrams & Manuals
ELT125G33DB 33" 12.5 Hp Gear Drive Tractor Series D View Diagrams & Manuals
ELT125G38AB (80395) 38" 12.5 Hp Euro Tractor Series "A" View Diagrams & Manuals
ELT130G38AB 38" 13 Hp Euro Tractor Series "A" View Diagrams & Manuals
LT120G30AB (80350) 30" 12 Hp Gear Drive Tractor Series A View Diagrams & Manuals
LT120G30BB 30" 12 Hp Gear Drive Tractor Series B View Diagrams & Manuals
LT120G30DB 30" 12 Hp Gear Drive Tractor Series D View Diagrams & Manuals
LT125G33AB (80554) 33" 12.5 Hp Euro Tractor Series "A" View Diagrams & Manuals
LT125G33BB 33" 12.5 Hp Gear Drive Tractor Series B View Diagrams & Manuals
LT125G38AB (80377) 38" 12.5 Hp Gear Drive Tractor Series A View Diagrams & Manuals
LT125G38DB 38" 12.5 Hp Gear Drive Tractor Series D View Diagrams & Manuals
LT130G38AB 38" 13 Hp Euro Tractor Series "A" View Diagrams & Manuals
C2812523BVE (7800365) 28" 12.5 Hp Rear Engine Rider California Series 23 View Diagrams & Manuals
C3011523BV (7800364) 30" 11.5 Hp Rear Engine Rider California Series 23 View Diagrams & Manuals
C3012523BVE (7800366) 30" 12.5 Hp Rear Engine Rider California Series 23 View Diagrams & Manuals
C3317523BVE (7800368) 33" 17.5 Hp Rear Engine Rider California Series 23 View Diagrams & Manuals
E251023BVE (85636) 25" 10 Hp Rear Engine Rider Euro Series 23 View Diagrams & Manuals
E2512523BVE (7084651) 25" 12.5 Hp Rear Engine Rider Euro Series 23 View Diagrams & Manuals
E281123BVE (84886) 28" 11 Hp Rear Engine Rider Euro Series 23 View Diagrams & Manuals
E2812523BVE (7085626) 28" 12.5 Hp Rear Engine Rider Euro Series 23 View Diagrams & Manuals
E281323BVE (84887) 28" 13 Hp Rear Engine Rider Euro Series 23 View Diagrams & Manuals
E2813523BVE (7085686) 28" 13.5 Hp Rear Engine Rider Euro Series 23 View Diagrams & Manuals
E2814523BVE (7800790) 28" 14.5 Hp Rear Engine Rider Euro Series 23 View Diagrams & Manuals
E331523KVE (7084888) 33" 15 Hp Rear Engine Rider Euro Series 23 View Diagrams & Manuals
E3317523BVE (7800718) 33" 17.5 Hp Rear Engine Rider Euro Series 23 View Diagrams & Manuals
W280923BV (84881) 28" 9 Hp Rear Engine Rider Series 23 View Diagrams & Manuals
W281023BVE (84884) 28" 10 Hp Rear Engine Rider Series 23 View Diagrams & Manuals
W301023BVE (84882) 30" 10 Hp Rear Engine Rider Series 23 View Diagrams & Manuals
2811524BV (7800784) 28" 11.5 Hp Rear Engine Rider Series 24 View Diagrams & Manuals
2812524BVE (7800785) 28" 12.5 Hp Rear Engine Rider Series 24 View Diagrams & Manuals
3014524BVE (7800786) 30" 14.5 Hp Rear Engine Rider Series 24 View Diagrams & Manuals
E3312511BE 33" 12.5 Hp Rear Engine Rider European Series 11 View Diagrams & Manuals
E331411KVE 33" 14 Hp Rear Engine Rider European Series 11 View Diagrams & Manuals
R250811BE 25" 8 Hp Rear Engine Rider Recycling Series 11 View Diagrams & Manuals
R2811511BE 28" 11 Hp Rear Engine Rider Recycling Series 11 View Diagrams & Manuals
R3312511BE 33" 12.5 Hp Rear Engine Rider Recycling Series 11 View Diagrams & Manuals
250612T 25" 6 Hp Rear Engine Rider Series 12 View Diagrams & Manuals
250812BE 25" 8 Hp Rear Engine Rider Series 12 View Diagrams & Manuals
260612T 26" 6 Hp Rear Engine Rider Series 12 View Diagrams & Manuals
280812BE 28" 8 Hp Rear Engine Rider Series 12 View Diagrams & Manuals
300812B 30" 8 Hp Rear Engine Rider Series 12 View Diagrams & Manuals
300812BE 30" 8 Hp Rear Engine Rider Series 12 View Diagrams & Manuals
250813BE 25" 8 Hp Rear Engine Rider Series 13 View Diagrams & Manuals
280813BE 28" 8 Hp Rear Engine Rider Series 13 View Diagrams & Manuals
281013BE 28" 10 Hp Rear Engine Rider Series 13 View Diagrams & Manuals
300813BE 30" 8 Hp Rear Engine Rider Series 13 View Diagrams & Manuals
301013BE 30" 10 Hp Rear Engine Rider Series 13 View Diagrams & Manuals
301213BE 30" 12 Hp Rear Engine Rider Series 13 View Diagrams & Manuals
301413KVE 30" 14 Hp Rear Engine Rider Series 13 View Diagrams & Manuals
3312513BE 33" 12.5 Hp Rear Engine Rider Series 13 View Diagrams & Manuals
331313BE 33" 13 Hp Rear Engine Rider Series 13 View Diagrams & Manuals
ELT145H33FBV (84360) 38" 14.5 Hp European Hydro Drive Tractor Series F View Diagrams & Manuals
ELT145H33GBV (84597) 33" 14.5 Hp Hydro Drive Tractor Series G View Diagrams & Manuals
ELT145H33HBV 33" 14.5 Hp Hydro Drive Euro Tractor Series H View Diagrams & Manuals
ELT150H33IBV 33" 15 Hp Hydro Drive Euro Tractor Series I View Diagrams & Manuals
ELT180H33IBV 33" 18 Hp Hydro Drive Euro Tractor Series I View Diagrams & Manuals
LT140H33BBV 33" 14 Hp Hydro Drive Tractor Series B View Diagrams & Manuals
LT140H33DBV 33" 14 Hp Hydro Drive Tractor Series D View Diagrams & Manuals
LT140H38ABV (80561) 38" 14 Hp Hydro Drive Tractor Series A View Diagrams & Manuals
LT140H38BBV 38" 14 Hp Hydro Drive Tractor Series B View Diagrams & Manuals
LT145H33FBV (84355) 33" 14.5 Hp Hydro Drive Tractor Series F View Diagrams & Manuals
LT145H33GBV (84591) 33" 14.5 Hp Hydro Drive Tractor Series G View Diagrams & Manuals
LT145H33HBV 33" 14.5 Hp Hydro Drive Tractor Series H View Diagrams & Manuals
LT145H38DBV 38" 14.5 Hp Hydro Drive Tractor Series D View Diagrams & Manuals
LT145H38FBV (84356) 38" 14.5 Hp Hydro Drive Tractor Series F View Diagrams & Manuals
LT145H38GBV (84592) 38" 14.5 Hp Hydro Drive Tractor Series G View Diagrams & Manuals
LT145H38HBV 38" 14.5 Hp Hydro Drive Tractor Series H View Diagrams & Manuals
LT150H33IBV 33" 15 Hp Hydro Drive Tractor Series I View Diagrams & Manuals
LT150H38BBV 38" 15 Hp Hydro Drive Tractor Series B View Diagrams & Manuals
LT150H38GKV (84593) 38" 15 Hp Hydro Drive Tractor Series G View Diagrams & Manuals
HT18330 (82839) 33" 18 Hp Hydro Drive Yard Tractor Series 4 View Diagrams & Manuals
HT18410 (82819) 41" 18 Hp Hydro Drive Yard Tractor Series 4 View Diagrams & Manuals
HT18480 (82829) 48" 18 Hp Hydro Drive Yard Tractor Series 4 View Diagrams & Manuals
HZS14380BVE 38" 14 Hp Ztr Yard Cruiser Series 0 View Diagrams & Manuals
HZS15420KVE 42" 15 Hp Ztr Yard Cruiser Series 0 View Diagrams & Manuals
NHZ14380BVE 38" 14 Hp Ztr Yard Cruiser Series 0 View Diagrams & Manuals
HZS14331BVE 33" 14 Hp Ztr Yard Cruiser Series 1 View Diagrams & Manuals
HZS14381BVE 38" 14 Hp Ztr Yard Cruiser Series 1 View Diagrams & Manuals
HZS15421KVE 42" 15 Hp Ztr Yard Cruiser Series 1 View Diagrams & Manuals
HZS15422KVE 42" 15 Hp Ztr Yard Cruiser Series 2 View Diagrams & Manuals
HZS16481BVE 48" 16 Hp Ztr Yard Cruiser Series 1 View Diagrams & Manuals
HZS18482BVE 48" 18 Hp Ztr Yard Cruiser Series 2 View Diagrams & Manuals
HZS15423KVE 42" 15 Hp Ztr Yard Cruiser Series 3 View Diagrams & Manuals
HZS18483BVE 48" 18 Hp Ztr Yard Cruiser Series 3 View Diagrams & Manuals
YZ13331BE 33" 13 Hp Ztr Yard Cruiser Series 1 View Diagrams & Manuals
YZ13381BE 38" 13 Hp Ztr Yard Cruiser Series 1 View Diagrams & Manuals
YZ145332BVE 33" 14.5 Hp Ztr Yard Cruiser Series 2 View Diagrams & Manuals
YZ145382BVE 38" 14.5 Hp Ztr Yard Cruiser Series 2 View Diagrams & Manuals
YZ145333BVE 33" 14.5 Hp Ztr Yard Cruiser Series 3 View Diagrams & Manuals
YZ145383BVE 38" 14.5 Hp Ztr Yard Cruiser Series 3 View Diagrams & Manuals
EYZ15334BVE 33" 15 Hp Ztr Yard Cruiser Series 4 View Diagrams & Manuals
YZ15334BVE 33" 15 Hp Ztr Yard Cruiser Series 4 View Diagrams & Manuals
YZ15384BVE 38" 15 Hp Ztr Yard Cruiser Series 4 View Diagrams & Manuals
YZ16424BVE 42" 16 Hp Ztr Yard Cruiser Series 4 View Diagrams & Manuals
YZ20484BVE 48" 18 Hp Ztr Yard Cruiser Series 4 View Diagrams & Manuals
YZ16335BVE (84946) 33" 16 Hp Ztr Scrambler Series 5 View Diagrams & Manuals
YZ16385BVE (84945) 38" 16 Hp Ztr Scrambler Series 5 View Diagrams & Manuals
YZ18336BVE (85693) 33" 18 Hp Ztr Scrambler Series 6 View Diagrams & Manuals
YZ18386BVE (85694) 38" 18 Hp Ztr Scrambler Series 6 View Diagrams & Manuals
NLT120G30DB 30" 12 Hp Gear Drive Tractor Series D View Diagrams & Manuals
LT145H38CBV 38" 14.5 Hp Hydro Drive Tractor Series C View Diagrams & Manuals
LT160H42CBV 42" 16 Hp Hydro Drive Tractor Series C View Diagrams & Manuals
LT160H42CBV2 42" 16 Hp Hydro Drive Tractor Series C View Diagrams & Manuals
LT160H42DBV 42" 16 Hp Hydro Drive Tractor Series D View Diagrams & Manuals
LT160H42DBV2 42" 16 Hp Hydro Drive Tractor Series D View Diagrams & Manuals
LT160H42FBV 42" 16 Hp Hydro Drive Tractor Series F View Diagrams & Manuals
LT160H42FBV2 42" 16 Hp Hydro Drive Tractor Series F View Diagrams & Manuals
LT160H42GBV (84594) 42" 16 Hp Hydro Drive Tractor Series G View Diagrams & Manuals
LT160H42GBV2 (84595) 42" 16 Hp Hydro Drive Tractor Series G View Diagrams & Manuals
LT160H42HBV (84723) 42" 16 Hp Hydro Drive Tractor Series H View Diagrams & Manuals
LT160H42HBV2 (84724) 42" 16 Hp Hydro Drive Tractor Series H View Diagrams & Manuals
LT150H38HKV 38" 15 Hp Hydro Drive Tractor Series H View Diagrams & Manuals
LT150H38IBV 38" 15 Hp Hydro Drive Tractor Series I View Diagrams & Manuals
LT155H42BBV 42" 15.5 Hp Hydro Drive Tractor Series B View Diagrams & Manuals
LT180H33IBV 33" 18 Hp Hydro Drive Tractor Series I View Diagrams & Manuals
LT180H38IBV 38" 18 Hp Hydro Drive Tractor Series I View Diagrams & Manuals
NLT145H38DBV 38" 14.5 Hp Hydro Drive Tractor Series D View Diagrams & Manuals
WLT145H38GBV (84657) 38" 14.5 Hp Hydro Drive Tractor Series G View Diagrams & Manuals
WLT145H38HBV 38" 14.5 Hp Hydro Drive Tractor Series H View Diagrams & Manuals
WLT150H38IBV 38" 15 Hp Hydro Drive Tractor Series I View Diagrams & Manuals
WLT170H38IBV 38" 17 Hp Hydro Drive Tractor Series I View Diagrams & Manuals
LT12D330B 33" 12 Hp Disc Drive Tractor Series 0 View Diagrams & Manuals
LT12D410B 41" 12 Hp Disc Drive Tractor Series 0 View Diagrams & Manuals
LT160H42IBV (84895) 42" 16 Hp Hydro Drive Tractor Series I View Diagrams & Manuals
LT180H42IBV (85692) 42" 18 Hp Hydro Drive Tractor Series I View Diagrams & Manuals
LT180H42IBV2 (84896) 42" 18 Hp Hydro Drive Tractor Series I View Diagrams & Manuals
LT180H48DBV2 48" 18 Hp Hydro Drive Tractor Series D View Diagrams & Manuals
LT180H48FBV2 48" 18 Hp Hydro Drive Tractor Series F View Diagrams & Manuals
LT180H48GBV2 (84596) 48" 18 Hp Hydro Drive Tractor Series G View Diagrams & Manuals
LT180H48HBV2 (84725) 48" 18 Hp Hydro Drive Tractor Series H View Diagrams & Manuals
LT200H42IBV2 (85920) 42" 20 Hp Hydro Drive Tractor Series I View Diagrams & Manuals
LT200H48IBV2 (84897) 48" 20 Hp Hydro Drive Tractor Series I View Diagrams & Manuals
WLT160H42GBV (84658) 42" 16 Hp Hydro Drive Tractor Series G View Diagrams & Manuals
WLT160H42HBV (84728) 42" 16 Hp Hydro Drive Tractor Series H View Diagrams & Manuals
WLT180H42IBV2 (84903) 42" 18 Hp Hydro Drive Tractor Series I View Diagrams & Manuals
WLT180H48GBV2 (84659) 48" 18 Hp Hydro Drive Tractor Series G View Diagrams & Manuals
WLT180H48HBV2 (84729) 48" 18 Hp Hydro Drive Tractor Series H View Diagrams & Manuals
WLT200H48IBV2 (84904) 48" 20 Hp Hydro Drive Tractor Series I View Diagrams & Manuals
ELT140H33ABV (80562) 33" 14 Hp Hydro Drive Euro Tractor Series A View Diagrams & Manuals
ELT140H33BBV 33" 14 Hp Hydro Drive Tractor Series B View Diagrams & Manuals
ELT140H33DBV 33" 14 Hp Hydro Drive Tractor Series D View Diagrams & Manuals
LT12482 48" 12.5 Hp Disc Drive Tractor Series 2 View Diagrams & Manuals
LT12502 12.5 Hp Disc Drive Tractor Series 2 View Diagrams & Manuals
LT16001 16 Hp Disc Drive Tractor Series 1 View Diagrams & Manuals
LT16002 16 Hp Disc Drive Tracor Series 2 View Diagrams & Manuals
LT16332 33" 16 Hp Disc Drive Tractor Series 2 View Diagrams & Manuals
LT16412 41" 16 Hp Disc Drive Tractor Series 2 View Diagrams & Manuals
LT16482 48" 16 Hp Disc Drive Tractor Series 2 View Diagrams & Manuals
RYT16D334K 33" 16 Hp Disc Drive Yard Tractor Series 4 View Diagrams & Manuals
YT12333 33" 12.5 Hp Disc Drive Yard Tractor Series 3 View Diagrams & Manuals
YT12413 41" 12.5 Hp Disc Drive Yard Tractor Series 3 View Diagrams & Manuals
YT12D334B 33" 12.5 Hp Disc Drive Yard Tractor Series 4 View Diagrams & Manuals
YT12D414B 41" 12.5 Hp Disc Drive Yard Tractor Series 4 View Diagrams & Manuals
YT16333 33" 16 Hp Disc Drive Yard Tractor Series 3 View Diagrams & Manuals
YT16413 41" 16 Hp Disc Drive Yard Tractor Series 3 View Diagrams & Manuals
YT16483 48" 16 Hp Disc Drive Yard Tractor Series 3 View Diagrams & Manuals
YT16D334B 33" 16 Hp Disc Drive Yard Tractor Series 4 View Diagrams & Manuals
M281019BE 28" 10 Hp Rear Engine Rider "M" Series 19 View Diagrams & Manuals
M300919B 30" 9 Hp Rear Engine Rider "M" Series 19 View Diagrams & Manuals
M301019BE 30" 10 Hp Rear Engine Rider "M" Series 19 View Diagrams & Manuals
281320BE 28" 13 Hp Rear Engine Rider Series 20 View Diagrams & Manuals
301320BE 30" 13 Hp Rear Engine Rider Series 20 View Diagrams & Manuals
3314520BVE 33" 14.5 Hp Rear Engine Rider Series 20 View Diagrams & Manuals
331520KVE 33" 15 Hp Rear Engine Rider Series 20 View Diagrams & Manuals
421620BVE 42" 16 Hp Rear Engine Rider Series 20 View Diagrams & Manuals
E281320BE 28" 13 Hp Rear Engine Rider European Series 20 View Diagrams & Manuals
E331520KVE 33" 15 Hp Rear Engine Rider European Series 20 View Diagrams & Manuals
EM250821BE (84587) 25" 8 Hp Rear Engine Rider Euro "M" Series 21 View Diagrams & Manuals
EM281021BE (84588) 28" 10 Hp Rear Engine Rider Euro "M" Series 21 View Diagrams & Manuals
M250821BE (84579) 25" 8 Hp Rear Engine Rider "M" Series 21 View Diagrams & Manuals
M280921B (84577) 28" 9 Hp Rear Engine Rider "M" Series 21 View Diagrams & Manuals
M281021BE (84580) 28" 10 Hp Rear Engine Rider "M" Series 21 View Diagrams & Manuals
M300921B (84578) 30" 9 Hp Rear Engine Rider "M" Series 21 View Diagrams & Manuals
M301021BE (84581) 30" 10 Hp Rear Engine Rider "M" Series 21 View Diagrams & Manuals
WM280921B (84660) 28" 9 Hp Rear Engine Rider "M" Series 21 View Diagrams & Manuals
WM301021BE (84661) 30" 10 Hp Rear Engine Rider "M" Series 21 View Diagrams & Manuals
N281016BE 28" 10 Hp Rear Engine Rider Series 16 View Diagrams & Manuals
M280817B -82519 28" 8 Hp Rear Engine Rider "M" Series 17 View Diagrams & Manuals
M280917B -84249 28" 9 Hp Rear Engine Rider "M" Series 17 View Diagrams & Manuals
M280917BE -84250 28" 9 Hp Rear Engine Rider "M" Series 17 View Diagrams & Manuals
M300917B -84283 30" 9 Hp Rear Engine Rider "M" Series 17 View Diagrams & Manuals
281318BE -84381 28" 13 Hp Rear Engine Rider Series 18 View Diagrams & Manuals
301318BE -84382 30" 13 Hp Rear Engine Rider Series 18 View Diagrams & Manuals
3314518BVE -84262 33" 14.5 Hp Rear Engine Rider Series 18 View Diagrams & Manuals
331518KVE -84263 33" 15 Hp Rear Engine Rider Series 18 View Diagrams & Manuals
421618BVE -84264 42" 16 Hp Rear Engine Rider Series 18 View Diagrams & Manuals
E250818BE -84265 25" 8 Hp Rear Engine Rider Series 18 View Diagrams & Manuals
E281018BE -84266 28" 10 Hp Rear Engine Rider Series 18 View Diagrams & Manuals
E281318BE -84267 28" 13 Hp Rear Engine Rider Series 18 View Diagrams & Manuals
E331518KVE -84389 33" 15 Hp Rear Engine Rider Series 18 View Diagrams & Manuals
EM250819BE 25" 8 Hp Rear Engine Rider "M" View Diagrams & Manuals
EM281019BE 28" 10 Hp Rear Engine Rider "M" View Diagrams & Manuals
M250819BE 25" 8 Hp Rear Engine Rider "M" Series 19 View Diagrams & Manuals
M280919B 28" 9 Hp Rear Engine Rider "M" Series 19 View Diagrams & Manuals
GYT12333 33" 12.5 Hp Disc Drive Yard Tractor Series 3 View Diagrams & Manuals
GYT16333 33" 16 Hp Disc Drive Yard Tractor Series 3 View Diagrams & Manuals
LT11000 11 Hp Disc Drive Tractor Series 0 View Diagrams & Manuals
LT11001 11 Hp Disc Drive Tractor Series 1 View Diagrams & Manuals
LT12332 33" 12.5 Hp Disc Drive Tractor Series 2 View Diagrams & Manuals
LT12412 41" 12.5 Hp Disc Drive Tractor Series 2 View Diagrams & Manuals
R25089TE 25" 8 Hp Rear Engine Rider Recycling Series 9 View Diagrams & Manuals
250610T 25" 6 Hp Rear Engine Rider Series 10 View Diagrams & Manuals
260610T 26" 6 Hp Rear Engine Rider Series 10 View Diagrams & Manuals
280810BE 28" 8 Hp Rear Engine Rider Series 10 View Diagrams & Manuals
280810T 28" 8 Hp Rear Engine Rider Series 10 View Diagrams & Manuals
300810BE 30" 8 Hp Rear Engine Rider Series 10 View Diagrams & Manuals
300810T 30" 8 Hp Rear Engine Rider Series 10 View Diagrams & Manuals
250811BE 25" 8 Hp Rear Engine Rider Series 11 View Diagrams & Manuals
281011BE 28" 10 Hp Rear Engine Rider Series 11 View Diagrams & Manuals
2811511BE 28" 11.5 Hp Rear Engine Rider Series 11 View Diagrams & Manuals
301011BE 30" 10 Hp Rear Engine Rider Series 11 View Diagrams & Manuals
3011511BE 30" 11.5 Hp Rear Engine Rider Series 11 View Diagrams & Manuals
301411KVE 30" 14 Hp Rear Engine Rider Series 11 View Diagrams & Manuals
3312511BE 33" 12.5 Hp Rear Engine Rider Series 11 View Diagrams & Manuals
331411KVE 33" 14 Hp Rear Engine Rider Series 11 View Diagrams & Manuals
411611BVE 41" 16 Hp Rear Engine Rider Series 11 View Diagrams & Manuals
E250811B 25" 8 Hp Rear Engine Rider European Series 11 View Diagrams & Manuals
E250811BE 25" 8 Hp Rear Engine Rider European Series 11 View Diagrams & Manuals
E281011BE 28" 10 Hp Rear Engine Rider European Series 11 View Diagrams & Manuals
E2811511BE 28" 11.5 Hp Rear Engine Rider European Series 11 View Diagrams & Manuals
YT180H334K (80239) 33" 18 Hp Hydro Drive Yard Tractor Series 4 View Diagrams & Manuals
YT180H414K (80240) 41" 18 Hp Hydro Drive Yard Tractor Series 4 View Diagrams & Manuals
YT180H484K (80241) 48" 18 Hp Hydro Drive Yard Tractor Series 4 View Diagrams & Manuals
2650 26" 5 Hp Rear Engine Rider Series 0 View Diagrams & Manuals
2650S 26" 5 Hp Rear Engine Rider Series 0 View Diagrams & Manuals
2680 26" 8 Hp Rear Engine Rider Series 0 View Diagrams & Manuals
2680S 26" 8 Hp Rear Engine Rider Series 0 View Diagrams & Manuals
3080 30" 8 Hp Rear Engine Rider Series 0 View Diagrams & Manuals
3080S 30" 8 Hp Rear Engine Rider Series 0 View Diagrams & Manuals
2651 26" 5 Hp Rear Engine Rider Series 1 View Diagrams & Manuals
2651S 26" 5 Hp Rear Engine Rider Series 1 View Diagrams & Manuals
2661S 26" 6 Hp Rear Engine Rider Series 1 View Diagrams & Manuals
2681 26" 8 Hp Rear Engine Rider Series 1 View Diagrams & Manuals
SZT18336BVE 85679 33" 18 Hp Ztr Twin Stick Series 6 View Diagrams & Manuals
SZT18386BVE 85680 38" 18 Hp Ztr Twin Stick Series 6 View Diagrams & Manuals
SZT18426BVE 85681 42" 18 Hp Ztr Twin Stick Series 6 View Diagrams & Manuals
SZT20486BVE 85682 48" 20 Hp Ztr Twin Stick Series 6 View Diagrams & Manuals
YT16D334K 33" 16 Hp Disc Drive Yard Tractor Series 4 View Diagrams & Manuals
YT16D414B 41" 16 Hp Disc Drive Yard Tractor Series 4 View Diagrams & Manuals
YT16D414K 41" 16 Hp Disc Drive Yard Tractor Series 4 View Diagrams & Manuals
YT16D484B 48" 16 Hp Disc Drive Yard Tractor Series 4 View Diagrams & Manuals
YT16D484K 48" 16 Hp Disc Drive Yard Tractor Series 4 View Diagrams & Manuals
EGT180H335K 80398 33" 18 Hp Hydro Drive Garden Tractor Euro Series 5 View Diagrams & Manuals
EGT180H425K 80544 42" 18 Hp Hydro Drive Garden Tractor Euro Series 5 View Diagrams & Manuals
GT180H334K 80239 33" 18 Hp Hydro Drive Garden Tractor Series 4 View Diagrams & Manuals
GT180H335K 82391 33" 18 Hp Hydro Drive Garden Tractor Series 5 View Diagrams & Manuals
GT180H414K 80240 41" 18 Hp Hydro Drive Garden Tractor Series 4 View Diagrams & Manuals
GT180H415K 80383 41" 18 Hp Hydro Drive Gt Tractor Series 5 View Diagrams & Manuals
GT180H425K 80383 42" 18 Hp Hydro Drive Garden Tractor Series 5 View Diagrams & Manuals
GT180H484K 80241 48" 18 Hp Hydro Drive Garden Tractor Series 4 View Diagrams & Manuals
GT180H485K 80384 48" 18 Hp Hydro Drive Garden Tractor Series 5 View Diagrams & Manuals
YZ18425BVE 84944 42" 18 Hp Ztr Scrambler Series 5 View Diagrams & Manuals
YZ18426BVE 85695 42" 18 Hp Ztr Scrambler Series 6 View Diagrams & Manuals
YZ20485BVE 84943 48" 20 Hp Ztr Scrambler Series 5 View Diagrams & Manuals
YZ20486BVE 85696 48" 20 Hp Ztr Scrambler Series 6 View Diagrams & Manuals
ESZT18336BVE 85697 33" 18 Hp Ztr Twin Stick Euro Series 6 View Diagrams & Manuals
2650 (Series 0)(87085) 26-Inch 5 Hp Rear Engine Rider View Diagrams & Manuals
2650S (Series 0)(87088) 26-Inch 5 Hp Rear Engine Rider View Diagrams & Manuals
2680 (Series 0)(87090) 26-Inch 8 Hp Rear Engine Rider View Diagrams & Manuals
3081S (Series 1)(87991) 30-Inch 8 Hp Rear Engine Rider View Diagrams & Manuals
2681S (Series 1)(88098) 26-Inch 8 Hp Rear Engine Rider View Diagrams & Manuals
25062 (Series 2)(87468) 25-Inch 6 Hp Rear Engine Rider View Diagrams & Manuals
3080S (Series 0)(87198) 30-Inch 8 Hp Rear Engine Rider View Diagrams & Manuals
2681 (Series 1)(86699) 26-Inch 8 Hp Rear Engine Rider View Diagrams & Manuals
2680S (Series 0)(87091) 26-Inch 8 Hp Rear Engine Rider View Diagrams & Manuals
2651 (Series 1)(87485) 26-Inch 5 Hp Rear Engine Rider View Diagrams & Manuals
3080 (Series 0)(87194) 30-Inch 8 Hp Rear Engine Rider View Diagrams & Manuals
2651S (Series 1)(87488) 26-Inch 5 Hp Rear Engine Rider View Diagrams & Manuals
2661S (Series 1)(87571) 26-Inch 6 Hp Rear Engine Rider View Diagrams & Manuals
3081 (Series 1)(87990) 30-Inch 8 Hp Rear Engine Rider View Diagrams & Manuals
25062S (Series 2)(87469) 25-Inch 6 Hp Rear Engine Rider View Diagrams & Manuals
26062 (Series 2)(87568) 26-Inch 6 Hp Rear Engine Rider View Diagrams & Manuals
26062S (Series 2)(87569) 26-Inch 6 Hp Rear Engine Rider View Diagrams & Manuals
2652S (Series 2)(87889) 26-Inch 5 Hp Rear Engine Rider View Diagrams & Manuals
2652 (Series 2)(88176) 26-Inch 5 Hp Rear Engine Rider View Diagrams & Manuals
4210WS (Series W)(89284) 42-Inch 10 Hp Rear Engine Rider (3 Blades) View Diagrams & Manuals
25063 (Series 3)(89375) 25-Inch 6 Hp Rear Engine Rider View Diagrams & Manuals
25063S (Series 3)(89377) 25-Inch 6 Hp Rear Engine Rider View Diagrams & Manuals
25083 (Series 3)(89394) 25-Inch 8 Hp Rear Engine Rider View Diagrams & Manuals
25083S (Series 3)(89396) 25-Inch 8 Hp Rear Engine Rider View Diagrams & Manuals
26063 (Series 3)(89475) 26-Inch 6 Hp Rear Engine Rider View Diagrams & Manuals
26063S (Series 3)(89477) 26-Inch 6 Hp Rear Engine Rider View Diagrams & Manuals
26083 (Series 3)(89494) 26-Inch 8 Hp Rear Engine Rider View Diagrams & Manuals
26083S (Series 3)(89498) 26-Inch 8 Hp Rear Engine Rider View Diagrams & Manuals
28113S (Series 3)(89584) 28-Inch 11 Hp Rear Engine Rider View Diagrams & Manuals
28083 (Series 3)(89594) 28-Inch 8 Hp Rear Engine Rider View Diagrams & Manuals
28083S (Series 3)(89598) 28-Inch 8 Hp Rear Engine Rider View Diagrams & Manuals
30113S (Series 3)(89684) 30-Inch 11 Hp Rear Engine Rider View Diagrams & Manuals
E331523KVE (Series 23)(7084888) 33-Inch 15 Hp Rear Engine Rider Euro View Diagrams & Manuals
2811523BV (Series 23)(7084940) 28-Inch 11.5 Hp Rear Engine Rider View Diagrams & Manuals
33148KVE (Series 8)(80115) 33-Inch 14 Hp Rear Engine Rider View Diagrams & Manuals
33128RE (Series 8)(80118) 33-Inch 12 Hp Rear Engine Rider View Diagrams & Manuals
3011523BV (Series 23)(7084941) 30-Inch 11.5 Hp Rear Engine Rider View Diagrams & Manuals
R33148KVE (Series 8)(80126) 33-Inch 14 Hp Rear Engine Rider Recycling View Diagrams & Manuals
281011BE (Series 11)(80258) 28-Inch 10 Hp Rear Engine Rider View Diagrams & Manuals
331723BVE (Series 23)(7084954) 33-Inch 17 Hp Rear Engine Rider View Diagrams & Manuals
28088B (Series 8)(80145) 28-Inch 8 Hp Rear Engine Rider View Diagrams & Manuals
2811511BE (Series 11)(80259) 28-Inch 11.5 Hp Rear Engine Rider View Diagrams & Manuals
2812523BVE (Series 23)(7085622) 28-Inch 12.5 Hp Rear Engine Rider View Diagrams & Manuals
30088B (Series 8)(80148) 30-Inch 8 Hp Rear Engine Rider View Diagrams & Manuals
301011BE (Series 11)(80260) 30-Inch 10 Hp Rear Engine Rider View Diagrams & Manuals
3012523BVE (Series 23)(7085623) 30-Inch 12.5 Hp Rear Engine Rider View Diagrams & Manuals
3011511BE (Series 11)(80261) 30-Inch 11.5 Hp Rear Engine Rider View Diagrams & Manuals
3312511BE (Series 11)(80262) 33-Inch 12.5 Hp Rear Engine Rider View Diagrams & Manuals
331411KVE (Series 11)(80263) 33-Inch 14 Hp Rear Engine Rider View Diagrams & Manuals
411611BVE (Series 11)(80264) 41-Inch 16 Hp Rear Engine Rider View Diagrams & Manuals
R250811BE (Series 11)(80265) 25-Inch 8 Hp Rear Engine Rider Recycling View Diagrams & Manuals
R2811511BE (Series 11)(80266) 28-Inch 11 Hp Rear Engine Rider Recycling View Diagrams & Manuals
30088T (Series 8)(80109) 30-Inch 8 Hp Rear Engine Rider View Diagrams & Manuals
30088TE (Series 8)(80110) 30-Inch 8 Hp Rear Engine Rider View Diagrams & Manuals
300810BE (Series 10)(80319) 30-Inch 8 Hp Rear Engine Rider View Diagrams & Manuals
300810T (Series 10)(80250) 30-Inch 8 Hp Rear Engine Rider View Diagrams & Manuals
280810BE (Series 10)(80320) 28-Inch 8 Hp Rear Engine Rider View Diagrams & Manuals
30148KVE (Series 8)(80111) 30-Inch 14 Hp Rear Engine Rider View Diagrams & Manuals
30128BE (Series 8)(80112) 30-Inch 12 Hp Rear Engine Rider View Diagrams & Manuals
33128BE (Series 8)(80113) 33-Inch 12 Hp Rear Engine Rider View Diagrams & Manuals
331723BVE (Series 23)(7800107) 33-Inch 17 Hp Rear Engine Rider View Diagrams & Manuals
E2512523BVE (Series 23)(7800116) 25-Inch 12.5 Hp Rear Engine Rider Euro View Diagrams & Manuals
33128TVE (Series 8)(80114) 33-Inch 12 Hp Rear Engine Rider View Diagrams & Manuals
281222BE (Series 22)(84703) 28-Inch 12 Hp Rear Engine Rider View Diagrams & Manuals
301222BE (Series 22)(84704) 30-Inch 12 Hp Rear Engine Rider View Diagrams & Manuals
421622BVE (Series 22)(84707) 42-Inch 16 Hp Rear Engine Rider View Diagrams & Manuals
30106S (Series 6)(81498) 30-Inch 10 Hp Rear Engine Rider View Diagrams & Manuals
M280921B (Series 21)(84577) 28-Inch 9 Hp Rear Engine Rider -Inchm-Inch View Diagrams & Manuals
M300921B (Series 21)(84578) 30-Inch 9 Hp Rear Engine Rider -Inchm-Inch View Diagrams & Manuals
2812X6S (Series 6)(81508) 28-Inch 12hp Extra Tough Rear Engine Rider View Diagrams & Manuals
M250821BE (Series 21)(84579) 25-Inch 8 Hp Rear Engine Rider -Inchm-Inch View Diagrams & Manuals
E281022BE (Series 22)(84709) 28-Inch 10 Hp Rear Engine Rider Euro View Diagrams & Manuals
3312X6ST (Series 6)(81568) 33-Inch 12hp Extra Tough Rear Engine Rider View Diagrams & Manuals
M281021BE (Series 21)(84580) 28-Inch 10 Hp Rear Engine Rider -Inchm-Inch View Diagrams & Manuals
M301021BE (Series 21)(84581) 30-Inch 10 Hp Rear Engine Rider -Inchm-Inch View Diagrams & Manuals
EM250821BE (Series 21)(84587) 25-Inch 8 Hp Rear Engine Rider Euro -Inchm-Inch View Diagrams & Manuals
EM281021BE (Series 21)(84588) 28-Inch 10 Hp Rear Engine Rider Euro -Inchm-Inch View Diagrams & Manuals
WM280921B (Series 21)(84660) 28-Inch 9 Hp Rear Engine Rider -Inchm-Inch View Diagrams & Manuals
WM301021BE (Series 21)(84661) 30-Inch 10 Hp Rear Engine Rider -Inchm-Inch View Diagrams & Manuals
4112X6ST (Series 6)(81588) 41-Inch 12hp Extra Tough Rear Engine Rider View Diagrams & Manuals
W301022BE (Series 22)(84702) 30-Inch 10 Hp Rear Engine Rider View Diagrams & Manuals
3314522BVE (Series 22)(84668) 33-Inch 14.5 Hp Rear Engine Rider View Diagrams & Manuals
331522KVE (Series 22)(84677) 33-Inch 15 Hp Rear Engine Rider View Diagrams & Manuals
280922B (Series 22)(84697) 28-Inch 9 Hp Rear Engine Rider View Diagrams & Manuals
W280922B (Series 22)(84698) 28-Inch 9 Hp Rear Engine Rider View Diagrams & Manuals
300922B (Series 22)(84699) 30-Inch 9 Hp Rear Engine Rider View Diagrams & Manuals
281022BE (Series 22)(84700) 28-Inch 10 Hp Rear Engine Rider View Diagrams & Manuals
301022BE (Series 22)(84701) 30-Inch 10 Hp Rear Engine Rider View Diagrams & Manuals
2812X6ST (Series 6)(81738) 28-Inch 12hp Extra Tough Rear Engine Rider View Diagrams & Manuals
3012X6ST (Series 6)(81758) 30-Inch 12hp Extra Tough Rear Engine Rider View Diagrams & Manuals
G28086SB (Series 6)(81779) 28-Inch 8 Hp Rear Engine Rider European View Diagrams & Manuals
G2812X6S (Series 6)(81789) 28-Inch 12 Hp Rear Engine Rider European View Diagrams & Manuals
G25066 (Series 6)(81769) 25-Inch 6 Hp Rear Engine Rider European View Diagrams & Manuals
G3312X6S (Series 6)(81799) 33-Inch 12 Hp Rear Engine Rider European View Diagrams & Manuals
33147KE (Series 7)(80027) 33-Inch 14 Hp Rear Engine Rider View Diagrams & Manuals
25657B (Series 7)(81810) 25-Inch 6.5 Hp Rear Engine Rider View Diagrams & Manuals
25657BE (Series 7)(81820) 25-Inch 6.5 Hp Rear Engine Rider View Diagrams & Manuals
26657 (Series 7)(81830) 26-Inch 6.5 Hp Rear Engine Rider View Diagrams & Manuals
26657BE (Series 7)(81840) 26-Inch 6.5 Hp Rear Engine Rider View Diagrams & Manuals
28087B (Series 7)(81850) 28-Inch 8 Hp Rear Engine Rider View Diagrams & Manuals
28087BE (Series 7)(81860) 28-Inch 8 Hp Rear Engine Rider View Diagrams & Manuals
28127BE (Series 7)(81880) 28-Inch 12 Hp Rear Engine Rider View Diagrams & Manuals
30087 (Series 7)(81890) 30-Inch 8 Hp Rear Engine Rider View Diagrams & Manuals
30087BE (Series 7)(81920) 30-Inch 8 Hp Rear Engine Rider View Diagrams & Manuals
2813523BVE (Series 23)(7085624) 28-Inch 13.5 Hp Rear Engine Rider View Diagrams & Manuals
30127BE (Series 7)(81930) 30-Inch 12 Hp Rear Engine Rider View Diagrams & Manuals
3013523BVE (Series 23)(7085625) 30-Inch 13.5 Hp Rear Engine Rider View Diagrams & Manuals
33147BVE (Series 7)(81960) 33-Inch 14 Hp Rear Engine Rider View Diagrams & Manuals
33127BE (Series 7)(81980) 33-Inch 12 Hp Rear Engine Rider View Diagrams & Manuals
E2812523BVE (Series 23)(7085626) 28-Inch 12.5 Hp Rear Engine Rider Euro View Diagrams & Manuals
E2813523BVE (Series 23)(7085686) 28-Inch 13.5 Hp Rear Engine Rider Euro View Diagrams & Manuals
281123BV (Series 23)(7800102) 28-Inch 11 Hp Rear Engine Rider View Diagrams & Manuals
3011523BV (Series 23)(7800103) 30-Inch 11.5 Hp Rear Engine Rider View Diagrams & Manuals
28088BE (Series 8) 28-Inch 8 Hp Rear Engine Rider View Diagrams & Manuals
30088BE (Series 8) 30-Inch 8 Hp Rear Engine Rider View Diagrams & Manuals
2812523BVE (Series 23)(7800104) 28-Inch 12.5 Hp Rear Engine Rider View Diagrams & Manuals
30108BE (Series 8)(80103) 30-Inch 10 Hp Rear Engine Rider View Diagrams & Manuals
28108BE (Series 8)(80099) 28-Inch 10 Hp Rear Engine Rider View Diagrams & Manuals
28088T (Series 8)(80105) 28-Inch 8 Hp Rear Engine Rider View Diagrams & Manuals
28088TE (Series 8)(80106) 28-Inch 8 Hp Rear Engine Rider View Diagrams & Manuals
3012523BVE (Series 23)(7800105) 30-Inch 12.5 Hp Rear Engine Rider View Diagrams & Manuals
30128RE (Series 8) 30-Inch 12 Hp Rear Engine Rider View Diagrams & Manuals
331523KVE (Series 23)(7800106) 33-Inch 15 Hp Rear Engine Rider View Diagrams & Manuals
28128BE (Series 8)(80107) 28-Inch 12 Hp Rear Engine Rider View Diagrams & Manuals
28128TVE (Series 8)(80108) 28-Inch 12 Hp Rear Engine Rider View Diagrams & Manuals
E281222BE (Series 22)(84710) 28-Inch 12 Hp Rear Engine Rider Euro View Diagrams & Manuals
E331522KVE (Series 22)(84711) 33-Inch 15 Hp Rear Engine Rider Euro View Diagrams & Manuals
E2512523BVE (Series 23)(7084651) 25-Inch 12.5 Hp Rear Engine Rider Euro View Diagrams & Manuals
331523KVE (Series 23)(7084879) 33-Inch 15 Hp Rear Engine Rider View Diagrams & Manuals
41128BE (Series 8)(80206) 41-Inch 12 Hp Rear Engine Rider View Diagrams & Manuals
R3312511BE (Series 11)(80267) 33-Inch 12.5 Hp Rear Engine Rider Recycling View Diagrams & Manuals
E281011BE (Series 11)(80308) 28-Inch 10 Hp Rear Engine Rider European View Diagrams & Manuals
E2811511BE (Series 11)(80309) 28-Inch 11.5 Hp Rear Engine Rider European View Diagrams & Manuals
301411KVE (Series 11)(80310) 30-Inch 14 Hp Rear Engine Rider View Diagrams & Manuals
250811BE (Series 11)(80256) 25-Inch 8 Hp Rear Engine Rider View Diagrams & Manuals
E331411KVE (Series 11)(80311) 33-Inch 14 Hp Rear Engine Rider European View Diagrams & Manuals
E250811B (Series 11)(80352) 25-Inch 8 Hp Rear Engine Rider European View Diagrams & Manuals
E250811BE (Series 11)(80353) 25-Inch 8 Hp Rear Engine Rider European View Diagrams & Manuals
E3312511BE (Series 11)(80354) 33-Inch 12.5 Hp Rear Engine Rider European View Diagrams & Manuals
250612T (Series 12)(80419) 25-Inch 6 Hp Rear Engine Rider Series 12 View Diagrams & Manuals
25069T (Series 9)(80098) 25-Inch 6 Hp Rear Engine Rider View Diagrams & Manuals
260612T (Series 12)(80420) 26-Inch 6 Hp Rear Engine Rider Series 12 View Diagrams & Manuals
25659BE (Series 9)(80101) 25-Inch 6.5 Hp Rear Engine Rider View Diagrams & Manuals
26069T (Series 9)(80102) 26-Inch 6 Hp Rear Engine Rider View Diagrams & Manuals
26659BE (Series 9)(80104) 26-Inch 6.5 Hp Rear Engine Rider View Diagrams & Manuals
300812B (Series 12)(80421) 30-Inch 8 Hp Rear Engine Rider View Diagrams & Manuals
R25089TE (Series 9)(80119) 25-Inch 8 Hp Rear Engine Rider Recycling View Diagrams & Manuals
280812BE (Series 12)(80422) 28-Inch 8 Hp Rear Engine Rider View Diagrams & Manuals
300812BE (Series 12)(80423) 30-Inch 8 Hp Rear Engine Rider View Diagrams & Manuals
250812BE (Series 12)(80541) 25-Inch 8 Hp Rear Engine Rider View Diagrams & Manuals
281013BE (Series 13)(80425) 28-Inch 10 Hp Rear Engine Rider View Diagrams & Manuals
301013BE (Series 13)(80426) 30-Inch 10 Hp Rear Engine Rider View Diagrams & Manuals
301213BE (Series 13)(80427) 30-Inch 12 Hp Rear Engine Rider View Diagrams & Manuals
301413KVE (Series 13)(80428) 30-Inch 14 Hp Rear Engine Rider View Diagrams & Manuals
3312513BE (Series 13)(80429) 33-Inch 12.5 Hp Rear Engine Rider View Diagrams & Manuals
331413KVE (Series 13)(80430) 33-Inch 14 Hp Rear Engine Rider View Diagrams & Manuals
421613BVE (Series 13)(80431) 42-Inch 16 Hp Rear Engine Rider View Diagrams & Manuals
R281213BE (Series 13)(80432) 28-Inch 12 Hp Rear Engine Rider Recycling View Diagrams & Manuals
260610T (Series 10)(80242) 26-Inch 6 Hp Rear Engine Rider View Diagrams & Manuals
250610T (Series 10)(80248) 25-Inch 6 Hp Rear Engine Rider View Diagrams & Manuals
R3312513BE (Series 13)(80433) 33-Inch 12.5 Hp Rear Engine Rider Recycling View Diagrams & Manuals
280810T (Series 10)(80249) 28-Inch 8 Hp Rear Engine Rider View Diagrams & Manuals
E250813BE (Series 13)(80434) 25-Inch 8 Hp Rear Engine Rider European View Diagrams & Manuals
E250813B (Series 13)(80435) 25-Inch 8 Hp Rear Engine Rider European View Diagrams & Manuals
E281213BE (Series 13)(80437) 28-Inch 12 Hp Rear Engine Rider European View Diagrams & Manuals
E331413KVE (Series 13)(80438) 33-Inch 14 Hp Rear Engine Rider European View Diagrams & Manuals
E3312513BE (Series 13)(80439) 33-Inch 12.5 Hp Rear Engine Rider European View Diagrams & Manuals
E421613BVE (Series 13)(80440) 42-Inch 16 Hp Rear Engine Rider European View Diagrams & Manuals
331313BE (Series 13)(80542) 33-Inch 13 Hp Rear Engine Rider View Diagrams & Manuals
E331313BE (Series 13)(80545) 33-Inch 13 Hp Rear Engine Rider European View Diagrams & Manuals
421613BVE1 (Series 13)(80556) 42-Inch 16 Hp Rear Engine Rider View Diagrams & Manuals
250813BE (Series 13)(80565) 25-Inch 8 Hp Rear Engine Rider View Diagrams & Manuals
280813BE (Series 13)(80566) 28-Inch 8 Hp Rear Engine Rider View Diagrams & Manuals
300813BE (Series 13)(80567) 30-Inch 8 Hp Rear Engine Rider View Diagrams & Manuals
E280813BE (Series 13)(80636) 28-Inch 8 Hp Rear Engine Rider European View Diagrams & Manuals
250814B (Series 14)(80627) Rear Engine Rider View Diagrams & Manuals
250814BE (Series 14)(80632) Rear Engine Rider View Diagrams & Manuals
30083S (Series 3)(89698) 30-Inch 8 Hp Rear Engine Rider View Diagrams & Manuals
280914BE (Series 14)(80633) Rear Engine Rider View Diagrams & Manuals
300914BE (Series 14)(80634) Rear Engine Rider View Diagrams & Manuals
281014BE (Series 14)(80635) Rear Engine Rider View Diagrams & Manuals
301014BE (Series 14)(80637) Rear Engine Rider View Diagrams & Manuals
301214BE (Series 14)(80638) Rear Engine Rider View Diagrams & Manuals
250815BE (Series 15)(80023) Rear Engine Rider View Diagrams & Manuals
E250815BE (Series 15)(80121) 25-Inch Rear Engine Rider (Euro) View Diagrams & Manuals
331314BE (Series 14)(80639) Rear Engine Rider View Diagrams & Manuals
280915BE (Series 15)(80122) Rear Engine Rider View Diagrams & Manuals
331414KVE (Series 14)(80640) Rear Engine Rider View Diagrams & Manuals
421614BVE (Series 14)(80663) Rear Engine Rider View Diagrams & Manuals
250815B (Series 15)(80022) Rear Engine Rider View Diagrams & Manuals
26084B (Series 4)(88694) 26-Inch 8 Hp Rear Engine Rider View Diagrams & Manuals
30083 (Series 3)(89694) 30-Inch 8 Hp Rear Engine Rider View Diagrams & Manuals
26084 (Series 4)(88695) 26-Inch 8 Hp Rear Engine Rider View Diagrams & Manuals
26084S (Series 4)(88696) 26-Inch 8 Hp Rear Engine Rider View Diagrams & Manuals
421615BVE (Series 15)(80872) Rear Engine Rider Series 15 View Diagrams & Manuals
421615TVE (Series 15)(80873) Rear Engine Rider Series 15 View Diagrams & Manuals
N250816B (Series 16)(82377) 25-Inch 8 Hp Rear Engine Rider View Diagrams & Manuals
250816BE (Series 16)(82378) 25-Inch 8 Hp Rear Engine Rider View Diagrams & Manuals
28114S (Series 4)(88784) 28-Inch 11 Hp Rear Engine Rider View Diagrams & Manuals
281016BE (Series 16)(82379) 28-Inch 10 Hp Rear Engine Rider View Diagrams & Manuals
301016BE (Series 16)(82380) 30-Inch 10 Hp Rear Engine Rider View Diagrams & Manuals
301216BE (Series 16)(82381) 30-Inch 12 Hp Rear Engine Rider View Diagrams & Manuals
33113S (Series 3)(89784) 33-Inch 11 Hp Rear Engine Rider View Diagrams & Manuals
331416KVE (Series 16)(82383) 33-Inch 14 Hp Rear Engine Rider View Diagrams & Manuals
421616BVE (Series 16)(82384) 42-Inch 16 Hp Rear Engine Rider View Diagrams & Manuals
28084S (Series 4)(88796) 28-Inch 8 Hp Rear Engine Rider View Diagrams & Manuals
42113S (Series 3)(89884) 42-Inch 11 Hp Rear Engine Rider View Diagrams & Manuals
E331416KVE (Series 16)(82420) 33-Inch 14 Hp Rear Engine Rider European View Diagrams & Manuals
25064 (Series 4)(88575) 25-Inch 6 Hp Rear Engine Rider View Diagrams & Manuals
301215BE (Series 15)(80857) Rear Engine Rider View Diagrams & Manuals
E280915BE (Series 15)(80855) 28-Inch 9 Hp Rear Engine Rider (Euro) View Diagrams & Manuals
300915BE (Series 15)(80856) Rear Engine Rider View Diagrams & Manuals
331415KVE (Series 15)(80861) Rear Engine Rider View Diagrams & Manuals
E331315BVE (Series 15)(80862) 33-Inch 13 Hp Rear Engine Rider (Euro) View Diagrams & Manuals
E331415KVE (Series 15)(80863) 33-Inch 14 Hp Rear Engine Rider (Euro) View Diagrams & Manuals
331415BVE (Series 15)(80864) Rear Engine Rider Series 15 View Diagrams & Manuals
25064S (Series 4)(88577) 25-Inch 6 Hp Rear Engine Rider View Diagrams & Manuals
25084BS (Series 4)(88594) 25-Inch 8 Hp Rear Engine Rider View Diagrams & Manuals
25084 (Series 4)(88595) 25-Inch 8 Hp Rear Engine Rider View Diagrams & Manuals
25084S (Series 4)(88598) 25-Inch 8 Hp Rear Engine Rider View Diagrams & Manuals
26064 (Series 4)(88675) 26-Inch 6 Hp Rear Engine Rider View Diagrams & Manuals
26064S (Series 4)(88677) 26-Inch 6 Hp Rear Engine Rider View Diagrams & Manuals
41085 (Series 5)(81186) 41-Inch 8 Hp Rear Engine Rider View Diagrams & Manuals
28084 (Series 4)(88798) 28-Inch 8 Hp Rear Engine Rider View Diagrams & Manuals
30114S (Series 4)(88884) 30-Inch 11 Hp Rear Engine Rider View Diagrams & Manuals
30084 (Series 4)(88894) 30-Inch 8 Hp Rear Engine Rider View Diagrams & Manuals
41085S (Series 5)(81216) 41-Inch 8 Hp Rear Engine Rider View Diagrams & Manuals
26085 (Series 5)(81376) 26-Inch 8 Hp Rear Engine Rider View Diagrams & Manuals
30084S (Series 4)(88898) 30-Inch 8 Hp Rear Engine Rider View Diagrams & Manuals
3311X5S (Series 5)(87082) 33-Inch 11 Hp Extra Tough Rear Engine Rider View Diagrams & Manuals
33114S (Series 4)(88984) 33-Inch 11 Hp Rear Engine Rider View Diagrams & Manuals
28085 (Series 5)(81066) 28-Inch 8 Hp Rear Engine Rider View Diagrams & Manuals
30085 (Series 5)(81116) 30-Inch 8 Hp Rear Engine Rider View Diagrams & Manuals
E331316BVE (Series 16)(82471) 33-Inch 13 Hp Rear Engine Rider European View Diagrams & Manuals
30085S (Series 5)(81156) 30-Inch 8 Hp Rear Engine Rider View Diagrams & Manuals
E281016BE (Series 16)(84219) 28-Inch 10 Hp Rear Engine Rider European View Diagrams & Manuals
331416BVE (Series 16)(84233) 33-Inch 14 Hp Rear Engine Rider View Diagrams & Manuals
250816B (Series 16)(82483) 25-Inch 8 Hp Rear Engine Rider View Diagrams & Manuals
4111X5S (Series 5)(87382) 41-Inch 11 Hp Extra Tough Rear Engine Rider View Diagrams & Manuals
E281216BE (Series 16)(84236) 28-Inch 12 Hp Rear Engine Rider European View Diagrams & Manuals
M280817B (Series 17)(82519) 28-Inch 8 Hp Rear Engine Rider -Inchm-Inch View Diagrams & Manuals
M280917B (Series 17)(84249) 28-Inch 9 Hp Rear Engine Rider -Inchm-Inch View Diagrams & Manuals
25065 (Series 5)(87575) 25-Inch 6 Hp Rear Engine Rider View Diagrams & Manuals
M280917BE (Series 17)(84250) 28-Inch 9 Hp Rear Engine Rider -Inchm-Inch View Diagrams & Manuals
M300917B (Series 17)(84283) 30-Inch 9 Hp Rear Engine Rider -Inchm-Inch View Diagrams & Manuals
3314518BVE (Series 18)(84262) 33-Inch 14.5 Hp Rear Engine Rider View Diagrams & Manuals
25085S (Series 5)(87598) 25-Inch 8 Hp Rear Engine Rider View Diagrams & Manuals
26085BS (Series 5)(87694) 26-Inch 8 Hp Rear Engine Rider View Diagrams & Manuals
26085S (Series 5)(87698) 26-Inch 8 Hp Rear Engine Rider View Diagrams & Manuals
28115S (Series 5)(87784) 28-Inch 11 Hp Rear Engine Rider View Diagrams & Manuals
28085S (Series 5)(87798) 28-Inch 8 Hp Rear Engine Rider View Diagrams & Manuals
33115S (Series 5)(87984) 33-Inch 11 Hp Rear Engine Rider View Diagrams & Manuals
331518KVE (Series 18)(84263) 33-Inch 15 Hp Rear Engine Rider View Diagrams & Manuals
2811X5S (Series 5)(88082) 28-Inch 11 Hp Extra Tough Rear Engine Rider View Diagrams & Manuals
N250816BE (Series 16)(82427) 25-Inch 8 Hp Rear Engine Rider View Diagrams & Manuals
421618BVE (Series 18)(84264) 42-Inch 16 Hp Rear Engine Rider View Diagrams & Manuals
N281016BE (Series 16)(82428) 28-Inch 10 Hp Rear Engine Rider View Diagrams & Manuals
E250816BE (Series 16)(82469) 25-Inch 8 Hp Rear Engine Rider European View Diagrams & Manuals
25065S (Series 5)(87577) 25-Inch 6 Hp Rear Engine Rider View Diagrams & Manuals
E250818BE (Series 18)(84265) 25-Inch 8 Hp Rear Engine Rider European View Diagrams & Manuals
25085 (Series 5)(87594) 25-Inch 8 Hp Rear Engine Rider View Diagrams & Manuals
E281018BE (Series 18)(84266) 28-Inch 10 Hp Rear Engine Rider European View Diagrams & Manuals
3011X5S (Series 5)(88182) 30-Inch 11 Hp Extra Tough Rear Engine Rider View Diagrams & Manuals
421618BVE (Series 18)(84385) 42-Inch 16 Hp Rear Engine Rider View Diagrams & Manuals
E331518KVE (Series 18)(84389) 33-Inch 15 Hp Rear Engine Rider European View Diagrams & Manuals
M301019BE (Series 19)(84313) 30-Inch 10 Hp Rear Engine Rider -Inchm-Inch View Diagrams & Manuals
EM281019BE (84315) 28-Inch 10 Hp European Rear Engine Rider -Inchm-Inch View Diagrams & Manuals
M280919B (Series 19)(84316) 28-Inch 9 Hp Rear Engine Rider -Inchm-Inch View Diagrams & Manuals
EM250819BE (84314) 25-Inch 8 Hp European Rear Engine Rider -Inchm-Inch View Diagrams & Manuals
281318BE (Series 18)(84381) 28-Inch 13 Hp Rear Engine Rider View Diagrams & Manuals
301318BE (Series 18)(84382) 30-Inch 13 Hp Rear Engine Rider View Diagrams & Manuals
30086S (Series 6)(81158) 30-Inch 8 Hp Rear Engine Rider View Diagrams & Manuals
E281318BE (Series 18)(84267) 28-Inch 13 Hp Rear Engine Rider European View Diagrams & Manuals
33115SC (Series 5)(88382) 33-Inch 11 Hp Commercial Rear Engine Rider View Diagrams & Manuals
3011X6S (Series 6)(81167) 30-Inch 11hp Extra Tough Rear Engine Rider View Diagrams & Manuals
3311X6S (Series 6)(81177) 33-Inch 11hp Extra Tough Rear Engine Rider View Diagrams & Manuals
M300919B (Series 19)(84317) 30-Inch 9 Hp Rear Engine Rider -Inchm-Inch View Diagrams & Manuals
4111X6S (Series 6)(81227) 41-Inch 11hp Extra Tough Rear Engine Rider View Diagrams & Manuals
25086S (Series 6)(81357) 25-Inch 8 Hp Rear Engine Rider View Diagrams & Manuals
28086 (Series 6)(81068) 28-Inch 8 Hp Rear Engine Rider View Diagrams & Manuals
26086 (Series 6)(81377) 26-Inch 8 Hp Rear Engine Rider View Diagrams & Manuals
26086S (Series 6)(81387) 26-Inch 8 Hp Rear Engine Rider View Diagrams & Manuals
28086S (Series 6)(81088) 28-Inch 8 Hp Rear Engine Rider View Diagrams & Manuals
2811X6S (Series 6)(81107) 28-Inch 11 Hp Extra Tough Rear Engine Rider View Diagrams & Manuals
3312X6S (Series 6)(81408) 33-Inch 12hp Extra Tough Rear Engine Rider View Diagrams & Manuals
M250819BE (Series 19)(84318) 25-Inch 8 Hp Rear Engine Rider -Inchm-Inch View Diagrams & Manuals
3012X6S (Series 6)(81418) 30-Inch 12hp Extra Tough Rear Engine Rider View Diagrams & Manuals
30086 (Series 6)(81118) 30-Inch 8 Hp Rear Engine Rider View Diagrams & Manuals
2812X6SR (Series 6)(81438) 28-Inch 12hp Extra Tough Rear Engine Rider View Diagrams & Manuals
3012X6SR (Series 6)(81448) 30-Inch 12hp Extra Tough Rear Engine Rider View Diagrams & Manuals
3312X6SR (Series 6)(81458) 33-Inch 12hp Extra Tough Rear Engine Rider View Diagrams & Manuals
4112X6SR (Series 6)(81468) 41-Inch 12hp Extra Tough Rear Engine Rider View Diagrams & Manuals
331520KVE (Series 20)(84585) 33-Inch 15 Hp Rear Engine Rider View Diagrams & Manuals
421620BVE (Series 20)(84586) 42-Inch 16 Hp Rear Engine Rider View Diagrams & Manuals
M281019BE (Series 19)(84319) 28-Inch 10 Hp Rear Engine Rider -Inchm-Inch View Diagrams & Manuals
41115SC (Series 5)(89182) 41-Inch 11 Hp Commercial Rear Engine Rider View Diagrams & Manuals
E281320BE (Series 20)(84589) 28-Inch 13 Hp Rear Engine Rider European View Diagrams & Manuals
E331520KVE (Series 20)(84590) 33-Inch 15 Hp Rear Engine Rider European View Diagrams & Manuals
281320BE (Series 20)(84582) 28-Inch 13 Hp Rear Engine Rider View Diagrams & Manuals
81007 (Series 6)(25066) 25-Inch 6 Hp Rear Engine Rider View Diagrams & Manuals
25066S (Series 6)(81017) 25-Inch 6 Hp Rear Engine Rider View Diagrams & Manuals
301320BE (Series 20)(84583) 30-Inch 13 Hp Rear Engine Rider View Diagrams & Manuals
3314520BVE (Series 20)(84584) 33-Inch 14.5 Hp Rear Engine Rider View Diagrams & Manuals
25086 (Series 6)(81028) 25-Inch 8 Hp Rear Engine Rider View Diagrams & Manuals
4112X6S (Series 6)(81478) 41-Inch 12hp Extra Tough Rear Engine Rider View Diagrams & Manuals
28106S (Series 6)(81488) 28-Inch 10 Hp Rear Engine Rider View Diagrams & Manuals
C2811523BV (Series 23)(7800363) 28-Inch 11.5 Hp Rear Engine Rider California View Diagrams & Manuals
E2512523BVE (Series 23)(7800139) 25-Inch 12.5 Hp Rear Engine Rider Euro View Diagrams & Manuals
C3011523BV (Series 23)(7800364) 30-Inch 11.5 Hp Rear Engine Rider California View Diagrams & Manuals
C2812523BVE (Series 23)(7800365) 28-Inch 12.5 Hp Rear Engine Rider California View Diagrams & Manuals
3317523BVE (Series 23)(7800254) 33-Inch 17.5 Hp Rear Engine Rider View Diagrams & Manuals
C3012523BVE (Series 23)(7800366) 30-Inch 12.5 Hp Rear Engine Rider California View Diagrams & Manuals
C3317523BVE (Series 23)(7800368) 33-Inch 17.5 Hp Rear Engine Rider California View Diagrams & Manuals
E2812523BVE (Series 23)(7800117) 28-Inch 12.5 Hp Rear Engine Rider Euro View Diagrams & Manuals
E2813523BVE (Series 23)(7800118) 28-Inch 13.5 Hp Rear Engine Rider Euro View Diagrams & Manuals
E331523KVE (Series 23)(7800119) 33-Inch 15 Hp Rear Engine Rider Euro View Diagrams & Manuals
YT16D414K (Series 4)(80090) 41-Inch 16 Hp Disc Drive Yard Tractor View Diagrams & Manuals
YT16D484K (Series 4)(80091) 48-Inch 16 Hp Disc Drive Yard Tractor View Diagrams & Manuals
HT18410 (Series 4)(82819) 41-Inch 18 Hp Hydro Drive Yard Tractor View Diagrams & Manuals
EGT180H335K (Series 5)(80398) 33-Inch 18 Hp Hydro Drive Garden Tractor Euro View Diagrams & Manuals
EGT180H425K (Series 5)(80544) 42-Inch 18 Hp Hydro Drive Garden Tractor Euro View Diagrams & Manuals
GT180H335K (Series 5)(82391) 33-Inch 18 Hp Hydro Drive Garden Tractor View Diagrams & Manuals
HT18480 (Series 4)(82829) 48-Inch 18 Hp Hydro Drive Yard Tractor View Diagrams & Manuals
HT18330 (Series 4)(82839) 33-Inch 18 Hp Hydro Drive Yard Tractor View Diagrams & Manuals
YT16D334K (Series 4)(80089) 33-Inch 16 Hp Disc Drive Yard Tractor View Diagrams & Manuals
RYT16D334K (Series 4)(80170) 33-Inch 16 Hp Disc Drive Yard Tractor View Diagrams & Manuals
381450HBVE (Series 0)(84270) 38-Inch 14 Hp Rer Hydro Drive View Diagrams & Manuals
381451HBVE (Series 1)(84393) 38-Inch 14 Hp Rer Hydro Drive View Diagrams & Manuals
E2813523BVE (Series 23)(7800501) 28-Inch 13.5 Hp Rear Engine Rider Euro View Diagrams & Manuals
E331523KVE (Series 23)(7800502) 33-Inch 15 Hp Rear Engine Rider Euro View Diagrams & Manuals
E2512523BVE (Series 23)(7800499) 25-Inch 12.5 Hp Rear Engine Rider Euro View Diagrams & Manuals
E2812523BVE (Series 23)(7800500) 28-Inch 12.5 Hp Rear Engine Rider Euro View Diagrams & Manuals
2811523BV (Series 23)(7800647) 28-Inch 11.5 Hp Rear Engine Rider View Diagrams & Manuals
3011523BV (Series 23)(7800648) 30-Inch 11.5 Hp Rear Engine Rider View Diagrams & Manuals
2812523BVE (Series 23)(7800649) 28-Inch 12.5 Hp Rear Engine Rider View Diagrams & Manuals
3012523BVE (Series 23)(7800650) 30-Inch 12.5 Hp Rear Engine Rider View Diagrams & Manuals
3317523BVE (Series 23)(7800652) 33-Inch 17.5 Hp Rear Engine Rider View Diagrams & Manuals
LT16002 (Series 2)(82016) 16 Hp Disc Drive Tracor View Diagrams & Manuals
YT12D334B (Series 4)(80171) 33-Inch 12.5 Hp Disc Drive Yard Tractor View Diagrams & Manuals
YT12D414B (Series 4)(80172) 41-Inch 12.5 Hp Disc Drive Yard Tractor View Diagrams & Manuals
LT12502 (Series 2)(82026) 12.5 Hp Disc Drive Tractor View Diagrams & Manuals
LT12332 (Series 2)(82038) 33-Inch 12.5 Hp Disc Drive Tractor View Diagrams & Manuals
YT12333 (Series 3)(82039) 33-Inch 12.5 Hp Disc Drive Yard Tractor View Diagrams & Manuals
YT16D414B (Series 4)(80174) 41-Inch 16 Hp Disc Drive Yard Tractor View Diagrams & Manuals
E2512523BVE (Series 23)(7800653) 25-Inch 12.5 Hp Rear Engine Rider Euro View Diagrams & Manuals
E2813523BVE (Series 23)(7800655) 28-Inch 13.5 Hp Rear Engine Rider Euro View Diagrams & Manuals
E331523KVE (Series 23)(7800660) 33-Inch 15 Hp Rear Engine Rider Euro View Diagrams & Manuals
E331523KVE (Series 23)(7800656) 33-Inch 15 Hp Rear Engine Rider Euro View Diagrams & Manuals
3013523BVE (Series 23)(7800697) 30-Inch 13.5 Hp Rear Engine Rider View Diagrams & Manuals
E3317523BVE (Series 23)(7800718) 33-Inch 17.5 Hp Rear Engine Rider Euro View Diagrams & Manuals
E2512523BVE (Series 23)(7800657) 25-Inch 12.5 Hp Rear Engine Rider Euro View Diagrams & Manuals
E2812523BVE (Series 23)(7800658) 28-Inch 12.5 Hp Rear Engine Rider Euro View Diagrams & Manuals
281023BVE (Series 23)(84871) 28-Inch 10 Hp Rear Engine Rider View Diagrams & Manuals
E2813523BVE (Series 23)(7800659) 28-Inch 13.5 Hp Rear Engine Rider Euro View Diagrams & Manuals
281123BV (Series 23)(84872) 28-Inch 11 Hp Rear Engine Rider View Diagrams & Manuals
301123BV (Series 23)(84873) 30-Inch 11 Hp Rear Engine Rider View Diagrams & Manuals
E2814523BVE (Series 23)(7800790) 28-Inch 14.5 Hp Rear Engine Rider Euro View Diagrams & Manuals
281123BVE (Series 23)(84874) 28-Inch 11 Hp Rear Engine Rider View Diagrams & Manuals
E2512523BVE (Series 23)(84651) 25-Inch 12.5 Hp Rear Engine Rider Euro View Diagrams & Manuals
301123BVE (Series 23)(84875) 30-Inch 11 Hp Rear Engine Rider View Diagrams & Manuals
281323BVE (Series 23)(84876) 28-Inch 13 Hp Rear Engine Rider View Diagrams & Manuals
LT12412 (Series 2)(82048) 41-Inch 12.5 Hp Disc Drive Tractor View Diagrams & Manuals
301323BVE (Series 23)(84877) 30-Inch 13 Hp Rear Engine Rider View Diagrams & Manuals
331523BVE (Series 23)(84878) 33-Inch 15 Hp Rear Engine Rider View Diagrams & Manuals
YT16333 (Series 3)(82069) 33-Inch 16 Hp Disc Drive Yard Tractor View Diagrams & Manuals
LT16412 (Series 2)(82078) 41-Inch 16 Hp Disc Drive Tractor View Diagrams & Manuals
YT12413 (Series 3)(82049) 41-Inch 12.5 Hp Disc Drive Yard Tractor View Diagrams & Manuals
LT12482 (Series 2)(82058) 48-Inch 12.5 Hp Disc Drive Tractor View Diagrams & Manuals
YT16D334B (Series 4)(82060) 33-Inch 16 Hp Disc Drive Yard Tractor View Diagrams & Manuals
LT16332 (Series 2)(82068) 33-Inch 16 Hp Disc Drive Tractor View Diagrams & Manuals
281123HVE (Series 23)(84883) 28-Inch 11 Hp Rear Engine Rider View Diagrams & Manuals
W281023BVE (Series 23)(84884) 28-Inch 10 Hp Rear Engine Rider View Diagrams & Manuals
331323HVE (Series 23)(84885) 33-Inch 13 Hp Rear Engine Rider View Diagrams & Manuals
E281123BVE (Series 23)(84886) 28-Inch 11 Hp Rear Engine Rider Euro View Diagrams & Manuals
E281323BVE (Series 23)(84887) 28-Inch 13 Hp Rear Engine Rider Euro View Diagrams & Manuals
E331523KVE (Series 23)(84888) 33-Inch 15 Hp Rear Engine Rider Euro View Diagrams & Manuals
281123BV (Series 23)(84940) 28-Inch 11 Hp Rear Engine Rider View Diagrams & Manuals
301123BV (Series 23)(84941) 30-Inch 11 Hp Rear Engine Rider View Diagrams & Manuals
331623BVE (Series 23)(84954) 33-Inch 16 Hp Rear Engine Rider View Diagrams & Manuals
281223BVE (Series 23)(85622) 28-Inch 12 Hp Rear Engine Rider View Diagrams & Manuals
3012523BVE (Series 23)(85623) 30-Inch 12 Hp Rear Engine Rider View Diagrams & Manuals
2813523BVE (Series 23)(85624) 28-Inch 13.5 Hp Rear Engine Rider View Diagrams & Manuals
3013523BVE (Series 23)(85625) 30-Inch 13.5 Hp Rear Engine Rider View Diagrams & Manuals
E2812523BVE (Series 23)(85626) 28-Inch 12.5 Hp Rear Engine Rider Euro View Diagrams & Manuals
E281323BVE (Series 23)(85627) 28-Inch 13 Hp Rear Engine Rider Euro View Diagrams & Manuals
331523KVE (Series 23)(84879) 33-Inch 15 Hp Rear Engine Rider View Diagrams & Manuals
E251023BVE (Series 23)(85636) 25-Inch 10 Hp Rear Engine Rider Euro View Diagrams & Manuals
421823BVE (Series 23)(84880) 42-Inch 18 Hp Rear Engine Rider View Diagrams & Manuals
W280923BV (Series 23)(84881) 28-Inch 9 Hp Rear Engine Rider View Diagrams & Manuals
W301023BVE (Series 23)(84882) 30-Inch 10 Hp Rear Engine Rider View Diagrams & Manuals
422023BVE (Series 23)(85684) 42-Inch 20 Hp Rear Engine Rider View Diagrams & Manuals
E2813523BVE (Series 23)(85686) 28-Inch 13.5 Hp Rear Engine Rider Euro View Diagrams & Manuals
2811524BV (Series 24)(7800784) 28-Inch 11.5 Hp Rear Engine Rider View Diagrams & Manuals
3315525BVE (Series 25)(2691526-00) 33-Inch 15.5 Hp Rear Engine Rider View Diagrams & Manuals
2812524BVE (Series 24)(7800785) 28-Inch 12.5 Hp Rear Engine Rider View Diagrams & Manuals
3014524BVE (Series 24)(7800786) 30-Inch 14.5 Hp Rear Engine Rider View Diagrams & Manuals
3317524BVE (Series 24)(7800787) 33-Inch 17.5 Hp Rear Engine Rider View Diagrams & Manuals
E2813524BVE (Series 24)(7800978-00) 28-Inch 13.5 Hp Rear Engine Rider Euro View Diagrams & Manuals
E2813525BVE (Series 25)(2691382-00) 28-Inch 13.5 Hp Rear Engine Rider Euro View Diagrams & Manuals
E2811525BVE (Series 25)(2691382-01) 28-Inch 11.5 Hp Rear Engine Rider Euro View Diagrams & Manuals
E3317525BVE (Series 25)(2691383-00) 33-Inch 17.5 Hp Rear Engine Rider Euro View Diagrams & Manuals
E3315525BVE (Series 25)(2691383-01) 33-Inch 15.5 Hp Rear Engine Rider Euro View Diagrams & Manuals
2811525BVE (Series 25)(2691525-00) 28-Inch 11.5 Hp Rear Engine Rider View Diagrams & Manuals
GT180H334K (Series 4)(80239) 33-Inch 18 Hp Hydro Drive Garden Tractor View Diagrams & Manuals
GT180H414K (Series 4)(80240) 41-Inch 18 Hp Hydro Drive Garden Tractor View Diagrams & Manuals
308X (Series X)(86794) 30-Inch 8 Hp Rear Engine Rider Comet View Diagrams & Manuals
308XS (Series X)(86798) 30-Inch 8 Hp Rear Engine Rider Comet View Diagrams & Manuals
GT180H484K (Series 4)(80241) 48-Inch 18 Hp Hydro Drive Garden Tractor View Diagrams & Manuals
GT180H415K (Series 5)(80383) 41-Inch 18 Hp Hydro Drive Gt Tractor View Diagrams & Manuals
GT180H425K (Series 5)(80383) 42-Inch 18 Hp Hydro Drive Garden Tractor View Diagrams & Manuals
GT180H485K (Series 5)(80384) 48-Inch 18 Hp Hydro Drive Garden Tractor View Diagrams & Manuals
265X (Series X)(86685) 26-Inch 5 Hp Rear Engine Rider Comet View Diagrams & Manuals
265XS (Series X)(86688) 26-Inch 5 Hp Rear Engine Rider Comet View Diagrams & Manuals
268X (Series X)(86694) 26-Inch 8 Hp Rear Engine Rider Comet View Diagrams & Manuals
268XS (Series X)(86698) 26-Inch 8 Hp Rear Engine Rider Comet View Diagrams & Manuals
YT16D484B (Series 4)(82080) 48-Inch 16 Hp Disc Drive Yard Tractor View Diagrams & Manuals
LT16482 (Series 2)(82088) 48-Inch 16 Hp Disc Drive Tractor View Diagrams & Manuals
YT16483 (Series 3)(82089) 48-Inch 16 Hp Disc Drive Yard Tractor View Diagrams & Manuals
GYT12333 (Series 3)(82939) 33-Inch 12.5 Hp Disc Drive Yard Tractor View Diagrams & Manuals
GYT16333 (Series 3)(82949) 33-Inch 16 Hp Disc Drive Yard Tractor View Diagrams & Manuals
LT11001 (Series 1)(83132) 11 Hp Disc Drive Tractor View Diagrams & Manuals
LT11000 (Series 0)(89032) 11 Hp Disc Drive Tractor View Diagrams & Manuals
LT16001 (Series 1)(89050) 16 Hp Disc Drive Tractor View Diagrams & Manuals
YT16413 (Series 3)(82079) 41-Inch 16 Hp Disc Drive Yard Tractor View Diagrams & Manuals
ELT125G38AB (Series A)(80395) 38-Inch 12.5 Hp Euro Tractor View Diagrams & Manuals
LT125G33BB (Series B)(80462) 33-Inch 12.5 Hp Gear Drive Tractor View Diagrams & Manuals
ELT120G33AB (Series A)(80476) 33-Inch 12 Hp Euro Tractor View Diagrams & Manuals
ELT125G33AB (Series A)(80476) 33-Inch 12.5 Hp Euro Tractor View Diagrams & Manuals
LT130G38AB (Series A)(80550) 38-Inch 13 Hp Euro Tractor View Diagrams & Manuals
YT180H334K (Series 4)(80239) 33-Inch 18 Hp Hydro Drive Yard Tractor View Diagrams & Manuals
YT180H414K (Series 4)(80240) 41-Inch 18 Hp Hydro Drive Yard Tractor View Diagrams & Manuals
YT180H484K (Series 4)(80241) 48-Inch 18 Hp Hydro Drive Yard Tractor View Diagrams & Manuals
ELT130G38AB (Series A)(80551) 38-Inch 13 Hp Euro Tractor View Diagrams & Manuals
LT125G33AB (Series A)(80554) 33-Inch 12.5 Hp Euro Tractor View Diagrams & Manuals
BH120G38AB (Series A)(80479) 38-Inch 12 Hp Gear Drive Bh Tractor View Diagrams & Manuals
BH140G42ABV (Series A)(80480) 42-Inch 14 Hp Gear Drive Bh Tractor View Diagrams & Manuals
BH140H33BBV (Series B)(80878) 33-Inch 14 Hp Hydro Drive Bh Tractor View Diagrams & Manuals
BH125G38BB (Series B)(82356) 38-Inch 12.5 Hp Gear Drive Bh Tractor View Diagrams & Manuals
LT120G30BB (Series B)(80641) 30-Inch 12 Hp Gear Drive Tractor View Diagrams & Manuals
BH140H38BBV (Series B)(82361) 38-Inch 14 Hp Hydro Drive Bh Tractor View Diagrams & Manuals
LT120G30AB (Series A)(80350) 30-Inch 12 Hp Gear Drive Tractor View Diagrams & Manuals
LT125G38AB (Series A)(80377) 38-Inch 12.5 Hp Gear Drive Tractor View Diagrams & Manuals
ELT125G33BB (Series B)(80647) 33-Inch 12.5 Hp Gear Drive Tractor View Diagrams & Manuals
LT120G30DB (Series D)(82386) 30-Inch 12 Hp Gear Drive Tractor View Diagrams & Manuals
ELT125G33DB (Series D)(82417) 33-Inch 12.5 Hp Gear Drive Tractor View Diagrams & Manuals
NLT120G30DB (Series D)(82445) 30-Inch 12 Hp Gear Drive Tractor View Diagrams & Manuals
ELT120G30AB (Series A)(80394) 30-Inch 12 Hp Gear Drive Euro Tractor View Diagrams & Manuals
LT125G38DB (Series D)(82456) 38-Inch 12.5 Hp Gear Drive Tractor View Diagrams & Manuals
LT145H38CBV (Series C)(80840) 38-Inch 14.5 Hp Hydro Drive Tractor View Diagrams & Manuals
LT160H42CBV (Series C)(80842) 42-Inch 16 Hp Hydro Drive Tractor View Diagrams & Manuals
LT160H42CBV2 (Series C)(80843) 42-Inch 16 Hp Hydro Drive Tractor View Diagrams & Manuals
LT160H42DBV2 (Series D)(82390) 42-Inch 16 Hp Hydro Drive Tractor View Diagrams & Manuals
LT145H38GBV (Series G)(84592) 38-Inch 14.5 Hp Hydro Drive Tractor View Diagrams & Manuals
LT150H38GKV (Series G)(84593) 38-Inch 15 Hp Hydro Drive Tractor View Diagrams & Manuals
ELT145H33GBV (Series G)(84597) 33-Inch 14.5 Hp Hydro Drive Tractor View Diagrams & Manuals
WLT145H38GBV (Series G)(84657) 38-Inch 14.5 Hp Hydro Drive Tractor View Diagrams & Manuals
LT145H33HBV (Series H)(84720) 33-Inch 14.5 Hp Hydro Drive Tractor View Diagrams & Manuals
LT145H38HBV (Series H)(84721) 38-Inch 14.5 Hp Hydro Drive Tractor View Diagrams & Manuals
LT150H38HKV (Series H)(84722) 38-Inch 15 Hp Hydro Drive Tractor View Diagrams & Manuals
ELT145H33HBV (Series H)(84726) 33-Inch 14.5 Hp Hydro Drive Euro Tractor View Diagrams & Manuals
WLT145H38HBV (Series H)(84727) 38-Inch 14.5 Hp Hydro Drive Tractor View Diagrams & Manuals
LT150H33IBV (Series I)(84899) 33-Inch 15 Hp Hydro Drive Tractor View Diagrams & Manuals
WLT180H42IBV2 (Series I)(84903) 42-Inch 18 Hp Hydro Drive Tractor View Diagrams & Manuals
WLT200H48IBV2 (Series I)(84904) 48-Inch 20 Hp Hydro Drive Tractor View Diagrams & Manuals
LT180H42IBV (Series I)(85692) 42-Inch 18 Hp Hydro Drive Tractor View Diagrams & Manuals
LT200H42IBV2 (Series I)(85920) 42-Inch 20 Hp Hydro Drive Tractor View Diagrams & Manuals
LT140H38ABV (Series A)(80561) 38-Inch 14 Hp Hydro Drive Tractor View Diagrams & Manuals
ELT140H33ABV (Series A)(80562) 33-Inch 14 Hp Hydro Drive Euro Tractor View Diagrams & Manuals
LT140H38BBV (Series B)(80643) 38-Inch 14 Hp Hydro Drive Tractor View Diagrams & Manuals
LT150H38BBV (Series B)(80644) 38-Inch 15 Hp Hydro Drive Tractor View Diagrams & Manuals
LT155H42BBV (Series B)(80645) 42-Inch 15.5 Hp Hydro Drive Tractor View Diagrams & Manuals
ELT140H33BBV (Series B)(80649) 33-Inch 14 Hp Hydro Drive Tractor View Diagrams & Manuals
LT140H33BBV (Series B)(80723) 33-Inch 14 Hp Hydro Drive Tractor View Diagrams & Manuals
ELT140H33DBV (Series D)(82418) 33-Inch 14 Hp Hydro Drive Tractor View Diagrams & Manuals
LT160H42DBV (Series D)(84240) 42-Inch 16 Hp Hydro Drive Tractor View Diagrams & Manuals
NLT145H38DBV (Series D)(82455) 38-Inch 14.5 Hp Hydro Drive Tractor View Diagrams & Manuals
LT180H48DBV2 (Series D)(84253) 48-Inch 18 Hp Hydro Drive Tractor View Diagrams & Manuals
LT140H33DBV (Series D)(84238) 33-Inch 14 Hp Hydro Drive Tractor View Diagrams & Manuals
LT160H42FBV (Series F)(84357) 42-Inch 16 Hp Hydro Drive Tractor View Diagrams & Manuals
LT145H38DBV (Series D)(84239) 38-Inch 14.5 Hp Hydro Drive Tractor View Diagrams & Manuals
LT160H42FBV2 (Series F)(84358) 42-Inch 16 Hp Hydro Drive Tractor View Diagrams & Manuals
LT145H33FBV (Series F)(84355) 33-Inch 14.5 Hp Hydro Drive Tractor View Diagrams & Manuals
LT180H48FBV2 (Series F)(84359) 48-Inch 18 Hp Hydro Drive Tractor View Diagrams & Manuals
LT145H38FBV (Series F)(84356) 38-Inch 14.5 Hp Hydro Drive Tractor View Diagrams & Manuals
LT160H42GBV (Series G)(84594) 42-Inch 16 Hp Hydro Drive Tractor View Diagrams & Manuals
ELT145H33FBV (Series F)(84360) 38-Inch 14.5 Hp European Hydro Drive Tractor View Diagrams & Manuals
LT145H33GBV (Series G)(84591) 33-Inch 14.5 Hp Hydro Drive Tractor View Diagrams & Manuals
LT160H42GBV2 (Series G)(84595) 42-Inch 16 Hp Hydro Drive Tractor View Diagrams & Manuals
LT180H48GBV2 (Series G)(84596) 48-Inch 18 Hp Hydro Drive Tractor View Diagrams & Manuals
WLT160H42GBV (Series G)(84658) 42-Inch 16 Hp Hydro Drive Tractor View Diagrams & Manuals
WLT180H48GBV2 (Series G)(84659) 48-Inch 18 Hp Hydro Drive Tractor View Diagrams & Manuals
LT160H42HBV (Series H)(84723) 42-Inch 16 Hp Hydro Drive Tractor View Diagrams & Manuals
LT160H42HBV2 (Series H)(84724) 42-Inch 16 Hp Hydro Drive Tractor View Diagrams & Manuals
LT180H48HBV2 (Series H)(84725) 48-Inch 18 Hp Hydro Drive Tractor View Diagrams & Manuals
WLT160H42HBV (Series H)(84728) 42-Inch 16 Hp Hydro Drive Tractor View Diagrams & Manuals
WLT180H48HBV2 (Series H)(84729) 48-Inch 18 Hp Hydro Drive Tractor View Diagrams & Manuals
LT160H42IBV (Series I)(84895) 42-Inch 16 Hp Hydro Drive Tractor View Diagrams & Manuals
LT180H42IBV2 (Series I)(84896) 42-Inch 18 Hp Hydro Drive Tractor View Diagrams & Manuals
LT200H48IBV2 (Series I)(84897) 48-Inch 20 Hp Hydro Drive Tractor View Diagrams & Manuals
LT12D410B (Series 0)(82879) 41-Inch 12 Hp Disc Drive Tractor View Diagrams & Manuals
LT12D330B (Series 0)(82899) 33-Inch 12 Hp Disc Drive Tractor View Diagrams & Manuals
LT150H38IBV (Series I)(84900) 38-Inch 15 Hp Hydro Drive Tractor View Diagrams & Manuals
ELT150H33IBV (Series I)(84901) 33-Inch 15 Hp Hydro Drive Euro Tractor View Diagrams & Manuals
WLT150H38IBV (Series I)(84902) 38-Inch 15 Hp Hydro Drive Tractor View Diagrams & Manuals
WLT170H38IBV (Series I)(84925) 38-Inch 17 Hp Hydro Drive Tractor View Diagrams & Manuals
ELT180H33IBV (Series I)(85689) 33-Inch 18 Hp Hydro Drive Euro Tractor View Diagrams & Manuals
LT180H33IBV (Series I)(85690) 33-Inch 18 Hp Hydro Drive Tractor View Diagrams & Manuals
LT180H38IBV (Series I)(85691) 38-Inch 18 Hp Hydro Drive Tractor View Diagrams & Manuals
HZ14330BVE (Series 0)(82366) 33-Inch 14 Hp Ztr Yard Cruiser View Diagrams & Manuals
HZ14380BVE (Series 0)(82367) 38-Inch 14 Hp Ztr Yard Cruiser View Diagrams & Manuals
HZ16480BVE (Series 0)(82368) 48-Inch 16 Hp Ztr Yard Cruiser View Diagrams & Manuals
HZ15420KVE (Series 0)(82370) 42-Inch 15 Hp Ztr Yard Cruiser View Diagrams & Manuals
HZS15420KVE (Series 0)(82370) 42-Inch 15 Hp Ztr Yard Cruiser View Diagrams & Manuals
NHZ14380BVE (Series 0)(82487) 38-Inch 14 Hp Ztr Yard Cruiser View Diagrams & Manuals
HZS14330BVE (Series 0)(82520) 33-Inch 14 Hp Ztr Yard Cruiser View Diagrams & Manuals
HZS14380BVE (Series 0)(82522) 38-Inch 14 Hp Ztr Yard Cruiser View Diagrams & Manuals
HZS14331BVE (Series 1)(82545) 33-Inch 14 Hp Ztr Yard Cruiser View Diagrams & Manuals
HZS14381BVE (Series 1)(82546) 38-Inch 14 Hp Ztr Yard Cruiser View Diagrams & Manuals
SZT18336BVE (Series 6)(85679) 33-Inch 18 Hp Ztr Twin Stick View Diagrams & Manuals
SZT18386BVE (Series 6)(85680) 38-Inch 18 Hp Ztr Twin Stick View Diagrams & Manuals
HZS15421KVE (Series 1)(82547) 42-Inch 15 Hp Ztr Yard Cruiser View Diagrams & Manuals
HZS16481BVE (Series 1)(82548) 48-Inch 16 Hp Ztr Yard Cruiser View Diagrams & Manuals
SZT18426BVE (Series 6)(85681) 42-Inch 18 Hp Ztr Twin Stick View Diagrams & Manuals
YZ145383BVE (Series 3)(84732) 38-Inch 14.5 Hp Ztr Yard Cruiser View Diagrams & Manuals
SZT20486BVE (Series 6)(85682) 48-Inch 20 Hp Ztr Twin Stick View Diagrams & Manuals
YZ145333BVE (Series 3)(84733) 33-Inch 14.5 Hp Ztr Yard Cruiser View Diagrams & Manuals
ESZT18336BVE (Series 6)(85697) 33-Inch 18 Hp Ztr Twin Stick Euro View Diagrams & Manuals
YZ20484BVE (Series 4)(84889) 48-Inch 18 Hp Ztr Yard Cruiser View Diagrams & Manuals
YZ16424BVE (Series 4)(84890) 42-Inch 16 Hp Ztr Yard Cruiser View Diagrams & Manuals
YZ15384BVE (Series 4)(84891) 38-Inch 15 Hp Ztr Yard Cruiser View Diagrams & Manuals
YZ15334BVE (Series 4)(84892) 33-Inch 15 Hp Ztr Yard Cruiser View Diagrams & Manuals
EYZ15334BVE (Series 4)(84893) 33-Inch 15 Hp Ztr Yard Cruiser View Diagrams & Manuals
YZ20485BVE (Series 5)(84943) 48-Inch 20 Hp Ztr Scrambler View Diagrams & Manuals
YZ18425BVE (Series 5)(84944) 42-Inch 18 Hp Ztr Scrambler View Diagrams & Manuals
YZ16385BVE (Series 5)(84945) 38-Inch 16 Hp Ztr Scrambler View Diagrams & Manuals
YZ16335BVE (Series 5)(84946) 33-Inch 16 Hp Ztr Scrambler View Diagrams & Manuals
YZ18336BVE (Series 6)(85693) 33-Inch 18 Hp Ztr Scrambler View Diagrams & Manuals
YZ18386BVE (Series 6)(85694) 38-Inch 18 Hp Ztr Scrambler View Diagrams & Manuals
YZ18426BVE (Series 6)(85695) 42-Inch 18 Hp Ztr Scrambler View Diagrams & Manuals
YZ20486BVE (Series 6)(85696) 48-Inch 20 Hp Ztr Scrambler View Diagrams & Manuals
HZS18482BVE (Series 2)(84305) 48-Inch 18 Hp Ztr Yard Cruiser View Diagrams & Manuals
HZS15422KVE (Series 2)(84308) 42-Inch 15 Hp Ztr Yard Cruiser View Diagrams & Manuals
HZS18483BVE (Series 3)(84730) 48-Inch 18 Hp Ztr Yard Cruiser View Diagrams & Manuals
HZS15423KVE (Series 3)(84735) 42-Inch 15 Hp Ztr Yard Cruiser View Diagrams & Manuals
YZ13331BE (Series 1)(82531) 33-Inch 13 Hp Ztr Yard Cruiser View Diagrams & Manuals
YZ13381BE (Series 1)(82532) 38-Inch 13 Hp Ztr Yard Cruiser View Diagrams & Manuals
YZ145332BVE (Series 2)(84598) 33-Inch 14.5 Hp Ztr Yard Cruiser View Diagrams & Manuals
YZ145382BVE (Series 2)(84599) 38-Inch 14.5 Hp Ztr Yard Cruiser View Diagrams & Manuals
Show More Compatible Models
This item works with the following types of products:
- Lawn Tractor Parts
This part replaces obsolete part #: 7011022
Customer Part Reviews ?
Average Rating (out of 5):
Click to filter by ratings:
5 stars
3
4 stars
0
3 stars
0
2 stars
0
1 stars
0
< PREV
- 1
Great product and service
It was quick and easy to order and shipped the same day I ordered received it two days later. Can't beat that
Guest -
September 23, 2022
Verified Purchase
Great parts resource
The part we ordered was an exact replacement and it snapped into place perfectly !
Guest -
November 13, 2021
Verified Purchase
Great customer support
I wasn't sure of the part I needed so I called and received the help I needed. Thanks!
Guest -
June 22, 2021
Verified Purchase
t
t
t -
t days ago
Verified Purchase
eReplacementParts Team
t
Questions & Answers ?
Our customer Service team is at the ready daily to answer your part and product questions.

Ask our Team
We have a dedicated staff with decades of collective experience in helping customers just like you purchase parts to repair their products.
Does this fit my product?Questions & Answers for Hub Cap
No questions have been asked yet
Customer Repair Instructions ?
All our customer repair instructions are solicited directly from other customers just like you who have purchased and replaced this exact part.
lost my hub cap
Pat - June 28, 2019
👍 1 of 1 people found this instruction helpful
Tool Type
Lawn Mower
Difficulty
Easy
Time
Less than 15 minutes
Tools Used
, elbow grease
Parts Used
put grease in the fitting, snap the cap on
Did you find this story helpful?
Thanks for voting and helping fellow customers!
missing hub cap
robert - May 22, 2023
Tool Type
Lawn Tractor
Difficulty
Easy
Time
Less than 15 minutes
Tools Used
, rubber hammer
Parts Used
Put it on
Did you find this story helpful?
Thanks for voting and helping fellow customers!
Tie rod end worn out (came apart) and bearings worn.
Fred - June 19, 2020
Tool Type
Lawn Tractor
Difficulty
Easy
Time
30-60 minutes
Tools Used
Screwdriver, Pliers, Wrench Set, hammer
1. Jacked up front end of mower.
2. removed nuts/washers from tie rod ends.
3. Replaced new tie rods with old nuts/washers.
4. Removed hub caps from front wheels and cleaned off excess grease.
5. Removed cotter pin, washer, wheel, inner washers, seal, and cap dust cover.
6. Removed inner and outer bearings with screw driver and hammer.
7. Replaced bearings and put everything back in reverse order.
8. Added grease to wheels between the bearings and replaced the hub caps.
Did you find this story helpful?
Thanks for voting and helping fellow customers!
Parts worn or broken.
Timothy - July 5, 2019
Tool Type
Lawn Tractor
Difficulty
Medium
Time
1-2 hours
Tools Used
Screwdriver, Pliers, Power Drill, Socket set, Wrench Set, Nutdriver, Adjustable Wrench, Grease gun, File, Wheel puller, penetrating oil.
Tipped the machine up on the back bumper stands. Removed the rear tires and left hand fender from the lawn tractor.
Removed old cables and replaced with the new ones.
Cleaned parts that was going to be reused.
Cleaned and Greased the rear axe before installing the new rubber protective boots on the rear axel.
Re-assembled the rear axel assembly. I had to add nylon
shims to take up the slop between the rear axel and the
left hand tire bushing bearing prior to installing the left hand fender and tires.
Adjusted the chain case and brake cables as required.
Test ran the tractor after the repairs were made.
All pats fit and performed great. Tractor is running good !
Did you find this story helpful?
Thanks for voting and helping fellow customers!
hubcap
richard - April 5, 2019
Tool Type
Lawn Mower
Difficulty
Easy
Time
Less than 15 minutes
Tools Used
, hammer
Parts Used
took hammer and knock it on
Did you find this story helpful?
Thanks for voting and helping fellow customers!
Restoring a Snapper rear engine mower. Needed hub-caps
Terry - July 21, 2017
👍 1 of 2 people found this instruction helpful
Tool Type
Lawn Mower
Difficulty
Easy
Time
15-30 minutes
Tools Used
Socket set
Simply removed old hub-caps on front wheels and snapped new ones on. Unbolted rear wheels to replace hub-caps.
Did you find this story helpful?
Thanks for voting and helping fellow customers!
Hub caps fell off
Tom - May 22, 2016
👍 0 of 1 people found this instruction helpful
Tool Type
Lawn Mower
Difficulty
Easy
Time
Less than 15 minutes
Tools Used
, Soft mallet
Parts Used
Easy. All you need to do is to tap them on.
Did you find this story helpful?
Thanks for voting and helping fellow customers!
Hub cap on the right front wheel of our Snapper riding mower came off and was hit by the mower blade.
Ray - April 24, 2016
👍 0 of 1 people found this instruction helpful
Tool Type
Lawn Mower
Difficulty
Easy
Time
Less than 15 minutes
Tools Used
, Rubber-headed mallet
Parts Used
Clean all grease and debris from the bearing surfaces on both the wheel and the axle (if done before another mowing, one does not have to remove the wheel). Install the new hub cap (plastic) by gently tapping on the new cap to completely seat the unit. Re-grease the hub assembly through the Zerk fitting...avoiding adding too much grease (adds too much pressure on the hub cap).
Did you find this story helpful?
Thanks for voting and helping fellow customers!
Old hubcaps had fallen off apparently due to age making plastic caps loose.
David - April 22, 2016
👍 0 of 1 people found this instruction helpful
Tool Type
Lawn Mower
Difficulty
Easy
Time
Less than 15 minutes
Tools Used
, Rubber Mallet
Parts Used
New caps fit tight. A rubber mallet is needed to tap them on.
Did you find this story helpful?
Thanks for voting and helping fellow customers!
OEM stands for Original Equipment Manufacturer and means the part you’re buying is sourced directly from the manufacturer who made your product. At eReplacementParts, we sell only genuine OEM parts, guaranteeing the part you’re purchasing is of better design and of higher quality than aftermarket parts.
Our product descriptions are a combination of data sourced directly from the manufacturers who made your product as well as content researched and curated by our content & customer service teams. This content is edited and reviewed internally before being made public to customers.
Our customer service team are at the ready daily to answer your part and product questions. We have a dedicated staff with decades of collective experience in helping customers just like you purchase parts to repair their products.
All our part reviews are solicited directly from other customers who have purchased this exact part. While we moderate these reviews for profanity, offensive language or personally identifiable information, these reviews are posted exactly as submitted and no alterations are made by our team.
All our customer repair instructions are solicited directly from other customers just like you who have purchased and replaced this exact part. While we moderate these reviews for profanity, offensive language or personally identifiable information, these reviews are posted exactly as submitted and no alterations are made by our team.
Based on data from past customer purchasing behaviors, these parts are most commonly purchased together along with the part you are viewing. These parts may be necessary or helpful to replace to complete your current repair.
All our installation videos are created and produced in collaboration with our in-house repair technician, Mark Sodja, who has helped millions of eReplacementParts customers over the last 13 years repair their products. Mark has years of experience in selling and repairing both commercial and residential products with a specialty in gas-powered equipment.
This data is collected from customers who submitted a repair instruction after replacing this exact part. Customers can rate how easy the repair was to complete and how long it took. We aggregate this data to provide a repair rating that allows customers to quickly determine the difficulty and time needed to perform their own repair.