eReplacementParts.com
877-346-4814
Bosch Parts
Repair Parts Home
  
Power Tool Parts
  
Bosch Parts
  2610917408 Hook And Loop Sander Pad

Hook And Loop Sander Pad 2610917408

OEM part for: Bosch

Part Number: 2610917408


Install
Videos!
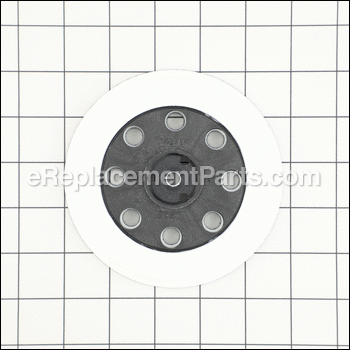
Grid squares measure 1x1 inch
Hook And Loop Sander Pad - 2610917408:BoschHook And Loop Sander Pad - 2610917408:Bosch
Usually ships in 7 - 12 business days
Leaves our warehouse within
7 - 12 business days
Easy Less than 15 minutes (59 rated repairs)?
OEM: Original Equipment Manufacturer ?
Bosch
Does this d-block d-md-none fit my product?

Product Description ?

This pad is the soft backing pad that is standard on new Bosch sanders.
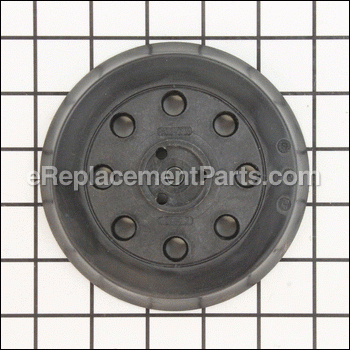
This Bosch 2610917408 8-hole sander backing pad has a Velcro surface to accommodate hook and loop sandpaper. It is a genuine Bosch brand product. The pad is flexible to allow flat or contour sanding without gouging. It is for use with abrasive discs and polishing bonnets on random orbital sanders. It has a 5-inch diameter.

  • Weight: 0.25 lbs.
  • Shipping: Ships Worldwide

Compatibility

This part will fit the following 15 machines

Bosch

1295DH (0601295539) Random Orbit Sander View Diagrams & Manuals
1295DVS (0601295739) Random Orbit Sander View Diagrams & Manuals
3725DVS (0601372539) 5" Random Orbit Sander View Diagrams & Manuals
B7250 (0603283735) Random Orbit Sander View Diagrams & Manuals
3283DVS (0603283739) Random Orbit Sander View Diagrams & Manuals
3107DVS (0603310639) Random Orbit Sander View Diagrams & Manuals
B7255 (0603310735) Random Orbit Sander View Diagrams & Manuals
3107DVS (0603310739) Random Orbit Sander View Diagrams & Manuals
1295D (0601295039) Random Orbit Sander View Diagrams & Manuals
1295DP (0601295139) Random Orbit Sander View Diagrams & Manuals
1295D (0601295056) Random Orbit Sander View Diagrams & Manuals
1295DVS (0601295756) Random Orbit Sander View Diagrams & Manuals
1893D (0601295160) Random Orbit Sander View Diagrams & Manuals
1893DVS (0601295560) Random Orbit Sander View Diagrams & Manuals
3725DEVS (0601372439) Random Orbit Sander View Diagrams & Manuals
Show More Compatible Models
Don't see yours? Try searching our site for :

This item works with the following types of products:

  • Sander Parts

This part replaces obsolete part #: 2610992164, RSP019, RS031, 2608000124

Customer Part Reviews ?

4.8
Average Rating (out of 5):
35 Reviews
Click to filter by ratings:
5 stars
31
4 stars
2
3 stars
1
2 stars
0
1 stars
1
  • Highest Rating
  • Most Recent
< PREV
  • 1
  • 2
  • 3
NEXT >
  • easy repair
    The repair part went on very easy and appears o be better than the original.
    John - August 15, 2023 Verified Purchase
    All went perfectly
    Part was a perfect match. Thanks
    Guest - January 7, 2023 Verified Purchase
    Part was what I ordered
    Worked great
    Donavan - July 12, 2022 Verified Purchase
    Replacement sanding pad
    Replacement random orbit sanding pad, perfect fit and solved problem with securing sanding discs.
    Guest - June 30, 2022 Verified Purchase
    Worked as a charm
    Correct fit, project done!
    Guest - May 30, 2022 Verified Purchase
    Great Transaction
    Received the correct part quickly. What more could I ask for?
    Guest - March 26, 2022 Verified Purchase
    Easy repair
    This part was easy to install and fir just like it should a slightly different design but was same fit as the part it replaced.
    Raymond - March 22, 2022 Verified Purchase
    Efficient
    Very surprised. Ordered my Hook and Loop Sander Pad on Sunday afternoon and received it on Thursday. Very pleased nd will use them again.
    Merle - March 18, 2022 Verified Purchase
    Great website
    Figuring out what I needed and then ordering it could not have been easier.
    Guest - February 11, 2022 Verified Purchase
    Easy to shop and order.
    The part was in great shape and arrived quickly. Easy to replace on sander. Question, the part was a cushioned pad. Do you carry a pad which is like the original which was a pad with a much firmer surface to attach the sanding paper? The firmer surface would be much more useful in more difficult jobs!
    Guest - February 3, 2022 Verified Purchase
    t
    t
    t - t days ago Verified Purchase
    eReplacementParts Team
    t

    Questions & Answers ?

    Our customer Service team is at the ready daily to answer your part and product questions.

    photo of team member
    Ask our Team

    We have a dedicated staff with decades of collective experience in helping customers just like you purchase parts to repair their products.

    Does this fit my product?

    Questions & Answers for Hook And Loop Sander Pad


    No questions have been asked yet

    Customer Repair Instructions ?

    All our customer repair instructions are solicited directly from other customers just like you who have purchased and replaced this exact part.

    Easy Less than 15 minutes (59 rated repairs)?

    Sanding pad tore and separated

    Michael - November 21, 2015
    👍 12 of 13 people found this instruction helpful
    Tool Type

    Sander

    Difficulty

    Easy

    Time

    15-30 minutes

    Tools Used

    Screwdriver, Allen wrench

    Loosen and remove the screws that secure the case to the internal mechanism.The pad is held in place by an Allen screw and is accessible once the case is open. The screw is evidently torqued into place at the time of manufacture so some effort is required to loosen it. Remove the screw and the pad. The inside of the case was heavily impacted with saw dust. It needs to be cleaned. Once clean, install the new pad and reinstall the allen screw. Reassembled the case around the works, then reinstall the screws and tighten. The repair is easy and straight forward. And hats off to Bosch for a beautifully designed piece of equipment.
    Did you find this story helpful?
    Thanks for voting and helping fellow customers!

    Needed new sanding pad

    John - March 6, 2016
    👍 5 of 5 people found this instruction helpful
    Tool Type

    Sander

    Difficulty

    Easy

    Time

    Less than 15 minutes

    Tools Used

    Screwdriver, None

    Remove one screw from the pad, then removed the pad. I then used my compressor to blow out the saw dust from inside the sander. Then I installed the new pad with the screw. Worked perfectly. Just what I ordered!
    Did you find this story helpful?
    Thanks for voting and helping fellow customers!

    Sander pad foam was deteriorating

    Conrad - July 25, 2016
    👍 3 of 3 people found this instruction helpful
    Tool Type

    Sander

    Difficulty

    Easy

    Time

    Less than 15 minutes

    Tools Used

    , Allen wrench that came with the sander

    Step 1: Laying the sander down on its side, holding the sander and pad with my left hand and using the Allen wrench in my right hand, I loosened the center bolt. This was pretty snug since there is Lock-tite used on the threads.
    Step 2: Once the old pad was removed I wiped down the sander and removed all of the built up sawdust with a damp rag.
    Step 3: Put a drop of blue Lock-tite on the center bolt and installed the new pad using Step 1 and tightened the center bolt.
    Did you find this story helpful?
    Thanks for voting and helping fellow customers!

    Sanding plate lost the velcro grip and wouldn't hold sanding discs

    James - October 7, 2018
    👍 1 of 1 people found this instruction helpful
    Tool Type

    Sander

    Difficulty

    Easy

    Time

    Less than 15 minutes

    Tools Used

    , Allen wrench

    1 Removed old sanding plate
    2 Replaced with new plate
    Did you find this story helpful?
    Thanks for voting and helping fellow customers!

    Hook and loop pad was worn out.

    William - September 23, 2018
    👍 1 of 1 people found this instruction helpful
    Tool Type

    Sander

    Difficulty

    Easy

    Time

    Less than 15 minutes

    Tools Used

    , Allen wrench

    Removed the allen screw from the middle of the pad, then removed the old pad.
    Then installed the new pad with the allen screw
    Did you find this story helpful?
    Thanks for voting and helping fellow customers!

    Pad beneath hook pad dry rotted

    witold - July 6, 2017
    👍 1 of 1 people found this instruction helpful
    Tool Type

    Sander

    Difficulty

    Easy

    Time

    15-30 minutes

    Tools Used

    Screwdriver, Allen wrench

    1. Remove the old pad by unscrewing the mounting screw.
    2. Remove the old pad.
    3. Clear out the old dry rotted particles from beneath the old mounting pad.
    4. Align the new pad with the screw hole.
    5. Secure the new pad with the original mounting screw.
    Did you find this story helpful?
    Thanks for voting and helping fellow customers!

    Worn out sanding pad.

    GARY - April 30, 2017
    👍 1 of 1 people found this instruction helpful
    Tool Type

    Sander

    Difficulty

    Easy

    Time

    Less than 15 minutes

    Tools Used

    , Allen wrench

    Removed the old pad, and installed the new pad.
    Did you find this story helpful?
    Thanks for voting and helping fellow customers!

    Hook and Loop pad was worn out and falling apart

    William - September 8, 2018
    Tool Type

    Sander

    Difficulty

    Easy

    Time

    Less than 15 minutes

    Tools Used

    , Allen wrench

    Removed old pad and attached new pad. Was great to find the right pad for an older Bosch sander.
    Did you find this story helpful?
    Thanks for voting and helping fellow customers!

    The sander pad had become separated from the sander.

    Alan - August 30, 2018
    Tool Type

    Sander

    Difficulty

    Easy

    Time

    Less than 15 minutes

    Tools Used

    Nutdriver

    I used the provided nut driver and removed the base of the sander pad. Put the new one in place and put the nut back in place.
    Did you find this story helpful?
    Thanks for voting and helping fellow customers!

    Sand paper would no longer attach to the hook and loop pad.

    JAMES - May 16, 2018
    Tool Type

    Sander

    Difficulty

    Easy

    Time

    Less than 15 minutes

    Tools Used

    , Allen wrench

    Used an allen wrench to remove the old pad and replaced with the new ones. A very simple repair and I now have 2 sanders that are like new. I love your website and how well the parts are described. I knew the parts were right before I ordered them. Thank you! It was a great help and the parts arrived in a matter of a couple days. Thanks again!
    JIM
    Did you find this story helpful?
    Thanks for voting and helping fellow customers!

    OEM stands for Original Equipment Manufacturer and means the part you’re buying is sourced directly from the manufacturer who made your product. At eReplacementParts, we sell only genuine OEM parts, guaranteeing the part you’re purchasing is of better design and of higher quality than aftermarket parts.

    Our product descriptions are a combination of data sourced directly from the manufacturers who made your product as well as content researched and curated by our content & customer service teams. This content is edited and reviewed internally before being made public to customers.

    Our customer service team are at the ready daily to answer your part and product questions. We have a dedicated staff with decades of collective experience in helping customers just like you purchase parts to repair their products.

    All our part reviews are solicited directly from other customers who have purchased this exact part. While we moderate these reviews for profanity, offensive language or personally identifiable information, these reviews are posted exactly as submitted and no alterations are made by our team.

    All our customer repair instructions are solicited directly from other customers just like you who have purchased and replaced this exact part. While we moderate these reviews for profanity, offensive language or personally identifiable information, these reviews are posted exactly as submitted and no alterations are made by our team.

    Based on data from past customer purchasing behaviors, these parts are most commonly purchased together along with the part you are viewing. These parts may be necessary or helpful to replace to complete your current repair.

    All our installation videos are created and produced in collaboration with our in-house repair technician, Mark Sodja, who has helped millions of eReplacementParts customers over the last 13 years repair their products. Mark has years of experience in selling and repairing both commercial and residential products with a specialty in gas-powered equipment.

    This data is collected from customers who submitted a repair instruction after replacing this exact part. Customers can rate how easy the repair was to complete and how long it took. We aggregate this data to provide a repair rating that allows customers to quickly determine the difficulty and time needed to perform their own repair.

    eReplacementParts.com
    7174 South 400 West
    Suite 5
    Midvale, UT 84047
    visa mastercard discover american express PayPal