
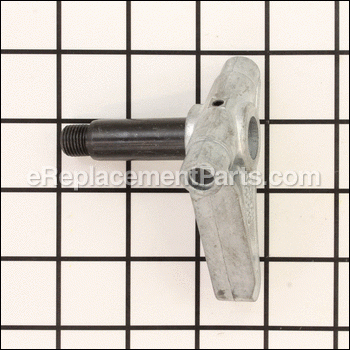
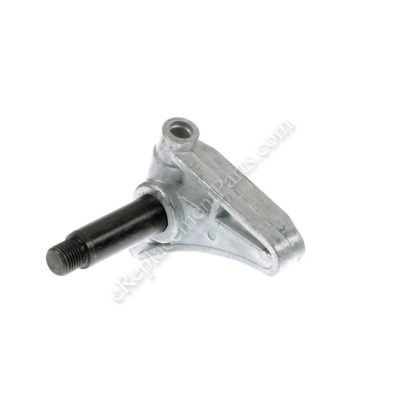


It is a genuine manufacturer-supplied part that is made for use with Jet and Wilton vertical bandsaws. The hinge-upper is a special component which helps to adjust the blade tracking. If the part is missing or is damaged, this will provide an identical replacement for the original part that was installed on a new unit. One durable metal hinge-upper is included. Check the owner's manual and the appropriate diagram for your model to ensure the proper repair procedure. A wrench set might be needed to remove the old component and secure the new one.
Hinge-upper 5782531
OEM part for: Wilton, Jet
Part Number: 5782531
$28.18
In Stock
Jump To:
Frequently Purchased Together ?


Compatibility
This part will fit the following 8 machines
Wilton
8201 (9078171) 14-Inch Vertical Bandsaw View Diagrams & Manuals
8203 (9078171) 14-Inch Vertical Bandsaw View Diagrams & Manuals
8201VS (9078171) 14-Inch Vertical Bandsaw View Diagrams & Manuals
8203VS Saw View Diagrams & Manuals
Jet
J-8201K (414500K) 14 Inch Vertical Band Saw View Diagrams & Manuals
J-8203 (414504) 14 Inch Vertical Band Saw View Diagrams & Manuals
J-8201VS (414502) 14 Inch Vertical Band Saw View Diagrams & Manuals
J-8203VS 14 Inch Vertical Band Saw View Diagrams & Manuals
Show More Compatible Models
This item works with the following types of products:
- Band Saw Parts
- Saw Parts
Customer Part Reviews ?
Average Rating (out of 5):
Click to filter by ratings:
5 stars
6
4 stars
1
3 stars
0
2 stars
0
1 stars
0
< PREV
- 1
Great parts diagram, received exactly what I ordered. Fast delivery
Part fit perfectly
James -
March 28, 2023
Verified Purchase
Improved design over original
Couldn't believe they still make this part. Perfect fit with some small adjustments on my off brand saw. All in all I couldn't be happier, my band saw works perfectly again for a fair price.
Robert -
January 28, 2023
Verified Purchase
perfect replacement, thank you for the service. Bandsaw like new! :)
Terribly hard to find replacement part here in Australia. Fitted and works fine!
iGlobal -
September 21, 2022
Verified Purchase
Great part!!
Its great doing purchases with this company!!
Guest -
April 6, 2021
Verified Purchase
Quick service!
Great service, quick delivery! Part fit and easy to install!
Guest -
September 24, 2020
Verified Purchase
Nearly identical to my discontinued saw.
The part arrived very quickly. I took a chance that this would fit my 30+ year old band saw. The only difference was the size of the pivot holes, which were easy to drill 1/64" larger. The part works like a charm. It saved me hundreds not having to buy a replacement saw.
Guest -
August 12, 2020
Verified Purchase
Long shot, but it worked.
I have a Ram bandsaw, purchased in about 1985. The arm on the upper hinge broke, and in trying to get it apart I also broke the box it rides in. In the catalog, Jet parts looked very similar, so I ordered them. It didn't quite work, I had to make 5/16" pins to fit the upper hinge, and the nut was 12mm instead of 1/2", but the saw is working again.
Guest -
May 26, 2019
Verified Purchase
t
t
t -
t days ago
Verified Purchase
eReplacementParts Team
t
Questions & Answers ?
Our customer Service team is at the ready daily to answer your part and product questions.

Ask our Team
We have a dedicated staff with decades of collective experience in helping customers just like you purchase parts to repair their products.
Does this fit my product?Questions & Answers for Hinge-upper
No questions have been asked yet
Customer Repair Instructions ?
All our customer repair instructions are solicited directly from other customers just like you who have purchased and replaced this exact part.
The cast hinge assembly used to adjust the blade tracking had broke......a true mystery. Possibly metal fatigue.
John - December 15, 2016
👍 5 of 5 people found this instruction helpful
Tool Type
Band Saw
Difficulty
Easy
Time
15-30 minutes
Tools Used
Screwdriver, Adjustable Wrench, Punch and hammer to tap in the hinge pins.
Parts Used
To be responsible, I suppose I should, like all manuals, state the obvious.....unplug the band saw! Next, I removed the blade. The blade guide on the left was held on by 2 screws. An adjustable wrench removed two lower bolt like devices ( one holds the door latch and the other hold the screw for the blade guide). If you have a manual with an exploded view this is helpful. They are also available on line.
Use a wrench for removal of upper wheel. Two more screws free the upper metal cover. The adjustment device slides out of the cast iron track. The most difficult part is removing the pins that secure the hinge. I used a 1/8" drill bit and made a pilot hole in the end of each pin. Then I screwed in a self tapping 1/2" metal screw. Screw it in so that its tight but still partially exposed. With a vise grip, you can now turn the pin and pull it out. When replacing the pin, it will need to be tapped in. I used a hammer and punch for this leaving the drilled end exposed in the event that I ever have to repeat this. Reassemble, adjust the blade according to instructions for your machine, and you're good to go. Hope this is helpful.
Use a wrench for removal of upper wheel. Two more screws free the upper metal cover. The adjustment device slides out of the cast iron track. The most difficult part is removing the pins that secure the hinge. I used a 1/8" drill bit and made a pilot hole in the end of each pin. Then I screwed in a self tapping 1/2" metal screw. Screw it in so that its tight but still partially exposed. With a vise grip, you can now turn the pin and pull it out. When replacing the pin, it will need to be tapped in. I used a hammer and punch for this leaving the drilled end exposed in the event that I ever have to repeat this. Reassemble, adjust the blade according to instructions for your machine, and you're good to go. Hope this is helpful.
Did you find this story helpful?
Thanks for voting and helping fellow customers!
The tracking hinge adjustment was broken
GEORGE - July 5, 2017
👍 1 of 1 people found this instruction helpful
Tool Type
Band Saw
Difficulty
Medium
Time
30-60 minutes
Tools Used
Pliers, Hammer & pin punch hack saw bench vice
Parts Used
Removed broken tracking adjuster by cutting the hinge pins out with a hacksaw
Installed hinge pins by pressing in with bench vice
Used hammer and pin punch to finish installing the hinge pins
Installed hinge pins by pressing in with bench vice
Used hammer and pin punch to finish installing the hinge pins
Did you find this story helpful?
Thanks for voting and helping fellow customers!
Upper wheel hinge lever broke
Dominic - September 12, 2022
Tool Type
Band Saw
Difficulty
Easy
Time
15-30 minutes
Tools Used
Screwdriver, Power Drill, Wrench Set
Parts Used
1. Remove blade.
2. Remove upper wheel.
3. Remove upper housing.
4. Remove wheel hinge assembly.
5. Remove hinge pins - most effective method was to drill a small hole in the pin, put a screw in it, and pull the pin using the screw as a handle.
6. Reassemble in reverse order.
2. Remove upper wheel.
3. Remove upper housing.
4. Remove wheel hinge assembly.
5. Remove hinge pins - most effective method was to drill a small hole in the pin, put a screw in it, and pull the pin using the screw as a handle.
6. Reassemble in reverse order.
Did you find this story helpful?
Thanks for voting and helping fellow customers!
Upper hinge was bent
Fred - March 14, 2022
Tool Type
Band Saw
Difficulty
Easy
Time
30-60 minutes
Tools Used
Screwdriver, Socket set, Wrench Set
Remove upper hinge assembly
Did you find this story helpful?
Thanks for voting and helping fellow customers!
band saw upper hinge replacement
ken - July 23, 2020
Tool Type
Band Saw
Difficulty
Easy
Time
30-60 minutes
Tools Used
Screwdriver, Pliers, Wrench Set
Parts Used
1 removed blade and upper guards
2 replaced hinge
3 replaced guards and blade
4 adjust tracking
5 cut my wood
2 replaced hinge
3 replaced guards and blade
4 adjust tracking
5 cut my wood
Did you find this story helpful?
Thanks for voting and helping fellow customers!
The lever on the upper hinge broke.
Michael - May 26, 2019
Tool Type
Band Saw
Difficulty
Medium
Time
More than 2 hours
Tools Used
Wrench Set, lathe
I have a Ram bandsaw, purchased in about 1985. The arm on the upper hinge broke, and in trying to get it apart I also broke the box it rides in. In the catalog, Jet parts looked very similar, so I ordered them. It didn't quite work, I had to make 5/16" pins to fit the upper hinge, and the nut was 12mm instead of 1/2", but the saw is working again.
Did you find this story helpful?
Thanks for voting and helping fellow customers!
OEM stands for Original Equipment Manufacturer and means the part you’re buying is sourced directly from the manufacturer who made your product. At eReplacementParts, we sell only genuine OEM parts, guaranteeing the part you’re purchasing is of better design and of higher quality than aftermarket parts.
Our product descriptions are a combination of data sourced directly from the manufacturers who made your product as well as content researched and curated by our content & customer service teams. This content is edited and reviewed internally before being made public to customers.
Our customer service team are at the ready daily to answer your part and product questions. We have a dedicated staff with decades of collective experience in helping customers just like you purchase parts to repair their products.
All our part reviews are solicited directly from other customers who have purchased this exact part. While we moderate these reviews for profanity, offensive language or personally identifiable information, these reviews are posted exactly as submitted and no alterations are made by our team.
All our customer repair instructions are solicited directly from other customers just like you who have purchased and replaced this exact part. While we moderate these reviews for profanity, offensive language or personally identifiable information, these reviews are posted exactly as submitted and no alterations are made by our team.
Based on data from past customer purchasing behaviors, these parts are most commonly purchased together along with the part you are viewing. These parts may be necessary or helpful to replace to complete your current repair.
All our installation videos are created and produced in collaboration with our in-house repair technician, Mark Sodja, who has helped millions of eReplacementParts customers over the last 13 years repair their products. Mark has years of experience in selling and repairing both commercial and residential products with a specialty in gas-powered equipment.
This data is collected from customers who submitted a repair instruction after replacing this exact part. Customers can rate how easy the repair was to complete and how long it took. We aggregate this data to provide a repair rating that allows customers to quickly determine the difficulty and time needed to perform their own repair.