
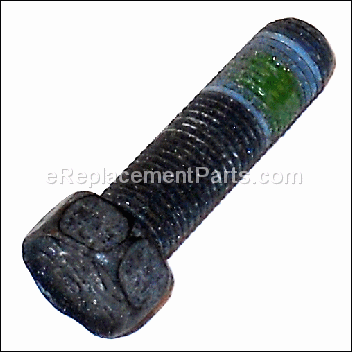
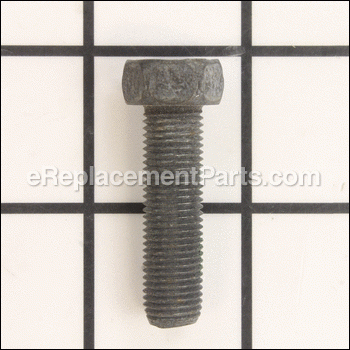
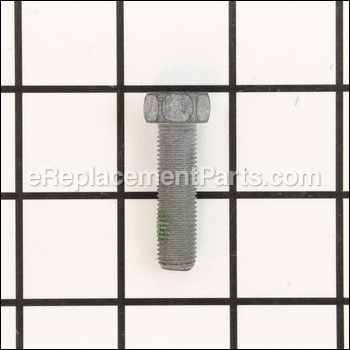
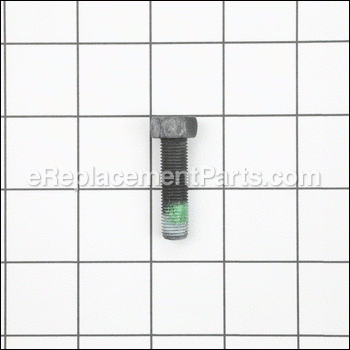

This is a genuine manufacturer-sourced replacement screw which is specially designed for use with Craftsman lawn and garden equipment. It is a standard hardware which has multiple applications depending on the model of your unit, please refer to the appropriate diagrams for the correct location and use of this item. This part is made of high-quality metal and it is sold individually, you will need a wrench to secure or remove it.
Hex Head Screw 532851084
OEM part for: Husqvarna, Poulan, Weed Eater, Craftsman, Ryobi, Murray
Part Number: 532851084
$4.99
In Stock
Jump To:
Product Description ?
- Dimension: 3/8-24 X 1-3/8, Gr. 8
- Classification: Part
- Weight: 0.02 lbs.
- Shipping: Ships Worldwide
Frequently Purchased Together ?


Compatibility
This part will fit the following 3351 machines
Poulan
PP2035 Mower View Diagrams & Manuals
PP2035A Mower View Diagrams & Manuals
PP2055 Mower View Diagrams & Manuals
PP2055A Mower View Diagrams & Manuals
PP2240 Mower View Diagrams & Manuals
PP2240A Mower View Diagrams & Manuals
PP2255 Mower View Diagrams & Manuals
PP2255A Mower View Diagrams & Manuals
PP500HK Mower View Diagrams & Manuals
PP500HKA Mower View Diagrams & Manuals
PP722L Mower View Diagrams & Manuals
PP722SB Mower View Diagrams & Manuals
PP722SI Mower View Diagrams & Manuals
PP722SIA Mower View Diagrams & Manuals
PP722SJ Mower View Diagrams & Manuals
PP722SJA Mower View Diagrams & Manuals
PP722SK Mower View Diagrams & Manuals
PP722SKA Mower View Diagrams & Manuals
PP722SLA Mower View Diagrams & Manuals
PP730 Mower View Diagrams & Manuals
PP730A Mower View Diagrams & Manuals
PP730S Mower View Diagrams & Manuals
PP730SC Mower View Diagrams & Manuals
PP730SJA Mower View Diagrams & Manuals
PP735 Mower View Diagrams & Manuals
PP735A Mower View Diagrams & Manuals
PP735L Mower View Diagrams & Manuals
PP735LA Mower View Diagrams & Manuals
PP735SK Mower View Diagrams & Manuals
PP735SKA Mower View Diagrams & Manuals
PP740S Mower View Diagrams & Manuals
PP750HWA Mower View Diagrams & Manuals
PP750P Mower View Diagrams & Manuals
PP750PA Mower View Diagrams & Manuals
PP750PJ Mower View Diagrams & Manuals
PP750PJA Mower View Diagrams & Manuals
PP750PK Mower View Diagrams & Manuals
PP750PKA Mower View Diagrams & Manuals
PP750PS Mower View Diagrams & Manuals
PP751HI Mower View Diagrams & Manuals
PP751HIA Mower View Diagrams & Manuals
PP751HIJ Mower View Diagrams & Manuals
PP751HK Mower View Diagrams & Manuals
PP751HKA Mower View Diagrams & Manuals
PP751HL Mower View Diagrams & Manuals
PP751HLA Mower View Diagrams & Manuals
PP751HW Mower View Diagrams & Manuals
PP752HI Mower View Diagrams & Manuals
PP752HIA Mower View Diagrams & Manuals
PP752HLA Mower View Diagrams & Manuals
PP752HW Mower View Diagrams & Manuals
PP752PHJA Mower View Diagrams & Manuals
PP752PHK Mower View Diagrams & Manuals
PP752PHKA Mower View Diagrams & Manuals
PP8000M Mower View Diagrams & Manuals
PP8000MA Mower View Diagrams & Manuals
PP800MI Mower View Diagrams & Manuals
PP800MIA Mower View Diagrams & Manuals
PP800MK Mower View Diagrams & Manuals
PP800MKA Mower View Diagrams & Manuals
PP800ML Mower View Diagrams & Manuals
PP800MLA Mower View Diagrams & Manuals
PP800MX Mower View Diagrams & Manuals
P2260A Mower View Diagrams & Manuals
PP820SA Mower View Diagrams & Manuals
PP835 Mower View Diagrams & Manuals
PP835C Mower View Diagrams & Manuals
PP835SJA Mower View Diagrams & Manuals
PP835SK Mower View Diagrams & Manuals
PP835SKA Mower View Diagrams & Manuals
PP850P Mower View Diagrams & Manuals
PP850PA Mower View Diagrams & Manuals
PP850PE Mower View Diagrams & Manuals
PP850PEA Mower View Diagrams & Manuals
PP850PX Mower View Diagrams & Manuals
PPT730S Mower View Diagrams & Manuals
XE735AR Mower View Diagrams & Manuals
XE750HWAR Mower View Diagrams & Manuals
XE750PAR Mower View Diagrams & Manuals
XE835AR Mower View Diagrams & Manuals
XE850PAR Mower View Diagrams & Manuals
PR65Y21RHP Rotary Lawn Mower View Diagrams & Manuals
PR65Y21RKP (96142002401) Rotary Lawn Mower View Diagrams & Manuals
PR6Y22CHA Power Propelled Rotary Lawn Mower View Diagrams & Manuals
AG62522SH Rotary Lawn Mower View Diagrams & Manuals
PO450N20S (430499) Lawn Mower View Diagrams & Manuals
PO500N22S (425059) Lawn Mower View Diagrams & Manuals
PO500N22S (430446) Lawn Mower View Diagrams & Manuals
PPWT60022 (431477) High Wheeled Trimmer View Diagrams & Manuals
PPWT60022 (412266) High Wheeled Trimmer View Diagrams & Manuals
PPWT60022X (412267) High Wheeled Trimmer View Diagrams & Manuals
PPWT60022X (431476) High Wheeled Trimmer View Diagrams & Manuals
PPWT62522 High Wheeled Trimmer View Diagrams & Manuals
PR625N21RH3 Lawn Mower View Diagrams & Manuals
PR625N21RH3X Lawn Mower View Diagrams & Manuals
PR625Y22RHP (424636) Lawn Mower View Diagrams & Manuals
PR625Y22RHP (430543) Lawn Mower View Diagrams & Manuals
PR625Y22RKP (417357) Lawn Mower View Diagrams & Manuals
PR625Y22RP (427741) Lawn Mower View Diagrams & Manuals
PR625Y22RP (430510) Lawn Mower View Diagrams & Manuals
PR625Y22SHP Lawn Mower View Diagrams & Manuals
PP208E24 (428701) Snowblower View Diagrams & Manuals
PP208E24 (435562) Snowblower View Diagrams & Manuals
PP265E27 (428550) Snowblower View Diagrams & Manuals
PP291E30 (435555) Snowblower View Diagrams & Manuals
PP291EPS27 (435548) Snowblower View Diagrams & Manuals
PP414EPS30 Snowblower View Diagrams & Manuals
PP1150E27 (429264) Snowblower View Diagrams & Manuals
PP1150E27 (436842) Snowblower View Diagrams & Manuals
PP1150E30 Snowblower View Diagrams & Manuals
PR6R24 Snowblower View Diagrams & Manuals
PR550N22SH Lawn Mower View Diagrams & Manuals
PR827ES (428502) Snowblower View Diagrams & Manuals
PR827ES (436134) Snowblower View Diagrams & Manuals
PR1030ES Snowblower View Diagrams & Manuals
PR1330ES Snowblower View Diagrams & Manuals
PR62522SHC Rotary Lawn Mower View Diagrams & Manuals
S55HY22CHA Power Propelled Rotary Lawn Mower View Diagrams & Manuals
PR6Y22CHB Power Propelled Rotary Lawn Mower View Diagrams & Manuals
CH65N21RH Rotary Lawn Mower View Diagrams & Manuals
PR675Y22SHP (96122000400) Rotary Lawn Mower View Diagrams & Manuals
PP1850ES (96198005502)(2012-08) Snowblower View Diagrams & Manuals
PR14527ES (96198004702)(2012-06) Snowblower View Diagrams & Manuals
PR14527ES (96198004704)(2012-08) Snowblower View Diagrams & Manuals
PR18530ES (96198004902)(2012-07) Snowblower View Diagrams & Manuals
PR18530ES (96198004904)(2012-08) Snowblower View Diagrams & Manuals
PR624ES (96198004604)(2012-08) Snowblower View Diagrams & Manuals
PR627ES (96192003803)(2012-08) Snowblower View Diagrams & Manuals
PR627ES (96192003804)(2012-06) Snowblower View Diagrams & Manuals
PR8P27ES (96192004603)(2012-06) Snowblower View Diagrams & Manuals
PR8P27ES (96192004605)(2012-08) Snowblower View Diagrams & Manuals
PP208E24 Snowblower View Diagrams & Manuals
96194000200 Snowblower View Diagrams & Manuals
PP927ESC Snowblower View Diagrams & Manuals
961970004 Snowblower View Diagrams & Manuals
PO45N22S (96112002400) Rotary Lawn Mower View Diagrams & Manuals
PO45N22S (96112001300) Rotary Lawn Mower View Diagrams & Manuals
PP800EPS24 Snow Blowers View Diagrams & Manuals
PP5524ES Snow Thrower View Diagrams & Manuals
WET5R301B Rotary Lawn Mower View Diagrams & Manuals
PR55Y21CHC Lawn Mower View Diagrams & Manuals
961420106 (2012-03) Lawn Mower View Diagrams & Manuals
PR675Y21CHC Rotary Lawn Mower View Diagrams & Manuals
PR65Y21CB Rotary Lawn Mower View Diagrams & Manuals
PP1130ES (96192000700) Snowblower View Diagrams & Manuals
PPWT62522 (96172000401) Wheeled Weedtrimmer View Diagrams & Manuals
96136000100 Rotary Lawn Mower View Diagrams & Manuals
96134000800 Lawn Mower View Diagrams & Manuals
961360005 Lawn Mower View Diagrams & Manuals
PR55R21AD Lawn Mower View Diagrams & Manuals
PR55Y21RH Lawn Mower View Diagrams & Manuals
PR65Y22SHP Lawn Mower View Diagrams & Manuals
PR675N21RH (96132000701) Rotary Lawn Mower View Diagrams & Manuals
PP55Y22CHA Rotary Lawn Mower View Diagrams & Manuals
S65N22CHA Power Propelled Rotary Lawn Mower View Diagrams & Manuals
961940007 Snowblower View Diagrams & Manuals
PP8527ES Snow Thrower View Diagrams & Manuals
PP930ES (96192000600) Snow Thrower View Diagrams & Manuals
PP10530ES Snow Thrower View Diagrams & Manuals
961940008 Snow Thrower View Diagrams & Manuals
961940009 Snow Thrower View Diagrams & Manuals
PP927ESA Snow Thrower View Diagrams & Manuals
PR524 Snowblower View Diagrams & Manuals
PR10527ESA Snowblower View Diagrams & Manuals
PR624ES (96192003700) Snow Thrower View Diagrams & Manuals
PR624ES (96192002901) Snow Thrower View Diagrams & Manuals
PR8527ES (96192000300) Snowblower View Diagrams & Manuals
PR65Y21MA (2002) Lawn Mower View Diagrams & Manuals
PR600Y21RP Rotary Lawn Mower View Diagrams & Manuals
961940010 (2013-07) 96194001005 Snowthrower View Diagrams & Manuals
PR65Y21RSP Rotary Lawn Mower View Diagrams & Manuals
PR675Y21CHB Rotary Lawn Mower View Diagrams & Manuals
PR550Y22SHP Walk Behind Lawn Mower View Diagrams & Manuals
961140016 (96114001600) Rotary Lawn Mower View Diagrams & Manuals
PR55N21C ((96132000300)) Rotary Lawn Mower View Diagrams & Manuals
PR55N21C ((96132000301)) Rotary Lawn Mower View Diagrams & Manuals
PR500N21SH ((96112012401)) Rotary Lawn Mower View Diagrams & Manuals
PR550N22SH ((96112008300)) Rotary Lawn Mower View Diagrams & Manuals
PR600Y22RHP (96142004600) Rotary Lawn Mower View Diagrams & Manuals
PR675Y21RDP ((96142001000)) Rotary Lawn Mower View Diagrams & Manuals
PR675Y21RP ((96142000800)) Rotary Lawn Mower View Diagrams & Manuals
PR500N21SH (96112012402) Rotary Lawn Mower View Diagrams & Manuals
PR500N21SH (96112012403) Rotary Lawn Mower View Diagrams & Manuals
961420032 Self Propelled Rotary Lawn Mower View Diagrams & Manuals
PR550N22S (96112010901) Rotary Lawn Mower View Diagrams & Manuals
PR550N22S (96112012800) Rotary Lawn Mower View Diagrams & Manuals
PR500N22S (96112012103) Rotary Lawn Mower View Diagrams & Manuals
XT625Y22RHP (96142008300) Rotary Lawn Mower View Diagrams & Manuals
PR55N21C (96132000300) Rotary Lawn Mower View Diagrams & Manuals
PR55N21C (96132000301) Rotary Lawn Mower View Diagrams & Manuals
PP11530ES (96192001901) Snow Thrower View Diagrams & Manuals
PO4N22S (96112002300) Rotary Lawn Mower View Diagrams & Manuals
HD4QN20RE Rotary Lawn Mower View Diagrams & Manuals
961240002 (96124000200) Rotary Lawn Mower View Diagrams & Manuals
XE850PEAR Lawn Tractor View Diagrams & Manuals
961440001 (96144000100) Rotary Lawn Mower View Diagrams & Manuals
96122000301 (PR45Y22SP) Rotary Lawn Mower View Diagrams & Manuals
PR65N21RH Rotary Lawn Mower View Diagrams & Manuals
PR625Y22RKP (96142007700) Rotary Lawn Mower View Diagrams & Manuals
PR7Y21CHB Pro Walk-Behind Mower View Diagrams & Manuals
961360002 Rotary Lawn Mower View Diagrams & Manuals
XT625Y22RKP (96142008400) Rotary Lawn Mower View Diagrams & Manuals
PR65N22S (96112003000) Rotary Lawn Mower View Diagrams & Manuals
HD4QN20RF Rear Bagger Rotary Mower View Diagrams & Manuals
PR55R621CA (2000-01) Walk-Behind Mower View Diagrams & Manuals
96142010200 Rotary Lawn Mower View Diagrams & Manuals
PR600N21RH (96132002305) Rotary Lawn Mower View Diagrams & Manuals
PR65N21CHD Rotary Lawn Mower View Diagrams & Manuals
PR625Y22RKP (96142003600) Rotary Lawn Mower View Diagrams & Manuals
PR675Y22RHP (96142011201) Rotary Lawn Mower View Diagrams & Manuals
PR600Y21RHP (96142003501) Rotary Lawn Mower View Diagrams & Manuals
HD4X Walk-Behind Mower View Diagrams & Manuals
PR55R21AG Rotary Lawn Mower View Diagrams & Manuals
Weed Eater
96114000317 Rotary Lawn Mower View Diagrams & Manuals
WM55Y22SA Rotary Lawn Mower View Diagrams & Manuals
96114001500 Rotary Lawn Mower View Diagrams & Manuals
961140007 (2007) Walk Behind Lawn Mower View Diagrams & Manuals
961140007 (2008) Walk Behind Lawn Mower View Diagrams & Manuals
96114000800 Walk Behind Lawn Mower View Diagrams & Manuals
96114000300 Walk Behind Lawn Mower View Diagrams & Manuals
96114000400 (2006) Walk Behind Lawn Mower View Diagrams & Manuals
96114000400 (2007) Walk Behind Lawn Mower View Diagrams & Manuals
96114001000 Walk Behind Lawn Mower View Diagrams & Manuals
96114001404 Walk Behind Lawn Mower View Diagrams & Manuals
96134000106 Walk Behind Lawn Mower View Diagrams & Manuals
96134000301 Walk Behind Lawn Mower View Diagrams & Manuals
96134000600 Walk Behind Lawn Mower View Diagrams & Manuals
CHD4QE22SA Walk Behind Lawn Mower View Diagrams & Manuals
CHD4QE22SB Walk Behind Lawn Mower View Diagrams & Manuals
CHD4QE22SC Walk Behind Lawn Mower View Diagrams & Manuals
HD4QE22SD Walk Behind Lawn Mower View Diagrams & Manuals
WE4TN22SHA Walk Behind Lawn Mower View Diagrams & Manuals
WE45TN20RB Walk Behind Lawn Mower View Diagrams & Manuals
WE45TN20RE Walk Behind Lawn Mower View Diagrams & Manuals
WE45TN22SD Walk Behind Lawn Mower View Diagrams & Manuals
WE45TN22SE Walk Behind Lawn Mower View Diagrams & Manuals
WE300N20S Walk Behind Lawn Mower View Diagrams & Manuals
WE986RC Walk Behind Lawn Mower View Diagrams & Manuals
WT4000 Wheeled Weedtrimmer View Diagrams & Manuals
WT420 Wheeled Weedtrimmer View Diagrams & Manuals
PWT420A Wheeled Weedtrimmer View Diagrams & Manuals
WT6000 Wheeled Weedtrimmer View Diagrams & Manuals
96114000316 Rotory Lawn Mower View Diagrams & Manuals
WM5N22SHA Rotary Lawn Mower View Diagrams & Manuals
96114002300 Rotary Lawn Mower View Diagrams & Manuals
96114001502 Mulching Mower View Diagrams & Manuals
96114000201 Rotary Mower View Diagrams & Manuals
96112009001 Rotary Mower View Diagrams & Manuals
96116000100 Gas Rotary Lawn Mower View Diagrams & Manuals
96142009401 Rotary Lawn Mower View Diagrams & Manuals
96114001503 Rotary Lawn Mower View Diagrams & Manuals
WE977REA (1999) 22" Rear Bagger Lawn Mower View Diagrams & Manuals
WM45N22SA Rotary Lawn Mower View Diagrams & Manuals
96114000401 Rotary Mower View Diagrams & Manuals
96116000301 Rotary Lawn Mower View Diagrams & Manuals
96114001501 Rotary Lawn Mower View Diagrams & Manuals
96112011501 (2012-05) Rotary Lawn Mower View Diagrams & Manuals
96114000311 Rotary Lawn Mower View Diagrams & Manuals
961140004 (96114000402) Rotary Lawn Mower View Diagrams & Manuals
96114000405 Rotary Lawn Mower View Diagrams & Manuals
S65N22CHC Power Propelled Rotary Lawn Mower View Diagrams & Manuals
Husqvarna
50 DK (1997-01) Walk Mower View Diagrams & Manuals
50 DK (95440068A) (1997-02) Walk Mower View Diagrams & Manuals
51 (954065601A) (1994-07) Walk Mower View Diagrams & Manuals
51 (954065601B) (1995-03) Walk Mower View Diagrams & Manuals
51 (954076601A) (1995-08) Walk Mower View Diagrams & Manuals
51 (95414032B) (1997-12) Walk Mower View Diagrams & Manuals
51 (954065701A) (1994-07) Walk Mower View Diagrams & Manuals
51 (954140031B) (1997-12) Walk Mower View Diagrams & Manuals
51 D H51 DE (954071701) (1995-01) Walk Mower View Diagrams & Manuals
51 D H51DB (954052601) (1991-01) Walk Mower View Diagrams & Manuals
51 DH (954065901A) (1994-07) Walk Mower View Diagrams & Manuals
51 M H51MA (954056101) (1991-01) Walk Mower View Diagrams & Manuals
51 M H51MC (954056111) (1992-08) Walk Mower View Diagrams & Manuals
51 MD (954065801A) (1994-07) Walk Mower View Diagrams & Manuals
51 MD (954065801B) (1995-03) Walk Mower View Diagrams & Manuals
51 MD (954076801A) (1995-08) Walk Mower View Diagrams & Manuals
51 MD H51MDB (954071901) (1994-12) Walk Mower View Diagrams & Manuals
51 MDT (954140034A) (1997-07) Walk Mower View Diagrams & Manuals
510 (954140051A) (1998-02) Walk Mower View Diagrams & Manuals
510 MD (654140053A) (1999-03) Walk Mower View Diagrams & Manuals
510 MD (954140052A) (1998-02) Walk Mower View Diagrams & Manuals
510 MD (954140052B) (1999-04) Walk Mower View Diagrams & Manuals
510 MD (954140052D) (2000-01) Walk Mower View Diagrams & Manuals
510 MDT (954140054A) (1998-02) Walk Mower View Diagrams & Manuals
530 RS (954140072A) (1999-03) Walk Mower View Diagrams & Manuals
530 RS (954140072B) (1999-05) Walk Mower View Diagrams & Manuals
530 RS (954140072C) (1999-06) Walk Mower View Diagrams & Manuals
530 RS (954140072D) (1999-12) Walk Mower View Diagrams & Manuals
5521 CHA (954223234) (2003-06) Walk Mower View Diagrams & Manuals
5521 CHB (954223234) (2003-03) Walk Mower View Diagrams & Manuals
5521 CHV (961430001-07) (2007-09) Walk Mower View Diagrams & Manuals
5521 CHV (96143000100) (2004-12) Walk Mower View Diagrams & Manuals
5521 CHV (96143000101) (2005-01) Walk Mower View Diagrams & Manuals
5521 CHV (96143000102) (2005-04) Walk Mower View Diagrams & Manuals
5521 CHV (96143000103) (2006-02) Walk Mower View Diagrams & Manuals
5521 CHV (96143000104) (2006-08) Walk Mower View Diagrams & Manuals
5521 CHV (96143000105) (2006-12) Walk Mower View Diagrams & Manuals
5521 CHV (96143000106) (2006-12) Walk Mower View Diagrams & Manuals
5521 CHVA (954223883) (2004-07) Walk Mower View Diagrams & Manuals
5521 CHVB (954223883) (2004-07) Walk Mower View Diagrams & Manuals
5521 CM (96133000300) (2006-04) Walk Mower View Diagrams & Manuals
5521 CM (96133000301) (2006-08) Walk Mower View Diagrams & Manuals
5521 CM (96133000302) (2006-12) Walk Mower View Diagrams & Manuals
5521 CM (96133000303) (2007-04) Walk Mower View Diagrams & Manuals
5521 CM (96133000304) (2007-04) Walk Mower View Diagrams & Manuals
5521 CM (96133000305) (2008-01) Walk Mower View Diagrams & Manuals
5521 CM (96133000306) Walk Mower View Diagrams & Manuals
ST 9027 (HU9027STB) (954223074) (2003-08) Snowblower View Diagrams & Manuals
STE 8527 (HL8527STEA) (954223654) (2003-07) Snowblower View Diagrams & Manuals
5521 RSB (954223470) (2004-07) Lawn Mower View Diagrams & Manuals
5521 RSC (954223470) (2004-07) Lawn Mower View Diagrams & Manuals
5521 RSD (954223470) (2004-07) Lawn Mower View Diagrams & Manuals
5521 RSE (954223470) (2004-07) Lawn Mower View Diagrams & Manuals
5521 RSX (96143002400) (2007-01) Lawn Mower View Diagrams & Manuals
56 C (954065201A) (1994-07) Lawn Mower View Diagrams & Manuals
56 C (H56CA) (1994-01) Lawn Mower View Diagrams & Manuals
56 CS (954069001A) (1994-07) Lawn Mower View Diagrams & Manuals
56 DH (H56 DHG) (954072201) Lawn Mower View Diagrams & Manuals
56 DH (H56DHB) (954050701) (1990-10) Lawn Mower View Diagrams & Manuals
56 DH (H56DHD) (954050721) Lawn Mower View Diagrams & Manuals
56 DH (H56DHF) (954065901) (1994-01) Lawn Mower View Diagrams & Manuals
56 DHS (954069101)A (1994-01) Lawn Mower View Diagrams & Manuals
56 DHS (954069101)A (1995-04) Lawn Mower View Diagrams & Manuals
56 DHS (954069101)B (1995-08) Lawn Mower View Diagrams & Manuals
56 DHS (H56DHSB) (954072301) (1995-03) Lawn Mower View Diagrams & Manuals
56 H (954076201)A (1995-10) Lawn Mower View Diagrams & Manuals
56 H (954076208)A (1996-03) Lawn Mower View Diagrams & Manuals
56 H (954140041A) (1998-02) Lawn Mower View Diagrams & Manuals
56 HS (954077201)A (1995-10) Lawn Mower View Diagrams & Manuals
56 HS (954140039A) (1996-10) Lawn Mower View Diagrams & Manuals
56 HST (954140040A) (1997-07) Lawn Mower View Diagrams & Manuals
56 HT (954140038A) (1997-07) Lawn Mower View Diagrams & Manuals
56 SF (954066101)A (1994-01) Lawn Mower View Diagrams & Manuals
56 SF (954066101)B (1995-04) Lawn Mower View Diagrams & Manuals
56 SF (954077101A) (1995-10) Lawn Mower View Diagrams & Manuals
56 SF (954140035A) (1996-10) Lawn Mower View Diagrams & Manuals
56 SF (954140043A) (1998-02) Lawn Mower View Diagrams & Manuals
56 SF (H56SFC) (954050821) (1992-01) Lawn Mower View Diagrams & Manuals
56 SF (H56SFG) (954072501) (1995-03) Lawn Mower View Diagrams & Manuals
56 SF (H56SFH) (1996-02) Lawn Mower View Diagrams & Manuals
56 SFE (954065401)A (1994-01) Lawn Mower View Diagrams & Manuals
56 SFE (954065401)C (1995-04) Lawn Mower View Diagrams & Manuals
56 SFE (954065401B) (1995-01) Lawn Mower View Diagrams & Manuals
56 SFE (954076401)A (1995-09) Lawn Mower View Diagrams & Manuals
56 SFE (H56SFEF) (954072401) (1995-03) Lawn Mower View Diagrams & Manuals
56 SFEB (954050901) (1999-12) Lawn Mower View Diagrams & Manuals
560 H (954140055A) (1998-02) Lawn Mower View Diagrams & Manuals
560 H (954140055C) (1999-04) Lawn Mower View Diagrams & Manuals
560 H (954140055D) (1999-04) Lawn Mower View Diagrams & Manuals
560 H (954140055E) (1999-12) Lawn Mower View Diagrams & Manuals
560 HH (954140056A) (1998-02) Lawn Mower View Diagrams & Manuals
560 HS (954140058A) (1998-02) Lawn Mower View Diagrams & Manuals
560 HS (954140058B) (1998-07) Lawn Mower View Diagrams & Manuals
560 HS (954140058D) (1999-04) Lawn Mower View Diagrams & Manuals
560 HS (954140058E) (1999-12) Lawn Mower View Diagrams & Manuals
560 HSH (954140059A) (1998-02) Lawn Mower View Diagrams & Manuals
560 HST (954140060A) (1998-02) Lawn Mower View Diagrams & Manuals
560 HT (954140057A) (1998-02) Lawn Mower View Diagrams & Manuals
560 HT (954140057B) (1998-07) Lawn Mower View Diagrams & Manuals
65021 CHV (2007-07) Lawn Mower View Diagrams & Manuals
65021 CHV (96143001900) (2006-12) Lawn Mower View Diagrams & Manuals
65021 CHV (96143001901) (2006-12) Lawn Mower View Diagrams & Manuals
65021 CHV (96143001903) (2007-08) Lawn Mower View Diagrams & Manuals
65021 CHV (96143001904) (2008-01) Lawn Mower View Diagrams & Manuals
65021 ES (96143002000) (2006-12) Lawn Mower View Diagrams & Manuals
65021 ES (96143002001) (2007-07) Lawn Mower View Diagrams & Manuals
65022 ES (96143002300) (2007-05) Lawn Mower View Diagrams & Manuals
65022 ES (96143002301) (2007-08) Lawn Mower View Diagrams & Manuals
65022 ES (96143002302) (2008-04) Lawn Mower View Diagrams & Manuals
6521 RS (961450005-00) (2007-09) Lawn Mower View Diagrams & Manuals
6521 RS (96145000500) (2007-03) Lawn Mower View Diagrams & Manuals
6521 RSA (6522RRA) (2000-01) Lawn Mower View Diagrams & Manuals
6521 RSB (954222732) (2001-12) Lawn Mower View Diagrams & Manuals
6522 CHA (6522RFA) (2000-01) Lawn Mower View Diagrams & Manuals
6522 CHB (954222725) (2001-10) Lawn Mower View Diagrams & Manuals
6522 CHC (954222725) (2001-11) Lawn Mower View Diagrams & Manuals
6522 SH (96143000901) (2005-02) Lawn Mower View Diagrams & Manuals
6522 SH (96143000902) (2006-02) Lawn Mower View Diagrams & Manuals
6522 SH (96143000903) (2006-01) Lawn Mower View Diagrams & Manuals
6522 SH (96143000904) (2006-08) Lawn Mower View Diagrams & Manuals
6522 SHA (6522SFA) (2000-01) Lawn Mower View Diagrams & Manuals
6522 SHB (954222718) (2001-10) Lawn Mower View Diagrams & Manuals
6522 SHC (954222718) (2001-11) Lawn Mower View Diagrams & Manuals
6522 SL (96143000801) (2005-09) Lawn Mower View Diagrams & Manuals
6522 SL (96143000802) (2005-02) Lawn Mower View Diagrams & Manuals
6522 SL (96143000802) (2006-02) Lawn Mower View Diagrams & Manuals
6522 SL (96143000803) (2006-01) Lawn Mower View Diagrams & Manuals
67521 ES (96143003100) (2008-01) Lawn Mower View Diagrams & Manuals
67522 ES (96143001200) (2006-03) Lawn Mower View Diagrams & Manuals
70021 CH1 (96143000601) (2005-01) Lawn Mower View Diagrams & Manuals
7021 CH1 (96143000600) (2004-10) Lawn Mower View Diagrams & Manuals
7021 CH1A (954224095) (2004-06) Lawn Mower View Diagrams & Manuals
7021 CH1B (954224095) (2004-06) Lawn Mower View Diagrams & Manuals
7021 CM (96133000100) (2004-10) Lawn Mower View Diagrams & Manuals
7021 CMA (954224088) (2003-11) Lawn Mower View Diagrams & Manuals
7021 CMB (954224088) (2004-01) Lawn Mower View Diagrams & Manuals
7021 CMC (954224088) (2004-09) Lawn Mower View Diagrams & Manuals
7021 CP (96133000200) (2005-01) Lawn Mower View Diagrams & Manuals
7021 RES (96143001800) (2006-01) Lawn Mower View Diagrams & Manuals
7021 RES (96143001801) (2006-04) Lawn Mower View Diagrams & Manuals
7021 RS (96143001700) (2006-01) Lawn Mower View Diagrams & Manuals
7021 RS (96143003000) (2008-01) Lawn Mower View Diagrams & Manuals
7021 RS (96143003001) (2008-01) Lawn Mower View Diagrams & Manuals
87521 RES (2007-02) Lawn Mower View Diagrams & Manuals
917.375350 (2005-01) Lawn Mower View Diagrams & Manuals
917.375361 (2005-01) Lawn Mower View Diagrams & Manuals
917.375810 (2006-05) Lawn Mower View Diagrams & Manuals
917.375820 (2006-01) Lawn Mower View Diagrams & Manuals
917.375830 (2006-01) Lawn Mower View Diagrams & Manuals
H 51 (954140045A) (1998-02) Lawn Mower View Diagrams & Manuals
Jet 50 (1991-04) Lawn Mower View Diagrams & Manuals
Jet 50 R (1991-04) Lawn Mower View Diagrams & Manuals
1027 STE (HL1027STEA) (954633545) (2003-07) Snowblower View Diagrams & Manuals
10527 SB (96193002700) (2008-08) Snowblower View Diagrams & Manuals
10527 SB LS (96193002800) (2008-09) Snowblower View Diagrams & Manuals
10527 SBE (96193000900) (2006-05) Snowblower View Diagrams & Manuals
10527 SBE (96193000901) (2006-05) Snowblower View Diagrams & Manuals
10527 SBE (961930016-04) (2007-11) Snowblower View Diagrams & Manuals
10527 SBE (961930016-05) (2007-12) Snowblower View Diagrams & Manuals
10527 SBE (96193001600) (2006-08) Snowblower View Diagrams & Manuals
10527 SBE (96193001602) (2006-08) Snowblower View Diagrams & Manuals
10527 SBE (96193001603) (2007-08) Snowblower View Diagrams & Manuals
10527 SBE (96193001606) (2008-01) Snowblower View Diagrams & Manuals
10527 STE Snowblower View Diagrams & Manuals
10527 STE (HL10527STEA) (954633545) (2003-07) Snowblower View Diagrams & Manuals
10530 SBE (96193000400) (2006-05) Snowblower View Diagrams & Manuals
10530 SBE (96193000401) (2006-05) Snowblower View Diagrams & Manuals
10530 SBE (96193002000) (2006-08) Snowblower View Diagrams & Manuals
10530 SBE (96195000100) (2006-06) Snowblower View Diagrams & Manuals
10530 SBE (96195000101) (2006-06) Snowblower View Diagrams & Manuals
10530 SBE (96195000102) (2006-07) Snowblower View Diagrams & Manuals
10530 SBE (96195000103) (2006-08) Snowblower View Diagrams & Manuals
10530 SBEB (96193001300) (2006-06) Snowblower View Diagrams & Manuals
1130 SB LS (96193002900) (2008-08) Snowblower View Diagrams & Manuals
1130 SB XLS (96193003000) (2008-09) Snowblower View Diagrams & Manuals
1130 SBE (96193001700) (2006-08) Snowblower View Diagrams & Manuals
1130 SBE (96193001701) (2008-01) Snowblower View Diagrams & Manuals
1130 SBEOV (96193002100) (2006-09) Snowblower View Diagrams & Manuals
1130 SBEXP (96193000600) (2006-05) Snowblower View Diagrams & Manuals
1130 SBEXP (96193001800) (2006-10) Snowblower View Diagrams & Manuals
1130 SBEXP (96193001801) (2008-01) Snowblower View Diagrams & Manuals
1130 SBEXP (96195000200) (2006-06) Snowblower View Diagrams & Manuals
1130 SBEXP (96195000201) (2006-10) Snowblower View Diagrams & Manuals
1130 SBEXP (96195000202) (2006-10) Snowblower View Diagrams & Manuals
1330 SBE XP (96193001901) (2007-11) Snowblower View Diagrams & Manuals
1330 SBEXP (96193001900) (2006-08) Snowblower View Diagrams & Manuals
5224 STE (96193001400) (2006-08) Snowblower View Diagrams & Manuals
524 S (96193000100) (2006-06) Snowblower View Diagrams & Manuals
524 STE (2004-08) Snowblower View Diagrams & Manuals
5521 CHV (96143000107) (2008-01) Snowblower View Diagrams & Manuals
5524 SB (96193002500) (2008-08) Snowblower View Diagrams & Manuals
5524 SE (96193000200) (2005-07) Snowblower View Diagrams & Manuals
5524 SEB (96193001000) (2005-12) Snowblower View Diagrams & Manuals
5524 ST (HU5524STA) (954223067) (2002-09) Snowblower View Diagrams & Manuals
5524 STE (96193001400) (2006-08) Snowblower View Diagrams & Manuals
5524 STE (96193001401) (2008-01) Snowblower View Diagrams & Manuals
8024 ST (HU8024STA) (954223104) (2002-09) Snowblower View Diagrams & Manuals
8524 STE (2004-08) Snowblower View Diagrams & Manuals
8527 SBE (927SBE) (96193000300) (2006-05) Snowblower View Diagrams & Manuals
8527 SBEB (96193001100) (2005-12) Snowblower View Diagrams & Manuals
9027 ST (HU9027STA) (954223074) (2002-09) Snowblower View Diagrams & Manuals
9027 STE XP (2004-07) Snowblower View Diagrams & Manuals
924 SB (96193002600) (2008-08) Snowblower View Diagrams & Manuals
924 SB XLS (96193003200) (2008-08) Snowblower View Diagrams & Manuals
924 SBE (96193001500) (2006-08) Snowblower View Diagrams & Manuals
924 SBE (96193002200) (2008-01) Snowblower View Diagrams & Manuals
924 SBE (96193992201) (2007-09) Snowblower View Diagrams & Manuals
927 SBEXP (96193000500) (2006-05) Snowblower View Diagrams & Manuals
9527 SBEB (96193001200) (2005-12) Snowblower View Diagrams & Manuals
HL 1027 STE B (954633545) (2004-09) Snowblower View Diagrams & Manuals
HL 524 STE A (954224200) (2004-08) Snowblower View Diagrams & Manuals
HL 8524 STE A (954224194) (2004-08) Snowblower View Diagrams & Manuals
HU 1130 ST C (954223081) (2004-07) Snowblower View Diagrams & Manuals
HU 9027 ST C (954223077) (2004-07) Snowblower View Diagrams & Manuals
ST 1130 (HU1130STB) (954223081) (2003-08) Snowblower View Diagrams & Manuals
1827EXLT (96193007700) (2011-08) Snowblower / Throwers View Diagrams & Manuals
1830EXL (96193007600) (2011-06) Snowblower / Throwers View Diagrams & Manuals
1830EXLT (96193007800) (2011-07) Snowblower / Throwers View Diagrams & Manuals
1830HV (96193005400) (2010-05) Snowblower / Throwers View Diagrams & Manuals
1830HV (96193005401) (2010-08) Snowblower / Throwers View Diagrams & Manuals
1830HV (96193007300) (2011-06) Snowblower / Throwers View Diagrams & Manuals
1830HV (96193007301) (2011-07) Snowblower / Throwers View Diagrams & Manuals
1830HV (96193008100) (2011-07) Snowblower / Throwers View Diagrams & Manuals
11524E (96193006600) (2010-08) Snowblower / Throwers View Diagrams & Manuals
11524E (96193007400) (2011-07) Snowblower / Throwers View Diagrams & Manuals
11524E (96193007401) (2011-07) Snowblower / Throwers View Diagrams & Manuals
11524E (96193008200) (2011-08) Snowblower / Throwers View Diagrams & Manuals
12527HV (96193005300) (2010-06) Snowblower / Throwers View Diagrams & Manuals
12527HV (96193005301) (2010-07) Snowblower / Throwers View Diagrams & Manuals
12527HV (96193007100) (2011-06) Snowblower / Throwers View Diagrams & Manuals
12527HV (96193007101) (2011-07) Snowblower / Throwers View Diagrams & Manuals
12527HV (96193008000) (2011-07) Snowblower / Throwers View Diagrams & Manuals
14527E (96193006700) (2010-05) Snowblower / Throwers View Diagrams & Manuals
14527E (96193007501) (2011-07) Snowblower / Throwers View Diagrams & Manuals
14527E (96193008300) (2011-08) Snowblower / Throwers View Diagrams & Manuals
145270 (96193007500) (2011-06) Snowblower / Throwers View Diagrams & Manuals
PO475N20S (2006-12) Lawn Mower View Diagrams & Manuals
PO475N20S (2007-05) Lawn Mower View Diagrams & Manuals
PO475N20SX (2007-01) Lawn Mower View Diagrams & Manuals
7021R (96143006300) 21-Inch Self-Propelled Lawn Mower View Diagrams & Manuals
HU775H (96145000700)(2011-12) Walk Behind Mower View Diagrams & Manuals
924HV (96193005200)(2010-04) Snowblower View Diagrams & Manuals
924HV (96193007000)(2011-06) Snowblower View Diagrams & Manuals
924HV (96193007001)(2012-05) Snowblower View Diagrams & Manuals
924HV (96193007002)(2012-06) Snowblower View Diagrams & Manuals
924HV (96193007003)(2012-07) Snowblower View Diagrams & Manuals
924HV (96193007004)(2012-08) Snowblower View Diagrams & Manuals
924HV (96193007900)(2011-07) Snowblower View Diagrams & Manuals
1650EXL (96193008700)(2012-07) Snowblower View Diagrams & Manuals
1650EXL (96193008701)(2012-08) Snowblower View Diagrams & Manuals
1650EXL (96193008702)(2012-08) Snowblower View Diagrams & Manuals
1650EXLT (96193008901)(2012-10) Snowblower View Diagrams & Manuals
1830EXLT (96193007801)(2012-07) Snowblower View Diagrams & Manuals
1830EXLT (96193007802)(2012-06) Snowblower View Diagrams & Manuals
1830HV (96193007303)(2012-06) Snowblower View Diagrams & Manuals
1830HV (96193007305)(2012-08) Snowblower View Diagrams & Manuals
5524ST (96191001604)(2008-08) Snowblower View Diagrams & Manuals
5524ST (96191001605)(2009-08) Snowblower View Diagrams & Manuals
5524ST (96191001606)(2010-04) Snowblower View Diagrams & Manuals
5524ST (96191001607)(2011-05) Snowblower View Diagrams & Manuals
5524ST (96191001608)(2012-05) Snowblower View Diagrams & Manuals
5524ST (96191001609)(2012-05) Snowblower View Diagrams & Manuals
5524ST (EU5524STA)(954170234)(2004-09) Snowblower View Diagrams & Manuals
11524E (96193007403)(2012-06) Snowblower View Diagrams & Manuals
11524E (96193007404)(2012-08) Snowblower View Diagrams & Manuals
12527HV (96193007102)(2012-07) Snowblower View Diagrams & Manuals
12527HV (96193007103)(2012-06) Snowblower View Diagrams & Manuals
12527HV (96193007104)(2012-06) Snowblower View Diagrams & Manuals
12527HV (96193007105)(2012-08) Snowblower View Diagrams & Manuals
12530HV (96193007200)(2011-07) Snowblower View Diagrams & Manuals
12530HV (96193007201)(2012-06) Snowblower View Diagrams & Manuals
12530HV (96193007203)(2012-08) Snowblower View Diagrams & Manuals
14527E (96193007503)(2012-06) Snowblower View Diagrams & Manuals
14527E (96193007504)(2012-08) Snowblower View Diagrams & Manuals
16527EXLT (96193008500)(2011-08) Snowblower View Diagrams & Manuals
ST 268EP (96191003802)(2011-05) Snowblower View Diagrams & Manuals
ST 268EP (96191003803)(2011-07) Snowblower View Diagrams & Manuals
ST 268EP (96191003804)(2012-07) Snowblower View Diagrams & Manuals
ST 268EP (96191003805)(2012-06) Snowblower View Diagrams & Manuals
ST 276EP (96191003902)(2011-05) Snowblower View Diagrams & Manuals
ST 276EP (96191003903)(2011-07) Snowblower View Diagrams & Manuals
ST 276EP (96191003904)(2012-06) Snowblower View Diagrams & Manuals
ST 276EP (96191003905)(2012-05) Snowblower View Diagrams & Manuals
ST230E (96195001600)(2012-06) Snowblower View Diagrams & Manuals
ST230E (96195001601)(2012-08) Snowblower View Diagrams & Manuals
ST230E (96195001602)(2012-08) Snowblower View Diagrams & Manuals
HU775BBC Lawn Mower View Diagrams & Manuals
HU700F (2011-11)(96145000600) Walk Behind Mower View Diagrams & Manuals
HU700F (2012-11)(96145000900) Walk Behind Mower View Diagrams & Manuals
HU700F (2012-01)(96145000601) Walk Behind Mower View Diagrams & Manuals
HU625HWT (2011-10)(96173000202) Trimmer View Diagrams & Manuals
HU625HWT (2012-01)(96173000203) Trimmer View Diagrams & Manuals
HU625HWT (2011-11)(96173000300) Trimmer View Diagrams & Manuals
HU625HWT (2012-01)(96173000301) Trimmer View Diagrams & Manuals
HU625HWT (2012-10)(96173000302) Trimmer View Diagrams & Manuals
HU625HWT (2013-03)(96173000400) Trimmer View Diagrams & Manuals
62522 FE (2009-01)(96142006700) Lawn Mower:Consumer Walk-Behind View Diagrams & Manuals
62522 FE (2009-03)(96142006701) Lawn Mower:Consumer Walk-Behind View Diagrams & Manuals
62522 FE (2009-01)(96142006800) Lawn Mower:Consumer Walk-Behind View Diagrams & Manuals
62522 FE (2009-01)(96143004400) Lawn Mower:Consumer Walk-Behind View Diagrams & Manuals
62522 FE (2008-11)(96143004500) Lawn Mower:Consumer Walk-Behind View Diagrams & Manuals
6021P (2013-01)(384519) Lawn Mowers: Walk Behind View Diagrams & Manuals
6021P (2010-11)(917384512) Lawn Mowers: Walk Behind View Diagrams & Manuals
6021P (2011-02)(917384521) Lawn Mowers: Walk Behind View Diagrams & Manuals
6021P (2012-03)(917384518) Lawn Mowers: Walk Behind View Diagrams & Manuals
HU800AWD (2013-02)(96145001100) Lawn Mower View Diagrams & Manuals
XT721F (961430059) (2009-12) Lawn Mower View Diagrams & Manuals
XT721F (96143005901) (2010-02) Lawn Mower View Diagrams & Manuals
XT721F (96143006200) (2009-12) Lawn Mower View Diagrams & Manuals
HU625HWT (2013-10)(96173000500) Wheeled Weed Trimmer View Diagrams & Manuals
15530SB-LS (96193003803) Snowblower View Diagrams & Manuals
1130SBEXP (96193001803) Snow Blower View Diagrams & Manuals
HU725F Rotary Lawn Mower View Diagrams & Manuals
96194000801 (2010-03) 96194000801 (2010-03) View Diagrams & Manuals
1830SB (2010-04) 1830SB, 96193005700 (2010-04) View Diagrams & Manuals
96194000901 (2009-08) 96194000901 (2009-08) View Diagrams & Manuals
96194000901 (2010-06) 96194000901 (2010-06) View Diagrams & Manuals
PO10527ESA (2004) PO10527ESA (2004) View Diagrams & Manuals
PO8527ESA (2004) PO8527ESA (2004) View Diagrams & Manuals
PP208E24 (2009-07) PP208E24, 96198002600 (2009-07) View Diagrams & Manuals
P524ESA (2002) P524ESA (2002) View Diagrams & Manuals
P8527ESA (2002) P8527ESA (2002) View Diagrams & Manuals
P10530ESA (2002) P10530ESA (2002) View Diagrams & Manuals
PP208EPS24 (2009-08) PP208EPS24, 96198002701 (2009-08) View Diagrams & Manuals
PP208E24 (2010-04) PP208E24, 96198002603 (2010-04) View Diagrams & Manuals
PP291E27 (2010-05) PP291E27, 96198003600 (2010-05) View Diagrams & Manuals
PP265E27 (2009-08) PP265E27, 96198002800 (2009-08) View Diagrams & Manuals
PP208EPS24 (2010-07) PP208EPS24, 96198002701 (2010-07) View Diagrams & Manuals
PP291E30 (2010-03) PP291E30, 96198003001 (2010-03) View Diagrams & Manuals
PP291E27 (2010-07) PP291E27, 96198003601 (2010-07) View Diagrams & Manuals
PP927ESB (2003) PP927ESB (2003) View Diagrams & Manuals
PP524B (2004) PP524B (2004) View Diagrams & Manuals
PP524A (2003) PP524A (2003) View Diagrams & Manuals
PP414EPS30 (2010-04) PP414EPS30, 96198003101 (2010-04) View Diagrams & Manuals
PP291EPS27 (2010-04) PP291EPS27, 96198002901 (2010-04) View Diagrams & Manuals
PP1150E27 (2009-07) PP1150E27, 96198003301 (2009-07) View Diagrams & Manuals
PP1130ESC (2004) PP1130ESC (2004) View Diagrams & Manuals
PP1130ESB (2003) PP1130ESB (2003) View Diagrams & Manuals
PP1130ESA (2002) PP1130ESA (2002) View Diagrams & Manuals
PP5524ESA (2002) PP5524ESA (2002) View Diagrams & Manuals
PP1330ES (2009-08) PP1330ES, 96192003200 (2009-08) View Diagrams & Manuals
PP1150E27 (2010-06) PP1150E27, 96198003302 (2010-06) View Diagrams & Manuals
PP8527ESB (2003) PP8527ESB (2003) View Diagrams & Manuals
PP5524ESC (2004) PP5524ESC (2004) View Diagrams & Manuals
PP5524ESB (2003) PP5524ESB (2003) View Diagrams & Manuals
PR827ES (2009-07) PR827ES, 96192003001 (2009-07) View Diagrams & Manuals
PR624ES (2010-04) PR624ES, 96192003700 (2010-04) View Diagrams & Manuals
PR624 (2010-04) PR624, 96192004200 (2010-04) View Diagrams & Manuals
PR524ESA (2004) PR524ESA (2004) View Diagrams & Manuals
PR6R24 (2009-09) PR6R24, 96192002802 (2009-09) View Diagrams & Manuals
PP10527ESA (2003) PP10527ESA (2003) View Diagrams & Manuals
PR8527ESA (2003) PR8527ESA (2003) View Diagrams & Manuals
PR8527ES (2008-10) PR8527ES, 96192001706 (2008-10) View Diagrams & Manuals
PR1030ES (2009-06) PR1030ES, 96192003100 (2009-06) View Diagrams & Manuals
PR827ES (2010-06) PR827ES, 96192004300 (2010-06) View Diagrams & Manuals
St (2012-08) St 2111E - 96191004106 (2012-08) View Diagrams & Manuals
PSB270 (2010-06) PSB270 - 96191004400 (2010-06) View Diagrams & Manuals
PSB240 (2010-06) PSB240 - 96191003502 (2010-06) View Diagrams & Manuals
PR10527ESA (2004) PR10527ESA (2004) View Diagrams & Manuals
PR8527ESB (2004) PR8527ESB (2004) View Diagrams & Manuals
XT824ES (2009-10) XT824ES, 96192003302 (2009-10) View Diagrams & Manuals
XT624ES (2010-07) XT624ES, 96192004400 (2010-07) View Diagrams & Manuals
ST2106 (2012-06) ST2106 - 96191002008 (2012-06) View Diagrams & Manuals
1206-74 (1997) 1206-74 (1997) View Diagrams & Manuals
1220-14 (1999 And Before) 1220-14 (1999 And Before) View Diagrams & Manuals
1226-14 (1999 And Before) 1226-14 (1999 And Before) View Diagrams & Manuals
1227-14 (1999 And Before) 1227-14 (1999 And Before) View Diagrams & Manuals
1229-14 (1999 And Before) 1229-14 (1999 And Before) View Diagrams & Manuals
124F (1999 And Before) 124F (1999 And Before) View Diagrams & Manuals
1A (1999 And Before) 1A (1999 And Before) View Diagrams & Manuals
1A101A (1999 And Before) 1A101A (1999 And Before) View Diagrams & Manuals
1A201A (1999 And Before) 1A201A (1999 And Before) View Diagrams & Manuals
1A201B (1999 And Before) 1A201B (1999 And Before) View Diagrams & Manuals
1B (1999 And Before) 1B (1999 And Before) View Diagrams & Manuals
1B101A (1999 And Before) 1B101A (1999 And Before) View Diagrams & Manuals
1B101B (1999 And Before) 1B101B (1999 And Before) View Diagrams & Manuals
1B101C (1995) 1B101C (1995) View Diagrams & Manuals
1B101D (1995) 1B101D (1995) View Diagrams & Manuals
1B101E (1996) 1B101E (1996) View Diagrams & Manuals
1B201A (1996) 1B201A (1996) View Diagrams & Manuals
1C209A (1999 And Before) 1C209A (1999 And Before) View Diagrams & Manuals
1CA (2000) 1CA (2000) View Diagrams & Manuals
1M309A (1996) 1M309A (1996) View Diagrams & Manuals
1M309B (1996) 1M309B (1996) View Diagrams & Manuals
1N101A (1999 And Before) 1N101A (1999 And Before) View Diagrams & Manuals
1N101B (1995) 1N101B (1995) View Diagrams & Manuals
1N101D (1996) 1N101D (1996) View Diagrams & Manuals
1N101E (1999 And Before) 1N101E (1999 And Before) View Diagrams & Manuals
1P209A (1999 And Before) 1P209A (1999 And Before) View Diagrams & Manuals
1P209B (1999 And Before) 1P209B (1999 And Before) View Diagrams & Manuals
1P309B (1999 And Before) 1P309B (1999 And Before) View Diagrams & Manuals
1P309C (1995) 1P309C (1995) View Diagrams & Manuals
2032A59 (1999 And Before) 2032A59 (1999 And Before) View Diagrams & Manuals
2032A89 (1998) 2032A89 (1998) View Diagrams & Manuals
2033A59 (1999 And Before) 2033A59 (1999 And Before) View Diagrams & Manuals
2033A89 (1998) 2033A89 (1998) View Diagrams & Manuals
2034A59 (1999 And Before) 2034A59 (1999 And Before) View Diagrams & Manuals
2035A99 (1999) 2035A99 (1999) View Diagrams & Manuals
219611X83E (2006) 219611X83E/96147000201 (2006) View Diagrams & Manuals
2226-74 (1997) 2226-74 (1997) View Diagrams & Manuals
2233A59 (1999 And Before) 2233A59 (1999 And Before) View Diagrams & Manuals
224110X92E0 (2005) 224110X92E0 (2005) View Diagrams & Manuals
224110X92E2 (2005) 224110X92E2 (2005) View Diagrams & Manuals
224111X83E (2006) 224111X83E/96117000200 (2006) View Diagrams & Manuals
2243A89 (1998) 2243A89 (1998) View Diagrams & Manuals
2243A99 (1999) 2243A99 (1999) View Diagrams & Manuals
2243B99 (1999) 2243B99 (1999) View Diagrams & Manuals
225114X92E0 (2005) 225114X92E0 (2005) View Diagrams & Manuals
225114X92E2 (2005) 225114X92E2 (2005) View Diagrams & Manuals
2A (1999 And Before) 2A (1999 And Before) View Diagrams & Manuals
2A151A (1999 And Before) 2A151A (1999 And Before) View Diagrams & Manuals
2A271A (1999 And Before) 2A271A (1999 And Before) View Diagrams & Manuals
2A271B (1999 And Before) 2A271B (1999 And Before) View Diagrams & Manuals
2A271C (1999 And Before) 2A271C (1999 And Before) View Diagrams & Manuals
2A271D (1999 And Before) 2A271D (1999 And Before) View Diagrams & Manuals
2A271E (1995) 2A271E (1995) View Diagrams & Manuals
2A271F (1996) 2A271F (1996) View Diagrams & Manuals
2B (1999 And Before) 2B (1999 And Before) View Diagrams & Manuals
2B151A (1999 And Before) 2B151A (1999 And Before) View Diagrams & Manuals
2B151B (1999 And Before) 2B151B (1999 And Before) View Diagrams & Manuals
2B151C (1995) 2B151C (1995) View Diagrams & Manuals
2C372A (1999 And Before) 2C372A (1999 And Before) View Diagrams & Manuals
2C672A (1999 And Before) 2C672A (1999 And Before) View Diagrams & Manuals
2CA (2000) 2CA (2000) View Diagrams & Manuals
2D772A (1999 And Before) 2D772A (1999 And Before) View Diagrams & Manuals
2D772B (1999 And Before) 2D772B (1999 And Before) View Diagrams & Manuals
2D779A (1999 And Before) 2D779A (1999 And Before) View Diagrams & Manuals
2E372A (1999 And Before) 2E372A (1999 And Before) View Diagrams & Manuals
2N151A (1999 And Before) 2N151A (1999 And Before) View Diagrams & Manuals
2N151B (1995) 2N151B (1995) View Diagrams & Manuals
2N151C (1995) 2N151C (1995) View Diagrams & Manuals
2N151D (1996) 2N151D (1996) View Diagrams & Manuals
2P372A (1999 And Before) 2P372A (1999 And Before) View Diagrams & Manuals
2P372B (1995) 2P372B (1995) View Diagrams & Manuals
2P372C (1995) 2P372C (1995) View Diagrams & Manuals
2P372D (1999 And Before) 2P372D (1999 And Before) View Diagrams & Manuals
2P379A (1999 And Before) 2P379A (1999 And Before) View Diagrams & Manuals
2P379B (1999 And Before) 2P379B (1999 And Before) View Diagrams & Manuals
2P659A (1999 And Before) 2P659A (1999 And Before) View Diagrams & Manuals
2P672A (1999 And Before) 2P672A (1999 And Before) View Diagrams & Manuals
3232A59 (1999 And Before) 3232A59 (1999 And Before) View Diagrams & Manuals
3242A89 (1998) 3242A89 (1998) View Diagrams & Manuals
3242A99 (1999) 3242A99 (1999) View Diagrams & Manuals
3242B89 (1998) 3242B89 (1998) View Diagrams & Manuals
4H473A (1999 And Before) 4H473A (1999 And Before) View Diagrams & Manuals
4H473B (1999 And Before) 4H473B (1999 And Before) View Diagrams & Manuals
4H473C (1999 And Before) 4H473C (1999 And Before) View Diagrams & Manuals
4H482A (1999 And Before) 4H482A (1999 And Before) View Diagrams & Manuals
4H494A (1999 And Before) 4H494A (1999 And Before) View Diagrams & Manuals
4M372A (1995) 4M372A (1995) View Diagrams & Manuals
4M372B (1995) 4M372B (1995) View Diagrams & Manuals
4M472A (1995) 4M472A (1995) View Diagrams & Manuals
4M472C (1996) 4M472C (1996) View Diagrams & Manuals
4P472A (1999 And Before) 4P472A (1999 And Before) View Diagrams & Manuals
4V582A (1999 And Before) 4V582A (1999 And Before) View Diagrams & Manuals
4V582B (1999 And Before) 4V582B (1999 And Before) View Diagrams & Manuals
5132A59 (1999 And Before) 5132A59 (1999 And Before) View Diagrams & Manuals
5133A89 (1998) 5133A89 (1998) View Diagrams & Manuals
5133A99 (1999) 5133A99 (1999) View Diagrams & Manuals
5135A89 (1998) 5135A89 (1998) View Diagrams & Manuals
5135A99 (1999) 5135A99 (1999) View Diagrams & Manuals
5155A59 (1995) 5155A59 (1995) View Diagrams & Manuals
5157A59 (1999 And Before) 5157A59 (1999 And Before) View Diagrams & Manuals
5166A89 (1998) 5166A89 (1998) View Diagrams & Manuals
5166A99 (1999) 5166A99 (1999) View Diagrams & Manuals
5255A59 (1999 And Before) 5255A59 (1999 And Before) View Diagrams & Manuals
5266A89 (1998) 5266A89 (1998) View Diagrams & Manuals
5266A99 (1999) 5266A99 (1999) View Diagrams & Manuals
5268A99 (1999) 5268A99 (1999) View Diagrams & Manuals
5269A99 (1999) 5269A99 (1999) View Diagrams & Manuals
3256A59 (1999 And Before) 3256A59 (1999 And Before) View Diagrams & Manuals
3266A89 (1998) 3266A89 (1998) View Diagrams & Manuals
37611 (2006) 37611/376110 (2006) View Diagrams & Manuals
38508 (2006) 38508/385080 (2006) View Diagrams & Manuals
38509 (2006) 38509/385090 (2006) View Diagrams & Manuals
386090 (2005) 386090 (2005) View Diagrams & Manuals
386191 (2005) 386191 (2005) View Diagrams & Manuals
38807 (2006) 38807/388070 (2006) View Diagrams & Manuals
38808 (2006) 38808/388080 (2006) View Diagrams & Manuals
3A (1999 And Before) 3A (1999 And Before) View Diagrams & Manuals
3A101A (1999 And Before) 3A101A (1999 And Before) View Diagrams & Manuals
3A201A (1999 And Before) 3A201A (1999 And Before) View Diagrams & Manuals
3A201B (1999 And Before) 3A201B (1999 And Before) View Diagrams & Manuals
3B (1999 And Before) 3B (1999 And Before) View Diagrams & Manuals
3C202A (1999 And Before) 3C202A (1999 And Before) View Diagrams & Manuals
3C209A (1999 And Before) 3C209A (1999 And Before) View Diagrams & Manuals
3C302A (1999 And Before) 3C302A (1999 And Before) View Diagrams & Manuals
3C402A (1999 And Before) 3C402A (1999 And Before) View Diagrams & Manuals
3C402B (1999 And Before) 3C402B (1999 And Before) View Diagrams & Manuals
3CA (2000) 3CA (2000) View Diagrams & Manuals
3D209A (1999 And Before) 3D209A (1999 And Before) View Diagrams & Manuals
3H302A (1999 And Before) 3H302A (1999 And Before) View Diagrams & Manuals
3H302B (1999 And Before) 3H302B (1999 And Before) View Diagrams & Manuals
3H302C (1999 And Before) 3H302C (1999 And Before) View Diagrams & Manuals
3H302D (1995) 3H302D (1995) View Diagrams & Manuals
3H302E (1997) 3H302E (1997) View Diagrams & Manuals
3H402A (1999 And Before) 3H402A (1999 And Before) View Diagrams & Manuals
3H402B (1999 And Before) 3H402B (1999 And Before) View Diagrams & Manuals
3H402C (1999 And Before) 3H402C (1999 And Before) View Diagrams & Manuals
3M302A (1996) 3M302A (1996) View Diagrams & Manuals
3M402B (1995) 3M402B (1995) View Diagrams & Manuals
3M402C (1999 And Before) 3M402C (1999 And Before) View Diagrams & Manuals
3P202B (1995) 3P202B (1995) View Diagrams & Manuals
3P202C (1995) 3P202C (1995) View Diagrams & Manuals
3P202D (1996) 3P202D (1996) View Diagrams & Manuals
3P209A (1999 And Before) 3P209A (1999 And Before) View Diagrams & Manuals
3P209B (1995) 3P209B (1995) View Diagrams & Manuals
3P209C (1996) 3P209C (1996) View Diagrams & Manuals
3P302A (1995) 3P302A (1995) View Diagrams & Manuals
3P302B (1995) 3P302B (1995) View Diagrams & Manuals
3P302C (1996) 3P302C (1996) View Diagrams & Manuals
3P302D (1997) 3P302D (1997) View Diagrams & Manuals
3P302E (1998) 3P302E (1998) View Diagrams & Manuals
3P402A (1999 And Before) 3P402A (1999 And Before) View Diagrams & Manuals
3P409A (1999 And Before) 3P409A (1999 And Before) View Diagrams & Manuals
3P409B (1996) 3P409B (1996) View Diagrams & Manuals
3P409C (1997) 3P409C (1997) View Diagrams & Manuals
3P409D (1998) 3P409D (1998) View Diagrams & Manuals
409940 (1999 And Before) 409940 (1999 And Before) View Diagrams & Manuals
409941 (1996) 409941 (1996) View Diagrams & Manuals
409942 (1996) 409942 (1996) View Diagrams & Manuals
4230A59 (1999 And Before) 4230A59 (1999 And Before) View Diagrams & Manuals
4232A29 (1999 And Before) 4232A29 (1999 And Before) View Diagrams & Manuals
4232A59 (1999 And Before) 4232A59 (1999 And Before) View Diagrams & Manuals
4242A89 (1998) 4242A89 (1998) View Diagrams & Manuals
4242A99 (1999) 4242A99 (1999) View Diagrams & Manuals
425130 (1999 And Before) 425130 (1999 And Before) View Diagrams & Manuals
425131 (1999 And Before) 425131 (1999 And Before) View Diagrams & Manuals
425132 (1999 And Before) 425132 (1999 And Before) View Diagrams & Manuals
425133 (1996) 425133 (1996) View Diagrams & Manuals
425160 (1999 And Before) 425160 (1999 And Before) View Diagrams & Manuals
425161 (1999 And Before) 425161 (1999 And Before) View Diagrams & Manuals
4254A59 (1999 And Before) 4254A59 (1999 And Before) View Diagrams & Manuals
4258A59 (1999 And Before) 4258A59 (1999 And Before) View Diagrams & Manuals
4264A89 (1998) 4264A89 (1998) View Diagrams & Manuals
4264A89 (1999 And Before) 4264A89 (1999 And Before) View Diagrams & Manuals
4264A99 (1999) 4264A99 (1999) View Diagrams & Manuals
4A (1999 And Before) 4A (1999 And Before) View Diagrams & Manuals
4B (1999 And Before) 4B (1999 And Before) View Diagrams & Manuals
4C372A (1999 And Before) 4C372A (1999 And Before) View Diagrams & Manuals
4C472A (1999 And Before) 4C472A (1999 And Before) View Diagrams & Manuals
4C472B (1999 And Before) 4C472B (1999 And Before) View Diagrams & Manuals
4CA (2000) 4CA (2000) View Diagrams & Manuals
4E372A (1999 And Before) 4E372A (1999 And Before) View Diagrams & Manuals
4E372B (1999 And Before) 4E372B (1999 And Before) View Diagrams & Manuals
4E379A (1999 And Before) 4E379A (1999 And Before) View Diagrams & Manuals
4E482A (1999 And Before) 4E482A (1999 And Before) View Diagrams & Manuals
4E482B (1999 And Before) 4E482B (1999 And Before) View Diagrams & Manuals
4H472A (1999 And Before) 4H472A (1999 And Before) View Diagrams & Manuals
4H472B (1999 And Before) 4H472B (1999 And Before) View Diagrams & Manuals
4H472C (1999 And Before) 4H472C (1999 And Before) View Diagrams & Manuals
4H472D (1999 And Before) 4H472D (1999 And Before) View Diagrams & Manuals
4H472F (1996) 4H472F (1996) View Diagrams & Manuals
Y1844D (1994) Y1844D (1994) View Diagrams & Manuals
XT722FE (961430061) Rotary Lawn Mower View Diagrams & Manuals
XT722 FE (96143006105) Rotary Lawn Mower View Diagrams & Manuals
HU775H (96145001000)(2013-02) Walk-Behind Lawn Mower View Diagrams & Manuals
HD775HW (96143008603) Walk-Behind Lawn Mower View Diagrams & Manuals
917377230 Rotary Lawn Mower View Diagrams & Manuals
PR627ES (96192003800) (2010-04) Tiller View Diagrams & Manuals
PPWT60022 (96172000600) (2009-11) Handheld Trimmer View Diagrams & Manuals
961140014 (96114001400) (2009-05) Lawn Mower: Consumer Walk Behind View Diagrams & Manuals
961140014 (96114001401) (2009-03) Lawn Mower: Consumer Walk Behind View Diagrams & Manuals
961140014 (96114001402) (2009-03) Lawn Mower: Consumer Walk Behind View Diagrams & Manuals
961140014 (96114001403) (2009-03) Lawn Mower: Consumer Walk Behind View Diagrams & Manuals
961140014 (96114001404) (2009-03) Lawn Mower: Consumer Walk Behind View Diagrams & Manuals
961140014 (96114001405) (2009-11) Lawn Mower: Consumer Walk Behind View Diagrams & Manuals
961140014 (96114001406) (2009-11) Lawn Mower: Consumer Walk Behind View Diagrams & Manuals
96114001500 (2008-10) Lawn Mower: Consumer Walk Behind View Diagrams & Manuals
96114001501 (2009-04) Lawn Mower: Consumer Walk Behind View Diagrams & Manuals
96114001703 (2010-04) Lawn Mower: Consumer Walk Behind View Diagrams & Manuals
96114001800 (2008-10) Lawn Mower: Consumer Walk Behind View Diagrams & Manuals
96116000100 (2004-10) Lawn Mower: Consumer Walk Behind View Diagrams & Manuals
961240001 (2004-12) Lawn Mower: Consumer Walk Behind View Diagrams & Manuals
961240002 (96124000201) (2009-04) Lawn Mower: Consumer Walk Behind View Diagrams & Manuals
96124000300 (2008-11) Lawn Mower: Consumer Walk Behind View Diagrams & Manuals
96134000800 (2008-10) Lawn Mower: Consumer Walk Behind View Diagrams & Manuals
HD6A22HWD (2010-02) Lawn Mower: Consumer Walk Behind View Diagrams & Manuals
P53-190DWA (2010-07) 96141017904 Lawn Mower: Consumer Walk Behind View Diagrams & Manuals
PEM65Y21RHP (96141009101) (2006-06) Lawn Mower: Consumer Walk Behind View Diagrams & Manuals
PEM65Y21RP (96141009000) (2006-06) Lawn Mower: Consumer Walk Behind View Diagrams & Manuals
PEM65Y21RP (96141009100) (2006-06) Lawn Mower: Consumer Walk Behind View Diagrams & Manuals
PH65Y21RHP (96142003700) (2007-01) Lawn Mower: Consumer Walk Behind View Diagrams & Manuals
PO450N20S (96112007004) (2009-11) Lawn Mower: Consumer Walk Behind View Diagrams & Manuals
PO450N20SC (96118000700) (2010-01) Lawn Mower: Consumer Walk Behind View Diagrams & Manuals
PO450N20SX (96112007201) (2009-12) Lawn Mower: Consumer Walk Behind View Diagrams & Manuals
PO500N21R (96132003000) (2006-12) Lawn Mower: Consumer Walk Behind View Diagrams & Manuals
PO500N21R (96132003001) (2007-03) Lawn Mower: Consumer Walk Behind View Diagrams & Manuals
PO500N21R (96132003002) (2007-11) Lawn Mower: Consumer Walk Behind View Diagrams & Manuals
PO500N21R (96132003003) (2007-11) Lawn Mower: Consumer Walk Behind View Diagrams & Manuals
PO500N21RH (96132002200) (2007-01) Lawn Mower: Consumer Walk Behind View Diagrams & Manuals
PO500N21RH3 (96132003500) (2007-10) Lawn Mower: Consumer Walk Behind View Diagrams & Manuals
PO500N21RHX (96132002800) (2007-01) Lawn Mower: Consumer Walk Behind View Diagrams & Manuals
PO500N21RHX (96132002801) (2007-03) Lawn Mower: Consumer Walk Behind View Diagrams & Manuals
PO500N22S (96112004100) (2006-12) Lawn Mower: Consumer Walk Behind View Diagrams & Manuals
PO500N22S (96112004101) (2006-12) Lawn Mower: Consumer Walk Behind View Diagrams & Manuals
PO500N22S (96112004101) (2007-12) Lawn Mower: Consumer Walk Behind View Diagrams & Manuals
PO500N22S (96112004102) (2008-01) Lawn Mower: Consumer Walk Behind View Diagrams & Manuals
PO500N22S (96112004104) (2009-03) Lawn Mower: Consumer Walk Behind View Diagrams & Manuals
PO500N22S (96112004105) (2009-11) Lawn Mower: Consumer Walk Behind View Diagrams & Manuals
PO500N22SH (96112004200) (2006-12) Lawn Mower: Consumer Walk Behind View Diagrams & Manuals
PO500N22SHX (96112005200) (2007-01) Lawn Mower: Consumer Walk Behind View Diagrams & Manuals
PO500N22SX (96112005400) (2007-01) Lawn Mower: Consumer Walk Behind View Diagrams & Manuals
PO500N22SX (96112007301) (2009-11) Lawn Mower: Consumer Walk Behind View Diagrams & Manuals
PP675B22ES (96142006000) (2008-12) Lawn Mower: Consumer Walk Behind View Diagrams & Manuals
PP675B22ES (96142006001) (2009-05) Lawn Mower: Consumer Walk Behind View Diagrams & Manuals
PPWT60022X (96172000700) (2010-04) Lawn Mower: Consumer Walk Behind View Diagrams & Manuals
PR160N21CHC (96138000500) (2008-01) Lawn Mower: Consumer Walk Behind View Diagrams & Manuals
PR160N21CHC (9613800501) (2009-01) Lawn Mower: Consumer Walk Behind View Diagrams & Manuals
PR160N21CHC (9613800502) (2010-01) Lawn Mower: Consumer Walk Behind View Diagrams & Manuals
PR160Y21RDP (96142004500) (2008-01) Lawn Mower: Consumer Walk Behind View Diagrams & Manuals
PR160Y21RPC (96148000900) (2008-01) Lawn Mower: Consumer Walk Behind View Diagrams & Manuals
PR173Y22RP (96142007100) (2010-02) Lawn Mower: Consumer Walk Behind View Diagrams & Manuals
PR4N22SHA (2002-01) Lawn Mower: Consumer Walk Behind View Diagrams & Manuals
PR4N22SHB (2003-04) Lawn Mower: Consumer Walk Behind View Diagrams & Manuals
PR550N21R (96132004600) (2010-02) Lawn Mower: Consumer Walk Behind View Diagrams & Manuals
PR550N21RH3 (96132005000) (2009-12) Lawn Mower: Consumer Walk Behind View Diagrams & Manuals
PR550N21RX (96132004700) (2009-12) Lawn Mower: Consumer Walk Behind View Diagrams & Manuals
PR550N22SH (96112008300) (2010-03) Lawn Mower: Consumer Walk Behind View Diagrams & Manuals
PR550N22SHX (96112008400) (2009-11) Lawn Mower: Consumer Walk Behind View Diagrams & Manuals
PR550Y22S (96122002000) (2008-02) Lawn Mower: Consumer Walk Behind View Diagrams & Manuals
PR600N21RH (96132002300) (2007-01) Lawn Mower: Consumer Walk Behind View Diagrams & Manuals
PR600N21RH (96132002301) (2007-03) Lawn Mower: Consumer Walk Behind View Diagrams & Manuals
PR600N21RH (96132002302) (2007-08) Lawn Mower: Consumer Walk Behind View Diagrams & Manuals
PR600N21RH (96132002303) (2007-10) Lawn Mower: Consumer Walk Behind View Diagrams & Manuals
PR600N21RH (96132002304) (2007-11) Lawn Mower: Consumer Walk Behind View Diagrams & Manuals
PR600N21RH (96132002305) (2008-01) Lawn Mower: Consumer Walk Behind View Diagrams & Manuals
PR600N21RH (96132002306) (2008-03) Lawn Mower: Consumer Walk Behind View Diagrams & Manuals
PR600N21RH (96132002307) (2008-03) Lawn Mower: Consumer Walk Behind View Diagrams & Manuals
PR600N21RH (96132002308) (2008-06) Lawn Mower: Consumer Walk Behind View Diagrams & Manuals
PR600N21RH (96132002309) (2008-11) Lawn Mower: Consumer Walk Behind View Diagrams & Manuals
PR600N21RHC (96138000400) (2008-01) Lawn Mower: Consumer Walk Behind View Diagrams & Manuals
PR600N21RHX (96132002900) (2007-01) Lawn Mower: Consumer Walk Behind View Diagrams & Manuals
PR600N21RHX (96132002901) (2007-03) Lawn Mower: Consumer Walk Behind View Diagrams & Manuals
PR600N21RHX (96132003700) (2007-12) Lawn Mower: Consumer Walk Behind View Diagrams & Manuals
PR600N22S (96112004300) (2007-01) Lawn Mower: Consumer Walk Behind View Diagrams & Manuals
PR600N22SH (96112004400) (2006-01) Lawn Mower: Consumer Walk Behind View Diagrams & Manuals
PR600Y21RDP (96142004400) (2008-01) Lawn Mower: Consumer Walk Behind View Diagrams & Manuals
PR600Y21RDP (96142004401) (2008-01) Lawn Mower: Consumer Walk Behind View Diagrams & Manuals
PR600Y21RDP (96142004402) (2008-01) Lawn Mower: Consumer Walk Behind View Diagrams & Manuals
PR600Y21RHP (96142003500) (2007-01) Lawn Mower: Consumer Walk Behind View Diagrams & Manuals
PR600Y21RHP (96142003501) (2007-03) Lawn Mower: Consumer Walk Behind View Diagrams & Manuals
PR600Y21RHPX (96142003800) (2007-01) Lawn Mower: Consumer Walk Behind View Diagrams & Manuals
PR600Y21RP (96142003400) (2007-01) Lawn Mower: Consumer Walk Behind View Diagrams & Manuals
PR600Y21RP (96142003401) (2007-01) Lawn Mower: Consumer Walk Behind View Diagrams & Manuals
PR600Y21RP (96142003402) (2007-11) Lawn Mower: Consumer Walk Behind View Diagrams & Manuals
PR600Y21RPX (96142004000) (2007-01) Lawn Mower: Consumer Walk Behind View Diagrams & Manuals
PR600Y22RHP (96142004600) (2007-10) Lawn Mower: Consumer Walk Behind View Diagrams & Manuals
PR600Y22RHP (96142004600) (2009-06) Lawn Mower: Consumer Walk Behind View Diagrams & Manuals
PR600Y22RHP (96142004601) (2008-01) Lawn Mower: Consumer Walk Behind View Diagrams & Manuals
PR600Y22RHP (96142004601) (2009-06) Lawn Mower: Consumer Walk Behind View Diagrams & Manuals
PR600Y22RHP (96142004603) (2009-06) Lawn Mower: Consumer Walk Behind View Diagrams & Manuals
PR600Y22RHP (96142004604) (2009-06) Lawn Mower: Consumer Walk Behind View Diagrams & Manuals
PR600Y22RHP (96142004605) (2009-06) Lawn Mower: Consumer Walk Behind View Diagrams & Manuals
PR600Y22RHPC (96148000400) (2008-01) Lawn Mower: Consumer Walk Behind View Diagrams & Manuals
PR600Y22SHP (96122001400) (2007-01) Lawn Mower: Consumer Walk Behind View Diagrams & Manuals
PR600Y22SHP (96122001401) (2007-11) Lawn Mower: Consumer Walk Behind View Diagrams & Manuals
PR600Y22SHP (96122001402) (2008-01) Lawn Mower: Consumer Walk Behind View Diagrams & Manuals
PR600Y22SHP (96122001403) (2008-02) Lawn Mower: Consumer Walk Behind View Diagrams & Manuals
PR600Y22SHP (96122001404) (2008-02) Lawn Mower: Consumer Walk Behind View Diagrams & Manuals
PR600Y22SHP (96122001405) (2008-08) Lawn Mower: Consumer Walk Behind View Diagrams & Manuals
PR600Y22SHPC (96128000100) (2008-01) Lawn Mower: Consumer Walk Behind View Diagrams & Manuals
PR600Y22SHPX (96122001700) (2007-01) Lawn Mower: Consumer Walk Behind View Diagrams & Manuals
PR600Y22SHPX (96122001701) (2008-01) Lawn Mower: Consumer Walk Behind View Diagrams & Manuals
PR625N21RH3 (96132004800) (2010-04) Lawn Mower: Consumer Walk Behind View Diagrams & Manuals
PR625N21RH3 (96132004801) (2010-03) Lawn Mower: Consumer Walk Behind View Diagrams & Manuals
PR625N21RH3X (96132004900) (2010-01) Lawn Mower: Consumer Walk Behind View Diagrams & Manuals
PR625Y21RKP (96142003600) (2007-01) Lawn Mower: Consumer Walk Behind View Diagrams & Manuals
PR625Y21RKPX (96142004100) (2007-01) Lawn Mower: Consumer Walk Behind View Diagrams & Manuals
PR625Y22RHP (96142007500) (2009-11) Lawn Mower: Consumer Walk Behind View Diagrams & Manuals
PR625Y22RHPX (96142007600) (2009-12) Lawn Mower: Consumer Walk Behind View Diagrams & Manuals
PR625Y22RKP (96142003600) (2007-01) Lawn Mower: Consumer Walk Behind View Diagrams & Manuals
PR625Y22RKP (96142003600) (2009-07) Lawn Mower: Consumer Walk Behind View Diagrams & Manuals
PR625Y22RKP (96142003601) (2007-09) Lawn Mower: Consumer Walk Behind View Diagrams & Manuals
PR625Y22RKP (96142003601) (2008-04) Lawn Mower: Consumer Walk Behind View Diagrams & Manuals
PR625Y22RKP (96142003602) (2008-04) Lawn Mower: Consumer Walk Behind View Diagrams & Manuals
PR625Y22RKP (96142007700) (2009-11) Lawn Mower: Consumer Walk Behind View Diagrams & Manuals
PR625Y22RKPX (96142004100) (2007-04) Lawn Mower: Consumer Walk Behind View Diagrams & Manuals
PR625Y22RKPX (96142007800) (2010-01) Lawn Mower: Consumer Walk Behind View Diagrams & Manuals
PR625Y22RP (96142007300) (2009-11) Lawn Mower: Consumer Walk Behind View Diagrams & Manuals
PR625Y22RPX (96142007400) (2009-11) Lawn Mower: Consumer Walk Behind View Diagrams & Manuals
PR625Y22SHP (96122002400) (2010-03) Lawn Mower: Consumer Walk Behind View Diagrams & Manuals
PR625Y22SHPX (96122002500) (2009-11) Lawn Mower: Consumer Walk Behind View Diagrams & Manuals
PR6Y22CA (2000-12) Lawn Mower: Consumer Walk Behind View Diagrams & Manuals
PR6Y22CA (2001-12) Lawn Mower: Consumer Walk Behind View Diagrams & Manuals
PR6Y22CHA (1999-12) Lawn Mower: Consumer Walk Behind View Diagrams & Manuals
PR6Y22CHB (2000-12) Lawn Mower: Consumer Walk Behind View Diagrams & Manuals
PR6Y22SHA (2000-02) Lawn Mower: Consumer Walk Behind View Diagrams & Manuals
PR7R21A (2004-07) Lawn Mower: Consumer Walk Behind View Diagrams & Manuals
PR7R21B (2004-02) Lawn Mower: Consumer Walk Behind View Diagrams & Manuals
PR7R21C (2004-03) Lawn Mower: Consumer Walk Behind View Diagrams & Manuals
PR7Y21CHA (2004-06) Lawn Mower: Consumer Walk Behind View Diagrams & Manuals
PR7Y21CHB (2004-08) Lawn Mower: Consumer Walk Behind View Diagrams & Manuals
PR7Y21RHP (96142001202) (2005-02) Lawn Mower: Consumer Walk Behind View Diagrams & Manuals
PXT20 (96116000500) (2010-03) Lawn Mower: Consumer Walk Behind View Diagrams & Manuals
PXT22 (96116000800) (2010-04) Lawn Mower: Consumer Walk Behind View Diagrams & Manuals
ROTARY LAWN MOWER (96114000311) (2007-03) Lawn Mower: Consumer Walk Behind View Diagrams & Manuals
ROTARY LAWN MOWER (96114000312) (2007-04) Lawn Mower: Consumer Walk Behind View Diagrams & Manuals
ROTARY LAWN MOWER (96114000313) (2007-04) Lawn Mower: Consumer Walk Behind View Diagrams & Manuals
ROTARY LAWN MOWER (96114000314) (2007-05) Lawn Mower: Consumer Walk Behind View Diagrams & Manuals
ROTARY LAWN MOWER (96114000315) (2007-07) Lawn Mower: Consumer Walk Behind View Diagrams & Manuals
ROTARY LAWN MOWER (96114000316) (2007-10) Lawn Mower: Consumer Walk Behind View Diagrams & Manuals
ROTARY LAWN MOWER (96114000317) (2007-11) Lawn Mower: Consumer Walk Behind View Diagrams & Manuals
ROTARY LAWN MOWER (96114000403) (2006-07) Lawn Mower: Consumer Walk Behind View Diagrams & Manuals
ROTARY LAWN MOWER (96114000404) (2006-11) Lawn Mower: Consumer Walk Behind View Diagrams & Manuals
ROTARY LAWN MOWER (96114000405) (2007-02) Lawn Mower: Consumer Walk Behind View Diagrams & Manuals
ROTARY LAWN MOWER (96114000406) (2007-03) Lawn Mower: Consumer Walk Behind View Diagrams & Manuals
ROTARY LAWN MOWER (96114000407) (2007-05) Lawn Mower: Consumer Walk Behind View Diagrams & Manuals
ROTARY LAWN MOWER (96114000408) (2007-07) Lawn Mower: Consumer Walk Behind View Diagrams & Manuals
ROTARY LAWN MOWER (96114000409) (2007-10) Lawn Mower: Consumer Walk Behind View Diagrams & Manuals
ROTARY LAWN MOWER (96114000409) (2007-11) Lawn Mower: Consumer Walk Behind View Diagrams & Manuals
ROTARY LAWN MOWER (96114000700) (2006-11) Lawn Mower: Consumer Walk Behind View Diagrams & Manuals
ROTARY LAWN MOWER (96114000700) (2007-03) Lawn Mower: Consumer Walk Behind View Diagrams & Manuals
ROTARY LAWN MOWER (96114000701) (2007-01) Lawn Mower: Consumer Walk Behind View Diagrams & Manuals
ROTARY LAWN MOWER (96114000702) (2007-03) Lawn Mower: Consumer Walk Behind View Diagrams & Manuals
ROTARY LAWN MOWER (96114000703) (2007-04) Lawn Mower: Consumer Walk Behind View Diagrams & Manuals
ROTARY LAWN MOWER (96114000704) (2007-04) Lawn Mower: Consumer Walk Behind View Diagrams & Manuals
ROTARY LAWN MOWER (96114000705) (2007-04) Lawn Mower: Consumer Walk Behind View Diagrams & Manuals
ROTARY LAWN MOWER (96114000706) (2007-04) Lawn Mower: Consumer Walk Behind View Diagrams & Manuals
ROTARY LAWN MOWER (96114000707) (2007-03) Lawn Mower: Consumer Walk Behind View Diagrams & Manuals
ROTARY LAWN MOWER (96114000707) (2007-04) Lawn Mower: Consumer Walk Behind View Diagrams & Manuals
ROTARY LAWN MOWER (96114000708) (2007-05) Lawn Mower: Consumer Walk Behind View Diagrams & Manuals
ROTARY LAWN MOWER (96114000709) (2007-05) Lawn Mower: Consumer Walk Behind View Diagrams & Manuals
ROTARY LAWN MOWER (96114000710) (2007-05) Lawn Mower: Consumer Walk Behind View Diagrams & Manuals
ROTARY LAWN MOWER (96114000711) (2007-05) Lawn Mower: Consumer Walk Behind View Diagrams & Manuals
ROTARY LAWN MOWER (96114000712) (2007-05) Lawn Mower: Consumer Walk Behind View Diagrams & Manuals
ROTARY LAWN MOWER (96114000713) (2007-06) Lawn Mower: Consumer Walk Behind View Diagrams & Manuals
ROTARY LAWN MOWER (96114000714) (2007-07) Lawn Mower: Consumer Walk Behind View Diagrams & Manuals
ROTARY LAWN MOWER (96114000715) (2007-10) Lawn Mower: Consumer Walk Behind View Diagrams & Manuals
ROTARY LAWN MOWER (96114000717) (2007-11) Lawn Mower: Consumer Walk Behind View Diagrams & Manuals
ROTARY LAWN MOWER (96114000718) (2008-02) Lawn Mower: Consumer Walk Behind View Diagrams & Manuals
ROTARY LAWN MOWER (96114000719) (2007-11) Lawn Mower: Consumer Walk Behind View Diagrams & Manuals
ROTARY LAWN MOWER (96114000720) (2008-01) Lawn Mower: Consumer Walk Behind View Diagrams & Manuals
ROTARY LAWN MOWER (96114000721) (2008-01) Lawn Mower: Consumer Walk Behind View Diagrams & Manuals
ROTARY LAWN MOWER (96114000722) (2008-02) Lawn Mower: Consumer Walk Behind View Diagrams & Manuals
ROTARY LAWN MOWER (96114000723) (2008-04) Lawn Mower: Consumer Walk Behind View Diagrams & Manuals
ROTARY LAWN MOWER (96114000800) (2007-03) Lawn Mower: Consumer Walk Behind View Diagrams & Manuals
ROTARY LAWN MOWER (96114001100) (2007-11) Lawn Mower: Consumer Walk Behind View Diagrams & Manuals
ROTARY LAWN MOWER (96114001200) (2007-11) Lawn Mower: Consumer Walk Behind View Diagrams & Manuals
ROTARY LAWN MOWER (96114001300) (2007-11) Lawn Mower: Consumer Walk Behind View Diagrams & Manuals
ROTARY LAWN MOWER (96114001600) (2008-10) Lawn Mower: Consumer Walk Behind View Diagrams & Manuals
ROTARY LAWN MOWER (96134000106) (2006-11) Lawn Mower: Consumer Walk Behind View Diagrams & Manuals
ROTARY LAWN MOWER (96134000300) (2006-12) Lawn Mower: Consumer Walk Behind View Diagrams & Manuals
ROTARY LAWN MOWER (96134000301) (2006-11) Lawn Mower: Consumer Walk Behind View Diagrams & Manuals
ROTARY LAWN MOWER (96134000400) (2007-03) Lawn Mower: Consumer Walk Behind View Diagrams & Manuals
ROTARY LAWN MOWER (96134000401) (2007-03) Lawn Mower: Consumer Walk Behind View Diagrams & Manuals
ROTARY LAWN MOWER (96134000600) (2007-11) Lawn Mower: Consumer Walk Behind View Diagrams & Manuals
ROTARY LAWN MOWER (96134000601) (2007-11) Lawn Mower: Consumer Walk Behind View Diagrams & Manuals
ROTARY LAWN MOWER (96134000602) (2008-01) Lawn Mower: Consumer Walk Behind View Diagrams & Manuals
ROTARY LAWN MOWER (96134000700) (2007-11) Lawn Mower: Consumer Walk Behind View Diagrams & Manuals
ROTARY LAWN MOWER (96134000701) (2007-11) Lawn Mower: Consumer Walk Behind View Diagrams & Manuals
WE300N20S (96118000601) (2010-01) Lawn Mower: Consumer Walk Behind View Diagrams & Manuals
WE5N22SH4D (200-01) Lawn Mower: Consumer Walk Behind View Diagrams & Manuals
WE5N22SH4D (2000-01) Lawn Mower: Consumer Walk Behind View Diagrams & Manuals
WE5N22SH4E (2000-12) Lawn Mower: Consumer Walk Behind View Diagrams & Manuals
WE5N22SH4F (2001-12) Lawn Mower: Consumer Walk Behind View Diagrams & Manuals
WM45N22SA (2003-11) Lawn Mower: Consumer Walk Behind View Diagrams & Manuals
XT500N21R (96132003101) (2007-03) Lawn Mower: Consumer Walk Behind View Diagrams & Manuals
XT500N21RH3 (96132003800) (2008-01) Lawn Mower: Consumer Walk Behind View Diagrams & Manuals
XT500Y22SP (96122001900) (2008-02) Lawn Mower: Consumer Walk Behind View Diagrams & Manuals
XT550N22SH (96112008600) (2010-02) Lawn Mower: Consumer Walk Behind View Diagrams & Manuals
XT550Y22SP (96122002700) (2010-01) Lawn Mower: Consumer Walk Behind View Diagrams & Manuals
XT600N21RH (96132003200) (2007-02) Lawn Mower: Consumer Walk Behind View Diagrams & Manuals
XT600N21RH (96132003201) (2007-03) Lawn Mower: Consumer Walk Behind View Diagrams & Manuals
XT600Y21RP (96142004200) (2007-01) Lawn Mower: Consumer Walk Behind View Diagrams & Manuals
XT600Y21RP (96142004201) (2008-02) Lawn Mower: Consumer Walk Behind View Diagrams & Manuals
XT600Y22SHP (96122001800) (2007-02) Lawn Mower: Consumer Walk Behind View Diagrams & Manuals
XT625N21RH3 (96132005200) (2010-01) Lawn Mower: Consumer Walk Behind View Diagrams & Manuals
XT625Y22RHP (96142008300) (2010-01) Lawn Mower: Consumer Walk Behind View Diagrams & Manuals
XT625Y22RKP (96142004300) (2007-02) Lawn Mower: Consumer Walk Behind View Diagrams & Manuals
XT625Y22RKP (96142004301) (2007-04) Lawn Mower: Consumer Walk Behind View Diagrams & Manuals
XT625Y22RKP (96142004301) (2008-04) Lawn Mower: Consumer Walk Behind View Diagrams & Manuals
XT625Y22RKP (96142006900) (2009-04) Lawn Mower: Consumer Walk Behind View Diagrams & Manuals
XT625Y22RKP (96142008400) (2010-01) Lawn Mower: Consumer Walk Behind View Diagrams & Manuals
XT625Y22RKP (96142008401) (2010-02) Lawn Mower: Consumer Walk Behind View Diagrams & Manuals
XT625Y22RP (96142008200) (2010-01) Lawn Mower: Consumer Walk Behind View Diagrams & Manuals
XT625Y22SHP (96122002800) (2010-01) Lawn Mower: Consumer Walk Behind View Diagrams & Manuals
2111E (2012-08) St - 96191004106 View Diagrams & Manuals
961940008 (2009-10) Snow Blower View Diagrams & Manuals
961940009 (2009-08) Snow Blower View Diagrams & Manuals
PP8527ESA (2003) Snow Blower View Diagrams & Manuals
PP927ESA (2002) Snow Blower View Diagrams & Manuals
PP927ESC (2004) Snow Blower View Diagrams & Manuals
XT11530ES (96192003501) (2009-10) Snow Blower View Diagrams & Manuals
XT11530ES (96192003502) (2010-06) Snow Blower View Diagrams & Manuals
XT827ES (96192003401) (2009-09) Snow Blower View Diagrams & Manuals
212310X83E (2006) 96137000100 Walk Behind Rotary Mower View Diagrams & Manuals
214502X83E (2006) 96147000100 Walk Behind Rotary Mower View Diagrams & Manuals
R52 SE (96141006101, 961410061) (2006-05) Lawn Mower: Consumer Walk Behind View Diagrams & Manuals
R53 (96131002305) (2008-11) Lawn Mower: Consumer Walk Behind View Diagrams & Manuals
R53 SVL (96141019202) (2009-04) Lawn Mower: Consumer Walk Behind View Diagrams & Manuals
R53 SVL (96141019201) (2008-07) Lawn Mower: Consumer Walk Behind View Diagrams & Manuals
5521 RS C (954223470, 532187213) (2004-07) Lawn Mower: Consumer Walk Behind View Diagrams & Manuals
HU675FE (2014-01) (96143009301) Lawn Mower: Consumer Walk Behind View Diagrams & Manuals
56 HSFEF (1995-03) (954072401) Lawn Mower View Diagrams & Manuals
6020 MDB (954222688) (2001-01) Lawn Mower: Consumer Walk Behind View Diagrams & Manuals
R52 E (954170215) (2004-01) Lawn Mower: Consumer Walk Behind View Diagrams & Manuals
R52 E (954170058) (2003-01) Lawn Mower: Consumer Walk Behind View Diagrams & Manuals
R52 (954170040) (2003-01) D Lawn Mower: Consumer Walk Behind View Diagrams & Manuals
R52 (954170040) (2001-03) A Lawn Mower: Consumer Walk Behind View Diagrams & Manuals
R52 (954170040) (2003-05) Lawn Mower: Consumer Walk Behind View Diagrams & Manuals
R53 SVL (96141019200) (2008-02) Lawn Mower View Diagrams & Manuals
16530 SBXLS (2009-08) (96193004102 ) Snow Blower View Diagrams & Manuals
14527 SBLS (2009-08) (96193004901) Snow Blower View Diagrams & Manuals
R52 S (96141006006) (2008-08) Lawn Mower: Commercial Walk Behind View Diagrams & Manuals
954014314 (2009-10) 350 Lawn Mower: Consumer Walk Behind View Diagrams & Manuals
38045 (380453) (2012-12) Lawn Mower: Consumer Walk Behind View Diagrams & Manuals
38045 (380452) (2012-04) Lawn Mower: Consumer Walk Behind View Diagrams & Manuals
38045 (380451) (2012-01) Lawn Mower: Consumer Walk Behind View Diagrams & Manuals
38045 (380450) (2011-10) Lawn Mower: Consumer Walk Behind View Diagrams & Manuals
38046 (380461) (2012-01) Lawn Mower: Consumer Walk Behind View Diagrams & Manuals
38046 (380460) (2011-10) Lawn Mower: Consumer Walk Behind View Diagrams & Manuals
38096 (380961) (2012-03) Lawn Mower: Consumer Walk Behind View Diagrams & Manuals
38096 (380960) (2011-10) Lawn Mower: Consumer Walk Behind View Diagrams & Manuals
38097 (380970) (2011-12) Lawn Mower: Consumer Walk Behind View Diagrams & Manuals
961430054 (2009-07) 00 Lawn Mower: Consumer Walk Behind View Diagrams & Manuals
38454 (384543) (2013) 2013 12 Lawn Mower: Consumer Walk Behind View Diagrams & Manuals
38454 (384542) (2013) 2013 02 Lawn Mower: Consumer Walk Behind View Diagrams & Manuals
38454 (384541) (2012-01) Lawn Mower: Consumer Walk Behind View Diagrams & Manuals
38454 (384540) (2011-11) Lawn Mower: Consumer Walk Behind View Diagrams & Manuals
51 D (954071701) (1995) H51DE, 1995 Lawn Mower: Consumer Walk Behind View Diagrams & Manuals
51 D (954140031D) (1997-01) Lawn Mower: Consumer Walk Behind View Diagrams & Manuals
51 M (954056111, H51MC) (1992-08) Lawn Mower: Consumer Walk Behind View Diagrams & Manuals
HD600L (96143008400) (2011-10) Lawn Mower: Consumer Walk Behind View Diagrams & Manuals
HD600L (96143008301) (2012-02) Lawn Mower: Consumer Walk Behind View Diagrams & Manuals
HD600L (96143008300) (2011-11) Lawn Mower: Consumer Walk Behind View Diagrams & Manuals
HD700L (96143008500) (2011-10) Lawn Mower: Consumer Walk Behind View Diagrams & Manuals
HD725E (96143008703) (2014-02) Lawn Mower: Consumer Walk Behind View Diagrams & Manuals
HD725E (96143008702) (2013-12) Lawn Mower: Consumer Walk Behind View Diagrams & Manuals
HD725E (96143008701) (2013-03) Lawn Mower: Consumer Walk Behind View Diagrams & Manuals
HD725E (96143008700) (2011-10) Lawn Mower: Consumer Walk Behind View Diagrams & Manuals
HD800HW (96143008803) (2014-02) Lawn Mower: Consumer Walk Behind View Diagrams & Manuals
HD800HW (96143008802) (2013-12) Lawn Mower: Consumer Walk Behind View Diagrams & Manuals
HD800HW (96143008801) (2013-02) Lawn Mower: Consumer Walk Behind View Diagrams & Manuals
HD800HW (96143008800) (2011-10) Lawn Mower: Consumer Walk Behind View Diagrams & Manuals
HU550F (96143009502) (2014-02) Lawn Mower: Consumer Walk Behind View Diagrams & Manuals
HU550F (96143009501) (2013-11) Lawn Mower: Consumer Walk Behind View Diagrams & Manuals
HU550F (96143009500) (2013-02) Lawn Mower: Consumer Walk Behind View Diagrams & Manuals
5521P (96133002102) (2014-03) Lawn Mower: Consumer Walk Behind View Diagrams & Manuals
5521P (96133002101) (2013-12) Lawn Mower: Consumer Walk Behind View Diagrams & Manuals
5521P (96133002100) (2013-02) Lawn Mower: Consumer Walk Behind View Diagrams & Manuals
5521P (96133001806) (2017-09) Lawn Mower: Consumer Walk Behind View Diagrams & Manuals
5521P (96133001805) (2016-10) Lawn Mower: Consumer Walk Behind View Diagrams & Manuals
5521P (96133001804) (2015-01) Lawn Mower: Consumer Walk Behind View Diagrams & Manuals
5521P (96133001803) (2014-09) Lawn Mower: Consumer Walk Behind View Diagrams & Manuals
5521P (96133001802) (2014-01) Lawn Mower: Consumer Walk Behind View Diagrams & Manuals
5521P (96133001801) (2013-09) Lawn Mower: Consumer Walk Behind View Diagrams & Manuals
5521P (96133001800) (2013-02) Lawn Mower: Consumer Walk Behind View Diagrams & Manuals
5521 P (96133001602) (2012-01) Lawn Mower: Consumer Walk Behind View Diagrams & Manuals
5521 P (96133001601) (2012-01) Lawn Mower: Consumer Walk Behind View Diagrams & Manuals
5521 P (96133001600) (2011-11) Lawn Mower: Consumer Walk Behind View Diagrams & Manuals
HU550FH (96143012500) (2016-11) Lawn Mower: Consumer Walk Behind View Diagrams & Manuals
HU550FH (96143009606) (2016-08) Lawn Mower: Consumer Walk Behind View Diagrams & Manuals
HU550FH (96143009605) (2015-09) Lawn Mower: Consumer Walk Behind View Diagrams & Manuals
HU550FH (96143009604) (2015-01) Lawn Mower: Consumer Walk Behind View Diagrams & Manuals
HU550FH (96143009603) (2014-09) Lawn Mower: Consumer Walk Behind View Diagrams & Manuals
HU550FH (96143009602) (2014-03) Lawn Mower: Consumer Walk Behind View Diagrams & Manuals
HU550FH (96143009601) (2013-11) Lawn Mower: Consumer Walk Behind View Diagrams & Manuals
HU550FH (96143009600) (2012-11) Lawn Mower: Consumer Walk Behind View Diagrams & Manuals
5521 RS (96143002400, 961430024) (2007-01) X Lawn Mower: Consumer Walk Behind View Diagrams & Manuals
5521 RS (954223270, 532188645) (2004-07) E Lawn Mower: Consumer Walk Behind View Diagrams & Manuals
5521 RS (954223470, 532188645) (2004-07) D Lawn Mower: Consumer Walk Behind View Diagrams & Manuals
5521 RS (954223470) (2004-07) D Lawn Mower: Consumer Walk Behind View Diagrams & Manuals
5521 RS (954223470, 532187213) (2004-07) B Lawn Mower: Consumer Walk Behind View Diagrams & Manuals
5521 RS (954223470, 532180868) (2003-09) A Lawn Mower: Consumer Walk Behind View Diagrams & Manuals
5521 RS (96143000208) (2007-11) Lawn Mower: Consumer Walk Behind View Diagrams & Manuals
5521 RS (96143000207) (2007-11) Lawn Mower: Consumer Walk Behind View Diagrams & Manuals
5521 RS (96143000206, 961430002) (2007-02) Lawn Mower: Consumer Walk Behind View Diagrams & Manuals
5521 RS (96143000205, 961430002) (2007-01) Lawn Mower: Consumer Walk Behind View Diagrams & Manuals
5521 RS (96143000204, 961430002) (2006-09) Lawn Mower: Consumer Walk Behind View Diagrams & Manuals
5521 RS (96143000203) (2005-11) Lawn Mower: Consumer Walk Behind View Diagrams & Manuals
5521 RS (96143000202) (2005-05) Lawn Mower: Consumer Walk Behind View Diagrams & Manuals
5521 RS (96143000201) (2005-05) Lawn Mower: Consumer Walk Behind View Diagrams & Manuals
5521 RS (96143000200, 532188645) (2005-03) Lawn Mower: Consumer Walk Behind View Diagrams & Manuals
HU600F (376980) (2010-12) Lawn Mower: Consumer Walk Behind View Diagrams & Manuals
HU600F (376972) (2011-03) Lawn Mower: Consumer Walk Behind View Diagrams & Manuals
HU600F (376971) (2011-01) Lawn Mower: Consumer Walk Behind View Diagrams & Manuals
HU600F (376970) (2010-12) Lawn Mower: Consumer Walk Behind View Diagrams & Manuals
5521L (96133002302) (2015-11) Lawn Mower: Consumer Walk Behind View Diagrams & Manuals
5521L (96133002301) (2015-01) Lawn Mower: Consumer Walk Behind View Diagrams & Manuals
5521L (96133002300) (2014-12) Lawn Mower: Consumer Walk Behind View Diagrams & Manuals
HU600L (96143007601) (2011-02) Lawn Mower: Consumer Walk Behind View Diagrams & Manuals
HU600L (96143007600) (2010-12) Lawn Mower: Consumer Walk Behind View Diagrams & Manuals
HU600L (96143006801) (2011-04) Lawn Mower: Consumer Walk Behind View Diagrams & Manuals
HU600L (96143006800) (2011-01) Lawn Mower: Consumer Walk Behind View Diagrams & Manuals
HU600L (379141) (2011-01) Lawn Mower: Consumer Walk Behind View Diagrams & Manuals
HU600L (379140) (2010-12) Lawn Mower: Consumer Walk Behind View Diagrams & Manuals
HU600L (379133) (2011-03) Lawn Mower: Consumer Walk Behind View Diagrams & Manuals
HU600L (379132) (2011-05) Lawn Mower: Consumer Walk Behind View Diagrams & Manuals
HU600L (379131) (2011-02) Lawn Mower: Consumer Walk Behind View Diagrams & Manuals
HU600L (379130) (2010-12) Lawn Mower: Consumer Walk Behind View Diagrams & Manuals
HU675AWD (96145001601) (2014-02) Lawn Mower: Consumer Walk Behind View Diagrams & Manuals
HU675AWD (96145001600) (2013-12) Lawn Mower: Consumer Walk Behind View Diagrams & Manuals
HU675AWD (96145001501) (2014-02) Lawn Mower: Consumer Walk Behind View Diagrams & Manuals
HU675AWD (96145001500) (2013-11) Lawn Mower: Consumer Walk Behind View Diagrams & Manuals
HU675AWD (96143010802) (2014-05) Lawn Mower: Consumer Walk Behind View Diagrams & Manuals
HU675AWD (96143010801) (2014-02) Lawn Mower: Consumer Walk Behind View Diagrams & Manuals
HU675AWD (96143010800) (2013-12) Lawn Mower: Consumer Walk Behind View Diagrams & Manuals
HU675F (96143009200) (2011-12) Lawn Mower: Consumer Walk Behind View Diagrams & Manuals
HU675FE (2014-01) 96143009302 Lawn Mower: Consumer Walk Behind View Diagrams & Manuals
HU675FE (2013-02) 96143009300 Lawn Mower: Consumer Walk Behind View Diagrams & Manuals
HU700AWD (2015-02) 96145002001 Lawn Mower: Consumer Walk Behind View Diagrams & Manuals
HU700AWD (2014-11) 96145002000 Lawn Mower: Consumer Walk Behind View Diagrams & Manuals
56 (H56SFH) (1996-02) Lawn Mower: Consumer Walk Behind View Diagrams & Manuals
56 (1995-03) (954072501) (HSFG) Lawn Mower: Commercial Walk Behind View Diagrams & Manuals
56 (1995-03) (954072301) (HDHSB) Lawn Mower: Commercial Walk Behind View Diagrams & Manuals
HU700H (96145002402) (2015-02) Lawn Mower: Consumer Walk Behind View Diagrams & Manuals
HU700H (96145002401) (2015-01) Lawn Mower: Consumer Walk Behind View Diagrams & Manuals
HU700H (96145002400) (2014-11) Lawn Mower: Consumer Walk Behind View Diagrams & Manuals
HU700H (96145002303) (2015-09) Lawn Mower: Consumer Walk Behind View Diagrams & Manuals
HU700H (96145002302) (2015-01) Lawn Mower: Consumer Walk Behind View Diagrams & Manuals
HU700H (96145002301) (2014-12) Lawn Mower: Consumer Walk Behind View Diagrams & Manuals
HU700H (96145002300) (2014-11) Lawn Mower: Consumer Walk Behind View Diagrams & Manuals
HU700H (96143012800) (2016-10) Lawn Mower: Consumer Walk Behind View Diagrams & Manuals
HU700HW (96143007001) (2011-04) Lawn Mower: Consumer Walk Behind View Diagrams & Manuals
HU700HW (96143007000) (2011-04) Lawn Mower: Consumer Walk Behind View Diagrams & Manuals
HU700L (96143009703) (2014-02) Lawn Mower: Consumer Walk Behind View Diagrams & Manuals
HU700L (96143009702) (2013-11) Lawn Mower: Consumer Walk Behind View Diagrams & Manuals
HU700L (96143009701) (2013-09) Lawn Mower: Consumer Walk Behind View Diagrams & Manuals
HU700L (96143009700) (2013-03) Lawn Mower: Consumer Walk Behind View Diagrams & Manuals
HU700L (96143006901) (2011-04) Lawn Mower: Consumer Walk Behind View Diagrams & Manuals
HU700L (96143006900) (2011-04) Lawn Mower: Consumer Walk Behind View Diagrams & Manuals
HU725AWD/BBC (96145001802) (2015-01) Lawn Mower: Consumer Walk Behind View Diagrams & Manuals
HU725AWD/BBC (96145001801) (2014-01) Lawn Mower: Consumer Walk Behind View Diagrams & Manuals
HU725AWD/BBC (96145001800) (2014-01) Lawn Mower: Consumer Walk Behind View Diagrams & Manuals
HU725AWD/BBC (96143010402) (2014-12) Lawn Mower: Consumer Walk Behind View Diagrams & Manuals
HU725AWD/BBC (96143010401) (2014-03) Lawn Mower: Consumer Walk Behind View Diagrams & Manuals
HU725AWD/BBC (96143010400) (2013-11) Lawn Mower: Consumer Walk Behind View Diagrams & Manuals
LC56 (96141027500) (2013-01) Lawn Mower: Consumer Walk Behind View Diagrams & Manuals
LC56 (96141027300) (2013-02) B Lawn Mower: Consumer Walk Behind View Diagrams & Manuals
LC56AWD (96141027200) (2013-02) Lawn Mower: Consumer Walk Behind View Diagrams & Manuals
HU725BBC (96143009402) (2014-04) Lawn Mower: Consumer Walk Behind View Diagrams & Manuals
HU725BBC (96143009401) (2013-12) Lawn Mower: Consumer Walk Behind View Diagrams & Manuals
HU725BBC (96143009400) (2013-02) Lawn Mower: Consumer Walk Behind View Diagrams & Manuals
HU725E (96143009800) (2013-02) Lawn Mower: Consumer Walk Behind View Diagrams & Manuals
560 (954140058B) (1998-10) Lawn Mower: Consumer Walk Behind View Diagrams & Manuals
560 (954140056A) (1998-02) Lawn Mower: Consumer Walk Behind View Diagrams & Manuals
560 (954140055C) (1999-04) Lawn Mower: Consumer Walk Behind View Diagrams & Manuals
560 (954140055A) (1998-02) Lawn Mower: Consumer Walk Behind View Diagrams & Manuals
HU725FH (96145001302) (2014-03) Lawn Mower: Consumer Walk Behind View Diagrams & Manuals
HU725FH (96145001301) (2013-12) Lawn Mower: Consumer Walk Behind View Diagrams & Manuals
HU725FH (96145001300) (2013-02) Lawn Mower: Consumer Walk Behind View Diagrams & Manuals
HU775HW (96143007701) (2011-03) Lawn Mower: Consumer Walk Behind View Diagrams & Manuals
HU775HW (96143007700) (2010-12) Lawn Mower: Consumer Walk Behind View Diagrams & Manuals
HU775L (96145000800) (2011-12) Lawn Mower: Consumer Walk Behind View Diagrams & Manuals
560 SR (954140061A, 150330) (1998-10) Lawn Mower: Consumer Walk Behind View Diagrams & Manuals
HU800AWDH (96145002103) (2016-07) Lawn Mower: Consumer Walk Behind View Diagrams & Manuals
HU800AWDH (96145002102) (2015-02) Lawn Mower: Consumer Walk Behind View Diagrams & Manuals
HU800AWDH (96145002101) (2015-01) Lawn Mower: Consumer Walk Behind View Diagrams & Manuals
HU800AWDH (96145002100) (2014-11) Lawn Mower: Consumer Walk Behind View Diagrams & Manuals
HU800AWDX/BBC (96145002901) (2016-09) Lawn Mower: Consumer Walk Behind View Diagrams & Manuals
HU800AWDX/BBC (96145002900) (2016-01) Lawn Mower: Consumer Walk Behind View Diagrams & Manuals
HU800H (96143009902) (2014-01) Lawn Mower: Consumer Walk Behind View Diagrams & Manuals
HU800H (96143009901) (2013-09) Lawn Mower: Consumer Walk Behind View Diagrams & Manuals
HU800H (96143009900) (2013-02) Lawn Mower: Consumer Walk Behind View Diagrams & Manuals
HU800HW (96143007103) (2012-04) Lawn Mower: Consumer Walk Behind View Diagrams & Manuals
HU800HW (96143007102) (2011-03) Lawn Mower: Consumer Walk Behind View Diagrams & Manuals
HU800HW (96143007101) (2011-04) Lawn Mower: Consumer Walk Behind View Diagrams & Manuals
HU800HW (96143007100) (2011-04) Lawn Mower: Consumer Walk Behind View Diagrams & Manuals
HU800HW (379152) (2011-04) Lawn Mower: Consumer Walk Behind View Diagrams & Manuals
HU800HW (379151) (2011-04) Lawn Mower: Consumer Walk Behind View Diagrams & Manuals
HU800HW (379150) (2010-12) Lawn Mower: Consumer Walk Behind View Diagrams & Manuals
HUSKY JET (954163101) (2000-02) JET49J Lawn Mower: Consumer Walk Behind View Diagrams & Manuals
HUSKY JET (954063101) (1999-02) JET49H Lawn Mower: Consumer Walk Behind View Diagrams & Manuals
HUSKY JET (1998-03) Lawn Mower: Consumer Walk Behind View Diagrams & Manuals
HUSKY JET (1997-03) Lawn Mower: Consumer Walk Behind View Diagrams & Manuals
HUSKY JET (1995-03) Lawn Mower: Consumer Walk Behind View Diagrams & Manuals
6020 MD (954222688) (2001-01) A Lawn Mower: Consumer Walk Behind View Diagrams & Manuals
6020 MP (954222688) (2001-01) A Lawn Mower: Consumer Walk Behind View Diagrams & Manuals
6022 CH (954222701) (2001-10) B Lawn Mower: Consumer Walk Behind View Diagrams & Manuals
6022 CH (954222701) (2001-01) A Lawn Mower: Consumer Walk Behind View Diagrams & Manuals
J49 (JET49N) (2004-01) 954 17 02-19 Lawn Mower: Consumer Walk Behind View Diagrams & Manuals
J49 (95417021900) (2005-02) 954 17 02-19 Lawn Mower: Consumer Walk Behind View Diagrams & Manuals
6022 SH (954222695) (2001-10) B Lawn Mower: Consumer Walk Behind View Diagrams & Manuals
6022 SH (954222695) (2001-01) A Lawn Mower: Consumer Walk Behind View Diagrams & Manuals
J50 (96111001307) (2010-12) Lawn Mower: Consumer Walk Behind View Diagrams & Manuals
J50 (96111001306, 961110013) (2009-12) Lawn Mower: Consumer Walk Behind View Diagrams & Manuals
J50 (96111001306) (2010-01) Lawn Mower: Consumer Walk Behind View Diagrams & Manuals
J50 (96111001305, 961110013) (2008-02) Lawn Mower: Consumer Walk Behind View Diagrams & Manuals
J50 (96111001304, 961110013) (2008-02) Lawn Mower: Consumer Walk Behind View Diagrams & Manuals
J50 (96111001303) (2007-06) Lawn Mower: Consumer Walk Behind View Diagrams & Manuals
J50 (96111001302, 961110013) (2007-02) Lawn Mower: Consumer Walk Behind View Diagrams & Manuals
J50 (JET50S) (2004-01) 954 17 02-20 Lawn Mower: Consumer Walk Behind View Diagrams & Manuals
J50 (96111001301) (2006-03) 961 11 00-13 Lawn Mower: Consumer Walk Behind View Diagrams & Manuals
J50 (96111001300) (2006-01) 961 11 00-13 Lawn Mower: Consumer Walk Behind View Diagrams & Manuals
J50 (95417022000) (2005-02) 954 17 02-20 Lawn Mower: Consumer Walk Behind View Diagrams & Manuals
J50 R (JET50RU) (2004-01) 954 17 02-21 Lawn Mower: Consumer Walk Behind View Diagrams & Manuals
J50 R (95417022100) (2005-02) 954 17 02-21 Lawn Mower: Consumer Walk Behind View Diagrams & Manuals
62522 SH (2007-05) 96143000906 Lawn Mower: Consumer Walk Behind View Diagrams & Manuals
62522 SH (2007-03) 96143000905 Lawn Mower: Consumer Walk Behind View Diagrams & Manuals
J55 L (96111002704) (2011-06) Lawn Mower: Consumer Walk Behind View Diagrams & Manuals
J55 L (96111002703) (2010-11) Lawn Mower: Consumer Walk Behind View Diagrams & Manuals
J55 L (96111002702) (2009-10) Lawn Mower: Consumer Walk Behind View Diagrams & Manuals
J55 L (96111002701) (2008-11) Lawn Mower: Consumer Walk Behind View Diagrams & Manuals
J55 L (96111002700, 961110027) (2008-02) Lawn Mower: Consumer Walk Behind View Diagrams & Manuals
J55 S (96121000708) (2010-10) Lawn Mower: Consumer Walk Behind View Diagrams & Manuals
J55 S (96121000707) (2010-01) Lawn Mower: Consumer Walk Behind View Diagrams & Manuals
J55 S (96121000706) (2009-01) Lawn Mower: Consumer Walk Behind View Diagrams & Manuals
J55 S (96121000705) (2008-05) Lawn Mower: Consumer Walk Behind View Diagrams & Manuals
J55 S (96121000704) (2008-02) Lawn Mower: Consumer Walk Behind View Diagrams & Manuals
J55 S (96121000703) (2008-07) Lawn Mower: Consumer Walk Behind View Diagrams & Manuals
J55 S (96121000702, 961210007) (2007-05) Lawn Mower: Consumer Walk Behind View Diagrams & Manuals
J55 S (JET55ST) (2004-01) 954 17 02-18 Lawn Mower: Consumer Walk Behind View Diagrams & Manuals
J55 S (96121000701) (2006-03) 961 21 00-07 Lawn Mower: Consumer Walk Behind View Diagrams & Manuals
J55 S (96121000700) (2006-01) 961 21 00-07 Lawn Mower: Consumer Walk Behind View Diagrams & Manuals
J55 S (95417021801) (2004-01) 954 17 02-18 Lawn Mower: Consumer Walk Behind View Diagrams & Manuals
J55 S (95417021800) (2005-02) 954 17 02-18 Lawn Mower: Consumer Walk Behind View Diagrams & Manuals
55S (96121001808) (2013-05) J L Lawn Mower: Consumer Walk Behind View Diagrams & Manuals
55S (96121001807) (2013-02) J L Lawn Mower: Consumer Walk Behind View Diagrams & Manuals
J55 SL (96121001806) (2012-01) Lawn Mower: Consumer Walk Behind View Diagrams & Manuals
J55 SL (96121001805) (2011-10) Lawn Mower: Consumer Walk Behind View Diagrams & Manuals
J55 SL (96121001804) (2011-07) Lawn Mower: Consumer Walk Behind View Diagrams & Manuals
J55 SL (96121001803) (2010-10) Lawn Mower: Consumer Walk Behind View Diagrams & Manuals
J55 SL (96121001802) (2009-11) Lawn Mower: Consumer Walk Behind View Diagrams & Manuals
J55 SL (96121001801) (2008-11) Lawn Mower: Consumer Walk Behind View Diagrams & Manuals
J55 SL (96121001800) (2008-02) Lawn Mower: Consumer Walk Behind View Diagrams & Manuals
JET 49 (JET49M, 954163101) (2003-01) Lawn Mower: Consumer Walk Behind View Diagrams & Manuals
JET 49 (JET49L, 954163101) (2002-01) Lawn Mower: Consumer Walk Behind View Diagrams & Manuals
JET 49 (JET49K) (2001-03) 954163101 Lawn Mower: Consumer Walk Behind View Diagrams & Manuals
JET 49 (JET49D, 954063101) (1996-01) Lawn Mower: Consumer Walk Behind View Diagrams & Manuals
JET 49 (HLA49D, 954820323) (2002-01) Lawn Mower: Consumer Walk Behind View Diagrams & Manuals
R52 (954170058) (2003-01) Ec Lawn Mower: Consumer Walk Behind View Diagrams & Manuals
R52 E (954170040) (2003-05) Lawn Mower: Consumer Walk Behind View Diagrams & Manuals
R52 (954170040) (2002-06) C Lawn Mower: Consumer Walk Behind View Diagrams & Manuals
R52 (954170215) (2004-01) Lawn Mower: Consumer Walk Behind View Diagrams & Manuals
R52 (954170040) (2003-01) Lawn Mower: Consumer Walk Behind View Diagrams & Manuals
R52 (954170040) (2001-03) Lawn Mower: Consumer Walk Behind View Diagrams & Manuals
R52 S (R52, 954170215) (2004-10) F Lawn Mower: Consumer Walk Behind View Diagrams & Manuals
R52 S (96141006010) (2012-10) Lawn Mower: Consumer Walk Behind View Diagrams & Manuals
R52 S (96141006009) (2011-10) Lawn Mower: Consumer Walk Behind View Diagrams & Manuals
R52 S (96141006008) (2010-10) Lawn Mower: Consumer Walk Behind View Diagrams & Manuals
R52 S (96141006007) (2009-09) Lawn Mower: Consumer Walk Behind View Diagrams & Manuals
R52 S (96141006005, 961410060) (2008-02) Lawn Mower: Consumer Walk Behind View Diagrams & Manuals
R52 S (96141006003, 961410060) (2007-05) Lawn Mower: Consumer Walk Behind View Diagrams & Manuals
R52 S (96141006002, 961410060) (2007-05) Lawn Mower: Consumer Walk Behind View Diagrams & Manuals
R52 S (96141006001, 961410060) (2007-05) Lawn Mower: Consumer Walk Behind View Diagrams & Manuals
R52 S (96141006000, 961410061) (2006-01) Lawn Mower: Consumer Walk Behind View Diagrams & Manuals
R52 S (95417021502, 954170215) (2005-08) Lawn Mower: Consumer Walk Behind View Diagrams & Manuals
R52 S (95417021501, 954170215) (2005-02) Lawn Mower: Consumer Walk Behind View Diagrams & Manuals
6521 CM (96133000401) (2008-01) Lawn Mower: Consumer Walk Behind View Diagrams & Manuals
50Q (954170032) (2002-03) Jet Lawn Mower: Consumer Walk Behind View Diagrams & Manuals
R52 SE (R52EE, 954170216) (2004-01) Lawn Mower: Consumer Walk Behind View Diagrams & Manuals
R52 SE (R52ED, 954170216) (2004-01) Lawn Mower: Consumer Walk Behind View Diagrams & Manuals
R52 SE (96141006100, 961410061) (2006-05) Lawn Mower: Consumer Walk Behind View Diagrams & Manuals
R52 SE (95417021601, 954170216) (2005-02) Lawn Mower: Consumer Walk Behind View Diagrams & Manuals
R52 SE (95417021600, 954170216) (2005-02) Lawn Mower: Consumer Walk Behind View Diagrams & Manuals
JET 51 (1995-03) Lawn Mower: Consumer Walk Behind View Diagrams & Manuals
R53 (96131002313) (2012-11) Lawn Mower: Consumer Walk Behind View Diagrams & Manuals
R53 (96131002312) (2012-01) Lawn Mower: Consumer Walk Behind View Diagrams & Manuals
R53 (96131002311) (2011-10) Lawn Mower: Consumer Walk Behind View Diagrams & Manuals
R53 (96131002310) (2011-06) Lawn Mower: Consumer Walk Behind View Diagrams & Manuals
R53 (96131002309) (2011-01) Lawn Mower: Consumer Walk Behind View Diagrams & Manuals
R53 (96131002308) (2010-10) Lawn Mower: Consumer Walk Behind View Diagrams & Manuals
R53 (96131002307) (2009-10) Lawn Mower: Consumer Walk Behind View Diagrams & Manuals
R53 (96131002306) (2009-04) Lawn Mower: Consumer Walk Behind View Diagrams & Manuals
R53 (96131002304) (2008-08) Lawn Mower: Consumer Walk Behind View Diagrams & Manuals
R53 (96131002303, 961310023) (2008-02) Lawn Mower: Consumer Walk Behind View Diagrams & Manuals
R53 (96131002302) (2008-07) Lawn Mower View Diagrams & Manuals
R53 (96131002301, 961310023) (2007-05) Lawn Mower: Consumer Walk Behind View Diagrams & Manuals
R53 (96131002300) (2007-03) Lawn Mower: Consumer Walk Behind View Diagrams & Manuals
6522 CH (954222725, 532702511) (2001-11) C Lawn Mower: Consumer Walk Behind View Diagrams & Manuals
6522 CH (954222725) (2001-10) B Lawn Mower: Consumer Walk Behind View Diagrams & Manuals
6522 CH (954222725, 532702511) (2001-01) A Lawn Mower: Consumer Walk Behind View Diagrams & Manuals
R53 SV (96141019309) (2013-02) Lawn Mower: Consumer Walk Behind View Diagrams & Manuals
R53 SV (96141019308) (2013-02) Lawn Mower: Consumer Walk Behind View Diagrams & Manuals
R53 SV (96141019307) (2012-01) Lawn Mower: Consumer Walk Behind View Diagrams & Manuals
R53 SV (96141019306) (2011-10) Lawn Mower: Consumer Walk Behind View Diagrams & Manuals
R53 SV (96141019305) (2010-11) Lawn Mower: Consumer Walk Behind View Diagrams & Manuals
R53 SV (96141019304) (2010-02) Lawn Mower: Consumer Walk Behind View Diagrams & Manuals
R53 SV (96141019303) (2010-01) Lawn Mower: Consumer Walk Behind View Diagrams & Manuals
R53 SV (96141019302) (2008-11) Lawn Mower: Consumer Walk Behind View Diagrams & Manuals
R53 SV (96141019301) (2008-05) Lawn Mower: Consumer Walk Behind View Diagrams & Manuals
R53 SV (96141019300) (2008-02) Lawn Mower: Consumer Walk Behind View Diagrams & Manuals
R53 SV (96141013502, 961410135) (2007-08) Lawn Mower: Consumer Walk Behind View Diagrams & Manuals
R53 SV (96141013501, 961410135) (2007-05) Lawn Mower: Consumer Walk Behind View Diagrams & Manuals
R53 SV (96141013500) (2007-03) Lawn Mower: Consumer Walk Behind View Diagrams & Manuals
R53 SV (96141005801, 961410058) (2008-02) Lawn Mower: Consumer Walk Behind View Diagrams & Manuals
6522 SF (532702511) (2001-01) A Lawn Mower: Consumer Walk Behind View Diagrams & Manuals
JET55S (JET55SS, 954170093) (2003-05) Lawn Mower: Consumer Walk Behind View Diagrams & Manuals
JET55S (JET55SR, 954170093) (2003-01) Lawn Mower: Consumer Walk Behind View Diagrams & Manuals
JET55S (JET55SQ, 954170039) (2002-01) Lawn Mower: Consumer Walk Behind View Diagrams & Manuals
JET55S (JET55SP, 954170039) (2001-03) Lawn Mower: Consumer Walk Behind View Diagrams & Manuals
JET55S (JET55SN, 954170014) (2000-02) Lawn Mower: Consumer Walk Behind View Diagrams & Manuals
JET55S (JET55SM, 954170014) (1999-02) Lawn Mower: Consumer Walk Behind View Diagrams & Manuals
JET 55 (1998-03) S Lawn Mower: Consumer Walk Behind View Diagrams & Manuals
JET 55 (1997-03) S Lawn Mower: Consumer Walk Behind View Diagrams & Manuals
JET55S (1995-03) Lawn Mower: Consumer Walk Behind View Diagrams & Manuals
R53 SVL (961410226032) (2011-12) Lawn Mower: Consumer Walk Behind View Diagrams & Manuals
R53 SVL (96141022602) (2011-01) Lawn Mower: Consumer Walk Behind View Diagrams & Manuals
R53 SVL (96141022601) (2010-03) Lawn Mower: Consumer Walk Behind View Diagrams & Manuals
R53 SVL (96141022600) (2009-10) Lawn Mower: Consumer Walk Behind View Diagrams & Manuals
R53 SVL (96141019200, 961410192) (2008-02) Lawn Mower: Consumer Walk Behind View Diagrams & Manuals
R53 SVW (96141005800, 961410058) (2006-01) Lawn Mower: Consumer Walk Behind View Diagrams & Manuals
R53 SVW (95417024303, 954170243) (2005-04) Lawn Mower: Consumer Walk Behind View Diagrams & Manuals
R53 SVW (95417024302, 954170243) (2005-04) Lawn Mower: Consumer Walk Behind View Diagrams & Manuals
R53 SVW (95417024301, 954170243) (2005-02) Lawn Mower: Consumer Walk Behind View Diagrams & Manuals
R53 SVW (95417024300, 954170243) (2005-02) Lawn Mower: Consumer Walk Behind View Diagrams & Manuals
R53 W (96131000801, 961310008) (2006-05) Lawn Mower: Consumer Walk Behind View Diagrams & Manuals
R53 W (96131000800, 961310008) (2006-02) Lawn Mower: Consumer Walk Behind View Diagrams & Manuals
6751P (96133002400) (2015-01) Lawn Mower: Consumer Walk Behind View Diagrams & Manuals
6751P (96133002201) (2014-03) Lawn Mower: Consumer Walk Behind View Diagrams & Manuals
6751P (96133002200) (2014-03) Lawn Mower: Consumer Walk Behind View Diagrams & Manuals
LB 155S (2018-06) 96121003703 Lawn Mower: Consumer Walk Behind View Diagrams & Manuals
LB 155S (2017-11) 96121003702 Lawn Mower: Consumer Walk Behind View Diagrams & Manuals
LB 155S (2016-08) 96121003701 Lawn Mower: Consumer Walk Behind View Diagrams & Manuals
LB 155S (2016-01) 96121003700 Lawn Mower: Consumer Walk Behind View Diagrams & Manuals
LB 155S (96121002701) (2014-09) Lawn Mower: Consumer Walk Behind View Diagrams & Manuals
LB 155S (96121002700) (2013-10) Lawn Mower: Consumer Walk Behind View Diagrams & Manuals
7021 (376822) (2010-02) Lawn Mower: Consumer Walk Behind View Diagrams & Manuals
7021 (2010-01) 374082 Lawn Mower: Consumer Walk Behind View Diagrams & Manuals
7021 (374081) (2010-01) Lawn Mower: Consumer Walk Behind View Diagrams & Manuals
7021 F (96143004205) (2012-01) Lawn Mower: Consumer Walk Behind View Diagrams & Manuals
7021 F (96143004204) (2011-10) Lawn Mower: Consumer Walk Behind View Diagrams & Manuals
7021 F (96143004202) (2010-01) Lawn Mower: Consumer Walk Behind View Diagrams & Manuals
7021 F (96143004201) (2009-12) Lawn Mower: Consumer Walk Behind View Diagrams & Manuals
7021 F (96143004200) (2009-01) Lawn Mower: Consumer Walk Behind View Diagrams & Manuals
7021KF (96143010000) (2013-01) Lawn Mower: Consumer Walk Behind View Diagrams & Manuals
7021 KF (96143009102) (2012-04) Lawn Mower: Consumer Walk Behind View Diagrams & Manuals
7021 KF (96143009101) (2012-02) Lawn Mower: Consumer Walk Behind View Diagrams & Manuals
7021 KF (96143009100) (2011-12) Lawn Mower: Consumer Walk Behind View Diagrams & Manuals
7021KP (96133002002) (2014-03) Lawn Mower: Consumer Walk Behind View Diagrams & Manuals
7021KP (96133002001) (2013-12) Lawn Mower: Consumer Walk Behind View Diagrams & Manuals
7021KP (96133002000) (2013-01) Lawn Mower: Consumer Walk Behind View Diagrams & Manuals
7021 KP (96133001701) (2012-03) Lawn Mower: Consumer Walk Behind View Diagrams & Manuals
7021 KP (96133001700) (2011-12) Lawn Mower: Consumer Walk Behind View Diagrams & Manuals
7021 KR (96143010100) (2013-03) Lawn Mower: Consumer Walk Behind View Diagrams & Manuals
7021 KR (96143009001) (2012-02) Lawn Mower: Consumer Walk Behind View Diagrams & Manuals
7021 KR (96143009000) (2012-01) Lawn Mower: Consumer Walk Behind View Diagrams & Manuals
7021P (96133003800) (2017-11) Lawn Mower: Consumer Walk Behind View Diagrams & Manuals
7021P (96133003101) (2017-09) Lawn Mower: Consumer Walk Behind View Diagrams & Manuals
7021P (96133003100) (2016-11) Lawn Mower: Consumer Walk Behind View Diagrams & Manuals
7021P (96133003001) (2017-09) Lawn Mower: Consumer Walk Behind View Diagrams & Manuals
7021P (96133003000) (2016-07) Lawn Mower: Consumer Walk Behind View Diagrams & Manuals
7021P (96133001905) (2015-02) Lawn Mower: Consumer Walk Behind View Diagrams & Manuals
7021 P (96133001904) (2014-02) Lawn Mower: Consumer Walk Behind View Diagrams & Manuals
7021 P (96133001903) (2014-02) Lawn Mower: Consumer Walk Behind View Diagrams & Manuals
7021 P (96133001902) (2013-11) Lawn Mower: Consumer Walk Behind View Diagrams & Manuals
7021 P (96133001901) (2013-09) Lawn Mower: Consumer Walk Behind View Diagrams & Manuals
7021 P (96133001900) (2012-10) Lawn Mower: Consumer Walk Behind View Diagrams & Manuals
7021P (96133000710) (2014-05) Lawn Mower: Consumer Walk Behind View Diagrams & Manuals
7021P (96133000709) (2014-03) Lawn Mower: Consumer Walk Behind View Diagrams & Manuals
7021P (96133000708) (2013-12) Lawn Mower: Consumer Walk Behind View Diagrams & Manuals
7021P (96133000707) (2013-02) Lawn Mower: Consumer Walk Behind View Diagrams & Manuals
7021 P (96133000706) (2012-01) Lawn Mower: Consumer Walk Behind View Diagrams & Manuals
7021 P (96133000705) (2012-01) Lawn Mower: Consumer Walk Behind View Diagrams & Manuals
7021 P (96133000704) (2011-11) Lawn Mower: Consumer Walk Behind View Diagrams & Manuals
7021 P (96133000703) (2011-01) Lawn Mower: Consumer Walk Behind View Diagrams & Manuals
7021 P (96133000702) (2010-11) Lawn Mower: Consumer Walk Behind View Diagrams & Manuals
7021 P (96133000701) (2010-03) Lawn Mower: Consumer Walk Behind View Diagrams & Manuals
7021 P (96133000701) (2009-11) Lawn Mower: Consumer Walk Behind View Diagrams & Manuals
7021 P (96133000700) (2009-01) Lawn Mower: Consumer Walk Behind View Diagrams & Manuals
7021P (96133000501) (2017-09) Lawn Mower: Consumer Walk Behind View Diagrams & Manuals
7021P (96133000500) (2016-09) Lawn Mower: Consumer Walk Behind View Diagrams & Manuals
LC 153 (96131003703) (2017-08) Lawn Mower: Consumer Walk Behind View Diagrams & Manuals
LC 153 (96131003702) (2016-08) Lawn Mower: Consumer Walk Behind View Diagrams & Manuals
LC 153 (96131003701) (2015-12) Lawn Mower: Consumer Walk Behind View Diagrams & Manuals
LC 153 (96131003700) (2014-10) Lawn Mower: Consumer Walk Behind View Diagrams & Manuals
LC 153 (96131003500) (2013-10) Lawn Mower: Consumer Walk Behind View Diagrams & Manuals
ROYAL 52 (R52C, 954170040) (2002-06) S Lawn Mower: Consumer Walk Behind View Diagrams & Manuals
ROYAL 52 (R52EB, 954170058) (2002-06) Se Lawn Mower: Consumer Walk Behind View Diagrams & Manuals
ROYAL 52 (R52B, 954170040) (2002-01) Lawn Mower: Consumer Walk Behind View Diagrams & Manuals
ROYAL 52 (R52EA, 954170058) (2002-01) E Lawn Mower: Consumer Walk Behind View Diagrams & Manuals
ROYAL 52 (954170040) (2003-05) Lawn Mower: Consumer Walk Behind View Diagrams & Manuals
LC 153-HD (96131003900) (2016-09) Lawn Mower: Consumer Walk Behind View Diagrams & Manuals
LC 153-HD (96131003402) (2015-12) Lawn Mower: Consumer Walk Behind View Diagrams & Manuals
LC 153-HD (96131003401) (2015-01) Lawn Mower: Consumer Walk Behind View Diagrams & Manuals
LC 153-HD (96131003400) (2013-08) Lawn Mower: Consumer Walk Behind View Diagrams & Manuals
LC 153S (96141029801) (2015-11) Lawn Mower: Consumer Walk Behind View Diagrams & Manuals
LC 153S (96141029800) (2014-10) Lawn Mower: Consumer Walk Behind View Diagrams & Manuals
LC 153S (96141029000) (2013 -10) Lawn Mower: Consumer Walk Behind View Diagrams & Manuals
LC 153V (96141028602) (2015-10) Lawn Mower: Consumer Walk Behind View Diagrams & Manuals
LC 153V (96141028601) (2014-10) Lawn Mower: Consumer Walk Behind View Diagrams & Manuals
LC 153V (96141028600) (2014-02) Lawn Mower: Consumer Walk Behind View Diagrams & Manuals
7022 RLS (96143007800) (2010-12) Lawn Mower: Consumer Walk Behind View Diagrams & Manuals
7022 RLS (96143006400) (2010-02) Lawn Mower: Consumer Walk Behind View Diagrams & Manuals
96143007801 (2011-03) 7021 Rls Lawn Mower: Consumer Walk Behind View Diagrams & Manuals
7022F (96143010501) (2014-04) Lawn Mower: Consumer Walk Behind View Diagrams & Manuals
7022F (96143010500) (2014-03) Lawn Mower: Consumer Walk Behind View Diagrams & Manuals
LC 356AWD (96141029205) (2017-11) Lawn Mower: Consumer Walk Behind View Diagrams & Manuals
LC 356AWD (96141029204) (2016-07) Lawn Mower: Consumer Walk Behind View Diagrams & Manuals
LC 356AWD (96141029203) (2015-10) Lawn Mower: Consumer Walk Behind View Diagrams & Manuals
LC 356AWD (96141029202) (2015-02) Lawn Mower: Consumer Walk Behind View Diagrams & Manuals
LC 356AWD (96141029201) (2014-10) Lawn Mower: Consumer Walk Behind View Diagrams & Manuals
LC 356AWD (96141029200) (2014-02) Lawn Mower: Consumer Walk Behind View Diagrams & Manuals
7022KF (96143011100) (2013-12) Lawn Mower: Consumer Walk Behind View Diagrams & Manuals
LC 356V (96141029105) (2017-12) Lawn Mower: Consumer Walk Behind View Diagrams & Manuals
LC 356V (96141029104) (2016-08) Lawn Mower: Consumer Walk Behind View Diagrams & Manuals
LC 356V (96141029103) (2015-10) Lawn Mower: Consumer Walk Behind View Diagrams & Manuals
LC 356V (96141029102) (2014-10) Lawn Mower: Consumer Walk Behind View Diagrams & Manuals
LC 356V (96141029101) (2014-01) Lawn Mower: Consumer Walk Behind View Diagrams & Manuals
LC 356V (96141029100) (2013-10) Lawn Mower: Consumer Walk Behind View Diagrams & Manuals
7022KR (96143011200) (2013-12) Lawn Mower: Consumer Walk Behind View Diagrams & Manuals
LC 356VB (96141028804) (2017-11) Lawn Mower: Consumer Walk Behind View Diagrams & Manuals
LC 356VB (96141028803) (2016-07) Lawn Mower: Consumer Walk Behind View Diagrams & Manuals
LC 356VB (96141028802) (2015-08) Lawn Mower: Consumer Walk Behind View Diagrams & Manuals
LC 356VB (96141028801) (2014-10) Lawn Mower: Consumer Walk Behind View Diagrams & Manuals
LC 356VB (96141028800) (2013-10) Lawn Mower: Consumer Walk Behind View Diagrams & Manuals
7022R (96143010601) (2014-04) Lawn Mower: Consumer Walk Behind View Diagrams & Manuals
7022R (96143010600) (2013-12) Lawn Mower: Consumer Walk Behind View Diagrams & Manuals
LC121P (96135000201) (2016-07) Lawn Mower: Consumer Walk Behind View Diagrams & Manuals
LC121P (96135000200) (2015-10) Lawn Mower: Consumer Walk Behind View Diagrams & Manuals
LC121P (96133003201) (2017-09) Lawn Mower: Consumer Walk Behind View Diagrams & Manuals
LC121P (96133003200) (2016-10) Lawn Mower: Consumer Walk Behind View Diagrams & Manuals
LC121P (96133002702) (2017-08) Lawn Mower: Consumer Walk Behind View Diagrams & Manuals
LC121P (96133002701) (2016-07) Lawn Mower: Consumer Walk Behind View Diagrams & Manuals
LC121P (96133002700) (2015-11) Lawn Mower: Consumer Walk Behind View Diagrams & Manuals
8522 RLS (96143007901) (2011-03) Lawn Mower: Consumer Walk Behind View Diagrams & Manuals
8522 RLS (96143007900) (2011-01) Lawn Mower: Consumer Walk Behind View Diagrams & Manuals
8522 RLS (96143006500) (2010-01) Lawn Mower: Consumer Walk Behind View Diagrams & Manuals
875 SERIES (917374456) (2008-02) Lawn Mower: Consumer Walk Behind View Diagrams & Manuals
5521 RS C (954223470, 532187213) (2004-07) Lawn Mower: Consumer Walk Behind View Diagrams & Manuals
HU675FE (2014-01) (96143009301) Lawn Mower: Consumer Walk Behind View Diagrams & Manuals
56 HSFEF (1995-03) (954072401) Lawn Mower View Diagrams & Manuals
6020 MDB (954222688) (2001-01) Lawn Mower: Consumer Walk Behind View Diagrams & Manuals
R52 E (954170215) (2004-01) Lawn Mower: Consumer Walk Behind View Diagrams & Manuals
R52 E (954170058) (2003-01) Lawn Mower: Consumer Walk Behind View Diagrams & Manuals
R52 D (954170040) (2003-01) Lawn Mower: Consumer Walk Behind View Diagrams & Manuals
R52 A (954170040) (2001-03) Lawn Mower: Consumer Walk Behind View Diagrams & Manuals
R52 (954170040) (2003-05) Lawn Mower: Consumer Walk Behind View Diagrams & Manuals
R52 SE (96141006101, 961410061) (2006-05) Lawn Mower: Consumer Walk Behind View Diagrams & Manuals
R53 (96131002305) (2008-11) Lawn Mower: Consumer Walk Behind View Diagrams & Manuals
R53 SVL (96141019202) (2009-04) Lawn Mower: Consumer Walk Behind View Diagrams & Manuals
R53 SVL (96141019201) (2008-07) Lawn Mower: Consumer Walk Behind View Diagrams & Manuals
R53 SVL (96141019200) (2008-02) Lawn Mower: Consumer Walk Behind View Diagrams & Manuals
16530 EXL (96193008400) (2011-07) Snow Blower View Diagrams & Manuals
16530 EXL (96193006901) (2010-06) Snow Blower View Diagrams & Manuals
16530 EXL (96193006900) (2010-05) Snow Blower View Diagrams & Manuals
EU9027STE (96191000304) (2007-01) Snow Blower View Diagrams & Manuals
EU9027STE (96191000302) (2007-01) Snow Blower View Diagrams & Manuals
EU9027STE (96191000301) (2012-11) Snow Blower View Diagrams & Manuals
16530 EXLT (96193008600) (2011-08) Snow Blower View Diagrams & Manuals
16530 SBXLS (2009-08) (96193004102 ) Snow Blower View Diagrams & Manuals
16530 SBXLS (2009-08) 96193004101 Snow Blower View Diagrams & Manuals
10527 SBB (96193003600) (2008-10) Snow Blower View Diagrams & Manuals
16530 XLS (96193006201) (2010-10) Snow Blower View Diagrams & Manuals
16530 XLS (96193006200) (2010-06) Snow Blower View Diagrams & Manuals
1827 SB (2009-09) 96193004701 Snow Blower View Diagrams & Manuals
1827 SB (2009-08) 96193004700 Snow Blower View Diagrams & Manuals
1130 SBLSB (96193003800) (2008-11) Snow Blower View Diagrams & Manuals
1130 SBXLSB (2008-12) 96193004000 Snow Blower View Diagrams & Manuals
1130 ST (HU1130STB, 954223081) (2004-03) Snow Blower View Diagrams & Manuals
1130 ST (HU1130STA, 954223081) (2002-09) Snow Blower View Diagrams & Manuals
524 ST (HL524STA, 954633552) (2004-03) Snow Blower View Diagrams & Manuals
1130 STE (EU1130STEA, 954170237) (2004-09) Snow Blower View Diagrams & Manuals
1130 STE (EI1130STE, 96191000404, 961910004) (2007-01) Snow Blower View Diagrams & Manuals
1130 STE (96191001905) (2008-08) Snow Blower View Diagrams & Manuals
1130 STE (96191001904) (2008-09) Snow Blower View Diagrams & Manuals
1130 STE (96191001903) (2007-10) Snow Blower View Diagrams & Manuals
1130 STE (96191001902, 961910019) (2007-10) Snow Blower View Diagrams & Manuals
1130 STE (96191001901, 961910019) (2007-10) Snow Blower View Diagrams & Manuals
1130 STE (96191001900, 961910019) (2007-07) Snow Blower View Diagrams & Manuals
1130 STE (96191000404, 961910004) (2007-01) Snow Blower View Diagrams & Manuals
1130 STE (96191000402, 961910004) (2007-01) Snow Blower View Diagrams & Manuals
1130 STE (96191000401, 961910004) (2007-01) Snow Blower View Diagrams & Manuals
1130 STE (96191000400, 961910004) (2005-10) Snow Blower View Diagrams & Manuals
1130 STE (96091001906) (2008-11) Snow Blower View Diagrams & Manuals
ST 261E (96191003011) (2014-08) Snow Blower View Diagrams & Manuals
ST 261E (96191003010) (2014-08) Snow Blower View Diagrams & Manuals
ST 261E (96191003009) (2014-07) Snow Blower View Diagrams & Manuals
ST 261E (96191003008) (2013-09) Snow Blower View Diagrams & Manuals
ST 261E (96191003007) (2013-07) Snow Blower View Diagrams & Manuals
ST 261E (96191003006) (2013-06) Snow Blower View Diagrams & Manuals
ST 261E (96191003005) (2012-09) Snow Blower View Diagrams & Manuals
ST 261E (96191003004) (2012-07) Snow Blower View Diagrams & Manuals
ST 261E (96191003003) (2012-06) Snow Blower View Diagrams & Manuals
ST 261E (96191003002) (2011-05) Snow Blower View Diagrams & Manuals
ST 261E (96191003001) (2009-08) Snow Blower View Diagrams & Manuals
ST 261E (2009-09) 96191003000 Snow Blower View Diagrams & Manuals
1130 STEXP (HU1130STC, 954223081) (2004-07) Snow Blower View Diagrams & Manuals
ST 268EPT (96191005005) (2013-07) Snow Blower View Diagrams & Manuals
ST 268EPT (96191005004) (2013-07) Snow Blower View Diagrams & Manuals
ST 268EPT (96191005003) (2012-09) Snow Blower View Diagrams & Manuals
ST 268EPT (96191005002) (2012-07) Snow Blower View Diagrams & Manuals
ST 268EPT (96191005001) (2012-10) Snow Blower View Diagrams & Manuals
ST 268EPT (96191005000) (2011-08) Snow Blower View Diagrams & Manuals
11524 LS (96193005800) (2010-08) Snow Blower View Diagrams & Manuals
11527 SB (2010-06) 96193006400 Snow Blower View Diagrams & Manuals
ST 276EPT (96191005104) (2013-09) Snow Blower View Diagrams & Manuals
ST 276EPT (96191005103) (2013-07) Snow Blower View Diagrams & Manuals
ST 276EPT (96191005102) (2012-08) Snow Blower View Diagrams & Manuals
ST 276EPT (96191005101) (2012-07) Snow Blower View Diagrams & Manuals
ST 276EPT (96191005100) (2011-08) Snow Blower View Diagrams & Manuals
12524 SB (2009-09) 96193004600 Snow Blower View Diagrams & Manuals
ST 324P (96193009101) (2014-05) Snow Blower View Diagrams & Manuals
ST 324P (96191008200) (2014-06) Snow Blower View Diagrams & Manuals
12527 SB (2010-07) 96193005600 Snow Blower View Diagrams & Manuals
ST 327P (96193009201) (2014-05) Snow Blower View Diagrams & Manuals
ST 327P (96191008300) (2014-06) Snow Blower View Diagrams & Manuals
12527 (96195001800) (2013-06) Hvx Snow Blower View Diagrams & Manuals
8024 STE (EU8024STEA, 954170235) (2004-09) Snow Blower View Diagrams & Manuals
8024 STE (EU8024STE, 96191000202, 961910002) (2007-01) Snow Blower View Diagrams & Manuals
8024 STE (EU8024STE, 96191000201, 961910002) (2007-01) Snow Blower View Diagrams & Manuals
8024 STE (96191001707) (2009-01) Snow Blower View Diagrams & Manuals
8024 STE (96191001706) (2008-08) Snow Blower View Diagrams & Manuals
8024 STE (96191001705) (2008-08) Snow Blower View Diagrams & Manuals
8024 STE (96191001704) (2008-08) Snow Blower View Diagrams & Manuals
8024 STE (96191001703) (2008-11) Snow Blower View Diagrams & Manuals
8024 STE (96191001701, 961910017) (2007-10) Snow Blower View Diagrams & Manuals
8024 STE (96191001700, 961910017) (2007-07) Snow Blower View Diagrams & Manuals
8024 STE (96191000201, 961910002) (2007-01) Snow Blower View Diagrams & Manuals
8024 STE (96191000200, 961910002) (2005-10) Snow Blower View Diagrams & Manuals
ST 327T (96193009301) (2014-06) Snow Blower View Diagrams & Manuals
ST 327T (96191008400) (2014-05) Snow Blower View Diagrams & Manuals
ST 330P (96193009401) (2014-05) Snow Blower View Diagrams & Manuals
ST 330P (96191008500) (2014-05) Snow Blower View Diagrams & Manuals
1330 SB (96193004200) (2008-11) Snow Blower View Diagrams & Manuals
ST 330T (96193009501) (2014-06) Snow Blower View Diagrams & Manuals
ST 330T (96191008600) (2014-06) Snow Blower View Diagrams & Manuals
1330 SBXLSB (96193004100) (2009-02) Snow Blower View Diagrams & Manuals
8527 STE (HL8527STEA, 954223654) (2004-03) Snow Blower View Diagrams & Manuals
13524 SBXLS (2009-08) 96193004800 Snow Blower View Diagrams & Manuals
9027 STE (HU9027STC, 954223077) (2004-07) Xp Snow Blower View Diagrams & Manuals
9027 STE (EU9027STEA, 954170236) (2004-09) Snow Blower View Diagrams & Manuals
9027 STE (96191001805) (2009-01) Snow Blower View Diagrams & Manuals
9027 STE (96191001804) (2008-08) Snow Blower View Diagrams & Manuals
9027 STE (96191001803) (2008-02) Snow Blower View Diagrams & Manuals
9027 STE (96191001802, 961910018) (2007-10) Snow Blower View Diagrams & Manuals
9027 STE (96191001801, 961910018) (2007-10) Snow Blower View Diagrams & Manuals
9027 STE (96191001800) (2007-07) Snow Blower View Diagrams & Manuals
9027 STE (96191000300, 961910003) (2005-10) Snow Blower View Diagrams & Manuals
9027 STE (96091001805) (2008-11) Snow Blower View Diagrams & Manuals
14527 LS (96193005901) (2010-09) Snow Blower View Diagrams & Manuals
14527 LS (96193005900) (2010-06) Snow Blower View Diagrams & Manuals
14527 SBLS (2009-08) 96193004900 Snow Blower View Diagrams & Manuals
14527 XLS (2010-08) 96193006101 Snow Blower View Diagrams & Manuals
15530 SBXLS (2009-09) 96193004001 Snow Blower View Diagrams & Manuals
924HVX (96195001700) (2013-06) Snow Blower View Diagrams & Manuals
927 SB (96193004400) (2008-11) Snow Blower View Diagrams & Manuals
16530 E (96193006800) (2010-05) Snow Blower View Diagrams & Manuals
14527 SBLS (2009-08) (96193004901) Snow Blower View Diagrams & Manuals
HU625WT (96173000101) (2010-11) Trimmer View Diagrams & Manuals
HU625WT (96173000100) (2009-11) Trimmer View Diagrams & Manuals
HU625WTX (96173000201) (2011-09) Trimmer View Diagrams & Manuals
HU625WTX (96173000200) (2010-12) Trimmer View Diagrams & Manuals
HU675HWT (96175000202) (2017-01) Trimmer View Diagrams & Manuals
HU675HWT (96175000201) (2016-08) Trimmer View Diagrams & Manuals
HU675HWT (96175000200) (2015-12) Trimmer View Diagrams & Manuals
HU675HWT (96173000601) (2017-01) Trimmer View Diagrams & Manuals
HU675HWT (96173000600) (2015-10) Trimmer View Diagrams & Manuals
8024 STE (96191001702, 961910017) (2007-10) Snow Blower View Diagrams & Manuals
14527 XLS (96193006102) (2010-09) Snow Blower View Diagrams & Manuals
5521 RS C (954223470, 532187213) (2004-07) Lawn Mower: Consumer Walk Behind View Diagrams & Manuals
HU675FE (2014-01) (96143009301) Lawn Mower: Consumer Walk Behind View Diagrams & Manuals
56 HSFEF (1995-03) (954072401) Lawn Mower View Diagrams & Manuals
6020 MDB (954222688) (2001-01) Lawn Mower: Consumer Walk Behind View Diagrams & Manuals
R52 E (954170215) (2004-01) Lawn Mower: Consumer Walk Behind View Diagrams & Manuals
R52 E (954170058) (2003-01) Lawn Mower: Consumer Walk Behind View Diagrams & Manuals
R52 D (954170040) (2003-01) Lawn Mower: Consumer Walk Behind View Diagrams & Manuals
R52 A (954170040) (2001-03) Lawn Mower: Consumer Walk Behind View Diagrams & Manuals
R52 (954170040) (2003-05) Lawn Mower: Consumer Walk Behind View Diagrams & Manuals
R52 SE (96141006101, 961410061) (2006-05) Lawn Mower: Consumer Walk Behind View Diagrams & Manuals
R53 (96131002305) (2008-11) Lawn Mower: Consumer Walk Behind View Diagrams & Manuals
R53 SVL (96141019202) (2009-04) Lawn Mower: Consumer Walk Behind View Diagrams & Manuals
R53 SVL (96141019201) (2008-07) Lawn Mower: Consumer Walk Behind View Diagrams & Manuals
R53 SVL (96141019200) (2008-02) Lawn Mower: Consumer Walk Behind View Diagrams & Manuals
16530 SBXLS (2009-08) (96193004102 ) Snow Blower View Diagrams & Manuals
14527 SBLS (2009-08) (96193004901) Snow Blower View Diagrams & Manuals
510 MDH (954140053A)(1999-03) Walk Behind Mower View Diagrams & Manuals
54RST (CHI54RSTB)(2001-03) Walk Behind Mower View Diagrams & Manuals
54RST (CH154RSTB)(2001-03) Walk Behind Mower View Diagrams & Manuals
5521 CHV X (96143002701)(2007-03) Walk Behind Mower View Diagrams & Manuals
JET 50 RT (954053811)(2003-01) Walk Behind Mower View Diagrams & Manuals
JET 50 RS (954053811)(2002-01) Walk Behind Mower View Diagrams & Manuals
JET 50 RR (954053811)(2002-01) Walk Behind Mower View Diagrams & Manuals
JET 50 RP (954053811)(2000-03) Walk Behind Mower View Diagrams & Manuals
JET 50 RJ (954053811)(1996-01) Walk Behind Mower View Diagrams & Manuals
JET50 RQ (954053811)(2001-03) Walk Behind Mower View Diagrams & Manuals
9614300540 (2009-07) Rotary Lawn Mower View Diagrams & Manuals
927 SBE (961930003-00)(2006-05) 27 Inch Snow Blower View Diagrams & Manuals
87521 RSX (961430038-00)(2008-03) 21 Inch Walk-Behind Mower Carb View Diagrams & Manuals
961440054-00 (2009-07) Walk-Behind Mower View Diagrams & Manuals
H 51 D (954052601)(1991-01) Walk-Behind Mower View Diagrams & Manuals
H 51 M (954056111)(1992-08) Walk-Behind Mower View Diagrams & Manuals
H 51 MD (954071901)(1994-12) Walk-Behind Mower View Diagrams & Manuals
Craftsman
944528117 Snowblower View Diagrams & Manuals
917253581 Snowblower View Diagrams & Manuals
917253572 Snowblower View Diagrams & Manuals
917881063 Snowblower View Diagrams & Manuals
917881065 Snowblower View Diagrams & Manuals
917253570 Snowblower View Diagrams & Manuals
917253580 Snowblower View Diagrams & Manuals
917253560 Snowblower View Diagrams & Manuals
917885522 Snowblower View Diagrams & Manuals
917881064 Snowblower View Diagrams & Manuals
944524593 Snowblower View Diagrams & Manuals
917881062 Snowblower View Diagrams & Manuals
917881061 Snowblower View Diagrams & Manuals
917885530 Snowblower View Diagrams & Manuals
917885531 Snowblower View Diagrams & Manuals
917885520 Snowblower View Diagrams & Manuals
944527700 Snowblower View Diagrams & Manuals
917881052 Snowblower View Diagrams & Manuals
917881053 Snowblower View Diagrams & Manuals
917881051 Snowblower View Diagrams & Manuals
917881152 Snowblower View Diagrams & Manuals
917881050 Snowblower View Diagrams & Manuals
917881151 Snowblower View Diagrams & Manuals
917885521 Snowblower View Diagrams & Manuals
917881060 Snowblower View Diagrams & Manuals
91788777 Snowblower View Diagrams & Manuals
917254881 Snowblower View Diagrams & Manuals
917253561 Snowblower View Diagrams & Manuals
917254880 Snowblower View Diagrams & Manuals
917253571 Snowblower View Diagrams & Manuals
917881150 Snowblower View Diagrams & Manuals
917880020 Snowblower View Diagrams & Manuals
917376080 6.5 Horsepower Power-Propelled 22" Multi-Cut View Diagrams & Manuals
917377151 Lawn Mower View Diagrams & Manuals
917388961 Rotary Mower View Diagrams & Manuals
917371600 Lawn Mower View Diagrams & Manuals
917376583 Rotary Mower View Diagrams & Manuals
917378320 Rotary Mower View Diagrams & Manuals
917376470 Mower View Diagrams & Manuals
917374545 Lawn Mower View Diagrams & Manuals
96146000200 Rotary Mower View Diagrams & Manuals
917773708 Weed Trimmer View Diagrams & Manuals
917388721 Walk Behind Lawnmower View Diagrams & Manuals
917376681 Lawn Mower View Diagrams & Manuals
917773710 Wheeled Weed Trimmer View Diagrams & Manuals
917387490 Rotary Mower View Diagrams & Manuals
917377590 Mower View Diagrams & Manuals
917376091 Mower View Diagrams & Manuals
917377540 Lawn Mower View Diagrams & Manuals
917376742 Lawn Mower View Diagrams & Manuals
917388732 Gas Walk Behind Lawn Mower View Diagrams & Manuals
917378851 6.75 Horsepower Power-Propelled 21" Discharge View Diagrams & Manuals
917388861 Rotary Lawn Mower View Diagrams & Manuals
917374461 Walk Behind Lawn Mower View Diagrams & Manuals
917374541 Mower View Diagrams & Manuals
917.388600 Lawn Mower View Diagrams & Manuals
917376061 Lawn Mower View Diagrams & Manuals
917387681 Mower View Diagrams & Manuals
917370441 Lawn Mower View Diagrams & Manuals
917.370752 Lawn Mower View Diagrams & Manuals
917376810 Lawn Mower View Diagrams & Manuals
917379470 Lawn Mower View Diagrams & Manuals
917370920 Lawn Mower View Diagrams & Manuals
917.377271 Rotary Mower View Diagrams & Manuals
917374371 Lawn Mower View Diagrams & Manuals
917376673 Lawn Mower View Diagrams & Manuals
917377522 Rotary Mower View Diagrams & Manuals
917376531 Lawn Mower View Diagrams & Manuals
917371650 Lawn Mower View Diagrams & Manuals
917388620 Lawn Mower View Diagrams & Manuals
917378781 Gas, Walk-Behind Lawn Mower View Diagrams & Manuals
917372471 Mower View Diagrams & Manuals
917370610 Lawn Mower View Diagrams & Manuals
917389021 Mower View Diagrams & Manuals
917.371722 Lawn Mower View Diagrams & Manuals
917374358 Lawn Mower View Diagrams & Manuals
917386152 Rotary Lawn Mower View Diagrams & Manuals
917374356 Lawn Mower View Diagrams & Manuals
917388980 Mower View Diagrams & Manuals
917379100 Rotary Lawn Mower View Diagrams & Manuals
917376391 Mower View Diagrams & Manuals
917385127 Mower View Diagrams & Manuals
917372822 Lawn Mower View Diagrams & Manuals
917.773706 High Wheel Weed Trimmer View Diagrams & Manuals
917378420 Rotary Lawn Mower View Diagrams & Manuals
917389391 Rotary Lawn Mower View Diagrams & Manuals
917388510 Walk Behind Lawn Mower View Diagrams & Manuals
917377131 Gas, Walk Behind Lawn Mower View Diagrams & Manuals
917378410 Gas, Walk Behind Lawn Mower View Diagrams & Manuals
917377553 Rotary Mower View Diagrams & Manuals
917385131 Lawn Mower View Diagrams & Manuals
917773741 Trimmer View Diagrams & Manuals
917.376054 Mower View Diagrams & Manuals
917.377970 Gas Walk Behind Lawnmower View Diagrams & Manuals
917379200 6.25 Horsepower 22" Side Discharge View Diagrams & Manuals
917.378440 Gas Walk Behind Lawnmower View Diagrams & Manuals
917.374551 Electric Start 22" Multi-Cut View Diagrams & Manuals
917376551 Rotary Lawn Mower View Diagrams & Manuals
917388850 6.5 Hp 21" Rear Discharge Rotary Lawn Mower View Diagrams & Manuals
917376164 Lawn Mower View Diagrams & Manuals
917377600 Gas, Walk Behind Lawnmower View Diagrams & Manuals
917376732 Lawn Mower View Diagrams & Manuals
917378311 22" Lawn Mower View Diagrams & Manuals
917376562 Rotary Mower View Diagrams & Manuals
917378430 Gas Walk Behind Lawn Mower View Diagrams & Manuals
917384370 Lawn Mower View Diagrams & Manuals
917370581 Lawn Mower View Diagrams & Manuals
917374544 Lawn Mower View Diagrams & Manuals
917378030 Lawn Mower View Diagrams & Manuals
917376722 Lawn Mower View Diagrams & Manuals
917378461 Gas Walk Behind Lawnmower View Diagrams & Manuals
917379203 Lawn Mower View Diagrams & Manuals
917255540 Lawn Tractor View Diagrams & Manuals
917253401 Lawn Mower View Diagrams & Manuals
917253431 Lawn Mower View Diagrams & Manuals
917253432 Lawn Mower View Diagrams & Manuals
917253450 Lawn Mower View Diagrams & Manuals
917253461 Lawn Mower View Diagrams & Manuals
917253400 Lawn Mower View Diagrams & Manuals
917253410 Lawn Mower View Diagrams & Manuals
917253411 Lawn Mower View Diagrams & Manuals
917253440 Lawn Mower View Diagrams & Manuals
917254470 Lawn Mower View Diagrams & Manuals
917254501 Lawn Mower View Diagrams & Manuals
917254502 Lawn Mower View Diagrams & Manuals
917255500 Lawn Mower View Diagrams & Manuals
917253462 Lawn Mower View Diagrams & Manuals
917254380 Lawn Mower View Diagrams & Manuals
917254381 Lawn Mower View Diagrams & Manuals
917254390 Lawn Mower View Diagrams & Manuals
917254391 Lawn Mower View Diagrams & Manuals
917254540 Lawn Mower View Diagrams & Manuals
917254541 Lawn Mower View Diagrams & Manuals
917254542 Lawn Mower View Diagrams & Manuals
917254570 Lawn Mower View Diagrams & Manuals
917254571 Lawn Mower View Diagrams & Manuals
917254572 Lawn Mower View Diagrams & Manuals
917254590 Lawn Mower View Diagrams & Manuals
917254591 Lawn Mower View Diagrams & Manuals
917276521 Lawn Mower View Diagrams & Manuals
917278870 Lawn Mower View Diagrams & Manuals
917290800 Lawn Mower View Diagrams & Manuals
917290810 Lawn Mower View Diagrams & Manuals
917364250 Lawn Mower View Diagrams & Manuals
917367060 Lawn Mower View Diagrams & Manuals
917370400 Lawn Mower View Diagrams & Manuals
917370401 Lawn Mower View Diagrams & Manuals
917370410 Lawn Mower View Diagrams & Manuals
917370411 Lawn Mower View Diagrams & Manuals
917370412 Lawn Mower View Diagrams & Manuals
917370413 Lawn Mower View Diagrams & Manuals
917370414 Lawn Mower View Diagrams & Manuals
917370415 Lawn Mower View Diagrams & Manuals
917370430 Lawn Mower View Diagrams & Manuals
917370431 Lawn Mower View Diagrams & Manuals
917370432 Lawn Mower View Diagrams & Manuals
917370433 Lawn Mower View Diagrams & Manuals
917370434 Lawn Mower View Diagrams & Manuals
917370600 Lawn Mower View Diagrams & Manuals
917370601 Lawn Mower View Diagrams & Manuals
917370602 Lawn Mower View Diagrams & Manuals
917370603 Lawn Mower View Diagrams & Manuals
917370604 Lawn Mower View Diagrams & Manuals
917370620 Lawn Mower View Diagrams & Manuals
917370640 Lawn Mower View Diagrams & Manuals
917370650 Lawn Mower View Diagrams & Manuals
917370651 Lawn Mower View Diagrams & Manuals
917370660 Lawn Mower View Diagrams & Manuals
917370661 Lawn Mower View Diagrams & Manuals
917370670 Lawn Mower View Diagrams & Manuals
917370671 Lawn Mower View Diagrams & Manuals
917370680 Lawn Mower View Diagrams & Manuals
917370681 Lawn Mower View Diagrams & Manuals
917370700 Lawn Mower View Diagrams & Manuals
917370701 Lawn Mower View Diagrams & Manuals
917370810 Lawn Mower View Diagrams & Manuals
917370830 Lawn Mower View Diagrams & Manuals
917370840 Lawn Mower View Diagrams & Manuals
917370850 Lawn Mower View Diagrams & Manuals
917370860 Lawn Mower View Diagrams & Manuals
917370861 Lawn Mower View Diagrams & Manuals
917370910 Lawn Mower View Diagrams & Manuals
917370911 Lawn Mower View Diagrams & Manuals
917371010 Lawn Mower View Diagrams & Manuals
917371020 Lawn Mower View Diagrams & Manuals
917371076 Lawn Mower View Diagrams & Manuals
917371120 Lawn Mower View Diagrams & Manuals
917371130 Lawn Mower View Diagrams & Manuals
917371140 Lawn Mower View Diagrams & Manuals
917371150 Lawn Mower View Diagrams & Manuals
917371320 Lawn Mower View Diagrams & Manuals
917371330 Lawn Mower View Diagrams & Manuals
917371340 Lawn Mower View Diagrams & Manuals
917371341 Lawn Mower View Diagrams & Manuals
917371342 Lawn Mower View Diagrams & Manuals
917371343 Lawn Mower View Diagrams & Manuals
917371350 Lawn Mower View Diagrams & Manuals
917371370 Lawn Mower View Diagrams & Manuals
917371440 Lawn Mower View Diagrams & Manuals
917371460 Lawn Mower View Diagrams & Manuals
917371470 Lawn Mower View Diagrams & Manuals
917371520 Lawn Mower View Diagrams & Manuals
917371521 Lawn Mower View Diagrams & Manuals
917371522 Lawn Mower View Diagrams & Manuals
917371523 Lawn Mower View Diagrams & Manuals
917371530 Lawn Mower View Diagrams & Manuals
917371531 Lawn Mower View Diagrams & Manuals
917371532 Lawn Mower View Diagrams & Manuals
917371560 Lawn Mower View Diagrams & Manuals
917371561 Lawn Mower View Diagrams & Manuals
917371570 Lawn Mower View Diagrams & Manuals
917371571 Lawn Mower View Diagrams & Manuals
917371740 Lawn Mower View Diagrams & Manuals
917371750 Lawn Mower View Diagrams & Manuals
917371751 Lawn Mower View Diagrams & Manuals
917371760 Lawn Mower View Diagrams & Manuals
917371770 Lawn Mower View Diagrams & Manuals
917371780 Lawn Mower View Diagrams & Manuals
917371790 Lawn Mower View Diagrams & Manuals
917371880 Lawn Mower View Diagrams & Manuals
917371881 Lawn Mower View Diagrams & Manuals
917371890 Lawn Mower View Diagrams & Manuals
917371891 Lawn Mower View Diagrams & Manuals
917372800 Lawn Mower View Diagrams & Manuals
917372820 Lawn Mower View Diagrams & Manuals
917372821 Lawn Mower View Diagrams & Manuals
917372823 Lawn Mower View Diagrams & Manuals
917372833 Lawn Mower View Diagrams & Manuals
917372861 Lawn Mower View Diagrams & Manuals
917372930 Lawn Mower View Diagrams & Manuals
917373441 Lawn Mower View Diagrams & Manuals
917374010 Lawn Mower View Diagrams & Manuals
917374011 Lawn Mower View Diagrams & Manuals
917374020 Lawn Mower View Diagrams & Manuals
917374021 Lawn Mower View Diagrams & Manuals
917374022 Lawn Mower View Diagrams & Manuals
917374030 Lawn Mower View Diagrams & Manuals
917374031 Lawn Mower View Diagrams & Manuals
917374040 Lawn Mower View Diagrams & Manuals
917374041 Lawn Mower View Diagrams & Manuals
917374042 Lawn Mower View Diagrams & Manuals
917374043 Lawn Mower View Diagrams & Manuals
917374050 Lawn Mower View Diagrams & Manuals
917255501 Lawn Mower View Diagrams & Manuals
917255502 Lawn Mower View Diagrams & Manuals
917255503 Lawn Mower View Diagrams & Manuals
917370440 Lawn Mower View Diagrams & Manuals
917370442 Lawn Mower View Diagrams & Manuals
917370443 Lawn Mower View Diagrams & Manuals
917370444 Lawn Mower View Diagrams & Manuals
917370445 Lawn Mower View Diagrams & Manuals
917370446 Lawn Mower View Diagrams & Manuals
917370447 Lawn Mower View Diagrams & Manuals
917370530 Lawn Mower View Diagrams & Manuals
917370532 Lawn Mower View Diagrams & Manuals
917370533 Lawn Mower View Diagrams & Manuals
917370534 Lawn Mower View Diagrams & Manuals
917370536 Lawn Mower View Diagrams & Manuals
917370540 Lawn Mower View Diagrams & Manuals
917370541 Lawn Mower View Diagrams & Manuals
917370542 Lawn Mower View Diagrams & Manuals
917370543 Lawn Mower View Diagrams & Manuals
917370560 Lawn Mower View Diagrams & Manuals
917370561 Lawn Mower View Diagrams & Manuals
917370562 Lawn Mower View Diagrams & Manuals
917370563 Lawn Mower View Diagrams & Manuals
917370565 Lawn Mower View Diagrams & Manuals
917370580 Lawn Mower View Diagrams & Manuals
917370583 Lawn Mower View Diagrams & Manuals
917370584 Lawn Mower View Diagrams & Manuals
917370690 Lawn Mower View Diagrams & Manuals
917370691 Lawn Mower View Diagrams & Manuals
917370692 Lawn Mower View Diagrams & Manuals
917370693 Lawn Mower View Diagrams & Manuals
917370710 Lawn Mower View Diagrams & Manuals
917370711 Lawn Mower View Diagrams & Manuals
917370712 Lawn Mower View Diagrams & Manuals
917370714 Lawn Mower View Diagrams & Manuals
917370715 Lawn Mower View Diagrams & Manuals
917370716 Lawn Mower View Diagrams & Manuals
917370720 Lawn Mower View Diagrams & Manuals
917370721 Lawn Mower View Diagrams & Manuals
917370722 Lawn Mower View Diagrams & Manuals
917370723 Lawn Mower View Diagrams & Manuals
917370724 Lawn Mower View Diagrams & Manuals
917370730 Lawn Mower View Diagrams & Manuals
917370731 Lawn Mower View Diagrams & Manuals
917370732 Lawn Mower View Diagrams & Manuals
917370733 Lawn Mower View Diagrams & Manuals
917370735 Lawn Mower View Diagrams & Manuals
917370740 Lawn Mower View Diagrams & Manuals
917370741 Lawn Mower View Diagrams & Manuals
917370750 Lawn Mower View Diagrams & Manuals
917370752 Lawn Mower View Diagrams & Manuals
917370760 Lawn Mower View Diagrams & Manuals
917370770 Lawn Mower View Diagrams & Manuals
917370771 Lawn Mower View Diagrams & Manuals
917370870 Lawn Mower View Diagrams & Manuals
917370871 Lawn Mower View Diagrams & Manuals
917370872 Lawn Mower View Diagrams & Manuals
917370922 Lawn Mower View Diagrams & Manuals
917370923 Lawn Mower View Diagrams & Manuals
917370924 Lawn Mower View Diagrams & Manuals
917370925 Lawn Mower View Diagrams & Manuals
917370930 Lawn Mower View Diagrams & Manuals
917370931 Lawn Mower View Diagrams & Manuals
917370932 Lawn Mower View Diagrams & Manuals
917370933 Lawn Mower View Diagrams & Manuals
917370934 Lawn Mower View Diagrams & Manuals
917370935 Lawn Mower View Diagrams & Manuals
917370936 Lawn Mower View Diagrams & Manuals
917370937 Lawn Mower View Diagrams & Manuals
917371040 Lawn Mower View Diagrams & Manuals
917371221 Lawn Mower View Diagrams & Manuals
917371230 Lawn Mower View Diagrams & Manuals
91737127 Lawn Mower View Diagrams & Manuals
917371271 Lawn Mower View Diagrams & Manuals
917371290 Lawn Mower View Diagrams & Manuals
917371310 Lawn Mower View Diagrams & Manuals
917371441 Lawn Mower View Diagrams & Manuals
917371510 Lawn Mower View Diagrams & Manuals
917371541 Lawn Mower View Diagrams & Manuals
917371601 Lawn Mower View Diagrams & Manuals
917371602 Lawn Mower View Diagrams & Manuals
917371610 Lawn Mower View Diagrams & Manuals
917371611 Lawn Mower View Diagrams & Manuals
917371620 Lawn Mower View Diagrams & Manuals
917371621 Lawn Mower View Diagrams & Manuals
917371622 Lawn Mower View Diagrams & Manuals
917371623 Lawn Mower View Diagrams & Manuals
917371624 Lawn Mower View Diagrams & Manuals
917371630 Lawn Mower View Diagrams & Manuals
917371631 Lawn Mower View Diagrams & Manuals
917371640 Lawn Mower View Diagrams & Manuals
917371641 Lawn Mower View Diagrams & Manuals
917371651 Lawn Mower View Diagrams & Manuals
917371660 Lawn Mower View Diagrams & Manuals
917371661 Lawn Mower View Diagrams & Manuals
917371662 Lawn Mower View Diagrams & Manuals
917371663 Lawn Mower View Diagrams & Manuals
917371664 Lawn Mower View Diagrams & Manuals
917371670 Lawn Mower View Diagrams & Manuals
917371671 Lawn Mower View Diagrams & Manuals
917371680 Lawn Mower View Diagrams & Manuals
917371700 Lawn Mower View Diagrams & Manuals
917371701 Lawn Mower View Diagrams & Manuals
917371702 Lawn Mower View Diagrams & Manuals
917371710 Lawn Mower View Diagrams & Manuals
917371711 Lawn Mower View Diagrams & Manuals
917371720 Lawn Mower View Diagrams & Manuals
917371721 Lawn Mower View Diagrams & Manuals
917371722 Lawn Mower View Diagrams & Manuals
917371830 Lawn Mower View Diagrams & Manuals
917371840 Lawn Mower View Diagrams & Manuals
917371920 Lawn Mower View Diagrams & Manuals
917371930 Lawn Mower View Diagrams & Manuals
917371940 Lawn Mower View Diagrams & Manuals
917371950 Lawn Mower View Diagrams & Manuals
917372060 Lawn Mower View Diagrams & Manuals
917372150 Lawn Mower View Diagrams & Manuals
917372280 Lawn Mower View Diagrams & Manuals
917372281 Lawn Mower View Diagrams & Manuals
917372282 Lawn Mower View Diagrams & Manuals
917372283 Lawn Mower View Diagrams & Manuals
917372284 Lawn Mower View Diagrams & Manuals
917372285 Lawn Mower View Diagrams & Manuals
917372286 Lawn Mower View Diagrams & Manuals
917372290 Lawn Mower View Diagrams & Manuals
917372291 Lawn Mower View Diagrams & Manuals
917372442 Lawn Mower View Diagrams & Manuals
917372450 Lawn Mower View Diagrams & Manuals
917372451 Lawn Mower View Diagrams & Manuals
917372470 Lawn Mower View Diagrams & Manuals
917372472 Lawn Mower View Diagrams & Manuals
917372473 Lawn Mower View Diagrams & Manuals
917372480 Lawn Mower View Diagrams & Manuals
917372490 Lawn Mower View Diagrams & Manuals
917372780 Lawn Mower View Diagrams & Manuals
917372810 Lawn Mower View Diagrams & Manuals
917372830 Lawn Mower View Diagrams & Manuals
917372831 Lawn Mower View Diagrams & Manuals
917372832 Lawn Mower View Diagrams & Manuals
917372840 Lawn Mower View Diagrams & Manuals
917372841 Lawn Mower View Diagrams & Manuals
917372850 Lawn Mower View Diagrams & Manuals
917372852 Lawn Mower View Diagrams & Manuals
917372853 Lawn Mower View Diagrams & Manuals
917372854 Lawn Mower View Diagrams & Manuals
917372860 Lawn Mower View Diagrams & Manuals
917372862 Lawn Mower View Diagrams & Manuals
917372870 Lawn Mower View Diagrams & Manuals
917372871 Lawn Mower View Diagrams & Manuals
917372880 Lawn Mower View Diagrams & Manuals
917372881 Lawn Mower View Diagrams & Manuals
917372890 Lawn Mower View Diagrams & Manuals
917372891 Lawn Mower View Diagrams & Manuals
917372892 Lawn Mower View Diagrams & Manuals
917372910 Lawn Mower View Diagrams & Manuals
917372920 Lawn Mower View Diagrams & Manuals
917372940 Lawn Mower View Diagrams & Manuals
917373220 Lawn Mower View Diagrams & Manuals
917373221 Lawn Mower View Diagrams & Manuals
917373230 Lawn Mower View Diagrams & Manuals
917373231 Lawn Mower View Diagrams & Manuals
917373260 Lawn Mower View Diagrams & Manuals
917373270 Lawn Mower View Diagrams & Manuals
917373271 Lawn Mower View Diagrams & Manuals
917373280 Lawn Mower View Diagrams & Manuals
917373440 Lawn Mower View Diagrams & Manuals
917373442 Lawn Mower View Diagrams & Manuals
917373460 Lawn Mower View Diagrams & Manuals
917373490 Lawn Mower View Diagrams & Manuals
917373491 Lawn Mower View Diagrams & Manuals
917373580 Lawn Mower View Diagrams & Manuals
917373680 Lawn Mower View Diagrams & Manuals
917373681 Lawn Mower View Diagrams & Manuals
917373682 Lawn Mower View Diagrams & Manuals
917373780 Lawn Mower View Diagrams & Manuals
917373781 Lawn Mower View Diagrams & Manuals
917373820 Lawn Mower View Diagrams & Manuals
917373821 Lawn Mower View Diagrams & Manuals
917373840 Lawn Mower View Diagrams & Manuals
917373842 Lawn Mower View Diagrams & Manuals
917373843 Lawn Mower View Diagrams & Manuals
917373844 Lawn Mower View Diagrams & Manuals
917373980 Lawn Mower View Diagrams & Manuals
917373981 Lawn Mower View Diagrams & Manuals
917373982 Lawn Mower View Diagrams & Manuals
917374060 Lawn Mower View Diagrams & Manuals
917374061 Lawn Mower View Diagrams & Manuals
917374070 Lawn Mower View Diagrams & Manuals
917374071 Lawn Mower View Diagrams & Manuals
917374100 Lawn Mower View Diagrams & Manuals
917374102 Lawn Mower View Diagrams & Manuals
917374103 Lawn Mower View Diagrams & Manuals
917374104 Lawn Mower View Diagrams & Manuals
917374105 Lawn Mower View Diagrams & Manuals
917374106 Lawn Mower View Diagrams & Manuals
917374120 Lawn Mower View Diagrams & Manuals
917374290 Lawn Mower View Diagrams & Manuals
917374291 Lawn Mower View Diagrams & Manuals
917374360 Lawn Mower View Diagrams & Manuals
917374361 Lawn Mower View Diagrams & Manuals
917374362 Lawn Mower View Diagrams & Manuals
917374363 Lawn Mower View Diagrams & Manuals
917374364 Lawn Mower View Diagrams & Manuals
917374365 Lawn Mower View Diagrams & Manuals
917374366 Lawn Mower View Diagrams & Manuals
917374367 Lawn Mower View Diagrams & Manuals
917374368 Lawn Mower View Diagrams & Manuals
917374369 Lawn Mower View Diagrams & Manuals
917374370 Lawn Mower View Diagrams & Manuals
917374390 Lawn Mower View Diagrams & Manuals
917374391 Lawn Mower View Diagrams & Manuals
917374392 Lawn Mower View Diagrams & Manuals
917374490 Lawn Mower View Diagrams & Manuals
917374491 Lawn Mower View Diagrams & Manuals
917374540 Lawn Mower View Diagrams & Manuals
917374542 Lawn Mower View Diagrams & Manuals
917374543 Lawn Mower View Diagrams & Manuals
917374550 Lawn Mower View Diagrams & Manuals
917374551 Lawn Mower View Diagrams & Manuals
917374552 Lawn Mower View Diagrams & Manuals
917374553 Lawn Mower View Diagrams & Manuals
917374591 Lawn Mower View Diagrams & Manuals
917374592 Lawn Mower View Diagrams & Manuals
917374642 Lawn Mower View Diagrams & Manuals
917374651 Lawn Mower View Diagrams & Manuals
917374670 Lawn Mower View Diagrams & Manuals
917374051 Lawn Mower View Diagrams & Manuals
917374052 Lawn Mower View Diagrams & Manuals
917374053 Lawn Mower View Diagrams & Manuals
917374054 Lawn Mower View Diagrams & Manuals
917374090 Lawn Mower View Diagrams & Manuals
917374091 Lawn Mower View Diagrams & Manuals
917374092 Lawn Mower View Diagrams & Manuals
917374093 Lawn Mower View Diagrams & Manuals
917374094 Lawn Mower View Diagrams & Manuals
917374095 Lawn Mower View Diagrams & Manuals
917374150 Lawn Mower View Diagrams & Manuals
917374160 Lawn Mower View Diagrams & Manuals
917374170 Lawn Mower View Diagrams & Manuals
917374350 Lawn Mower View Diagrams & Manuals
917374351 Lawn Mower View Diagrams & Manuals
917374353 Lawn Mower View Diagrams & Manuals
917374354 Lawn Mower View Diagrams & Manuals
917374355 Lawn Mower View Diagrams & Manuals
917374357 Lawn Mower View Diagrams & Manuals
917374710 Lawn Mower View Diagrams & Manuals
917374711 Lawn Mower View Diagrams & Manuals
917374720 Lawn Mower View Diagrams & Manuals
917374750 Lawn Mower View Diagrams & Manuals
917374760 Lawn Mower View Diagrams & Manuals
917374910 Lawn Mower View Diagrams & Manuals
917375010 Lawn Mower View Diagrams & Manuals
917375011 Lawn Mower View Diagrams & Manuals
917375012 Lawn Mower View Diagrams & Manuals
917375013 Lawn Mower View Diagrams & Manuals
917375020 Lawn Mower View Diagrams & Manuals
917375021 Lawn Mower View Diagrams & Manuals
917375450 Lawn Mower View Diagrams & Manuals
917375451 Lawn Mower View Diagrams & Manuals
917375500 Lawn Mower View Diagrams & Manuals
917375503 Lawn Mower View Diagrams & Manuals
917376040 Lawn Mower View Diagrams & Manuals
917376041 Lawn Mower View Diagrams & Manuals
917376220 Lawn Mower View Diagrams & Manuals
917376221 Lawn Mower View Diagrams & Manuals
917376222 Lawn Mower View Diagrams & Manuals
917376223 Lawn Mower View Diagrams & Manuals
917376224 Lawn Mower View Diagrams & Manuals
917376225 Lawn Mower View Diagrams & Manuals
917376230 Lawn Mower View Diagrams & Manuals
917376231 Lawn Mower View Diagrams & Manuals
917376232 Lawn Mower View Diagrams & Manuals
917376233 Lawn Mower View Diagrams & Manuals
917376234 Lawn Mower View Diagrams & Manuals
917376240 Lawn Mower View Diagrams & Manuals
917376241 Lawn Mower View Diagrams & Manuals
917376242 Lawn Mower View Diagrams & Manuals
917376280 Lawn Mower View Diagrams & Manuals
917376281 Lawn Mower View Diagrams & Manuals
917376282 Lawn Mower View Diagrams & Manuals
917376283 Lawn Mower View Diagrams & Manuals
917376290 Lawn Mower View Diagrams & Manuals
917376301 Lawn Mower View Diagrams & Manuals
917376350 Lawn Mower View Diagrams & Manuals
917376370 Lawn Mower View Diagrams & Manuals
917376390 Lawn Mower View Diagrams & Manuals
917376392 Lawn Mower View Diagrams & Manuals
917376393 Lawn Mower View Diagrams & Manuals
917376394 Lawn Mower View Diagrams & Manuals
917376395 Lawn Mower View Diagrams & Manuals
917376400 Lawn Mower View Diagrams & Manuals
917376401 Lawn Mower View Diagrams & Manuals
917376402 Lawn Mower View Diagrams & Manuals
917376403 Lawn Mower View Diagrams & Manuals
917376404 Lawn Mower View Diagrams & Manuals
917376405 Lawn Mower View Diagrams & Manuals
917376406 Lawn Mower View Diagrams & Manuals
917376407 Lawn Mower View Diagrams & Manuals
917376410 Lawn Mower View Diagrams & Manuals
917376411 Lawn Mower View Diagrams & Manuals
917376523 Lawn Mower View Diagrams & Manuals
917376540 Lawn Mower View Diagrams & Manuals
917376541 Lawn Mower View Diagrams & Manuals
917376544 Lawn Mower View Diagrams & Manuals
917376545 Lawn Mower View Diagrams & Manuals
917376552 Lawn Mower View Diagrams & Manuals
917376770 Lawn Mower View Diagrams & Manuals
917376805 Lawn Mower View Diagrams & Manuals
917376806 Lawn Mower View Diagrams & Manuals
917376807 Lawn Mower View Diagrams & Manuals
917376850 Lawn Mower View Diagrams & Manuals
917376880 Lawn Mower View Diagrams & Manuals
917376905 Lawn Mower View Diagrams & Manuals
917376930 Lawn Mower View Diagrams & Manuals
917376931 Lawn Mower View Diagrams & Manuals
917376940 Lawn Mower View Diagrams & Manuals
917374671 Lawn Mower View Diagrams & Manuals
917374672 Lawn Mower View Diagrams & Manuals
917374673 Lawn Mower View Diagrams & Manuals
917374820 Lawn Mower View Diagrams & Manuals
917374821 Lawn Mower View Diagrams & Manuals
917374822 Lawn Mower View Diagrams & Manuals
917374823 Lawn Mower View Diagrams & Manuals
917374940 Lawn Mower View Diagrams & Manuals
917374941 Lawn Mower View Diagrams & Manuals
917374942 Lawn Mower View Diagrams & Manuals
917374943 Lawn Mower View Diagrams & Manuals
917374944 Lawn Mower View Diagrams & Manuals
917374950 Lawn Mower View Diagrams & Manuals
917374951 Lawn Mower View Diagrams & Manuals
917375350 Lawn Mower View Diagrams & Manuals
917375351 Lawn Mower View Diagrams & Manuals
917375510 Lawn Mower View Diagrams & Manuals
917375511 Lawn Mower View Diagrams & Manuals
917375520 Lawn Mower View Diagrams & Manuals
917375620 Lawn Mower View Diagrams & Manuals
917375621 Lawn Mower View Diagrams & Manuals
917375622 Lawn Mower View Diagrams & Manuals
917375630 Lawn Mower View Diagrams & Manuals
917375631 Lawn Mower View Diagrams & Manuals
917375632 Lawn Mower View Diagrams & Manuals
917375810 Lawn Mower View Diagrams & Manuals
917375830 Lawn Mower View Diagrams & Manuals
917375840 Lawn Mower View Diagrams & Manuals
917376050 Lawn Mower View Diagrams & Manuals
917376051 Lawn Mower View Diagrams & Manuals
917376052 Lawn Mower View Diagrams & Manuals
917376054 Lawn Mower View Diagrams & Manuals
917376055 Lawn Mower View Diagrams & Manuals
917376060 Lawn Mower View Diagrams & Manuals
917376062 Lawn Mower View Diagrams & Manuals
917376063 Lawn Mower View Diagrams & Manuals
917376070 Lawn Mower View Diagrams & Manuals
917376071 Lawn Mower View Diagrams & Manuals
917376081 Lawn Mower View Diagrams & Manuals
917376090 Lawn Mower View Diagrams & Manuals
917376092 Lawn Mower View Diagrams & Manuals
917376093 Lawn Mower View Diagrams & Manuals
917376094 Lawn Mower View Diagrams & Manuals
917376095 Lawn Mower View Diagrams & Manuals
917376096 Lawn Mower View Diagrams & Manuals
917376150 Lawn Mower View Diagrams & Manuals
917376151 Lawn Mower View Diagrams & Manuals
917376152 Lawn Mower View Diagrams & Manuals
917376153 Lawn Mower View Diagrams & Manuals
917376156 Lawn Mower View Diagrams & Manuals
917376160 Lawn Mower View Diagrams & Manuals
917376161 Lawn Mower View Diagrams & Manuals
917376162 Lawn Mower View Diagrams & Manuals
917376163 Lawn Mower View Diagrams & Manuals
917376165 Lawn Mower View Diagrams & Manuals
917376166 Lawn Mower View Diagrams & Manuals
917376167 Lawn Mower View Diagrams & Manuals
917376168 Lawn Mower View Diagrams & Manuals
917376169 Lawn Mower View Diagrams & Manuals
917376271 Lawn Mower View Diagrams & Manuals
917376272 Lawn Mower View Diagrams & Manuals
917376310 Lawn Mower View Diagrams & Manuals
917376320 Lawn Mower View Diagrams & Manuals
917376331 Lawn Mower View Diagrams & Manuals
917376340 Lawn Mower View Diagrams & Manuals
917376341 Lawn Mower View Diagrams & Manuals
917376360 Lawn Mower View Diagrams & Manuals
917376430 Lawn Mower View Diagrams & Manuals
917376440 Lawn Mower View Diagrams & Manuals
917376450 Lawn Mower View Diagrams & Manuals
917376451 Lawn Mower View Diagrams & Manuals
917376452 Lawn Mower View Diagrams & Manuals
917376460 Lawn Mower View Diagrams & Manuals
917376462 Lawn Mower View Diagrams & Manuals
917376471 Lawn Mower View Diagrams & Manuals
917376480 Lawn Mower View Diagrams & Manuals
917376481 Lawn Mower View Diagrams & Manuals
917376483 Lawn Mower View Diagrams & Manuals
917376520 Lawn Mower View Diagrams & Manuals
917376521 Lawn Mower View Diagrams & Manuals
917376522 Lawn Mower View Diagrams & Manuals
917376530 Lawn Mower View Diagrams & Manuals
917376532 Lawn Mower View Diagrams & Manuals
917376533 Lawn Mower View Diagrams & Manuals
917376534 Lawn Mower View Diagrams & Manuals
917376536 Lawn Mower View Diagrams & Manuals
917376537 Lawn Mower View Diagrams & Manuals
917376543 Lawn Mower View Diagrams & Manuals
917376560 Lawn Mower View Diagrams & Manuals
917376561 Lawn Mower View Diagrams & Manuals
917376571 Lawn Mower View Diagrams & Manuals
917376572 Lawn Mower View Diagrams & Manuals
917376581 Lawn Mower View Diagrams & Manuals
917376582 Lawn Mower View Diagrams & Manuals
917376590 Lawn Mower View Diagrams & Manuals
917376591 Lawn Mower View Diagrams & Manuals
917376592 Lawn Mower View Diagrams & Manuals
917376593 Lawn Mower View Diagrams & Manuals
917376631 Lawn Mower View Diagrams & Manuals
917376632 Lawn Mower View Diagrams & Manuals
917376650 Lawn Mower View Diagrams & Manuals
917376651 Lawn Mower View Diagrams & Manuals
917376652 Lawn Mower View Diagrams & Manuals
917376653 Lawn Mower View Diagrams & Manuals
917376654 Lawn Mower View Diagrams & Manuals
917376655 Lawn Mower View Diagrams & Manuals
917376656 Lawn Mower View Diagrams & Manuals
917376657 Lawn Mower View Diagrams & Manuals
917376658 Lawn Mower View Diagrams & Manuals
917376659 Lawn Mower View Diagrams & Manuals
917376660 Lawn Mower View Diagrams & Manuals
917376661 Lawn Mower View Diagrams & Manuals
917376662 Lawn Mower View Diagrams & Manuals
917376670 Lawn Mower View Diagrams & Manuals
917376671 Lawn Mower View Diagrams & Manuals
917376672 Lawn Mower View Diagrams & Manuals
917376674 Lawn Mower View Diagrams & Manuals
917376676 Lawn Mower View Diagrams & Manuals
917376678 Lawn Mower View Diagrams & Manuals
917376680 Lawn Mower View Diagrams & Manuals
917376682 Lawn Mower View Diagrams & Manuals
917376690 Lawn Mower View Diagrams & Manuals
917376691 Lawn Mower View Diagrams & Manuals
917376692 Lawn Mower View Diagrams & Manuals
917376720 Lawn Mower View Diagrams & Manuals
917376721 Lawn Mower View Diagrams & Manuals
917376723 Lawn Mower View Diagrams & Manuals
917376724 Lawn Mower View Diagrams & Manuals
917376730 Lawn Mower View Diagrams & Manuals
917376731 Lawn Mower View Diagrams & Manuals
917376733 Lawn Mower View Diagrams & Manuals
917376734 Lawn Mower View Diagrams & Manuals
917376735 Lawn Mower View Diagrams & Manuals
917376736 Lawn Mower View Diagrams & Manuals
917376741 Lawn Mower View Diagrams & Manuals
917376743 Lawn Mower View Diagrams & Manuals
917376744 Lawn Mower View Diagrams & Manuals
917376745 Lawn Mower View Diagrams & Manuals
917376746 Lawn Mower View Diagrams & Manuals
917376750 Lawn Mower View Diagrams & Manuals
917376751 Lawn Mower View Diagrams & Manuals
917376760 Lawn Mower View Diagrams & Manuals
917376780 Lawn Mower View Diagrams & Manuals
917376781 Lawn Mower View Diagrams & Manuals
917376782 Lawn Mower View Diagrams & Manuals
917376783 Lawn Mower View Diagrams & Manuals
917376784 Lawn Mower View Diagrams & Manuals
917376785 Lawn Mower View Diagrams & Manuals
917376790 Lawn Mower View Diagrams & Manuals
917376791 Lawn Mower View Diagrams & Manuals
917376793 Lawn Mower View Diagrams & Manuals
917376800 Lawn Mower View Diagrams & Manuals
917376801 Lawn Mower View Diagrams & Manuals
917376802 Lawn Mower View Diagrams & Manuals
917376803 Lawn Mower View Diagrams & Manuals
917376804 Lawn Mower View Diagrams & Manuals
917376870 Lawn Mower View Diagrams & Manuals
917376910 Lawn Mower View Diagrams & Manuals
917376920 Lawn Mower View Diagrams & Manuals
917376941 Lawn Mower View Diagrams & Manuals
917376950 Lawn Mower View Diagrams & Manuals
917376960 Lawn Mower View Diagrams & Manuals
917377060 Lawn Mower View Diagrams & Manuals
917377070 Lawn Mower View Diagrams & Manuals
917377160 Lawn Mower View Diagrams & Manuals
917377220 Lawn Mower View Diagrams & Manuals
917377260 Lawn Mower View Diagrams & Manuals
917377261 Lawn Mower View Diagrams & Manuals
917377271 Lawn Mower View Diagrams & Manuals
917377280 Lawn Mower View Diagrams & Manuals
917377281 Lawn Mower View Diagrams & Manuals
917377282 Lawn Mower View Diagrams & Manuals
917377283 Lawn Mower View Diagrams & Manuals
917377284 Lawn Mower View Diagrams & Manuals
917377291 Lawn Mower View Diagrams & Manuals
917377301 Lawn Mower View Diagrams & Manuals
917377311 Lawn Mower View Diagrams & Manuals
917377321 Lawn Mower View Diagrams & Manuals
917377340 Lawn Mower View Diagrams & Manuals
917377351 Lawn Mower View Diagrams & Manuals
917377360 Lawn Mower View Diagrams & Manuals
917377361 Lawn Mower View Diagrams & Manuals
917377362 Lawn Mower View Diagrams & Manuals
917377430 Lawn Mower View Diagrams & Manuals
917377431 Lawn Mower View Diagrams & Manuals
917377523 Lawn Mower View Diagrams & Manuals
917377544 Lawn Mower View Diagrams & Manuals
917377554 Lawn Mower View Diagrams & Manuals
917377564 Lawn Mower View Diagrams & Manuals
917377570 Lawn Mower View Diagrams & Manuals
917377575 Lawn Mower View Diagrams & Manuals
917377582 Lawn Mower View Diagrams & Manuals
917377592 Lawn Mower View Diagrams & Manuals
917377593 Lawn Mower View Diagrams & Manuals
917377650 Lawn Mower View Diagrams & Manuals
917377651 Lawn Mower View Diagrams & Manuals
917377660 Lawn Mower View Diagrams & Manuals
917377661 Lawn Mower View Diagrams & Manuals
917377662 Lawn Mower View Diagrams & Manuals
917377663 Lawn Mower View Diagrams & Manuals
917377050 Lawn Mower View Diagrams & Manuals
917377100 Lawn Mower View Diagrams & Manuals
917377130 Lawn Mower View Diagrams & Manuals
917377132 Lawn Mower View Diagrams & Manuals
917377133 Lawn Mower View Diagrams & Manuals
917377152 Lawn Mower View Diagrams & Manuals
917377170 Lawn Mower View Diagrams & Manuals
917377171 Lawn Mower View Diagrams & Manuals
917377180 Lawn Mower View Diagrams & Manuals
917377190 Lawn Mower View Diagrams & Manuals
917377200 Lawn Mower View Diagrams & Manuals
917377201 Lawn Mower View Diagrams & Manuals
917377210 Lawn Mower View Diagrams & Manuals
917377211 Lawn Mower View Diagrams & Manuals
917377212 Lawn Mower View Diagrams & Manuals
917377250 Lawn Mower View Diagrams & Manuals
917377251 Lawn Mower View Diagrams & Manuals
917377262 Lawn Mower View Diagrams & Manuals
917377263 Lawn Mower View Diagrams & Manuals
917377264 Lawn Mower View Diagrams & Manuals
917377272 Lawn Mower View Diagrams & Manuals
917377273 Lawn Mower View Diagrams & Manuals
917377292 Lawn Mower View Diagrams & Manuals
917377300 Lawn Mower View Diagrams & Manuals
917377302 Lawn Mower View Diagrams & Manuals
917377303 Lawn Mower View Diagrams & Manuals
917377310 Lawn Mower View Diagrams & Manuals
917377320 Lawn Mower View Diagrams & Manuals
917377330 Lawn Mower View Diagrams & Manuals
917377331 Lawn Mower View Diagrams & Manuals
917377332 Lawn Mower View Diagrams & Manuals
917377333 Lawn Mower View Diagrams & Manuals
917377350 Lawn Mower View Diagrams & Manuals
917377353 Lawn Mower View Diagrams & Manuals
917377380 Lawn Mower View Diagrams & Manuals
917377381 Lawn Mower View Diagrams & Manuals
917377390 Lawn Mower View Diagrams & Manuals
917377391 Lawn Mower View Diagrams & Manuals
917377400 Lawn Mower View Diagrams & Manuals
917377401 Lawn Mower View Diagrams & Manuals
917377410 Lawn Mower View Diagrams & Manuals
917377411 Lawn Mower View Diagrams & Manuals
917377420 Lawn Mower View Diagrams & Manuals
917377421 Lawn Mower View Diagrams & Manuals
917377422 Lawn Mower View Diagrams & Manuals
917377423 Lawn Mower View Diagrams & Manuals
917377424 Lawn Mower View Diagrams & Manuals
917377425 Lawn Mower View Diagrams & Manuals
91737742A Lawn Mower View Diagrams & Manuals
917377500 Lawn Mower View Diagrams & Manuals
917377520 Lawn Mower View Diagrams & Manuals
917377521 Lawn Mower View Diagrams & Manuals
917377524 Lawn Mower View Diagrams & Manuals
91737752A Lawn Mower View Diagrams & Manuals
917377530 Lawn Mower View Diagrams & Manuals
917377531 Lawn Mower View Diagrams & Manuals
917377532 Lawn Mower View Diagrams & Manuals
917377543 Lawn Mower View Diagrams & Manuals
917377545 Lawn Mower View Diagrams & Manuals
91737754A Lawn Mower View Diagrams & Manuals
917377550 Lawn Mower View Diagrams & Manuals
917377551 Lawn Mower View Diagrams & Manuals
917377552 Lawn Mower View Diagrams & Manuals
91737755A Lawn Mower View Diagrams & Manuals
917377560 Lawn Mower View Diagrams & Manuals
917377561 Lawn Mower View Diagrams & Manuals
917377562 Lawn Mower View Diagrams & Manuals
917377565 Lawn Mower View Diagrams & Manuals
917377571 Lawn Mower View Diagrams & Manuals
917377572 Lawn Mower View Diagrams & Manuals
917377573 Lawn Mower View Diagrams & Manuals
917377574 Lawn Mower View Diagrams & Manuals
917377580 Lawn Mower View Diagrams & Manuals
917377581 Lawn Mower View Diagrams & Manuals
917377591 Lawn Mower View Diagrams & Manuals
917377610 Lawn Mower View Diagrams & Manuals
917377620 Lawn Mower View Diagrams & Manuals
917377621 Lawn Mower View Diagrams & Manuals
917377630 Lawn Mower View Diagrams & Manuals
917377640 Lawn Mower View Diagrams & Manuals
917377641 Lawn Mower View Diagrams & Manuals
917377664 Lawn Mower View Diagrams & Manuals
917377690 Lawn Mower View Diagrams & Manuals
917377730 Lawn Mower View Diagrams & Manuals
917377731 Lawn Mower View Diagrams & Manuals
917377740 Lawn Mower View Diagrams & Manuals
917377750 Lawn Mower View Diagrams & Manuals
917377801 Lawn Mower View Diagrams & Manuals
91737790 Lawn Mower View Diagrams & Manuals
917377980 Lawn Mower View Diagrams & Manuals
917377981 Lawn Mower View Diagrams & Manuals
917377665 Lawn Tractor View Diagrams & Manuals
917377680 Lawn Tractor View Diagrams & Manuals
917377681 Lawn Tractor View Diagrams & Manuals
917377682 Lawn Tractor View Diagrams & Manuals
917377700 Lawn Tractor View Diagrams & Manuals
917377710 Gas Walk Behind Lawn Mower View Diagrams & Manuals
917377760 Lawn Tractor View Diagrams & Manuals
917377780 Lawn Tractor View Diagrams & Manuals
917377781 Lawn Tractor View Diagrams & Manuals
917377782 Lawn Tractor View Diagrams & Manuals
917377783 Lawn Tractor View Diagrams & Manuals
917377784 Lawn Tractor View Diagrams & Manuals
917377800 Lawn Tractor View Diagrams & Manuals
917377810 Lawn Tractor View Diagrams & Manuals
917377811 Lawn Tractor View Diagrams & Manuals
917377812 Lawn Tractor View Diagrams & Manuals
917377821 Lawn Tractor View Diagrams & Manuals
917377823 Lawn Tractor View Diagrams & Manuals
917377830 Lawn Tractor View Diagrams & Manuals
917377880 Lawn Tractor View Diagrams & Manuals
917377910 Lawn Tractor View Diagrams & Manuals
917377911 Lawn Tractor View Diagrams & Manuals
917377912 Lawn Tractor View Diagrams & Manuals
917377960 Lawn Tractor View Diagrams & Manuals
917377961 Lawn Tractor View Diagrams & Manuals
917377962 Lawn Tractor View Diagrams & Manuals
917377970 Lawn Tractor View Diagrams & Manuals
917377971 Lawn Tractor View Diagrams & Manuals
917377972 Lawn Tractor View Diagrams & Manuals
917377991 Lawn Tractor View Diagrams & Manuals
917378050 Lawn Tractor View Diagrams & Manuals
917378170 Lawn Tractor View Diagrams & Manuals
917378171 Lawn Tractor View Diagrams & Manuals
917378271 Lawn Tractor View Diagrams & Manuals
917378272 Lawn Tractor View Diagrams & Manuals
917378290 Lawn Tractor View Diagrams & Manuals
917378452 Lawn Tractor View Diagrams & Manuals
917378470 Lawn Tractor View Diagrams & Manuals
917378500 Lawn Tractor View Diagrams & Manuals
917378501 Lawn Tractor View Diagrams & Manuals
917377990 Lawn Mower View Diagrams & Manuals
917378060 Lawn Mower View Diagrams & Manuals
917378071 Lawn Mower View Diagrams & Manuals
917378072 Lawn Mower View Diagrams & Manuals
917378150 Lawn Mower View Diagrams & Manuals
917378151 Lawn Mower View Diagrams & Manuals
917378160 Lawn Mower View Diagrams & Manuals
917378190 Lawn Mower View Diagrams & Manuals
917378210 Lawn Mower View Diagrams & Manuals
917378211 Lawn Mower View Diagrams & Manuals
917378212 Lawn Mower View Diagrams & Manuals
917378310 Lawn Mower View Diagrams & Manuals
917378340 Lawn Mower View Diagrams & Manuals
917378341 Lawn Mower View Diagrams & Manuals
917378342 Lawn Mower View Diagrams & Manuals
917378350 Lawn Mower View Diagrams & Manuals
917378351 Lawn Mower View Diagrams & Manuals
917378352 Lawn Mower View Diagrams & Manuals
917378360 Lawn Mower View Diagrams & Manuals
917378361 Lawn Mower View Diagrams & Manuals
917378380 Lawn Mower View Diagrams & Manuals
917378381 Lawn Mower View Diagrams & Manuals
917378411 Lawn Mower View Diagrams & Manuals
917378412 Lawn Mower View Diagrams & Manuals
917378421 Lawn Mower View Diagrams & Manuals
917378422 Lawn Mower View Diagrams & Manuals
917378431 Lawn Mower View Diagrams & Manuals
917378440 Lawn Mower View Diagrams & Manuals
917378441 Lawn Mower View Diagrams & Manuals
917378442 Lawn Mower View Diagrams & Manuals
917378450 Lawn Mower View Diagrams & Manuals
917378451 Lawn Mower View Diagrams & Manuals
917378460 Lawn Mower View Diagrams & Manuals
917378652 Lawn Mower View Diagrams & Manuals
917378760 Lawn Mower View Diagrams & Manuals
917378761 Lawn Mower View Diagrams & Manuals
917378770 Lawn Mower View Diagrams & Manuals
917378771 Lawn Mower View Diagrams & Manuals
917378772 Lawn Mower View Diagrams & Manuals
917378780 Lawn Mower View Diagrams & Manuals
917378800 Lawn Mower View Diagrams & Manuals
917378840 Lawn Mower View Diagrams & Manuals
917378841 Lawn Mower View Diagrams & Manuals
917378850 Lawn Mower View Diagrams & Manuals
917378852 Lawn Mower View Diagrams & Manuals
917378860 Lawn Mower View Diagrams & Manuals
917378861 Lawn Mower View Diagrams & Manuals
917378870 Lawn Mower View Diagrams & Manuals
917378871 Lawn Mower View Diagrams & Manuals
917378890 Lawn Mower View Diagrams & Manuals
917378891 Lawn Mower View Diagrams & Manuals
917378900 Lawn Mower View Diagrams & Manuals
917378960 Lawn Mower View Diagrams & Manuals
917379040 Lawn Mower View Diagrams & Manuals
917379070 Lawn Mower View Diagrams & Manuals
917379071 Lawn Mower View Diagrams & Manuals
917379120 Lawn Mower View Diagrams & Manuals
917379221 Lawn Mower View Diagrams & Manuals
917379250 Lawn Mower View Diagrams & Manuals
917379260 Lawn Mower View Diagrams & Manuals
917379262 Lawn Mower View Diagrams & Manuals
917379273 Lawn Mower View Diagrams & Manuals
917379290 Lawn Mower View Diagrams & Manuals
917379292 Lawn Mower View Diagrams & Manuals
917379300 Lawn Mower View Diagrams & Manuals
917379320 Lawn Mower View Diagrams & Manuals
917379322 Lawn Mower View Diagrams & Manuals
917379330 Lawn Mower View Diagrams & Manuals
917379350 Lawn Mower View Diagrams & Manuals
917379380 Lawn Mower View Diagrams & Manuals
917379390 Lawn Mower View Diagrams & Manuals
917379401 Lawn Mower View Diagrams & Manuals
917379420 Lawn Mower View Diagrams & Manuals
917379430 Lawn Mower View Diagrams & Manuals
917379431 Lawn Mower View Diagrams & Manuals
917379440 Lawn Mower View Diagrams & Manuals
917379441 Lawn Mower View Diagrams & Manuals
917379480 Lawn Mower View Diagrams & Manuals
917379500 Lawn Mower View Diagrams & Manuals
917379510 Lawn Mower View Diagrams & Manuals
917379540 Lawn Mower View Diagrams & Manuals
917379580 Lawn Mower View Diagrams & Manuals
917378521 Lawn Mower View Diagrams & Manuals
917378550 Lawn Mower View Diagrams & Manuals
917378551 Lawn Mower View Diagrams & Manuals
917378570 Lawn Mower View Diagrams & Manuals
917378571 Lawn Mower View Diagrams & Manuals
917378590 Lawn Mower View Diagrams & Manuals
917378591 Lawn Mower View Diagrams & Manuals
917378601 Lawn Mower View Diagrams & Manuals
917378602 Lawn Mower View Diagrams & Manuals
917378620 Lawn Mower View Diagrams & Manuals
917378630 Lawn Mower View Diagrams & Manuals
917378631 Lawn Mower View Diagrams & Manuals
917378632 Lawn Mower View Diagrams & Manuals
917378633 Lawn Mower View Diagrams & Manuals
917378650 Lawn Mower View Diagrams & Manuals
917378651 Lawn Mower View Diagrams & Manuals
917378692 Lawn Mower View Diagrams & Manuals
917378693 Lawn Mower View Diagrams & Manuals
917378694 Lawn Mower View Diagrams & Manuals
917378700 Lawn Mower View Diagrams & Manuals
917378711 Lawn Mower View Diagrams & Manuals
917378750 Lawn Mower View Diagrams & Manuals
917378752 Lawn Mower View Diagrams & Manuals
917378790 Lawn Mower View Diagrams & Manuals
917378892 Lawn Mower View Diagrams & Manuals
917378893 Lawn Mower View Diagrams & Manuals
917378910 Lawn Mower View Diagrams & Manuals
917379080 Lawn Mower View Diagrams & Manuals
917379201 Lawn Mower View Diagrams & Manuals
917379202 Lawn Mower View Diagrams & Manuals
917379210 Lawn Mower View Diagrams & Manuals
917379240 Lawn Mower View Diagrams & Manuals
917379241 Lawn Mower View Diagrams & Manuals
917379261 Lawn Mower View Diagrams & Manuals
917379271 Lawn Mower View Diagrams & Manuals
917379281 Lawn Mower View Diagrams & Manuals
917379321 Lawn Mower View Diagrams & Manuals
917379340 Lawn Mower View Diagrams & Manuals
917379351 Lawn Mower View Diagrams & Manuals
917379360 Lawn Mower View Diagrams & Manuals
917379361 Lawn Mower View Diagrams & Manuals
917379370 Lawn Mower View Diagrams & Manuals
917379371 Lawn Mower View Diagrams & Manuals
917379400 Lawn Mower View Diagrams & Manuals
917379450 Lawn Mower View Diagrams & Manuals
917379591 Lawn Mower View Diagrams & Manuals
917379690 Lawn Mower View Diagrams & Manuals
917379750 Lawn Mower View Diagrams & Manuals
917379810 Lawn Mower View Diagrams & Manuals
917379811 Lawn Mower View Diagrams & Manuals
917379812 Lawn Mower View Diagrams & Manuals
917380093 Lawn Mower View Diagrams & Manuals
917380542 Lawn Mower View Diagrams & Manuals
917383161 Lawn Mower View Diagrams & Manuals
917389731 Lawn Mower View Diagrams & Manuals
917389870 Lawn Mower View Diagrams & Manuals
917389871 Lawn Mower View Diagrams & Manuals
917389880 Lawn Mower View Diagrams & Manuals
917389890 Lawn Mower View Diagrams & Manuals
917389892 Lawn Mower View Diagrams & Manuals
917389960 Lawn Mower View Diagrams & Manuals
917389962 Lawn Mower View Diagrams & Manuals
9179994A Lawn Mower View Diagrams & Manuals
9179994B Lawn Mower View Diagrams & Manuals
917379582 Lawn Mower View Diagrams & Manuals
917379590 Lawn Mower View Diagrams & Manuals
917379601 Lawn Mower View Diagrams & Manuals
917379610 Lawn Mower View Diagrams & Manuals
917379611 Lawn Mower View Diagrams & Manuals
917379680 Lawn Mower View Diagrams & Manuals
917379740 Lawn Mower View Diagrams & Manuals
917380040 Lawn Mower View Diagrams & Manuals
917380041 Lawn Mower View Diagrams & Manuals
917380042 Lawn Mower View Diagrams & Manuals
917380070 Lawn Mower View Diagrams & Manuals
917380071 Lawn Mower View Diagrams & Manuals
917380072 Lawn Mower View Diagrams & Manuals
917380073 Lawn Mower View Diagrams & Manuals
917380074 Lawn Mower View Diagrams & Manuals
917380090 Lawn Mower View Diagrams & Manuals
917380091 Lawn Mower View Diagrams & Manuals
917380092 Lawn Mower View Diagrams & Manuals
917380140 Lawn Mower View Diagrams & Manuals
917380190 Lawn Mower View Diagrams & Manuals
917380230 Lawn Mower View Diagrams & Manuals
917380231 Lawn Mower View Diagrams & Manuals
917380232 Lawn Mower View Diagrams & Manuals
917380250 Lawn Mower View Diagrams & Manuals
917380260 Lawn Mower View Diagrams & Manuals
917380270 Lawn Mower View Diagrams & Manuals
917380271 Lawn Mower View Diagrams & Manuals
917380280 Lawn Mower View Diagrams & Manuals
917380330 Lawn Mower View Diagrams & Manuals
917380331 Lawn Mower View Diagrams & Manuals
917380340 Lawn Mower View Diagrams & Manuals
917380380 Lawn Mower View Diagrams & Manuals
917380450 Lawn Mower View Diagrams & Manuals
917380451 Lawn Mower View Diagrams & Manuals
917380470 Lawn Mower View Diagrams & Manuals
917380480 Lawn Mower View Diagrams & Manuals
917380481 Lawn Mower View Diagrams & Manuals
917380482 Lawn Mower View Diagrams & Manuals
917380490 Lawn Mower View Diagrams & Manuals
917380510 Lawn Mower View Diagrams & Manuals
917380520 Lawn Mower View Diagrams & Manuals
917380540 Lawn Mower View Diagrams & Manuals
917380541 Lawn Mower View Diagrams & Manuals
917380560 Lawn Mower View Diagrams & Manuals
917380590 Lawn Mower View Diagrams & Manuals
917380740 Lawn Mower View Diagrams & Manuals
917380840 Lawn Mower View Diagrams & Manuals
917380841 Lawn Mower View Diagrams & Manuals
917380842 Lawn Mower View Diagrams & Manuals
917380940 Lawn Mower View Diagrams & Manuals
917381020 Lawn Mower View Diagrams & Manuals
917381030 Lawn Mower View Diagrams & Manuals
917381040 Lawn Mower View Diagrams & Manuals
917381050 Lawn Mower View Diagrams & Manuals
917381080 Lawn Mower View Diagrams & Manuals
917381090 Lawn Mower View Diagrams & Manuals
917381320 Lawn Mower View Diagrams & Manuals
917381321 Lawn Mower View Diagrams & Manuals
917381400 Lawn Mower View Diagrams & Manuals
917381401 Lawn Mower View Diagrams & Manuals
917381402 Lawn Mower View Diagrams & Manuals
917382700 Lawn Mower View Diagrams & Manuals
917382710 Lawn Mower View Diagrams & Manuals
917382711 Lawn Mower View Diagrams & Manuals
917382720 Lawn Mower View Diagrams & Manuals
917382721 Lawn Mower View Diagrams & Manuals
917382730 Lawn Mower View Diagrams & Manuals
917382731 Lawn Mower View Diagrams & Manuals
917382740 Lawn Mower View Diagrams & Manuals
917382741 Lawn Mower View Diagrams & Manuals
917382750 Lawn Mower View Diagrams & Manuals
917382760 Lawn Mower View Diagrams & Manuals
917382761 Lawn Mower View Diagrams & Manuals
917382770 Lawn Mower View Diagrams & Manuals
917382771 Lawn Mower View Diagrams & Manuals
917382772 Lawn Mower View Diagrams & Manuals
917382780 Lawn Mower View Diagrams & Manuals
917382790 Lawn Mower View Diagrams & Manuals
917382800 Lawn Mower View Diagrams & Manuals
917382810 Lawn Mower View Diagrams & Manuals
917382820 Lawn Mower View Diagrams & Manuals
917382830 Lawn Mower View Diagrams & Manuals
917382840 Lawn Mower View Diagrams & Manuals
917383031 Lawn Mower View Diagrams & Manuals
917383040 Lawn Mower View Diagrams & Manuals
917383060 Lawn Mower View Diagrams & Manuals
917383061 Lawn Mower View Diagrams & Manuals
917383090 Lawn Mower View Diagrams & Manuals
917383091 Lawn Mower View Diagrams & Manuals
917383130 Lawn Mower View Diagrams & Manuals
917383141 Lawn Mower View Diagrams & Manuals
917383142 Lawn Mower View Diagrams & Manuals
917383160 Lawn Mower View Diagrams & Manuals
917383162 Lawn Mower View Diagrams & Manuals
917383163 Lawn Mower View Diagrams & Manuals
917383164 Lawn Mower View Diagrams & Manuals
917383165 Lawn Mower View Diagrams & Manuals
917383180 Lawn Mower View Diagrams & Manuals
917383181 Lawn Mower View Diagrams & Manuals
917383190 Lawn Mower View Diagrams & Manuals
917383221 Lawn Mower View Diagrams & Manuals
917383222 Lawn Mower View Diagrams & Manuals
917383223 Lawn Mower View Diagrams & Manuals
917383224 Lawn Mower View Diagrams & Manuals
917383225 Lawn Mower View Diagrams & Manuals
917383240 Lawn Mower View Diagrams & Manuals
917383241 Lawn Mower View Diagrams & Manuals
917383242 Lawn Mower View Diagrams & Manuals
917383250 Lawn Mower View Diagrams & Manuals
917383251 Lawn Mower View Diagrams & Manuals
917383260 Lawn Mower View Diagrams & Manuals
917383270 Lawn Mower View Diagrams & Manuals
917383271 Lawn Mower View Diagrams & Manuals
917383280 Lawn Mower View Diagrams & Manuals
917383340 Lawn Mower View Diagrams & Manuals
917383341 Lawn Mower View Diagrams & Manuals
917383342 Lawn Mower View Diagrams & Manuals
917383360 Lawn Mower View Diagrams & Manuals
917383361 Lawn Mower View Diagrams & Manuals
917383370 Lawn Mower View Diagrams & Manuals
917383371 Lawn Mower View Diagrams & Manuals
917383480 Lawn Mower View Diagrams & Manuals
917383481 Lawn Mower View Diagrams & Manuals
917383490 Lawn Mower View Diagrams & Manuals
917383491 Lawn Mower View Diagrams & Manuals
917383540 Lawn Mower View Diagrams & Manuals
917383541 Lawn Mower View Diagrams & Manuals
917383591 Lawn Mower View Diagrams & Manuals
917383592 Lawn Mower View Diagrams & Manuals
917383640 Lawn Mower View Diagrams & Manuals
917383641 Lawn Mower View Diagrams & Manuals
917383740 Lawn Mower View Diagrams & Manuals
917384041 Lawn Mower View Diagrams & Manuals
917384150 Lawn Mower View Diagrams & Manuals
917384151 Lawn Mower View Diagrams & Manuals
917384210 Lawn Mower View Diagrams & Manuals
917384230 Lawn Mower View Diagrams & Manuals
917384240 Lawn Mower View Diagrams & Manuals
917384241 Lawn Mower View Diagrams & Manuals
917384250 Lawn Mower View Diagrams & Manuals
917384340 Lawn Mower View Diagrams & Manuals
917384341 Lawn Mower View Diagrams & Manuals
917384342 Lawn Mower View Diagrams & Manuals
917384343 Lawn Mower View Diagrams & Manuals
917384350 Lawn Mower View Diagrams & Manuals
917384371 Lawn Mower View Diagrams & Manuals
917384410 Lawn Mower View Diagrams & Manuals
917384420 Lawn Mower View Diagrams & Manuals
917384430 Lawn Mower View Diagrams & Manuals
917384530 Lawn Mower View Diagrams & Manuals
917384531 Lawn Mower View Diagrams & Manuals
917385110 Lawn Mower View Diagrams & Manuals
917385111 Lawn Mower View Diagrams & Manuals
917385120 Lawn Mower View Diagrams & Manuals
917385121 Lawn Mower View Diagrams & Manuals
917385122 Lawn Mower View Diagrams & Manuals
917385123 Lawn Mower View Diagrams & Manuals
917385124 Lawn Mower View Diagrams & Manuals
917385125 Lawn Mower View Diagrams & Manuals
917385126 Lawn Mower View Diagrams & Manuals
917385130 Lawn Mower View Diagrams & Manuals
917385140 Lawn Mower View Diagrams & Manuals
917385141 Lawn Mower View Diagrams & Manuals
917385142 Lawn Mower View Diagrams & Manuals
917385143 Lawn Mower View Diagrams & Manuals
917385190 Lawn Mower View Diagrams & Manuals
917385191 Lawn Mower View Diagrams & Manuals
917385192 Lawn Mower View Diagrams & Manuals
917385270 Lawn Mower View Diagrams & Manuals
917385320 Lawn Mower View Diagrams & Manuals
917385321 Lawn Mower View Diagrams & Manuals
917385322 Lawn Mower View Diagrams & Manuals
917385340 Lawn Mower View Diagrams & Manuals
917385350 Lawn Mower View Diagrams & Manuals
917385351 Lawn Mower View Diagrams & Manuals
917385352 Lawn Mower View Diagrams & Manuals
917385353 Lawn Mower View Diagrams & Manuals
917385390 Lawn Mower View Diagrams & Manuals
917385391 Lawn Mower View Diagrams & Manuals
917385410 Lawn Mower View Diagrams & Manuals
917385411 Lawn Mower View Diagrams & Manuals
917386000 Lawn Mower View Diagrams & Manuals
917386010 Lawn Mower View Diagrams & Manuals
917386020 Lawn Mower View Diagrams & Manuals
917386030 Lawn Mower View Diagrams & Manuals
917386031 Lawn Mower View Diagrams & Manuals
917386040 Lawn Mower View Diagrams & Manuals
917386041 Lawn Mower View Diagrams & Manuals
917386050 Lawn Mower View Diagrams & Manuals
917386051 Lawn Mower View Diagrams & Manuals
917386052 Lawn Mower View Diagrams & Manuals
917386060 Lawn Mower View Diagrams & Manuals
917386061 Lawn Mower View Diagrams & Manuals
917386070 Lawn Mower View Diagrams & Manuals
917386071 Lawn Mower View Diagrams & Manuals
917386072 Lawn Mower View Diagrams & Manuals
917386073 Lawn Mower View Diagrams & Manuals
917386080 Lawn Mower View Diagrams & Manuals
917386081 Lawn Mower View Diagrams & Manuals
917386082 Lawn Mower View Diagrams & Manuals
917386090 Lawn Mower View Diagrams & Manuals
917386100 Lawn Mower View Diagrams & Manuals
917386101 Lawn Mower View Diagrams & Manuals
917386110 Lawn Mower View Diagrams & Manuals
917386120 Lawn Mower View Diagrams & Manuals
917386121 Lawn Mower View Diagrams & Manuals
917386130 Lawn Mower View Diagrams & Manuals
917386131 Lawn Mower View Diagrams & Manuals
917386132 Lawn Mower View Diagrams & Manuals
917386140 Lawn Mower View Diagrams & Manuals
917386150 Lawn Mower View Diagrams & Manuals
917386151 Lawn Mower View Diagrams & Manuals
917386153 Lawn Mower View Diagrams & Manuals
917386180 Lawn Mower View Diagrams & Manuals
917386181 Lawn Mower View Diagrams & Manuals
917386190 Lawn Mower View Diagrams & Manuals
917386191 Lawn Mower View Diagrams & Manuals
917386210 Lawn Mower View Diagrams & Manuals
917386220 Lawn Mower View Diagrams & Manuals
917386230 Lawn Mower View Diagrams & Manuals
917386240 Lawn Mower View Diagrams & Manuals
917386400 Lawn Mower View Diagrams & Manuals
917386401 Lawn Mower View Diagrams & Manuals
917386410 Lawn Mower View Diagrams & Manuals
917386411 Lawn Mower View Diagrams & Manuals
917386520 Lawn Mower View Diagrams & Manuals
917386530 Lawn Mower View Diagrams & Manuals
917386620 Lawn Mower View Diagrams & Manuals
917386630 Lawn Mower View Diagrams & Manuals
917386640 Lawn Mower View Diagrams & Manuals
917386650 Lawn Mower View Diagrams & Manuals
917386651 Lawn Mower View Diagrams & Manuals
917386990 Lawn Mower View Diagrams & Manuals
917387000 Lawn Mower View Diagrams & Manuals
917387001 Lawn Mower View Diagrams & Manuals
917387002 Lawn Mower View Diagrams & Manuals
917387003 Lawn Mower View Diagrams & Manuals
917387010 Lawn Mower View Diagrams & Manuals
917387020 Lawn Mower View Diagrams & Manuals
917387021 Lawn Mower View Diagrams & Manuals
917387022 Lawn Mower View Diagrams & Manuals
917387023 Lawn Mower View Diagrams & Manuals
917387030 Lawn Mower View Diagrams & Manuals
917387031 Lawn Mower View Diagrams & Manuals
917387032 Lawn Mower View Diagrams & Manuals
917387050 Lawn Mower View Diagrams & Manuals
917387051 Lawn Mower View Diagrams & Manuals
917387059 Lawn Mower View Diagrams & Manuals
917387060 Lawn Mower View Diagrams & Manuals
917387061 Lawn Mower View Diagrams & Manuals
917387062 Lawn Mower View Diagrams & Manuals
917387070 Lawn Mower View Diagrams & Manuals
917387071 Lawn Mower View Diagrams & Manuals
917387072 Lawn Mower View Diagrams & Manuals
917387100 Lawn Mower View Diagrams & Manuals
917387101 Lawn Mower View Diagrams & Manuals
917387102 Lawn Mower View Diagrams & Manuals
917387120 Lawn Mower View Diagrams & Manuals
917387121 Lawn Mower View Diagrams & Manuals
917387130 Lawn Mower View Diagrams & Manuals
917387131 Lawn Mower View Diagrams & Manuals
917387132 Lawn Mower View Diagrams & Manuals
917387140 Lawn Mower View Diagrams & Manuals
917387141 Lawn Mower View Diagrams & Manuals
917387151 Lawn Mower View Diagrams & Manuals
917387152 Lawn Mower View Diagrams & Manuals
917387153 Lawn Mower View Diagrams & Manuals
917387160 Lawn Mower View Diagrams & Manuals
917387161 Lawn Mower View Diagrams & Manuals
917387200 Lawn Mower View Diagrams & Manuals
917387201 Lawn Mower View Diagrams & Manuals
917387202 Lawn Mower View Diagrams & Manuals
917387203 Lawn Mower View Diagrams & Manuals
917387204 Lawn Mower View Diagrams & Manuals
917387205 Lawn Mower View Diagrams & Manuals
917387210 Lawn Mower View Diagrams & Manuals
917387211 Lawn Mower View Diagrams & Manuals
917387220 Lawn Mower View Diagrams & Manuals
917387221 Lawn Mower View Diagrams & Manuals
917387222 Lawn Mower View Diagrams & Manuals
917387223 Lawn Mower View Diagrams & Manuals
917387224 Lawn Mower View Diagrams & Manuals
917387225 Lawn Mower View Diagrams & Manuals
917387230 Lawn Mower View Diagrams & Manuals
917387231 Lawn Mower View Diagrams & Manuals
917387240 Lawn Mower View Diagrams & Manuals
917387241 Lawn Mower View Diagrams & Manuals
917387242 Lawn Mower View Diagrams & Manuals
917387250 Lawn Mower View Diagrams & Manuals
917387251 Lawn Mower View Diagrams & Manuals
917387252 Lawn Mower View Diagrams & Manuals
917387253 Lawn Mower View Diagrams & Manuals
917387254 Lawn Mower View Diagrams & Manuals
917387255 Lawn Mower View Diagrams & Manuals
917387256 Lawn Mower View Diagrams & Manuals
917387257 Lawn Mower View Diagrams & Manuals
917387258 Lawn Mower View Diagrams & Manuals
917387260 Lawn Mower View Diagrams & Manuals
917387261 Lawn Mower View Diagrams & Manuals
917387262 Lawn Mower View Diagrams & Manuals
917387270 Lawn Mower View Diagrams & Manuals
917387271 Lawn Mower View Diagrams & Manuals
917387272 Lawn Mower View Diagrams & Manuals
917387280 Lawn Mower View Diagrams & Manuals
917387281 Lawn Mower View Diagrams & Manuals
917387282 Lawn Mower View Diagrams & Manuals
917387290 Lawn Mower View Diagrams & Manuals
917387291 Lawn Mower View Diagrams & Manuals
917387292 Lawn Mower View Diagrams & Manuals
917387300 Lawn Mower View Diagrams & Manuals
917387301 Lawn Mower View Diagrams & Manuals
917387302 Lawn Mower View Diagrams & Manuals
917387320 Lawn Mower View Diagrams & Manuals
917387321 Lawn Mower View Diagrams & Manuals
917387322 Lawn Mower View Diagrams & Manuals
917387323 Lawn Mower View Diagrams & Manuals
917387330 Lawn Mower View Diagrams & Manuals
917387331 Lawn Mower View Diagrams & Manuals
917387332 Lawn Mower View Diagrams & Manuals
917387350 Lawn Mower View Diagrams & Manuals
917387360 Lawn Mower View Diagrams & Manuals
917387370 Lawn Mower View Diagrams & Manuals
917387380 Lawn Mower View Diagrams & Manuals
917387381 Lawn Mower View Diagrams & Manuals
917387382 Lawn Mower View Diagrams & Manuals
917387390 Lawn Mower View Diagrams & Manuals
917387400 Lawn Mower View Diagrams & Manuals
917387401 Lawn Mower View Diagrams & Manuals
917387402 Lawn Mower View Diagrams & Manuals
917387410 Lawn Mower View Diagrams & Manuals
917387411 Lawn Mower View Diagrams & Manuals
917387412 Lawn Mower View Diagrams & Manuals
917387430 Lawn Mower View Diagrams & Manuals
917387440 Lawn Mower View Diagrams & Manuals
917387441 Lawn Mower View Diagrams & Manuals
917387442 Lawn Mower View Diagrams & Manuals
917387460 Lawn Mower View Diagrams & Manuals
917387461 Lawn Mower View Diagrams & Manuals
917387470 Lawn Mower View Diagrams & Manuals
917387471 Lawn Mower View Diagrams & Manuals
917387472 Lawn Mower View Diagrams & Manuals
917387480 Lawn Mower View Diagrams & Manuals
917387500 Lawn Mower View Diagrams & Manuals
917387501 Lawn Mower View Diagrams & Manuals
917387530 Lawn Mower View Diagrams & Manuals
917387560 Lawn Mower View Diagrams & Manuals
917387561 Lawn Mower View Diagrams & Manuals
917387580 Lawn Mower View Diagrams & Manuals
917387581 Lawn Mower View Diagrams & Manuals
917387582 Lawn Mower View Diagrams & Manuals
917387600 Lawn Mower View Diagrams & Manuals
917387610 Lawn Mower View Diagrams & Manuals
917387611 Lawn Mower View Diagrams & Manuals
917387612 Lawn Mower View Diagrams & Manuals
917387613 Lawn Mower View Diagrams & Manuals
917387620 Lawn Mower View Diagrams & Manuals
917387630 Lawn Mower View Diagrams & Manuals
917387650 Lawn Mower View Diagrams & Manuals
917387660 Lawn Mower View Diagrams & Manuals
917387670 Lawn Mower View Diagrams & Manuals
917387671 Lawn Mower View Diagrams & Manuals
917387680 Lawn Mower View Diagrams & Manuals
917387690 Lawn Mower View Diagrams & Manuals
917387691 Lawn Mower View Diagrams & Manuals
917387700 Lawn Mower View Diagrams & Manuals
917387701 Lawn Mower View Diagrams & Manuals
917387720 Lawn Mower View Diagrams & Manuals
917387721 Lawn Mower View Diagrams & Manuals
917387760 Lawn Mower View Diagrams & Manuals
917387761 Lawn Mower View Diagrams & Manuals
917387820 Lawn Mower View Diagrams & Manuals
917387821 Lawn Mower View Diagrams & Manuals
917387830 Lawn Mower View Diagrams & Manuals
917387831 Lawn Mower View Diagrams & Manuals
917387840 Lawn Mower View Diagrams & Manuals
917387841 Lawn Mower View Diagrams & Manuals
917387850 Lawn Mower View Diagrams & Manuals
917387851 Lawn Mower View Diagrams & Manuals
917387852 Lawn Mower View Diagrams & Manuals
917387860 Lawn Mower View Diagrams & Manuals
917387861 Lawn Mower View Diagrams & Manuals
917387880 Lawn Mower View Diagrams & Manuals
917387990 Lawn Mower View Diagrams & Manuals
917387991 Lawn Mower View Diagrams & Manuals
917388010 Lawn Mower View Diagrams & Manuals
917388011 Lawn Mower View Diagrams & Manuals
917388012 Lawn Mower View Diagrams & Manuals
917388013 Lawn Mower View Diagrams & Manuals
917388020 Lawn Mower View Diagrams & Manuals
917388021 Lawn Mower View Diagrams & Manuals
917388022 Lawn Mower View Diagrams & Manuals
917388030 Lawn Mower View Diagrams & Manuals
917388040 Lawn Mower View Diagrams & Manuals
917388041 Lawn Mower View Diagrams & Manuals
917388042 Lawn Mower View Diagrams & Manuals
917388060 Lawn Mower View Diagrams & Manuals
917388061 Lawn Mower View Diagrams & Manuals
917388090 Lawn Mower View Diagrams & Manuals
917388092 Lawn Mower View Diagrams & Manuals
917388093 Lawn Mower View Diagrams & Manuals
917388100 Lawn Mower View Diagrams & Manuals
917388101 Lawn Mower View Diagrams & Manuals
917388102 Lawn Mower View Diagrams & Manuals
917388103 Lawn Mower View Diagrams & Manuals
917388104 Lawn Mower View Diagrams & Manuals
917388105 Lawn Mower View Diagrams & Manuals
917388106 Lawn Mower View Diagrams & Manuals
917388107 Lawn Mower View Diagrams & Manuals
917388108 Lawn Mower View Diagrams & Manuals
917388109 Lawn Mower View Diagrams & Manuals
917388110 Lawn Mower View Diagrams & Manuals
917388111 Lawn Mower View Diagrams & Manuals
917388112 Lawn Mower View Diagrams & Manuals
917388113 Lawn Mower View Diagrams & Manuals
917388114 Lawn Mower View Diagrams & Manuals
917388115 Lawn Mower View Diagrams & Manuals
917388121 Lawn Mower View Diagrams & Manuals
917388122 Lawn Mower View Diagrams & Manuals
917388123 Lawn Mower View Diagrams & Manuals
917388124 Lawn Mower View Diagrams & Manuals
917388125 Lawn Mower View Diagrams & Manuals
917388126 Lawn Mower View Diagrams & Manuals
917388127 Lawn Mower View Diagrams & Manuals
917388128 Lawn Mower View Diagrams & Manuals
917388130 Lawn Mower View Diagrams & Manuals
917388131 Lawn Mower View Diagrams & Manuals
917388132 Lawn Mower View Diagrams & Manuals
917388133 Lawn Mower View Diagrams & Manuals
917388134 Lawn Mower View Diagrams & Manuals
917388140 Lawn Mower View Diagrams & Manuals
917388141 Lawn Mower View Diagrams & Manuals
917388142 Lawn Mower View Diagrams & Manuals
917388150 Lawn Mower View Diagrams & Manuals
917388151 Lawn Mower View Diagrams & Manuals
917388152 Lawn Mower View Diagrams & Manuals
917388153 Lawn Mower View Diagrams & Manuals
917388190 Lawn Mower View Diagrams & Manuals
917388191 Lawn Mower View Diagrams & Manuals
917388193 Lawn Mower View Diagrams & Manuals
917388200 Lawn Mower View Diagrams & Manuals
917388203 Lawn Mower View Diagrams & Manuals
917388220 Lawn Mower View Diagrams & Manuals
917388221 Lawn Mower View Diagrams & Manuals
917388222 Lawn Mower View Diagrams & Manuals
917388223 Lawn Mower View Diagrams & Manuals
917388224 Lawn Mower View Diagrams & Manuals
917388225 Lawn Mower View Diagrams & Manuals
917388230 Lawn Mower View Diagrams & Manuals
917388260 Lawn Mower View Diagrams & Manuals
917388261 Lawn Mower View Diagrams & Manuals
917388262 Lawn Mower View Diagrams & Manuals
917388270 Lawn Mower View Diagrams & Manuals
917388271 Lawn Mower View Diagrams & Manuals
917388272 Lawn Mower View Diagrams & Manuals
917388280 Lawn Mower View Diagrams & Manuals
917388290 Lawn Mower View Diagrams & Manuals
917388300 Lawn Mower View Diagrams & Manuals
917388320 Lawn Mower View Diagrams & Manuals
917388321 Lawn Mower View Diagrams & Manuals
917388330 Lawn Mower View Diagrams & Manuals
917388340 Lawn Mower View Diagrams & Manuals
917388350 Lawn Mower View Diagrams & Manuals
917388351 Lawn Mower View Diagrams & Manuals
917388360 Lawn Mower View Diagrams & Manuals
917388370 Lawn Mower View Diagrams & Manuals
917388380 Lawn Mower View Diagrams & Manuals
917388381 Lawn Mower View Diagrams & Manuals
917388382 Lawn Mower View Diagrams & Manuals
917388383 Lawn Mower View Diagrams & Manuals
917388390 Lawn Mower View Diagrams & Manuals
917388391 Lawn Mower View Diagrams & Manuals
917388400 Lawn Mower View Diagrams & Manuals
917388410 Lawn Mower View Diagrams & Manuals
917388420 Lawn Mower View Diagrams & Manuals
917388430 Lawn Mower View Diagrams & Manuals
917388431 Lawn Mower View Diagrams & Manuals
917388440 Lawn Mower View Diagrams & Manuals
917388442 Lawn Mower View Diagrams & Manuals
917388450 Lawn Mower View Diagrams & Manuals
917388460 Lawn Mower View Diagrams & Manuals
917388480 Lawn Mower View Diagrams & Manuals
917388500 Lawn Mower View Diagrams & Manuals
917388511 Lawn Mower View Diagrams & Manuals
917388512 Lawn Mower View Diagrams & Manuals
917388513 Lawn Mower View Diagrams & Manuals
917388520 Lawn Mower View Diagrams & Manuals
917388521 Lawn Mower View Diagrams & Manuals
917388522 Lawn Mower View Diagrams & Manuals
917388530 Lawn Mower View Diagrams & Manuals
917388531 Lawn Mower View Diagrams & Manuals
917388540 Lawn Mower View Diagrams & Manuals
917388541 Lawn Mower View Diagrams & Manuals
917388550 Lawn Mower View Diagrams & Manuals
917388551 Lawn Mower View Diagrams & Manuals
917388552 Lawn Mower View Diagrams & Manuals
917388553 Lawn Mower View Diagrams & Manuals
917388560 Lawn Mower View Diagrams & Manuals
917388561 Lawn Mower View Diagrams & Manuals
917388562 Lawn Mower View Diagrams & Manuals
917388563 Lawn Mower View Diagrams & Manuals
917388570 Lawn Mower View Diagrams & Manuals
917388571 Lawn Mower View Diagrams & Manuals
917388572 Lawn Mower View Diagrams & Manuals
917388590 Lawn Mower View Diagrams & Manuals
917388592 Lawn Mower View Diagrams & Manuals
917388600 Lawn Mower View Diagrams & Manuals
917388610 Lawn Mower View Diagrams & Manuals
917388611 Lawn Mower View Diagrams & Manuals
917388621 Lawn Mower View Diagrams & Manuals
917388630 Lawn Mower View Diagrams & Manuals
917388631 Lawn Mower View Diagrams & Manuals
917388632 Lawn Mower View Diagrams & Manuals
917388650 Lawn Mower View Diagrams & Manuals
917388651 Lawn Mower View Diagrams & Manuals
917388652 Lawn Mower View Diagrams & Manuals
917388660 Lawn Mower View Diagrams & Manuals
917388661 Lawn Mower View Diagrams & Manuals
917388670 Lawn Mower View Diagrams & Manuals
917388680 Lawn Mower View Diagrams & Manuals
917388690 Lawn Mower View Diagrams & Manuals
917388720 Lawn Mower View Diagrams & Manuals
917388730 Lawn Mower View Diagrams & Manuals
917388731 Lawn Mower View Diagrams & Manuals
917388740 Lawn Mower View Diagrams & Manuals
917388741 Lawn Mower View Diagrams & Manuals
917388742 Lawn Mower View Diagrams & Manuals
917388750 Lawn Mower View Diagrams & Manuals
917388751 Lawn Mower View Diagrams & Manuals
917388760 Lawn Mower View Diagrams & Manuals
917388800 Lawn Mower View Diagrams & Manuals
917388801 Lawn Mower View Diagrams & Manuals
917388810 Lawn Mower View Diagrams & Manuals
917388811 Lawn Mower View Diagrams & Manuals
917388812 Lawn Mower View Diagrams & Manuals
917388820 Lawn Mower View Diagrams & Manuals
917388830 Lawn Mower View Diagrams & Manuals
917388831 Lawn Mower View Diagrams & Manuals
917388832 Lawn Mower View Diagrams & Manuals
917388833 Lawn Mower View Diagrams & Manuals
917388834 Lawn Mower View Diagrams & Manuals
917388840 Lawn Mower View Diagrams & Manuals
917388841 Lawn Mower View Diagrams & Manuals
917388842 Lawn Mower View Diagrams & Manuals
917388843 Lawn Mower View Diagrams & Manuals
917388851 Lawn Mower View Diagrams & Manuals
917388852 Lawn Mower View Diagrams & Manuals
917388853 Lawn Mower View Diagrams & Manuals
917388860 Lawn Mower View Diagrams & Manuals
917388880 Lawn Mower View Diagrams & Manuals
917388890 Lawn Mower View Diagrams & Manuals
917388891 Lawn Mower View Diagrams & Manuals
917388892 Lawn Mower View Diagrams & Manuals
917388893 Lawn Mower View Diagrams & Manuals
917388894 Lawn Mower View Diagrams & Manuals
917388895 Lawn Mower View Diagrams & Manuals
917388900 Lawn Mower View Diagrams & Manuals
917388910 Lawn Mower View Diagrams & Manuals
917388920 Lawn Mower View Diagrams & Manuals
917388930 Lawn Mower View Diagrams & Manuals
917388931 Lawn Mower View Diagrams & Manuals
917388932 Lawn Mower View Diagrams & Manuals
917388933 Lawn Mower View Diagrams & Manuals
917388934 Lawn Mower View Diagrams & Manuals
917388940 Lawn Mower View Diagrams & Manuals
917388941 Lawn Mower View Diagrams & Manuals
917388942 Lawn Mower View Diagrams & Manuals
917388950 Lawn Mower View Diagrams & Manuals
917388951 Lawn Mower View Diagrams & Manuals
917388952 Lawn Mower View Diagrams & Manuals
917388953 Lawn Mower View Diagrams & Manuals
917388954 Lawn Mower View Diagrams & Manuals
917388955 Lawn Mower View Diagrams & Manuals
917388960 Lawn Mower View Diagrams & Manuals
917388962 Lawn Mower View Diagrams & Manuals
917388963 Lawn Mower View Diagrams & Manuals
917388964 Lawn Mower View Diagrams & Manuals
917388965 Lawn Mower View Diagrams & Manuals
917388966 Lawn Mower View Diagrams & Manuals
917388970 Lawn Mower View Diagrams & Manuals
917388971 Lawn Mower View Diagrams & Manuals
917388972 Lawn Mower View Diagrams & Manuals
917388981 Lawn Mower View Diagrams & Manuals
917389010 Lawn Mower View Diagrams & Manuals
917389011 Lawn Mower View Diagrams & Manuals
917389020 Lawn Mower View Diagrams & Manuals
917389040 Lawn Mower View Diagrams & Manuals
917389050 Lawn Mower View Diagrams & Manuals
917389051 Lawn Mower View Diagrams & Manuals
917389052 Lawn Mower View Diagrams & Manuals
917389060 Lawn Mower View Diagrams & Manuals
917389061 Lawn Mower View Diagrams & Manuals
917389062 Lawn Mower View Diagrams & Manuals
917389064 Lawn Mower View Diagrams & Manuals
917389070 Lawn Mower View Diagrams & Manuals
917389071 Lawn Mower View Diagrams & Manuals
917389100 Lawn Mower View Diagrams & Manuals
917389151 Lawn Mower View Diagrams & Manuals
917389200 Lawn Mower View Diagrams & Manuals
917389220 Lawn Mower View Diagrams & Manuals
917389240 Lawn Mower View Diagrams & Manuals
917389250 Lawn Mower View Diagrams & Manuals
917389260 Lawn Mower View Diagrams & Manuals
917389270 Lawn Mower View Diagrams & Manuals
917389290 Lawn Mower View Diagrams & Manuals
917389310 Lawn Mower View Diagrams & Manuals
917389320 Lawn Mower View Diagrams & Manuals
917389340 Lawn Mower View Diagrams & Manuals
917389350 Lawn Mower View Diagrams & Manuals
917389380 Lawn Mower View Diagrams & Manuals
917389381 Lawn Mower View Diagrams & Manuals
917389382 Lawn Mower View Diagrams & Manuals
917389390 Lawn Mower View Diagrams & Manuals
917389470 Lawn Mower View Diagrams & Manuals
917389490 Lawn Mower View Diagrams & Manuals
917389500 Lawn Mower View Diagrams & Manuals
917389510 Lawn Mower View Diagrams & Manuals
917389511 Lawn Mower View Diagrams & Manuals
917389521 Lawn Mower View Diagrams & Manuals
917389581 Lawn Mower View Diagrams & Manuals
917389591 Lawn Mower View Diagrams & Manuals
917389610 Lawn Mower View Diagrams & Manuals
917389611 Lawn Mower View Diagrams & Manuals
917389612 Lawn Mower View Diagrams & Manuals
917389620 Lawn Mower View Diagrams & Manuals
917389621 Lawn Mower View Diagrams & Manuals
917389622 Lawn Mower View Diagrams & Manuals
917389680 Lawn Mower View Diagrams & Manuals
917389690 Lawn Mower View Diagrams & Manuals
917389760 Lawn Mower View Diagrams & Manuals
917389990 Lawn Mower View Diagrams & Manuals
9174787A Lawn Mower View Diagrams & Manuals
9174789A Lawn Mower View Diagrams & Manuals
9174790A Lawn Mower View Diagrams & Manuals
9174790B Lawn Mower View Diagrams & Manuals
9174791A Lawn Mower View Diagrams & Manuals
9174791B Lawn Mower View Diagrams & Manuals
917992110 Lawn Mower View Diagrams & Manuals
9179993A Lawn Mower View Diagrams & Manuals
9179995A Lawn Mower View Diagrams & Manuals
9179995B Lawn Mower View Diagrams & Manuals
9179997A Lawn Mower View Diagrams & Manuals
9179997B Lawn Mower View Diagrams & Manuals
9179997C Lawn Mower View Diagrams & Manuals
9179998A Lawn Mower View Diagrams & Manuals
9179998B Lawn Mower View Diagrams & Manuals
9179998C Lawn Mower View Diagrams & Manuals
917773703 Trimmer View Diagrams & Manuals
917773704 Trimmer View Diagrams & Manuals
917773705 Trimmer View Diagrams & Manuals
917773706 Trimmer View Diagrams & Manuals
917773707 Trimmer View Diagrams & Manuals
917773711 Trimmer View Diagrams & Manuals
917773730 Trimmer View Diagrams & Manuals
917773740 Trimmer View Diagrams & Manuals
917773742 Trimmer View Diagrams & Manuals
917773743 Trimmer View Diagrams & Manuals
917773744 Trimmer View Diagrams & Manuals
917773745 Trimmer View Diagrams & Manuals
917773746 Trimmer View Diagrams & Manuals
917773753 Trimmer View Diagrams & Manuals
917773754 Trimmer View Diagrams & Manuals
917773760 Trimmer View Diagrams & Manuals
917773761 Trimmer View Diagrams & Manuals
917773762 Trimmer View Diagrams & Manuals
917773763 Trimmer View Diagrams & Manuals
917773764 Trimmer View Diagrams & Manuals
917.376592 Electric Start Rotary Lawn Mower View Diagrams & Manuals
917377061 Rotary Lawn Mower View Diagrams & Manuals
917376821 Walk-Behind Lawn Mower View Diagrams & Manuals
917374352 Walk-Behind Rotary Lawn Mower View Diagrams & Manuals
917.377190 Gas Walk Behind Lawnmower View Diagrams & Manuals
944101761 Lawn Mower View Diagrams & Manuals
944364153 Lawn Mower View Diagrams & Manuals
944364741 Lawn Mower View Diagrams & Manuals
944364701 Lawn Mower View Diagrams & Manuals
944101781 Lawn Mower View Diagrams & Manuals
917.384518 (6021 P)(2012-03) (Sears) Walk-Behind Mower View Diagrams & Manuals
Ryobi
96116000200 Mower View Diagrams & Manuals
Murray
M20300 (2012 96114002402) 20-In. Walk Behind Mower View Diagrams & Manuals
M20300 (2012 96114002702) 20-In. Walk Behind Mower View Diagrams & Manuals
Show More Compatible Models
This item works with the following types of products:
- Lawn Mower Parts
- Snowblower Parts
- Trimmer Parts
- Lawn Tractor Parts
This part replaces obsolete part #: 851084, 5324353-45, 532435345
Customer Part Reviews ?
Average Rating (out of 5):
Click to filter by ratings:
5 stars
9
4 stars
2
3 stars
0
2 stars
0
1 stars
0
< PREV
- 1
- 2
Perfect fit
Thank you for sending the correct part!!
Mark -
September 14, 2021
Verified Purchase
Easy
Researched on site, purchased, here in a few days! Excellent!!!
Guest -
September 4, 2021
Verified Purchase
Worked as expected
Fixed my mower and it's working great!
PayPal 2020-07-31 Fix -
August 21, 2020
Verified Purchase
Speedy service
Ordered on a Saturday, shipped promptly and received in 4-5 days from day of order. Great and speedy service. Thank you.
Guest -
April 27, 2020
Verified Purchase
Arrived faster than expected
Part looks right but haven’t used yet.
Guest -
March 23, 2020
Verified Purchase
Good product
The product was new condition, arrived quickly and my mower is fixed and working great
Jon -
September 16, 2019
Verified Purchase
Great assistance identifying part I needed
Associate I spoke with helped me quickly identify a part for a Husqvarna mower with various versions. Timely shipping on exactly what I needed
Guest -
July 22, 2019
Verified Purchase
original equipment parts are great
perfect fit, add your site makes it easy to find
Guest -
June 4, 2019
Verified Purchase
Exactly as Ordered
Perfect replacement.
Guest -
May 24, 2019
Verified Purchase
Right fit
Fit perfectly..
Guest -
August 27, 2019
Verified Purchase
t
t
t -
t days ago
Verified Purchase
eReplacementParts Team
t
Questions & Answers ?
Our customer Service team is at the ready daily to answer your part and product questions.

Ask our Team
We have a dedicated staff with decades of collective experience in helping customers just like you purchase parts to repair their products.
Does this fit my product?Questions & Answers for Hex Head Screw
No questions have been asked yet
Customer Repair Instructions ?
All our customer repair instructions are solicited directly from other customers just like you who have purchased and replaced this exact part.
Blade Sheared off the mower from thick grass
Ken - May 31, 2018
👍 5 of 5 people found this instruction helpful
Tool Type
Lawn Mower
Difficulty
Medium
Time
15-30 minutes
Tools Used
Socket set
Removed the broken bolt.
Replaced the adapter.
Installed new blade and bolt.
2nd time this has happened.
Replaced the adapter.
Installed new blade and bolt.
2nd time this has happened.
Did you find this story helpful?
Thanks for voting and helping fellow customers!
Adapter broke, hex head screw broke
James - December 18, 2017
👍 3 of 3 people found this instruction helpful
Tool Type
Lawn Mower
Difficulty
Easy
Time
Less than 15 minutes
Tools Used
Socket set
1. Removed the broken part of the hex head screw.
2. Removed the adapter
3. Installed new adapter
4. Attached blade with the hardened washer and Hex headed screw.
5. Job complete
2. Removed the adapter
3. Installed new adapter
4. Attached blade with the hardened washer and Hex headed screw.
5. Job complete
Did you find this story helpful?
Thanks for voting and helping fellow customers!
Key sheared off in blade adapter on lawn mower
Keith - May 22, 2018
👍 1 of 1 people found this instruction helpful
Tool Type
Lawn Mower
Difficulty
Medium
Time
30-60 minutes
Tools Used
Socket set, Metal file
Old bolt was sheared off and old adapter had to be removed with a gear puller.
The end of the motor crankshaft had to be cleaned up for the new adapter to fit.
After this everything went back together OK.
The end of the motor crankshaft had to be cleaned up for the new adapter to fit.
After this everything went back together OK.
Did you find this story helpful?
Thanks for voting and helping fellow customers!
Sheared off bolt that holds blade on mower
Charles - May 18, 2018
👍 1 of 1 people found this instruction helpful
Tool Type
Lawn Mower
Difficulty
Medium
Time
1-2 hours
Tools Used
, hammer + steel punch
Parts Used
I drained the gas out of the tank so I could place mower upside down on saw horses. Some oil leaked out which I captured with news paper under mower. With WD-40, I soaked the piece of the original bolt, which had sheared off about 1/4" inside the threaded socket. I repeated this several times for an hour or so. Then, I took the punch, and hammered the piece of the bolt in the "un-screw" direction, repeating the WD-40 soaking between tapping. Eventually, the bolt piece started backing out of the threaded socket until I could grab it with a vice grip, and remove it from the threaded socket. Then, I mounted the blade back on the mower using replacement bolt. Have patience. Work slowly. Use plenty of WD-40, and the piece of bolt should come out.
Did you find this story helpful?
Thanks for voting and helping fellow customers!
Blade adapter stripped and bolt broke
Douglas - December 1, 2017
👍 1 of 1 people found this instruction helpful
Tool Type
Lawn Mower
Difficulty
Easy
Time
Less than 15 minutes
Tools Used
Socket set
Removed the broken bolt. Installed new adapter, bolt, washer and lock washer with existing blade. Good as new.
Did you find this story helpful?
Thanks for voting and helping fellow customers!
Bolt holding sleeve and mower blade to crankshaft broke 1/2 way into crankshaft.
Terry - November 28, 2017
👍 1 of 1 people found this instruction helpful
Tool Type
Lawn Mower
Difficulty
Easy
Time
15-30 minutes
Tools Used
Power Drill, Wrench Set, VISE GRIPS, EASY--OUT
Drilled hole into the part of the broken bolt still inside crankshaft, I then heated the bolt that was still inside the crankshaft with a propane soldering torch and used penetrating oil to soak into thread and then used an easy-out to remove the remaining half of the bolt from inside crankshaft.
I then replaced the old parts with the new ones I had purchased from your company
I then replaced the old parts with the new ones I had purchased from your company
Did you find this story helpful?
Thanks for voting and helping fellow customers!
Engine went , had to replace engine with all sub parts.
James - November 15, 2022
Tool Type
Lawn Mower
Difficulty
Easy
Time
1-2 hours
Tools Used
Screwdriver, Pliers, Power Drill, Socket set, Wrench Set
1. Removed old blade and engine.
2. Cleaned up everything.
3. Installed sub parts on new motor.
4. Installed new motor on deck.
5.Installed new blade hub on motor shaft.
6. Installed new blade.
7. Installed new throttle cable.
8.Completed all sub components on motor and deck.
9. Added oil and gas.
10. Start engine for breakin and test cut.
Did you find this story helpful?
Thanks for voting and helping fellow customers!
Star shape on adapter stripped off after SOMEBODY hit a immovable object.
David - October 3, 2021
Tool Type
Lawn Mower
Difficulty
Easy
Time
Less than 15 minutes
Tools Used
Socket set, Leather gloves to hold blade & WD-40 & maybe a screwdriver
1. Remove gas from tank.
2. Tip mower onto side with gas cap down.
3. Remove blade bolt with 9/16 socket wrench and remove bolt and blade..
4.Tap adapter with rubber hammer until loose.
5. Slide adapter down engine shaft until you can remove self-propel belt off pulley on adapter. Might have to use screwdriver to get belt started off pulley then it's comes off easy once it's past the guides on the bottom of the mower.
6. Reverse procedure. Slide new adapter onto engine shaft. I put a little WD-40 on shaft first. It only goes on one way on the shaft.
7. Put drive belt back on making sure adapter is all the way up on engine shaft and drive belt is in pulley groove and under belt guides on mower.
8. Install blade onto star shape on adapter and hold in place as you install blade bolt with flat washer and lock washer. Tighten to spec with socket wrench.
9. Put some gas in the gas tank and send your girlfriend back out to mow! ;-)
Did you find this story helpful?
Thanks for voting and helping fellow customers!
the original screw was stripped of the tread
Melissa - September 1, 2021
Tool Type
Lawn Mower
Difficulty
Easy
Time
Less than 15 minutes
Tools Used
Socket set
Parts Used
ordered the part online, received it installed perfect fit
Did you find this story helpful?
Thanks for voting and helping fellow customers!
Lawnmower blad was bent had taken the blade off and had lost the screw for the blade
Charita - August 9, 2021
Tool Type
Lawn Mower
Difficulty
Easy
Time
Less than 15 minutes
Tools Used
Adjustable Wrench, None
Well the blade was already off just leaned the lawnmower back. Put new blade on then put washer then hex had screw and tighten with wrench. Think I did well being a woman...
Did you find this story helpful?
Thanks for voting and helping fellow customers!
Load More Install Stories
OEM stands for Original Equipment Manufacturer and means the part you’re buying is sourced directly from the manufacturer who made your product. At eReplacementParts, we sell only genuine OEM parts, guaranteeing the part you’re purchasing is of better design and of higher quality than aftermarket parts.
Our product descriptions are a combination of data sourced directly from the manufacturers who made your product as well as content researched and curated by our content & customer service teams. This content is edited and reviewed internally before being made public to customers.
Our customer service team are at the ready daily to answer your part and product questions. We have a dedicated staff with decades of collective experience in helping customers just like you purchase parts to repair their products.
All our part reviews are solicited directly from other customers who have purchased this exact part. While we moderate these reviews for profanity, offensive language or personally identifiable information, these reviews are posted exactly as submitted and no alterations are made by our team.
All our customer repair instructions are solicited directly from other customers just like you who have purchased and replaced this exact part. While we moderate these reviews for profanity, offensive language or personally identifiable information, these reviews are posted exactly as submitted and no alterations are made by our team.
Based on data from past customer purchasing behaviors, these parts are most commonly purchased together along with the part you are viewing. These parts may be necessary or helpful to replace to complete your current repair.
All our installation videos are created and produced in collaboration with our in-house repair technician, Mark Sodja, who has helped millions of eReplacementParts customers over the last 13 years repair their products. Mark has years of experience in selling and repairing both commercial and residential products with a specialty in gas-powered equipment.
This data is collected from customers who submitted a repair instruction after replacing this exact part. Customers can rate how easy the repair was to complete and how long it took. We aggregate this data to provide a repair rating that allows customers to quickly determine the difficulty and time needed to perform their own repair.