eReplacementParts.com
877-346-4814
NuTone Parts
Repair Parts Home
  
HVAC Parts
  
NuTone Parts
  S97017648 Heater Assembly

Heater Assembly S97017648

OEM part for: Nutone, Broan

Part Number: S97017648


Install
Videos!
Heater Assembly - S97017648:Nutone 360 View
Heater Assembly - S97017648:NutoneHeater Assembly - S97017648:NutoneHeater Assembly - S97017648:NutoneHeater Assembly - S97017648:NutoneHeater Assembly - S97017648:NutoneHeater Assembly - S97017648:NutoneHeater Assembly - S97017648:NutoneHeater Assembly - S97017648:Nutone 360 View
$176.87
Usually ships in 7 - 12 business days
Leaves our warehouse within
7 - 12 business days
Easy Less than 15 minutes (25 rated repairs)?
OEM: Original Equipment Manufacturer ?
NutoneBroan
Does this d-block d-md-none fit my product?

Product Description ?

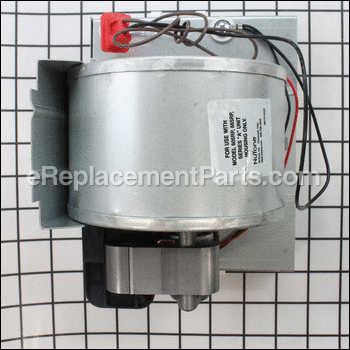
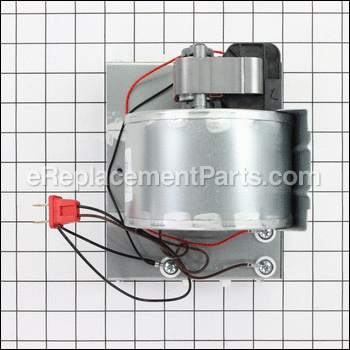
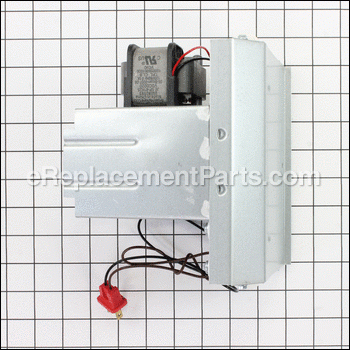
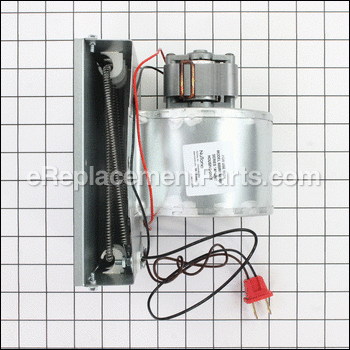
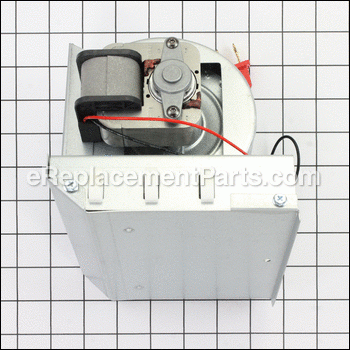
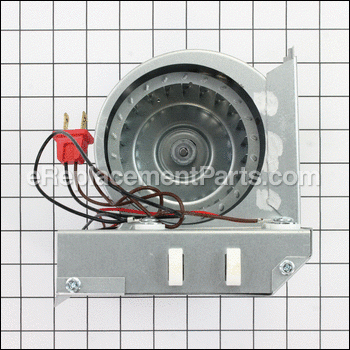
This genuine OEM heater assembly includes a scroll cover, scroll housing, motor, wheel, bolt assembly, element, hook (5), nut (6), screw (5), and a two-prong plug. It is sourced from the original manufacturer for use in ceiling heaters. If the appliance can no longer produce heat or switch on, the assembly should be replaced. Ensure that the power to the unit is turned off at the circuit breaker to prevent accidental shock. Remove the vent cover/grille to access the assembly. Unplug the heater assembly and remove the mounting screw(s) that hold it in place. Pull the faulty assembly out of the housing and place the new one in. Reinstall the mounting screw(s) and plug the assembly in. Reattach the cover/grill to complete the repair.

  • This part includes:
  • Scroll Cover
  • Motor
  • Scroll Housing
  • Wheel
  • Bolt Assembly
  • Element
  • Hook(5x)
  • Nut(6x)
  • Screw(5x)
  • Plug is two prong
  • Classification: Part
  • Weight: 4.02 lbs.
  • Shipping: Ships Worldwide

Frequently Purchased Together ?

Compatibility

This part will fit the following 14 machines

Nutone

605RP Ceiling Heater View Diagrams & Manuals
660RP Ceiling Heater View Diagrams & Manuals
665RF Ceiling Heater View Diagrams & Manuals
665RP Ceiling Heater View Diagrams & Manuals
665RSP Ceiling Heater View Diagrams & Manuals
9905 Ceiling Heater View Diagrams & Manuals
9965-R02 Ceiling Heater View Diagrams & Manuals

Broan

665RSP Valuetest Series Heater/Fan/Light - 1300 Watts / 70 Cfm / 4.0 Sones View Diagrams & Manuals
605RP Valuetest Series Heater/Fan - 1300 Watts / 70 Cfm / 4.0 Sones View Diagrams & Manuals
660RP Valuetest Series Heater/Light - 1500 Watts View Diagrams & Manuals
9905 Deluxe Series Heat-A-Vent - 1500 Watts / 70 Cfm / 4.0 Sones View Diagrams & Manuals
665RF Valuetest Series Heater/Fan/Light - 1500 Watts / 70 Cfm / 4.0 Sones View Diagrams & Manuals
665RP Valuetest Series Heater/Fan/Light - 1300 Watts / 70 Cfm / 4.0 Sones View Diagrams & Manuals
9965F Deluxe Series Heat-A-Ventlite - 1500 Watts / 70 Cfm / 4.0 Sones View Diagrams & Manuals
Show More Compatible Models
Don't see yours? Try searching our site for :

This item works with the following types of products:

  • Heater Parts

This part replaces obsolete part #: 97017648

Repair Videos ?

Watch the Repair Video for Heater Assembly

Customer Part Reviews ?

5
Average Rating (out of 5):
11 Reviews
Click to filter by ratings:
5 stars
11
4 stars
0
3 stars
0
2 stars
0
1 stars
0
  • Highest Rating
  • Most Recent
< PREV
  • 1
  • 2
NEXT >
  • Replacement heater
    The part arrived as promised and the installation was quick and easy. Thank you for providing a great product. It’s nice to have a heater in the bathroom again.
    Leslie - September 26, 2023 Verified Purchase
    Worked as expected
    Arrived Perfect condition. No problem installing. Very good customer service when ordering the heater.
    Guest - April 8, 2023 Verified Purchase
    Old heater
    The part was wrong due to my mistake in ordering.
    Tony - March 28, 2023 Verified Purchase
    Heater Assembly
    The Heater assembly was easy to replace and works very well.A little pricey but it is a direct replacement that makes it a simple fix.
    Guest - February 5, 2023 Verified Purchase
    no problems
    fit good
    Guest - August 22, 2022 Verified Purchase
    Ceiling fan back in business!
    Both the replacement ceiling vent and heater were an exact fit. Only took about an hour to install both parts and they worked perfectly.
    Guest - January 4, 2022 Verified Purchase
    Nice replacement from original
    The original heater/fan had a plastic housing that became disfigured from heat. The replacement heater is a metal housing and seems more robust.
    Guest - April 6, 2021 Verified Purchase
    Easy Repair - great part
    The part was perfect and the replacement was easy.
    Guest - November 16, 2020 Verified Purchase
    Heater assembly Nutone ceiling fan
    Perfect match. Works as expected
    Guest - December 2, 2019 Verified Purchase
    Heater and Fan Replacements
    It's great to be able to take showers in a warm, non foggy bathroom again. I'm glad that the parts were available since my ceiling fan/light/heater assembly is long out of warranty.
    Guest - October 29, 2019 Verified Purchase
    t
    t
    t - t days ago Verified Purchase
    eReplacementParts Team
    t

    Questions & Answers ?

    Our customer Service team is at the ready daily to answer your part and product questions.

    photo of team member
    Ask our Team

    We have a dedicated staff with decades of collective experience in helping customers just like you purchase parts to repair their products.

    Does this fit my product?

    Questions & Answers for Heater Assembly


    My opening for the heating coil box is 8 in. wide by 6 in. deep, what is the with of your heating coil box, will it fit my opening?
    Dennis for model number 665RP asked on 2023-01-04
    Hello Dennis , Thank you for the Austen. The Opening for the Box is approximately 8" wide. We hope this helps!
    eReplacementParts Team January 04, 2023

    Customer Repair Instructions ?

    All our customer repair instructions are solicited directly from other customers just like you who have purchased and replaced this exact part.

    Easy Less than 15 minutes (25 rated repairs)?

    Heater no longer blew hot

    Kevin - January 26, 2016
    👍 9 of 9 people found this instruction helpful
    Tool Type

    Heater

    Difficulty

    Medium

    Time

    15-30 minutes

    Tools Used

    Screwdriver

    Remove lamp cover and bulb. Remove heater unit vent cover with screwdriver. Unplug heater. Remove screw holding heater in bracket (takes a little twisting around to get it to come out). I then cleaned the housing where I removed broken heater unit. Replace with new heater unit. Plug up the unit and put vent cover back on. Replace bulb and lamp cover.
    Note-replacement heater unit is different style as original, however instructions show both units in the drawings so you know this new one is a new replacement for original.
    Did you find this story helpful?
    Thanks for voting and helping fellow customers!

    Heater would not put out.

    Bob - November 21, 2016
    👍 5 of 5 people found this instruction helpful
    Tool Type

    Heater

    Difficulty

    Easy

    Time

    Less than 15 minutes

    Tools Used

    Screwdriver

    First off, the new replacement heater assembly is a thousand percent better constructed than the original. The original motor system was plastic, where as this is all steel. The heater it self is wider, giving you more heated air flow. Replacement was as easy as pie. One screw out, remove old in with new, one screw in. It took longer to take the vent cover, and light assembly off than replace the heater. Excellent product!!
    Did you find this story helpful?
    Thanks for voting and helping fellow customers!

    Motor burnt out

    Victoria - December 3, 2016
    👍 3 of 3 people found this instruction helpful
    Tool Type

    Heater

    Difficulty

    Easy

    Time

    Less than 15 minutes

    Tools Used

    Screwdriver

    1. Unscrewed cover
    2. Unplugged heating assembly
    3. Removed one screw that held heating assembly unit
    4. Removed unit
    5. Replaced with new unit
    6. Replace one screw that holds unit
    7. Replace cover
    Did you find this story helpful?
    Thanks for voting and helping fellow customers!

    Fan and heating element went out

    William - November 17, 2016
    👍 2 of 2 people found this instruction helpful
    Tool Type

    Heater

    Difficulty

    Easy

    Time

    15-30 minutes

    Tools Used

    Screwdriver, Nutdriver

    Removed old fan and element. Diagnosed the problem.
    Ordered new assembly from you.
    Installed new assembly fitment was good part was of good quality
    Did you find this story helpful?
    Thanks for voting and helping fellow customers!

    Nutone Bathroom heater quit working

    Keith - November 1, 2016
    👍 2 of 2 people found this instruction helpful
    Tool Type

    Heater

    Difficulty

    Easy

    Time

    Less than 15 minutes

    Tools Used

    Screwdriver

    1.Removed cover with single screw
    2.Unplugged the heater unit
    3.Removed single retaining screw
    4.Slid old heater out
    5.Slid new heater in
    6.Plugged new heater in
    7.Replaced single retaining screw
    8.Replaced cover with single screw
    Did you find this story helpful?
    Thanks for voting and helping fellow customers!

    Heater blower quit functioning

    Paul - January 20, 2018
    👍 1 of 1 people found this instruction helpful
    Tool Type

    Heater

    Difficulty

    Easy

    Time

    15-30 minutes

    Tools Used

    Screwdriver

    Removed the cover plate to the heater, removed the light bulb shield, unplugged the original heater assembly (blower), plugged replacement part in, and secured with single metal screw.
    Replaced light bulb shield, and cover plate.
    Did you find this story helpful?
    Thanks for voting and helping fellow customers!

    Heater stopped working

    Frederick - December 8, 2017
    👍 1 of 1 people found this instruction helpful
    Tool Type

    Heater

    Difficulty

    Easy

    Time

    15-30 minutes

    Tools Used

    Screwdriver

    1. Opened the 3-part composite unit - ie. overhead light unit, vent unit and heater unit by removing the plastic light cover, the light bulb and removing the one phillips-head screw holding the light unit to the entire assembly
    2. Removed the heater unit by first unplugging the power cord, removing a somewhat difficult to access screw that holds the heater unit to the entire assembly and by manipulating the heater unit mounting flange to release it from the entire assembly.
    3. Tested the new unit to ensure that it functions by plugging it into a power strip for a minute.
    4. Installed the new heater by reversing the process - i.e. placing the heater unit mounting flange into the holding slot, using a NEW screw to hold the Heater unit to the entire assembly as that which came with the new Heater unit was too big for the mounting hole in the entire assembly, plugging the power cord into the appropriate receptacle, replacing the light assembly and returning the light cover.
    Did you find this story helpful?
    Thanks for voting and helping fellow customers!

    Heater unit was cutting out after a few minutes

    John - November 5, 2016
    👍 2 of 3 people found this instruction helpful
    Tool Type

    Heater

    Difficulty

    Easy

    Time

    15-30 minutes

    Tools Used

    Screwdriver, Pliers

    Simple repair. Remove light cover and bulb and center screw to get the cover off. Then get to unit and remove one screw, unplug interior connection and wiggle out old unit. Slide new unit in catching tab up to pre attached screw and plug and reinstall cover and done. Saved $250 in a few minutes
    Did you find this story helpful?
    Thanks for voting and helping fellow customers!

    Just put it in one screw & plug it in

    Barbara - July 24, 2021
    Tool Type

    Heater

    Difficulty

    Easy

    Time

    Less than 15 minutes

    Tools Used

    Screwdriver, None

    Good thank you I have looked for just the heater assembly for my bathroom fan in stores for years. I am truly grateful for businesses that service repair or replace items the replacement for the entire fan would have been awful thank you for the part replacement
    Did you find this story helpful?
    Thanks for voting and helping fellow customers!

    Nothing

    Brian - December 22, 2019
    Tool Type

    Heater

    Difficulty

    Easy

    Time

    Less than 15 minutes

    Tools Used

    Screwdriver

    Easy process. Removed old unit and replaced it with the new one.
    Did you find this story helpful?
    Thanks for voting and helping fellow customers!

    OEM stands for Original Equipment Manufacturer and means the part you’re buying is sourced directly from the manufacturer who made your product. At eReplacementParts, we sell only genuine OEM parts, guaranteeing the part you’re purchasing is of better design and of higher quality than aftermarket parts.

    Our product descriptions are a combination of data sourced directly from the manufacturers who made your product as well as content researched and curated by our content & customer service teams. This content is edited and reviewed internally before being made public to customers.

    Our customer service team are at the ready daily to answer your part and product questions. We have a dedicated staff with decades of collective experience in helping customers just like you purchase parts to repair their products.

    All our part reviews are solicited directly from other customers who have purchased this exact part. While we moderate these reviews for profanity, offensive language or personally identifiable information, these reviews are posted exactly as submitted and no alterations are made by our team.

    All our customer repair instructions are solicited directly from other customers just like you who have purchased and replaced this exact part. While we moderate these reviews for profanity, offensive language or personally identifiable information, these reviews are posted exactly as submitted and no alterations are made by our team.

    Based on data from past customer purchasing behaviors, these parts are most commonly purchased together along with the part you are viewing. These parts may be necessary or helpful to replace to complete your current repair.

    All our installation videos are created and produced in collaboration with our in-house repair technician, Mark Sodja, who has helped millions of eReplacementParts customers over the last 13 years repair their products. Mark has years of experience in selling and repairing both commercial and residential products with a specialty in gas-powered equipment.

    This data is collected from customers who submitted a repair instruction after replacing this exact part. Customers can rate how easy the repair was to complete and how long it took. We aggregate this data to provide a repair rating that allows customers to quickly determine the difficulty and time needed to perform their own repair.

    eReplacementParts.com
    7174 South 400 West
    Suite 5
    Midvale, UT 84047
    visa mastercard discover american express PayPal