
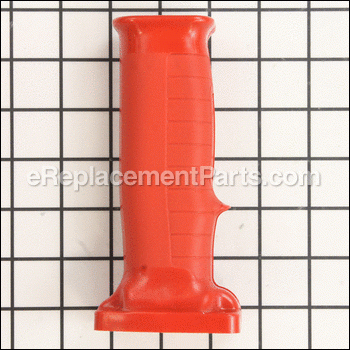
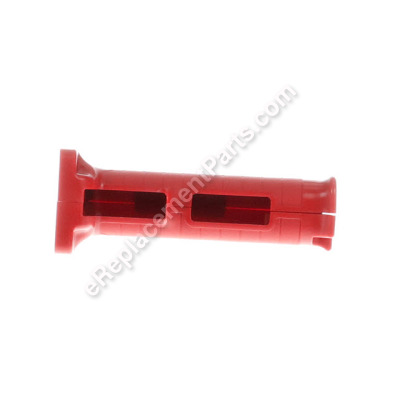


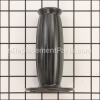
This plastic replacement handle fits various models of Milwaukee drills. It is an authentic replacement part assembled by original manufacturer. This is the main trigger handle which houses the cord, cord protector, and trigger switch. This part is sold individually.
Handle Set Service 31-44-1497
OEM part for: Milwaukee
Part Number: 31-44-1497
$11.38
In Stock
Jump To:
Frequently Purchased Together ?

Compatibility
This part will fit the following 57 machines
Milwaukee
1610-1 (SER 700A) Drill Press View Diagrams & Manuals
1660-1 (SER 719-29521) Drill Press View Diagrams & Manuals
1665-1 (SER 586-1001) Drill Press View Diagrams & Manuals
1675-1 (SER 413-336097) Two Speed Hole Hawg Drill View Diagrams & Manuals
1600-1 (SER 109-90001) Electric Drill / Driver View Diagrams & Manuals
1610-1 (SER 700-23791) Electric Drill / Driver View Diagrams & Manuals
1610-1 (SER 700-42061) Electric Drill / Driver View Diagrams & Manuals
1610-1 (SER 700-50000) Electric Drill / Driver View Diagrams & Manuals
1610-1 (SER 700B) Electric Drill / Driver View Diagrams & Manuals
1620-1 (SER 343-32501) Electric Drill / Driver View Diagrams & Manuals
1630-1 (SER 718-1001) Electric Drill / Driver View Diagrams & Manuals
1630-1 (SER 718-15756) Electric Drill / Driver View Diagrams & Manuals
1630-1 (SER 718-20000) Electric Drill / Driver View Diagrams & Manuals
1630-1 (SER 718-8206) Electric Drill / Driver View Diagrams & Manuals
1630-1 (SER 718A) Electric Drill / Driver View Diagrams & Manuals
1630-1 (SER 718B) Electric Drill / Driver View Diagrams & Manuals
1631-4 (SER 770-1001) Electric Drill / Driver View Diagrams & Manuals
1631-4 (SER 770A) Electric Drill / Driver View Diagrams & Manuals
1631-4 (SER 770B) Electric Drill / Driver View Diagrams & Manuals
1650-1 (SER 142-126501) Electric Drill / Driver View Diagrams & Manuals
1660-1 (SER 719-35446) Electric Drill / Driver View Diagrams & Manuals
1660-1 (SER 719-53025) Electric Drill / Driver View Diagrams & Manuals
1660-1 (SER 719-67000) Electric Drill / Driver View Diagrams & Manuals
1660-1 (SER 719A) Electric Drill / Driver View Diagrams & Manuals
1660-1 (SER 719B) Electric Drill / Driver View Diagrams & Manuals
1662-3 (SER 720-1001) Electric Drill / Driver View Diagrams & Manuals
1662-3 (SER 720-1211) Electric Drill / Driver View Diagrams & Manuals
1662-3 (SER 720-1400) Electric Drill / Driver View Diagrams & Manuals
1662-3 (SER 720-1765) Electric Drill / Driver View Diagrams & Manuals
1662-3 (SER 720-2000) Electric Drill / Driver View Diagrams & Manuals
1662-3 (SER 720A) Electric Drill / Driver View Diagrams & Manuals
1662-3 (SER 720B) Electric Drill / Driver View Diagrams & Manuals
1670-1 (SER 472-23375) Single Speed Hole Hawg Drill View Diagrams & Manuals
1670-1 (SER 472-24725) Single Speed Hole Hawg Drill View Diagrams & Manuals
1670-1 (SER 472A) Single Speed Hole Hawg Drill View Diagrams & Manuals
1670-1 (SER 472B) Single Speed Hole Hawg Drill View Diagrams & Manuals
1670-1 (SER 472C) Single Speed Hole Hawg Drill View Diagrams & Manuals
1670-1 (SER 472D) Single Speed Hole Hawg Drill View Diagrams & Manuals
1675-1 (SER 413-347251) Two Speed Hole Hawg Drill View Diagrams & Manuals
1675-1 (SER 413A) Two Speed Hole Hawg Drill View Diagrams & Manuals
1675-1 (SER 413B) Two Speed Hole Hawg Drill View Diagrams & Manuals
1675-1 (SER 413C) Two Speed Hole Hawg Drill View Diagrams & Manuals
1675-1 (SER 413D) Two Speed Hole Hawg Drill View Diagrams & Manuals
1679-01 (SER 915A) Electric Drill / Driver View Diagrams & Manuals
1754-1 (SER 566-2501) Electric Drill / Driver View Diagrams & Manuals
1754-1 (SER 566-2900) Electric Drill / Driver View Diagrams & Manuals
1754-1 (SER 566A) Electric Drill / Driver View Diagrams & Manuals
1754-1 (SER 566B) Electric Drill / Driver View Diagrams & Manuals
1854-1 (SER 567-11001) Electric Drill / Driver View Diagrams & Manuals
1854-1 (SER 567-17100) Electric Drill / Driver View Diagrams & Manuals
1854-1 (SER 567A) Electric Drill / Driver View Diagrams & Manuals
1854-1 (SER 567B) Electric Drill / Driver View Diagrams & Manuals
1854-3 (SER 567-145000) Electric Drill / Driver View Diagrams & Manuals
1854-3 (SER 567-146000) Electric Drill / Driver View Diagrams & Manuals
1854-3 (SER 567A) Electric Drill / Driver View Diagrams & Manuals
2404-1 (SER 568A) Electric Drill / Driver View Diagrams & Manuals
2404-1 (SER 568B) Electric Drill / Driver View Diagrams & Manuals
Show More Compatible Models
This item works with the following types of products:
- Drill Parts
- Drill Press Parts
- Electric Drill Parts
This part replaces obsolete part #: 31-44-1441, 31-44-1446, 31-44-1295, 31-44-1445
Customer Part Reviews ?
Average Rating (out of 5):
Click to filter by ratings:
5 stars
8
4 stars
0
3 stars
0
2 stars
0
1 stars
0
< PREV
- 1
matched
arrived fast and as expected
Guest -
April 17, 2021
Verified Purchase
Great service and part .
The handle fit perfect and I couldn’t find it anywhere else thank you
Guest -
March 27, 2021
Verified Purchase
exact fit for my drill. easy fix
Replaced handle for drill, back to new condition.
Guest -
January 28, 2021
Verified Purchase
Very pleased 🤙
I’ll be ordering again from your company very soon. Very pleased all around.
Guest -
December 24, 2020
Verified Purchase
Milwaukee drill handle
Quick delivery...fit perfect....good price
Guest -
February 18, 2020
Verified Purchase
Worked great you guys are the best. Thanks
Great
Guest -
February 8, 2020
Verified Purchase
Great service!
Parts look great, haven't installed yet but should be easy. Great communication and help when ordering!
Tom -
December 11, 2019
Verified Purchase
Service, price and quality all 5 stars.
thanks
Guest -
August 12, 2019
Verified Purchase
t
t
t -
t days ago
Verified Purchase
eReplacementParts Team
t
Questions & Answers ?
Our customer Service team is at the ready daily to answer your part and product questions.

Ask our Team
We have a dedicated staff with decades of collective experience in helping customers just like you purchase parts to repair their products.
Does this fit my product?Questions & Answers for Handle Set Service
No questions have been asked yet
Customer Repair Instructions ?
All our customer repair instructions are solicited directly from other customers just like you who have purchased and replaced this exact part.
Broken handle, frayed cord
Mark - December 29, 2017
👍 3 of 3 people found this instruction helpful
Tool Type
Drill
Difficulty
Medium
Time
1-2 hours
Tools Used
Screwdriver, Pliers, Power Drill, cutters
This was an older Milwaukee "Hole Hawg" drill with a broken handle and frayed cord. The correct handle was NLA, so I repaired it with a handle kit from a current unit. The power cord exits the handle in a different spot from the old handle and I missed buying the clamp for the power cable as well as the screws to hold the new handle together. There is a locking button on the older power switch that the new units don't have, so I had to drill the new handle for the button. Other than that, the old switch fit, and I was able to fit the new handle to the old drill. There is a small half-round gap between the new handle and the drill body where the old power cord used to go, but that is easily filled or left as-is. It was nice that in all of the years of production, the engineers at Milwaukee made it so the new parts would still fit the older drills with a minimum of trouble. It's also nice to see an old drill getting a new life with repair parts from eReplacementparts.com!
Did you find this story helpful?
Thanks for voting and helping fellow customers!
Dropped 1/2" drill and broke handle
Rick - January 21, 2019
👍 1 of 1 people found this instruction helpful
Tool Type
Electric Drill
Difficulty
Easy
Time
Less than 15 minutes
Tools Used
Screwdriver
Parts Used
Simple handle swop didn't need the instructions
Did you find this story helpful?
Thanks for voting and helping fellow customers!
Handle on 1/2" drill broken
Ron - April 15, 2017
👍 1 of 1 people found this instruction helpful
Tool Type
Electric Drill
Difficulty
Easy
Time
Less than 15 minutes
Tools Used
Screwdriver, Allen wrench
Parts Used
The handle replacement was very simple.
1. Removed switch from broken handle
2. Removed handle pieces from drill body
3. Installed one-half of handle on drill
4. Installed switch in new handle
5. Installed 2nd half of handle on drill
6. Done
Since the drill had not been been serviced for several years I opened it up for service.
removed all old grease, cleaned housing and gears with solvent, cleaned all the
accumulated dirt and grime from fan and housing, checked the brushes, re greased drill with mobile synthetic grease and re-assembled the drill.
entire time less than 1 hour.. Handle replacement itself less than 15 min
Did you find this story helpful?
Thanks for voting and helping fellow customers!
Handle required some modification to fit
Boehrig - January 27, 2022
Tool Type
Drill
Difficulty
Easy
Time
30-60 minutes
Tools Used
Screwdriver, None
After modifying the handle everything went well.
Did you find this story helpful?
Thanks for voting and helping fellow customers!
Handle set on my hole hawg was broken
James - April 21, 2021
Tool Type
Electric Drill
Difficulty
Easy
Time
Less than 15 minutes
Tools Used
Screwdriver
Parts Used
Remove the old handle set.
Route the wires and trigger switch in the new handle set.
Connect the two half's of the handle set.
Attach it to the drill motor.
Route the wires and trigger switch in the new handle set.
Connect the two half's of the handle set.
Attach it to the drill motor.
Did you find this story helpful?
Thanks for voting and helping fellow customers!
Hole hawg handle was broken
john - July 1, 2017
Tool Type
Electric Drill
Difficulty
Easy
Time
Less than 15 minutes
Tools Used
Screwdriver
Removed the broken handle and installed the new one
Did you find this story helpful?
Thanks for voting and helping fellow customers!
Plastic handle broken
William - June 1, 2017
Tool Type
Electric Drill
Difficulty
Easy
Time
Less than 15 minutes
Tools Used
Screwdriver, Torx bit
Parts Used
Remove the broken handle from the motor housing
Remove the cord clamp
Install one half of the handle half
Place the switch in the handle half
Install the cord clamp
Install the other half of the handle
Remove the cord clamp
Install one half of the handle half
Place the switch in the handle half
Install the cord clamp
Install the other half of the handle
Did you find this story helpful?
Thanks for voting and helping fellow customers!
Damaged cord and broken handle
jeff - January 17, 2017
Tool Type
Electric Drill
Difficulty
Easy
Time
15-30 minutes
Tools Used
Screwdriver, Pliers, Crimper
Remove the switch handle from the drill.
Remove the old cord wires from the switch and from the ground
Install the new cord to the switch with the switch clips ( YOU WILL NEED THESE )
Install the new switch and handle to the drill
Remove the old cord wires from the switch and from the ground
Install the new cord to the switch with the switch clips ( YOU WILL NEED THESE )
Install the new switch and handle to the drill
Did you find this story helpful?
Thanks for voting and helping fellow customers!
Handle was cracked and interfered with the trigger
Barbara - December 15, 2016
Tool Type
Electric Drill
Difficulty
Easy
Time
Less than 15 minutes
Tools Used
Screwdriver
Parts Used
1- Remove the screws from the handle and from the motor housing, & discard
2- Screw one half of the new handle switch to the housing
3- Place switch in the switch housing half
4- Screw both handle halves together
2- Screw one half of the new handle switch to the housing
3- Place switch in the switch housing half
4- Screw both handle halves together
Did you find this story helpful?
Thanks for voting and helping fellow customers!
Handle containing trigger switch damage during use
Craig - June 15, 2016
Tool Type
Electric Drill
Difficulty
Medium
Time
15-30 minutes
Tools Used
Power Drill
Parts Used
Removed screws holding handle to drill
Removed screws to split handle
Removed screws holding cord/stress reliever
Removed wiring, trigger switch and reversing switch
Placed switches and wiring into m New handle
Reversed above procedures
Tested drill for performance
Removed screws to split handle
Removed screws holding cord/stress reliever
Removed wiring, trigger switch and reversing switch
Placed switches and wiring into m New handle
Reversed above procedures
Tested drill for performance
Did you find this story helpful?
Thanks for voting and helping fellow customers!
Load More Install Stories
OEM stands for Original Equipment Manufacturer and means the part you’re buying is sourced directly from the manufacturer who made your product. At eReplacementParts, we sell only genuine OEM parts, guaranteeing the part you’re purchasing is of better design and of higher quality than aftermarket parts.
Our product descriptions are a combination of data sourced directly from the manufacturers who made your product as well as content researched and curated by our content & customer service teams. This content is edited and reviewed internally before being made public to customers.
Our customer service team are at the ready daily to answer your part and product questions. We have a dedicated staff with decades of collective experience in helping customers just like you purchase parts to repair their products.
All our part reviews are solicited directly from other customers who have purchased this exact part. While we moderate these reviews for profanity, offensive language or personally identifiable information, these reviews are posted exactly as submitted and no alterations are made by our team.
All our customer repair instructions are solicited directly from other customers just like you who have purchased and replaced this exact part. While we moderate these reviews for profanity, offensive language or personally identifiable information, these reviews are posted exactly as submitted and no alterations are made by our team.
Based on data from past customer purchasing behaviors, these parts are most commonly purchased together along with the part you are viewing. These parts may be necessary or helpful to replace to complete your current repair.
All our installation videos are created and produced in collaboration with our in-house repair technician, Mark Sodja, who has helped millions of eReplacementParts customers over the last 13 years repair their products. Mark has years of experience in selling and repairing both commercial and residential products with a specialty in gas-powered equipment.
This data is collected from customers who submitted a repair instruction after replacing this exact part. Customers can rate how easy the repair was to complete and how long it took. We aggregate this data to provide a repair rating that allows customers to quickly determine the difficulty and time needed to perform their own repair.