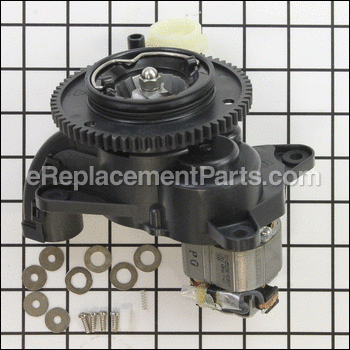

It is a genuine item that is supplied by the original equipment manufacturer for use with Breville coffee makers. This is a complete replacement for a missing or a faulty grinder assembly that was originally installed on a new unit. It is the part that grinds up the coffee beans. Please make sure to refer to the owners manual and the appropriate diagram of your model for the correct installation of this component. Keep in mind this high-quality grinder is sold individually. Note, the assembly includes the hardware to secure it.
Grinder Assembly Complete - Ve SP0023159
OEM part for: Breville
Part Number: SP0023159
$84.64
Usually ships in 7 - 12 business days
7 - 12 business days
Compatibility
This part will fit the following 1 machine
Breville
BES870XL The Barista Express View Diagrams & Manuals
This item works with the following types of products:
- Espresso Parts
This part replaces obsolete part #: BES870XL06, BES870XL/06, SP0010232
Customer Part Reviews ?
Average Rating (out of 5):
Click to filter by ratings:
5 stars
2
4 stars
0
3 stars
0
2 stars
0
1 stars
0
< PREV
- 1
Works well
It was simple to replace
Rick -
July 22, 2023
Verified Purchase
It was the right part and fixed the problem
The ordering process was Good. The part was back-ordered from the manufacturer so a little delay in delivery but it was shipped as soon as they received it. Installation went as expected with all parts included.
Guest -
December 28, 2022
Verified Purchase
t
t
t -
t days ago
Verified Purchase
eReplacementParts Team
t
Questions & Answers ?
Our customer Service team is at the ready daily to answer your part and product questions.

Ask our Team
We have a dedicated staff with decades of collective experience in helping customers just like you purchase parts to repair their products.
Does this fit my product?Questions & Answers for Grinder Assembly Complete - Ve
Does this include the lower and upper burr as pictured? Basically the entire grinder and all grinder parts?
Chase
for model number BES870XL
asked on 2023-12-30
Hello Chase, Thank you for your inquiry. We show it does include the upper and lower burr. We hope this helps.
eReplacementParts Team December 30, 2023
Customer Repair Instructions ?
All our customer repair instructions are solicited directly from other customers just like you who have purchased and replaced this exact part.
Grinder was not working, needed replacement
Matthew - February 21, 2017
👍 5 of 10 people found this instruction helpful
Tool Type
Espresso
Difficulty
Medium
Time
30-60 minutes
Tools Used
Screwdriver, Power Drill, Electrical tape
Parts Used
Remove screw in order to remove top and back of espresso machine. The caps covering screws under water container are hard to pry off. I used a small drill bit to drill a hole in each cap in order to insert a small nail in order to pry out. Move electrical board to the side in order to access black and white grinder wires. Twist off old wire connectors. Remove grinder by first removing screws holding it in. I did not have wire nuts to attach new wires so I used electrical tape.
Did you find this story helpful?
Thanks for voting and helping fellow customers!
slow at grinding. At full grind amount,still took two to three starts to fill filter basket.
Scott - March 27, 2023
👍 0 of 1 people found this instruction helpful
Tool Type
Espresso
Difficulty
Medium
Time
15-30 minutes
Tools Used
Screwdriver, wire strippers
Parts Used
opened top and back panels on espresso machine.(videos on you tube)
swapped old grinder assembly with new.
reconnected motor wires with supplied wire nuts.
reinstalled covers.
espresso machine works like new again.
Note: First tried replacing upper burr grinder for this problem but did not help.
swapped old grinder assembly with new.
reconnected motor wires with supplied wire nuts.
reinstalled covers.
espresso machine works like new again.
Note: First tried replacing upper burr grinder for this problem but did not help.
Did you find this story helpful?
Thanks for voting and helping fellow customers!
OEM stands for Original Equipment Manufacturer and means the part you’re buying is sourced directly from the manufacturer who made your product. At eReplacementParts, we sell only genuine OEM parts, guaranteeing the part you’re purchasing is of better design and of higher quality than aftermarket parts.
Our product descriptions are a combination of data sourced directly from the manufacturers who made your product as well as content researched and curated by our content & customer service teams. This content is edited and reviewed internally before being made public to customers.
Our customer service team are at the ready daily to answer your part and product questions. We have a dedicated staff with decades of collective experience in helping customers just like you purchase parts to repair their products.
All our part reviews are solicited directly from other customers who have purchased this exact part. While we moderate these reviews for profanity, offensive language or personally identifiable information, these reviews are posted exactly as submitted and no alterations are made by our team.
All our customer repair instructions are solicited directly from other customers just like you who have purchased and replaced this exact part. While we moderate these reviews for profanity, offensive language or personally identifiable information, these reviews are posted exactly as submitted and no alterations are made by our team.
Based on data from past customer purchasing behaviors, these parts are most commonly purchased together along with the part you are viewing. These parts may be necessary or helpful to replace to complete your current repair.
All our installation videos are created and produced in collaboration with our in-house repair technician, Mark Sodja, who has helped millions of eReplacementParts customers over the last 13 years repair their products. Mark has years of experience in selling and repairing both commercial and residential products with a specialty in gas-powered equipment.
This data is collected from customers who submitted a repair instruction after replacing this exact part. Customers can rate how easy the repair was to complete and how long it took. We aggregate this data to provide a repair rating that allows customers to quickly determine the difficulty and time needed to perform their own repair.