
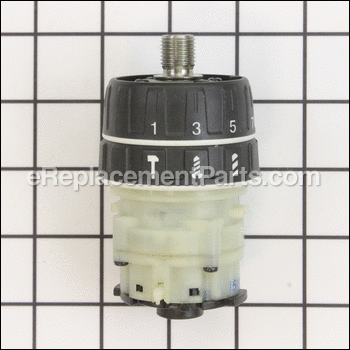
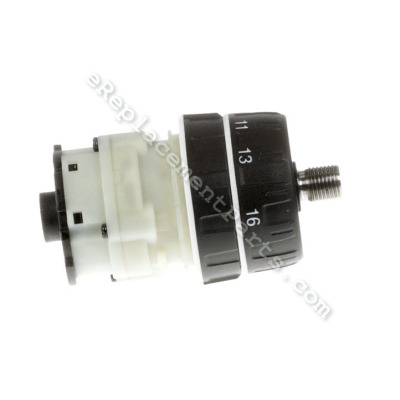


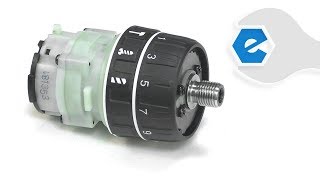
This is a genuine Makita replacement part that has been sourced from the original manufacturer to be used with hammer drills. The gear assembly is one of the drill\'s main components that is used to adjust the speed of the drill. This item is sold as an individual replacement part.
Gear Assy, Xph06 126353-0
OEM part for: Makita
Part Number: 126353-0
$54.93
In Stock
Compatibility
This part will fit the following 6 machines
Makita
XPH06 18V LXT Lithium-Ion Cordless 1/2" Hammer Driver-Drill Kit View Diagrams & Manuals
DHP480RFE Drill View Diagrams & Manuals
DHP480RME Drill View Diagrams & Manuals
DHP480SYE Drill View Diagrams & Manuals
DHP480Z Drill View Diagrams & Manuals
XPH06Z Drill View Diagrams & Manuals
Show More Compatible Models
This item works with the following types of products:
- Cordless Drill Parts
- Drill Parts
- Hammer Drill Parts
This part replaces obsolete part #:
Repair Videos ?
Watch the Repair Video for
Gear Assy, Xph06
Customer Part Reviews ?
Average Rating (out of 5):
Click to filter by ratings:
5 stars
4
4 stars
0
3 stars
0
2 stars
0
1 stars
0
< PREV
- 1
Easy repair....fair price on part...came quickly
This is a great part (thanks Makita)....all gears and clutch in one pack. Saved the drill....I hate throwing out things that can be repaired...as all of you probably do, too.
Daniel -
September 20, 2023
Verified Purchase
Gear Ass'y Easy repair
The Drill Gear Ass'y fit perfectly and arrived per stated delivery time. My drill is back in service.
Guest -
September 21, 2022
Verified Purchase
Fast easy service
The part fit perfect and was easy to replace. It arrived quickly!
Guest -
May 13, 2022
Verified Purchase
FAST SERVICE AND GREAT PRICES
FAST SERVICE AND GREAT PRICES
Ken -
November 18, 2020
Verified Purchase
t
t
t -
t days ago
Verified Purchase
eReplacementParts Team
t
Questions & Answers ?
Our customer Service team is at the ready daily to answer your part and product questions.

Ask our Team
We have a dedicated staff with decades of collective experience in helping customers just like you purchase parts to repair their products.
Does this fit my product?Questions & Answers for Gear Assy, Xph06
No questions have been asked yet
Customer Repair Instructions ?
All our customer repair instructions are solicited directly from other customers just like you who have purchased and replaced this exact part.
Clutch Slipping
Tyler - May 1, 2017
👍 2 of 2 people found this instruction helpful
Tool Type
Cordless Drill
Difficulty
Medium
Time
Less than 15 minutes
Tools Used
Screwdriver, Hammer, Allen Wrench
Parts Used
Removed screw with reverse threads from the chuck.
Chucked a large allen wrench into the chuck.
Used a Hammer to whack the allen wrench and get chuck free from the gear assembly.
Removed all screws on cover plates and removed cover plate.
Removed old gear assembly and installed new gear assembly.
Reassembled and it worked great!
Chucked a large allen wrench into the chuck.
Used a Hammer to whack the allen wrench and get chuck free from the gear assembly.
Removed all screws on cover plates and removed cover plate.
Removed old gear assembly and installed new gear assembly.
Reassembled and it worked great!
Did you find this story helpful?
Thanks for voting and helping fellow customers!
Gears Broke.
DAVID - July 25, 2016
👍 1 of 1 people found this instruction helpful
Tool Type
Cordless Drill
Difficulty
Medium
Time
15-30 minutes
Tools Used
Screwdriver, Air compressor, vice, 1/2\\
Parts Used
Removed the case screws, split the case, removed the gear assembly with the chuck. Removed the chuck screw, put unit in vise and put allen wrench in chuck and removed chuck with impact wrench.
Did you find this story helpful?
Thanks for voting and helping fellow customers!
Broken clutch assembly
JR - May 12, 2016
👍 1 of 1 people found this instruction helpful
Tool Type
Cordless Drill
Difficulty
Medium
Time
Less than 15 minutes
Tools Used
Screwdriver
Parts Used
I split the drill case in half. Removing the broken clutch assembly. Reinstalling the new clutch assembly and reassembling the drill.
Did you find this story helpful?
Thanks for voting and helping fellow customers!
clutch no longer functioned
Daniel - September 19, 2023
Tool Type
Hammer Drill
Difficulty
Medium
Time
30-60 minutes
Tools Used
Screwdriver, used an Allen key and hammer to get the keyless chuck off.
Parts Used
Removed the keyless chuck. Removed screws holding the case halfs together. Removed old clutch/gear pack. Reassembled. It works great again. Drill is probably six or seven years old.
Did you find this story helpful?
Thanks for voting and helping fellow customers!
Dropped the drill broke off at gear drive
John - September 21, 2018
Tool Type
Cordless Drill
Difficulty
Medium
Time
15-30 minutes
Tools Used
Screwdriver, Cordless impact with Allen hex socket
Parts Used
Did you find this story helpful?
Thanks for voting and helping fellow customers!
Gear assembly would not work in speed 1. Was slipping badly.
David - June 26, 2017
Tool Type
Cordless Drill
Difficulty
Medium
Time
15-30 minutes
Tools Used
Screwdriver, Hex Key wrench, Hammer
Parts Used
1. Removed drill cover, after removing battery.
2. Removed chuck screw and opened Chuck completely.
3. Removed chuck and gear assembly from motor.
4. Inserted Hex Key wrench into chuck, tightened chuck and placed assembly in bench vise.
5. Note Chuck screw and assembly thread are both reverse threaded.
6. Tap Hex Key wrench lightly with hammer to start the chuck unscrewing from the Gear box
7. Remove and replace and reassemble in the opposite order
Did you find this story helpful?
Thanks for voting and helping fellow customers!
Gear head was slipping
Roger - February 22, 2017
Tool Type
Hammer Drill
Difficulty
Medium
Time
15-30 minutes
Tools Used
Screwdriver
Parts Used
Removed the drill chuck ,
Took drill body apart exchanged gear heads ,reassembled
Took drill body apart exchanged gear heads ,reassembled
Did you find this story helpful?
Thanks for voting and helping fellow customers!
The gear assembly split in half
mike - January 2, 2017
Tool Type
Cordless Drill
Difficulty
Easy
Time
15-30 minutes
Tools Used
Screwdriver
I used a screwdriver to remove all the screws out of the case then I split the case and removed the broken gear assembly then I took off the hi lo switch off and put it on the new gear then slipped the new gear back in the case put case back together put all the screws back in and I am done
Did you find this story helpful?
Thanks for voting and helping fellow customers!
The clutch on the hammer drill went bad due to usage
David - July 25, 2016
Tool Type
Cordless Drill
Difficulty
Medium
Time
15-30 minutes
Tools Used
Screwdriver, Wrench Set
Parts Used
Removed drill chuck and all screws holding housing.
Did you find this story helpful?
Thanks for voting and helping fellow customers!
Slipping gear box
Mitsuko - August 25, 2017
👍 0 of 1 people found this instruction helpful
Tool Type
Hammer Drill
Difficulty
Easy
Time
Less than 15 minutes
Tools Used
Screwdriver
1. Remove plastic cover/case, only one side
2. Remove gear box with chuck, hammer drill chuck is right hand screw, to prevent chuck loose with reverse rotation, inside chuck has left hand pan head slotted screw. Removing left hand screw is easy using impact driver, however, I expect chuck, right hand screwed may not loose due to hummer action operation too many times. So I bought a gear box and a chuck.
3 Attach chuck to gear box.
4.Insert gear box/chuck inside case/cover. perfect alignment/position of all parts will be required before case/cover closing together.
5. Return self tapping screws, even self tap screws should not be "cross screw".
6. I don't know the best way to remove chuck from gear box. Anyway gear box is useless, remove all gears from gear box and use special tool, chuck may be removed.
7. My hammer drill has BL motor and last longer so it can be equivalent a new hammer drill after replace gear box.
Did you find this story helpful?
Thanks for voting and helping fellow customers!
OEM stands for Original Equipment Manufacturer and means the part you’re buying is sourced directly from the manufacturer who made your product. At eReplacementParts, we sell only genuine OEM parts, guaranteeing the part you’re purchasing is of better design and of higher quality than aftermarket parts.
Our product descriptions are a combination of data sourced directly from the manufacturers who made your product as well as content researched and curated by our content & customer service teams. This content is edited and reviewed internally before being made public to customers.
Our customer service team are at the ready daily to answer your part and product questions. We have a dedicated staff with decades of collective experience in helping customers just like you purchase parts to repair their products.
All our part reviews are solicited directly from other customers who have purchased this exact part. While we moderate these reviews for profanity, offensive language or personally identifiable information, these reviews are posted exactly as submitted and no alterations are made by our team.
All our customer repair instructions are solicited directly from other customers just like you who have purchased and replaced this exact part. While we moderate these reviews for profanity, offensive language or personally identifiable information, these reviews are posted exactly as submitted and no alterations are made by our team.
Based on data from past customer purchasing behaviors, these parts are most commonly purchased together along with the part you are viewing. These parts may be necessary or helpful to replace to complete your current repair.
All our installation videos are created and produced in collaboration with our in-house repair technician, Mark Sodja, who has helped millions of eReplacementParts customers over the last 13 years repair their products. Mark has years of experience in selling and repairing both commercial and residential products with a specialty in gas-powered equipment.
This data is collected from customers who submitted a repair instruction after replacing this exact part. Customers can rate how easy the repair was to complete and how long it took. We aggregate this data to provide a repair rating that allows customers to quickly determine the difficulty and time needed to perform their own repair.