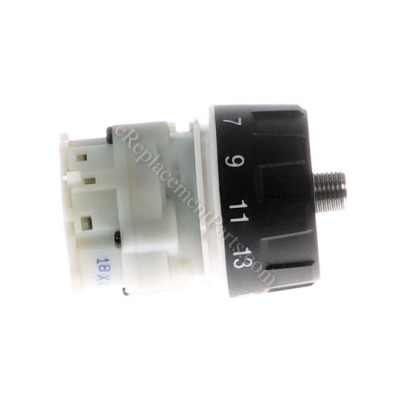


This gear assembly is an authentic OEM component. It is designed for use with Makita driver-drills. The assembly contains gears and it is the part that drives the chuck. Over time components may wear out or get damaged eventually requiring a replacement assembly. It is made of high-quality materials and is sold as an individual item. Check the owners manual and the diagrams of your model for the exact location and the correct installation of this part. You will need a screwdriver to take the drill apart and perform this repair.
Gear Assembly 126459-4
OEM part for: Makita
Part Number: 126459-4
$32.40
In Stock
Jump To:
Frequently Purchased Together ?
Compatibility
This part will fit the following 7 machines
Makita
LXFD01CW 18V Compact Lithium-Ion Cordless 1/2" Driver-Drill View Diagrams & Manuals
LXFD01 18V LXT Lithium-Ion Cordless 1/2" Driver-Drill View Diagrams & Manuals
LXFD01Z 18V LXT Lithium-Ion Cordless 1/2" Driver-Drill View Diagrams & Manuals
XFD01 18V LXT Lithium-Ion Cordless 1/2" Driver-Drill Kit View Diagrams & Manuals
XFD01RW 18V Compact Lithium-Ion Cordless 1/2" Driver-Drill Kit View Diagrams & Manuals
XFD01CW Drill View Diagrams & Manuals
XFD01Z Drill View Diagrams & Manuals
Show More Compatible Models
This item works with the following types of products:
- Cordless Drill Parts
- Drill Parts
This part replaces obsolete part #: 125831-7
Repair Videos ?
Watch the Repair Video for
Gear Assembly

Customer Part Reviews ?
Average Rating (out of 5):
Click to filter by ratings:
5 stars
3
4 stars
0
3 stars
0
2 stars
1
1 stars
0
< PREV
- 1
Great service
Right parts shipped and now installed. All is good
Guest -
December 13, 2021
Verified Purchase
easy to get and repair
brand new condition
Jeffrey -
December 11, 2021
Verified Purchase
Perfect part great video
I received the gear assembly way sooner than I had imagined. I had to watch the video a couple of times because the old part was very tight and difficult to get off. The new assembly seems to work fine. This saved me a ton of money.
Guest -
August 8, 2019
Verified Purchase
Overall Successful Repair, But....
Part was received promptly, and drill disassembly went smoothly. the new part dropped back in OK, but I could not put the cover back onto the drill to reassemble it. After an hour of trying, I went to bed and tried again the next day. After more frustration, I carefully opened the old and new gear assemblies to compare, and found the new part was incorrectly put together: ball bearings were loose inside, and the retaining washer and spring were not tightened down, as compared with the old part. Putting the ball bearings back into place with the retaining washer and the spring tightened, I tried again to reassemble the drill--the cover snapped back on with no trouble and I was able to get everything back together. Drill seems to work fine, but I shouldn't have needed to take apart and reassemble a brand new replacement part.
Guest -
July 10, 2019
Verified Purchase
t
t
t -
t days ago
Verified Purchase
eReplacementParts Team
t
Questions & Answers ?
Our customer Service team is at the ready daily to answer your part and product questions.

Ask our Team
We have a dedicated staff with decades of collective experience in helping customers just like you purchase parts to repair their products.
Does this fit my product?Questions & Answers for Gear Assembly
Does the gear assembly 126459 fit in the XPH14? It doesn't look the same.
r
for model number Makita XPH14
asked on 2023-05-24
Hello R, Thank you for your inquiry. We do not show this part as compatible. The compatible part number is 122F80-3. We hope this helps.
eReplacementParts Team May 24, 2023
Customer Repair Instructions ?
All our customer repair instructions are solicited directly from other customers just like you who have purchased and replaced this exact part.
Gear assembly needed replaced
Michael - May 22, 2017
👍 3 of 3 people found this instruction helpful
Tool Type
Cordless Drill
Difficulty
Medium
Time
30-60 minutes
Tools Used
Screwdriver, dead blow hammer, needle nose pliers, large allen wrench
Parts Used
1. Watched video from eReplacement parts on YouTube, and got several hints to watch out for when separating the drill housing.
2. Turned out reverse thread screw inside the chuck.
3. Removed chuck using a large allen wrench which proved to be a bit of a challenge. It took a number of tries to finally get the chuck to break loose.
4. Removed 2 rear housing screws. This allowed access to hidden screw holding rest of housing together shown in video.
5. Separated rear housing from rest of drill.
6. Removed all housing screws using magnetic Phillips head #2 screwdriver.
7. Separated housing being careful not to let springs on either side of speed control go flying as shown in the video.
8. Removed heat sink by pulling straight up with needle nose pliers.
9. Carefully removed gear box assembly after raising assembly and armature just enough to get the gear box out.
10. Put new gear box onto spindle making sure to line up the large notch with the large tab still connected to the armature. (Don't turn off the top part of gear assembly as the ball bearings inside will come out.)
11. Seated armature and gear assembly into housing making sure to seat all portions of both just like they were originally situated. Re-installed heat sink.
12. Re-installed the speed control switch being careful not to lose the springs on either side and inserting the little tab on the speed control into the proper gap.
13. With one side of the housing and parts fully assembled inside and laying on the bench, lined up the other half making sure all components were seated in the correct grooves, etc. I had a problem getting the housing to come together at the rear part and kept trying without forcing anything until I got the unit fully seated together. A little patience was called for to get this done since it didn't seem to matter that everything was lined up, but it just wouldn't come together as it should have. This step took the most time of the whole process.
14. Re-installed all housing screws including hidden one inside rear housing.
15. Used a dental pick to move springs holding brushes in place and pried off the snap on brush attachments with the same tool.
16. Carefully pulled out old brushes and replaced with new, realigned springs holding brushes in place and snapped on brush brackets onto top of brush housing.
17. Put rear housing back on and screwed back into place.
Did you find this story helpful?
Thanks for voting and helping fellow customers!
Clutch slipped when drilling.
Gene - May 28, 2018
👍 1 of 1 people found this instruction helpful
Tool Type
Cordless Drill
Difficulty
Easy
Time
15-30 minutes
Tools Used
Screwdriver, Allen wrench, hammer
Parts Used
Removed screw holding chuck.
Removed chuck from gear assembly using allen wrench and hammer.
Removed screws from housing.
Separated housing halves.
Removed old gear assembly.
Installed new gear assembly.
Reassembled housing, installed chuck, installed screw in chuck and tested.
Removed chuck from gear assembly using allen wrench and hammer.
Removed screws from housing.
Separated housing halves.
Removed old gear assembly.
Installed new gear assembly.
Reassembled housing, installed chuck, installed screw in chuck and tested.
Did you find this story helpful?
Thanks for voting and helping fellow customers!
High spend gear stripped
Robert - May 1, 2016
👍 2 of 3 people found this instruction helpful
Tool Type
Cordless Drill
Difficulty
Easy
Time
Less than 15 minutes
Tools Used
Screwdriver
Parts Used
Simple to remove chuck and take the drill apart. Then carefully remove the gear assembly, then install the new one. Reassemble in reverse order.
Did you find this story helpful?
Thanks for voting and helping fellow customers!
Failed keyless chuck that was unable to remove. So elected to replace the gear assembly also.
Philip - September 12, 2023
Tool Type
Cordless Drill
Difficulty
Easy
Time
15-30 minutes
Tools Used
Screwdriver, flashlight
Parts Used
Removed the screws from the drill housing and removed the right side of the housing.
Removed the old gear and chuck assembly.
Installed the new gear assembly.
Threaded the new chuck onto the gear assembly output shaft, then installed the new machine screw.
Reassembled the drilled housing, installed the housing screws, snugged the screws with a Phillips screwdriver.
Removed the old gear and chuck assembly.
Installed the new gear assembly.
Threaded the new chuck onto the gear assembly output shaft, then installed the new machine screw.
Reassembled the drilled housing, installed the housing screws, snugged the screws with a Phillips screwdriver.
Did you find this story helpful?
Thanks for voting and helping fellow customers!
Clutch slipping when driving screws
Tom - August 17, 2023
Tool Type
Cordless Drill
Difficulty
Easy
Time
15-30 minutes
Tools Used
Screwdriver, Large Allen Wrench and hammer
Parts Used
Followed steps in a video.
Did you find this story helpful?
Thanks for voting and helping fellow customers!
Drill chuck was worn and gearbox was not working as it should
Dan - April 29, 2022
Tool Type
Cordless Drill
Difficulty
Medium
Time
1-2 hours
Tools Used
Screwdriver, Allen wrench
The gearbox that I ordered was in pieces the gears and bearings was all apart .and some of the bearings were missing along with the two roller pins .No instructions on how this is assembled .No one would help me so I used some pieces out of my old gear box and just figured out how it was assembled
Did you find this story helpful?
Thanks for voting and helping fellow customers!
Gears were slipping
Kim - March 25, 2021
Tool Type
Cordless Drill
Difficulty
Medium
Time
15-30 minutes
Tools Used
Screwdriver
Parts Used
Dismantled the drill and replaced the part.
Did you find this story helpful?
Thanks for voting and helping fellow customers!
Cordless drill was not turning
Theodore - July 3, 2020
Tool Type
Cordless Drill
Difficulty
Easy
Time
15-30 minutes
Tools Used
Screwdriver
Parts Used
I followed the video and steps on ereplacements youtube, It was that easy
Did you find this story helpful?
Thanks for voting and helping fellow customers!
Gears were stripped out.
Joe - April 29, 2020
Tool Type
Cordless Drill
Difficulty
Easy
Time
30-60 minutes
Tools Used
Screwdriver, Impact driver
Parts Used
1. Loosened screw inside the drill chuck, it has reverse threads.
2. Tightened a medium size allen wrench in the chuck.
3. Held the drill tight on the workbench.
4. Hit the allen wrench with a rubber mallet to loosen the chuck from the gear assembly.
5. Unscrewed the chuck completely from the gear assembly.
6. Took all screws out so could take one half of the drill housing off.
7. Slowly lifted up the gear assembly and armature. Be careful not to lose the spring from the speed switch.
8. Carefully pull the gear assembly off.
9. Push the new gear assembly on, attach the speed switch, and push everything back into place.
10. Reassemble in reverse order of taking apart.
Did you find this story helpful?
Thanks for voting and helping fellow customers!
Drill clutch gears wore out, no longer functioning
James - December 8, 2019
Tool Type
Cordless Drill
Difficulty
Medium
Time
30-60 minutes
Tools Used
Screwdriver, Pliers, Large hex wrench
Parts Used
Followed instructions from repair video at e-replacement parts website. Repairs were completed and drill works like new. Thanks much.
Did you find this story helpful?
Thanks for voting and helping fellow customers!
Load More Install Stories
OEM stands for Original Equipment Manufacturer and means the part you’re buying is sourced directly from the manufacturer who made your product. At eReplacementParts, we sell only genuine OEM parts, guaranteeing the part you’re purchasing is of better design and of higher quality than aftermarket parts.
Our product descriptions are a combination of data sourced directly from the manufacturers who made your product as well as content researched and curated by our content & customer service teams. This content is edited and reviewed internally before being made public to customers.
Our customer service team are at the ready daily to answer your part and product questions. We have a dedicated staff with decades of collective experience in helping customers just like you purchase parts to repair their products.
All our part reviews are solicited directly from other customers who have purchased this exact part. While we moderate these reviews for profanity, offensive language or personally identifiable information, these reviews are posted exactly as submitted and no alterations are made by our team.
All our customer repair instructions are solicited directly from other customers just like you who have purchased and replaced this exact part. While we moderate these reviews for profanity, offensive language or personally identifiable information, these reviews are posted exactly as submitted and no alterations are made by our team.
Based on data from past customer purchasing behaviors, these parts are most commonly purchased together along with the part you are viewing. These parts may be necessary or helpful to replace to complete your current repair.
All our installation videos are created and produced in collaboration with our in-house repair technician, Mark Sodja, who has helped millions of eReplacementParts customers over the last 13 years repair their products. Mark has years of experience in selling and repairing both commercial and residential products with a specialty in gas-powered equipment.
This data is collected from customers who submitted a repair instruction after replacing this exact part. Customers can rate how easy the repair was to complete and how long it took. We aggregate this data to provide a repair rating that allows customers to quickly determine the difficulty and time needed to perform their own repair.