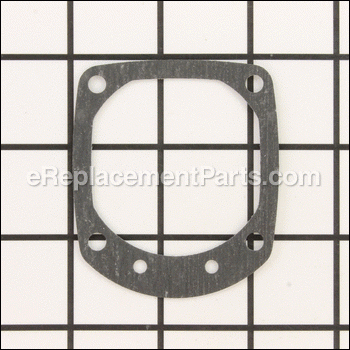


This is a genuine replacement head gasket. It is sourced directly from original equipment manufacturer for use with Porter Cable nailers/staplers. Its purpose is to provide and air tight seal for the housing cap and the body. Over time this gasket will deteriorate allowing for air leaks. This item is made with composite material and it is sold individually.
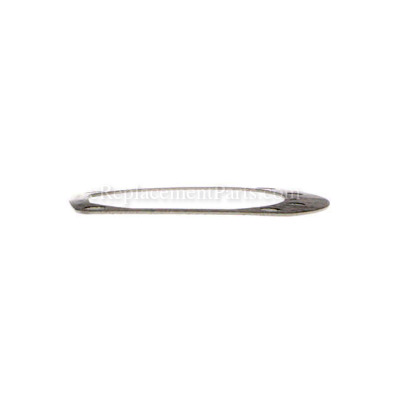
Replacing this gasket is a very simple and quick task. You should only need a hex/key allen wrench.
• Make sure the tool is unplugged
• Remove end cap screws
• Remove the cap and the old gasket
• Secure the new gasket in place
• Reassemble and test the unit
Gasket Head 894697
OEM part for: Porter Cable
Part Number: 894697
$7.91
In Stock
Jump To:
Product Description ?
- Classification: Part
- Weight: 0.01 lbs.
- Shipping: Ships Worldwide
Frequently Purchased Together ?


Compatibility
This part will fit the following 10 machines
Porter Cable
BN125A Brad Nailer View Diagrams & Manuals
BN200A Brad Nailer View Diagrams & Manuals
BN200V12 Type 1 Cordless Brad Nailer View Diagrams & Manuals
BN200V12 Type 2 Cordless Brad Nailer View Diagrams & Manuals
NS100A Narrow Crown Stapler View Diagrams & Manuals
NS150A Type 1 1-1/2" Stapler View Diagrams & Manuals
NS150A Type 2 1-1/2" Stapler View Diagrams & Manuals
BN125A (Type 1) Finish Nailer Power Tool View Diagrams & Manuals
BN200A (Type 1) Finish Nailer Power Tool View Diagrams & Manuals
NS100A (Type 1) Stapler Power Tool View Diagrams & Manuals
Show More Compatible Models
This item works with the following types of products:
- Nailer Parts
- Stapler Parts
Customer Part Reviews ?
Average Rating (out of 5):
Click to filter by ratings:
5 stars
5
4 stars
0
3 stars
0
2 stars
0
1 stars
0
< PREV
- 1
Great Part
The part of excellent. Fix better than the original part.
Guest -
May 2, 2020
Verified Purchase
Easy Repair
good fit
Edward -
March 16, 2020
Verified Purchase
Great part
I got it in a hurry. Worked perfect
Guest -
December 29, 2019
Verified Purchase
Once again eReplacement parts bailed me out. Their feature that helps you diagnose the problem along with the exploded view of the nail gun made it easy. I spent $10 in parts to fix a nail gun that would have cost me $110 to replace. If I could give more than five stars I would!
Quick shipping of the right parts made for an easy fix.
Guest -
August 6, 2019
Verified Purchase
Easy repair with perfect part
This part went just perfect and my nailer worked like new once installed. Came quickly.
Guest -
June 28, 2019
Verified Purchase
t
t
t -
t days ago
Verified Purchase
eReplacementParts Team
t
Questions & Answers ?
Our customer Service team is at the ready daily to answer your part and product questions.

Ask our Team
We have a dedicated staff with decades of collective experience in helping customers just like you purchase parts to repair their products.
Does this fit my product?Questions & Answers for Gasket Head
No questions have been asked yet
Customer Repair Instructions ?
All our customer repair instructions are solicited directly from other customers just like you who have purchased and replaced this exact part.
Housing was broken and gasket was damaged
Mark - April 8, 2021
Tool Type
Nailer
Difficulty
Easy
Time
15-30 minutes
Tools Used
Screwdriver, Power Drill
1. Removed housing cap
2. Then pull off seal/ o ring and replace with new one and attached to housing
3. Installed gasket and put housing back on
4. Note used a little flat head screw to remove o ring.
5. Test let’s it and all good to go. No air leaks
2. Then pull off seal/ o ring and replace with new one and attached to housing
3. Installed gasket and put housing back on
4. Note used a little flat head screw to remove o ring.
5. Test let’s it and all good to go. No air leaks
Did you find this story helpful?
Thanks for voting and helping fellow customers!
leaking air
THOMAS - October 26, 2020
Tool Type
Nailer
Difficulty
Easy
Time
Less than 15 minutes
Tools Used
, allen wrenches,fine pick to remove \\
Parts Used
Removed top of nailer, disaembled piston, replaced "o" rings. Lubricated all components, reassembled using parts breakdown supplied on line from EREPLACEMENTPARTS.COM.
Did you find this story helpful?
Thanks for voting and helping fellow customers!
Porter Cable BN200A Air Nailer, would not fire - massive internal air leak
K - September 7, 2018
Tool Type
Nailer
Difficulty
Easy
Time
15-30 minutes
Tools Used
, Allen wrench
Removal of the cap (4 internal hex cap screws) revealed a broken O-ring. There was a gasket under the cap. I ordered the most likely parts to wear or leak. No other tools were required to disassemble enough to replace the piston seal, and another O-ring in the cap. I lubricated the O-rings and piston seal with Vaseline. After reassembly, the nailer performed like new.
Big endorsement for ereplacementparts.com. They had the parts to keep this tool in operation.
Big endorsement for ereplacementparts.com. They had the parts to keep this tool in operation.
Did you find this story helpful?
Thanks for voting and helping fellow customers!
Brad nailer would not drive brad nails into the wood.
Robert - August 29, 2018
Tool Type
Nailer
Difficulty
Easy
Time
Less than 15 minutes
Tools Used
Nutdriver
Parts Used
1. Removed the cover from the nailer.
2 I replaced the head gasket and the seal.
3. I ordered the seal for the air intake and replaced it.
When all parts were replaced, I plugged the brad nailer into my air supply and was able to shoot a number of brads into a piece of oak with no problems. There were no special instructions necessary, I just used the diagram included with my Porter Cable Brad Nailer and replace the parts. Now it is working just like when I bought it.
Did you find this story helpful?
Thanks for voting and helping fellow customers!
Blew o-ring (seal) in brad nailer and also broke housing cap air deflector
Gordon - July 16, 2018
Tool Type
Nailer
Difficulty
Easy
Time
15-30 minutes
Tools Used
, Allen (Hex) wrench
1). Removed 4 hex screws from housing cap, retained for re-use.
2). Removed housing cap, saved spring & head valve seal (still in good condition) to go into new housing cap.
3). Cleaned broken o-ring parts from back of piston and within the nail gun housing.
4). Placed new o-ring on piston.
5). Inserted new seal, saved spring & head valve seal into new housing cap.
6). Attached new head gasket & housing cap to nail gun housing using hex screws.
7). Tightened screws, added a few drops of oil and test fired the mail gun.
Did you find this story helpful?
Thanks for voting and helping fellow customers!
Air leak
David - August 18, 2017
Tool Type
Nailer
Difficulty
Easy
Time
Less than 15 minutes
Tools Used
, Allen wrench
Parts Used
Removed head and installed the worn out O-ring and the head gasket. Then replaced the head.
Did you find this story helpful?
Thanks for voting and helping fellow customers!
O-ring was no good.
Robert - August 16, 2017
Tool Type
Nailer
Difficulty
Easy
Time
Less than 15 minutes
Tools Used
, Allen wrench
Parts Used
Removed and replaced the o-ring.
Did you find this story helpful?
Thanks for voting and helping fellow customers!
O-Ring split, caused by over pressure.
Lorin - July 12, 2017
Tool Type
Nailer
Difficulty
Easy
Time
15-30 minutes
Tools Used
, Allen Wrench
Parts Used
1. Removed top 4 screws.
2. Remove o-ring and debris
3. oil internal components
4. replace o-ring and gasket
tighten screws tight
2. Remove o-ring and debris
3. oil internal components
4. replace o-ring and gasket
tighten screws tight
Did you find this story helpful?
Thanks for voting and helping fellow customers!
The stapler was leaking air was not able to staple.
Randy - March 27, 2017
Tool Type
Stapler
Difficulty
Easy
Time
15-30 minutes
Tools Used
Screwdriver, Pliers, Allen wrench
Parts Used
I took it apart and replaced the gasket and o-ring. It wasn't hard the main thing keeping track of your screws.
Did you find this story helpful?
Thanks for voting and helping fellow customers!
Never had the gasket and leaked air
Steve - March 2, 2017
Tool Type
Nailer
Difficulty
Easy
Time
Less than 15 minutes
Tools Used
Socket set
Parts Used
Took the top off and set the gasket and replaced the top.
Did you find this story helpful?
Thanks for voting and helping fellow customers!
Load More Install Stories
OEM stands for Original Equipment Manufacturer and means the part you’re buying is sourced directly from the manufacturer who made your product. At eReplacementParts, we sell only genuine OEM parts, guaranteeing the part you’re purchasing is of better design and of higher quality than aftermarket parts.
Our product descriptions are a combination of data sourced directly from the manufacturers who made your product as well as content researched and curated by our content & customer service teams. This content is edited and reviewed internally before being made public to customers.
Our customer service team are at the ready daily to answer your part and product questions. We have a dedicated staff with decades of collective experience in helping customers just like you purchase parts to repair their products.
All our part reviews are solicited directly from other customers who have purchased this exact part. While we moderate these reviews for profanity, offensive language or personally identifiable information, these reviews are posted exactly as submitted and no alterations are made by our team.
All our customer repair instructions are solicited directly from other customers just like you who have purchased and replaced this exact part. While we moderate these reviews for profanity, offensive language or personally identifiable information, these reviews are posted exactly as submitted and no alterations are made by our team.
Based on data from past customer purchasing behaviors, these parts are most commonly purchased together along with the part you are viewing. These parts may be necessary or helpful to replace to complete your current repair.
All our installation videos are created and produced in collaboration with our in-house repair technician, Mark Sodja, who has helped millions of eReplacementParts customers over the last 13 years repair their products. Mark has years of experience in selling and repairing both commercial and residential products with a specialty in gas-powered equipment.
This data is collected from customers who submitted a repair instruction after replacing this exact part. Customers can rate how easy the repair was to complete and how long it took. We aggregate this data to provide a repair rating that allows customers to quickly determine the difficulty and time needed to perform their own repair.