
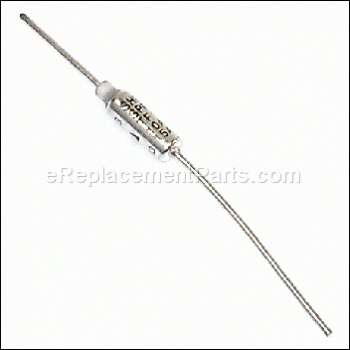
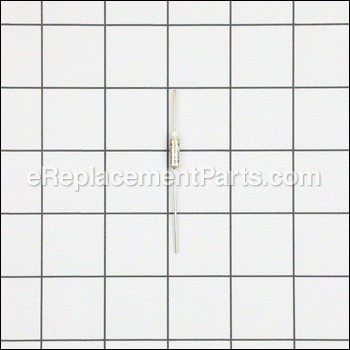

This is an authentic manufacturer-sourced component which is specially made for DeLonghi toaster ovens. Fuses are generally utilized to block excessive electric current from damaging or overheating other part assemblies along the circuit. It is an identical replacement for a damaged or a missing component that was installed on a new unit. Check the diagrams for your model to ensure the correct repair procedure. A screwdriver will be needed to replace this fuse.
Fuse GL1028
OEM part for: DeLonghi
Part Number: GL1028
$8.57
In Stock
Compatibility
This part will fit the following 10 machines
DeLonghi
EO2058 Toaster Oven View Diagrams & Manuals
EO2060 Toaster Oven W/Rotisserie View Diagrams & Manuals
RO2050 Toaster Oven View Diagrams & Manuals
RO2058 Toaster Oven View Diagrams & Manuals
EO2058 (118452300) Toaster Oven View Diagrams & Manuals
DO2058 (118852300) Toaster Oven View Diagrams & Manuals
RO2050 (0118451400) Toaster Oven View Diagrams & Manuals
RO2050B (0118451401) Toaster Oven View Diagrams & Manuals
RO2058 (118453500) Convection Toaster Oven View Diagrams & Manuals
EO2060 (118450200) Toaster Oven W/Rotisserie View Diagrams & Manuals
Show More Compatible Models
This item works with the following types of products:
- Convection Oven Parts
- Toaster Parts
Questions & Answers ?
Our customer Service team is at the ready daily to answer your part and product questions.

Ask our Team
We have a dedicated staff with decades of collective experience in helping customers just like you purchase parts to repair their products.
Does this fit my product?Questions & Answers for Fuse
No questions have been asked yet
Customer Repair Instructions ?
All our customer repair instructions are solicited directly from other customers just like you who have purchased and replaced this exact part.
Power was lost to the unit.
alan - April 3, 2019
Tool Type
Convection Oven
Difficulty
Hard
Time
More than 2 hours
Tools Used
Screwdriver, Pliers, Nutdriver, Required specialized driver with triangular head
Parts Used
You need to remove the side/top of the unit which requires removing all the screws you can see and a few that are a bit hard to find, like the ones in the foot, and those require a special driver from torqx with a triangular head. I was actually able to get them out using a tiny screwdriver. You then must removed the white wire cover (slice it carefully with a razor) to then see the fuse. You snip it off as you can't really re-use the connectors. Went to hardware store to get new connectors. Put insulated cover back over fuse and taped it in. Not the easiest repair but the unit is working good as new, and it is something I used on a regular basis.
Did you find this story helpful?
Thanks for voting and helping fellow customers!
Blown thermal fuse
MARK - April 26, 2017
Tool Type
Convection Oven
Difficulty
Medium
Time
15-30 minutes
Tools Used
Screwdriver, Triangle hd scrw drvr, cuttr/crimpr & heat shrink insulation
Parts Used
Removed (20+) screws/safety screws, handles, then hood. Located fuse between control knob and power source held in isolator arm, then released. Stripped insulation sleeve to get to fuse and crimps. I was able to separate old crimp connectors & reuse. Not certain but, I think the fuse is directional, so pay attention when removing. Connected one side of fuse then slide on heat shrink insulator, then connected the other side. I shrunk the insulation with a hair drier, then I rolled electrical tape around the fuse itself (app. 1/4") as added insulation from external heat. I then placed the fuse back into the isolator arm, tested, them reassembled.
The thing that took the longest was making a triangle head screw driver using an old Allen wrench and grinder, as I could not find one locally. These screws can be removed with the right sized flat head but, it can be difficult and takes longer.
The thing that took the longest was making a triangle head screw driver using an old Allen wrench and grinder, as I could not find one locally. These screws can be removed with the right sized flat head but, it can be difficult and takes longer.
Did you find this story helpful?
Thanks for voting and helping fellow customers!
Internal in line AC power fuse
robby - December 12, 2016
Tool Type
Convection Oven
Difficulty
Medium
Time
30-60 minutes
Tools Used
Screwdriver, Solder Iron, wire clipper, ohm meter
Parts Used
1. Removed Phillips head screws from entire outer casing.
2. Removed 5 screws with a triangle head drive, had to find a small, flat head screwdriver bit that fit in on an angle, a little difficult, but doable.
3. Located the in line fuse, attached to the power cord line, and covered with a heat resistant braided sleeve, and clamped to a metal standoff, to keep it clear from other parts.
4. Cut out original fuse which was blown (ohm meter tested).
5. Soldered in the new fuse, original was crimped in with small metal crimps.
6. Plugged in to confirm power up, digital display worked.
7. Closed the patient, resuscitation successful.
Did you find this story helpful?
Thanks for voting and helping fellow customers!
OEM stands for Original Equipment Manufacturer and means the part you’re buying is sourced directly from the manufacturer who made your product. At eReplacementParts, we sell only genuine OEM parts, guaranteeing the part you’re purchasing is of better design and of higher quality than aftermarket parts.
Our product descriptions are a combination of data sourced directly from the manufacturers who made your product as well as content researched and curated by our content & customer service teams. This content is edited and reviewed internally before being made public to customers.
Our customer service team are at the ready daily to answer your part and product questions. We have a dedicated staff with decades of collective experience in helping customers just like you purchase parts to repair their products.
All our part reviews are solicited directly from other customers who have purchased this exact part. While we moderate these reviews for profanity, offensive language or personally identifiable information, these reviews are posted exactly as submitted and no alterations are made by our team.
All our customer repair instructions are solicited directly from other customers just like you who have purchased and replaced this exact part. While we moderate these reviews for profanity, offensive language or personally identifiable information, these reviews are posted exactly as submitted and no alterations are made by our team.
Based on data from past customer purchasing behaviors, these parts are most commonly purchased together along with the part you are viewing. These parts may be necessary or helpful to replace to complete your current repair.
All our installation videos are created and produced in collaboration with our in-house repair technician, Mark Sodja, who has helped millions of eReplacementParts customers over the last 13 years repair their products. Mark has years of experience in selling and repairing both commercial and residential products with a specialty in gas-powered equipment.
This data is collected from customers who submitted a repair instruction after replacing this exact part. Customers can rate how easy the repair was to complete and how long it took. We aggregate this data to provide a repair rating that allows customers to quickly determine the difficulty and time needed to perform their own repair.