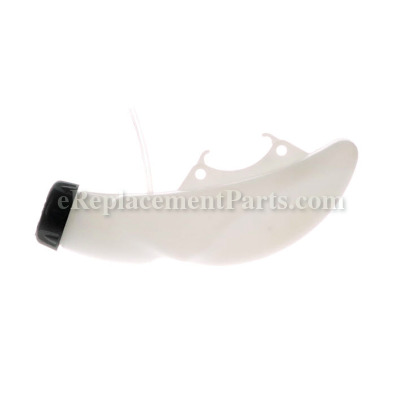


This is an authentic OEM fuel tank assembly commonly used on handheld gas leaf blowers. It is made out of plastic and it includes the fuel lines, and the fuel cap. It is very important to replace the fuel tank if it is cracked or damaged to avoid further damage or serious injuries. Make sure to drain the gas tank before starting a repair. Please note in-tank fuel filter is not included in this assembly, it is sold separately.
Fuel Tank 578943308
OEM part for: Poulan, Weed Eater, Craftsman, Husqvarna
Part Number: 578943308
$24.90
In Stock
Jump To:
Frequently Purchased Together ?


Compatibility
This part will fit the following 43 machines
Poulan
BVM200VS (Type 1) Gas Blower View Diagrams & Manuals
BVM200VS (Type 2) Gas Blower View Diagrams & Manuals
BVM210VS (Type1) Pro Gas Blower View Diagrams & Manuals
BVM210VS (Type2) Pro Gas Blower View Diagrams & Manuals
BVM200C Gas Blower View Diagrams & Manuals
BVM200FE Gas Blower View Diagrams & Manuals
PPB430VS (Type1) Pro Leaf Blower View Diagrams & Manuals
PPB430VS (Type2) Pro Leaf Blower View Diagrams & Manuals
SM210VS (Type1) Pro Leaf Blower View Diagrams & Manuals
SM210VS (Type2) Pro Leaf Blower View Diagrams & Manuals
Weed Eater
VS2000BV Handheld Blower View Diagrams & Manuals
Craftsman
358794770 Gas Blower View Diagrams & Manuals
358794780 Blower View Diagrams & Manuals
358794765 Blower View Diagrams & Manuals
358794774 Blower View Diagrams & Manuals
358794741 Blower View Diagrams & Manuals
358794773 Blower View Diagrams & Manuals
944518250 Blower View Diagrams & Manuals
944518252 Blower View Diagrams & Manuals
358794700 Blower View Diagrams & Manuals
358794701 Blower View Diagrams & Manuals
358794702 Blower View Diagrams & Manuals
358794740 Blower View Diagrams & Manuals
358794742 Blower View Diagrams & Manuals
358794743 Blower View Diagrams & Manuals
358794744 Blower View Diagrams & Manuals
358794750 Blower View Diagrams & Manuals
358794760 Blower View Diagrams & Manuals
358794761 Blower View Diagrams & Manuals
358794762 Blower View Diagrams & Manuals
358794763 Blower View Diagrams & Manuals
358794764 Blower View Diagrams & Manuals
358794771 Blower View Diagrams & Manuals
358794772 Blower View Diagrams & Manuals
Husqvarna
BVM200VS (2009-03) Blower View Diagrams & Manuals
BVM200VS (545103471) (2009-03) Blower View Diagrams & Manuals
BVM210VS (2009-03) Blower View Diagrams & Manuals
GBV325 (2010-07) 952715704 Blower View Diagrams & Manuals
GBV345 (2010-05) Blower View Diagrams & Manuals
P325 (2010-04) Blower View Diagrams & Manuals
PPB430VS (2009-03) Blower View Diagrams & Manuals
SM210VS (2009-03) Blower View Diagrams & Manuals
VS2000BV (952711922) (2009-04) Handheld Trimmer View Diagrams & Manuals
Show More Compatible Models
This item works with the following types of products:
- Blower Parts
This part replaces obsolete part #: 576764901, 526222201, 545100401
Customer Part Reviews ?
Average Rating (out of 5):
Click to filter by ratings:
5 stars
9
4 stars
2
3 stars
1
2 stars
0
1 stars
0
< PREV
- 1
- 2
La recibí a tiempo
En excelente condición y fácil de instalar, agradecido.
iGlobal -
August 5, 2021
Verified Purchase
Fuel tank
This was the exact replacement part for my Craftsman leaf blower.
Ordering online was quick and easy.
Guest -
September 3, 2020
Verified Purchase
Perfect replacement!
This was a great replacement for my blower! Simple repair! Fast shipping meant little down time. Very pleased and would definitely buy again.
Guest -
August 21, 2020
Verified Purchase
Easy Repair
Great part, prefect fit, works as expected.
Guest -
August 11, 2020
Verified Purchase
Exact fit part
Part was brand new and had new fuel lines already installed in tank. Which made changing a breeze. Will definately use again.
Guest -
March 23, 2020
Verified Purchase
Product came as described
Quick shipping kept my blower from being down weeks to days. I’ll use this company again
Guest -
November 18, 2019
Verified Purchase
Easy installatuon
It took about 15 minutes to install and leaf blower is like new now
Guest -
August 26, 2019
Verified Purchase
The correct part that I needed to correct fuel leak.
The tank with the fuel lines already installed makes it so easy to repair the lawn equipment. Fuel lines are very much key to the proper operation of the equipment.
Guest -
August 9, 2019
Verified Purchase
Parts worked perfect!
Ordered a new fuel tank, in tank fuel filter and air filter for a 2 cycle blower that had been setting for about a year. Parts were super easy to look up on your website and the parts delivered worked perfect. Thank you!
Guest -
June 24, 2019
Verified Purchase
Great part
The part worked perfectly. Thanks for being there.
Guest -
January 10, 2022
Verified Purchase
t
t
t -
t days ago
Verified Purchase
eReplacementParts Team
t
Questions & Answers ?
Our customer Service team is at the ready daily to answer your part and product questions.

Ask our Team
We have a dedicated staff with decades of collective experience in helping customers just like you purchase parts to repair their products.
Does this fit my product?Questions & Answers for Fuel Tank
I need a new fuel Tank with the fuel lines and filter installed and also the two fastening bolts
Peter
for model number BVM200FE
asked on 2022-12-01
Hi Peter,
Thank you for your question. The fuel tank comes with the fuel lines, but the fuel filter is sold separately. The part number listed under your model number for the fuel filter is 530095646. If you need help placing an order for it, customer service is open 7 days a week and anyone will be happy to assist you. Please feel free to give us a call. We look forward to hearing from you!
eReplacementParts Team December 01, 2022
when replacing fuel tank how long should the purge line be?thanks Mike
Michael
for model number 578943308
asked on 2022-04-19
Hi Michael,
Thank you for your question. When you purchase the fuel tank, the fuel lines are included and will be the correct length you need. If you have any questions, please let us know. We are open 7 days a week. We look forward to hearing from you!
eReplacementParts Team April 19, 2022
Customer Repair Instructions ?
All our customer repair instructions are solicited directly from other customers just like you who have purchased and replaced this exact part.
Fuel supply lines inside the fuel tank were brittle and broke off. Unable to insert new tubes, therefore had to replace the fuel tank with new fuel lines already installed.
Pedro - July 21, 2016
👍 18 of 18 people found this instruction helpful
Tool Type
Blower
Difficulty
Easy
Time
Less than 15 minutes
Tools Used
Screwdriver
Parts Used
Replacing the fuel tank was fairly easy, except it was attached with screws which had a star head. Luckily I had that type screw driver in my tool set and was able to remove and replace fairly easy. My blower is back in service.
Did you find this story helpful?
Thanks for voting and helping fellow customers!
Blower fuel lines cracked
Morry - July 18, 2018
👍 3 of 3 people found this instruction helpful
Tool Type
Blower
Difficulty
Easy
Time
15-30 minutes
Tools Used
Screwdriver, Pliers, Hex Wrench set
Parts Used
Gas tank developed a leak
1. Remove old tank
2. Remove filter holder
3. Disconnect fuel lines from carburetor
4. Install filter in fuel tank
5. Reconnect new fuel lines to carburetor
6. Attach fuel tank
7. Attach filter holder
8. Replace filter with new one
9. Fill tank with fuel mixture
10. Prime using primer bulb
11. Start blower
Did you find this story helpful?
Thanks for voting and helping fellow customers!
Crack in fuel tank. Air filter falling apart!
James - February 22, 2016
👍 3 of 3 people found this instruction helpful
Tool Type
Blower
Difficulty
Easy
Time
15-30 minutes
Tools Used
Pliers, Socket set, Only think special was the screws were star head on tank
Parts Used
Take two screws out of filter holder, remove throttle linkage from carb, remove two fuel lines. Easer with carb loose. Remove fuel filter from old due line, insert into new fuel line in new fuel tank. Unbolt old fuel tank and bolt in new one. Install fuel lines on carb, install linkage and two screws to hold carb and filter housing. Install new filter and cover. Prime ball and start blower!! All good! Check for leaks!!
Did you find this story helpful?
Thanks for voting and helping fellow customers!
Gas tank developed a leak
William - December 15, 2016
👍 1 of 1 people found this instruction helpful
Tool Type
Blower
Difficulty
Easy
Time
15-30 minutes
Tools Used
, Hex wrench set
Parts Used
1. Remove old tank
2. Remove filter holder
3. Disconnect fuel lines from carburetor
4. Install filter in fuel tank
5. Reconnect new fuel lines to carburetor
6. Attach fuel tank
7. Attach filter holder
8. Replace filter with new one
9. Fill tank with fuel mixture
10. Prime using primer bulb
11. Start blower
2. Remove filter holder
3. Disconnect fuel lines from carburetor
4. Install filter in fuel tank
5. Reconnect new fuel lines to carburetor
6. Attach fuel tank
7. Attach filter holder
8. Replace filter with new one
9. Fill tank with fuel mixture
10. Prime using primer bulb
11. Start blower
Did you find this story helpful?
Thanks for voting and helping fellow customers!
Gas tank feed disintegrated, needed replaced
Erik - January 5, 2024
Tool Type
Blower
Difficulty
Easy
Time
30-60 minutes
Tools Used
Screwdriver, Socket set, None
Parts Used
Replaced gas tank and Replaced fuel line.
Did you find this story helpful?
Thanks for voting and helping fellow customers!
Fuel tank replacement
Robert - November 19, 2020
Tool Type
Blower
Difficulty
Medium
Time
15-30 minutes
Tools Used
Screwdriver, Pliers, Socket set
Parts Used
Remove the old fuel tank.
Installed the new fuel tank
Installed the new fuel tank
Did you find this story helpful?
Thanks for voting and helping fellow customers!
would start and run 5 minutes and die ou. Then would not restart
rick - May 8, 2020
Tool Type
Blower
Difficulty
Medium
Time
15-30 minutes
Tools Used
Screwdriver, Pliers, Socket set
Parts Used
removed the side cover and replaced fuel tank also clean filter
Did you find this story helpful?
Thanks for voting and helping fellow customers!
gas tank cracked
Donald - January 24, 2020
Tool Type
Blower
Difficulty
Medium
Time
30-60 minutes
Tools Used
Screwdriver, Wrench Set, allen wrench
Parts Used
took old tank off and installed new one
Did you find this story helpful?
Thanks for voting and helping fellow customers!
Blower would not rev up
Scott - October 4, 2018
Tool Type
Blower
Difficulty
Easy
Time
15-30 minutes
Tools Used
Screwdriver, Socket set, Torx bit
Parts Used
Removed the carburetor cover,removed the fuel tank, removed carburetor to replace fuel lines. Reinstalled new tank, attach fuel lines, reinstall carb. Tighten screws to fuel tank. Pull fuel line from inside tank. Attach fuel filter to fuel line by pressing plastic line over tip on filter. Push filter down to bottom of tank. Replace carb cover. Fill with fresh mixed fuel.
Did you find this story helpful?
Thanks for voting and helping fellow customers!
Cracked fuel tank
James - July 16, 2018
Tool Type
Blower
Difficulty
Easy
Time
15-30 minutes
Tools Used
, Star-driver
Parts Used
1. Removed the old fuel tank and fuel lines from the carburetor.
2. Installed the new fuel tank with new lines included.
3. Installed a new fuel filter (not included) to the longer line provided in the tank.
4. Installed the new fuel lines from the tank to the carburetor.
5. Filled the fuel tank and pressed the primer bulb several times to test for leaks and pressure.
6. Replaced the spark plug and started the blower.
Notes: Drain any gas from the old tank before attempting to remove it.
I wasted a lot of time trying to start the blower with the old spark plug before replacing it.
Needle nose pliers helped a lot in getting the new fuel lines installed on the carburetor.
A little WD-40 was also helpful in getting the new lines started onto the carburetor fittings.
Did you find this story helpful?
Thanks for voting and helping fellow customers!
Load More Install Stories
OEM stands for Original Equipment Manufacturer and means the part you’re buying is sourced directly from the manufacturer who made your product. At eReplacementParts, we sell only genuine OEM parts, guaranteeing the part you’re purchasing is of better design and of higher quality than aftermarket parts.
Our product descriptions are a combination of data sourced directly from the manufacturers who made your product as well as content researched and curated by our content & customer service teams. This content is edited and reviewed internally before being made public to customers.
Our customer service team are at the ready daily to answer your part and product questions. We have a dedicated staff with decades of collective experience in helping customers just like you purchase parts to repair their products.
All our part reviews are solicited directly from other customers who have purchased this exact part. While we moderate these reviews for profanity, offensive language or personally identifiable information, these reviews are posted exactly as submitted and no alterations are made by our team.
All our customer repair instructions are solicited directly from other customers just like you who have purchased and replaced this exact part. While we moderate these reviews for profanity, offensive language or personally identifiable information, these reviews are posted exactly as submitted and no alterations are made by our team.
Based on data from past customer purchasing behaviors, these parts are most commonly purchased together along with the part you are viewing. These parts may be necessary or helpful to replace to complete your current repair.
All our installation videos are created and produced in collaboration with our in-house repair technician, Mark Sodja, who has helped millions of eReplacementParts customers over the last 13 years repair their products. Mark has years of experience in selling and repairing both commercial and residential products with a specialty in gas-powered equipment.
This data is collected from customers who submitted a repair instruction after replacing this exact part. Customers can rate how easy the repair was to complete and how long it took. We aggregate this data to provide a repair rating that allows customers to quickly determine the difficulty and time needed to perform their own repair.