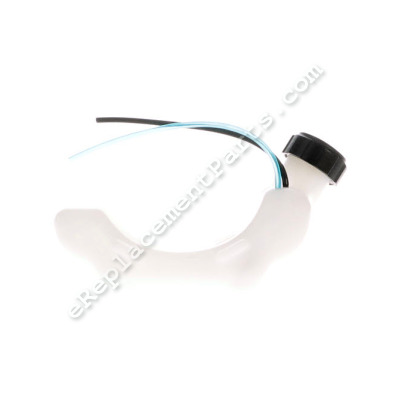
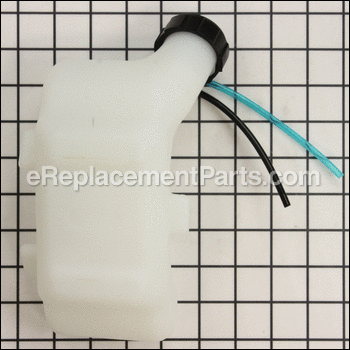


This is a genuine Troy-Bilt replacement fuel tank assembly. It is specially designed for trimmers/edgers and blowers. It is made out of plastic and it includes the fuel tank, fuel lines and the fuel cap. It is very important to replace the fuel tank if it is cracked or damaged. This item is sold individually.
Fuel Tank Asm 753-05256
OEM part for: Troy-Bilt, Cub Cadet
Part Number: 753-05256
$52.14
In Stock
Jump To:
Product Description ?
- Fuel tank assembly with fuel lines.
- Classification: Part
- Weight: 0.45 lbs.
- Shipping: Ships Worldwide
Frequently Purchased Together ?
Compatibility
This part will fit the following 28 machines
Troy-Bilt
TB360BV (41BS360G966) Blower View Diagrams & Manuals
25A-515-966 (TBE515) (2007) Edger View Diagrams & Manuals
25B-515-966 (TBE515) (2008) Edger View Diagrams & Manuals
TB514CS (41ADT51G966) Gas Trimmer View Diagrams & Manuals
TB525CS (41ADT52C711) Gas Trimmer View Diagrams & Manuals
TB525CS (41BDT52C966) Gas Trimmer View Diagrams & Manuals
TB525CS (Horse)(41ADT52C966) Gas Trimmer View Diagrams & Manuals
TB525ET (41ADT5EC966) Gas Trimmer View Diagrams & Manuals
TB575SS (41ADT57C711) Gas Trimmer View Diagrams & Manuals
TB575SS (Big Red)(41ADT57C966) Gas Trimmer View Diagrams & Manuals
TB590BC (41ADT59C711) Gas Trimmer View Diagrams & Manuals
TB590BC (41ADT59C966) Gas Trimmer View Diagrams & Manuals
TB539ES (41CDT53C966) 4-Cycle Gas Trimmer View Diagrams & Manuals
TB539ES (41DDT53C966) 4-Cycle Gas Trimmer View Diagrams & Manuals
TB525ES (41DDT52C966) Trimmer View Diagrams & Manuals
TB575SS (41BDT57C966) Trimmer View Diagrams & Manuals
TBE515 (2009) Gas Edger View Diagrams & Manuals
TB539E Trimmer View Diagrams & Manuals
41ADT52C966 (TB525CS) Horse Horse Handheld Gas Trimmer View Diagrams & Manuals
41ADT57C966 (TB575SS) Big Red Big Red Handheld Gas Trimmer View Diagrams & Manuals
Cub Cadet
CC5075SS (41AD575C910) (2006) Gas String Trimmer View Diagrams & Manuals
CC5090BC (41AD590C910) (2006) Gas String Trimmer View Diagrams & Manuals
CC5075SS (41AD575C910) (2007) Gas String Trimmer View Diagrams & Manuals
CC5090BC (41AD590C910) (2007) Gas String Trimmer View Diagrams & Manuals
CC5075SS (41AD575C912) (2008) Gas String Trimmer View Diagrams & Manuals
CC5090BC (41AD590C912, 41AD590C710, 41AD590C910) (2008) Gas String Trimmer View Diagrams & Manuals
CC5090BC (41AD590C910) (2009) Gas String Trimmer View Diagrams & Manuals
CC5090 (41AD590C910, 41AD590C709) (2010) 41AD590C Gas String Trimmer View Diagrams & Manuals
Show More Compatible Models
This item works with the following types of products:
- Blower Parts
- Edger Parts
- Trimmer Parts
This part replaces obsolete part #: 753-05288
Repair Videos ?
Watch the Repair Video for
Fuel Tank Asm

Articles:
|
Step-by-step instructions for removing and installing the fuel tank on your Troy-Bilt trimmer....
July 30, 2018
|

Customer Part Reviews ?
Average Rating (out of 5):
Click to filter by ratings:
5 stars
9
4 stars
0
3 stars
0
2 stars
0
1 stars
0
< PREV
- 1
Easy repair
Fuel tank for my weed eater arrived pretty fast and it worked perfectly. Price was good. Will definitely order parts when needed through ereplacement parts in the future. .
Guest -
May 24, 2023
Verified Purchase
worked as needed
good condition
Guest -
November 27, 2020
Verified Purchase
Ten year old trimmer going strong
Easy installation, perfect fit.
Guest -
October 20, 2020
Verified Purchase
Works Perfectly
Fit my TB525CS perfectly. Very happy with this purchase.
Guest -
June 9, 2020
Verified Purchase
quick and easy to remove old tank and replace with new.....
perfect fit
Guest -
May 11, 2020
Verified Purchase
Perfect Part
This was an exact fit and solved my fuel leaks. Great replacement part, reasonable price and fast shipping.
Guest -
January 21, 2020
Verified Purchase
Easy repair, fit correctly
Part was exactly what I needed.
Guest -
August 3, 2019
Verified Purchase
Worked as expected.
The item was brand new. Had all the pieces and arrived on time.
Guest -
May 21, 2019
Verified Purchase
This was a very easy repair.
The part was a direct replacement and fit perfectly. Everything was as described and I could not be more satisfied, thank you.
Guest -
May 7, 2019
Verified Purchase
t
t
t -
t days ago
Verified Purchase
eReplacementParts Team
t
Questions & Answers ?
Our customer Service team is at the ready daily to answer your part and product questions.

Ask our Team
We have a dedicated staff with decades of collective experience in helping customers just like you purchase parts to repair their products.
Does this fit my product?Questions & Answers for Fuel Tank Asm
No questions have been asked yet
Customer Repair Instructions ?
All our customer repair instructions are solicited directly from other customers just like you who have purchased and replaced this exact part.
Gas tank fuel delivery failed, gas feed tube separated inside tank
Chris - October 20, 2016
👍 11 of 12 people found this instruction helpful
Tool Type
Edger
Difficulty
Medium
Time
15-30 minutes
Tools Used
Screwdriver, Socket set, Wrench Set
Parts Used
Ordered new gas tank
Removed old, installed new tank, reconnected the gas feed tube and return tube to the carburetor. Reinstalled carburetor to crankcase/body. Replaced cover.
Note: gas delivery tubes must be reconnected to correct inlets on carburetor to work properly. In my case the return to tank tube was connected to the upper most inlet on the carburetor while the gas delivery tube connected to lower inlet. Observe the flow when engaging primer bulb, bubbles in return tube should flow into gas tank, bulb should fill within 10 pumps.
Did you find this story helpful?
Thanks for voting and helping fellow customers!
Our previous gas tank hoses dried and cracked.
Renee - May 26, 2016
👍 7 of 8 people found this instruction helpful
Tool Type
Trimmer
Difficulty
Easy
Time
15-30 minutes
Tools Used
Screwdriver, .
Parts Used
It was plug and play. Very user friendly. You don't have to be a fancy mechanic to do some stuff! I'm still grateful for the mechanics that are out there though!
Remove the cover, then remove the tank and fuel lines. Install the new tank and fuel lines . then the cover.
Remove the cover, then remove the tank and fuel lines. Install the new tank and fuel lines . then the cover.
Did you find this story helpful?
Thanks for voting and helping fellow customers!
Fuel lines had deteriorated. Primer bubble on carb had cracked (seperate repair)
David - March 13, 2018
👍 3 of 3 people found this instruction helpful
Tool Type
Trimmer
Difficulty
Easy
Time
15-30 minutes
Tools Used
Screwdriver
Parts Used
1. Removed screws from plastic motor housing
2. Removed housing
3. Removed old gas tank (simply pulls out of retention slots)
4. Put new tank in
5. Attached fuel lines
6. Replace plastic motor housing
Note: Before removing old tank, note the location of the fuel line connection on the carb for the intake and back flow hoses. Installing them backwards will prevent improper gas flow.
Did you find this story helpful?
Thanks for voting and helping fellow customers!
The fuel lines cracked.
kirk - July 6, 2016
👍 3 of 3 people found this instruction helpful
Tool Type
Trimmer
Difficulty
Medium
Time
1-2 hours
Tools Used
Screwdriver, Pliers, Torx driver
Parts Used
I removed the cover and disconnected the lines then put new tank in and reassembled.
Did you find this story helpful?
Thanks for voting and helping fellow customers!
Fuel lines had dried rotted.
Martin - June 4, 2017
👍 1 of 1 people found this instruction helpful
Tool Type
Edger
Difficulty
Easy
Time
15-30 minutes
Tools Used
Screwdriver
Parts Used
1. Removed cover.
2. Removed fuel tank.
3. Installed new tank.
4. Connected fuel lines.
2. Removed fuel tank.
3. Installed new tank.
4. Connected fuel lines.
Did you find this story helpful?
Thanks for voting and helping fellow customers!
Gas was leaking
Bunnie - July 19, 2023
Tool Type
Trimmer
Difficulty
Medium
Time
30-60 minutes
Tools Used
Screwdriver, Power Drill
Parts Used
Disconnected old tank and hoses. Cleaned weed wackier up and replaced new tank. Connected hoses. Needed to get the air out of the line and then it ran welll
Did you find this story helpful?
Thanks for voting and helping fellow customers!
Fuel lines from the tank to the Carb dry rotted and broke.
Marvin - June 5, 2021
Tool Type
Trimmer
Difficulty
Easy
Time
Less than 15 minutes
Tools Used
Screwdriver, Pliers
Parts Used
Removed the rear cover, (Tork screws) and the tank was free to remove. Cleaned out the area covered by the tank, reinstall vibration bumpers, inserted the new tank, and replaced the rear cover. Connected fuel lines, primed, and started the engine.
Did you find this story helpful?
Thanks for voting and helping fellow customers!
Cracked tank
Walter - April 23, 2021
Tool Type
Trimmer
Difficulty
Easy
Time
15-30 minutes
Tools Used
, Battery powered impact driver
Parts Used
Removed screws of housing.
Removed fuel supply line and overflow fuel line.
Removed fuel tank.
Installed new fuel tank.
Installed fuel supply line and overflow fuel line.
Installed screws of housing.
Added fuel and pressed fuel bulb 10x.
Pulled rope and trimmer started.
Removed fuel supply line and overflow fuel line.
Removed fuel tank.
Installed new fuel tank.
Installed fuel supply line and overflow fuel line.
Installed screws of housing.
Added fuel and pressed fuel bulb 10x.
Pulled rope and trimmer started.
Did you find this story helpful?
Thanks for voting and helping fellow customers!
The fuel tank lines inside the tank came loose and not drawing fuel from tank properly
David - June 17, 2020
Tool Type
Trimmer
Difficulty
Easy
Time
Less than 15 minutes
Tools Used
Screwdriver
Parts Used
Loosened the outer housing with screwdriver. Removed tank and disconnected lines. New tank snapped into place. Tightened the outer housing back up. Reconnected new lines to proper inlets filled with fuel. Less than 10 minutes after I began the replacement project I was trimming grass and edging my sidewalk and curb. EASY PEASY
Did you find this story helpful?
Thanks for voting and helping fellow customers!
Fuel tank leaked were hoses came out of the tank.
Allan - June 15, 2020
Tool Type
Trimmer
Difficulty
Easy
Time
15-30 minutes
Tools Used
Screwdriver
Parts Used
All there was to do was remove five screws in the cover, remove two hose and replace the mounts onto the new tank and reassemble very easy job.
Did you find this story helpful?
Thanks for voting and helping fellow customers!
Load More Install Stories
OEM stands for Original Equipment Manufacturer and means the part you’re buying is sourced directly from the manufacturer who made your product. At eReplacementParts, we sell only genuine OEM parts, guaranteeing the part you’re purchasing is of better design and of higher quality than aftermarket parts.
Our product descriptions are a combination of data sourced directly from the manufacturers who made your product as well as content researched and curated by our content & customer service teams. This content is edited and reviewed internally before being made public to customers.
Our customer service team are at the ready daily to answer your part and product questions. We have a dedicated staff with decades of collective experience in helping customers just like you purchase parts to repair their products.
All our part reviews are solicited directly from other customers who have purchased this exact part. While we moderate these reviews for profanity, offensive language or personally identifiable information, these reviews are posted exactly as submitted and no alterations are made by our team.
All our customer repair instructions are solicited directly from other customers just like you who have purchased and replaced this exact part. While we moderate these reviews for profanity, offensive language or personally identifiable information, these reviews are posted exactly as submitted and no alterations are made by our team.
Based on data from past customer purchasing behaviors, these parts are most commonly purchased together along with the part you are viewing. These parts may be necessary or helpful to replace to complete your current repair.
All our installation videos are created and produced in collaboration with our in-house repair technician, Mark Sodja, who has helped millions of eReplacementParts customers over the last 13 years repair their products. Mark has years of experience in selling and repairing both commercial and residential products with a specialty in gas-powered equipment.
This data is collected from customers who submitted a repair instruction after replacing this exact part. Customers can rate how easy the repair was to complete and how long it took. We aggregate this data to provide a repair rating that allows customers to quickly determine the difficulty and time needed to perform their own repair.