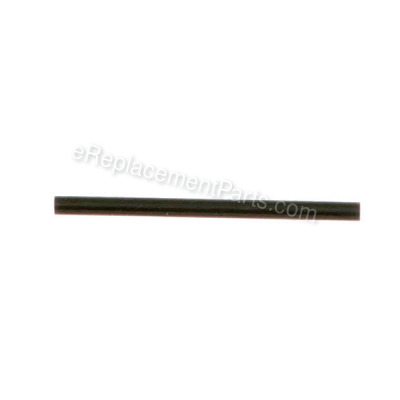
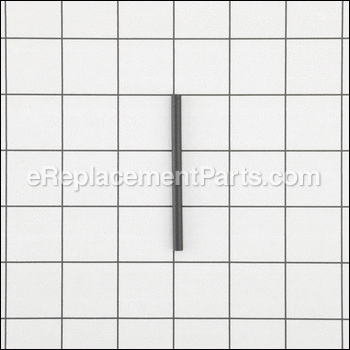


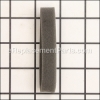
This is a genuine OEM replacement part designed for Hitachi power equipment. The purpose of fuel line is to to return excess fuel back on the system. By pressing the primmer bulb it will fill the carburetor with fuel, once it is full the excess fuel will be forced back into the tank through the fuel return line. It is made out of rubber and it is sold individually.
Over time the fuel lines will deteriorate and become brittle so they would need to be replaced.
Fuel Pipe 6699014
OEM part for: Metabo HPT (Hitachi), Tanaka
Part Number: 6699014
$4.99
Usually ships in 7 - 12 business days
7 - 12 business days
Jump To:
Product Description ?
- Classification: Part
- Weight: 0.01 lbs.
- Shipping: Ships Worldwide
Frequently Purchased Together ?


Compatibility
This part will fit the following 19 machines
Metabo HPT (Hitachi)
CG22EADSLP 21.1cc Split Shaft Grass Trimmer View Diagrams & Manuals
RB24EAP 23.9cc Handheld Blower View Diagrams & Manuals
CG22EASSLP 21.1 cc Straight Shaft Grass Trimmer View Diagrams & Manuals
TCS-40EA 40cc Chainsaw View Diagrams & Manuals
CS40EA18 Chainsaw View Diagrams & Manuals
CG22EABSLP Grass Trimmer View Diagrams & Manuals
CG27EASP Engine Brush Cutter View Diagrams & Manuals
CG24EASP Engine Brush Cutter View Diagrams & Manuals
CS40EA Gas Powered Rear Handle Chain Saw View Diagrams & Manuals
TRB24EAP 23.9cc Handheld Blower View Diagrams & Manuals
CG22EAD Trimmer View Diagrams & Manuals
CG22EAS Trimmer View Diagrams & Manuals
CG24EAS Trimmer View Diagrams & Manuals
CG24EBD Trimmer View Diagrams & Manuals
CG24EBDP Trimmer View Diagrams & Manuals
CG24EBS Trimmer View Diagrams & Manuals
CG24EBSP Trimmer View Diagrams & Manuals
Tanaka
TCG-22EAB Grass Trimmer View Diagrams & Manuals
TCG-22EAS Brush Cutter View Diagrams & Manuals
Show More Compatible Models
This item works with the following types of products:
- Grass Trimmer Parts
- Trimmer Parts
- Blower Parts
- Chain Saw Parts
- Saw Parts
This part replaces obsolete part #: 669-8401, 669-6476, , 6696476, 6698401
Customer Part Reviews ?
Average Rating (out of 5):
Click to filter by ratings:
5 stars
13
4 stars
1
3 stars
0
2 stars
0
1 stars
0
< PREV
- 1
- 2
Gas leak fixed on Hitachi leaf blower
Parts arrived quickly; fixed gas leak;
Guest -
November 6, 2023
Verified Purchase
great service
this is a great place for parts they seem to have what yu are looking for while others do not , Quick shipping you are up and back running in no time
Guest -
October 24, 2023
Verified Purchase
Quick Shipping
Order arrived quickly and all was in good shape. Easy purchase.
Michael -
November 30, 2021
Verified Purchase
Great fit
Arrived quickly and fit great.
Guest -
November 10, 2021
Verified Purchase
FIT WHAT I GOT IT FOR.
FAST DELIVERY, BLOWER WORKS
Guest -
September 6, 2021
Verified Purchase
Worked as expected
Arrived on time and as described. Fixed my blower quickly
Guest -
November 12, 2020
Verified Purchase
fixed gas blower
Parts arrived early, thank you. After installing parts, unit works again. Original parts failed prematurely, replacement parts made of materials that should easily exceed original. knok. Once again, thanks !!
Guest -
November 11, 2020
Verified Purchase
Great customer service!!
Arrived very fast!! The lady who placed the order for me was very nice!!
Guest -
January 1, 2020
Verified Purchase
Fast Delivery of the Parts I Needed
I found exactly the parts I needed and they were delivered quickly. I had my trimmer back up and running in record time!
Guest -
July 19, 2019
Verified Purchase
Great replacement parts
Parts were shipped promptly, fit perfectly on my Hitachi string trimmer. Fuel lines rotted out after several years of use and new filter and new fuel lines has my 7 year old trimmer running like new. Highly recommend this seller, very happy with my purchase.
Guest -
July 8, 2019
Verified Purchase
t
t
t -
t days ago
Verified Purchase
eReplacementParts Team
t
Questions & Answers ?
Our customer Service team is at the ready daily to answer your part and product questions.

Ask our Team
We have a dedicated staff with decades of collective experience in helping customers just like you purchase parts to repair their products.
Does this fit my product?Questions & Answers for Fuel Pipe
No questions have been asked yet
Customer Repair Instructions ?
All our customer repair instructions are solicited directly from other customers just like you who have purchased and replaced this exact part.
The gas return line was broken at the grommet
MICHEL - June 4, 2016
👍 10 of 10 people found this instruction helpful
Tool Type
Blower
Difficulty
Medium
Time
15-30 minutes
Tools Used
Screwdriver, Pliers, knife
Parts Used
• Removed the two screw holding to the body the air filter/choke assembly.
• Removed the grommet still holding a piece of pipe by cutting his collar.
• Removed broken fuel pipe.
• Lightly oiled the fuel pipe to push it to the grommet.
• Pushed that assembly through the hole in the gas tank using the screw driver to drive the grommet through the hole.
• Pushed the line on the outlet on the air filter/choke assembly.
• Reassembled the air filter/choke assembly using the two screw removed in first step
Did you find this story helpful?
Thanks for voting and helping fellow customers!
Line from priming bulb to fuel tank broke.
Mark - February 10, 2017
👍 8 of 8 people found this instruction helpful
Tool Type
Blower
Difficulty
Medium
Time
30-60 minutes
Tools Used
Pliers, 5.5\\
Parts Used
1. Unsnapped & removed plastic air filter cover to better access repair site.
2. Using pliers to slightly pinch closed tabs on inside, unsnapped priming bulb frame & pulled it out slightly to improve access to broken line.
3. Removed broken line from bulb nipple & fuel tank with needle nose pliers.
4. Wrapped ends of pliers with black tape to protect new line from possible damage.
5. Dipping end of line in oil/fuel mix to act as lubricant, gently, carefully worked it onto nipple & then through tank grommet into tank using pliers. Slow & tedious process!
6. Once line reached through grommet & into tank, grabbed line end & pulled it through with forceps. Those little forceps are great to have in your toolbox! Find them at pharmacies & online.
Did you find this story helpful?
Thanks for voting and helping fellow customers!
Tubing affected by gasoline. Dirty filter element.
James - April 23, 2017
👍 3 of 3 people found this instruction helpful
Tool Type
Blower
Difficulty
Easy
Time
15-30 minutes
Tools Used
Pliers, Wire
Needle nose pliers are helpful to change the tubing. A piece of wire is necessary to pull the tubing and filter from the gas tank.
Did you find this story helpful?
Thanks for voting and helping fellow customers!
Changed fuel line
Robert - April 21, 2017
👍 3 of 3 people found this instruction helpful
Tool Type
Blower
Difficulty
Medium
Time
15-30 minutes
Tools Used
Pliers
Parts Used
1. Connected fuel pipe to carb using long nose pliers
2. Slid other end into fuel tank using long nose pliers
3. Put gas in tank, primed and started right up
2. Slid other end into fuel tank using long nose pliers
3. Put gas in tank, primed and started right up
Did you find this story helpful?
Thanks for voting and helping fellow customers!
Hoses and grommets were cracking/leaking due to age
Gordon - January 31, 2017
👍 3 of 3 people found this instruction helpful
Tool Type
Blower
Difficulty
Medium
Time
30-60 minutes
Tools Used
Screwdriver, Pliers, Hook to pull hose out to add filter
1. Removed side cover
2. Removed gas tank
3. Removed old hoses and grommets
4. Lightly oiled hoses and inserted them in grommets
5. Lightly oiled grommets and with needle nose pliers rocked grommets into tank holes.
6. With hook pulled long hose out of tank fill and added filter
7. Reinstalled tank and attached hoses to carburator and purge pump
8. Reinstalled side cover.
9. Added fuel and started blower!
Did you find this story helpful?
Thanks for voting and helping fellow customers!
Fuel line leaking when priming
Hank - January 22, 2017
👍 1 of 1 people found this instruction helpful
Tool Type
Blower
Difficulty
Easy
Time
Less than 15 minutes
Tools Used
Screwdriver, Pliers
Parts Used
Removed plastic carb cover, took out 2 screws holding carb, removed backing gasket,tilted it out of the way,pulled off old hose on one end, the other end was stuck in the grommet to fuel tank,couldn't get the tip out,just pushed it in,lubed both ends of new hose, put in place,was careful putting old paper gasket on back of carb,put it back together, ran like a champ.
Did you find this story helpful?
Thanks for voting and helping fellow customers!
Gas priming bulb was leaking and decided to change all gas lines
Brian - December 15, 2016
👍 1 of 1 people found this instruction helpful
Tool Type
Blower
Difficulty
Medium
Time
30-60 minutes
Tools Used
Screwdriver, Pliers
Removed air filter housing to get to housing/carburetor attached fuel lines. The fuel priming bulb just snaps in place. The pink line attaches to the housing and proceeds through a grommet in the gas tank. The shorter black line goes from the housing to the carburetor. You will need to remove the other rubber grommet that seals the longer black fuel line going into the gas tank to feed the new line through it. You will also have to reach into fuel tank with a wire hook to retrieve the filter attached to the black line to remove it and attach new line since the grommet opening is not large enough to pull the filter through. The filter housing/carburetor screws are then put back in place and re-tightened.
Did you find this story helpful?
Thanks for voting and helping fellow customers!
Pink fuel line was brittle and cracked open leaking fuel.
David - November 4, 2016
👍 1 of 1 people found this instruction helpful
Tool Type
Blower
Difficulty
Easy
Time
Less than 15 minutes
Tools Used
, Needle nose pliers
Parts Used
Not a big deal. Used the needle nose pliers to gently pull the pink fuel line off of the carburetor port, and used the same pliers to gently push the replacement pipe back on. The pink fuel line is not super delicate but should not be abused. The other end of it slips into the black rubber stopper on the fuel tank itself. Why was all of this needed? I read where the leaf blower that uses gasoline with an ethanol mix to it tends to "make the pink fuel line brittle". After a while,and I had maybe 10 hours run time on it, the line gets brittle and will crack.
Did you find this story helpful?
Thanks for voting and helping fellow customers!
Leaf blower was leaking gas and would not start due to split fuel lines.
Robert - October 25, 2016
👍 1 of 1 people found this instruction helpful
Tool Type
Blower
Difficulty
Medium
Time
30-60 minutes
Tools Used
Screwdriver
Removed carburetor to get at three fuel lines. All were split and brittle from Ethanol. Replaced two but third broke off at grommet in the process because it was brittle. Suggest you replace all fuel lines at the same time needed or not. Suggest switch to nonEthanol fuel or use additive to combat Ethanol which drys out rubber lines and gaskets. Most major gasoline retailers now offer nonEthanol fuel. It's more expensive but worth in the end.
Did you find this story helpful?
Thanks for voting and helping fellow customers!
Gas leaking when pressing the primer bulb.
Rich - May 3, 2016
👍 1 of 1 people found this instruction helpful
Tool Type
Blower
Difficulty
Medium
Time
1-2 hours
Tools Used
Screwdriver, Pliers
After looking closer at the problem while getting ready to install the new parts, all that was needed was the Fuel Line which was cracked.
It was a bit difficult to get the grommets out because they were a bit greasy. It was necessary to remove the gas tank which was not possible because on screw would not come out.
When trying to thread the fuel line back through the grommet a bit of "3-in-one oil" made it easier.
The Fuel Pipe had to be 'fished' out of the gas tank opening because of the filter on the end.
Also it was a struggle trying to get the grommets snapped back in the holes.
Did you find this story helpful?
Thanks for voting and helping fellow customers!
Load More Install Stories
OEM stands for Original Equipment Manufacturer and means the part you’re buying is sourced directly from the manufacturer who made your product. At eReplacementParts, we sell only genuine OEM parts, guaranteeing the part you’re purchasing is of better design and of higher quality than aftermarket parts.
Our product descriptions are a combination of data sourced directly from the manufacturers who made your product as well as content researched and curated by our content & customer service teams. This content is edited and reviewed internally before being made public to customers.
Our customer service team are at the ready daily to answer your part and product questions. We have a dedicated staff with decades of collective experience in helping customers just like you purchase parts to repair their products.
All our part reviews are solicited directly from other customers who have purchased this exact part. While we moderate these reviews for profanity, offensive language or personally identifiable information, these reviews are posted exactly as submitted and no alterations are made by our team.
All our customer repair instructions are solicited directly from other customers just like you who have purchased and replaced this exact part. While we moderate these reviews for profanity, offensive language or personally identifiable information, these reviews are posted exactly as submitted and no alterations are made by our team.
Based on data from past customer purchasing behaviors, these parts are most commonly purchased together along with the part you are viewing. These parts may be necessary or helpful to replace to complete your current repair.
All our installation videos are created and produced in collaboration with our in-house repair technician, Mark Sodja, who has helped millions of eReplacementParts customers over the last 13 years repair their products. Mark has years of experience in selling and repairing both commercial and residential products with a specialty in gas-powered equipment.
This data is collected from customers who submitted a repair instruction after replacing this exact part. Customers can rate how easy the repair was to complete and how long it took. We aggregate this data to provide a repair rating that allows customers to quickly determine the difficulty and time needed to perform their own repair.