


Genuine OEM replacement part, this item is sold individually.
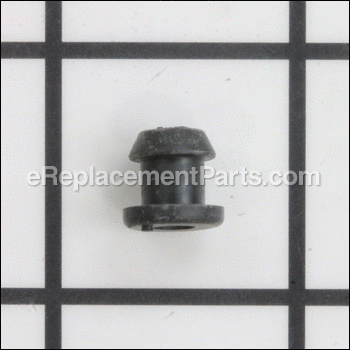
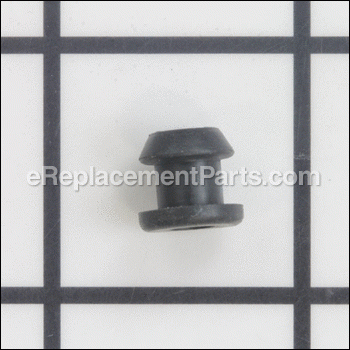
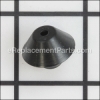
The Return Grommet is inserted in to the fuel tank on the outdoor products shown below.
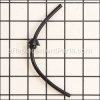
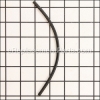
The the Return Fuel is installed into the Grommet.
Its purpose is to create a seal and prevent fuel leaks.
It may be easier to place the return fuel line in the grommet and install both in the fuel tank at the same time.
Return Grommet 6697846
OEM part for: Tanaka, Metabo HPT (Hitachi)
Part Number: 6697846
$5.19
Usually ships in 7 - 12 business days
7 - 12 business days
Jump To:
Product Description ?
- Classification: Part
- Weight: 0.01 lbs.
- Shipping: Ships Worldwide
Frequently Purchased Together ?


Compatibility
This part will fit the following 129 machines
Tanaka
TBL-455 Backpack Blower View Diagrams & Manuals
THB-2500 Handheld Blower View Diagrams & Manuals
THB-2510 Handheld Blower View Diagrams & Manuals
THB-260PF Handheld Blower View Diagrams & Manuals
DR-270PN Extended Reach Pole Saw View Diagrams & Manuals
TPS-2501 Extended Reach Pole Saw View Diagrams & Manuals
TPS-270PN Extended Reach Pole Saw View Diagrams & Manuals
TED-210 Gas Drill View Diagrams & Manuals
TED-262DH Portable Gas Drill View Diagrams & Manuals
TED-262HS High Speed Concrete Coring Drill View Diagrams & Manuals
TED-262L Portable Gas Drill View Diagrams & Manuals
TED-262R (S279070) Engine Drill W/Reverse View Diagrams & Manuals
TED-262R (Z227501) Engine Drill W/Reverse View Diagrams & Manuals
TBL-500 Backpack Blower View Diagrams & Manuals
TBL-505 Backpack Blower View Diagrams & Manuals
ECS-290 Chainsaw View Diagrams & Manuals
ECS-300 Chainsaw View Diagrams & Manuals
TPS-250PN Extended Reach Pole Saw View Diagrams & Manuals
TPS-2510 Extended Reach Pole Saw View Diagrams & Manuals
TPS-260PF Extended Reach Pole Saw View Diagrams & Manuals
TPS-270PF Extended Reach Pole Saw View Diagrams & Manuals
TED-262 Portable Gas Drill View Diagrams & Manuals
TPE-2501 Portable Edger View Diagrams & Manuals
TPE-250PF Portable Edger View Diagrams & Manuals
TPE-260PF Portable Edger View Diagrams & Manuals
TPE-270PF Portable Edger View Diagrams & Manuals
TPE-270PN Portable Edger View Diagrams & Manuals
HTD-2520PF Hedge Trimmer View Diagrams & Manuals
HTD-2522PF (C230891) 22" Hedge Trimmer View Diagrams & Manuals
HTD-2522PF (C230890) 22" Hedge Trimmer View Diagrams & Manuals
HTD-2526PF 26" Hedge Trimmer View Diagrams & Manuals
HTD-2530PF Low Emission 30" Hedge Trimmer View Diagrams & Manuals
THT-2000 Hedge Trimmer View Diagrams & Manuals
THT-2100 Hedge Trimmer View Diagrams & Manuals
THT-210S Hedge Trimmer View Diagrams & Manuals
THT-2120 Hedge Trimmer View Diagrams & Manuals
THT-2510 30" Hedge Trimmer View Diagrams & Manuals
THT-2520 30" Hedge Trimmer View Diagrams & Manuals
THT-2530 30" 24cc 1.3HP Single Sided Hedge Trimmer View Diagrams & Manuals
THT-2540 40" 24cc 1.3HP Single Sided Hedge Trimmer View Diagrams & Manuals
TPH-2501 Articulating Pole Hedge Trimmer View Diagrams & Manuals
TPH-250PF Articulating Pole Hedge Trimmer View Diagrams & Manuals
TPH-260PF Pole Hedge Trimmer View Diagrams & Manuals
TPH-270PF Articulating Pole Hedge Trimmer View Diagrams & Manuals
TPH-270PN Articulating Pole Hedge Trimmer View Diagrams & Manuals
TBC-250 Grass Trimmer / Brush Cutter View Diagrams & Manuals
TBC-2500 Grass Trimmer View Diagrams & Manuals
TBC-2501 Grass Trimmer View Diagrams & Manuals
TBC-2501H (C263177 - C263752) Grass Trimmer View Diagrams & Manuals
TST-218 Telescopic Shaft Trimmer View Diagrams & Manuals
PF-2500 Utility / Scooter Engine View Diagrams & Manuals
PF-2600 Utility / Scooter Engine View Diagrams & Manuals
PF-3000 Utility / Scooter Engine View Diagrams & Manuals
PF-3300 Utility / Scooter Engine View Diagrams & Manuals
TC-2300 Utility / Scooter Engine View Diagrams & Manuals
TC-2501 Utility / Scooter Engine View Diagrams & Manuals
TC-4700 Utility / Scooter Engine View Diagrams & Manuals
Wet Screed (P211650 & Lower) Weber Vibrating Wet Screed Engine View Diagrams & Manuals
AST-210 AutoStart Trimmer View Diagrams & Manuals
TBC-220 Grass Trimmer / Brush Cutter View Diagrams & Manuals
TBC-2251 Grass Trimmer View Diagrams & Manuals
TBC-225C Grass Trimmer View Diagrams & Manuals
TBC-220SS Brush Cutter View Diagrams & Manuals
TBC-225CS Grass Trimmer View Diagrams & Manuals
TBC-225S Grass Trimmer View Diagrams & Manuals
TBC-230 Grass Trimmer View Diagrams & Manuals
TBC-2211 Grass Trimmer View Diagrams & Manuals
TBC-225 Grass Trimmer View Diagrams & Manuals
TBC-230B Grass Trimmer View Diagrams & Manuals
TBC-240PF Grass Trimmer View Diagrams & Manuals
TBC-240PFCS Grass Trimmer View Diagrams & Manuals
TBC-245PF Grass Trimmer View Diagrams & Manuals
TBC-250PF Low Emission Grass Trimmer / Brush Cutter View Diagrams & Manuals
TBC-250PFD Low Emission Grass Trimmer / Brush Cutter View Diagrams & Manuals
TBC-2510 Grass Trimmer View Diagrams & Manuals
TBC-255PF Grass Trimmer View Diagrams & Manuals
TBC-260PF Grass Trimmer View Diagrams & Manuals
TBC-260PFL Grass Trimmer View Diagrams & Manuals
TBC-270PFD Brush Cutter View Diagrams & Manuals
TBC-270PN Low Emission Grass Trimmer / Brush Cutter View Diagrams & Manuals
TBC-265 Brush Cutter View Diagrams & Manuals
TBC-270PND Brush Cutter View Diagrams & Manuals
TBC-265SS Brush Cutter View Diagrams & Manuals
TBC-280 Grass Trimmer View Diagrams & Manuals
TBC-280PF Grass Trimmer View Diagrams & Manuals
TBC-270PF Low Emission Grass Trimmer / Brush Cutter View Diagrams & Manuals
TBC-300 Brush Cutter View Diagrams & Manuals
TBC-300SDH Grass Trimmer / Brush Cutter View Diagrams & Manuals
TBC-3010 Grass Trimmer / Brush Cutter View Diagrams & Manuals
TPK-470GS 47cc Paveracer Kart View Diagrams & Manuals
Moby X (24cc) Bladez PowerBoard W/PureFire Engine View Diagrams & Manuals
Moby X (25cc) Bladez PowerBoard View Diagrams & Manuals
Moby X (26cc) Bladez PowerBoard View Diagrams & Manuals
TBC-500 Brush Cutter View Diagrams & Manuals
TBC-425 Brush Cutter View Diagrams & Manuals
PB-SE833 Bladez Moby 33cc PowerBoard View Diagrams & Manuals
TBC-250SF Smart Fit - Multi Task Tool View Diagrams & Manuals
TBC-255SFK Smart Fit - 3 in 1 - Multi Task Tool View Diagrams & Manuals
TBC-260SF Smart Fit - Multi Task Tool View Diagrams & Manuals
TBC-340PF Grass Trimmer / Brush Cutter View Diagrams & Manuals
TBC-600 Brush Cutter View Diagrams & Manuals
TED-270PFR Portable Gas Drill W/Reverse View Diagrams & Manuals
HTS-2530PF 24cc, 30" Single-sided Blades, Hedge Trimmer View Diagrams & Manuals
PB-SE801 (Moby-X25PF) BladeZ 24.5cc Gas View Diagrams & Manuals
PB-SE801 (Moby-X26) BladeZ 26cc Gas View Diagrams & Manuals
TWS-250 24cc Screed Engine View Diagrams & Manuals
TCG-22EAB Grass Trimmer View Diagrams & Manuals
TBC-230SF 21cc Trimmer Multi-Task Tool View Diagrams & Manuals
PK-SE2033 32cc Gas Powerkart View Diagrams & Manuals
TIA-350PFS 32cc 1.6 H.P. One-man Power Auger View Diagrams & Manuals
PB-SE801 (Moby-X25) BladeZ 24cc PowerBoard w/PureFire Engine View Diagrams & Manuals
TED-270PFDH Dual Handle Bulb Planting Drill View Diagrams & Manuals
TCG-22EAS Brush Cutter View Diagrams & Manuals
Metabo HPT (Hitachi)
CG22EADSLP 21.1cc Split Shaft Grass Trimmer View Diagrams & Manuals
RB24EAP 23.9cc Handheld Blower View Diagrams & Manuals
CG22EASSLP 21.1 cc Straight Shaft Grass Trimmer View Diagrams & Manuals
CG24EKSL 23.9 cc Straight Shaft Grass Trimmer View Diagrams & Manuals
TCS-40EA 40cc Chainsaw View Diagrams & Manuals
CS40EA18 Chainsaw View Diagrams & Manuals
CG22EABSLP Grass Trimmer View Diagrams & Manuals
CG27EASP Engine Brush Cutter View Diagrams & Manuals
CG24EASP Engine Brush Cutter View Diagrams & Manuals
CS40EA Gas Powered Rear Handle Chain Saw View Diagrams & Manuals
TRB24EAP 23.9cc Handheld Blower View Diagrams & Manuals
CM75EBPM 14 Inch 75cc, 2 Stroke Gas Cut Off Saw With New /Purefire� Engine View Diagrams & Manuals
CG24EASPSL Trimmer View Diagrams & Manuals
CG27EASPSL Trimmer View Diagrams & Manuals
CH22EAP2 Trimmer View Diagrams & Manuals
CM75EBP View Diagrams & Manuals
Show More Compatible Models
This item works with the following types of products:
- Blower Parts
- Pole Saw Parts
- Saw Parts
- Drill Parts
- Chain Saw Parts
- Edger Parts
- Hedge Trimmer Parts
- Trimmer Parts
- Grass Trimmer Parts
- Engine Parts
- Multi-Tool Parts
This part replaces obsolete part #: 669-6970, 6696970, 6684627, 53432710200
Customer Part Reviews ?
Average Rating (out of 5):
Click to filter by ratings:
5 stars
23
4 stars
1
3 stars
0
2 stars
0
1 stars
0
< PREV
- 1
- 2
- 3
Great parts diagrams
quick shipping and easy install
Guest -
December 22, 2023
Verified Purchase
great part
good quality
Pedro -
August 14, 2023
Verified Purchase
EVERYTHING WAS PERFECT
GREAT SERVICE AND ALL PARTS WERE A PERFECT MATCH. THANK YOU VERY MUCH
Guest -
May 5, 2023
Verified Purchase
Perfect
Exactly what I needed to repair my leaf blower! Great price and fairly fast shipping.
Guest -
July 5, 2022
Verified Purchase
Right part
Right part and on time.
Guest -
May 30, 2022
Verified Purchase
Thanks you did a great job
Thanks, received what was expected in the frame the company indicated. Nice work.
Guest -
December 27, 2021
Verified Purchase
Fast shipping
Did the job on my trimmer.
Guest -
October 13, 2021
Verified Purchase
Amazing! You had it!!
Exactly the part needed to get my Hitachi leaf blower back up and running. Thank you 👍
Guest -
August 30, 2021
Verified Purchase
The grommet was the part it was a little difficult to replace however it did the job my weed wacker stopped leaking gas from the gas tank
The grommet fit great
Guest -
June 17, 2021
Verified Purchase
Worked very well thank you
Parts were brand new and fit perfect thanh you for your accurate parts and fast delivery will order again thanks jim
Guest -
June 20, 2020
Verified Purchase
t
t
t -
t days ago
Verified Purchase
eReplacementParts Team
t
Questions & Answers ?
Our customer Service team is at the ready daily to answer your part and product questions.

Ask our Team
We have a dedicated staff with decades of collective experience in helping customers just like you purchase parts to repair their products.
Does this fit my product?Questions & Answers for Return Grommet
No questions have been asked yet
Customer Repair Instructions ?
All our customer repair instructions are solicited directly from other customers just like you who have purchased and replaced this exact part.
Leaking gas from return line
John - November 20, 2017
👍 9 of 12 people found this instruction helpful
Tool Type
Blower
Difficulty
Easy
Time
15-30 minutes
Tools Used
Screwdriver, Pliers
Parts Used
1.Drained gas to make sure any crap was removed.
2. Pulled the fuel line with the filter somewhat out of the tank, squeezed it to make sure no leaks and not clogged. It just dropped out when I drained the tank. It was still good and not brittle or stiff, so did not use the replacement line I bought.
3. Removed gas return pipe with needle nose pliers. It was broken and still and brittle. When i pulled on the return line at the grommet end at tank,the grommet came out and apart in pieces)
4. Checked for grommet trash in tank, there was none. Sometimes you get lucky!
5. Put a smear of oil on one end of return line and inserted into the new grommet by twisting. It inserted just fit flush with bottom of grommet. I wasn't sure if some of the line was supposed to stick out of the grommet into the tank but there was some resistance with getting it all the way through, so I thought that as long as the gas was not leaking from the pipe or grommet and gas was going back to tank was OK. It Was.
6. Inserted one edge of grommet with return line in it into gas tank hole. Used a small screwdriver to mash rest of grommet into tank hole until seated. Took it easy so as not to tear it or return line.
7.Replaced other end of return fuel line to carb with needle nose pliers. A little tight working space but not too bad.
8. Checked return line to make sure there were no kinks and squeezed fuel bulb which still had a little fuel in it to make sure it was clear and sent fuel to tank.
9. Fueled up, pressed primer bulb, checked for leaks. There were none.
10. Started blower, checked for leaks. No leaks! Success!
Did you find this story helpful?
Thanks for voting and helping fellow customers!
Gas line leak
Norman - August 11, 2016
👍 8 of 11 people found this instruction helpful
Tool Type
Trimmer
Difficulty
Easy
Time
15-30 minutes
Tools Used
Screwdriver
Parts Used
Replaced the gas line grommet, easy!
Did you find this story helpful?
Thanks for voting and helping fellow customers!
Carburetor stopped up, fuel lines rotten ,fuel filter bad ,primer pump bad & air filter rotten. The hedge trimmer had not been cranked in 10 years
Hurbert - December 28, 2015
👍 6 of 9 people found this instruction helpful
Tool Type
Hedge Trimmer
Difficulty
Easy
Time
30-60 minutes
Tools Used
Screwdriver, Wire with hook on one end
Removed carburetor to a access fuel lines & primer pump, used wire with hook to remove the fuel filter. I replaced the fuel line fuel filter & primer pump. Then I dissembled the carburetor cleaned it in my ultrasonic cleaner resembled, reinstalled, checked the compression 110 lb. cranked it up it ran fine, oiled the blade.
Did you find this story helpful?
Thanks for voting and helping fellow customers!
Fuel leaking from the tank
Mike - September 14, 2018
👍 4 of 6 people found this instruction helpful
Tool Type
Pole Saw
Difficulty
Medium
Time
1-2 hours
Tools Used
Screwdriver, Pliers
0. Remove the remaining fuel from the tank. Using a funnel I put the fuel back into my 1 gallon gas can.
1. Removed the air cleaner cover.
2. Removed the hardware holding the tank in place.
3. Disconnect the fuel lines at the carburetor and primer, paying close attention to which line goes where.
4. Installed the new vent, return line and fuel line and filter into the new tank.
5. Removed the old primer and installed the new one.
6. Attached the new fuel lines to the correct places on the primer and carburetor.
7. Placed the new tank into position using the mounting bracket and screws attached the tank to the engine.
8. Filled the tank with fuel.
At this point I tried to start the saw, it would not start. I found that I had flooded the carburetor when I was checking the operation of the new primer.(guess I primed it one to many times!) Removed the spark plug then, using compressed air I dried the inside of the cylinder and the spark plug, reassembled and started the saw.
9. Installed the new air cleaner I had purchased and reinstalled the air cleaner cover.
10. Put the saw back to work trimming trees.
Did you find this story helpful?
Thanks for voting and helping fellow customers!
Leaking gas
Steve - June 26, 2017
👍 4 of 6 people found this instruction helpful
Tool Type
Trimmer
Difficulty
Easy
Time
Less than 15 minutes
Tools Used
Screwdriver
Parts Used
Replaced grommet - No leaks
Did you find this story helpful?
Thanks for voting and helping fellow customers!
Gas leaking when pressing the primer bulb.
Rich - May 3, 2016
👍 4 of 6 people found this instruction helpful
Tool Type
Blower
Difficulty
Medium
Time
1-2 hours
Tools Used
Screwdriver, Pliers
After looking closer at the problem while getting ready to install the new parts, all that was needed was the Fuel Line which was cracked.
It was a bit difficult to get the grommets out because they were a bit greasy. It was necessary to remove the gas tank which was not possible because on screw would not come out.
When trying to thread the fuel line back through the grommet a bit of "3-in-one oil" made it easier.
The Fuel Pipe had to be 'fished' out of the gas tank opening because of the filter on the end.
Also it was a struggle trying to get the grommets snapped back in the holes.
Did you find this story helpful?
Thanks for voting and helping fellow customers!
Gas was leaking around the old grommet and fuel return line
Dale - October 4, 2018
👍 3 of 5 people found this instruction helpful
Tool Type
Pole Saw
Difficulty
Easy
Time
15-30 minutes
Tools Used
Screwdriver, Pliers
-Removed the old grommet and fuel line.
-Installed the new grommet without the return line. Put oil or vaseline on the grommet to make it easier to push in the hole.
-Lubricate the outside of the fuel return line, and cut the end of the line at a sharp angle. Then split the line. This allows you to get it started in the grommet easily.
-If you want, reach inside the tank with a wire hook and pull the return line far enough to cut the end square with snips. Optional.
-Slide the other end of the fuel return line on the carburetor.
That is it!
Did you find this story helpful?
Thanks for voting and helping fellow customers!
Grommet had deteriorated and gasoline was leaking from the gas tank.
Mark - August 7, 2018
👍 3 of 5 people found this instruction helpful
Tool Type
Trimmer
Difficulty
Easy
Time
Less than 15 minutes
Tools Used
, Hands and fingers
Removed old grommet and gas-drenched air filter element and replaced with eReplacement parts. Commercial Tanaka trimmer works great again.
Did you find this story helpful?
Thanks for voting and helping fellow customers!
Return grommet leaked
Van - November 24, 2017
👍 4 of 7 people found this instruction helpful
Tool Type
Blower
Difficulty
Medium
Time
15-30 minutes
Tools Used
Pliers, Needle nose pliers
Parts Used
Used needle nose pliers to remove the old parts and replaced with the new ones.
Did you find this story helpful?
Thanks for voting and helping fellow customers!
Original return grommet broken, fuel leaking.
Mike - September 26, 2018
👍 1 of 2 people found this instruction helpful
Tool Type
Trimmer
Difficulty
Easy
Time
Less than 15 minutes
Tools Used
Pliers
Replaced grommet, and fuel pipe assembly at the same time.
Did you find this story helpful?
Thanks for voting and helping fellow customers!
Load More Install Stories
OEM stands for Original Equipment Manufacturer and means the part you’re buying is sourced directly from the manufacturer who made your product. At eReplacementParts, we sell only genuine OEM parts, guaranteeing the part you’re purchasing is of better design and of higher quality than aftermarket parts.
Our product descriptions are a combination of data sourced directly from the manufacturers who made your product as well as content researched and curated by our content & customer service teams. This content is edited and reviewed internally before being made public to customers.
Our customer service team are at the ready daily to answer your part and product questions. We have a dedicated staff with decades of collective experience in helping customers just like you purchase parts to repair their products.
All our part reviews are solicited directly from other customers who have purchased this exact part. While we moderate these reviews for profanity, offensive language or personally identifiable information, these reviews are posted exactly as submitted and no alterations are made by our team.
All our customer repair instructions are solicited directly from other customers just like you who have purchased and replaced this exact part. While we moderate these reviews for profanity, offensive language or personally identifiable information, these reviews are posted exactly as submitted and no alterations are made by our team.
Based on data from past customer purchasing behaviors, these parts are most commonly purchased together along with the part you are viewing. These parts may be necessary or helpful to replace to complete your current repair.
All our installation videos are created and produced in collaboration with our in-house repair technician, Mark Sodja, who has helped millions of eReplacementParts customers over the last 13 years repair their products. Mark has years of experience in selling and repairing both commercial and residential products with a specialty in gas-powered equipment.
This data is collected from customers who submitted a repair instruction after replacing this exact part. Customers can rate how easy the repair was to complete and how long it took. We aggregate this data to provide a repair rating that allows customers to quickly determine the difficulty and time needed to perform their own repair.