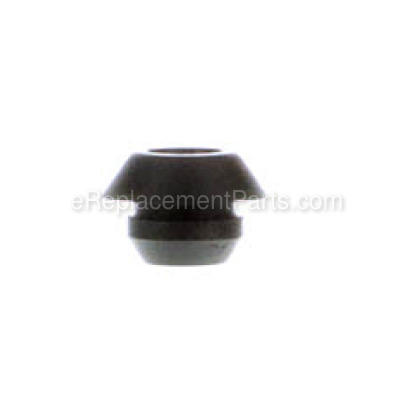
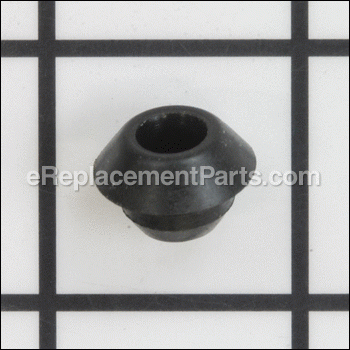


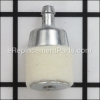
This is a genuine replacement part sourced directly from original manufacturer. This grommet is connected to the fuel hose and the fuel filter helping to secure it to the fuel tank. It purpose is to secure the fuel shut off valve. It is made out of rubber and it is sold individually. No tools are needed to replace.
Fuel Grommet (a) 6685308
OEM part for: Metabo HPT (Hitachi), Tanaka
Part Number: 6685308
$5.19
In Stock
Jump To:
Frequently Purchased Together ?


Compatibility
This part will fit the following 10 machines
Metabo HPT (Hitachi)
CS33EB16 16" Rear Handle Chainsaw 32.2cc View Diagrams & Manuals
TCS33EB-16 32cc Rear Handle Chainsaw View Diagrams & Manuals
TCS33EB-14 32cc Rear Handle Chainsaw View Diagrams & Manuals
TCS-40EA 40cc Chainsaw View Diagrams & Manuals
CS51EAP Chainsaw View Diagrams & Manuals
CS40EA18 Chainsaw View Diagrams & Manuals
CS33EDTP Engine Chainsaw View Diagrams & Manuals
CS40EA Gas Powered Rear Handle Chain Saw View Diagrams & Manuals
Tanaka
TCS33EDTP Gas Chainsaw View Diagrams & Manuals
TCG-22EAS Brush Cutter View Diagrams & Manuals
Show More Compatible Models
This item works with the following types of products:
- Chain Saw Parts
- Saw Parts
- Trimmer Parts
Customer Part Reviews ?
Average Rating (out of 5):
Click to filter by ratings:
5 stars
4
4 stars
0
3 stars
0
2 stars
0
1 stars
0
< PREV
- 1
Tank Grommets
GROMMETS FIT WELL , JUST WHAT I NEEDED TO GET MY WEED WHIP BACK UP AND RUNNING . FAST SHIPPING , THANK YOU
Kenneth -
August 1, 2022
Verified Purchase
Easy ordering experience
Needed a few part for the fuel system on my string trimmer. Everything was in stock and I was able to get it up and running within a few days
Guest -
May 12, 2022
Verified Purchase
Leaking no more
Parts arrived quickly and fit perfectly
Guest -
September 10, 2020
Verified Purchase
Parts
Worked great
Guest -
July 1, 2019
Verified Purchase
t
t
t -
t days ago
Verified Purchase
eReplacementParts Team
t
Questions & Answers ?
Our customer Service team is at the ready daily to answer your part and product questions.

Ask our Team
We have a dedicated staff with decades of collective experience in helping customers just like you purchase parts to repair their products.
Does this fit my product?Questions & Answers for Fuel Grommet (a)
No questions have been asked yet
Customer Repair Instructions ?
All our customer repair instructions are solicited directly from other customers just like you who have purchased and replaced this exact part.
Fuel lines worn out
Roy - May 25, 2017
👍 1 of 1 people found this instruction helpful
Tool Type
Blower
Difficulty
Medium
Time
15-30 minutes
Tools Used
Screwdriver, Pliers, Needle nose pliers
1. Remove gas cap and retainer.
2. Fish out fuel filter and remove filter and old fuel and primer lines
3. Remove old fuel line and primer grommets
4 Feed new lines through grommets
5. Install new grommets and fuel lines into gas tank
6. Re-install fuel filter to gas line
7. Replace gas cap
8 .Connect fuel lines to carburetor and primer
9. Done
Did you find this story helpful?
Thanks for voting and helping fellow customers!
Hoses and grommets were cracking/leaking due to age
Gordon - January 31, 2017
👍 1 of 1 people found this instruction helpful
Tool Type
Blower
Difficulty
Medium
Time
30-60 minutes
Tools Used
Screwdriver, Pliers, Hook to pull hose out to add filter
1. Removed side cover
2. Removed gas tank
3. Removed old hoses and grommets
4. Lightly oiled hoses and inserted them in grommets
5. Lightly oiled grommets and with needle nose pliers rocked grommets into tank holes.
6. With hook pulled long hose out of tank fill and added filter
7. Reinstalled tank and attached hoses to carburator and purge pump
8. Reinstalled side cover.
9. Added fuel and started blower!
Did you find this story helpful?
Thanks for voting and helping fellow customers!
Fuel leaked at gas tank
Walter - May 8, 2018
Tool Type
Trimmer
Difficulty
Easy
Time
15-30 minutes
Tools Used
Screwdriver, Pliers
1. Removed 4 screws holding gas tank on.
2. Removed fuel line and return line from carburetor
3. Put new fuel line/return line through grommets
4. Inserted new grommets on gas tank
5. Attached fuel line to Carburetor
6. Reinstalled gas tank
2. Removed fuel line and return line from carburetor
3. Put new fuel line/return line through grommets
4. Inserted new grommets on gas tank
5. Attached fuel line to Carburetor
6. Reinstalled gas tank
Did you find this story helpful?
Thanks for voting and helping fellow customers!
Ethanol ate the rubber and gas was leaking.
Brad - November 9, 2016
Tool Type
Blower
Difficulty
Medium
Time
15-30 minutes
Tools Used
Screwdriver, Pliers
Removed the old parts by pulling them off with needle nose pliers. Worked the new parts into place, more easily than expected.
Just keep track of what goes where, and it's pretty easy. Should be good to go for awhile until the gas eats the rubber again.
Just keep track of what goes where, and it's pretty easy. Should be good to go for awhile until the gas eats the rubber again.
Did you find this story helpful?
Thanks for voting and helping fellow customers!
The fuel tank had a Crack in the seam and was leaking fuel
tyler - September 21, 2016
Tool Type
Trimmer
Difficulty
Easy
Time
15-30 minutes
Tools Used
Screwdriver, Pliers
1. Removed 3 screws securing the tank.
2. Installed new fuel line and grommets onto new tank.
3. Placed new tank in position and reconnected new fuel lines to the carb.
4. Installed 3 screws to secure the tank in place.
2. Installed new fuel line and grommets onto new tank.
3. Placed new tank in position and reconnected new fuel lines to the carb.
4. Installed 3 screws to secure the tank in place.
Did you find this story helpful?
Thanks for voting and helping fellow customers!
Fuel supply
Raymond - August 10, 2016
Tool Type
Blower
Difficulty
Medium
Time
15-30 minutes
Tools Used
Screwdriver, Pliers
1. Remove fuel for safety.
2. Clean the general parts area.
3. Replace parts one at a time.
4. Works
2. Clean the general parts area.
3. Replace parts one at a time.
4. Works
Did you find this story helpful?
Thanks for voting and helping fellow customers!
Leaf blower difficult to start and engine running erratically
JIMMIE - November 27, 2015
Tool Type
Blower
Difficulty
Easy
Time
Less than 15 minutes
Tools Used
Screwdriver, Pliers, Wire to make a hook
Remove gas cap.
Disconnect fuel line at primer bulb on the tank.
Pull gas line from inside gas tank. Use a short piece of wire to snag the line, or some long needle nose pliers.
Insert new fuel grommet onto fuel line and insert line into gas tank.
Pull new fuel line out through filler opening and insert gas filter onto end of fuel line.
Drop the line back into the fuel tank, ensuring that it goes all the way in.
Pull the slack out of the fuel line from the top of the tank and press the grommet into the tank.
Connect the end of the fuel line onto the primer bulb.
Did you find this story helpful?
Thanks for voting and helping fellow customers!
OEM stands for Original Equipment Manufacturer and means the part you’re buying is sourced directly from the manufacturer who made your product. At eReplacementParts, we sell only genuine OEM parts, guaranteeing the part you’re purchasing is of better design and of higher quality than aftermarket parts.
Our product descriptions are a combination of data sourced directly from the manufacturers who made your product as well as content researched and curated by our content & customer service teams. This content is edited and reviewed internally before being made public to customers.
Our customer service team are at the ready daily to answer your part and product questions. We have a dedicated staff with decades of collective experience in helping customers just like you purchase parts to repair their products.
All our part reviews are solicited directly from other customers who have purchased this exact part. While we moderate these reviews for profanity, offensive language or personally identifiable information, these reviews are posted exactly as submitted and no alterations are made by our team.
All our customer repair instructions are solicited directly from other customers just like you who have purchased and replaced this exact part. While we moderate these reviews for profanity, offensive language or personally identifiable information, these reviews are posted exactly as submitted and no alterations are made by our team.
Based on data from past customer purchasing behaviors, these parts are most commonly purchased together along with the part you are viewing. These parts may be necessary or helpful to replace to complete your current repair.
All our installation videos are created and produced in collaboration with our in-house repair technician, Mark Sodja, who has helped millions of eReplacementParts customers over the last 13 years repair their products. Mark has years of experience in selling and repairing both commercial and residential products with a specialty in gas-powered equipment.
This data is collected from customers who submitted a repair instruction after replacing this exact part. Customers can rate how easy the repair was to complete and how long it took. We aggregate this data to provide a repair rating that allows customers to quickly determine the difficulty and time needed to perform their own repair.