
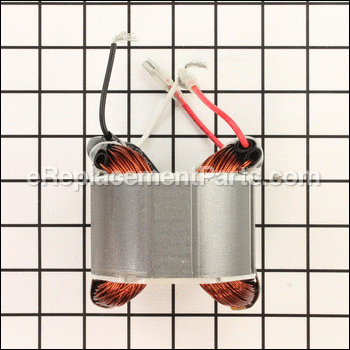
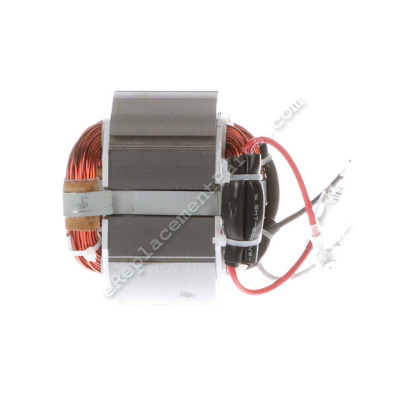


This is an original replacement field designed for use with Bosch table saws. In conjunction with armature it drives the unit. A field is usually damaged by overloading the power tool, or because of a bad armature. It is highly recommended to replace both carbon brushes when replacing a field. This item is sold individually. To complete this repair you would need a screwdriver.
• Make sure the saw is unplugged
• Remove brush covers and take out brushes
• Remove the cap and the housing screws
• Once the housing is removed you will have access to the field
• Disconnect all wires leading from the field
• Take out old field and replace it with a new one
• Re-connect all the wires
• Re-assemble the motor
Field 1619PA5590
OEM part for: Bosch
Part Number: 1619PA5590
$76.74
In Stock
Jump To:
Product Description ?
- 120V
- Classification: Part
- Weight: 3.00 lbs.
- Shipping: Ships Worldwide
Frequently Purchased Together ?


Compatibility
This part will fit the following 10 machines
Bosch
4000 (0601476139) Table Saw View Diagrams & Manuals
4100 (0601B13010) Table Saw View Diagrams & Manuals
4100DG-09 (0601B13010) 10" Worksite Table Saw View Diagrams & Manuals
4100DG-09 (3601L13010) 10" Worksite Table Saw View Diagrams & Manuals
4100-09 (0601B13010) 10" Worksite Table Saw View Diagrams & Manuals
4100-09 (3601L13010) 10" Worksite Table Saw View Diagrams & Manuals
4000 (0601476260) Saw Table View Diagrams & Manuals
4100 (3601L13010) Table Saw View Diagrams & Manuals
4100 (3601L13011) Table Saw View Diagrams & Manuals
4100 (3601L13012) Table Saw View Diagrams & Manuals
Show More Compatible Models
This item works with the following types of products:
- Saw Parts
- Table Saw Parts
This part replaces obsolete part #: 2610996867
Repair Videos ?
Articles:
|
This article defines the basic parts of most power tools, explains how they work, and what to look for when they stop wo...
September 25, 2009
|

Customer Part Reviews ?
Average Rating (out of 5):
Click to filter by ratings:
5 stars
6
4 stars
0
3 stars
0
2 stars
0
1 stars
0
< PREV
- 1
Repair worked great
Fast shipping
Guest -
February 16, 2022
Verified Purchase
Great part
The shipping was ridicules slow
Guest -
August 17, 2021
Verified Purchase
Exactly what was required. Easy.
Arrived in great condition and packaged well. Fit right in and no issues.
Guest -
April 21, 2021
Verified Purchase
Glad I was able to get the part
Fixed the problem.
peter -
January 11, 2021
Verified Purchase
Fit perfectly!
Table saw was running slowly backwards.
Replaced the field and it runs great again.
Guest -
March 24, 2020
Verified Purchase
perfect as as allways
arrived fast and worked great
Guest -
July 8, 2019
Verified Purchase
t
t
t -
t days ago
Verified Purchase
eReplacementParts Team
t
Questions & Answers ?
Our customer Service team is at the ready daily to answer your part and product questions.

Ask our Team
We have a dedicated staff with decades of collective experience in helping customers just like you purchase parts to repair their products.
Does this fit my product?Questions & Answers for Field
No questions have been asked yet
Customer Repair Instructions ?
All our customer repair instructions are solicited directly from other customers just like you who have purchased and replaced this exact part.
Motor lost power and then ran slowly in reverse.
Jeff - April 14, 2016
👍 11 of 11 people found this instruction helpful
Tool Type
Table Saw
Difficulty
Medium
Time
1-2 hours
Tools Used
Screwdriver, Pliers, Socket set
Parts Used
I tried the speed control circuit board first and while difficult to stuff the wiring for it back under the motor's end cover, It didn't help to fix the problem.
Next I ordered the field and a set of brushes. The armature looked fine but I still sanded it down and cleaned the slots between the bars w/ a brass wire "tooth" brush. The field was a very tight fit and difficult to pull from the plastic motor housing. And then, even harder to press back in and have the mounting holes be orientated correctly for the screws that went thru them. I finally took some 150 grit sand paper to the12 support fins in the plastic case and shaved them down just enough so the field would slide into its home a little more easily. All is well now. For $115, I have a mostly new table saw motor, which works like it used to. A local repair shop wanted 3 or 4 times that for parts and labor. Glad I tried to fix it myself.
Next I ordered the field and a set of brushes. The armature looked fine but I still sanded it down and cleaned the slots between the bars w/ a brass wire "tooth" brush. The field was a very tight fit and difficult to pull from the plastic motor housing. And then, even harder to press back in and have the mounting holes be orientated correctly for the screws that went thru them. I finally took some 150 grit sand paper to the12 support fins in the plastic case and shaved them down just enough so the field would slide into its home a little more easily. All is well now. For $115, I have a mostly new table saw motor, which works like it used to. A local repair shop wanted 3 or 4 times that for parts and labor. Glad I tried to fix it myself.
Did you find this story helpful?
Thanks for voting and helping fellow customers!
Table saw blade was running backwards
Bruce - June 4, 2016
👍 6 of 6 people found this instruction helpful
Tool Type
Table Saw
Difficulty
Hard
Time
More than 2 hours
Tools Used
Screwdriver, Wire Crimps, Channel Locks
Parts Used
With Table saw upside down, tilt saw blade to 45 degrees. Remove switch wire-stop where wire enters motor housing. Remove motor housing. Uncrimp wire connections with channel locks. Unbolt field and remove. Reverse order re-assembly, making sure new field wires exit internal motor housing together through access hole below the spinning rotor of the motor. NOTE: Internal plastic splines of motor housing had to be sanded down in order for new field to slide into housing. NOTE: New brushes cause minor intermittent voltage drops until they wear down into the shape of the motor rotor.
Did you find this story helpful?
Thanks for voting and helping fellow customers!
Motor bearings worn out
Daniel - September 20, 2016
👍 3 of 3 people found this instruction helpful
Tool Type
Table Saw
Difficulty
Medium
Time
1-2 hours
Tools Used
Screwdriver, Socket set, Wrench Set, Nutdriver, Wire strippers/crimper
1.) Bosch 4000 Table Saw w gravity rise stand. Removed blade and then table saw from stand (4 bolts)
2.) Turned table saw upside down and removed plastic table support frame from cast table to access motor (4 allen-head cap screws & 2 small bolts).
3.) Removed brushes (2)
4.) Removed motor end cap (3 screws) to expose rear motor bearing and wiring to motor field
5.) Removed motor housing from cast gear box/blade support (4 screws). Armature remained in gear box.
6.) Removed armature by pulling out of gear box and front bearing
7.) Removed front bearing retainer (2 screws) and removed bearing with inside puller. Replaced with new bearing and re-attached retainer.
8.) Removed rear bearing by cutting off with dremel and cutting wheel. The outer bearing had fallen off with ball bearings so only inner race remained on armature shaft and nothing for puller to grab to...so had to cut off.
9.) Replaced new bearing on shaft and cleaned armature with damp rag and a little brake cleaner.
10.) Removed wire nut caps from field wiring and rear motor cap (which contains speed control board). Removed 2 bolts that held field in motor housing. Removed field from motor housing by tapping out from rear.
11.) Replace with new field. Reattached wire nuts and tightened 2 bolts.
12.) Added grease to armature shaft gear end and reinstalled cast gear housing/blade support.
13.) Reassembled saw in reverse order
14.) Replaced saw blade
15.) Plugged in and ran like new. Parts for $100 saved my $600 table saw. Tool retailers wanted $300 minimum to begin repair which would be used towards the final repair bill. Glad I did it myself, but you should have some mechanical and electric motor knowledge and able to keep parts in order during disassembly.
Did you find this story helpful?
Thanks for voting and helping fellow customers!
Saw ran at real slow rpm , no way it would cut anything
Louis - October 29, 2016
👍 1 of 1 people found this instruction helpful
Tool Type
Table Saw
Difficulty
Medium
Time
More than 2 hours
Tools Used
Screwdriver, Pliers, Nutdriver
Removed motor from saw , disassembled motor, removed brushes, removed field from housing, installed new field, new armature, new speed control, new brushes . Installed motor in saw, reconnected on /off switch, plugged it in and turned tool on and bam! It worked !
Did you find this story helpful?
Thanks for voting and helping fellow customers!
Loud noise, not sure which part fixed it, but didn't want to put it together twice
Perry - April 23, 2023
Tool Type
Table Saw
Difficulty
Medium
Time
30-60 minutes
Tools Used
Pliers, Nutdriver, Bering puller
Parts Used
Took it apart and put it together
Did you find this story helpful?
Thanks for voting and helping fellow customers!
Table saw lost power and sparks were coming out of the motor
Conrad - October 28, 2020
Tool Type
Table Saw
Difficulty
Medium
Time
1-2 hours
Tools Used
Screwdriver, Pliers, Socket set
I was hoping replacing the brushes would do it. I found some at a local repair business and replaced them but had the same problem. They told me to check color of armature, if it was dark and not shiny the cost to fix would be to much and might as well buy a new saw. They were wrong. I spent a little over $200.00 instead of $600+. They sell tools too, Looked on ereplacementparts site and followed the instructions that someone else put on the site that had the same problem. He did a great job of explaining everything and I followed his instructions and took my time so I didn't mess up or forget something. My table saw is working great!
Did you find this story helpful?
Thanks for voting and helping fellow customers!
field became loose, and moved into fan blade on armature, cut field windings. i believe it was missing 2 screws from the factory
david - March 8, 2019
Tool Type
Table Saw
Difficulty
Medium
Time
30-60 minutes
Tools Used
Screwdriver, wire crimper
Parts Used
make sure tool is unplugged from electrical. remove end cap, disconnect wires. (3 Phillips head screws) remove 4 Phillips head screws on motor cover. twist and pull off, leaving armature attached to machine. remove (2) 1/4" drive hex head screws, remove field winding from housing. reverse procedure to reinstall new field windings.
Did you find this story helpful?
Thanks for voting and helping fellow customers!
Table not working
Gary - February 22, 2019
Tool Type
Table Saw
Difficulty
Medium
Time
15-30 minutes
Tools Used
Screwdriver, Pliers
Parts Used
Remove back of motor. Pull end cap off motor. Unplug all wires. Remove two field screws and pull field. replace and put all back together. Remember to remove brushes so motor will fit over shaft.
Did you find this story helpful?
Thanks for voting and helping fellow customers!
OEM stands for Original Equipment Manufacturer and means the part you’re buying is sourced directly from the manufacturer who made your product. At eReplacementParts, we sell only genuine OEM parts, guaranteeing the part you’re purchasing is of better design and of higher quality than aftermarket parts.
Our product descriptions are a combination of data sourced directly from the manufacturers who made your product as well as content researched and curated by our content & customer service teams. This content is edited and reviewed internally before being made public to customers.
Our customer service team are at the ready daily to answer your part and product questions. We have a dedicated staff with decades of collective experience in helping customers just like you purchase parts to repair their products.
All our part reviews are solicited directly from other customers who have purchased this exact part. While we moderate these reviews for profanity, offensive language or personally identifiable information, these reviews are posted exactly as submitted and no alterations are made by our team.
All our customer repair instructions are solicited directly from other customers just like you who have purchased and replaced this exact part. While we moderate these reviews for profanity, offensive language or personally identifiable information, these reviews are posted exactly as submitted and no alterations are made by our team.
Based on data from past customer purchasing behaviors, these parts are most commonly purchased together along with the part you are viewing. These parts may be necessary or helpful to replace to complete your current repair.
All our installation videos are created and produced in collaboration with our in-house repair technician, Mark Sodja, who has helped millions of eReplacementParts customers over the last 13 years repair their products. Mark has years of experience in selling and repairing both commercial and residential products with a specialty in gas-powered equipment.
This data is collected from customers who submitted a repair instruction after replacing this exact part. Customers can rate how easy the repair was to complete and how long it took. We aggregate this data to provide a repair rating that allows customers to quickly determine the difficulty and time needed to perform their own repair.