
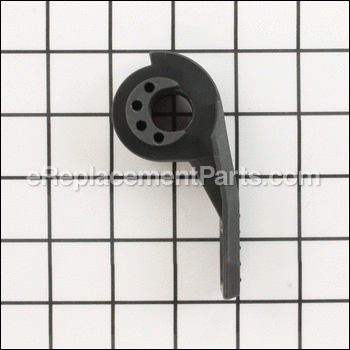
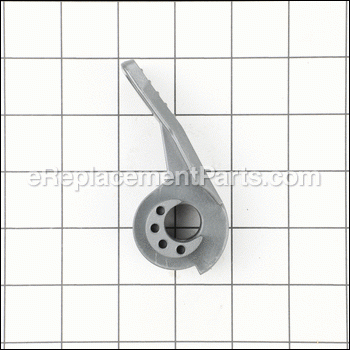
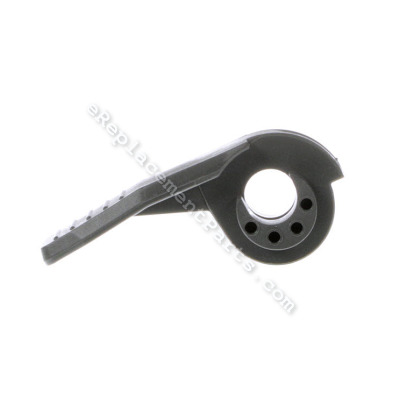


Fence Lever 089290001121
OEM part for: Ridgid
Part Number: 089290001121
$3.99
In Stock
Jump To:
Frequently Purchased Together ?

Compatibility
This item works with the following types of products:
- Saw Parts
- Table Saw Parts
Customer Part Reviews ?
Average Rating (out of 5):
Click to filter by ratings:
5 stars
3
4 stars
0
3 stars
0
2 stars
0
1 stars
0
< PREV
- 1
Replaced obsolete part
Replaced a lever for table saw that was an obsolete part; only the Color was different, Gray Vs Red. The new gray lever works perfectly
Gary -
January 18, 2022
Verified Purchase
it's the right fitting
it was pretty quick to get the part and the price was very reasonnable
Guest -
August 18, 2020
Verified Purchase
Perfect fit as always!!
I was amazed at how quickly the part arrived. It was the perfect fit. I have had the occasion to use your services in the past and I have always been more than satisfied with your response and, when necessary, with the help from your staff. Thanks again for you excellent service.
William -
April 17, 2020
Verified Purchase
t
t
t -
t days ago
Verified Purchase
eReplacementParts Team
t
Questions & Answers ?
Our customer Service team is at the ready daily to answer your part and product questions.

Ask our Team
We have a dedicated staff with decades of collective experience in helping customers just like you purchase parts to repair their products.
Does this fit my product?Questions & Answers for Fence Lever
No questions have been asked yet
Customer Repair Instructions ?
All our customer repair instructions are solicited directly from other customers just like you who have purchased and replaced this exact part.
Table saw fence was lost, made a new fence with your parts
Stephen - March 5, 2017
👍 1 of 1 people found this instruction helpful
Tool Type
Table Saw
Difficulty
Medium
Time
More than 2 hours
Tools Used
Screwdriver, Pliers, Power Drill, Socket set, Wrench Set, Nutdriver, Adjustable Wrench, file, metal saw, measuring tape
Parts Used
- Fence Warning Label - 080035003905
- Screw M5 X 16 Mm, Truss Hd - 080009022038
- Rear End Cap - 089290001106
- Lock Nut (m8) - 089290001107
- Spring Plate - 089290001108
- Lock Plate - 089290001109
- Lock Bracket - 089290001110
- Linkage - 089290001111
- Screw (m4 X 10 Mm, Pan Hd) - 089290001113
- Fence Indicator - 089290001114
- Screw (m6 X 15 Mm, Hex Soc Hd) - 089290001115
- Upper Fence Bracket - 089290001116
- Lower Fence Bracket - 089290001117
- Square Nut (m6) - 089290001118
- Slider - 089290001119
- Screw (m5 X 10 Mm) - 089290001120
- Fence Lever - 089290001121
- Outer Pad - 089290001122
- Crankshaft - 089290001123
- Screw (m6 X 15 Mm, Cheese Hd) - 089290001124
- Fence Lock Plate - 089290001125
I have 10 year old Ridgid TS2400LS table saw. Parts for that fence not available. I bought parts for R4513 saw and modified the fence assembly to fit my saw.
Did you find this story helpful?
Thanks for voting and helping fellow customers!
Fence locking handle was broken.
Terry - February 24, 2023
Tool Type
Table Saw
Difficulty
Easy
Time
15-30 minutes
Tools Used
Screwdriver, Socket set
Parts Used
1. Using a Phillips screwdriver, loosen the fence “end cover” (opposite the end from the locking handle) to allow unrestricted assess to the nut on the tension rod.
2. [Note: remember the position of the nut relative the end of tension rod for reassembly]. Remove 10mm nut and washer from tension rod opposite end of the fence from the locking handle.
3. Pull the fence locking handle outward, removing the tension rod and two plastic cams (one each side of the fence locking handle) assembly from the fence. [Note how the cams are installed on the connecting pin before proceeding to the next step.]
4. Carefully push the connecting pin through the plastic cams and fence locking handle to allow replacement of the broken fence handle.
4. Clean and lubricate cams; reassemble in reverse order using the new fence handle.
5. Reinstall the fence locking assembly and tension rod back through the fence making sure the tension rod passes through the stationery bracket opposite the fence locking assembly end; reinstall washer and locknut.
6. Tighten the 10mm locknut to the same location noted in step 2 prior to removal.
7. Tighten the fence end cap to the fence using a Phillips screwdriver.
8. Conduct a functional test of the table saw fence for proper operation.
Did you find this story helpful?
Thanks for voting and helping fellow customers!
Lock lever broke
Milton - February 28, 2019
Tool Type
Table Saw
Difficulty
Easy
Time
Less than 15 minutes
Tools Used
Screwdriver
Lost wrench's and broke lock lever to fence
Did you find this story helpful?
Thanks for voting and helping fellow customers!
OEM stands for Original Equipment Manufacturer and means the part you’re buying is sourced directly from the manufacturer who made your product. At eReplacementParts, we sell only genuine OEM parts, guaranteeing the part you’re purchasing is of better design and of higher quality than aftermarket parts.
Our product descriptions are a combination of data sourced directly from the manufacturers who made your product as well as content researched and curated by our content & customer service teams. This content is edited and reviewed internally before being made public to customers.
Our customer service team are at the ready daily to answer your part and product questions. We have a dedicated staff with decades of collective experience in helping customers just like you purchase parts to repair their products.
All our part reviews are solicited directly from other customers who have purchased this exact part. While we moderate these reviews for profanity, offensive language or personally identifiable information, these reviews are posted exactly as submitted and no alterations are made by our team.
All our customer repair instructions are solicited directly from other customers just like you who have purchased and replaced this exact part. While we moderate these reviews for profanity, offensive language or personally identifiable information, these reviews are posted exactly as submitted and no alterations are made by our team.
Based on data from past customer purchasing behaviors, these parts are most commonly purchased together along with the part you are viewing. These parts may be necessary or helpful to replace to complete your current repair.
All our installation videos are created and produced in collaboration with our in-house repair technician, Mark Sodja, who has helped millions of eReplacementParts customers over the last 13 years repair their products. Mark has years of experience in selling and repairing both commercial and residential products with a specialty in gas-powered equipment.
This data is collected from customers who submitted a repair instruction after replacing this exact part. Customers can rate how easy the repair was to complete and how long it took. We aggregate this data to provide a repair rating that allows customers to quickly determine the difficulty and time needed to perform their own repair.