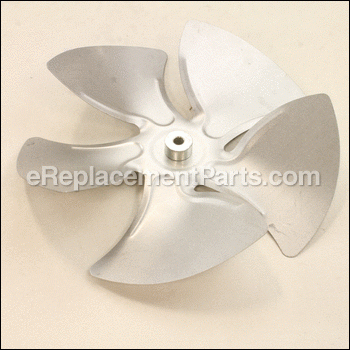

This fan assembly is a genuine OEM replacement part manufactured by Heatstar and Mr. Heater. It is commonly used in compact unit heaters. This fan is placed inside the body of the machine. It rotates, creating a steady flow of air. It is made of metal, and it should be replaced if any of the fins are chipped or damaged.
Fan Assembly 60125
OEM part for: Heatstar, Mr. Heater
Part Number: 60125
$14.96
Usually ships in 7 - 12 business days
7 - 12 business days
Jump To:
Frequently Purchased Together ?

Compatibility
This part will fit the following 2 machines
Heatstar
HSU45 Compact Unit Heater View Diagrams & Manuals
Mr. Heater
MHU45 Compact Unit Heater View Diagrams & Manuals
This item works with the following types of products:
- Heater Parts
Customer Part Reviews ?
Average Rating (out of 5):
Click to filter by ratings:
5 stars
3
4 stars
0
3 stars
0
2 stars
0
1 stars
0
< PREV
- 1
Easy repair, quality part that fit perfectly
My replacement fan arrived in 4 days and was in great shape, my garage heater is working like new again.
Guest -
February 4, 2021
Verified Purchase
No problems
Right part. Right price. Good delivery. No problems.
Guest -
February 3, 2021
Verified Purchase
SGTNAMVET
The part was as expected & the repair was Oh so easy, everything was a snap & I’ve got quiet heat in my Man Cave for my Classic Car a 1969 Camaro SS
Guest -
October 5, 2019
Verified Purchase
t
t
t -
t days ago
Verified Purchase
eReplacementParts Team
t
Questions & Answers ?
Our customer Service team is at the ready daily to answer your part and product questions.

Ask our Team
We have a dedicated staff with decades of collective experience in helping customers just like you purchase parts to repair their products.
Does this fit my product?Questions & Answers for Fan Assembly
What is the outer diameter of the blade? Looking for 7.25" diameter
Neil
asked on 2022-04-18
Hello Neil, thank you for writing. Our research shows the blade is a 10 inch Fan Assembly with a 5/16"internal diameter hub. For us to locate the correct parts and repair information we will require the model number of the unit. Once you have located the model number, please feel free to resubmit the question and we will be happy to help you. If you need help placing an order, customer service is open 7 days a week. Please feel free to give us a call. We look forward to hearing from you.
eReplacementParts Team April 18, 2022
Customer Repair Instructions ?
All our customer repair instructions are solicited directly from other customers just like you who have purchased and replaced this exact part.
Fan started make noise,shut it down found cracks in blades.
Gary - January 2, 2017
👍 1 of 1 people found this instruction helpful
Tool Type
Heater
Difficulty
Easy
Time
15-30 minutes
Tools Used
, Allen wrench
Parts Used
Loosen the set screw in the fan hub and removed the old fan
Place the fan in the same place on the shaft and tightened the set screw
Place the fan in the same place on the shaft and tightened the set screw
Did you find this story helpful?
Thanks for voting and helping fellow customers!
Fan blade had cracks from years of use.
Steffen - December 18, 2022
Tool Type
Heater
Difficulty
Easy
Time
15-30 minutes
Tools Used
Socket set, Took a couple wire nuts off to remove the fan.
Parts Used
Removed four bolts on the back of the unit to remove the fan took two wire nuts off to remove it to make it easier to put the new blade on.
Did you find this story helpful?
Thanks for voting and helping fellow customers!
FAN BLADE FOR NAT. GAS HEATER
Jerome - April 1, 2022
Tool Type
Heater
Difficulty
Easy
Time
Less than 15 minutes
Tools Used
Socket set, ALLEN WRENCH
Parts Used
NO SPECIAL INSTRUCTION SELF EXPLANTORY
Did you find this story helpful?
Thanks for voting and helping fellow customers!
Vibration coming from old motor, took it off and found out the shift had side play in it , probably from bearings failing
Todd - March 4, 2022
Tool Type
Heater
Difficulty
Easy
Time
15-30 minutes
Tools Used
Screwdriver, Socket set
Parts Used
Removed old motor .Mounted new motor to fan guard and put fan blade on shaft reattached to fan mount on back of heater, connected wires back up .
Did you find this story helpful?
Thanks for voting and helping fellow customers!
Heater blower fan blade broken
tom - June 28, 2019
Tool Type
Heater
Difficulty
Easy
Time
15-30 minutes
Tools Used
Screwdriver, Socket set, allen wrench
Parts Used
1 disconnect power source
2 remover fan guard around fan housing
3 remove side panel to get to fan motor wires from electric panel on heater
4 un-hook wires of fan motor from circuit board
5 remover fan and motor guard from heater and place on bench
6 use allen wrench to remove set screw, then remove fan blade from fan motor.
[my blade slid right off motor shaft]
7 install new blade and reverse procedure
Did you find this story helpful?
Thanks for voting and helping fellow customers!
Directive blade made too much noise
Alfonso - February 22, 2019
Tool Type
Heater
Difficulty
Easy
Time
15-30 minutes
Tools Used
Socket set, Allen wrench
Parts Used
Removed fan cover
Took out old fan and put new one in
Took out old fan and put new one in
Did you find this story helpful?
Thanks for voting and helping fellow customers!
Fan chrinp became loose
Robert - January 22, 2018
Tool Type
Heater
Difficulty
Easy
Time
15-30 minutes
Tools Used
Nutdriver, Allen wrench
Parts Used
1) Remove fan assembly from heater
2) Remove fan from motor drive shaft
3) Fix new fan on motor drive shaft
4) Refit motor and fan assembly to heater.
5) Test (Ok)
2) Remove fan from motor drive shaft
3) Fix new fan on motor drive shaft
4) Refit motor and fan assembly to heater.
5) Test (Ok)
Did you find this story helpful?
Thanks for voting and helping fellow customers!
Fan blade was cracked
Gregory - January 13, 2017
👍 1 of 2 people found this instruction helpful
Tool Type
Heater
Difficulty
Medium
Time
15-30 minutes
Tools Used
Nutdriver, Allen wrench
Parts Used
Removed the motor and fan
Removed the set screw in the old fan and removed it
Place the new fan on the shaft and tightened the set screw
Install the motor and new fan
Removed the set screw in the old fan and removed it
Place the new fan on the shaft and tightened the set screw
Install the motor and new fan
Did you find this story helpful?
Thanks for voting and helping fellow customers!
OEM stands for Original Equipment Manufacturer and means the part you’re buying is sourced directly from the manufacturer who made your product. At eReplacementParts, we sell only genuine OEM parts, guaranteeing the part you’re purchasing is of better design and of higher quality than aftermarket parts.
Our product descriptions are a combination of data sourced directly from the manufacturers who made your product as well as content researched and curated by our content & customer service teams. This content is edited and reviewed internally before being made public to customers.
Our customer service team are at the ready daily to answer your part and product questions. We have a dedicated staff with decades of collective experience in helping customers just like you purchase parts to repair their products.
All our part reviews are solicited directly from other customers who have purchased this exact part. While we moderate these reviews for profanity, offensive language or personally identifiable information, these reviews are posted exactly as submitted and no alterations are made by our team.
All our customer repair instructions are solicited directly from other customers just like you who have purchased and replaced this exact part. While we moderate these reviews for profanity, offensive language or personally identifiable information, these reviews are posted exactly as submitted and no alterations are made by our team.
Based on data from past customer purchasing behaviors, these parts are most commonly purchased together along with the part you are viewing. These parts may be necessary or helpful to replace to complete your current repair.
All our installation videos are created and produced in collaboration with our in-house repair technician, Mark Sodja, who has helped millions of eReplacementParts customers over the last 13 years repair their products. Mark has years of experience in selling and repairing both commercial and residential products with a specialty in gas-powered equipment.
This data is collected from customers who submitted a repair instruction after replacing this exact part. Customers can rate how easy the repair was to complete and how long it took. We aggregate this data to provide a repair rating that allows customers to quickly determine the difficulty and time needed to perform their own repair.