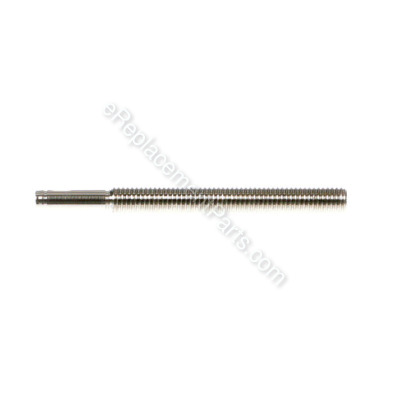


This is a genuine DeWALT replacement part for use in table saws. The elevating screw fits between the key and the flat washer. A screwdriver may be needed during the replacement of this part. This part is made out of metal and will need to be replaced if it breaks. This item is sold individually.
Elevating Screw 5140100-03
OEM part for: DeWALT
Part Number: 5140100-03
$14.74
In Stock
Jump To:
Frequently Purchased Together ?


Compatibility
This part will fit the following 10 machines
DeWALT
DW745 Type 1 Table Saw View Diagrams & Manuals
DW745 Type 2 Table Saw View Diagrams & Manuals
DWE7480 (Type 1) 10" Compact Job Site Table Saw View Diagrams & Manuals
DW745 (Type 3) 10" Table Saw View Diagrams & Manuals
DW745-AR (Type 1) 10 Jobsite Saw Power Tool View Diagrams & Manuals
DW745-AR (Type 3) 10 Jobsite Saw Power Tool View Diagrams & Manuals
DW745-B2 (Type 1) 10 Jobsite Saw Power Tool View Diagrams & Manuals
DW745-B2 (Type 3) 10 Jobsite Saw Power Tool View Diagrams & Manuals
DW745 (Type 20) 10 In Table Saw Power Tool View Diagrams & Manuals
DWE7480 (Type 20) Table Saw Power Tool View Diagrams & Manuals
Show More Compatible Models
This item works with the following types of products:
- Saw Parts
- Table Saw Parts
This part replaces obsolete part #: 5140032-71
Customer Part Reviews ?
Average Rating (out of 5):
Click to filter by ratings:
5 stars
3
4 stars
1
3 stars
0
2 stars
0
1 stars
0
< PREV
- 1
worked as expected
was in perfect condition and arrived on time
William -
November 11, 2023
Verified Purchase
right part...good quality
took several days to arrive, but it was a solid quality and the right part for my saw
Guest -
August 18, 2022
Verified Purchase
Exactly as expected
Part was as described, fit perfectly and shipped fast!
Guest -
August 25, 2021
Verified Purchase
Great job
I ordered 3 parts for my saw and they came realitivly quick. And now I'm up and running
Guest -
April 20, 2021
Verified Purchase
t
t
t -
t days ago
Verified Purchase
eReplacementParts Team
t
Questions & Answers ?
Our customer Service team is at the ready daily to answer your part and product questions.

Ask our Team
We have a dedicated staff with decades of collective experience in helping customers just like you purchase parts to repair their products.
Does this fit my product?Questions & Answers for Elevating Screw
No questions have been asked yet
Customer Repair Instructions ?
All our customer repair instructions are solicited directly from other customers just like you who have purchased and replaced this exact part.
DeWalt Table Saw blade housing wouldn't raise up
Brian - January 26, 2022
Tool Type
Table Saw
Difficulty
Hard
Time
More than 2 hours
Tools Used
Screwdriver, Pliers, Right Angle Drill Attachment, Alan Wrench, Ext. Bit Holder
1. Removed plastic shield where cord is located.
2. Removed motor case.
3. Removed gear case (threads were stripped in the gear case causing the housing to slip as I raised it).
4. Removed gears inside Gear Case.
5. Cleaned old lubricant.
6. Applied new lubricant to gears and new Gear Case.
7. Reinstalled everything in reverse order.
2. Removed motor case.
3. Removed gear case (threads were stripped in the gear case causing the housing to slip as I raised it).
4. Removed gears inside Gear Case.
5. Cleaned old lubricant.
6. Applied new lubricant to gears and new Gear Case.
7. Reinstalled everything in reverse order.
Did you find this story helpful?
Thanks for voting and helping fellow customers!
Elevating screw bent along with the elevating shafts
Joseph - March 6, 2021
Tool Type
Table Saw
Difficulty
Medium
Time
1-2 hours
Tools Used
Screwdriver, Pliers, Wrench Set, Adjustable Wrench
Remove blade guards
Remove elevating shafts screws and holder
Remove the helical gears
Replace in reverse order
Remove elevating shafts screws and holder
Remove the helical gears
Replace in reverse order
Did you find this story helpful?
Thanks for voting and helping fellow customers!
The elevating screw was bent after my table saw had fallen over. It would not lower the blade and thus sheared off the plastic teeth of the gears. Replaced gears with metal ones ( metal highly recomme
Chris - January 30, 2021
Tool Type
Table Saw
Difficulty
Medium
Time
1-2 hours
Tools Used
Screwdriver, Pliers, Power Drill, Socket set, Adjustable Wrench, Allen keys, dry silicone lube
Parts Used
It’s Easier to to work on the saw with the motor and housing removed from the table top. Then had to remove the elevating screw and remove the two posts that house the gears. Need to remove two spring clips holding the gears on to the posts. There are two screws attached to the housing for the vertical gear post that need to be removed from the inside of the saw blade housing (must remove blade to access). I took pictures along the way and used a magnetic dish to keep the crews from disappearing. Replaced everything and had to readjust the settings.
Did you find this story helpful?
Thanks for voting and helping fellow customers!
Motor would no longer raise and lower, the threads had stripped inside the aluminum motor housing
Scott - July 24, 2020
Tool Type
Table Saw
Difficulty
Hard
Time
1-2 hours
Tools Used
Screwdriver, Socket set
Remove the blade.
Remove the screws securing the slides, including the 2 allen screws inside the blade cavity
remove the gear case/ motor housing
Separate the motor out of the housing by lightly prying.
put grease into the new housing.
push the motor back into the housing using a hammer and lightly tapping it into place
screw the new elevating screw into place
get motor and housing back into place on the saw
reinsert all screws for the slides and adjust the allen screws to position the gears into each other.
Did you find this story helpful?
Thanks for voting and helping fellow customers!
Could not raise nor lower blade
Donald - February 26, 2020
Tool Type
Table Saw
Difficulty
Medium
Time
1-2 hours
Tools Used
Screwdriver, allen wrench, snap ring pliers.
Unplug saw, removed blade, turned saw upside down and vacuumed dust off. Turned crank to raise blade and found aluminum shavings coming out of threaded portion of gear case. Found the exact part at ereplacements.com, with recommendations for other useful parts. Once I had the motor cover and gear case removed I found that the armature and arbor were press fit parts and waited until I had new parts in hand to determine best was to disassemble. Removed 3 screws holding arbor plate to gear case, then carefully, a bit at a time, pried the arbor plate off, never prying on the ears that the screws go through as they could easily be broken off. Found that from inside I could use a screwdriver to gently pry the armature out of the gear case. It was a tight press fit. With a digital caliper I measured the bearing and the bore for the armature and found that they had no clearance whatsoever. The armature must be pressed in exactly square and this would be difficult to do by hand. A hammer is the last tool you want to use here. So, I heated the gearcase in my gas grill set to about 300 degrees and waited 15 minuets. Measuring the bore I found no expansion so waited another 15 min. and found that the bore had grown .005 inches. Perfect. With oven mitts I held the hot gearcase in one hand and slipped the armature in place easily, then let the parts cool to room temp. Reassembled everything and now am ready to get back to work. It took an hour or two partly because I'm retired and in no hurry, difficulty of repair depends on each persons experience ability and tools available.
Did you find this story helpful?
Thanks for voting and helping fellow customers!
Rise and lower blade
Ken - February 25, 2020
Tool Type
Table Saw
Difficulty
Easy
Time
1-2 hours
Tools Used
Screwdriver, Pliers, Allen wrench
Parts Used
No instructions just took apart put back together in reverse order
Did you find this story helpful?
Thanks for voting and helping fellow customers!
OEM stands for Original Equipment Manufacturer and means the part you’re buying is sourced directly from the manufacturer who made your product. At eReplacementParts, we sell only genuine OEM parts, guaranteeing the part you’re purchasing is of better design and of higher quality than aftermarket parts.
Our product descriptions are a combination of data sourced directly from the manufacturers who made your product as well as content researched and curated by our content & customer service teams. This content is edited and reviewed internally before being made public to customers.
Our customer service team are at the ready daily to answer your part and product questions. We have a dedicated staff with decades of collective experience in helping customers just like you purchase parts to repair their products.
All our part reviews are solicited directly from other customers who have purchased this exact part. While we moderate these reviews for profanity, offensive language or personally identifiable information, these reviews are posted exactly as submitted and no alterations are made by our team.
All our customer repair instructions are solicited directly from other customers just like you who have purchased and replaced this exact part. While we moderate these reviews for profanity, offensive language or personally identifiable information, these reviews are posted exactly as submitted and no alterations are made by our team.
Based on data from past customer purchasing behaviors, these parts are most commonly purchased together along with the part you are viewing. These parts may be necessary or helpful to replace to complete your current repair.
All our installation videos are created and produced in collaboration with our in-house repair technician, Mark Sodja, who has helped millions of eReplacementParts customers over the last 13 years repair their products. Mark has years of experience in selling and repairing both commercial and residential products with a specialty in gas-powered equipment.
This data is collected from customers who submitted a repair instruction after replacing this exact part. Customers can rate how easy the repair was to complete and how long it took. We aggregate this data to provide a repair rating that allows customers to quickly determine the difficulty and time needed to perform their own repair.