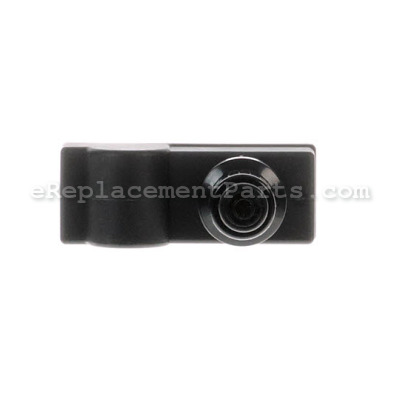
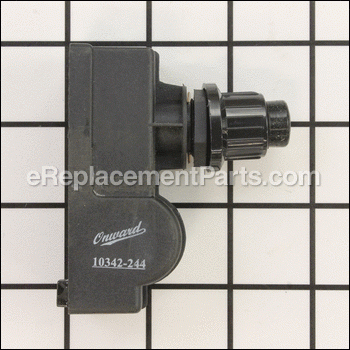


Electronic Ignitor 10342-244
Part Number: 10342-244
Order within the next 6 hours
and your part ships today!
and your part ships today!
Product Information
Description:
| This replacement electronic ignitor is specially designed use with for Broil-Mate gas grills. It is supplied directly from original equipment manufacturer. This part has a plastic body and it is sold individually. Igniter produces the spark to ignite the burner. It requires a "AAA" battery which is sold separately. Replacing this electronic ignition module is easy and does not require any tools • Disconnect the wires from the old module • Unscrew the button that holds it to the unit • Place a new module in place • Install the battery and secure the module with the button • Re-connect the wires |
Frequently Purchased With

Compatibility
the 46 compatible machines
This part is compatible with the following machines:
Broil-Mate
Broil King
9976-44 Imperial XL Gas Grill
9976-47 Imperial XL Gas Grill
9459-34 Crown Series Gas Grill
9459-37 Crown Series Gas Grill
949-24 (Crown Series 20) Gas Grill
949-27 (Crown Series 20) Gas Grill
949-74 (Crown Series 70) Gas Grill
949-77 (Crown Series 70) Gas Grill
9955-74 Crown Series Gas Grill
9955-77 Crown Series Gas Grill
9956-54 Crown Series Gas Grill
9956-57 Crown Series Gas Grill
9959-74 Crown Series Gas Grill
9959-77 Crown Series Gas Grill
946-24 (Crown Series 20) Gas Grill
946-27 (Crown Series 20) Gas Grill
9346-54 (Monarch 20) Gas Grill
9346-57 (Monarch 20) Gas Grill
9346-74 (Monarch 70) Gas Grill
9346-77 (Monarch 70) Gas Grill
9006-54 Porta-Chef Gas Grill
9576-44 Imperial XL Gas Grill
9576-47 Imperial XL Gas Grill
9576-84NZ Imperial XL Gas Grill
9571-44 BBQ Grill
9571-47 BBQ Grill
9453-54 BBQ Grill
9453-57 BBQ Grill
Sterling
Huntington
Products Compatibility
This item works with the following types of products:
- • Outdoor Grill
Repair Guides
![]()


Articles:
|
Having trouble getting your grill to light up? A common cause of this issue is a defective ignition switch. We'll sho...
November 08, 2012
|

Questions & Answers for Electronic Ignitor
No questions have been asked yet
Repair Instructions: Submitted by Customers Like You
3 of 3 people found this instruction helpful
Tool Type:
Outdoor Grill
Parts Used:
Repair Difficulty:
Easy
Time Spent Repairing:
Less than 15 minutes
Tools Used:
Pliers
Grill Igniter failed
Loosened securing nut, disconnected wire and removed defective igniter then reversed procedure and installed new igniter. Replacement part is exactly like original and the pricing was the best that I could find. 100% satisfaction!
Did you find this story helpful?
Thanks for voting and helping fellow customers!
Tool Type:
Outdoor Grill
Repair Difficulty:
Easy
Time Spent Repairing:
15-30 minutes
Tools Used:
Screwdriver
Grill fell over during wind storm and broke handle
Replace broken handle and Ignitor. Easy Fix
Did you find this story helpful?
Thanks for voting and helping fellow customers!
Tool Type:
Outdoor Grill
Parts Used:
Repair Difficulty:
Easy
Time Spent Repairing:
Less than 15 minutes
Tools Used:
, No tools
Ignitor was bad
Took the old one out. Put new one in
Did you find this story helpful?
Thanks for voting and helping fellow customers!
Tool Type:
Outdoor Grill
Parts Used:
Repair Difficulty:
Easy
Time Spent Repairing:
Less than 15 minutes
Tools Used:
Pliers
Igniter stopped working (7yrs old)
Removed old ignitor nut removed old ignitor and replace with new ignitor and nut. Works great.
Did you find this story helpful?
Thanks for voting and helping fellow customers!
Tool Type:
Outdoor Grill
Parts Used:
Repair Difficulty:
Easy
Time Spent Repairing:
15-30 minutes
Tools Used:
Screwdriver, Adjustable Wrench
gas valve on the grill seized.
removed the old parts and installed the new parts.
Did you find this story helpful?
Thanks for voting and helping fellow customers!
Tool Type:
Outdoor Grill
Parts Used:
Repair Difficulty:
Easy
Time Spent Repairing:
Less than 15 minutes
Tools Used:
Pliers
Original Unit Broken.
1. Removed the original Unit
2. Installed the replacement igniter with the new unit, by removing the exterior attaching nut, and installing the new igniter.
3. Attached the .wire and wallah it works perfect.
2. Installed the replacement igniter with the new unit, by removing the exterior attaching nut, and installing the new igniter.
3. Attached the .wire and wallah it works perfect.
Did you find this story helpful?
Thanks for voting and helping fellow customers!
Tool Type:
Outdoor Grill
Parts Used:
Repair Difficulty:
Easy
Time Spent Repairing:
Less than 15 minutes
Tools Used:
Pliers
Igniter not sparking
Replaced with new one, so simple.
Did you find this story helpful?
Thanks for voting and helping fellow customers!
1 of 2 people found this instruction helpful
Tool Type:
Outdoor Grill
Parts Used:
Repair Difficulty:
Easy
Time Spent Repairing:
Less than 15 minutes
Tools Used:
Wrench Set
Igniter on outdoor grill had failed.
1. Removed the old igniter from the grill by loosening a plastic nut on the front of the grill (used a wrench; probably didn't need it)
2. Removed the wire from the back of the old igniter by holding the connector at the end of the wire and gently pulling it straight out from the old igniter (could have done this first, but it was easier once the igniter was not attached to the grill) (by looking at the new igniter, you can see what the connection looks like; it a simple prong on the igniter that the wire connector slips around).
3. Attached the wire to the new igniter by gently pushing it over the prong in the igniter.
4. Put the new igniter in place and fastened it by tightening the nut that came with it and holds it in place.
About 5 minutes total time; no hassle.
Did you find this story helpful?
Thanks for voting and helping fellow customers!
0 of 1 people found this instruction helpful
Tool Type:
Outdoor Grill
Parts Used:
Repair Difficulty:
Easy
Time Spent Repairing:
Less than 15 minutes
Tools Used:
, None
Old igniter did not work
1. Remove wires and nut from the old igni
3. Inserted new igniter
3. Replaced wire's and nut
3. Inserted new igniter
3. Replaced wire's and nut
Did you find this story helpful?
Thanks for voting and helping fellow customers!
0 of 1 people found this instruction helpful
Tool Type:
Outdoor Grill
Parts Used:
Repair Difficulty:
Easy
Time Spent Repairing:
Less than 15 minutes
Tools Used:
Gas grill would not light.
Disconnected electrode from igniter.
Unscrewed nut holding igniter button from front panel.
Removed battery from igniter.
Replaced battery in replacement igniter.
Installed replacement igniter reversing removal steps.
Reattached electrode to replacement igniter.
Unscrewed nut holding igniter button from front panel.
Removed battery from igniter.
Replaced battery in replacement igniter.
Installed replacement igniter reversing removal steps.
Reattached electrode to replacement igniter.
Did you find this story helpful?
Thanks for voting and helping fellow customers!
Reviews
8 Reviews
Average Rating (out of 5):
Click to filter by ratings:
5 stars
7
4 stars
0
3 stars
0
2 stars
0
1 stars
1
< PREV
- 1
Great fast service, every time I have ordered
Fixed the problem quickly
Guest -
June 1, 2021
Verified Purchase
Easy repair
The igniter I received fit my gas grill perfectly, first press of the button worked great.
John -
March 21, 2020
Verified Purchase
Replacement Igniter
It was exactly what I needed. Installed it easily and it works great.
Guest -
December 6, 2019
Verified Purchase
Perfect
no issues, worked perfectly
Guest -
October 7, 2019
Verified Purchase
Easy repair
Was an easy repair taking no more than 2 minutes to swap the dead igniter with the new one.
Guest -
September 9, 2019
Verified Purchase
part as described
worked fine, right on time
Guest -
August 22, 2019
Verified Purchase
Works as expected
Works
Guest -
May 27, 2019
Verified Purchase
wrong part
Ordered an "electronic ignitor" for my grill, checked and re-checked to ensure I ordered the right part replacement. Part I received only had one place on the ignitor to connect the wires from my grill ..... my grill has 2 (two) wires to connect to an electronic ignitor. Not happy.
Guest -
September 15, 2021
Verified Purchase
eReplacementParts Team
Hi Stephen,
Thank you for your review. Please accept our apologies for this situation. We will be in touch with you shortly regarding your order.
Verified Purchase
eReplacementParts Team
< PREV
- 1
Product Information
Repair Guides
![]()
Articles:
|
Having trouble getting your grill to light up? A common cause of this issue is a defective ignition switch. We'll sho...
November 08, 2012
|