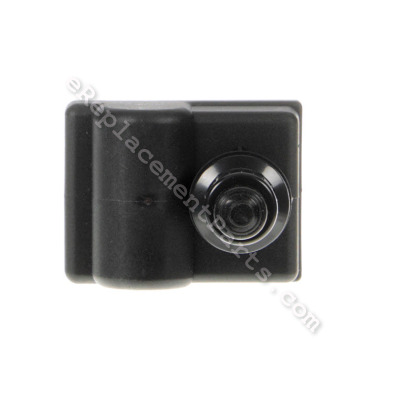
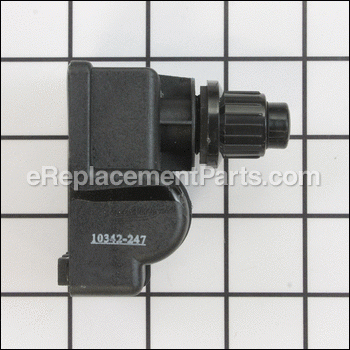


This is an original replacement part manufactured for use with outdoor grills. The ignitor creates an electric charge that is sent to an electrode that creates an arch that ignites the fuel dispensed by the burners. This electronic ignitor has a push button that is also used as the battery cap. The electronic ignitor is sold individually, and the battery is available separately.
Electronic Ignitor 10342-247
OEM part for: Broil-Mate, Broil King, Sterling, Huntington
Part Number: 10342-247
$14.01
In Stock
Jump To:
Frequently Purchased Together ?
Compatibility
This part will fit the following 52 machines
Broil-Mate
7123-84 Gas Grill View Diagrams & Manuals
7133-64 Gas Grill View Diagrams & Manuals
746164 Gas Grill View Diagrams & Manuals
746189 Gas Grill View Diagrams & Manuals
786184 Gas Grill View Diagrams & Manuals
786187 Gas Grill View Diagrams & Manuals
7132-64 Gas Grill View Diagrams & Manuals
7123-87 Gas Grill - NG View Diagrams & Manuals
7133-67 Gas Grill - NG View Diagrams & Manuals
7132-67 Gas Grill - NG View Diagrams & Manuals
7130-67 Gas Grill - NG View Diagrams & Manuals
Broil King
9976-44 Imperial XL Gas Grill View Diagrams & Manuals
9976-47 Imperial XL Gas Grill View Diagrams & Manuals
9986-44 Imperial 590 Gas Grill View Diagrams & Manuals
9986-47 Imperial 590 Gas Grill View Diagrams & Manuals
9576-44 Imperial XL Gas Grill View Diagrams & Manuals
9576-47 Imperial XL Gas Grill View Diagrams & Manuals
9566-44 Imperial 490 Gas Grill View Diagrams & Manuals
9566-47 Imperial 490 Gas Grill View Diagrams & Manuals
9571-44 BBQ Grill View Diagrams & Manuals
9571-47 BBQ Grill View Diagrams & Manuals
9235-84 BBQ Grill View Diagrams & Manuals
9235-87 BBQ Grill View Diagrams & Manuals
9225-84 BBQ Grill View Diagrams & Manuals
9225-87 BBQ Grill View Diagrams & Manuals
9561-84 BBQ Grill View Diagrams & Manuals
9561-87 BBQ Grill View Diagrams & Manuals
9565-44 BBQ Grill View Diagrams & Manuals
9565-47 BBQ Grill View Diagrams & Manuals
9888-44 BBQ Grill View Diagrams & Manuals
9888-47 BBQ Grill View Diagrams & Manuals
9878-44 BBQ Grill View Diagrams & Manuals
9878-47 BBQ Grill View Diagrams & Manuals
9868-84 BBQ Grill View Diagrams & Manuals
9868-87 BBQ Grill View Diagrams & Manuals
Sterling
586184 Grill View Diagrams & Manuals
5123-84 Gas Grill View Diagrams & Manuals
5132-64 Gas Grill View Diagrams & Manuals
5133-64 Gas Grill View Diagrams & Manuals
5130-64 Gas Grill View Diagrams & Manuals
5139-64 Gas Grill View Diagrams & Manuals
5133-67 Gas Grill - NG View Diagrams & Manuals
5123-87 Gas Grill - NG View Diagrams & Manuals
5132-67 Gas Grill - NG View Diagrams & Manuals
5130-67 Gas Grill - NG View Diagrams & Manuals
Huntington
6132-64 Gas Grill View Diagrams & Manuals
6023-89 Gas Grill View Diagrams & Manuals
6123-84 Gas Grill View Diagrams & Manuals
6123-89 Gas Grill View Diagrams & Manuals
6132-67 Gas Grill - NG View Diagrams & Manuals
6123-87 Gas Grill - NG View Diagrams & Manuals
6130-67 Gas Grill - NG View Diagrams & Manuals
Show More Compatible Models
This item works with the following types of products:
Repair Videos ?

Articles:
|
Having trouble getting your grill to light up? A common cause of this issue is a defective ignition switch. We'll sho...
November 08, 2012
|

Customer Part Reviews ?
Average Rating (out of 5):
Click to filter by ratings:
5 stars
5
4 stars
0
3 stars
0
2 stars
0
1 stars
0
< PREV
- 1
Direct replacement ignitor.
Worked as expected.
Gary -
June 15, 2023
Verified Purchase
Electric Ignitor
This was perfect, hooked it up to my BBQ and it worked perfectly from the “start”. I am very pleased with it and would definitely recommend them to purchase from, super fast delivery too!
Guest -
August 17, 2021
Verified Purchase
Great...
Just as described...
Guest -
December 15, 2020
Verified Purchase
Excellent part
This part fits perfectly, function better than the original, price is right & delivered promptly with great service.
Ramon -
August 20, 2019
Verified Purchase
Ignitor replacement
The ignitor arrived earlier than expected. Installation was a breeze. I have ordered parts from this merchant several times before and they have always been excellent to deal with. They are my go to guys for parts replacement, power tool parts etc...they will come through for you !!
Guest -
June 3, 2019
Verified Purchase
t
t
t -
t days ago
Verified Purchase
eReplacementParts Team
t
Questions & Answers ?
Our customer Service team is at the ready daily to answer your part and product questions.

Ask our Team
We have a dedicated staff with decades of collective experience in helping customers just like you purchase parts to repair their products.
Does this fit my product?Questions & Answers for Electronic Ignitor
No questions have been asked yet
Customer Repair Instructions ?
All our customer repair instructions are solicited directly from other customers just like you who have purchased and replaced this exact part.
the electrode would not lite the grill
Robert - December 11, 2020
Tool Type
Outdoor Grill
Difficulty
Medium
Time
15-30 minutes
Tools Used
Screwdriver, hands
Parts Used
removed the lower doors on the grill
removed the bar attached to both sides of the grill which hampered removal of the ignitor
detached the ignitor wires
removed the starter and replaced with new starter
grill lit, so I did not do the electrodes which is a much bigger job.
I may replace the gas jets next season and do the electrodes then.
Did you find this story helpful?
Thanks for voting and helping fellow customers!
Didnt ignite grill
Gregg - November 19, 2020
Tool Type
Outdoor Grill
Difficulty
Easy
Time
Less than 15 minutes
Tools Used
, No tools
Parts Used
Removed locking nut
Removed ignitor
Unplugged 4 wires
Replaced new ignitor
Removed ignitor
Unplugged 4 wires
Replaced new ignitor
Did you find this story helpful?
Thanks for voting and helping fellow customers!
Grill igniter went kaput
Somnath - July 14, 2020
Tool Type
Outdoor Grill
Difficulty
Easy
Time
Less than 15 minutes
Tools Used
Screwdriver, Hand
1) Unscrewed the igniter from the grill
2) Pulled the 4 wires out from the old igniter
3) Inserted wires into new igniter
4) Popped the AA battery in
5) Turned gas on
6) Pushed in the igniter button
7) Ignited grill
8) Grilled burgers
9) Washed down with beer
10) Happy Customer
2) Pulled the 4 wires out from the old igniter
3) Inserted wires into new igniter
4) Popped the AA battery in
5) Turned gas on
6) Pushed in the igniter button
7) Ignited grill
8) Grilled burgers
9) Washed down with beer
10) Happy Customer
Did you find this story helpful?
Thanks for voting and helping fellow customers!
Igniter didn’t work
John - February 29, 2020
Tool Type
Outdoor Grill
Difficulty
Easy
Time
Less than 15 minutes
Tools Used
Screwdriver
Parts Used
Removed 1 door on grill unscrewed 4 screws to remove metal plate in front of igniter, removed igniter replaced put back together. Maybe 10 minutes.
Did you find this story helpful?
Thanks for voting and helping fellow customers!
Ignitor burned out
THOMAS - July 17, 2019
Tool Type
Outdoor Grill
Difficulty
Easy
Time
Less than 15 minutes
Tools Used
Screwdriver
Parts Used
Removed original ignitor from outdoor grill and replaced with replacement ignitor. It took all of 10 minutes to complete.
Did you find this story helpful?
Thanks for voting and helping fellow customers!
Grill would lite
Gregg - May 1, 2017
Tool Type
Outdoor Grill
Difficulty
Easy
Time
Less than 15 minutes
Tools Used
, No tools required
Parts Used
Removed the battery the nut holding ignitor in place
Removed 4 ignitor wire's
Pulled switch out.
Put new switch in and attached the wire.
Removed 4 ignitor wire's
Pulled switch out.
Put new switch in and attached the wire.
Did you find this story helpful?
Thanks for voting and helping fellow customers!
Ignitor would not work
roger - December 10, 2016
👍 1 of 2 people found this instruction helpful
Tool Type
Outdoor Grill
Difficulty
Easy
Time
15-30 minutes
Tools Used
Screwdriver
Parts Used
Thread the front knob off of the ignitor
Remove the battery
Disconnect the wires from the old ignitor one at a timer, and place them on the new ignitor
Install the ignitor and battery
Thread the new front knob on
Remove the battery
Disconnect the wires from the old ignitor one at a timer, and place them on the new ignitor
Install the ignitor and battery
Thread the new front knob on
Did you find this story helpful?
Thanks for voting and helping fellow customers!
rebuilt my Barron grill
charles - February 20, 2019
👍 0 of 1 people found this instruction helpful
Tool Type
Outdoor Grill
Difficulty
Easy
Time
15-30 minutes
Tools Used
Screwdriver
The burners,burner rail,igniter plugs,igniter module,and heat plates arrived promptly, everything fit perfectly,I now basically have a new grill,on the in side,everything works perfectly.
Thanks
Charlie
Thanks
Charlie
Did you find this story helpful?
Thanks for voting and helping fellow customers!
The ignitor on my Broil King stopped working.
Perry - January 24, 2019
👍 0 of 1 people found this instruction helpful
Tool Type
Outdoor Grill
Difficulty
Medium
Time
15-30 minutes
Tools Used
Screwdriver, square head bit
Parts Used
I recommend removing the defective ignitor first to get the right part number as Onward Manufacturing in Canada is little to no help, especially if you live in Hawaii. I gave them the name, model number, and serial number and they still gave me the wrong part number and even though the grill is under warranty they refused to ship the part to Hawaii, this would have cost me over $50. Thanks to EReplacementParts I paid less than $20.
To replace the ignitor I had to remove the top backing bar behind the ignitor. Once I took the screws out on the backing bar the replacement was quick and easy.
1. Remove doors
2. Remove screws from backing bar, it does not have to be taken completely off just be able to move back enough for the ignitor to come out.
3. Remove nut from old ignitor, pull out and install the new ignitor.
4. Screw back in backing bar & replace doors.
Did you find this story helpful?
Thanks for voting and helping fellow customers!
No spark from ignitor.
Jim - September 6, 2018
👍 0 of 1 people found this instruction helpful
Tool Type
Outdoor Grill
Difficulty
Easy
Time
Less than 15 minutes
Tools Used
Screwdriver, Adjustable Wrench
Parts Used
Removed old coil igniter and wired new one, then reconnect wires from burners to new one. Screwed new one in and tightened screws on panel.
Did you find this story helpful?
Thanks for voting and helping fellow customers!
Load More Install Stories
OEM stands for Original Equipment Manufacturer and means the part you’re buying is sourced directly from the manufacturer who made your product. At eReplacementParts, we sell only genuine OEM parts, guaranteeing the part you’re purchasing is of better design and of higher quality than aftermarket parts.
Our product descriptions are a combination of data sourced directly from the manufacturers who made your product as well as content researched and curated by our content & customer service teams. This content is edited and reviewed internally before being made public to customers.
Our customer service team are at the ready daily to answer your part and product questions. We have a dedicated staff with decades of collective experience in helping customers just like you purchase parts to repair their products.
All our part reviews are solicited directly from other customers who have purchased this exact part. While we moderate these reviews for profanity, offensive language or personally identifiable information, these reviews are posted exactly as submitted and no alterations are made by our team.
All our customer repair instructions are solicited directly from other customers just like you who have purchased and replaced this exact part. While we moderate these reviews for profanity, offensive language or personally identifiable information, these reviews are posted exactly as submitted and no alterations are made by our team.
Based on data from past customer purchasing behaviors, these parts are most commonly purchased together along with the part you are viewing. These parts may be necessary or helpful to replace to complete your current repair.
All our installation videos are created and produced in collaboration with our in-house repair technician, Mark Sodja, who has helped millions of eReplacementParts customers over the last 13 years repair their products. Mark has years of experience in selling and repairing both commercial and residential products with a specialty in gas-powered equipment.
This data is collected from customers who submitted a repair instruction after replacing this exact part. Customers can rate how easy the repair was to complete and how long it took. We aggregate this data to provide a repair rating that allows customers to quickly determine the difficulty and time needed to perform their own repair.