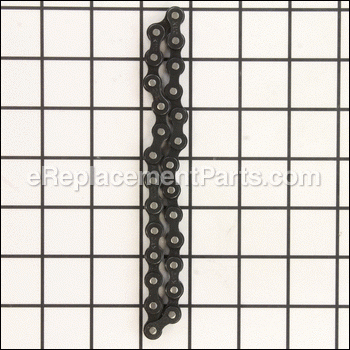

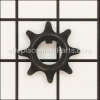
This genuine Dewalt drive chain is designed for use with planers. The purpose of this item is to drive the roller. Over time chain will stretch and would need to be replaced. It is made out of metal and it is sold individually. You would need a screwdriver and snap-ring pliers to complete this repair.
Drive Chain 285960-00
OEM part for: DeWALT
Part Number: 285960-00
$8.99
In Stock
Jump To:
Frequently Purchased Together ?


Compatibility
This part will fit the following 5 machines
DeWALT
DW733 Type 1 12 1/2 inch Planer View Diagrams & Manuals
DW733 Type 2 12 1/2 inch Planer View Diagrams & Manuals
DW734 Type 1 12-1/2 inch Planer View Diagrams & Manuals
DW733-B2 (Type 2) Planer View Diagrams & Manuals
DW733-B2C (Type 2) Planer Thicknesser Power Tool View Diagrams & Manuals
This item works with the following types of products:
- Planer Parts
Repair Videos ?
Watch the Repair Video for
Drive Chain

Articles:
|
Step-by-step instructions for removing and installing the drive chain on your DeWALT planer....
January 29, 2018
|

Customer Part Reviews ?
Average Rating (out of 5):
Click to filter by ratings:
5 stars
7
4 stars
2
3 stars
0
2 stars
0
1 stars
0
< PREV
- 1
Just what’s needed
Delivered as promised,just like the original
Nick -
April 11, 2023
Verified Purchase
easy install.
Works and fits just as it was suppose to.
Guest -
November 14, 2020
Verified Purchase
For great
My planner kept breaking drive roller gears. Installed new chains and now it works perfect.
Guest -
October 9, 2020
Verified Purchase
worked well
chains fit well with the new sprockets also
david -
October 6, 2020
Verified Purchase
Replacement chains for Dewalt 734 thickness planer
Installment of both chains went well thanks to your tutorial on how to do it.
Many thanks for the parts and help!
Guest -
March 23, 2020
Verified Purchase
Part fit perfectly
Correct parts, quick delivery, planner running like new again.
Guest -
March 8, 2020
Verified Purchase
DeWalt planner repair.
I had no problem ordering and the part fit as expected. Thank you.
Mark -
February 10, 2020
Verified Purchase
I replaced the chains since I read that they stretch and cause rolls to skip. New chains did not help and I ended up pulling the rollers out and finding a bad bushing. I ordered new bushings and that solved the problem!
Did not need the chains but needed bushings. Both parts were pretty easy to order and replace. Overall experience was good.
David -
April 12, 2022
Verified Purchase
Seems like a good chain but didn't solve the problem
I was hoping that the intermittent turning of the feed rollers on my Dewalt DW734 - due to the chain occasionally skipping sprocket teeth would be solved with a chain replacement. Alas, it appears that the chain is not the problem. My next try is looking at the bearings.
Guest -
October 24, 2019
Verified Purchase
t
t
t -
t days ago
Verified Purchase
eReplacementParts Team
t
Questions & Answers ?
Our customer Service team is at the ready daily to answer your part and product questions.

Ask our Team
We have a dedicated staff with decades of collective experience in helping customers just like you purchase parts to repair their products.
Does this fit my product?Questions & Answers for Drive Chain
Are both drive chains the same?
Nick
for model number DW733
asked on 2023-03-27
Hello Nick, thank you for your question. Yes, both chains are the same. We are pleased to have been able to help.
eReplacementParts Team March 27, 2023
Customer Repair Instructions ?
All our customer repair instructions are solicited directly from other customers just like you who have purchased and replaced this exact part.
Dewalt DW733 planer, feed rollers were skipping...
William - May 5, 2016
👍 14 of 15 people found this instruction helpful
Tool Type
Planer
Difficulty
Medium
Time
1-2 hours
Tools Used
Screwdriver, Retaining ring pliers
Parts Used
1) Unplug planer
2) Remove plastic side cover closest to switch by removing two screws and lifting cover off
3) Raise planer as if you were planning a 6 In think plank
4) Remove plastic chain drive cover using a stubby Phillips screwdriver
5) Remove retaining rings securing sprockets using retaining ring pliers
6) Remove chains and sprockets
7) Affix new chains to sprockets and re-install sprockets
8) Replace retaining rings
9) Replace plastic chain drive cover
10) Replace plastic side cover
PS: If also replacing the urethane drive belt on the opposite side, soaking the belt in very hot water, and having a second pair of hands will help with this challenging procedure.
Did you find this story helpful?
Thanks for voting and helping fellow customers!
Worn drive roller bushing
Gerald - September 16, 2016
👍 4 of 4 people found this instruction helpful
Tool Type
Planer
Difficulty
Easy
Time
15-30 minutes
Tools Used
Screwdriver, Socket set, snap ring pliers, allen wrenches
Parts Used
1. Remove covers
2.Remove sprocket holding snap rings
3. Slide the sprockets off with the chains
4. Block up drive rulers and remove bolts holding the bracket.
5. Remove blocks carefully and watch for springs, Note that on the output roller on sprocket end there are 2 springs one inside the other.
6. Replace bushings on drive rollers
7. Using blocks with a wedge to support the roller with springs on top of bushing slide the roller , bushings and springs up into the slot.
8. Bolt bushing brackets in place. Note: bolts are 1/2 in 10-32 I replaced the phillips head bolts with allen head bolts for easier removal in the future. Nearly all the phillips head stripped out on removal. had to use water pipe pliers to remove.
9. Put chain on sprockets, line up the keyway and slide sprockets on shaft.
10. Install snap rings to retain sprockets.
11. With coverings off, plug in and start planer. Observe the system in operation.
12. Replace covers.
Did you find this story helpful?
Thanks for voting and helping fellow customers!
Feed rollers kept skipping. Initially thought it was bad chain, but turned out one of the bushings had been almost entirely worn through.
Scott - May 2, 2018
👍 1 of 1 people found this instruction helpful
Tool Type
Planer
Difficulty
Medium
Time
30-60 minutes
Tools Used
Screwdriver, Pliers, Adjustable Wrench, Retaining Clip Pliers
Parts Used
1) Move cutting assembly to its highest level. This will give you just enough room for the screws you will have to take out.
2) Remove plastic yellow side panels. You must remove the one on left side of planer, the one on the right just makes it easier. There are two small screws at the top holding each in place. Quite a lot of force is required to pop these panels out.
3) On left side of unit, remove plastic housing covering chain/sprocket assembly. There are two screws from the bottom holding cover in place, one on either side, near the vertical rails. This should expose the ends of three axles, with two chain connecting them.
4) Remove retaining clips from end of axles to release sprockets. This was the hardest part, especially if you don't have the correct tool. I tried to get them with needle nose pliers and screwdrivers, but folded and purchased specialty pliers. Much easier with the right tool.
5) Remove sprockets, chains and spacers from axles.
6) The two bushings on this side should be exposed. You can identify the retaining bracket that is holding the bushings against some springs.
7) Remove all four retaining brackets. Each one is held in with two screws from the bottom of the assembly. This will require a very short screw driver as the clearance is minimal.
8) As the retaining brackets are removed the bushings will drop as they are being pressed by springs out of the assembly. Be sure to retain springs, they rolled all over my shop when I was not paying attention. There are two springs pushing the back left bushing, be aware.
9) Remove old bushings. Inspect for wear on the rollers. As the rollers are now out of the planer, this is a good time to clean them.
10) Lubricate new bushings. I used a silicon spray lubricant as suggested by my local power tool store. Slide new bushings on to rollers. Wipe away excess lubricant, you don't want that interacting with the rubber on the rollers.
11) Prepare retaining brackets, springs and bushing/roller assemblies. Insert spring first, then slide in bushing, paying attention to orientation. The long side should be parallel with the planing bed. This should mean there are no gaps between the sides of the bushing and the cutting assembly. Once spring and bushing are in place, re attach retaining bracket. Do this for all four bushings. Be sure to add the second spring to the back left bushing. This is the bushing where the rod had two sprockets, one from the motor and one going to the other roller.
12) Inspect chains. Lubricate or replace as needed. Re-attach sprockets with chains. Put the spacer on before putting the front roller sprocket on. Re-attach retaining clips.
13) Re-assemble housings and you should be good to go.
Did you find this story helpful?
Thanks for voting and helping fellow customers!
chain was too loose
Arvid - February 25, 2023
Tool Type
Planer
Difficulty
Easy
Time
Less than 15 minutes
Tools Used
Screwdriver, Pliers, gear puller
Parts Used
Use gear puller.
Replace new chain
Easy
Replace new chain
Easy
Did you find this story helpful?
Thanks for voting and helping fellow customers!
Drive chain had a seized link
Robert - December 28, 2022
Tool Type
Planer
Difficulty
Easy
Time
Less than 15 minutes
Tools Used
Screwdriver, Retainer spring pliers
Parts Used
Always unplug power tools before making repairs.
1. Remove the side panel on the drive chain side.
2. Remove the drive chain plastic shield.
3. Remove retainer springs from the outer sprockets.
4. Remove the sprockets and drive chain from the spindles simultaneously.
5. Repeat steps 3 and 4 to remove the inner sprockets and chain.
6. Replace the old drive chains with the new ones.
7. Reverse steps 5 thru 1 to reassemble.
Did you find this story helpful?
Thanks for voting and helping fellow customers!
rollers were hard to turn and the drive chain was freezing.
Thomas - February 22, 2022
Tool Type
Planer
Difficulty
Medium
Time
More than 2 hours
Tools Used
Screwdriver, Wrench Set, Adjustable Wrench, snap ring pliers, allen wrenches
1.removed top
2. cranked cutterhead up as far as possible.and turned over machine
3. removed drive chains and sprokets from rollers
4. removed bottom plate.
5. removed phillips head screws securing roller bearing with visegrips. Impossible to turn with phillips head scredriver
6. removed rollers, cleaned and regreased bearings rollers now turn smoothly
7. reassemble in reverse order with new chains
I have to check that the planer produces a board of uniform thickness.
Did you find this story helpful?
Thanks for voting and helping fellow customers!
Outboard drive broke a bearing
Joseph - October 26, 2020
Tool Type
Planer
Difficulty
Medium
Time
1-2 hours
Tools Used
Screwdriver, Snap Ring Pliers, Allen Wrenchs
Once I determined what was the problem and got the repair parts the repair just took a little time. The feed was jerking causing the planer to stop and jump at regular intervals. I checked the drive belt which looked fine. I then checked the drive chains which were binding and some links frozen or stiff. I corrected the link problem but still the problem remained. As soon as I took apart the outboard drive roller the drive side bearing came out in two pieces. There was more time to tear the planer down than to actually fix it. Since I had it apart and it has some age on it I decided to replace all the drive chains, all four bearings and all four washer. Luckily the shaft of the roller wasn't damaged so all I needed to do was reinstall all the parts and it ran fine. One note, make sure you put the washer back one with the hard smooth side outward. I installed one incorrectly until I started assembling the other one and realized the error. Only took a few minutes to take the first roller back apart and turn the washers around. This is not a hard job to replace the bearings but time consuming as you have to crank the planer down all the way to take some parts off then crank it all the way up to get access to the bearing screws. You'll need four or five tools to disassemble and reassemble. I used a stubby Philips screwdriver as working conditions are tight. I also happened to have a ratchet Philips screwdriver which helped to break some of the screws loose. You will need the snap ring pliers to get the retaining rings off the chain drives and reinstall. The Allen wrench that comes with the planer you'll need but also a slightly larger metric Allen wrench, 5mm I think. It's doable, just take your time and make sure you pay attention to the disassembly so you remember how to reassemble. Also the bearings go in so the fit is tight. If you rotate it 90 deg it will be loose. Also pay attention to the bearing retaining mounts. One is round holes and one is slotted to allow fitting. Install the round ones first and then put pressure on the other as you assemble to get a good tight fit of the roller with little or no side play. And be careful of the blades as they are exposed. They should be out of the way but easy to let your fingers get in the wrong place and bump them. They are sharp!
Did you find this story helpful?
Thanks for voting and helping fellow customers!
would not feed smothly
Richard - May 17, 2020
Tool Type
Planer
Difficulty
Easy
Time
15-30 minutes
Tools Used
Screwdriver, Socket set, snap ring plyers
Parts Used
took out old part put in new one
Did you find this story helpful?
Thanks for voting and helping fellow customers!
Drive chain that feeds boards broke in my DeWalt planer
Matt - September 11, 2019
Tool Type
Planer
Difficulty
Easy
Time
Less than 15 minutes
Tools Used
Screwdriver, Pliers
Parts Used
1. Removed the yellow left panel of the planer (opposite side from the thickness control handle)
2. Removed the black cover that houses the drive gears and chains
3. Removed the broken chain (there are two, in my case it was the inner chain)
4. Removed the outer chain (so I could install the new inner chain)
5. You will likely need to remove both gears that hold the chains to remove and install them since it is a tight fit. Gears can be pulled off once you pry off the little metal clip holding them on. Be careful not to bend the clip or let it fly off into some dark corner of your shop.
6. Put the inner chain on the gears in the orientation needed (there is a slot on the gears so they only fit on the shaft in one spot) and slide inner chain and gear assembly into position.
7. Replace the outer chain/gears and the metal clips holding the gears on.
8. Replace the covers and plane away!
Did you find this story helpful?
Thanks for voting and helping fellow customers!
Chain was lose
Rob - April 10, 2019
Tool Type
Planer
Difficulty
Easy
Time
15-30 minutes
Tools Used
Screwdriver, Pliers
Parts Used
Removed and replaced drive chains. Solved problem.
Did you find this story helpful?
Thanks for voting and helping fellow customers!
Load More Install Stories
OEM stands for Original Equipment Manufacturer and means the part you’re buying is sourced directly from the manufacturer who made your product. At eReplacementParts, we sell only genuine OEM parts, guaranteeing the part you’re purchasing is of better design and of higher quality than aftermarket parts.
Our product descriptions are a combination of data sourced directly from the manufacturers who made your product as well as content researched and curated by our content & customer service teams. This content is edited and reviewed internally before being made public to customers.
Our customer service team are at the ready daily to answer your part and product questions. We have a dedicated staff with decades of collective experience in helping customers just like you purchase parts to repair their products.
All our part reviews are solicited directly from other customers who have purchased this exact part. While we moderate these reviews for profanity, offensive language or personally identifiable information, these reviews are posted exactly as submitted and no alterations are made by our team.
All our customer repair instructions are solicited directly from other customers just like you who have purchased and replaced this exact part. While we moderate these reviews for profanity, offensive language or personally identifiable information, these reviews are posted exactly as submitted and no alterations are made by our team.
Based on data from past customer purchasing behaviors, these parts are most commonly purchased together along with the part you are viewing. These parts may be necessary or helpful to replace to complete your current repair.
All our installation videos are created and produced in collaboration with our in-house repair technician, Mark Sodja, who has helped millions of eReplacementParts customers over the last 13 years repair their products. Mark has years of experience in selling and repairing both commercial and residential products with a specialty in gas-powered equipment.
This data is collected from customers who submitted a repair instruction after replacing this exact part. Customers can rate how easy the repair was to complete and how long it took. We aggregate this data to provide a repair rating that allows customers to quickly determine the difficulty and time needed to perform their own repair.