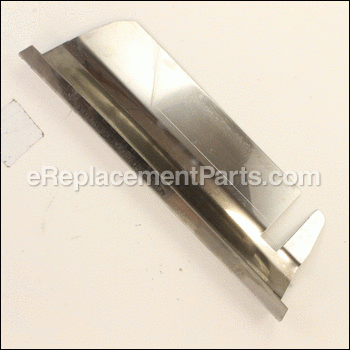

This replacement divider is an authentic stainless steel item that is sold individually. It is secured between burner tubes to help distribute the heat evenly, another benefit of this part is to direct food drippings helping with the clean up. Over time in combination of heat and moisture the metal may begin to rust and the divider will need to be replaced. It is advised to clean your grill with warm water and soap after each use to prevent warping or rusting.
Divider 18529
OEM part for: Broil King
Part Number: 18529
$24.89
In Stock
Jump To:
Frequently Purchased Together ?

Compatibility
This part will fit the following 48 machines
Broil King
9887-14 (XLS 20) Sovereign XLS Gas Grill View Diagrams & Manuals
9887-17 (XLS 20) Sovereign XLS Gas Grill View Diagrams & Manuals
9887-44 (XLS 90) Sovereign XLS Gas Grill View Diagrams & Manuals
9887-47 (XLS 90) Sovereign XLS Gas Grill View Diagrams & Manuals
9887-84 (XL 90 PRO) Sovereign XLS Gas Grill View Diagrams & Manuals
9887-87 (XL 90 PRO) Sovereign XLS Gas Grill View Diagrams & Manuals
9867-84 (Sovereign 90) Gas Grill View Diagrams & Manuals
9867-87 (Sovereign 90) Gas Grill View Diagrams & Manuals
9877-34 (Sovereign 70) Gas Grill View Diagrams & Manuals
9877-37 (Sovereign 70) Gas Grill View Diagrams & Manuals
9877-44 (Sovereign 90) Gas Grill View Diagrams & Manuals
9877-47 (Sovereign 90) Gas Grill View Diagrams & Manuals
9877-54 (Sovereign 20) Gas Grill View Diagrams & Manuals
9877-57 (Sovereign 20) Gas Grill View Diagrams & Manuals
9877-74 (Sovereign 70) Gas Grill View Diagrams & Manuals
9877-77 (Sovereign 70) Gas Grill View Diagrams & Manuals
9877-84 (Sovereign 90) Gas Grill View Diagrams & Manuals
9877-87 (Sovereign 90) Gas Grill View Diagrams & Manuals
9879-44 (Sovereign 90) Gas Grill View Diagrams & Manuals
9879-47 (Sovereign 90) Gas Grill View Diagrams & Manuals
9865-54 (Signet 20) Gas Grill View Diagrams & Manuals
9865-57 (Signet 20) Gas Grill View Diagrams & Manuals
9865-74 (Signet 70) Gas Grill View Diagrams & Manuals
9865-77 (Signet 70) Gas Grill View Diagrams & Manuals
9869-54 (Signet 20B) Gas Grill View Diagrams & Manuals
9869-57 (Signet 20B) Gas Grill View Diagrams & Manuals
9869-64 (Signet 40) Gas Grill View Diagrams & Manuals
9869-67 (Signet 40) Gas Grill View Diagrams & Manuals
9869-74C (Signet 70B) Gas Grill View Diagrams & Manuals
9869-77C (Signet 70B) Gas Grill View Diagrams & Manuals
9869-84R (Signet 90) Gas Grill View Diagrams & Manuals
9869-87R (Signet 90) Gas Grill View Diagrams & Manuals
9875-84 (Sovereign) Gas Grill View Diagrams & Manuals
9875-87 (Sovereign) Gas Grill View Diagrams & Manuals
9888-14 BBQ Grill View Diagrams & Manuals
9888-17 BBQ Grill View Diagrams & Manuals
9888-44 BBQ Grill View Diagrams & Manuals
9888-47 BBQ Grill View Diagrams & Manuals
9878-14 BBQ Grill View Diagrams & Manuals
9878-17 BBQ Grill View Diagrams & Manuals
9878-34 BBQ Grill View Diagrams & Manuals
9878-37 BBQ Grill View Diagrams & Manuals
9878-44 BBQ Grill View Diagrams & Manuals
9878-47 BBQ Grill View Diagrams & Manuals
9868-74 BBQ Grill View Diagrams & Manuals
9868-77 BBQ Grill View Diagrams & Manuals
9868-84 BBQ Grill View Diagrams & Manuals
9868-87 BBQ Grill View Diagrams & Manuals
Show More Compatible Models
This item works with the following types of products:
This part replaces obsolete part #: 10222-E401
Repair Videos ?

Articles:
|
Having trouble getting your grill to light up? A common cause of this issue is a defective ignition switch. We'll sho...
November 08, 2012
|

Questions & Answers ?
Our customer Service team is at the ready daily to answer your part and product questions.

Ask our Team
We have a dedicated staff with decades of collective experience in helping customers just like you purchase parts to repair their products.
Does this fit my product?Questions & Answers for Divider
No questions have been asked yet
Customer Repair Instructions ?
All our customer repair instructions are solicited directly from other customers just like you who have purchased and replaced this exact part.
I side grill parts were badly rusted. (3 Burners, 2 dividers, 1 Burner support bracket.
Wynn - July 13, 2020
Tool Type
Outdoor Grill
Difficulty
Medium
Time
30-60 minutes
Tools Used
Screwdriver, Pliers
Parts Used
Removal of parts: grill grates, Flavr Bars, and dividers.
Turn off gas at tank and remove hose from tank
1. After pulling off the 3 gas burner Control knobs and the starter button, Used philips screw driver to remove The front cover. Two screws on each side of cover.
2. To increase accessibility to burners disconnect starter mechanism on inside of front cover just removed.
3. On inside of grill tub the burners are connected To the back via the crimped thin edge of the Burners. Use Large wide flat screw driver By inserting it between the burner’s thin edge and the back of grill tub. Use the screw driver to force the burner out from the hex head bolt holding it in place. May need to use a hammer to break the Rusted burner loose from the bolt. Hit lightly on each side of burner hear the bolt until movement is detected.
4. Pull out burner support bar.
5. While all parts are removed from grill tub, clean the grill tub.
Installing new parts:
6. Install new (or old) burner support bar Making sure the electrodes (creates sparks for igniting the gas) are protruding up through the support bar.
7. Install burners by first inserting the gas intake end through Hole in front side Of grill tub. Lay the Back end of burner Down to the hex head bolt so that The burner’s thin edge can be inserted Under the Head of the bolt. Using a hammer, Very lightly tap on the gas intake End to help secure the thin edge of burner to the bolt.
8. Once all burners are installed, install the new dividers.
9. Install the Flavr Bars
10. Reinstall the grill grates.
11. Reinstall the starter button on the inside of cover.
12. Carefully reinstall the front cover making sure the gas supply nipples insert completely into each of the Burner intakes.
13. Push front cover in place without screwing it in.
14. Reconnect the gas hose to tank and turn on the gas supply.
15. Do a test start of the grill. May need to make adjustments To the air intake on each burner’s intake. Will need to pull open the front panel To have access to the air intake. (No instructions here on proper adjustment).
16. Once adjustments made and another test start works satisfactorily. Screw the front cover on and replace the control knobs.
DONE.
Did you find this story helpful?
Thanks for voting and helping fellow customers!
OEM stands for Original Equipment Manufacturer and means the part you’re buying is sourced directly from the manufacturer who made your product. At eReplacementParts, we sell only genuine OEM parts, guaranteeing the part you’re purchasing is of better design and of higher quality than aftermarket parts.
Our product descriptions are a combination of data sourced directly from the manufacturers who made your product as well as content researched and curated by our content & customer service teams. This content is edited and reviewed internally before being made public to customers.
Our customer service team are at the ready daily to answer your part and product questions. We have a dedicated staff with decades of collective experience in helping customers just like you purchase parts to repair their products.
All our part reviews are solicited directly from other customers who have purchased this exact part. While we moderate these reviews for profanity, offensive language or personally identifiable information, these reviews are posted exactly as submitted and no alterations are made by our team.
All our customer repair instructions are solicited directly from other customers just like you who have purchased and replaced this exact part. While we moderate these reviews for profanity, offensive language or personally identifiable information, these reviews are posted exactly as submitted and no alterations are made by our team.
Based on data from past customer purchasing behaviors, these parts are most commonly purchased together along with the part you are viewing. These parts may be necessary or helpful to replace to complete your current repair.
All our installation videos are created and produced in collaboration with our in-house repair technician, Mark Sodja, who has helped millions of eReplacementParts customers over the last 13 years repair their products. Mark has years of experience in selling and repairing both commercial and residential products with a specialty in gas-powered equipment.
This data is collected from customers who submitted a repair instruction after replacing this exact part. Customers can rate how easy the repair was to complete and how long it took. We aggregate this data to provide a repair rating that allows customers to quickly determine the difficulty and time needed to perform their own repair.